|
|
|
Porsche, and the Porsche crest are registered trademarks of Dr. Ing. h.c. F. Porsche AG.
This site is not affiliated with Porsche in any way. Its only purpose is to provide an online forum for car enthusiasts. All other trademarks are property of their respective owners. |
|
|

  |

| Superhawk996 |
 Apr 6 2020, 09:22 AM Apr 6 2020, 09:22 AM
Post
#281
|
|
914 Guru  Group: Members Posts: 7,935 Joined: 25-August 18 From: Woods of N. Idaho Member No.: 22,428 Region Association: Galt's Gulch |
QUOTE(bbrock @ Apr 6 2020, 10:56 AM)  Nice work on that tin (IMG:style_emoticons/default/smilie_pokal.gif) What is it about those six fans that make them so sexy? (IMG:style_emoticons/default/drooley.gif) @bbrock Just like that special Marshal amp that Nigel Tufnel had. Insert best Spinal Tap imitation here . . . It's that these go to 11 . . . See.  Not just 10 fan blades which anybody could do. . . but you see a Porsche fan has 11 blades. (IMG:style_emoticons/default/av-943.gif) |
   |

 
|
| Superhawk996 |
Apr 7 2020, 07:56 AM
Post
#282
|
|
914 Guru Group: Members Posts: 7,935 Joined: 25-August 18 From: Woods of N. Idaho Member No.: 22,428 Region Association: Galt's Gulch |
@tygaboy
@bbrock OK - So although I'm not a fan of bonking stuff with the BFH, I did make some progress but I hated every minute of it. It reminds me far too much or working on race cars under duress where expediency often trumps doing it right. My bigggest hammer is about 5 lbs and I was seriously worried about missing the 2x4 and really Fuching up something else. Plus I'm old and frail and swinging a 5 lb hammer gets tiring really fast! (IMG:style_emoticons/default/smash.gif) I gained about 0.020" or 0.5mm of movement and by that point I could see the hinge pillar sheetmetal starting to take on some deformation that I didn't like so I decided to call it quit's. Overall, it looks much better to my eye than the overall picture does in the photo. If I'm still not happy later, I can always mill the door hinges another 0.020" and /or use some shim stock to tweak the fit's. In reality that won't likely happen until I get around to completely stripping this car back to return to original color of Alaska Blue Metallic. I personally despise red. Red cars have me cost thousands more in speeding tickets than other less eye catching color cars. So here's the finished product. 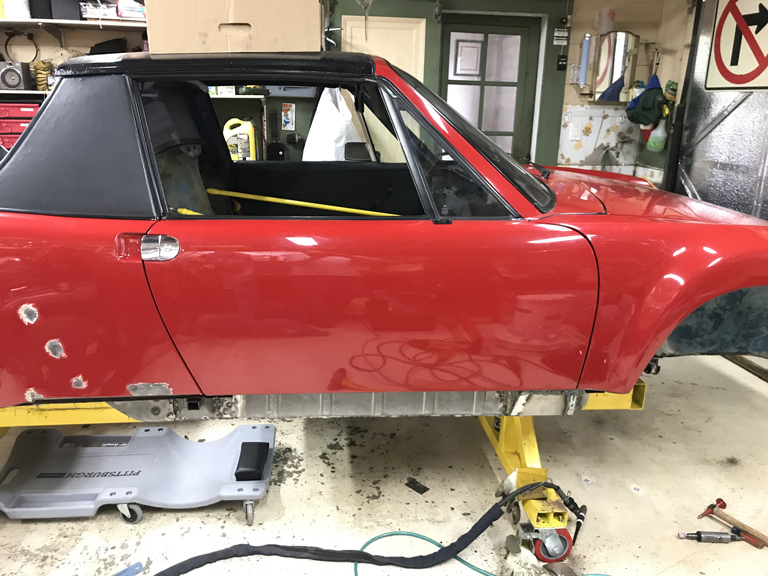 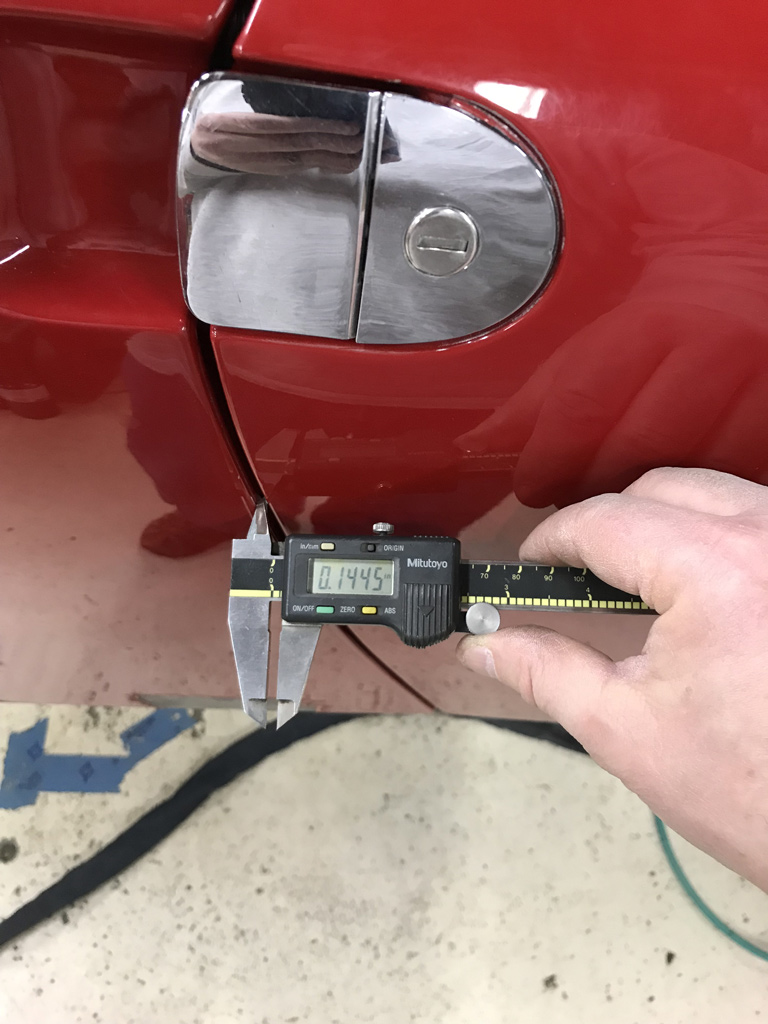 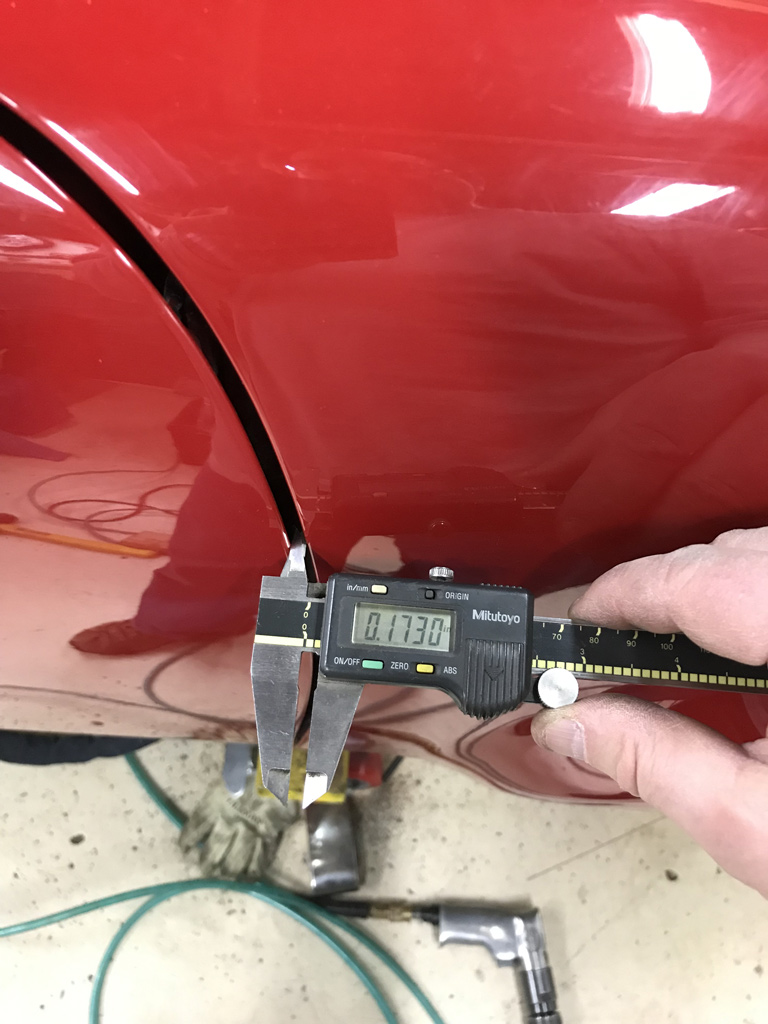 |
|
|
|
| bbrock |
Apr 7 2020, 08:02 AM
Post
#283
|
|
914 Guru Group: Members Posts: 5,269 Joined: 17-February 17 From: Montana Member No.: 20,845 Region Association: Rocky Mountains |
I would be happy with those gaps (IMG:style_emoticons/default/cheer.gif)
|
 |
|
| Superhawk996 |
Apr 7 2020, 08:08 AM
Post
#284
|
|
914 Guru Group: Members Posts: 7,935 Joined: 25-August 18 From: Woods of N. Idaho Member No.: 22,428 Region Association: Galt's Gulch |
One of the other key projects for the day was to go out and hoard some Argon. My local gas supplier is one of the last in the area still open for business.
Now that I'm on forced vacation, I'm going though lots of gas and getting tired of having to stop to go exhange a tank. Now I have a spare on standby! 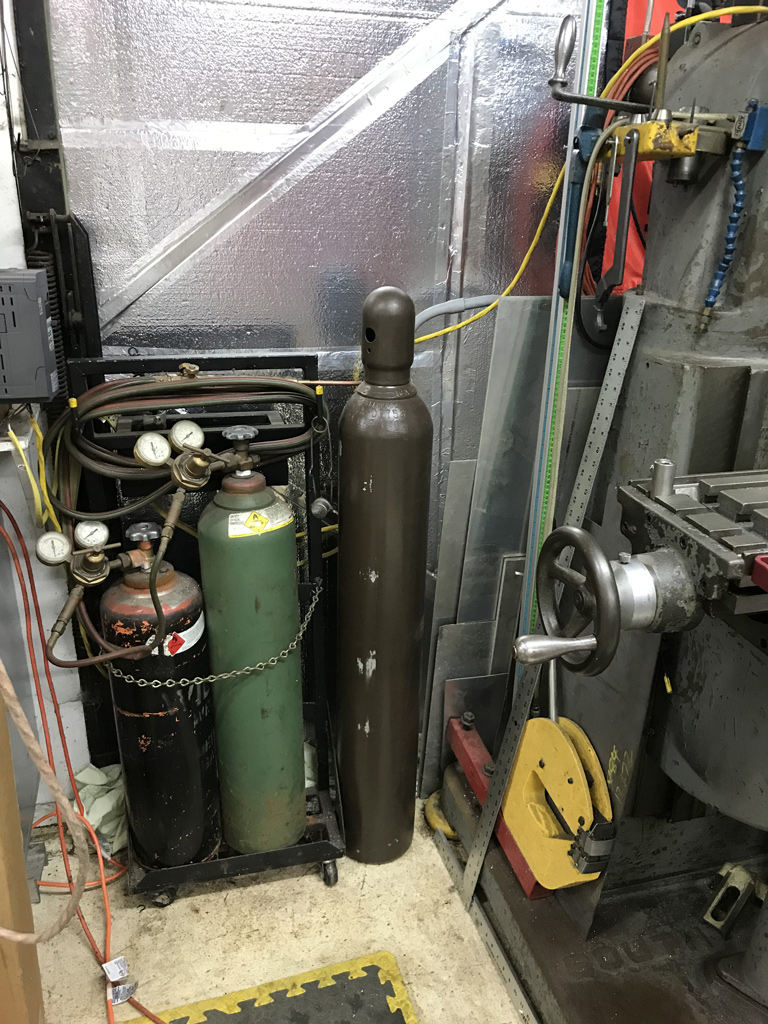 Having accomplished and after having tweaked the door fit, it was time to get the lower door post extension added that ties into the outer longitudinal. Fabrication of this little piece was way too time consuming. (IMG:style_emoticons/default/sad.gif) 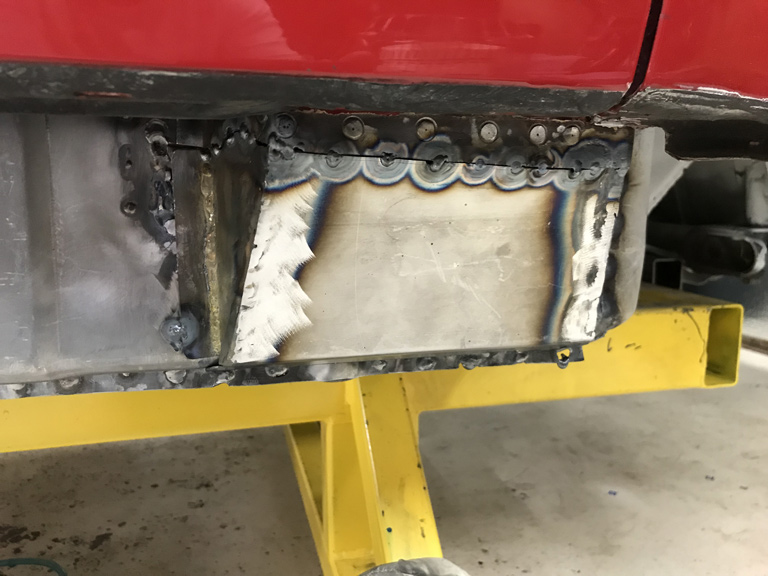 Most importantly, this piece had a couple of semi circular features that were used to fill in the remnants of previous AC damage left by a dealer turned loose with a hole saw (IMG:style_emoticons/default/headbang.gif) 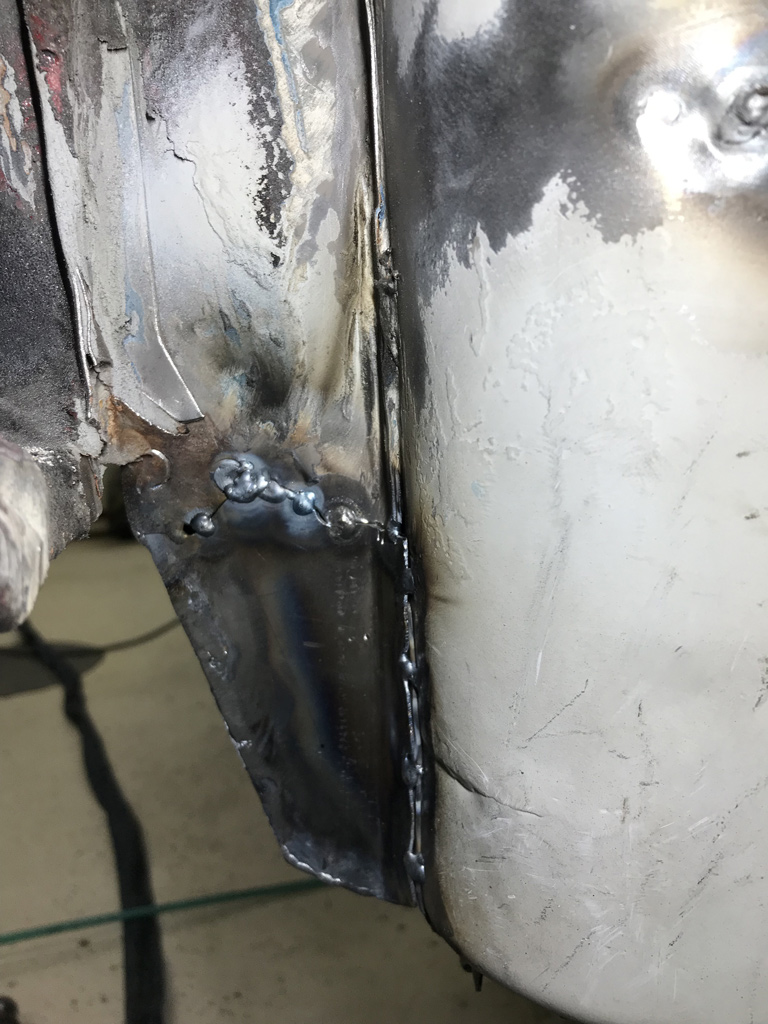 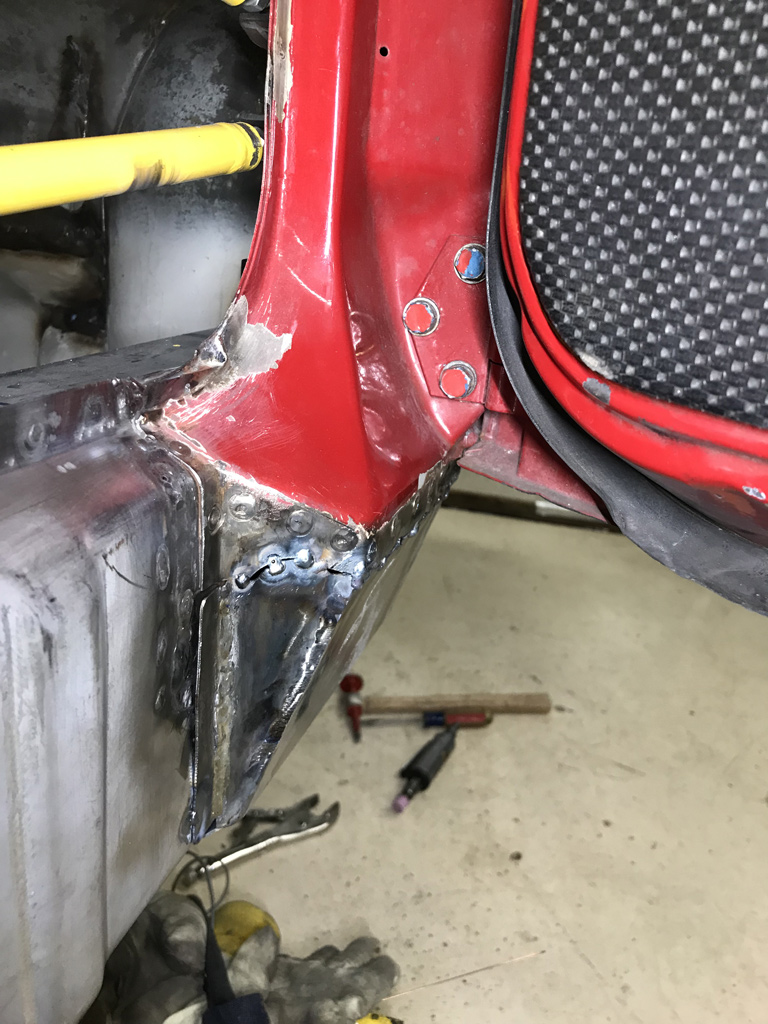 |
|
|
|
| tygaboy |
Apr 7 2020, 09:00 AM
Post
#285
|
|
914 Guru Group: Members Posts: 5,837 Joined: 6-October 15 From: Petaluma, CA Member No.: 19,241 Region Association: Northern California |
QUOTE(bbrock @ Apr 7 2020, 07:02 AM) (IMG:style_emoticons/default/agree.gif) , big time. Nice work. Don't let perfect get in the way of really good. (ask me how I know!) (IMG:style_emoticons/default/biggrin.gif) |
|
|
|
| Superhawk996 |
Apr 7 2020, 11:54 AM
Post
#286
|
|
914 Guru Group: Members Posts: 7,935 Joined: 25-August 18 From: Woods of N. Idaho Member No.: 22,428 Region Association: Galt's Gulch |
|
|
|
|
| euro911 |
Apr 7 2020, 12:50 PM
Post
#287
|
|
Retired & living the dream. God help me if I wake up! Group: Members Posts: 8,937 Joined: 2-December 06 From: So.Cal. & No.AZ (USA) Member No.: 7,300 Region Association: Southern California |
(IMG:style_emoticons/default/confused24.gif) For some reason, some of us older guys have enough extra gas without having to run out and get more (IMG:style_emoticons/default/rolleyes.gif)
(IMG:style_emoticons/default/poke.gif) |
|
|
|
| Superhawk996 |
Apr 8 2020, 09:49 AM
Post
#288
|
|
914 Guru Group: Members Posts: 7,935 Joined: 25-August 18 From: Woods of N. Idaho Member No.: 22,428 Region Association: Galt's Gulch |
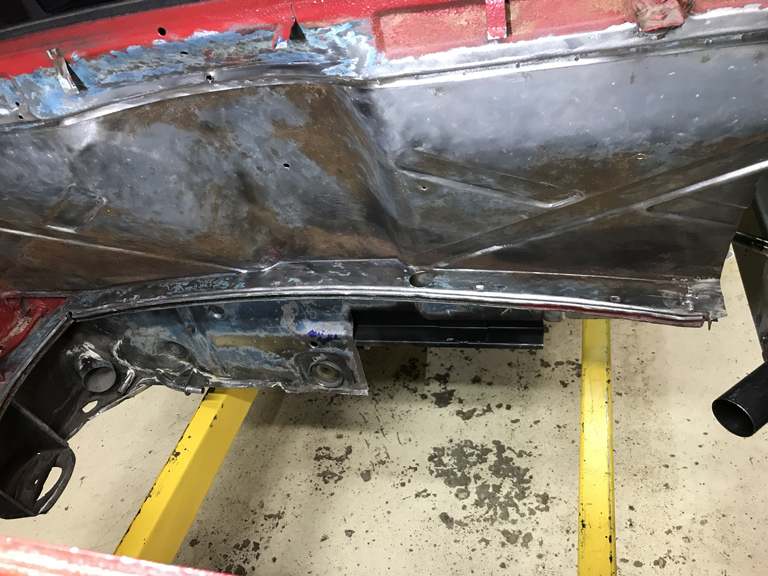
Started to prepare the rear bulkhead for new sheetmetal. Started by getting new panel holes for the snorkel and the speedo cable aligned to OEM sheetmetal.
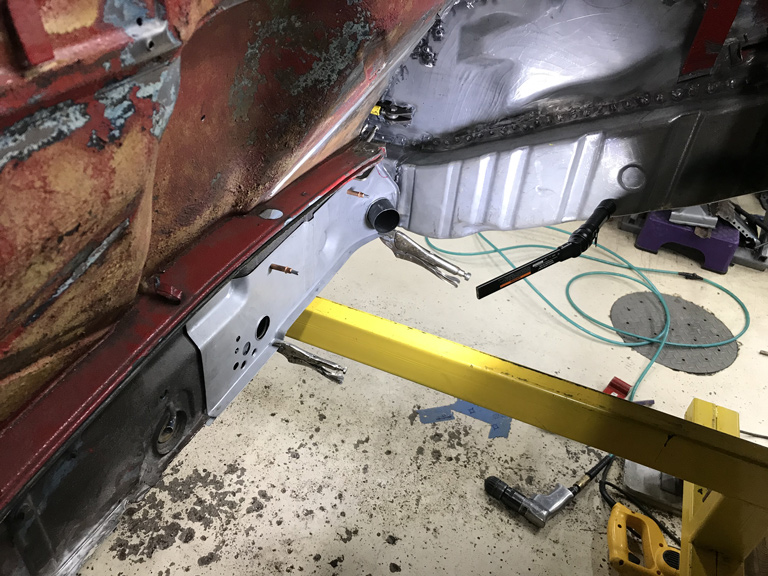 As usual, one thing leads to another. Needed to know how that outer bulkhead would fit to the inner bulkhead. And then of course since the inner bulkhead seemed too low, I needed to know how the new floorpan would fit. After exhausting my supply of vice grips and welding clamps I had a temporary loose mockup. Turns out it all looks to be pretty straight forward and fits pretty darn well for repop sheetmetal. 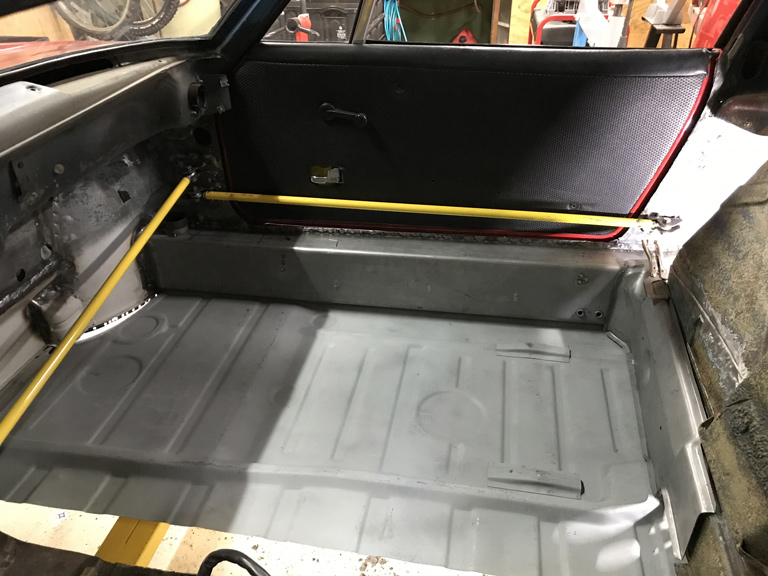 By then it was getting late, I was delerious, and after spending so much time in the hell hole, the sprayed on truck bed liner + the contact cement adhesive was grating on me. (IMG:style_emoticons/default/barf.gif) Based on some pin holes that are on the interior passenger side that I had found when I had to cut out to access all of this work, I had a feeling that the driver side bulkhead was probably hiding some rust. Turns out I was right. That damn OEM engine pad that holds moisture had done its work. The driver side had some pretty heavy pitting and a few pin holes too. (IMG:style_emoticons/default/sad.gif) More metal work! I was told this car was previously Florida car and owned by a body shop guy. I have found plenty of sand in the car so I suspect it may truly be a Florida car. Good body shop guy, well maybe not so much. Cheap body shop guy, maybe. (IMG:style_emoticons/default/confused24.gif) I had an inclination that the spray on bedliner wasn't just there for noise deadning. I hate when people just try to cover over rust and pretend it isn't there. (IMG:style_emoticons/default/ar15.gif) After many hours of listening to the flail wheel and after going though a fresh $40 belt, I got most of the bulkhead stripped. That crap is tough and doesn't come off easily. If anyone has better suggestion to stripping bed liner I'm all ears! 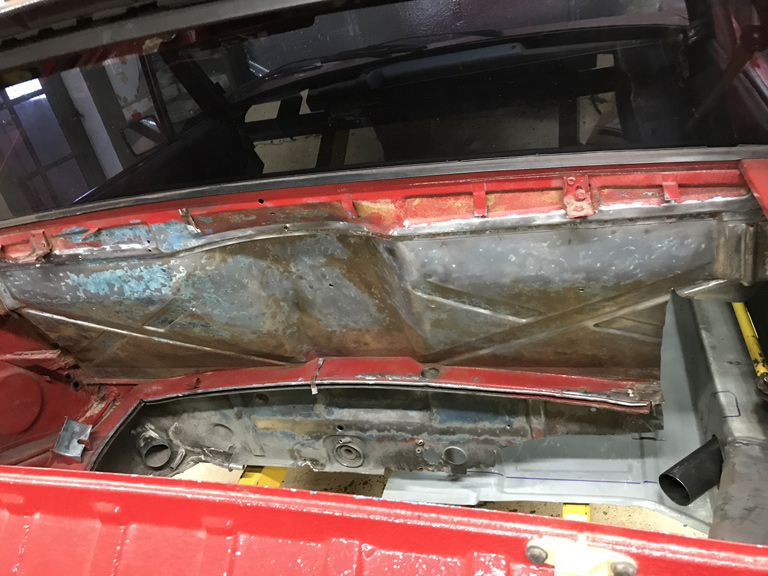 |
|
|
|
| kroelofsen |
Apr 8 2020, 12:02 PM
Post
#289
|
|
Member Group: Members Posts: 102 Joined: 27-June 19 From: The Netherlands Member No.: 23,255 Region Association: Europe |
Hi I use citrus spray to remove that kind of gunk...
https://www.amazon.co.uk/Citrus-Based-Adhes...M/dp/B0006VPLKM |
|
|
|
| Superhawk996 |
Apr 8 2020, 12:53 PM
Post
#290
|
|
914 Guru Group: Members Posts: 7,935 Joined: 25-August 18 From: Woods of N. Idaho Member No.: 22,428 Region Association: Galt's Gulch |
QUOTE(kroelofsen @ Apr 8 2020, 02:02 PM) Hi I use citrus spray to remove that kind of gunk... https://www.amazon.co.uk/Citrus-Based-Adhes...M/dp/B0006VPLKM @kroelofsen Although that would work on the residual contact cement adhesive, I don't think it would even touch the spray on bed liner underneath a layer of paint. If I'm mistaken, ping me back if you've sucessfully used it to remove spray on bed liner and how much of this stuff is needed. |
|
|
|
| kroelofsen |
Apr 9 2020, 01:52 AM
Post
#291
|
|
Member Group: Members Posts: 102 Joined: 27-June 19 From: The Netherlands Member No.: 23,255 Region Association: Europe |
QUOTE(Superhawk996 @ Apr 8 2020, 08:53 PM) QUOTE(kroelofsen @ Apr 8 2020, 02:02 PM) Hi I use citrus spray to remove that kind of gunk... https://www.amazon.co.uk/Citrus-Based-Adhes...M/dp/B0006VPLKM @kroelofsen Although that would work on the residual contact cement adhesive, I don't think it would even touch the spray on bed liner underneath a layer of paint. If I'm mistaken, ping me back if you've sucessfully used it to remove spray on bed liner and how much of this stuff is needed. Hi @Superhawk996 I used it to remove glue on the fire wall and to remove the undercoat in the wheel wells. It softens the under coat so it comes of more easy. It does not really touch paint although but it becomes dull...! |
|
|
|
| djway |
Apr 9 2020, 03:01 AM
Post
#292
|
|
Senior Member Group: Members Posts: 787 Joined: 16-October 15 From: Riverside Member No.: 19,266 Region Association: Southern California |
QUOTE(Superhawk996 @ Apr 7 2020, 06:56 AM) @tygaboy @bbrock OK - So although I'm not a fan of bonking stuff with the BFH, I did make some progress but I hated every minute of it. It reminds me far too much or working on race cars under duress where expediency often trumps doing it right. My bigggest hammer is about 5 lbs and I was seriously worried about missing the 2x4 and really Fuching up something else. Plus I'm old and frail and swinging a 5 lb hammer gets tiring really fast! (IMG:style_emoticons/default/smash.gif) I gained about 0.020" or 0.5mm of movement and by that point I could see the hinge pillar sheetmetal starting to take on some deformation that I didn't like so I decided to call it quit's. Overall, it looks much better to my eye than the overall picture does in the photo. If I'm still not happy later, I can always mill the door hinges another 0.020" and /or use some shim stock to tweak the fit's. In reality that won't likely happen until I get around to completely stripping this car back to return to original color of Alaska Blue Metallic. I personally despise red. Red cars have me cost thousands more in speeding tickets than other less eye catching color cars. So here's the finished product. If the door if functioning correctly and it is just the gap, which were bad from the factory on many cars, one trick is to weld on some welding rod to the leading edge then file to shape. |
|
|
|
| Superhawk996 |
Apr 19 2020, 08:03 AM
Post
#293
|
|
914 Guru Group: Members Posts: 7,935 Joined: 25-August 18 From: Woods of N. Idaho Member No.: 22,428 Region Association: Galt's Gulch |
Been a few weeks since I've posted. So many other things compete for garage time.
My wife has been insisting that I trim the "new" dog's hair since the dog groomers are no longer open. The important thing to understand is that I love dogs and that this is the Mother-In-Law dog that we are looking after while she is in assisted living. I've grown up with Labradors. Very low maintenance dogs. The idea that I'd have to spend more to get a dog a haircut than I spend to cut my own haircuts just doesn't seem right. Well, it just so happens that Amazon sells a set of dog clippers. How hard could it be? Turns out not terribly hard. Mission accomplished. (IMG:style_emoticons/default/aktion035.gif)  |
|
|
|
| Superhawk996 |
Apr 19 2020, 08:14 AM
Post
#294
|
|
914 Guru Group: Members Posts: 7,935 Joined: 25-August 18 From: Woods of N. Idaho Member No.: 22,428 Region Association: Galt's Gulch |
On the garage front, lots of time spent on things that will never be seen, or appreciated later on.
Added a doubler to the inner longitudinal transition. Not so much becuase I think it was absolutely necessary Porsche did a good job of staggering the joints but more so for my own piece of mind. 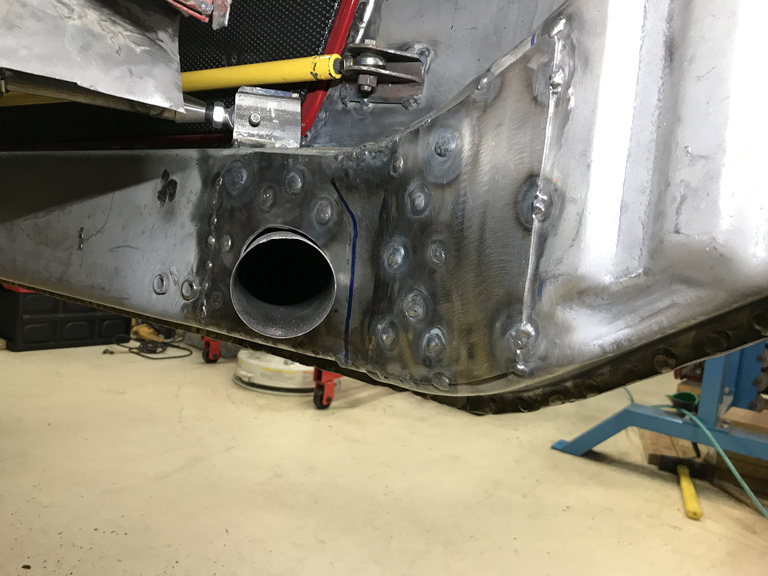 As it turns out, this might not have been a great move. Up until now I've been constantly checking my X & Y suspension pickup point locations and things were peachy. So yesterday just as a sanity check before moving on, I put the Z gauge back in place to check. (IMG:style_emoticons/default/headbang.gif) 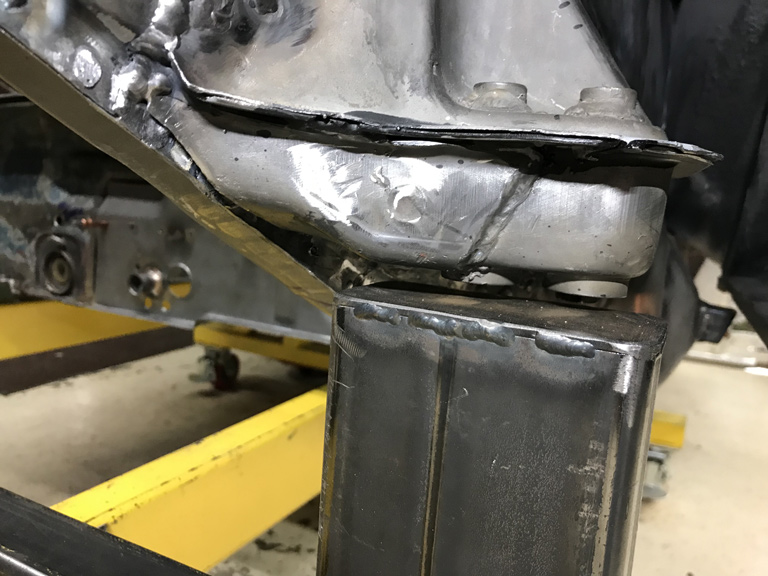 I now have a 6mm height change in Z! FUCH! Now I'm trying to figure out the next step. 1) Leave as is. Add another 6mm of caster shim as needed later on. 2) Try to create a fixture to "pull" this back down and then I could heat the "frame" sections with a rosebud torch to stress relieve it and hopefully get it to settle back to where it should be. Option 2 comes with the concern that my body dolly really isn't intended to be a Cellete that can stand up to body pulls. I'm very concerned that I'd have to double up my body dolly longitudinal member to prevent it from deforming as I pull down on the suspension console. (IMG:style_emoticons/default/idea.gif) Time to think about this carefully. I will be doing yet another complete round of measurement on all suspension pick up points just to make absolutely sure that Z height is the only thing that moved. (IMG:style_emoticons/default/huh.gif) |
|
|
|
| Superhawk996 |
Apr 19 2020, 08:22 AM
Post
#295
|
|
914 Guru Group: Members Posts: 7,935 Joined: 25-August 18 From: Woods of N. Idaho Member No.: 22,428 Region Association: Galt's Gulch |
Fuming from having discoverd the suspension console FUBAR I took out some agression by stripping the rest of the hell hole shelf.
 I then tried to distract myself for the remainder of the evening by prepping the lower bulkhead. This car is crazy. Much of the lower 1" of the floorpan to anything is terribly rusted. But above that 1" line, things are pretty solid. Case in point, here is the Speedometer cable tube after being removed from the original sheetmetal and blasted. Rock Solid. 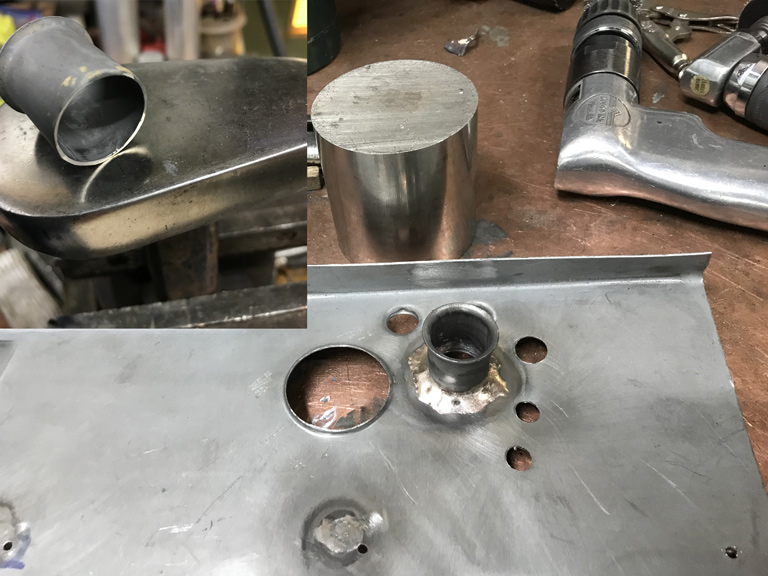 Brazed it to the replacement sheetmetal with some silicon bronze TIG filler. |
|
|
|
| bbrock |
Apr 19 2020, 09:06 AM
Post
#296
|
|
914 Guru Group: Members Posts: 5,269 Joined: 17-February 17 From: Montana Member No.: 20,845 Region Association: Rocky Mountains |
QUOTE(Superhawk996 @ Apr 19 2020, 07:14 AM) I now have a 6mm height change in Z! FUCH! Now I'm trying to figure out the next step. 1) Leave as is. Add another 6mm of caster shim as needed later on. 2) Try to create a fixture to "pull" this back down and then I could heat the "frame" sections with a rosebud torch to stress relieve it and hopefully get it to settle back to where it should be. Option 2 comes with the concern that my body dolly really isn't intended to be a Cellete that can stand up to body pulls. I'm very concerned that I'd have to double up my body dolly longitudinal member to prevent it from deforming as I pull down on the suspension console. (IMG:style_emoticons/default/idea.gif) Time to think about this carefully. I will be doing yet another complete round of measurement on all suspension pick up points just to make absolutely sure that Z height is the only thing that moved. (IMG:style_emoticons/default/huh.gif) Oh man. That sucks. What about just cutting off the suspension console and repositioning to the correct geometry location? Nice job on the hair cut! |
|
|
|
| Superhawk996 |
Apr 19 2020, 11:33 AM
Post
#297
|
|
914 Guru Group: Members Posts: 7,935 Joined: 25-August 18 From: Woods of N. Idaho Member No.: 22,428 Region Association: Galt's Gulch |
QUOTE(bbrock @ Apr 19 2020, 11:06 AM) Oh man. That sucks. What about just cutting off the suspension console and repositioning to the correct geometry location? @bbrock Entertained that for about 0.5 seconds. (IMG:style_emoticons/default/hissyfit.gif) That thing was already swiss cheese when I took it off the 1st time. After all the puddle welds the swiss cheese holes will be even larger. The other thing is that I've tried to execute this whole excercise without cutting my rear quater panel or the door jamb. I have esentially built the "frame" and suspension structure from the outside inward. Access to the front to the supension console for cutting puddle welds and/or to re-weld is non existant. (IMG:style_emoticons/default/sad.gif) I've got to admit at this point that tribal wisdom about cutting the quarter and/or door jamb appears to be the better path than the one I've taken by trying to preserve the paint. The new option crossing my mind is leave as-is. Mill a 6mm offset plate. Use as temporary solution. In future years I intend to strip all to bare metal, fix front quarter prior accident damage with lap welds and the shady trunk floorpan. At that time, I could put it on a Celette and have it pulled properly. Not ideal, but, I'm trying to prevent myself from getting too hung up on this as I contemplate solutions. Still cleaning up the floor and getting ready to lay down new measurement points to insure X & Y dimensions haven't changed. Need more think time. Open to alternatives like you've mentioned though if anyone else has experience recovering from a fiasco like this. |
|
|
|
| mbseto |
Apr 19 2020, 01:37 PM
Post
#298
|
|
Senior Member Group: Members Posts: 1,257 Joined: 6-August 14 From: Cincy Member No.: 17,743 Region Association: North East States |
Your rear fender looks like it has bullet holes. Something you're not telling us?
|
|
|
|
| Superhawk996 |
Apr 19 2020, 01:43 PM
Post
#299
|
|
914 Guru Group: Members Posts: 7,935 Joined: 25-August 18 From: Woods of N. Idaho Member No.: 22,428 Region Association: Galt's Gulch |
QUOTE(mbseto @ Apr 19 2020, 03:37 PM) Your rear fender looks like it has bullet holes. Something you're not telling us? I live in Detroit Metro area. Should be self explantory. (IMG:style_emoticons/default/lol-2.gif) That is the other part of why I should have just cut the rear quarter panel. In the process of trying to preserve the quarter panel paint, I decided to do this repair from the inside. As I was (IMG:style_emoticons/default/sawzall-smiley.gif) the frame initially, the sawzall blade hit the rear quarter several times from the inside, chipping the paint and raising a dent. So for all my best efforts, that quarter still needs some touch up. Not so bright on my part. (IMG:style_emoticons/default/screwy.gif) It was mentioned early on in my thread but there are a bunch of pages there so I'm sure others are wondering the same thing. With the wisdom of hindsight this probably wasn't the best way to approach the work. (IMG:style_emoticons/default/smash.gif) |
|
|
|
| euro911 |
Apr 19 2020, 02:07 PM
Post
#300
|
|
Retired & living the dream. God help me if I wake up! Group: Members Posts: 8,937 Joined: 2-December 06 From: So.Cal. & No.AZ (USA) Member No.: 7,300 Region Association: Southern California |
QUOTE(Superhawk996 @ Apr 19 2020, 12:43 PM) QUOTE(mbseto @ Apr 19 2020, 03:37 PM) Your rear fender looks like it has bullet holes. Something you're not telling us? I live in Detroit Metro area. Should be self explantory. (IMG:style_emoticons/default/lol-2.gif) |
|
|
|
|
1 User(s) are reading this topic (1 Guests and 0 Anonymous Users)
0 Members:

|
Lo-Fi Version | Time is now: 4th July 2026 - 03:50 PM |
Invision Power Board
v9.1.4 © 2026 IPS, Inc.