|
|
|
Porsche, and the Porsche crest are registered trademarks of Dr. Ing. h.c. F. Porsche AG.
This site is not affiliated with Porsche in any way. Its only purpose is to provide an online forum for car enthusiasts. All other trademarks are property of their respective owners. |
|
|

  |

| Superhawk996 |
 Aug 23 2020, 03:18 PM Aug 23 2020, 03:18 PM
Post
#361
|
|
914 Guru  Group: Members Posts: 7,935 Joined: 25-August 18 From: Woods of N. Idaho Member No.: 22,428 Region Association: Galt's Gulch |
QUOTE(bbrock @ Aug 19 2020, 10:07 AM)  That's awesome! If you get the Arduino setup working, I may have to copy it. Nice work on that pedal box too. (IMG:style_emoticons/default/beerchug.gif) PM sent. Arduino now functional to run the tach up and down by about 1000 RPM increments to avoid sudden changes that tend to bounce the needle off the pins. If anyone wants a copy of the Arduino code, PM me, it's yours for the asking. Not elegant (I'm not a software guy) but functional. https://www.youtube.com/watch?v=phWebSTri-w Equipment needed: 12v power supply or battery Sparkfun.com MOSFET shield Arduino Uno 12v coil (can also use a inductor of about 2-9mH and a ballast resistor) Associated jumper/test wires with alligator clips |
   |

 
|
| brcacti |
Aug 23 2020, 05:12 PM
Post
#362
|
|
1974 914 1.8 Group: Members Posts: 674 Joined: 17-July 19 From: PHX AZ 60 miles south Member No.: 23,302 Region Association: Southwest Region |
"Where the heck did the year go?"
The older you are it seems the faster the years go by. So drive that 914 when you can |
|
|
|
| Superhawk996 |
Aug 23 2020, 07:12 PM
Post
#363
|
|
914 Guru Group: Members Posts: 7,935 Joined: 25-August 18 From: Woods of N. Idaho Member No.: 22,428 Region Association: Galt's Gulch |
QUOTE(brcacti @ Aug 23 2020, 07:12 PM) "Where the heck did the year go?" The older you are it seems the faster the years go by. So drive that 914 when you can @brcacti There, I updated the header for you. It has gotten out of date (IMG:style_emoticons/default/lol-2.gif) Purchased in April of 2018 or something close to that. I did lose the better part of spring & summer 2019 to a skin graft surgery but that's just a lame excuse for not having gotten more done. (IMG:style_emoticons/default/happy11.gif) I can't wait to drive it but I'm not even close yet. I hope to have all structural sheet metal and floorpans resolved by Jan/Feb. Then the real fun begins. Need to put engine together, check out a transmission, and refresh a bunch of suspension stuff. I'll be lucky to have it off the build cart by the 3 year anniversary. What was I thinking trying to save such a dog (IMG:style_emoticons/default/screwy.gif) |
|
|
|
| 914_7T3 |
Aug 23 2020, 07:27 PM
Post
#364
|
|
Please forgive me, I'm new to all of this! Group: Members Posts: 1,898 Joined: 3-April 17 From: Los Angeles, CA Member No.: 20,991 Region Association: Southern California |
QUOTE(Superhawk996 @ Aug 23 2020, 06:12 PM) I'll be lucky to have it off the build cart by the 3 year anniversary. What was I thinking trying to save such a dog (IMG:style_emoticons/default/screwy.gif) It was the right thing to do! |
|
|
|
| Superhawk996 |
Aug 24 2020, 05:54 AM
Post
#365
|
|
914 Guru Group: Members Posts: 7,935 Joined: 25-August 18 From: Woods of N. Idaho Member No.: 22,428 Region Association: Galt's Gulch |
QUOTE(914_7T3 @ Aug 23 2020, 09:27 PM) QUOTE(Superhawk996 @ Aug 23 2020, 06:12 PM) I'll be lucky to have it off the build cart by the 3 year anniversary. What was I thinking trying to save such a dog (IMG:style_emoticons/default/screwy.gif) It was the right thing to do! @914_7T3 (IMG:style_emoticons/default/biggrin.gif) Appreciate the words of encouragement. My grandfather once told me that doing the right thing was rarely simple or the easiest path. Wisdom. Still buying a CA car as the starting point next time. (IMG:style_emoticons/default/laugh.gif) |
|
|
|
| brcacti |
Aug 24 2020, 12:32 PM
Post
#366
|
|
1974 914 1.8 Group: Members Posts: 674 Joined: 17-July 19 From: PHX AZ 60 miles south Member No.: 23,302 Region Association: Southwest Region |
QUOTE(Superhawk996 @ Aug 23 2020, 06:12 PM) QUOTE(brcacti @ Aug 23 2020, 07:12 PM) "Where the heck did the year go?" The older you are it seems the faster the years go by. So drive that 914 when you can @brcacti There, I updated the header for you. It has gotten out of date (IMG:style_emoticons/default/lol-2.gif) Purchased in April of 2018 or something close to that. I did lose the better part of spring & summer 2019 to a skin graft surgery but that's just a lame excuse for not having gotten more done. (IMG:style_emoticons/default/happy11.gif) I can't wait to drive it but I'm not even close yet. I hope to have all structural sheet metal and floorpans resolved by Jan/Feb. Then the real fun begins. Need to put engine together, check out a transmission, and refresh a bunch of suspension stuff. I'll be lucky to have it off the build cart by the 3 year anniversary. What was I thinking trying to save such a dog (IMG:style_emoticons/default/screwy.gif) Hello, you seem very handy with working on cars. I am NOT a mechanic but just do lots of very small things to keep it up, My last 914 was also in the 80 for two years had it I think 1982 to 84, was a fun car signal orange in great shape but then it was only about 9 years old when I bought it and 11 years old when I sold it. Should gave kept it but we all make so many mistake especially ME, hehehe. I seem to have bought a survivor in mid 2019 and just go lucky I guess, seems to be in great shape but have not looked at th longs that you mention. I have looked at the hell hole, under both trunks carpet and almost no signs of rust. I am guessing it was always garage kept, I think if they are not they are doomed. (IMG:style_emoticons/default/smile.gif) I also have a medical problem just doagnosed within a couple of weeks insulin resistant. Not quite pre diabetes or diabetes. Now I have to avoid ALL carbs just eat protein (meats) and fats/protein (nuts) and vegetables in mass. I understand completely when you get any king of medical problem you slow or stop everything |
|
|
|
| Superhawk996 |
Sep 5 2020, 08:06 AM
Post
#367
|
|
914 Guru Group: Members Posts: 7,935 Joined: 25-August 18 From: Woods of N. Idaho Member No.: 22,428 Region Association: Galt's Gulch |
Well, Labor Day weekend is here. I had big plans to get a big chunk of sheetmetal work done. Unfortunately life doesn't work that way.
My beloved Lincoln Precision TIG 225 has taken a dump. 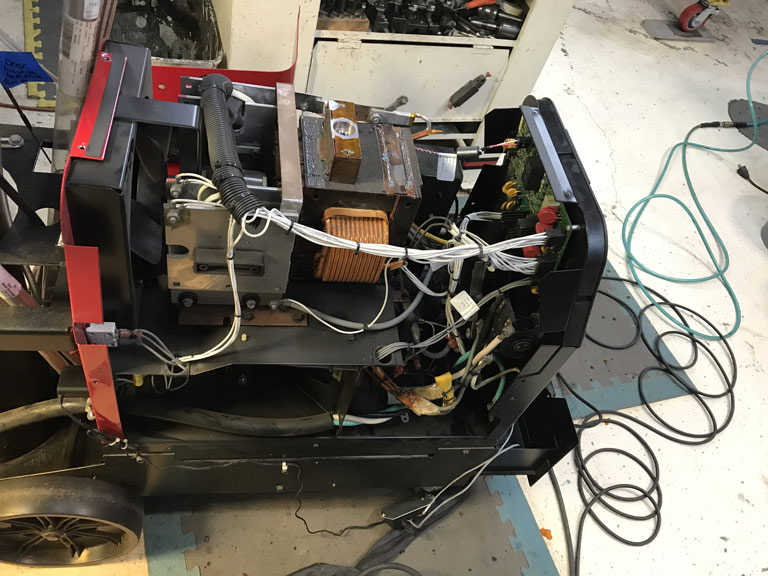 Worse yet, depite my previous love for Lincoln Electric, I fear I'm on the verge of a bad break up. Lincoln Customer Service / Tech Support has proven themselves to be absolutely useless over the course of this past week. My welder is now ramping up to about 80A-100A immediately after starting the arc. Of course this blows major holes in sheetmetal. It does the same thing regarless of what Amptrol is attached to it. It appears that it is a control board issue. The replacement board is about $900. Keep in mind that is 1/3 the cost of a new machine. Several calls to local welder repair shops seem to indicate that they belive it is a board issue but of course they can't confirm that without me schlepping a ~ 400lb machine to and from thier shop. (IMG:style_emoticons/default/sad.gif) I no longer have a utility trailer so any schelpping would involve a U-haul rental and even more wasted time. For it's part, Lincoln Electric hides the detailed board schematics and any technical block diagrams of the board theory of operation behind their website which is only accessible if your a Lincoln Dealer or Authorized Repair Shop. (IMG:style_emoticons/default/hissyfit.gif) To make matters worse, the board is heavily potted on once side with the usual rubbery potting coupound. (IMG:style_emoticons/default/headbang.gif) The other side has what appears to be an epoxy dip coating. (IMG:style_emoticons/default/barf.gif) This basically renders the board unserviceable according to a couple of the shops that I found that repair other boards for Miller, Hobart, ESAB, etc. I sort of get this from a reliability standpoint, these coatings shield the board from metallic dust and debris that could otherwise wreak havok. But come on. No once will touch the damn thing! One repair shop said they would try for $100/hr diagnostics & repair time and materials but no gurantee. (IMG:style_emoticons/default/confused24.gif) 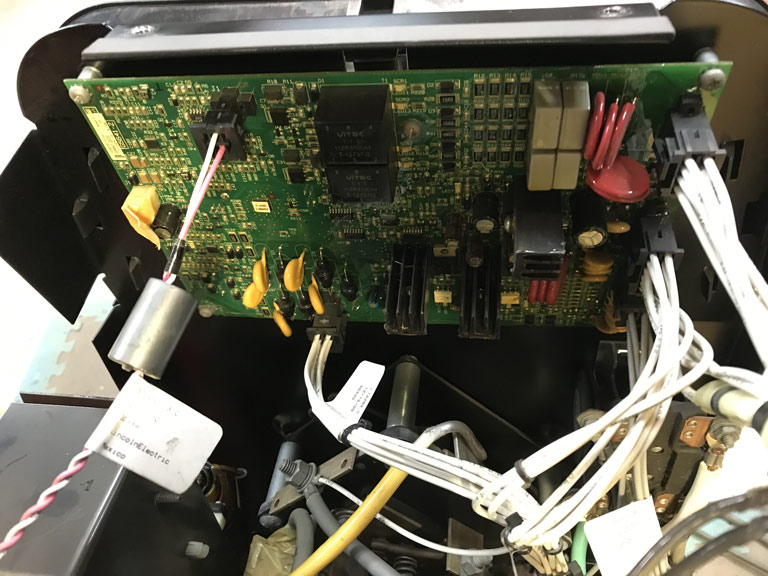 So I've ordered a replacement board but ouf course it isn't here yet. In fact they haven't even charged my card yet which makes me wonder if the company I ordered it from is having trouble getting it from Lincoln Electric. Moral of the story, my next welder will be blue instead of red. I guess I'll switch gears and do some work on engine cases, bearing fits, etc. |
|
|
|
| mb911 |
Sep 5 2020, 08:12 AM
Post
#368
|
|
914 Guru Group: Members Posts: 7,793 Joined: 2-January 09 From: Burlington wi Member No.: 9,892 Region Association: Upper MidWest |
QUOTE(Superhawk996 @ Sep 5 2020, 06:06 AM) Well, Labor Day weekend is here. I had big plans to get a big chunk of sheetmetal work done. Unfortunately life doesn't work that way. My beloved Lincoln Precision TIG 225 has taken a dump. Worse yet, depite my previous love for Lincoln Electric, I fear I'm on the verge of a bad break up. Lincoln Customer Service / Tech Support has proven themselves to be absolutely useless over the course of this past week. My welder is now ramping up to about 80A-100A immediately after starting the arc. Of course this blows major holes in sheetmetal. It appears that it is a control board issue. The replacement board is about $900. Keep in mind that is 1/3 the cost of a new machine. Several calls to local welder repair shops seem to indicate that they belive it is a board issue but of course they can't confirm that without me schlepping a 400lb+ machine to and from thier shop. (IMG:style_emoticons/default/sad.gif) For it's part, Lincoln Electric hides the detailed board schematics and any technical block diagrams of the board theory of operation behind their website which is only accessible if your a Lincoln Dealer or Authorized Repair Shop. (IMG:style_emoticons/default/hissyfit.gif) To make matters worse, the board is heavily potted on once side with the usual rubbery potting coupound. (IMG:style_emoticons/default/headbang.gif) The other side has what appears to be an epoxy dip coating. (IMG:style_emoticons/default/barf.gif) This basically renders the board unserviceable according to a couple of the shops that I found that repair other boards for Miller, Hobart, ESAB, etc. I sort of get this from a reliability standpoint, these coatings shield the board from metallic dust and debris that could otherwise wreak havok. But come on. No once will touch the damn thing! One repair shop said they would try for $100/hr diagnostics & repair time and materials but no gurantee. (IMG:style_emoticons/default/confused24.gif) So I've ordered a replacement board but ouf course it isn't here yet. In fact they haven't even charged my card yet which makes me wonder if the company I ordered it from is having trouble getting it. Moral of the story, my next welder will be blue instead of red. I guess I'll switch gears and do some work on engine cases, bearing fits, etc. Oh man don't go blue.. The same issues.. Lincoln does pretty good job on their machines.. We had 12 millers at school recently come in new in the box and all 12 boards were shot before even able to use the machines once.. Let me know if you need any help with Lincoln.. I am a national trainer for them and NC3 so I have some really great contacts there |
|
|
|
| Superhawk996 |
Sep 5 2020, 08:27 AM
Post
#369
|
|
914 Guru Group: Members Posts: 7,935 Joined: 25-August 18 From: Woods of N. Idaho Member No.: 22,428 Region Association: Galt's Gulch |
QUOTE(mb911 @ Sep 5 2020, 10:12 AM) Oh man don't go blue.. The same issues.. Lincoln does pretty good job on their machines.. We had 12 millers at school recently come in new in the box and all 12 boards were shot before even able to use the machines once.. Let me know if you need any help with Lincoln.. I am a national trainer for them and NC3 so I have some really great contacts there @mb911 Thanks for the offer for help Ben. I may take you up on that. I'm going to check some of the big wirewound resistors this weekend that contribute to the the Micro Start circuit and/or Stabilizer Bypass and then just wait for a board hoping that does the trick. Unfortunately at Lincoln I can't even seem to get in touch with a person that actually knows the TIG 225 with any level of detail other than what I can read for myself out of the owners manual. One customer service rep said he would have a Precision TIG 225 expert call me. No call. Of course for my own stupidity, I din't ask for a name and a direct phone # to said expert. Next week.! (IMG:style_emoticons/default/happy11.gif) I can't see the point in pitching the rest of the hardware over a bad board. In my mind the transformer based machines may be heavier than crap but the transformers rarely fail. A modern inverter sure looks appaling from a weight / transport standpoint. I appreciate the insight on Miller before I do something rash! (IMG:style_emoticons/default/smile.gif) So many of our Industrial Giants have simply gone to a throw away mentality, it really makes me sad. To say the least, am I really supposed to scrap the whole rest of the chassis and transformers just beause a Printed Circuit board failed. (IMG:style_emoticons/default/WTF.gif) |
|
|
|
| mb911 |
Sep 5 2020, 08:43 AM
Post
#370
|
|
914 Guru Group: Members Posts: 7,793 Joined: 2-January 09 From: Burlington wi Member No.: 9,892 Region Association: Upper MidWest |
QUOTE(Superhawk996 @ Sep 5 2020, 06:27 AM) QUOTE(mb911 @ Sep 5 2020, 10:12 AM) Oh man don't go blue.. The same issues.. Lincoln does pretty good job on their machines.. We had 12 millers at school recently come in new in the box and all 12 boards were shot before even able to use the machines once.. Let me know if you need any help with Lincoln.. I am a national trainer for them and NC3 so I have some really great contacts there @mb911 Thanks for the offer for help Ben. I may take you up on that. I'm going to check some of the big wirewound resistors this weekend that contribute to the the Micro Start circuit and/or Stabilizer Bypass and then just wait for a board hoping that does the trick. Unfortunately at Lincoln I can't even seem to get in touch with a person that actually knows the TIG 225 with any level of detail other than what I can read for myself out of the owners manual. One customer service rep said he would have a Precision TIG 225 expert call me. No call. Of course for my own stupidity, I din't ask for a name and a direct phone # to said expert. Next week.! (IMG:style_emoticons/default/happy11.gif) I can't see the point in pitching the rest of the hardware over a bad board. In my mind the transformer based machines may be heavier than crap but the transformers rarely fail. A modern inverter sure looks appaling from a weight / transport standpoint. I appreciate the insight on Miller before I do something rash! (IMG:style_emoticons/default/smile.gif) So many of our Industrial Giants have simply gone to a throw away mentality, it really makes me sad. To say the least, am I really supposed to scrap the whole rest of the chassis and transformers just beause a Printed Circuit board failed. (IMG:style_emoticons/default/WTF.gif) Send me an email and I will send you Dan's info |
|
|
|
| bbrock |
Sep 5 2020, 10:58 AM
Post
#371
|
|
914 Guru Group: Members Posts: 5,269 Joined: 17-February 17 From: Montana Member No.: 20,845 Region Association: Rocky Mountains |
Oh no! That truly sucks. I'm feeling better about my ancient little Hobart. I don't think there is a single PCB to be found in it - not even a little switch circuit. Of course, they are owned by Miller now but not when it was built. I sometimes drool over the thought advancing to a nice modern Miller or Lincoln but maybe I'm better off.
The power woodworking tool industry is even worse for racing to the bottom. Most of the old major brands have been bought out at least once by conglomerates and chopped up into pieces. Even Delta bit the dust. Finding parts for tools more than a few years old is nearly impossible. One reason I gravitate to Makita is because I can still easily find parts for 30 year old tools. It's weird because in some ways power tools have never been better and more affordable, but there is no commitment to the customer any more. Like you said, throw away culture. Good luck getting the welder repaired. Sorry it happened at the beginning of a long weekend. (IMG:style_emoticons/default/sad.gif) |
|
|
|
| mb911 |
Sep 5 2020, 10:59 AM
Post
#372
|
|
914 Guru Group: Members Posts: 7,793 Joined: 2-January 09 From: Burlington wi Member No.: 9,892 Region Association: Upper MidWest |
Funny thing is miller is owned by ITW and Lincoln is still family run which is amazing to me
|
|
|
|
| Superhawk996 |
Sep 7 2020, 07:55 AM
Post
#373
|
|
914 Guru Group: Members Posts: 7,935 Joined: 25-August 18 From: Woods of N. Idaho Member No.: 22,428 Region Association: Galt's Gulch |
QUOTE(Superhawk996 @ Aug 9 2020, 10:50 AM) The aftermarket bearing vs. Porsche OEM bearing saga continues. I ordered two half shells at about $45 each that serve as main bearings for bearings #2 through #7. I was hoping that they would measure a little tighter than aftermarket Glyco as bearing #1 half shells did. Nope. Well, maybe by 0.0001" - 0.0002" but I was hoping for something significant. (IMG:style_emoticons/default/wacko.gif) OK - Time to put the Porsche OEM bearing vs Glyco aftermarket thing to bed. The OEM Porsche bearings did reduce clearance by 0.001" vs. the aftermarket Glyco. Recall I had a OEM bearing #1 and a pair of shells for bearing #2 -7. I put the OEM 1/2 shell bearings in postions #1 & #7 and then rechecked with Red Plastigauge for 0.002" - 0.006" this time given that I had some Green (.001" - 0.003") that didn't seem to compress fully when I did this the last time around. 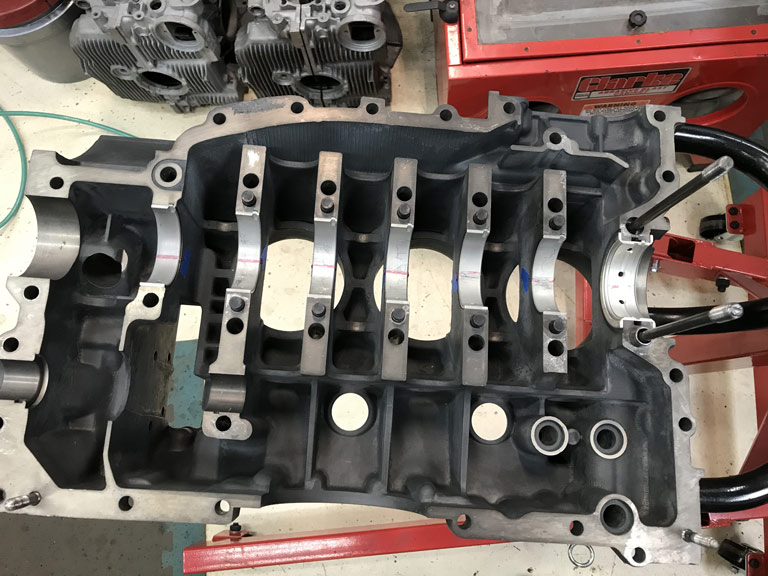 Results - Bearing #1 and #7 running at 0.003". Number 7 Porsche OEM 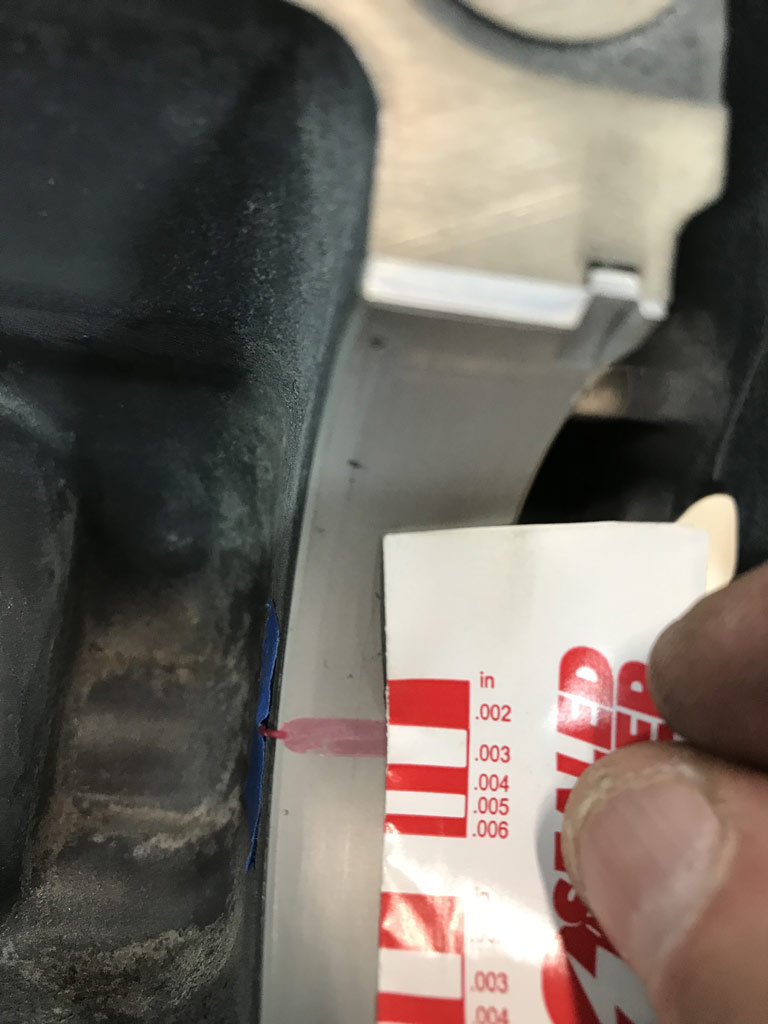 Number 1 Thrust Bearing Porsche OEM 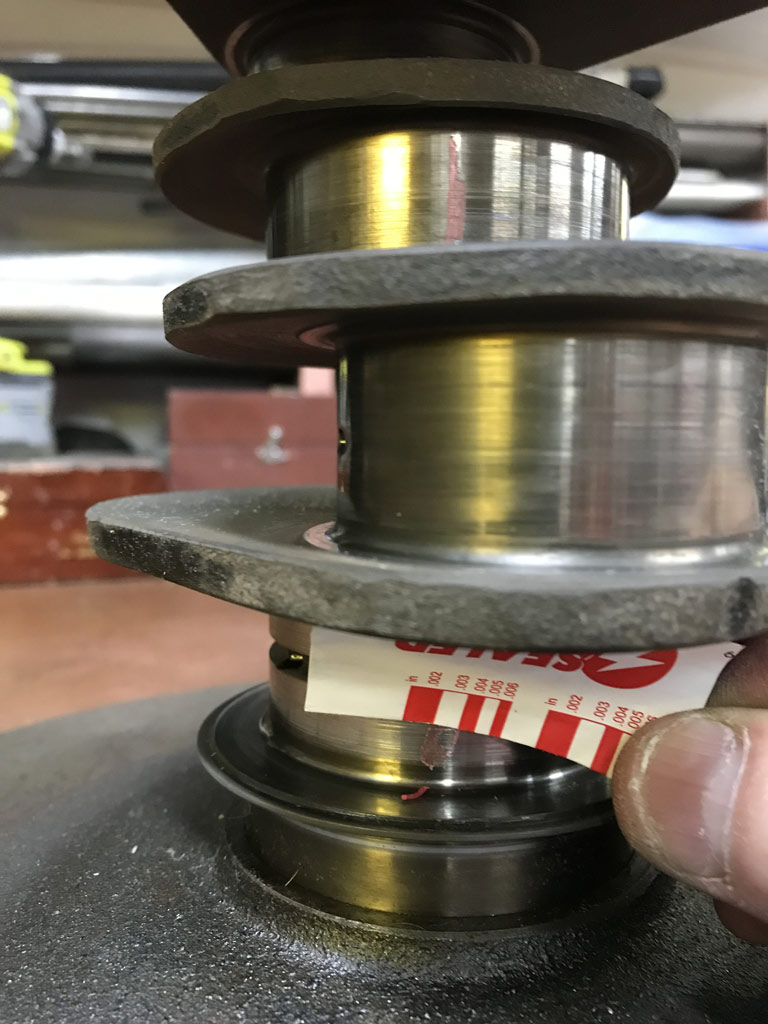 Number 2 thru 6 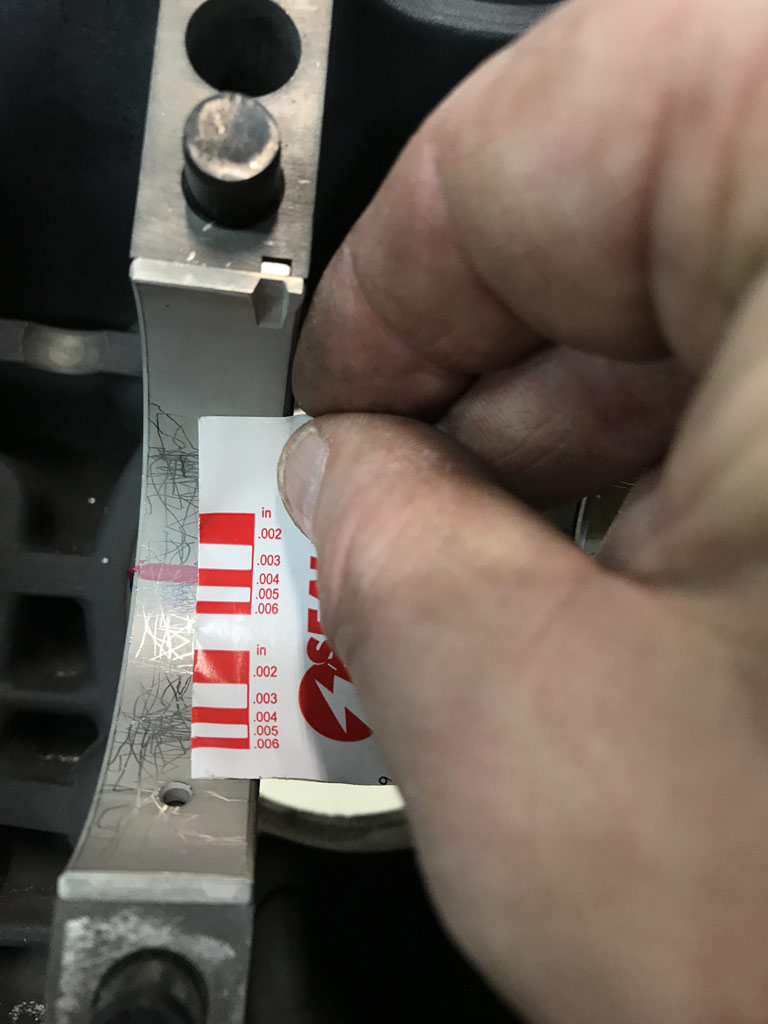 The good news is that all the rod clearances are looking good. Tightest was 0.001" and the other five were 0.0015" - 0.002" trending the tighter end at 0.0017" - 0.0018" or something like that (would need to measure with the bore gauge to know exactly). 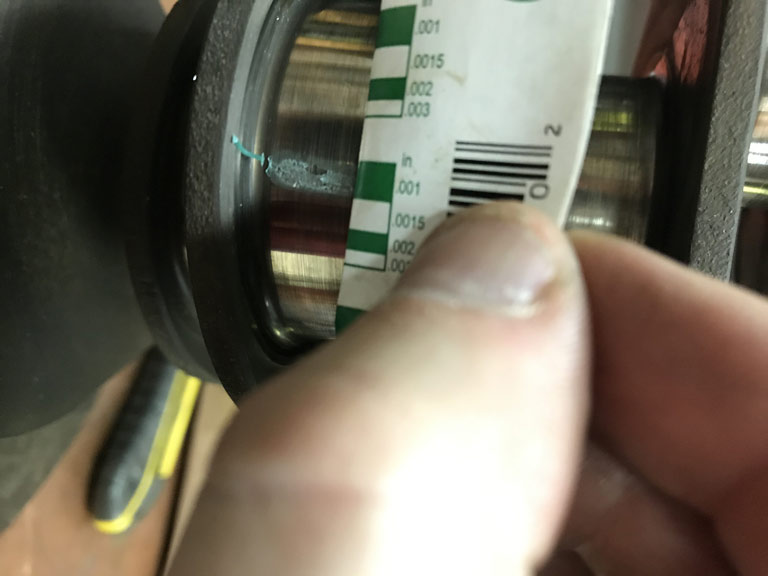 I now feel really confident that both the digital bore indicator method and the Plastigauge are in agreement that the Glyco bearings were giving me right around 0.004" of clearance (too much). Bottom line, crank is going to have to go to Ollies to have the mains ground 0.010" under and to see if they can just put a light (0.0001" - 0.0002") polish put on the rod journals. |
|
|
|
| 914_7T3 |
Sep 7 2020, 01:46 PM
Post
#374
|
|
Please forgive me, I'm new to all of this! Group: Members Posts: 1,898 Joined: 3-April 17 From: Los Angeles, CA Member No.: 20,991 Region Association: Southern California |
|
|
|
|
| Superhawk996 |
Sep 12 2020, 04:16 PM
Post
#375
|
|
914 Guru Group: Members Posts: 7,935 Joined: 25-August 18 From: Woods of N. Idaho Member No.: 22,428 Region Association: Galt's Gulch |
(IMG:style_emoticons/default/piratenanner.gif) Praise the Lord! Welder is fixed.
Many thanks to Ben for his advice and also for hooking me up with a knowledgable contact within Lincoln. I wish I could say it was something simple but that didn't happen. After having thouroughly checked out the basics like wiring and checking a couple of the big wire wound resistors, capacitors, adjusting the high frequency start point gap, and bunch of other stuff the only thing really left was the board. Conversation with Ben's Lincoln contact convinced me that it was time to open the box with the high dollar circuit board that becomes unreturnable once opened. Turns out that was the fix. Laid down several good beads on .039" sheetmetal without blowing the HUGE holes that had previously occurred when the welder would surge the current uncontrollably at the start or end of a bead. The unfortunate thing is no one can explain why the board went bad. As a former electronics tech, I've seen it happen before. Failure without explanation. Sometimes it just happens to circuits with fancy silicon in them. It sure aggravates me when I can't find a root cause though! New board is a revised Revision level so Lincoln certainly changed something on the board but no way to know what it was. Could be a transistor they can no longer get . . . or it could be that they changed a transistor that was operating too close to it's limits and had a penchant for failing. No way to know. (IMG:style_emoticons/default/dry.gif) I'll keep my fingers crossed this board lasts at least 10 years like the 1st. Back to (IMG:style_emoticons/default/welder.gif) on the car tomorrow. |
|
|
|
| mb911 |
Sep 12 2020, 04:21 PM
Post
#376
|
|
914 Guru Group: Members Posts: 7,793 Joined: 2-January 09 From: Burlington wi Member No.: 9,892 Region Association: Upper MidWest |
I am glad that Dan could help.. He bleeds lincoln so he is the guy to ask.
|
|
|
|
| Superhawk996 |
Sep 17 2020, 10:56 AM
Post
#377
|
|
914 Guru Group: Members Posts: 7,935 Joined: 25-August 18 From: Woods of N. Idaho Member No.: 22,428 Region Association: Galt's Gulch |
Quick post. Been super busy and not much time to spend welding. Hoping for better this weekend.
Spent some time filling the holes that got blown when welder 1st stareted acting up. Still have a couple more that need attention. Cut a 4mm thick strip to fill the gap between the two panels and then got it pasted in position using a 0.040" tungsten and .035" MIG wire as filler rod. All done at very low current to hold it together temporarily with temporary tack welds largely just sitting on top. Will use a copper backer this weekend and get the whole thing sewn together without blowing out the 4mm filler. 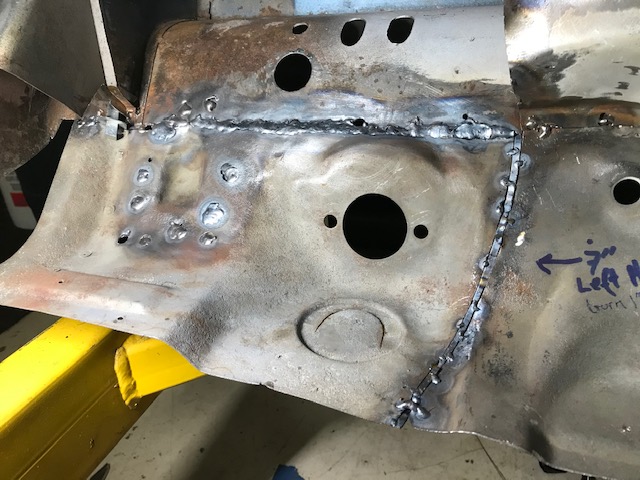 The whole area that sits below the brake reservoir then needs to be Ospho treated to address that surface rust before I put the flap back in place. |
|
|
|
| Superhawk996 |
Sep 19 2020, 05:15 PM
Post
#378
|
|
914 Guru Group: Members Posts: 7,935 Joined: 25-August 18 From: Woods of N. Idaho Member No.: 22,428 Region Association: Galt's Gulch |
Closing in on the worst of the pedal box area. It is just such a pain in the butt to work on this area without a rotiserrie. The wiring harness is tie wrapped up to the steering column mount and it is constantly touching or snagging my welding helmet. (IMG:style_emoticons/default/hissyfit.gif)
Got the area with the 4 mm filler burned in. 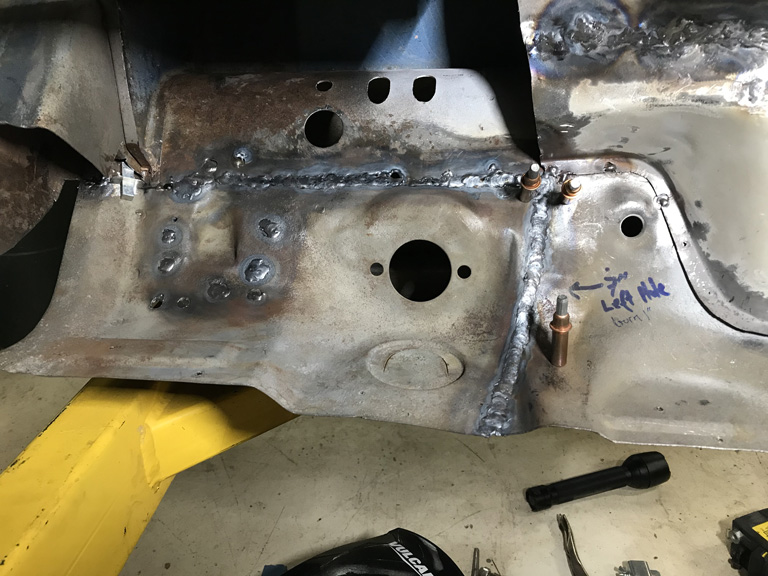 Used a copper backer that was held into place to help ensure good penetraiton and complete fusion of the 4 mm filler without burn through. 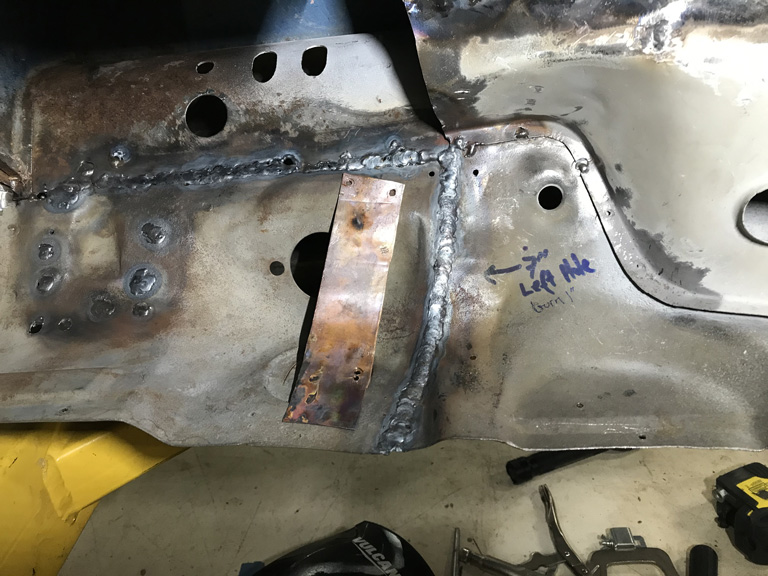 Totally happy with the penetration. Strong as the base metal. (IMG:style_emoticons/default/smile.gif) 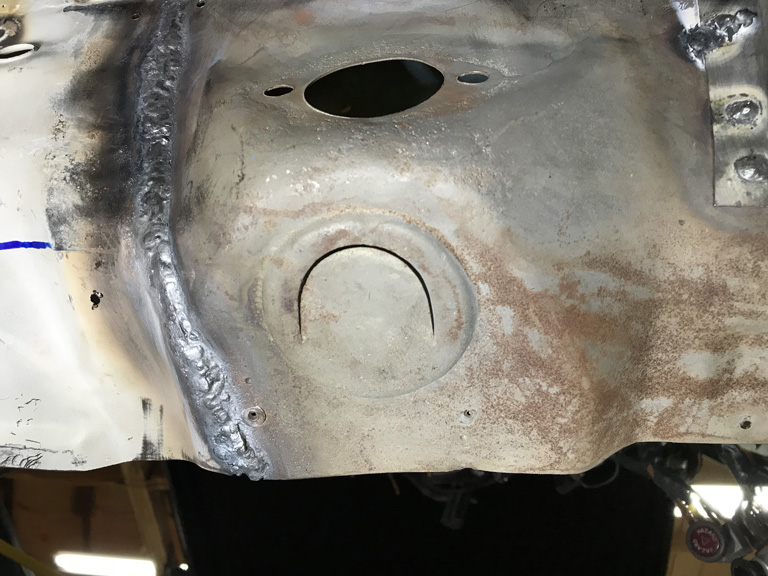 Then finished things off by filling the holes blown by the bad welder and making sure I had good weld penetration across the top. 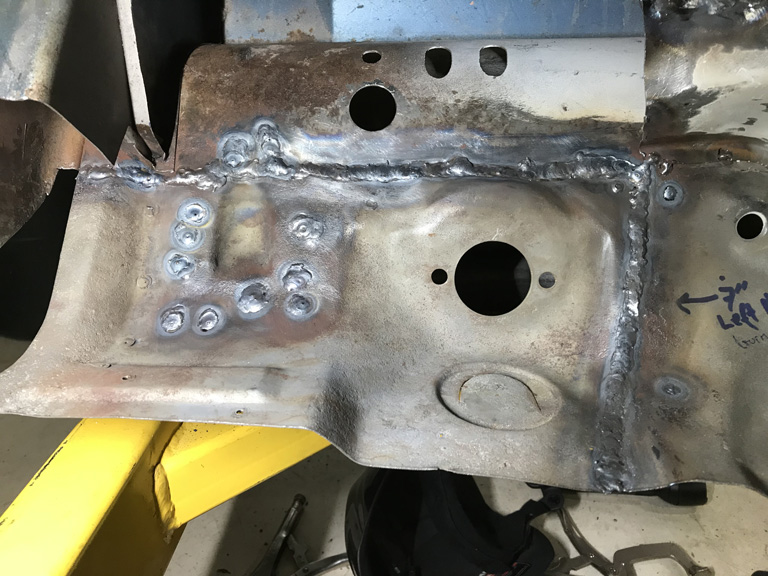 Dabbed some Ospho onto all surfaces. We had a bunch of humidity here that put a light surface rust on the panel. That will get the surface rust up under the tank area under control too. Did a quick check of the suspension point vs. my reference point on the floor and movement of was only about 1 mm which is awesome. (IMG:style_emoticons/default/piratenanner.gif) Next up. Put the tuna can flap back and then attack the section of the wheel house that had to be removed. |
|
|
|
| Superhawk996 |
Sep 21 2020, 06:12 AM
Post
#379
|
|
914 Guru Group: Members Posts: 7,935 Joined: 25-August 18 From: Woods of N. Idaho Member No.: 22,428 Region Association: Galt's Gulch |
Well rather than put the tuna can flap back, I decided to get started on the (IMG:style_emoticons/default/stromberg.gif) work.
There were still remnants of fiberglass and epoxy resin that needed removing. Let me say that there is a special place in hell for those that use fiberglass to "repair" sheetmetal rather than man up and do it properly. In the process of getting the last of the resin off the driver longitudinal, I found this nice stress crack. Not unheard of to have stress cracking here, but, I'll contend that someone drove this car around for quite a while with the passenger long completely roached and not able to bear it's fair share of the structural burden. 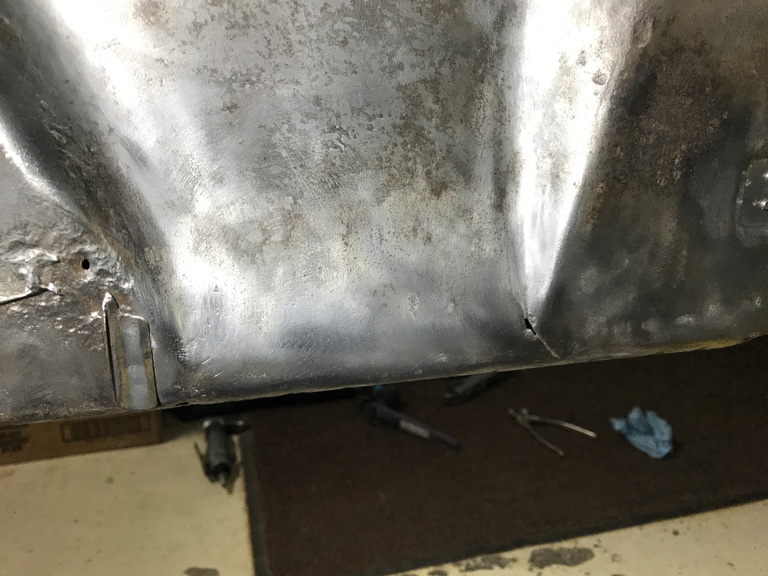 Since weekends have a way of disappearing too fast, I didn't get far with the wheel house but I was able to begin to trim away the donor sheetmetal. 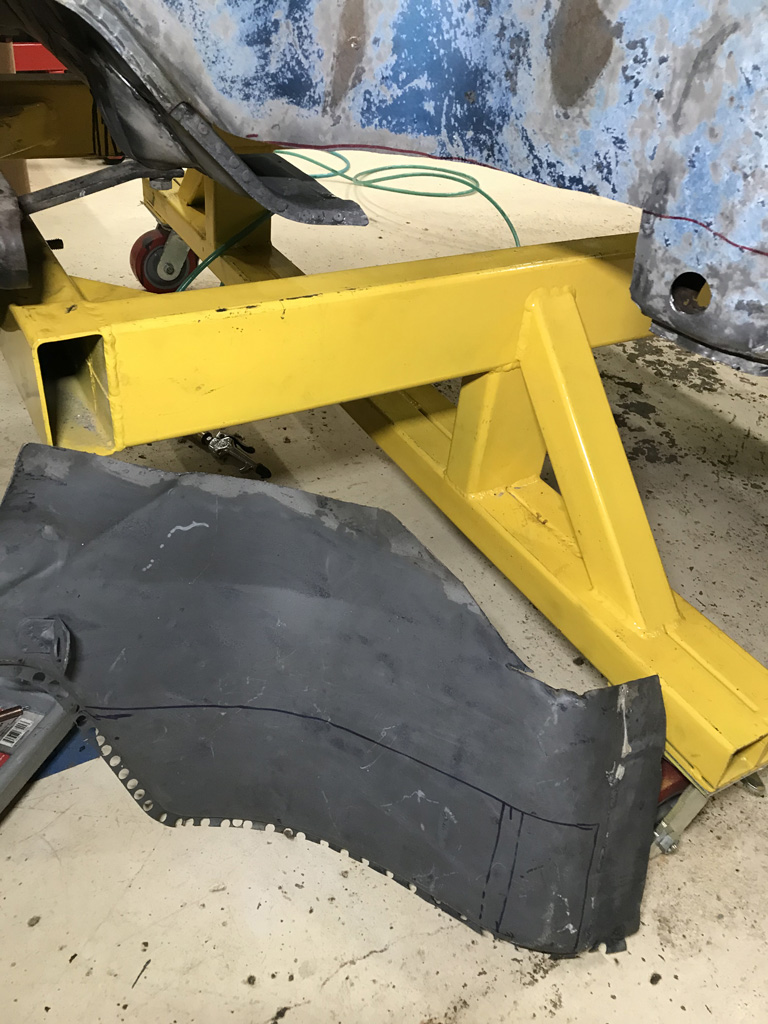 Rough mockup 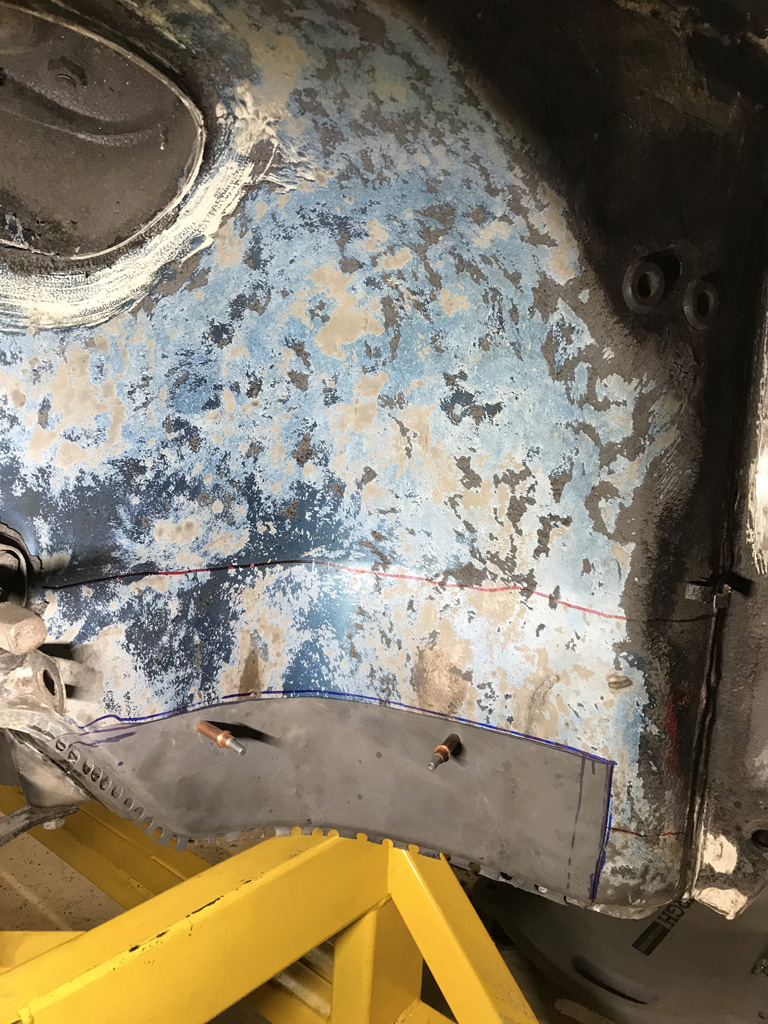 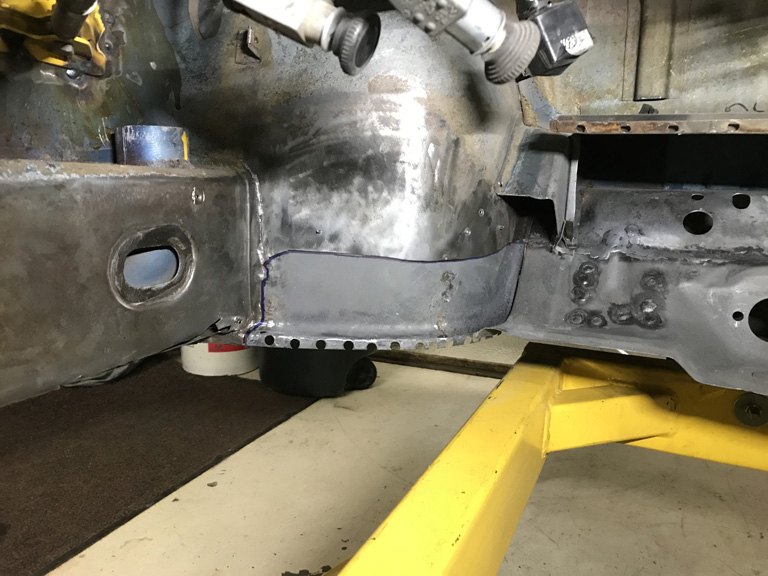 Maybe with a little luck this week I can get the final fitup done and get this tacked in before the weekend. |
|
|
|
| Superhawk996 |
Oct 12 2020, 10:59 AM
Post
#380
|
|
914 Guru Group: Members Posts: 7,935 Joined: 25-August 18 From: Woods of N. Idaho Member No.: 22,428 Region Association: Galt's Gulch |
Finished up the peal box area. What a PITA.
Front firewall / bulkhead sheetmetal is only about 0.030" which would be hard enough to weld but add a little surface rust on the backside and difficult access and it's a recipie for just blowing holes. 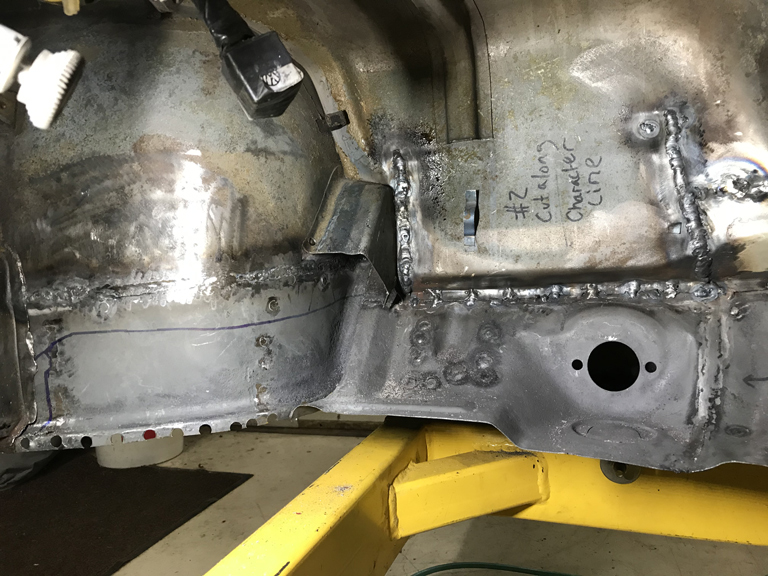 Copper backers cleco'd in place made it doable but I'm just glad to be done with this area. Final step is to use a shrinking wheel to suck out a little bit of the oil cannning that got created when the tuna can flap was bent up and out of the way. Bending the sheetmetal stretches it ever so slightly and shrinking it is the only way to get it back. Attached image(s) 
|
|
|
|
|
1 User(s) are reading this topic (1 Guests and 0 Anonymous Users)
0 Members:

|
Lo-Fi Version | Time is now: 4th July 2026 - 02:44 PM |
Invision Power Board
v9.1.4 © 2026 IPS, Inc.