|
|
|
Porsche, and the Porsche crest are registered trademarks of Dr. Ing. h.c. F. Porsche AG.
This site is not affiliated with Porsche in any way. Its only purpose is to provide an online forum for car enthusiasts. All other trademarks are property of their respective owners. |
|
|

  |

| Dion |
 Jan 24 2022, 07:54 AM Jan 24 2022, 07:54 AM
Post
#481
|
|
RN  Group: Members Posts: 2,926 Joined: 16-September 04 From: Audubon,PA Member No.: 2,766 Region Association: MidAtlantic Region |
Brilliant, just brilliant. Phil that is some mighty impressive work going on. I will be taking
some of your measurements into consideration when it comes time for the alignment on my car. You’ve done some homework for sure! Keep it coming. Thanks for posting the great details. |
   |

 
|
| 930cabman |
Jan 24 2022, 05:15 PM
Post
#482
|
|
Advanced Member Group: Members Posts: 4,663 Joined: 12-November 20 From: Buffalo Member No.: 24,877 Region Association: North East States |
Phil, you seem do get an awful lot of great work for being a candidate for OCD? And, where can you possibly find the time for this stuff, btw: keep up the good work and thanks again for documenting
|
|
|
|
| Superhawk996 |
Jan 30 2022, 06:34 PM
Post
#483
|
|
914 Guru Group: Members Posts: 7,840 Joined: 25-August 18 From: Woods of N. Idaho Member No.: 22,428 Region Association: Galt's Gulch |
Getting Close To A Rolling Chassis:
Engine Shelf is in. Threw down some primer. 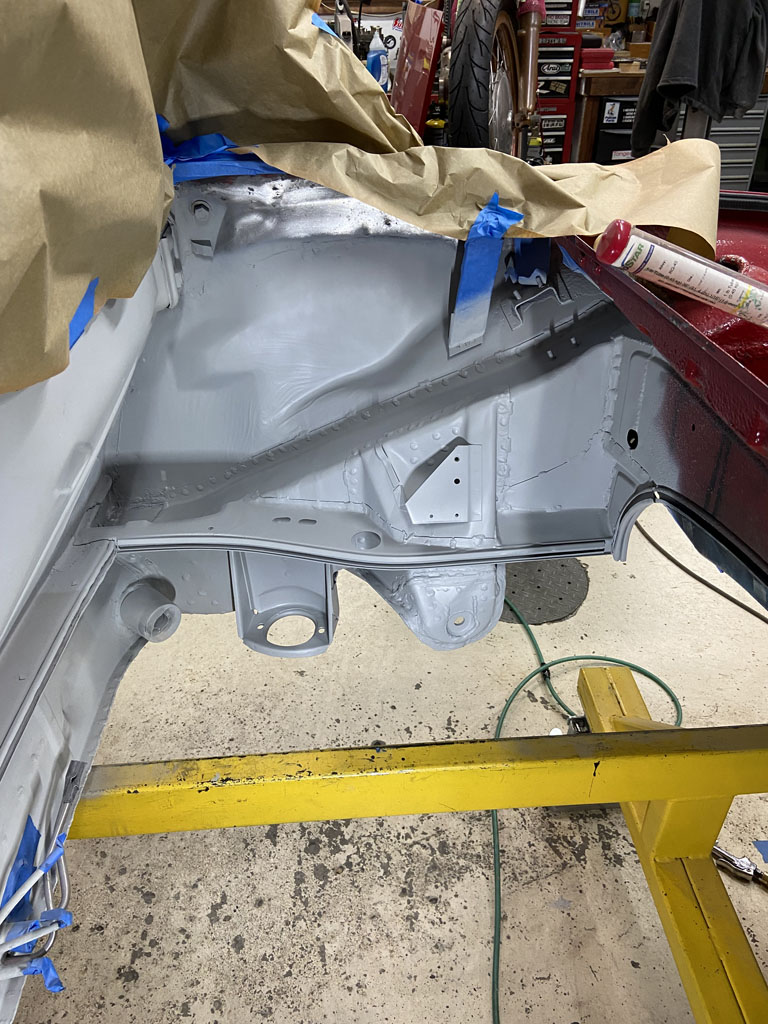 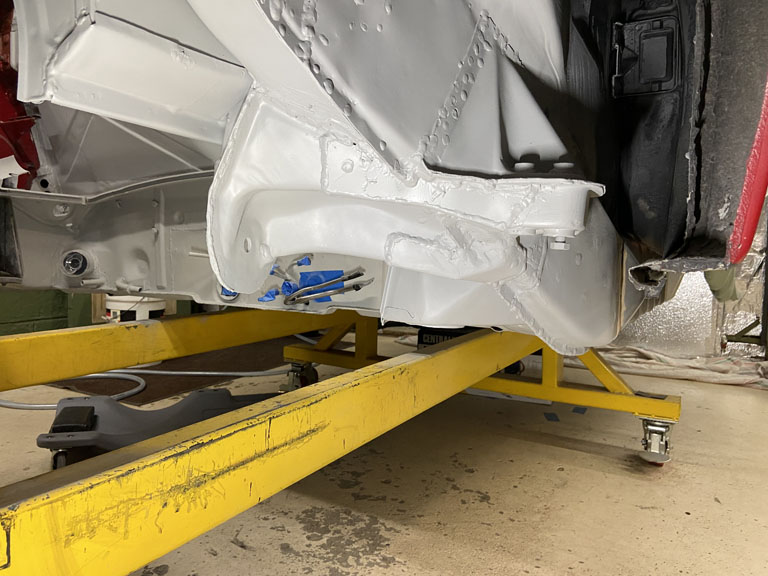 Up next: Time to get those trunk hinges replaced. Also need to bang out a few details like adding the little metal strips for the engine bay wiring harness, and the little lug that holds the parking brake cable. Not big projects but need to get done before I can be done bruising myself in the engine compartment. |
|
|
|
| Superhawk996 |
Feb 4 2022, 10:07 AM
Post
#484
|
|
914 Guru Group: Members Posts: 7,840 Joined: 25-August 18 From: Woods of N. Idaho Member No.: 22,428 Region Association: Galt's Gulch |
(IMG:style_emoticons/default/sheeplove.gif) (IMG:style_emoticons/default/sheeplove.gif) (IMG:style_emoticons/default/sheeplove.gif)
So tired of thinking that I'll have something knocked out over the weekend, only to find out that isn't likely to happen. Dug out the new trunk hinge mounts for the body side. Welded in the threaded inserts. No problem there. 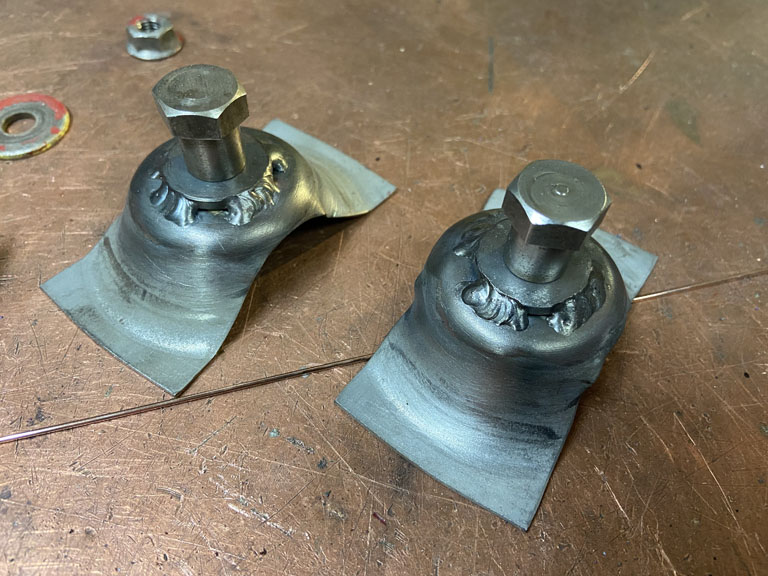 Then I went and dug out the passenger side trunk hinge. (IMG:style_emoticons/default/stromberg.gif) Apparently I have a bad habit of setting aside parts without a good inspection 1st. When I got the hinge back in my hand it was clear that the decades of 1/2 (IMG:style_emoticons/default/bootyshake.gif) fixes have taken their toll. When I disassembled it, someone had substituted a threaded bolt and nut for the proper shoulder bolt. Of course the threaded fastener has basically "filed" the hinge bushing. 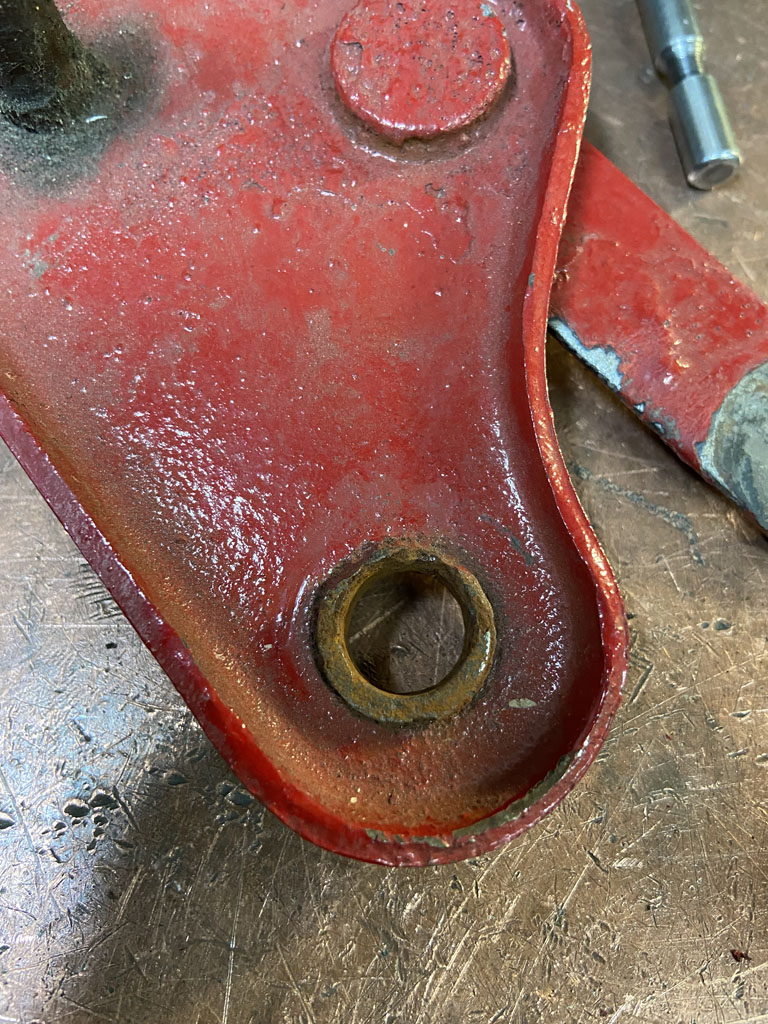 but wait, it gets worse. The other side surface that interfaces with the trunk hinge is corroded, pitted, and worn. That reduces bearing surface and the corroded pits and point loading will quickly wear upon the new hinge bracket. Not acceptable. 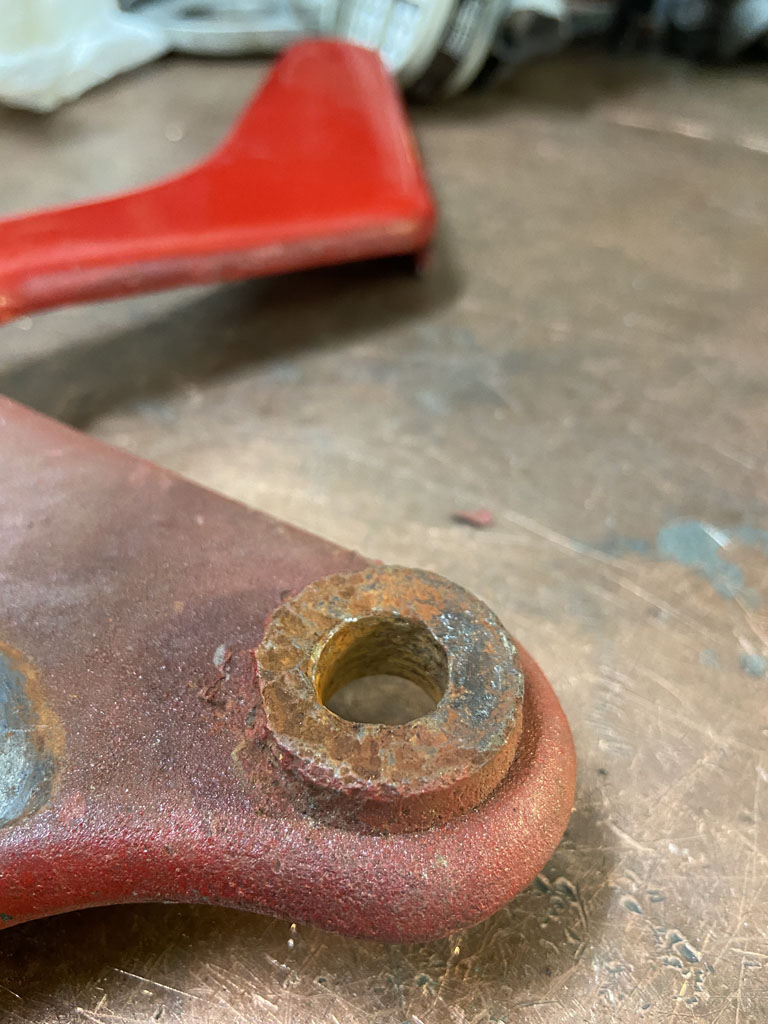 After being thoroughly disgusted with that I cleaned up the little linkage bracket only to discover that it has previously been stripped and 1/2 (IMG:style_emoticons/default/bootyshake.gif) rethreaded. 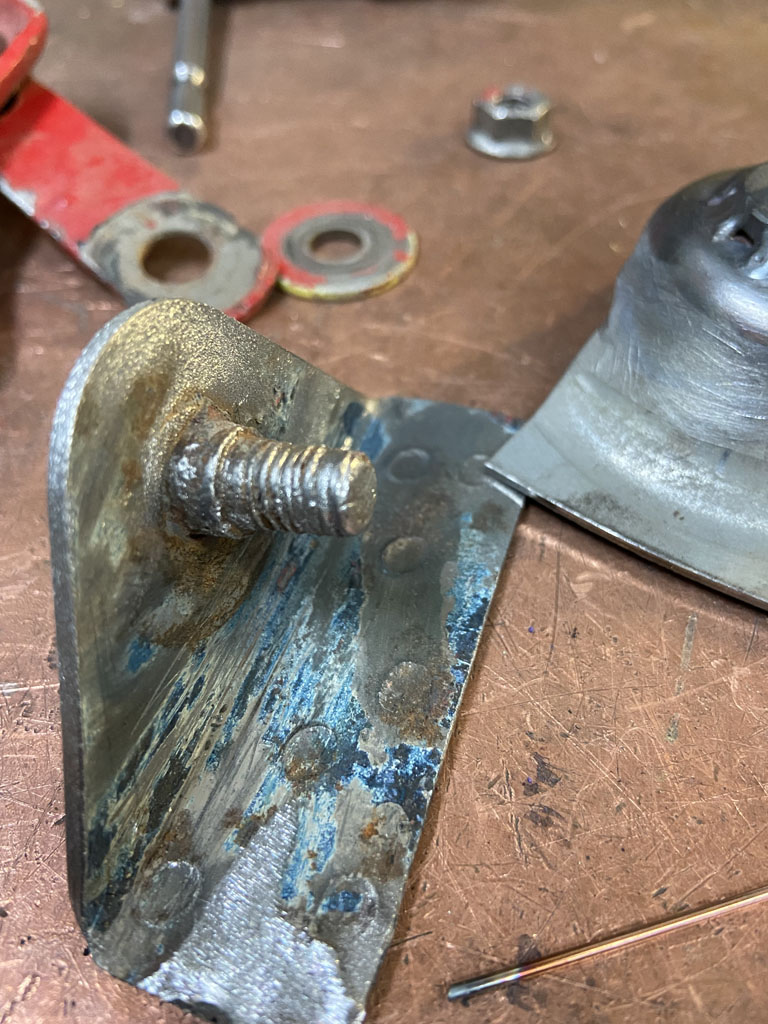 (IMG:style_emoticons/default/sheeplove.gif) (IMG:style_emoticons/default/sheeplove.gif) (IMG:style_emoticons/default/sheeplove.gif) (IMG:style_emoticons/default/sheeplove.gif) (IMG:style_emoticons/default/sheeplove.gif) (IMG:style_emoticons/default/sheeplove.gif) So I guess I'll spend time this weekend turning up new hinge bushing and a new stud. If anything was working in my favor, I guess it is that I begrudgingly took apart the driver side hinge thinking I might find the same hackery. Thank God, the shoulder bolt is still there and the hinge interface surface appeared to be OK. I guess the passenger side must have taken the usual battery acid hit which is what lead to the corrosion and subsequent "fixes". Oh, the joy of a 49 year old car. (IMG:style_emoticons/default/rolleyes.gif) Crap like this makes me wish I had simply bought an Elise. The frustration will pass . . . I find machining parts relaxes me. |
|
|
|
| 930cabman |
Feb 4 2022, 06:17 PM
Post
#485
|
|
Advanced Member Group: Members Posts: 4,663 Joined: 12-November 20 From: Buffalo Member No.: 24,877 Region Association: North East States |
After all, we do this for therapy??? or maybe for relaxation.
Either/or a rolling chassis is a major milestone. Keep it going and thanks as always for posting your progress |
|
|
|
| bbrock |
Feb 6 2022, 12:58 PM
Post
#486
|
|
914 Guru Group: Members Posts: 5,269 Joined: 17-February 17 From: Montana Member No.: 20,845 Region Association: Rocky Mountains |
Holy smokes Phil! I haven't been checking the World lately as life has been hectic, but you have been kicking (IMG:style_emoticons/default/bootyshake.gif) !!! I found a good match for the Bilstein yellow with Testers enamel paint. When I'm finished with the brake job on my snow plow, I'll pull if off the shelf to get the color. I'm with you though. Those unpainted grooves have GOT to be dealt with (IMG:style_emoticons/default/biggrin.gif)
|
|
|
|
| Superhawk996 |
Feb 7 2022, 07:24 AM
Post
#487
|
|
914 Guru Group: Members Posts: 7,840 Joined: 25-August 18 From: Woods of N. Idaho Member No.: 22,428 Region Association: Galt's Gulch |
Well, turns out I almost got the job done over the weekend.
 The problem is that the trunk gaps weren't quite where I wanted them and I chickened out on welding the hinges into postion. 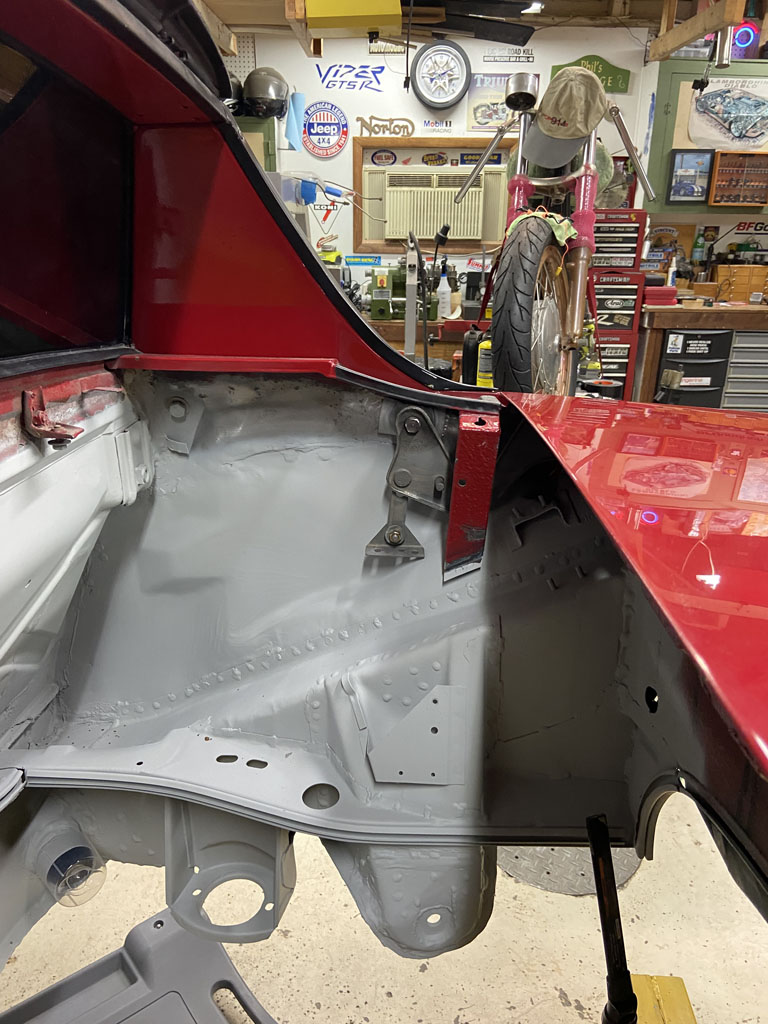 Another problem of too many degrees of freedom: 1) Trunk hinge slots 2) Trunk lock pin variance 3) Fit with seals in or seals out 4) Position of the new hinge bracket vs. the scribed location of the old. Well . . . the weekend clock ran out (IMG:style_emoticons/default/sad.gif) before I could work my way through the variables Here's the fabrication of the new bushings and threaded stud. Used the mill to cut off the off the button head of the old parts. Could also be done with a grinder but would be harder to keep a nice clean level surface for the new part to seat to. 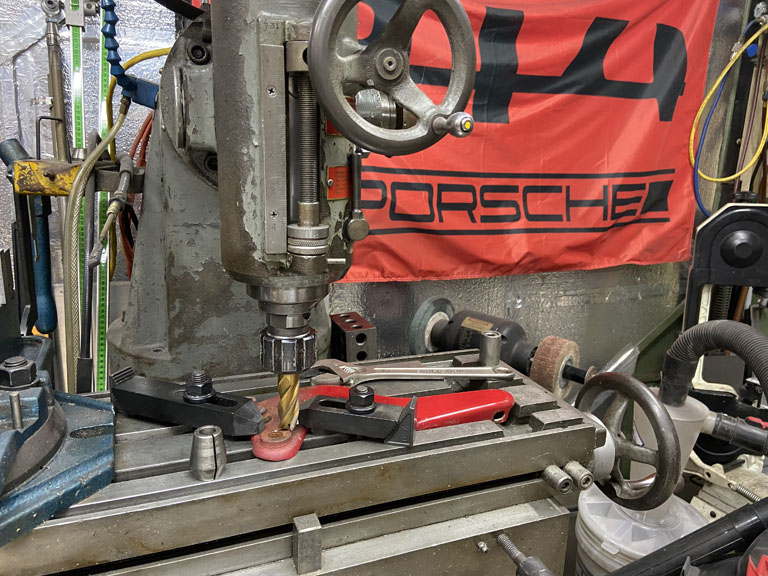 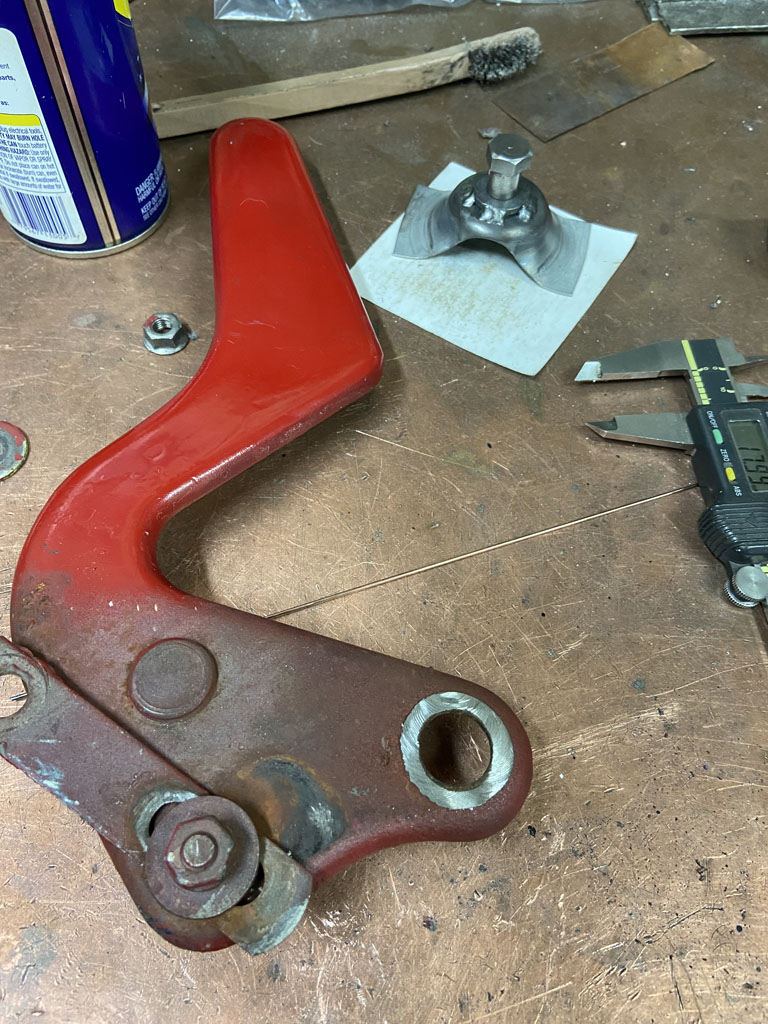 Turned up new parts in the lathe 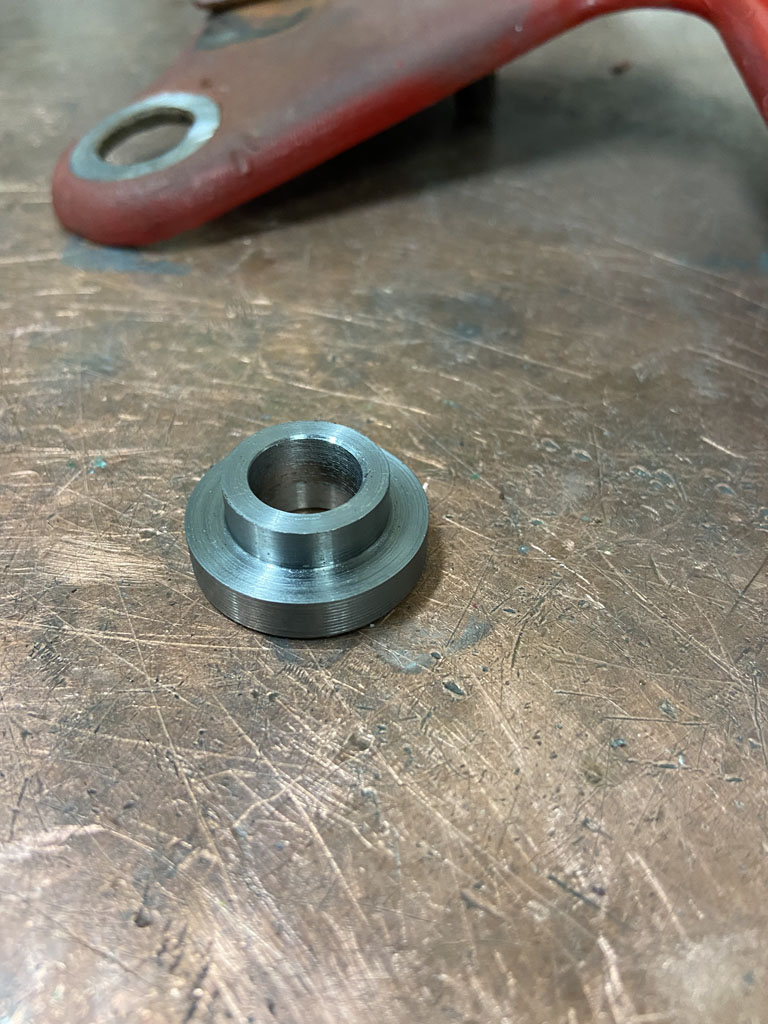 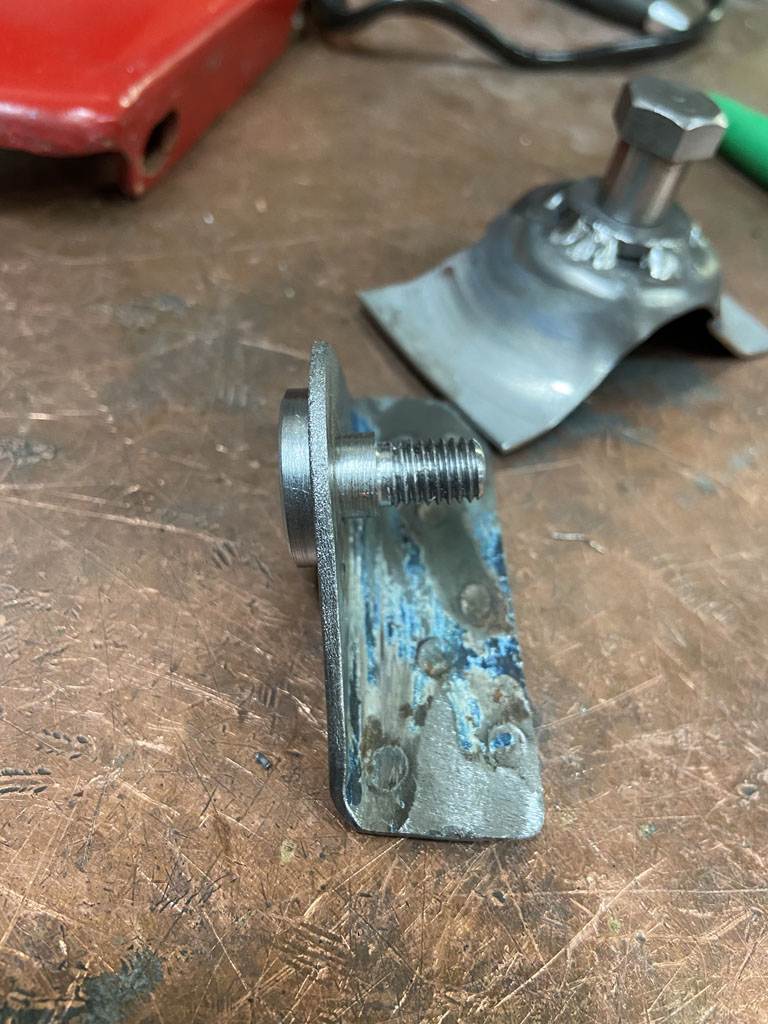 And of course sand blasted and welded the new bushing and stud parts in their new home. Hope to button it up this week one of these nights after work. |
|
|
|
| tygaboy |
Feb 7 2022, 09:11 AM
Post
#488
|
|
914 Guru Group: Members Posts: 5,826 Joined: 6-October 15 From: Petaluma, CA Member No.: 19,241 Region Association: Northern California |
Awesome! When I saw your hinge issue, my first thought was, "No biggie, he'll just buy some replacement hinges... NOT!". (IMG:style_emoticons/default/happy11.gif)
Give a man a dollar and he'll probably just spend it. Give a man a mill and lathe? Well. All sorts of way better stuff happens! (IMG:style_emoticons/default/wub.gif) Fab on, my friend. As @bbrock said: You're kickin' it! (IMG:style_emoticons/default/aktion035.gif) |
 |
|
| Superhawk996 |
Feb 7 2022, 09:41 AM
Post
#489
|
|
914 Guru Group: Members Posts: 7,840 Joined: 25-August 18 From: Woods of N. Idaho Member No.: 22,428 Region Association: Galt's Gulch |
QUOTE(tygaboy @ Feb 7 2022, 10:11 AM)  Awesome! When I saw your hinge issue, my first thought was, "No biggie, he'll just buy some replacement hinges... NOT!". (IMG:style_emoticons/default/happy11.gif) In all fairness, I did send Oscar a set of hood and trunk hinges for the GT lightening and plating treatement. This was more about being OCD, not wanting to reuse skanky parts while I wait for something much nicer. (IMG:style_emoticons/default/smile.gif) Plus, I have to justify that lathe and mill to the wife (IMG:style_emoticons/default/happy11.gif) |
|
|
|
| worn |
Feb 17 2022, 02:16 AM
Post
#490
|
|
Winner of the Utah Twisted Joint Award Group: Members Posts: 3,589 Joined: 3-June 11 From: Madison, WI and North Bend WA Member No.: 13,152 Region Association: Upper MidWest |
QUOTE(Superhawk996 @ Feb 7 2022, 07:41 AM) QUOTE(tygaboy @ Feb 7 2022, 10:11 AM) Awesome! When I saw your hinge issue, my first thought was, "No biggie, he'll just buy some replacement hinges... NOT!". (IMG:style_emoticons/default/happy11.gif) In all fairness, I did send Oscar a set of hood and trunk hinges for the GT lightening and plating treatement. This was more about being OCD, not wanting to reuse skanky parts while I wait for something much nicer. (IMG:style_emoticons/default/smile.gif) Plus, I have to justify that lathe and mill to the wife (IMG:style_emoticons/default/happy11.gif) Looks to me like road salt could have contributed to the rust fandangos. I have entry level lathe and mill machine tools that have been used to fix household things, and the mig saved a beloved mixing bowl. So my wife has no problem with the tools. The problem is that now i can fix rather than buy. Oh, that is an easy project. Then comes the search through scrap metal hunks, figuring out tooling and clamping. There ensues holding my breath as i get close to final size. A weekend is traded for a little gizmo that i made myself! Your car looks fantastic. When it is done take it on a ferry ride to Madison. |
|
|
|
| Arno914 |
Feb 17 2022, 03:32 AM
Post
#491
|
|
Member Group: Members Posts: 233 Joined: 13-May 20 From: Southbridge, MA, USA Member No.: 24,260 Region Association: North East States |
QUOTE A weekend is traded for a little gizmo that i made myself! We all know this very well...lost count over all those weekends fixing stuff... (IMG:style_emoticons/default/biggrin.gif) |
|
|
|
| Shivers |
Feb 17 2022, 08:05 AM
Post
#492
|
|
Senior Member Group: Members Posts: 3,391 Joined: 19-October 20 From: La Quinta, CA Member No.: 24,781 Region Association: Southern California |
I've been using my drill press as a mill, must be nice to have something that at least looks like a Bridgeport. I think your OCD has served you well, impossible not to be impressed. Great work!
Now I must ask, is it the lighting or is that table top copper? (tell me it's copper... (IMG:style_emoticons/default/smile.gif) ) I have pieces I clamp in place, sure would be nice to just clamp it to a table for fabrication. |
|
|
|
| Superhawk996 |
Feb 17 2022, 08:51 AM
Post
#493
|
|
914 Guru Group: Members Posts: 7,840 Joined: 25-August 18 From: Woods of N. Idaho Member No.: 22,428 Region Association: Galt's Gulch |
QUOTE(Shivers @ Feb 17 2022, 09:05 AM) I've been using my drill press as a mill, must be nice to have something that at least looks like a Bridgeport. I think your OCD has served you well, impossible not to be impressed. Great work! Now I must ask, is it the lighting or is that table top copper? (tell me it's copper... (IMG:style_emoticons/default/smile.gif) ) I have pieces I clamp in place, sure would be nice to just clamp it to a table for fabrication. @shivers Before I acquired the South Bend Mill for about $0.31/lb, I made do with many years with a X-Y table on a drill press. Works great as long as you're not trying to hog off heavy cuts of metal (IMG:style_emoticons/default/beerchug.gif) I love the South Bend because it's 1950's vintage (I love vintage stuff) and it has positive drive NT30 tooling that I feel has advantages over R8 tapers. Unfortunately NT30 tooling is a little harder to come by, but, not obsolete by any stretch. Yes, part of my workbench top is copper, but, it's copper over wood. I mostly use it for bench welding so I can just lay parts on it or put in the vise and weld away. It's about 1/16" thick roofing copper. If you have some quoted, get it quoted as roofing copper. Oxygen Free Copper is way more expensive. For clamping and welding, I think HF has a cheap steel welding table with clap slots. Of course Miller / Lincoln others have nicer welding tables but $$$. |
|
|
|
| Superhawk996 |
Feb 17 2022, 08:59 AM
Post
#494
|
|
914 Guru Group: Members Posts: 7,840 Joined: 25-August 18 From: Woods of N. Idaho Member No.: 22,428 Region Association: Galt's Gulch |
QUOTE(Arno914 @ Feb 17 2022, 04:32 AM) QUOTE A weekend is traded for a little gizmo that i made myself! We all know this very well...lost count over all those weekends fixing stuff... (IMG:style_emoticons/default/biggrin.gif) For me, I think those are the best weekends. I really hate throwing something away when I know it can be fixed. We've become a throw-a-way society. We give a lot of lip service to "green", or "sustainable" energy, houses, cars, etc., but, at the end of the day, nothing is more green than not tossing things into a landfill that can be reused, recycled, or fixed and kept in service. |
|
|
|
| 76-914 |
Feb 17 2022, 09:37 AM
Post
#495
|
|
Repeat Offender & Resident Subaru Antagonist Group: Members Posts: 13,883 Joined: 23-January 09 From: Temecula, CA Member No.: 9,964 Region Association: Southern California |
(IMG:style_emoticons/default/agree.gif) A weekend (or a weekday) without an accomplishment is wasted. Love those 50's mills and lathes. (IMG:style_emoticons/default/wub.gif) Wish I had some. (IMG:style_emoticons/default/beerchug.gif)
|
|
|
|
| Superhawk996 |
Feb 21 2022, 09:26 AM
Post
#496
|
|
914 Guru Group: Members Posts: 7,840 Joined: 25-August 18 From: Woods of N. Idaho Member No.: 22,428 Region Association: Galt's Gulch |
Anyone else suffer from having to repair tools before you can do the job you intended to do?
I love these HF rechargeable flashlights. Problem is, like most things, they aren’t very durable. I’ve had these for a couple years but they are getting flaky. Not charging properly and the light flickers from time to time. Like most modern things, they really aren’t designed to be serviced. The assumption is just throw it away and buy new ones. (IMG:style_emoticons/default/bs.gif) First trick is disassembly. My general thought is that if it was put together, it can be taken apart . . . Somehow. Here’s the exploded view 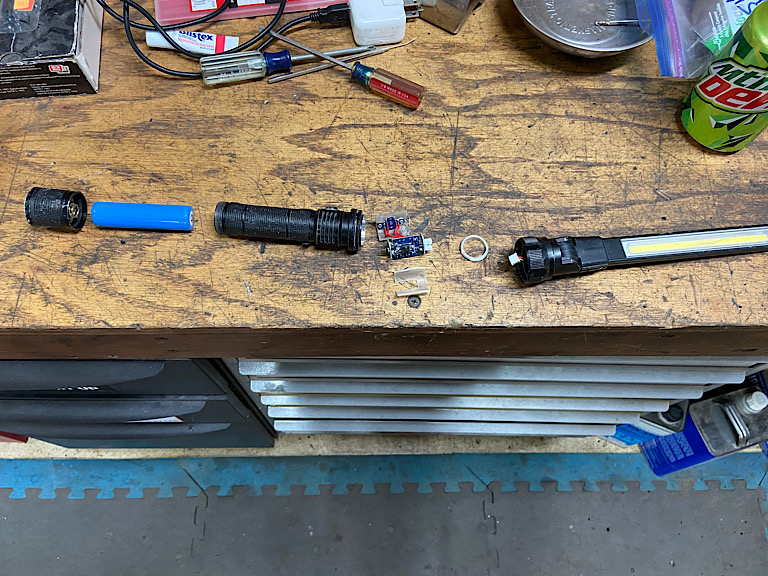 I never know whether to be impressed with miniaturization or pissed off how difficult it makes service. Lots of little surface mount components in these buggers!  What I found under magnification is that the solder connections to the mini USB were broken from stress cracking as the charging cord is inserted and removed . I can’t even show pics of the repair. I’ll just say if you don’t have a very fine tip soldering iron and experience working with surface mount components, you’re screwed. The final trick to reassembly was realization that the on/off button needs to be removed from the housing and then reinstalled after the circuit holder is reinstalled.  After several hours of work to repair two of these, I’m happy to say they are good as new. At least until they stress crack again. Hopefully not for a couple more years! |
|
|
|
| Superhawk996 |
Feb 21 2022, 09:35 AM
Post
#497
|
|
914 Guru Group: Members Posts: 7,840 Joined: 25-August 18 From: Woods of N. Idaho Member No.: 22,428 Region Association: Galt's Gulch |
Here was the original plan. Replace the driver side trunk hinge that had been broken and repaired in the past. The prior repair was a combination of self tapping sheet metal screws and later welding.
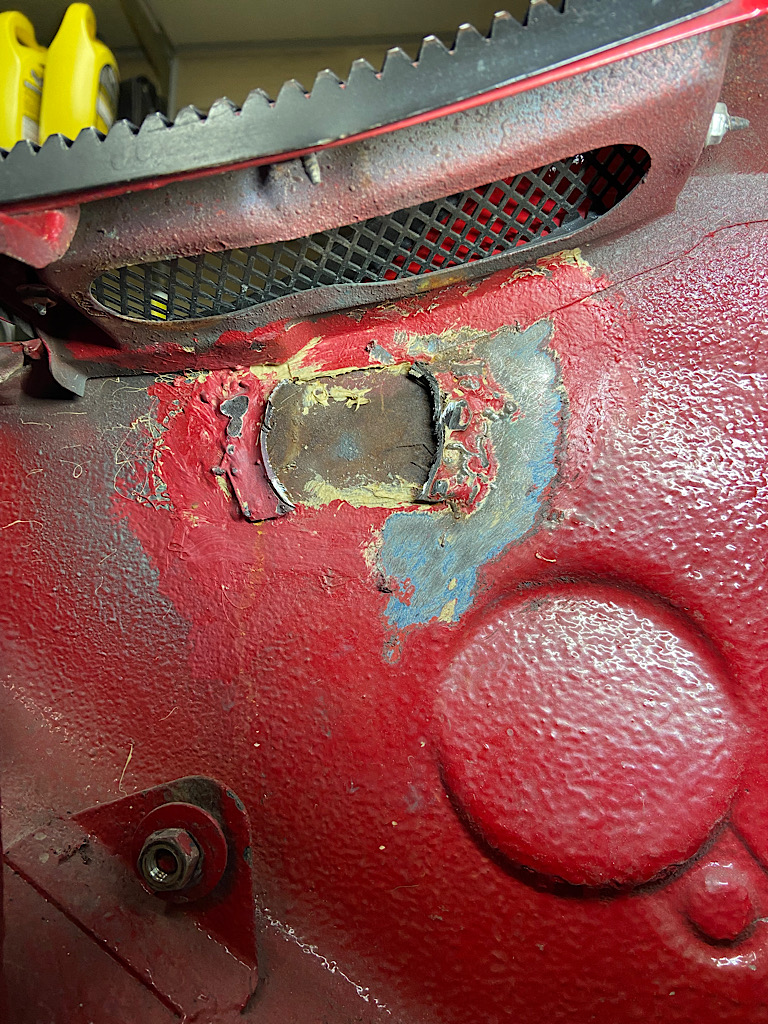 When I finally got it all cut away, there was a small hole where the OEM spot weld tore out. Not a big deal but hole needed to be fixed  So after the flashlight repairs this is all I got done for the day. (IMG:style_emoticons/default/sad.gif) Hopefully I’ll get time to locate and tack the hinge mount this week! |
|
|
|
| 930cabman |
Feb 21 2022, 04:30 PM
Post
#498
|
|
Advanced Member Group: Members Posts: 4,663 Joined: 12-November 20 From: Buffalo Member No.: 24,877 Region Association: North East States |
QUOTE(Superhawk996 @ Feb 17 2022, 09:59 AM) QUOTE(Arno914 @ Feb 17 2022, 04:32 AM) QUOTE A weekend is traded for a little gizmo that i made myself! We all know this very well...lost count over all those weekends fixing stuff... (IMG:style_emoticons/default/biggrin.gif) For me, I think those are the best weekends. I really hate throwing something away when I know it can be fixed. We've become a throw-a-way society. We give a lot of lip service to "green", or "sustainable" energy, houses, cars, etc., but, at the end of the day, nothing is more green than not tossing things into a landfill that can be reused, recycled, or fixed and kept in service. Exactly, too bad most of us Americans would rather Amazon for anything than repair "some old junk". I always prefer to invest a couple $$ and repair old stuff than spend the long $$ to get some new crap. |
|
|
|
| Superhawk996 |
Feb 26 2022, 10:29 AM
Post
#499
|
|
914 Guru Group: Members Posts: 7,840 Joined: 25-August 18 From: Woods of N. Idaho Member No.: 22,428 Region Association: Galt's Gulch |
Engine lid mocked up. Of course the engine lid brackets for this are jacked up. And . . . don't start with me on the painted gold PORSCHE letters (IMG:style_emoticons/default/headbang.gif) I still have the engine lid from my original teener as "wall art". I think I'm going to pull the script off that -- will be cool to have a little of my original 914 in this replacement.
 One of the engine lid brackets is broken loose from the firewall and has creative DAPO fix of shooting a bolt though the firewall and was tightened so tightly that it collapsed the formation that the hinge bracket is welded to. This tips the engine lid mounting bracket to the driver side making the engine lid gaps tight on the driver side, wide on passenger side. Pictures of the as-is condition and final proper fix forthcoming. |
|
|
|
| Superhawk996 |
Feb 26 2022, 03:18 PM
Post
#500
|
|
914 Guru Group: Members Posts: 7,840 Joined: 25-August 18 From: Woods of N. Idaho Member No.: 22,428 Region Association: Galt's Gulch |
It's Always Worse Than You Thought
So here's the situation, I knew this part was (IMG:style_emoticons/default/sheeplove.gif) -ery Passenger side "fix": 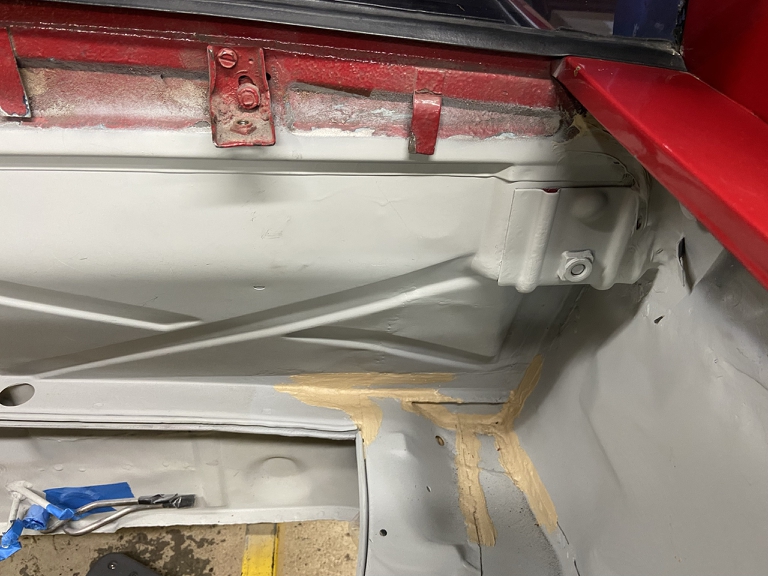 Inside passenger side. Clearly one hole shot and then someone decided to try again. Personally, I really enjoy it when the hardware is SAE rather than metric. It really gives the whole affair an air of I don't give a (IMG:style_emoticons/default/stromberg.gif), let's just get this pile back on the road. It also let's me use some of those SAE tools that don't get much love anymore (IMG:style_emoticons/default/laugh.gif) 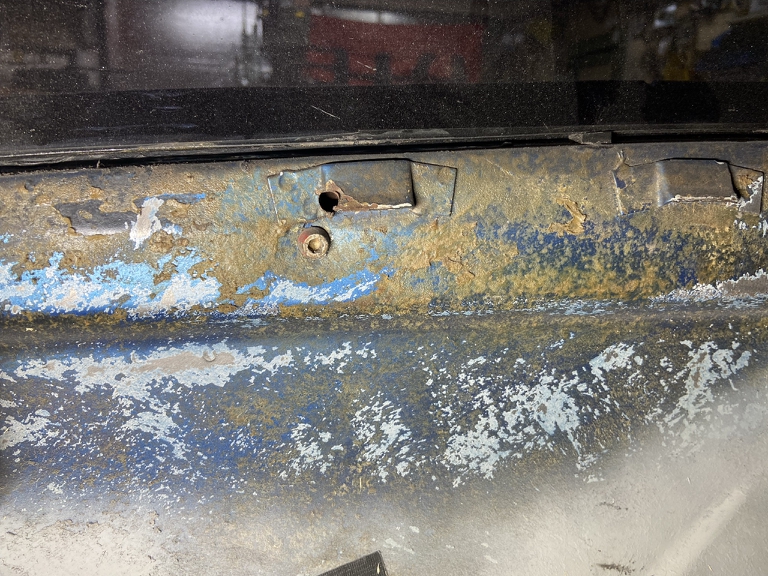 Driver side "fix": 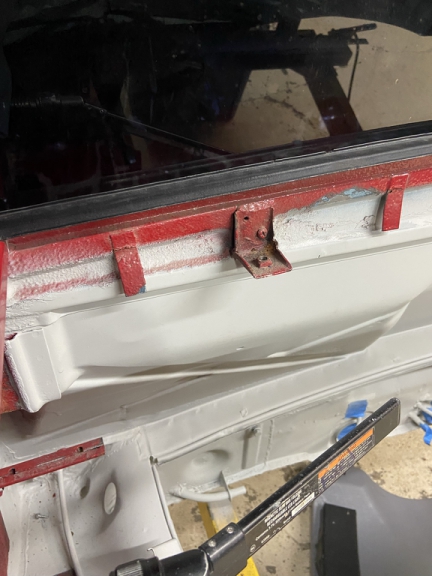 That would be bad enough but it gets worse after removing the brackets. Passenger side Swiss Cheese. I guess they did shoot more than just two holes (IMG:style_emoticons/default/screwy.gif) I'm betting the 1st "fix" was a couple of sheet metal screws that eventually let loose from letting the lid fly open repeatedly. That is probably what led to the genius idea of shooting a bolt all the way though to the interior. Brilliant! (IMG:style_emoticons/default/headbang.gif) 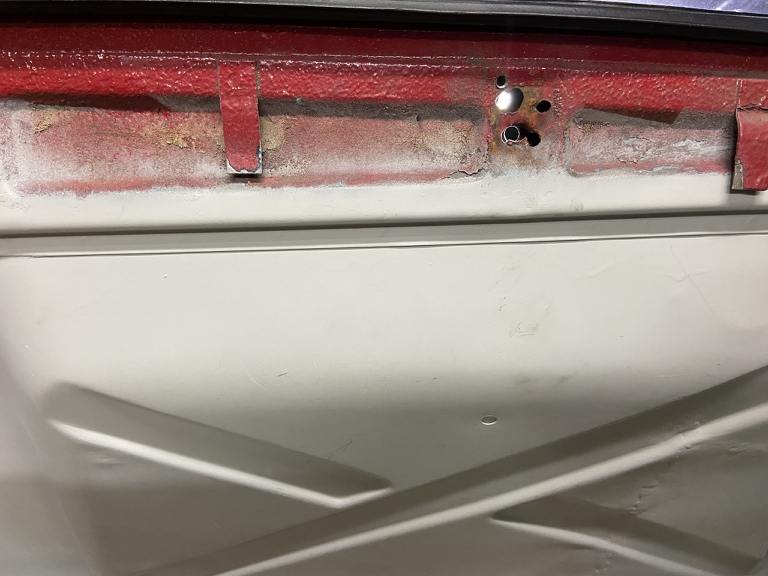 I think you see where this is going . . . wait for it . . . Driver side: 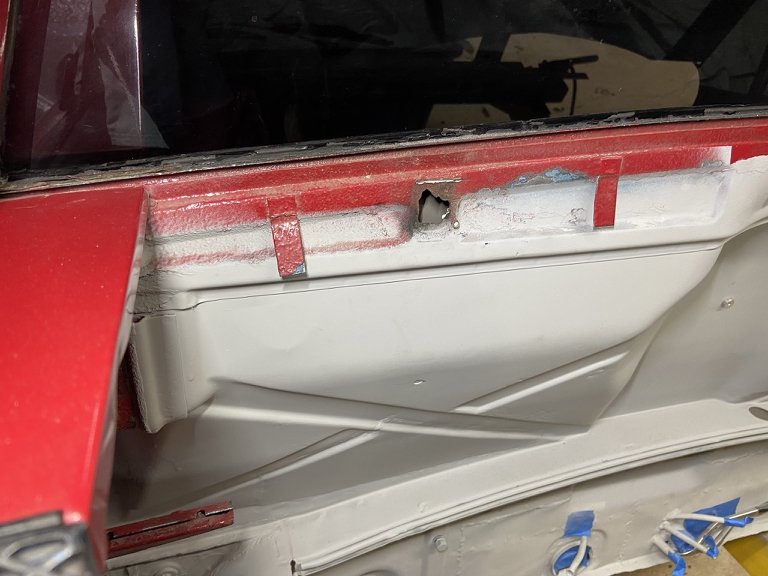 Clearly this had been stress cracked long ago before the red color change where we have a remnant of red overspray on top of rust. 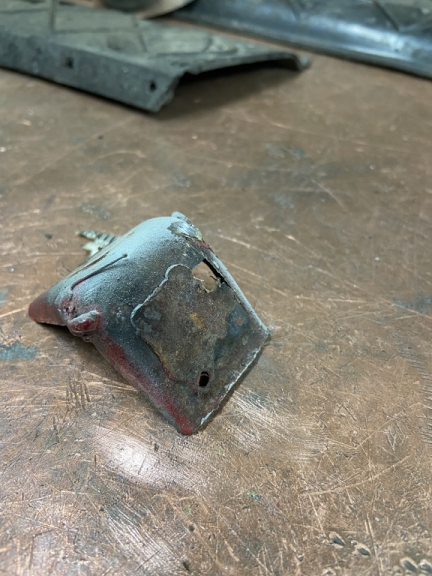 On a positive note, I already have RD brackets on hand to replace these The driver side came to me pre-stripped but luckily had just enough thread in there after retapping that allowed me to get the lid in there for mock-up and to figure out that the whole lid needs to move 2.5mm to the right. 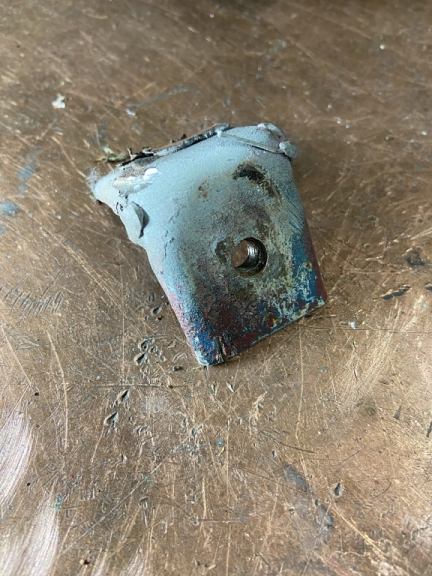 Time to get (IMG:style_emoticons/default/smash.gif) and (IMG:style_emoticons/default/welder.gif) |
|
|
|
|
2 User(s) are reading this topic (2 Guests and 0 Anonymous Users)
0 Members:

|
Lo-Fi Version | Time is now: 17th May 2026 - 09:21 AM |
Invision Power Board
v9.1.4 © 2026 IPS, Inc.