|
|
|
Porsche, and the Porsche crest are registered trademarks of Dr. Ing. h.c. F. Porsche AG.
This site is not affiliated with Porsche in any way. Its only purpose is to provide an online forum for car enthusiasts. All other trademarks are property of their respective owners. |
|
|

  |

| mgphoto |
 Mar 17 2019, 10:11 AM Mar 17 2019, 10:11 AM
Post
#61
|
|
"If there is a mistake it will find me"  Group: Members Posts: 1,491 Joined: 1-April 09 From: Los Angeles, CA Member No.: 10,225 Region Association: Southern California |
QUOTE Question: Does anyone know why the AA inner longitudinal has two seat belt bolts? My driver side and the cutout part only had one. I can't see the point in this. I'm likely to cut the 2nd out and fill the hole so that I only have one like the original. I bought the same part through Sierra Madre collection, it only had the single hole. 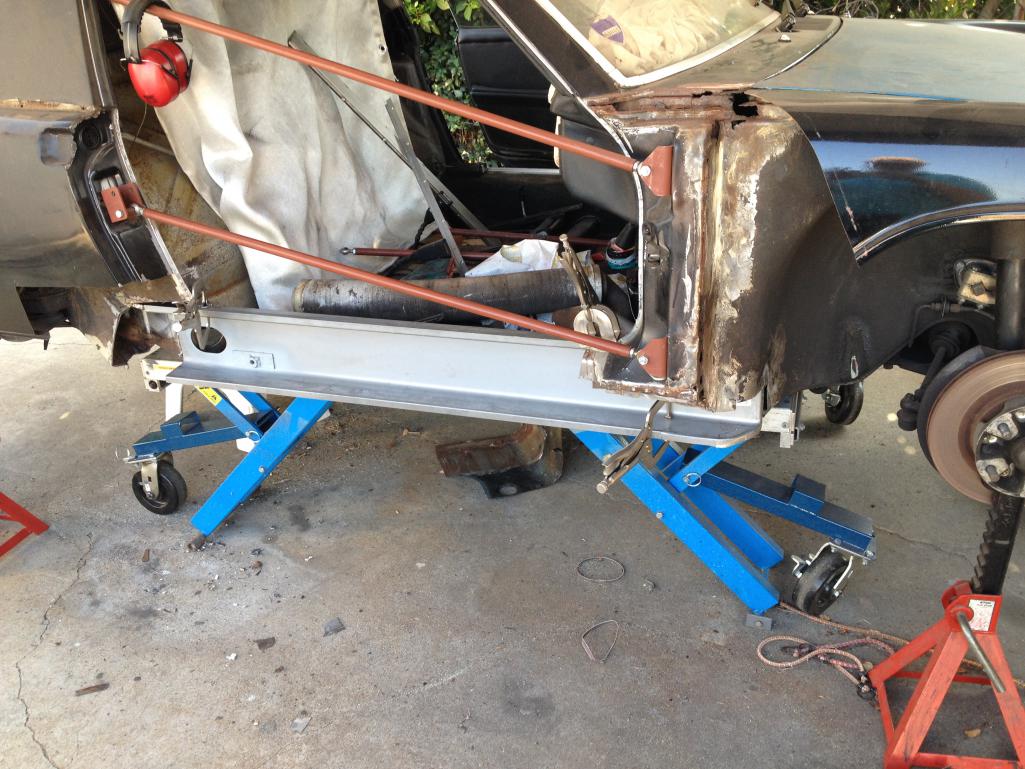 I bought it about 3 1/2 years ago. It was a challenge to install, you’re doing great, do you have a picture of the long from outside of the car? |
   |

 
|
| Superhawk996 |
Mar 17 2019, 10:20 AM
Post
#62
|
|
914 Guru Group: Members Posts: 7,935 Joined: 25-August 18 From: Woods of N. Idaho Member No.: 22,428 Region Association: Galt's Gulch |
@mgphoto
(IMG:style_emoticons/default/aktion035.gif) Nice project photo. I love seeing the rest of you guys that are tearing into and fixing up cars that would otherwise get scrapped. Not sure what you mean on the photo? Are you looking for a specific shot or angle. I will photo what ever I can to help you out. Thanks for confirmation of one hole on other aftermarket longitudinal parts!!! (IMG:style_emoticons/default/piratenanner.gif) |
|
|
|
| mgphoto |
Mar 17 2019, 10:41 AM
Post
#63
|
|
"If there is a mistake it will find me" Group: Members Posts: 1,491 Joined: 1-April 09 From: Los Angeles, CA Member No.: 10,225 Region Association: Southern California |
I would like to see a photo of your car sort of the same as mine, I want to see the position of the second hole.
|
|
|
|
| Superhawk996 |
Mar 17 2019, 11:42 AM
Post
#64
|
|
914 Guru Group: Members Posts: 7,935 Joined: 25-August 18 From: Woods of N. Idaho Member No.: 22,428 Region Association: Galt's Gulch |
QUOTE(mgphoto @ Mar 17 2019, 12:41 PM)  I would like to see a photo of your car sort of the same as mine, I want to see the position of the second hole. @mgphoto Here are two views. I can't get the innerwheel house / jack support out of the photo that is what currently holds it all in the car. If these photos don't help I can take a picture of just the long with a tape measure. My thought is the 2nd hole might have something to do with the early longitudinal on passenger side that had a fixed passenger seat and may have had the belt in slightly different spot. The other more cynical view is that in the 1970's we were all much thinner and maybe now we are all running out "Belts" out a few more notches than we used to? (IMG:style_emoticons/default/confused24.gif) 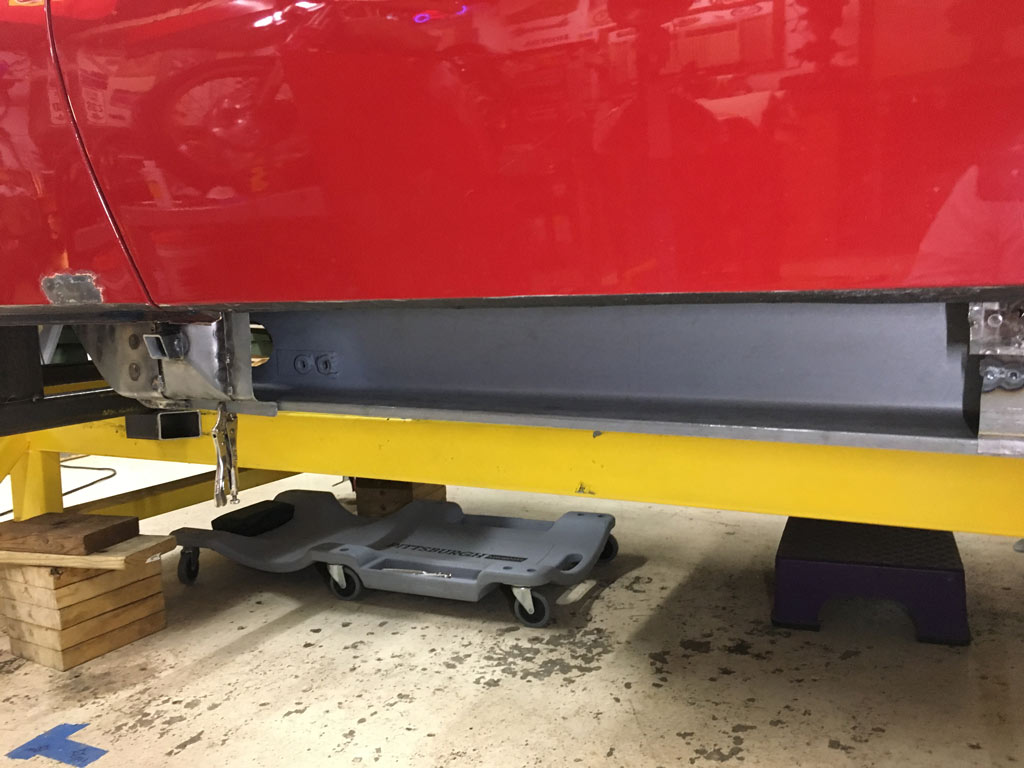  |
|
|
|
| Superhawk996 |
Mar 17 2019, 11:45 AM
Post
#65
|
|
914 Guru Group: Members Posts: 7,935 Joined: 25-August 18 From: Woods of N. Idaho Member No.: 22,428 Region Association: Galt's Gulch |
Photo of passenger side donor sheet metal rough trimmed & sandblasted.
Still need to fix a few of the holes from drilling spot welds and then will do a quick dip in metal prep. 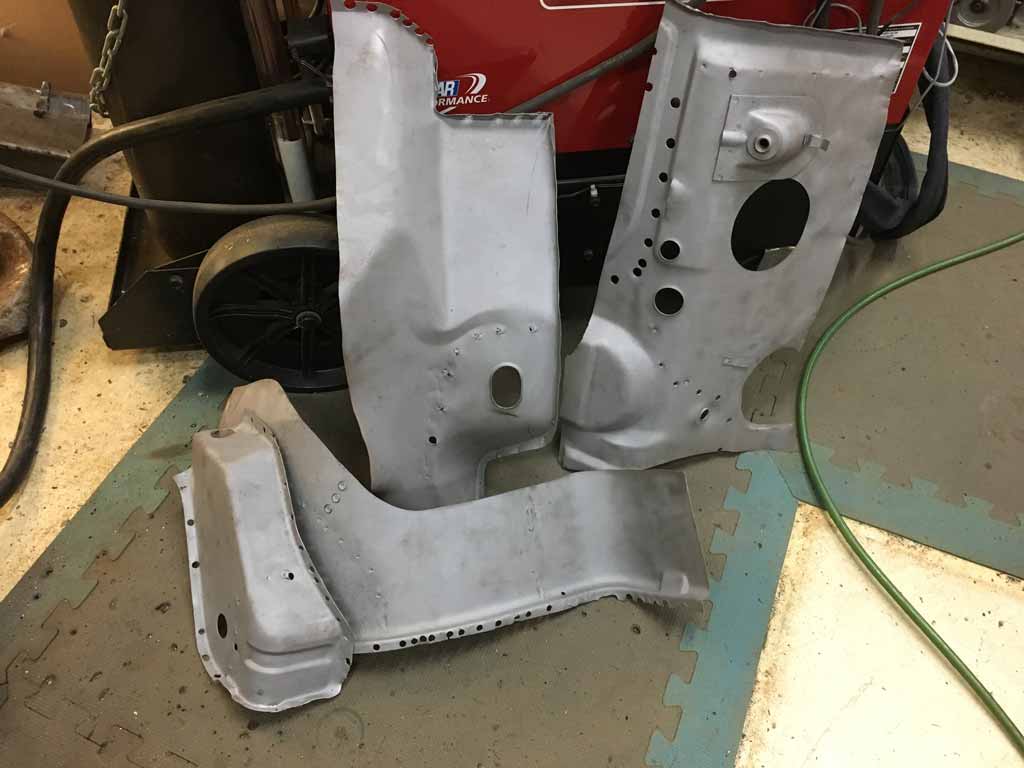 |
|
|
|
| bbrock |
Mar 17 2019, 12:20 PM
Post
#66
|
|
914 Guru Group: Members Posts: 5,269 Joined: 17-February 17 From: Montana Member No.: 20,845 Region Association: Rocky Mountains |
QUOTE(Superhawk996 @ Mar 17 2019, 11:42 AM) My thought is the 2nd hole might have something to do with the early longitudinal on passenger side that had a fixed passenger seat and may have had the belt in slightly different spot. The other more cynical view is that in the 1970's we were all much thinner and maybe now we are all running out "Belts" out a few more notches than we used to? (IMG:style_emoticons/default/confused24.gif) Early vs. late is the only thing I can think of, but I think your "Fat Ass Hypothesis" has merit. I concur that factory only had one hole but have no idea if they changed the position when they moved to movable passenger seats and American butts got bigger. |
|
|
|
| mgphoto |
Mar 20 2019, 11:54 AM
Post
#67
|
|
"If there is a mistake it will find me" Group: Members Posts: 1,491 Joined: 1-April 09 From: Los Angeles, CA Member No.: 10,225 Region Association: Southern California |
QUOTE(Superhawk996 @ Mar 17 2019, 10:42 AM) QUOTE(mgphoto @ Mar 17 2019, 12:41 PM) I would like to see a photo of your car sort of the same as mine, I want to see the position of the second hole. @mgphoto Here are two views. I can't get the innerwheel house / jack support out of the photo that is what currently holds it all in the car. If these photos don't help I can take a picture of just the long with a tape measure. My thought is the 2nd hole might have something to do with the early longitudinal on passenger side that had a fixed passenger seat and may have had the belt in slightly different spot. I don’t think so, I think the original mount was welded in the wrong place. It looks like the seatbelt mount might be to close to the bulkhead for it to swivel cleanly. Take your original carpet and see where the holes line up. Although I might not weld it up, it does leave an access hole. When I started, I got advice from a number of people on this board, one was Brad 914ltd, he said “belt and braces” paint the inside of the long and use cavity wax after assembly. The original longs have a rubber patch which covers the holes. The extra hole might be useful. |
|
|
|
| Superhawk996 |
Apr 6 2019, 04:17 PM
Post
#68
|
|
914 Guru Group: Members Posts: 7,935 Joined: 25-August 18 From: Woods of N. Idaho Member No.: 22,428 Region Association: Galt's Gulch |
Time to post a little progress for March.
Here is the problem: 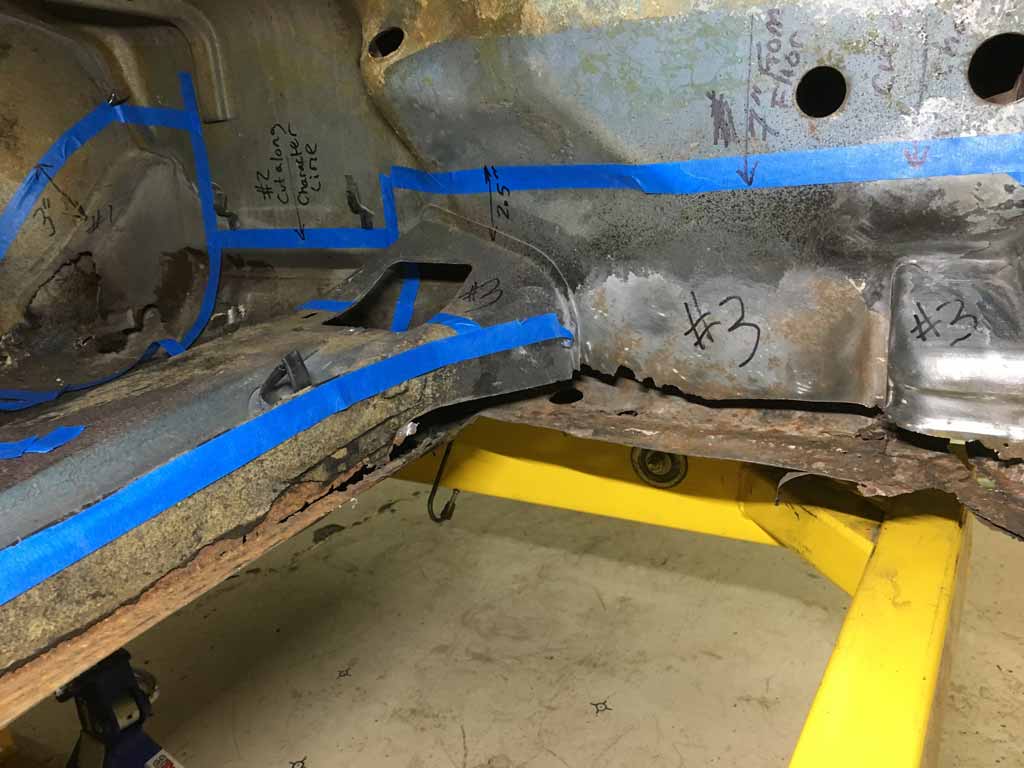 Everything starts with the simple task like getting ready to fit up the inner longitudinal. But then you have to deal with the fact that the metal it's supposed to mate to has been consumed by the tin worm. Then you have to stop the original task and then focus on this new one before you can do the main task. That is the way rustoration goes. I took 3 vacation days from work that butted up to a weekend and went to town. So with my newly prepped donor parts it's off to the races. Let the cutting begin. (IMG:style_emoticons/default/sawzall-smiley.gif) First victim - getting rid of the rear steering rack mount on the passenger side. Like the rear suspension console, it came to me "pre-stripped" by the previous owner. (IMG:style_emoticons/default/ar15.gif) That didn't really matter though because the sheetmetal was shot. Tunnel was also removed. Like all the other metal, it is shot at that transition between to the floorpan. I got tired of getting a kink in my back attempting to work around it & scratching my back on it! (IMG:style_emoticons/default/headbang.gif) Good riddance. (IMG:style_emoticons/default/piratenanner.gif) A donor tunnel has been sourced - we'll deal with that later (IMG:style_emoticons/default/biggrin.gif) 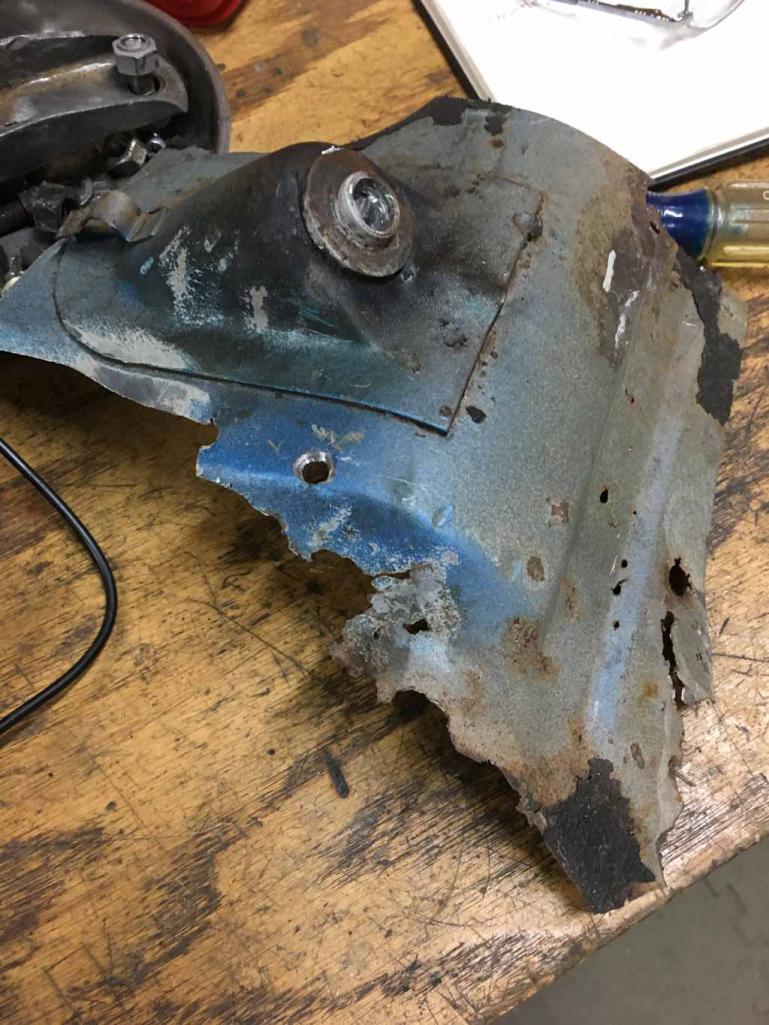 This car must have flexed and been as loose as the dickens given that the upper body sheetmetal is separated from the lower by rust though on the lower 1" all the way around. I often wonder how people don't notice chassis flex. (IMG:style_emoticons/default/unsure.gif) Garbage metal on the back side of the rear rack mount; absolutely no structure left here (IMG:style_emoticons/default/icon8.gif) 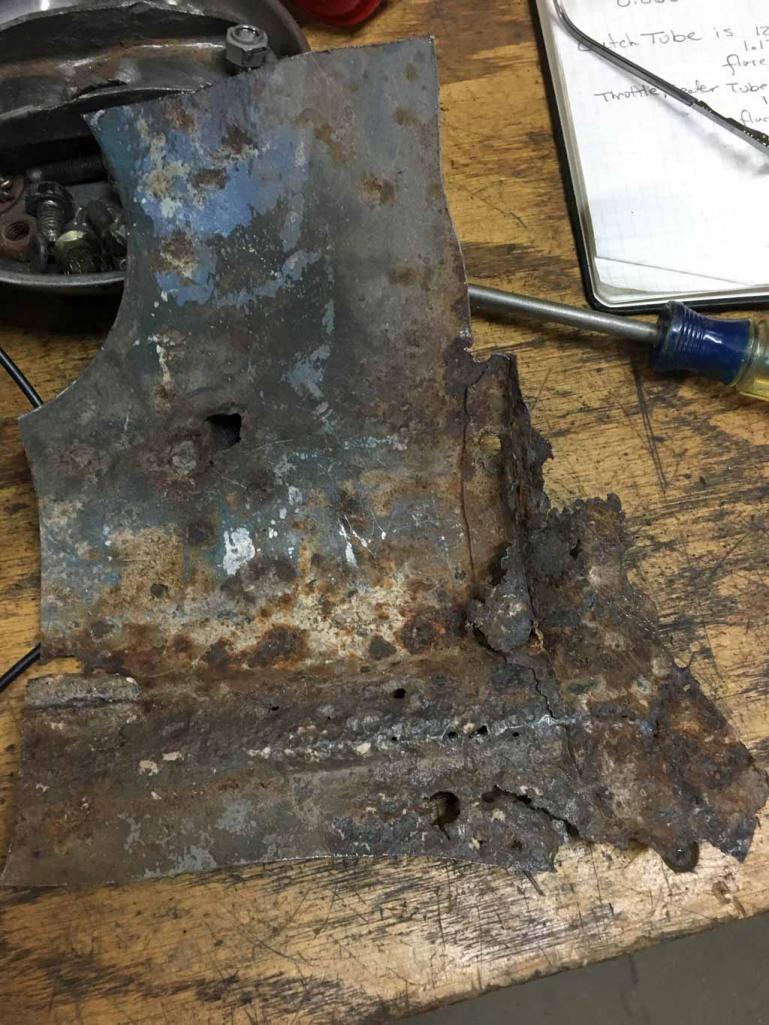 The donor metal I obtained was then fitted in on the passenger side floor 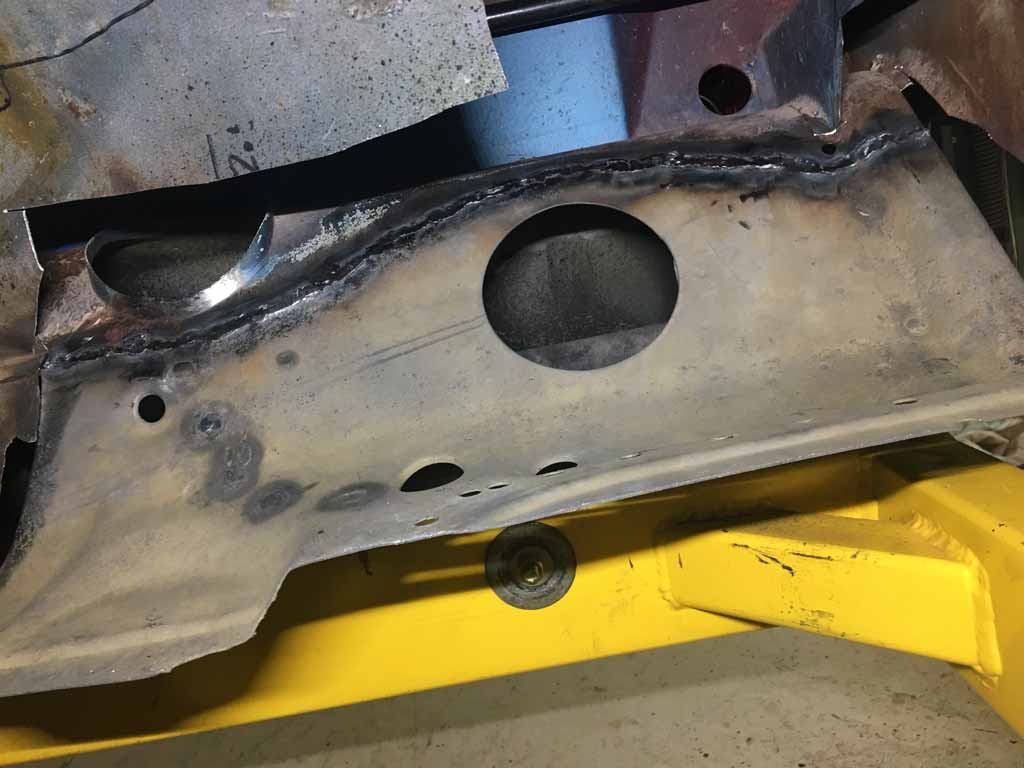 Then moved on to reworking the passenger side wheel wheel 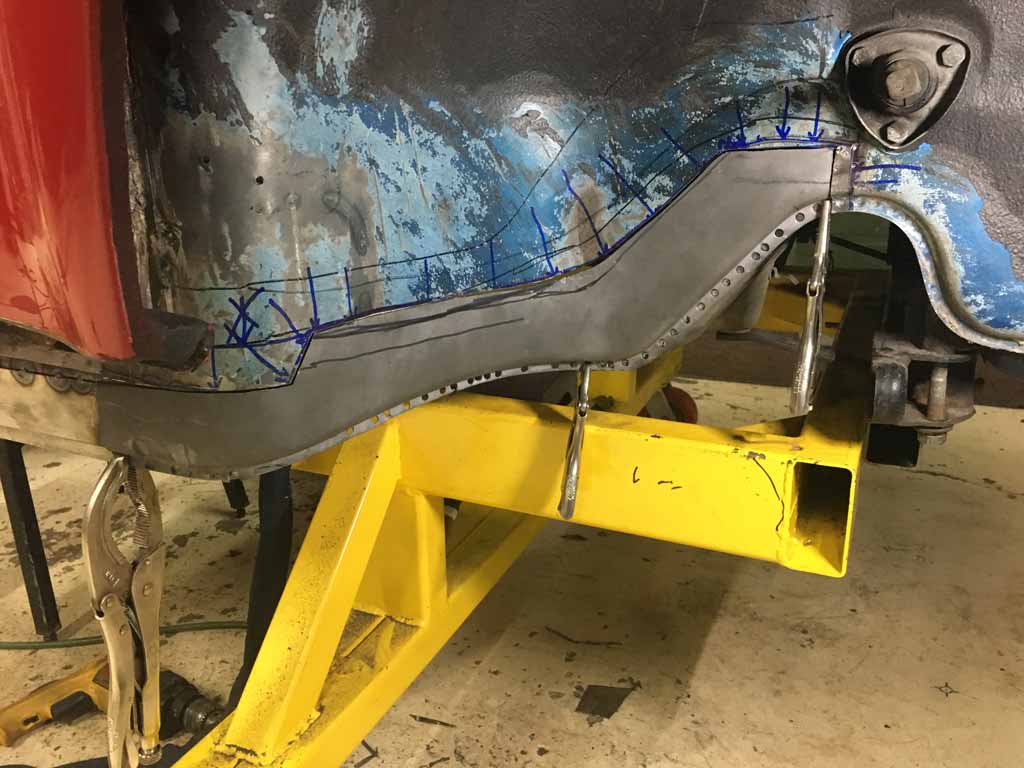 (IMG:style_emoticons/default/welder.gif) 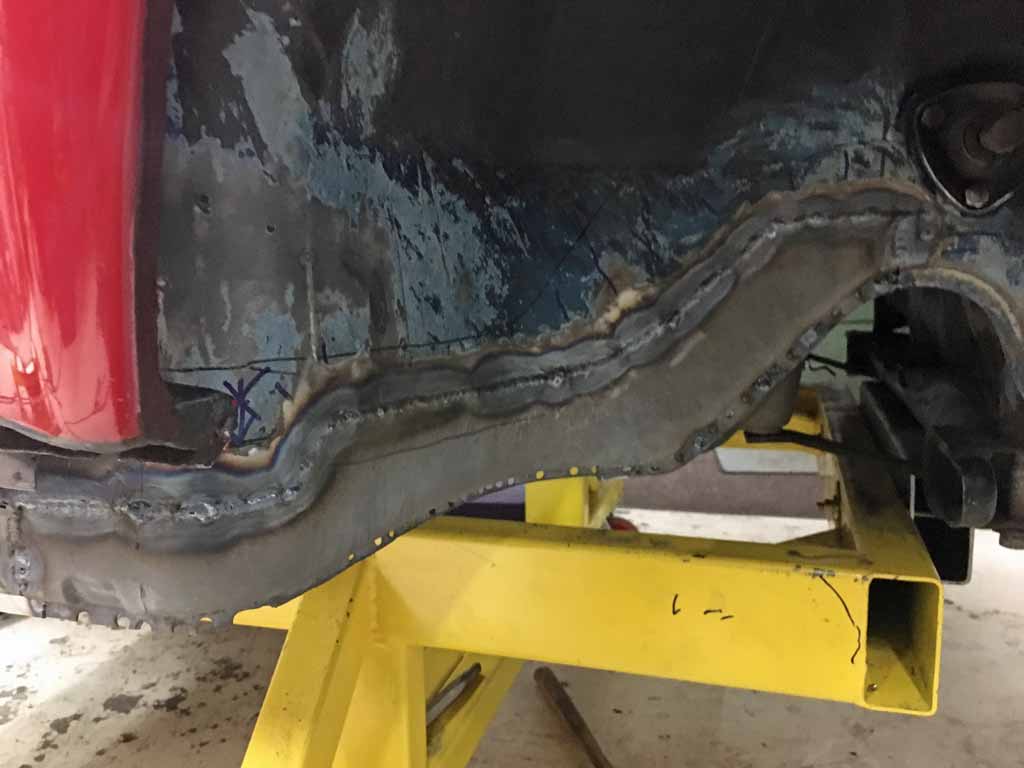 With that metal in place moved on to fixing the "frame" extension that comes in to the passenger compartment from under the fuel tank 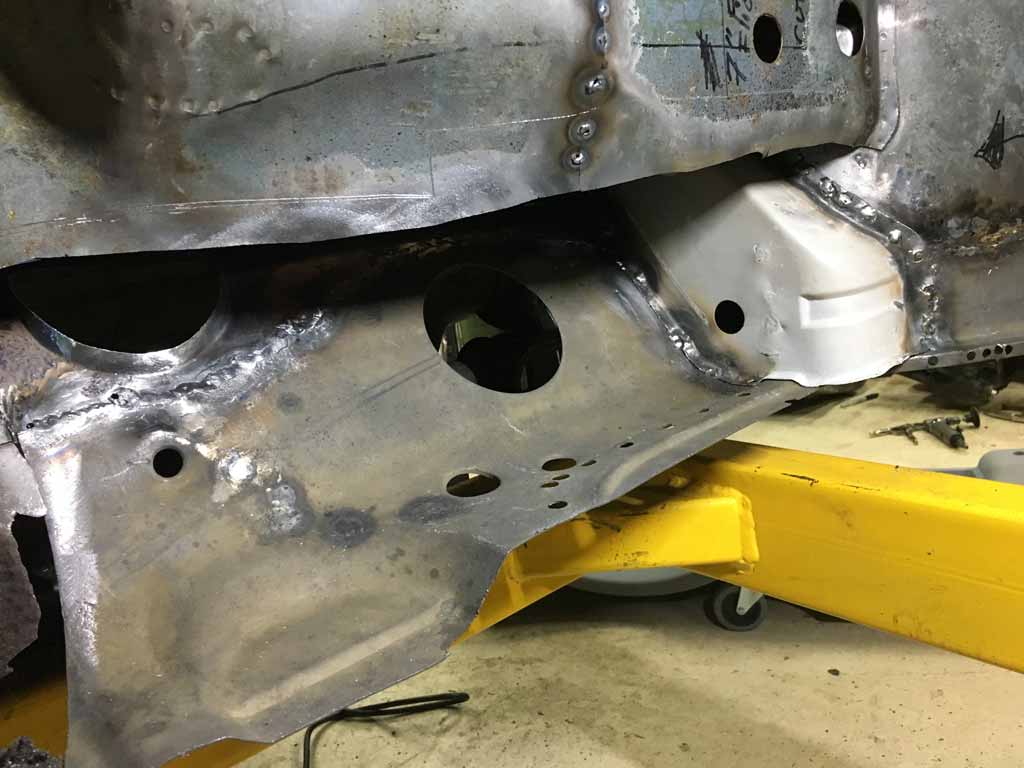 View from the Frunk 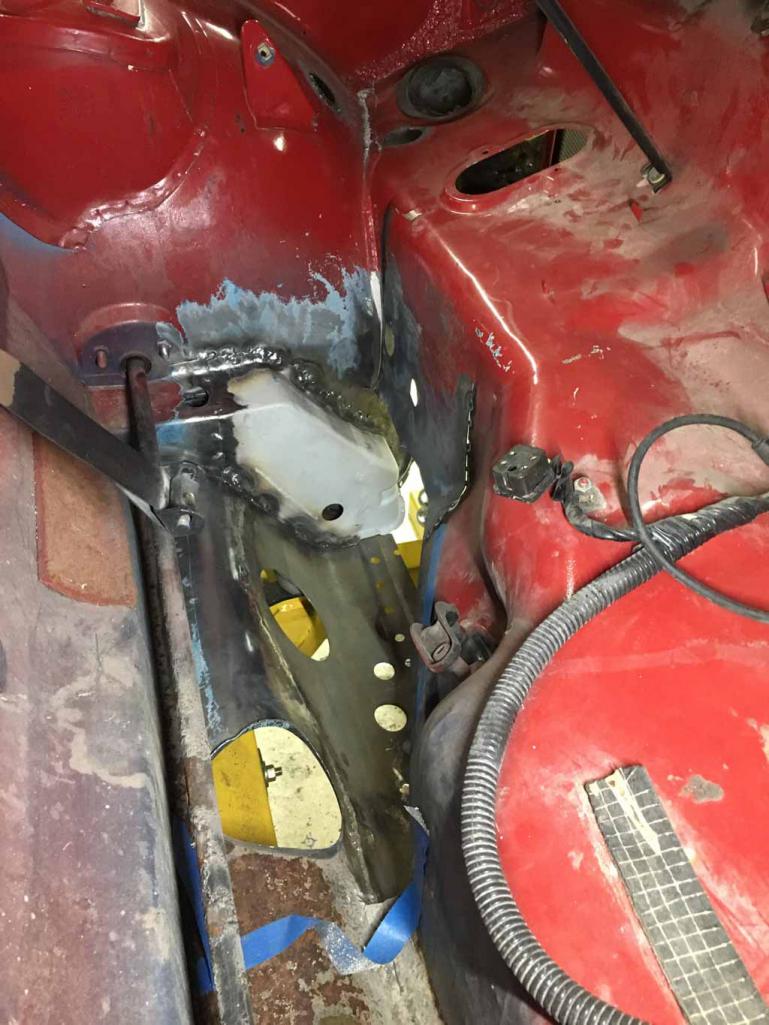 Spent some time fitting in the lower cowl and then returning my upper cowl access flap to its home. (IMG:style_emoticons/default/welder.gif) 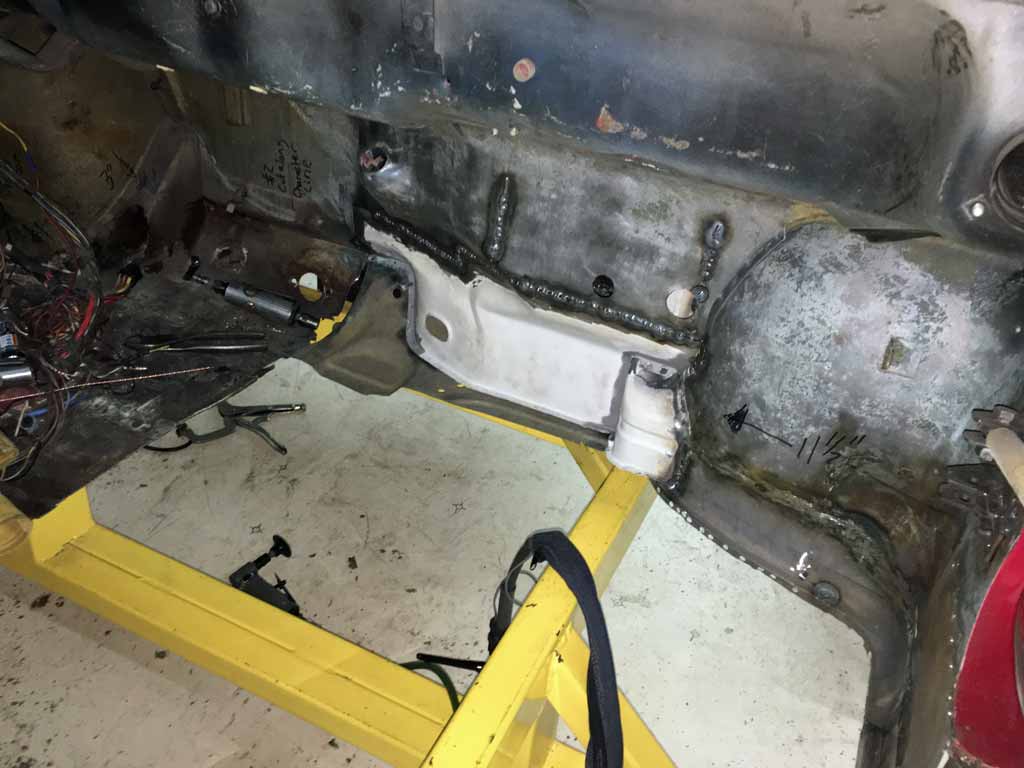 Although I'm making progress, I'm a well behind where I hoped to be by April. I think I'm about two months behind at this point. I would really like to keep this project contained to 1 winter season for the sheetmetal work but it's getting dicey. Not sure what I was thinking. (IMG:style_emoticons/default/screwy.gif) Gratuitous Parts Porn: 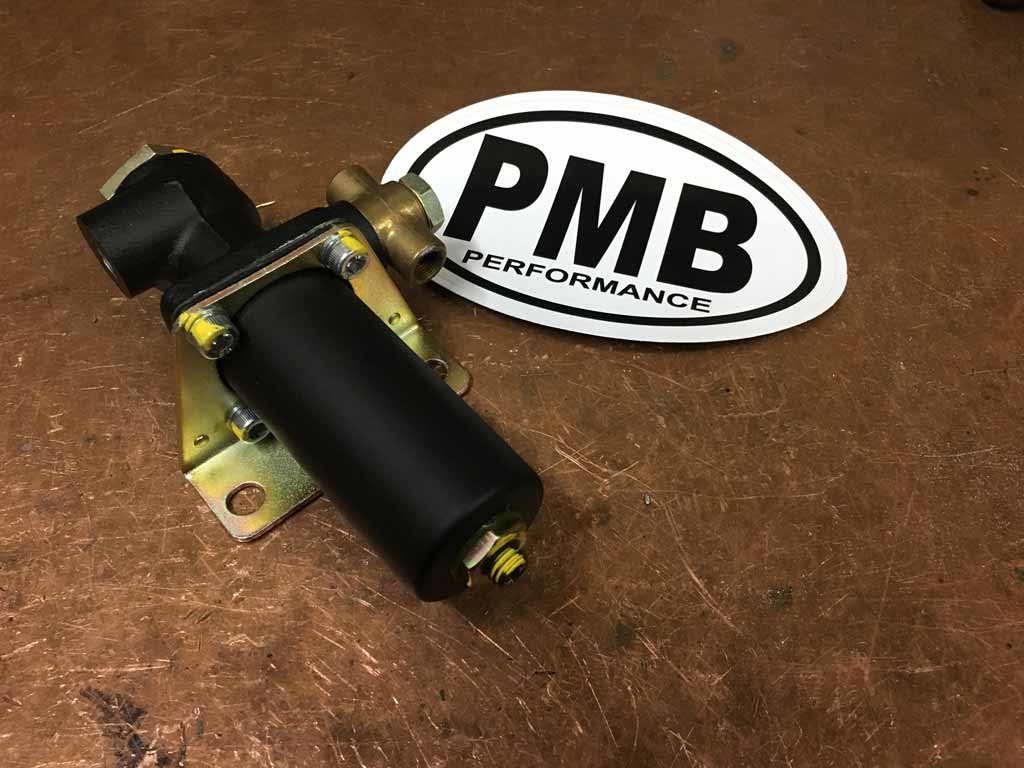 Got my proportioning valve back from restoration by PMB. Beautiful. @Eric_Shea |
|
|
|
| bbrock |
Apr 6 2019, 06:02 PM
Post
#69
|
|
914 Guru Group: Members Posts: 5,269 Joined: 17-February 17 From: Montana Member No.: 20,845 Region Association: Rocky Mountains |
Just your mark-up is a work of art. That's quite the puzzle you are piecing back together! I think your car would have defeated me. Incredible work. (IMG:style_emoticons/default/pray.gif)
|
|
|
|
| Superhawk996 |
Apr 6 2019, 06:26 PM
Post
#70
|
|
914 Guru Group: Members Posts: 7,935 Joined: 25-August 18 From: Woods of N. Idaho Member No.: 22,428 Region Association: Galt's Gulch |
QUOTE(bbrock @ Apr 6 2019, 08:02 PM) Just your mark-up is a work of art. That's quite the puzzle you are piecing back together! I think your car would have defeated me. Incredible work. (IMG:style_emoticons/default/pray.gif) Please. . . I cheated and used donor sheet metal to do the wheel well. I can't imagine how you had the patience to do those compound curves from scratch. (IMG:style_emoticons/default/beerchug.gif) |
|
|
|
| Superhawk996 |
Apr 6 2019, 06:35 PM
Post
#71
|
|
914 Guru Group: Members Posts: 7,935 Joined: 25-August 18 From: Woods of N. Idaho Member No.: 22,428 Region Association: Galt's Gulch |
I was saving my effort doing complex metal forming for motorcycle projects that are currently on hold while I do the 914.
Wife no longer willing to ride on the back of motorcycles. (IMG:style_emoticons/default/WTF.gif) Started this Norton Commando cafe in 2012. Metal fab still stuck at this state although I did get the engine and trans rebuilt and added into the mock up.  Previous aluminum tank of similar design. 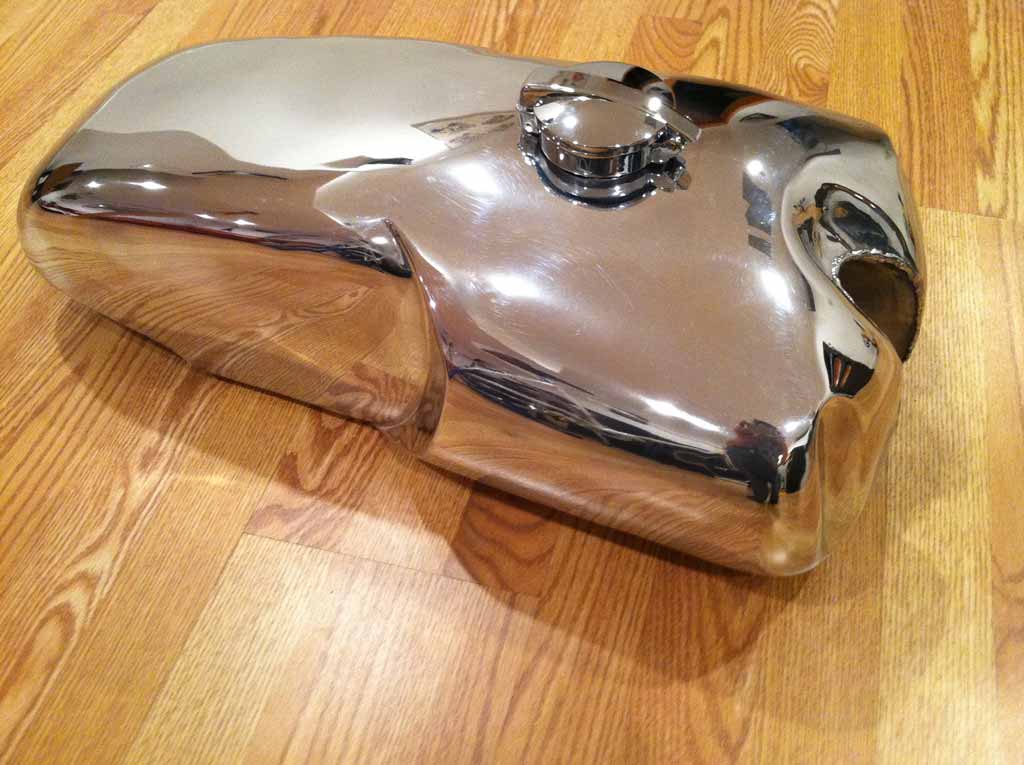 |
|
|
|
| Superhawk996 |
Apr 23 2019, 07:31 AM
Post
#72
|
|
914 Guru Group: Members Posts: 7,935 Joined: 25-August 18 From: Woods of N. Idaho Member No.: 22,428 Region Association: Galt's Gulch |
Been a little bit slow posting lately. Spring and yard work and honeydew list is competing for time.
Today I'm at the butcher having bits of of my face carved up to remove some minor skin cancer. The good news is I can catch up on my posts between butchering sessions. I am still working on the passenger side cowl to get that fixed up. Here is a before & after view. Attached image(s) 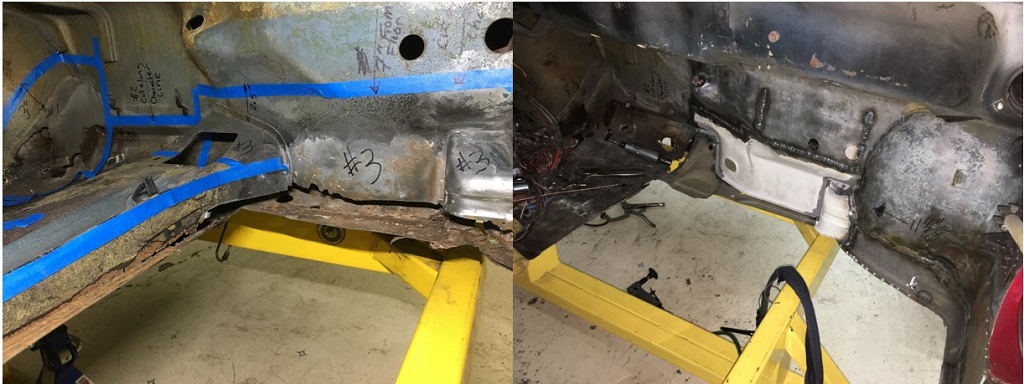
|
|
|
|
| Superhawk996 |
Apr 23 2019, 07:52 AM
Post
#73
|
|
914 Guru Group: Members Posts: 7,935 Joined: 25-August 18 From: Woods of N. Idaho Member No.: 22,428 Region Association: Galt's Gulch |
This cowl area has taken way too much time.
A few lessons that I've had to remember the hard way. I knew better but sometimes you get in a hurry and try to shortcut things. It rarely works. 1) Panel fit up is paramount. you have to have gaps that are 1mm or less to get a nice weld. 2) Use lots and lots of tack welds. Don't leave big gaps between the tacks. This helps eliminate warping and more importantly as the tacks increase in number, it yields more heat transfer paths to prevent burn through. When you think you have enough, double it! 3) Do very short welds between the sport welds with minimal filler. if more filler is needed its easier to add more later. I disregarded all three of these points and have regretted my choice! (IMG:style_emoticons/default/headbang.gif) I initially mis-trimmed the lower cowl a little bit under size. This lead to a 2-3mm gap. I should have just closed the gap up to 1mm and then had to bend the flanges down to the floorpan to make up for it. Instead, I fitted the flange to the floorpan and then let the gap be 2-3 mm. This was a critical mistake. Trying to fill a gap this large is just asking for trouble. I then did a awful lot of tack welds to bridge the gap . . . but not enough. I began to rush the job and wanted to get er' welded up. When I tried to close the open spaces between the tack welds I just ended up burning holes. This cowl sheet metal is only 0.036" thickness. Not very tolerant of being overheated. To further compound my mistakes, I ended up having to add lots of filler rod to keep from burning holes. This leads to big booger looking welds and the need to grind welds which is very time consuming. I then went back and ground down all the excess filler only to rediscover lots of pin holes that didn't fully fuse due to the large gap between the panels and the rapid addition of filler. Then tried to fill the pin holes and proceeded to blow more holes now that the weld was thinned excessively. This was a viscous circle. At some point you just realize you are making a mess and need to stop the madness. It took several welding sessions just forcing myself to slow down and to fix my mistakes as best I could. Ultimately I ended up putting a light in the gas tank area so I could see the pin holes and then carefully filled them. |
|
|
|
| Superhawk996 |
Apr 23 2019, 08:15 AM
Post
#74
|
|
914 Guru Group: Members Posts: 7,935 Joined: 25-August 18 From: Woods of N. Idaho Member No.: 22,428 Region Association: Galt's Gulch |
The other thing that led to rushing the job was all of this welding is out of position welding and needed to be done with me sitting or kneeling in uncomfortable positions on the floor while working in this area.
Nothing leads to rushing more than being uncomfortable. The other key thing is that is worth repeating is you can't weld what you can't see. some positions that I was forced into obscured my visibility to to the weld puddle. Not being able to see the puddle is a great way to let it get too hot and to burn through. To top all this off, my cowl area has an abundance of holes (other than rust) that needed to be fixed. 1) A/C holes were cut for lines to pass through. 2) Sheet metal screws were randomly punched though the cowl area to support the A/C unit itself under the dash. 3) whenever a previous owner wanted a ground connection, they just shot another screw though the cowl. I've started to address the large A/C line holes. The only problem here is this is overhead welding. Even more fun! 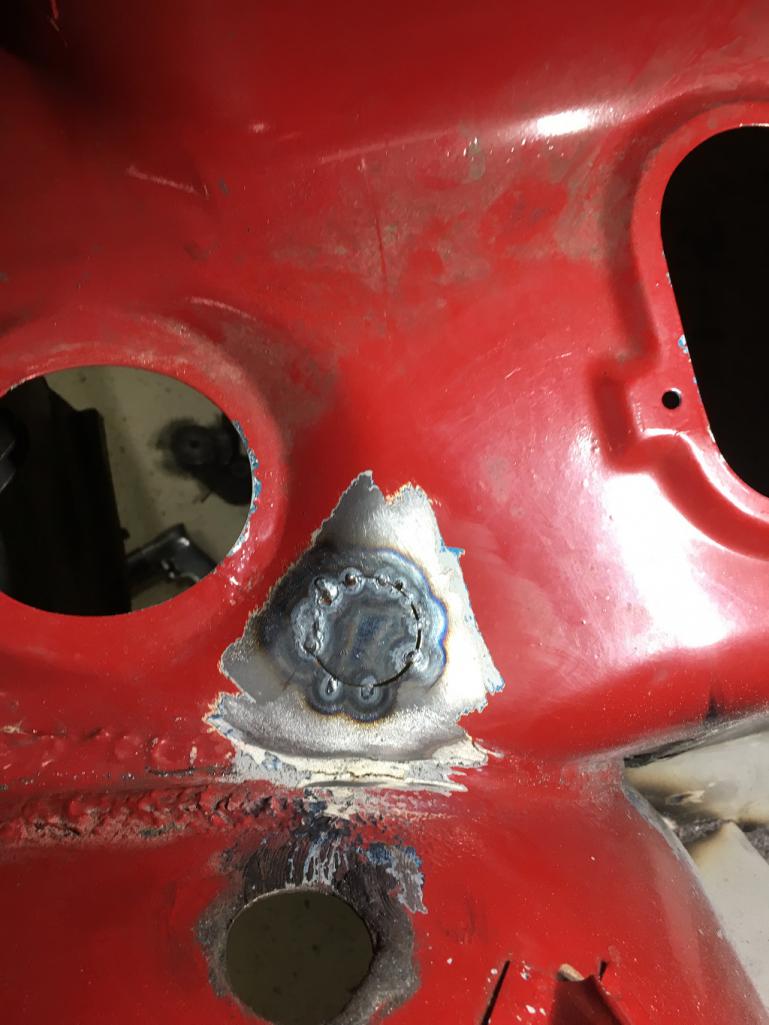 These holes are tucked right into the corner of the cowl & fender area. I tried to weld this in from above but my welding helmet prevents me from getting my face in a good position to see the weld puddle. You can see this by the tack weld at about the 7:00 position of the hole -- completely missed the weld gap! Cannot weld what you cannot see! . I resorted to doing the other tack welds from inside the passenger compartment and from below. I don't like this solution. I think my next try will be to use a gas lens and hang my Tungsten as far out as I can hoping to get better visibility to the weld. Trying to be slow and patient and find the best welding position to do this. If I start blowing holes in this area I'm screwed. |
|
|
|
| tygaboy |
Apr 23 2019, 08:32 AM
Post
#75
|
|
914 Guru Group: Members Posts: 5,837 Joined: 6-October 15 From: Petaluma, CA Member No.: 19,241 Region Association: Northern California |
(IMG:style_emoticons/default/agree.gif) with all the "can't see = can't weld". I'm living some of that now, too.
From my experience, I will say that in some of these situations, I've found MIG is my friend (vs TIG) in that it was easier to find a workable position, I didn't have to worry about how to work the pedal or find room/see the filler rod. If I could TIG everything, that would be my preference but... Your build is looking great, btw. Really nice work! |
 |
|
| Superhawk996 |
Apr 23 2019, 08:35 AM
Post
#76
|
|
914 Guru Group: Members Posts: 7,935 Joined: 25-August 18 From: Woods of N. Idaho Member No.: 22,428 Region Association: Galt's Gulch |
These are the easy ones. Just a quick dab or two of filler to weld up the sheet metal screw holes.
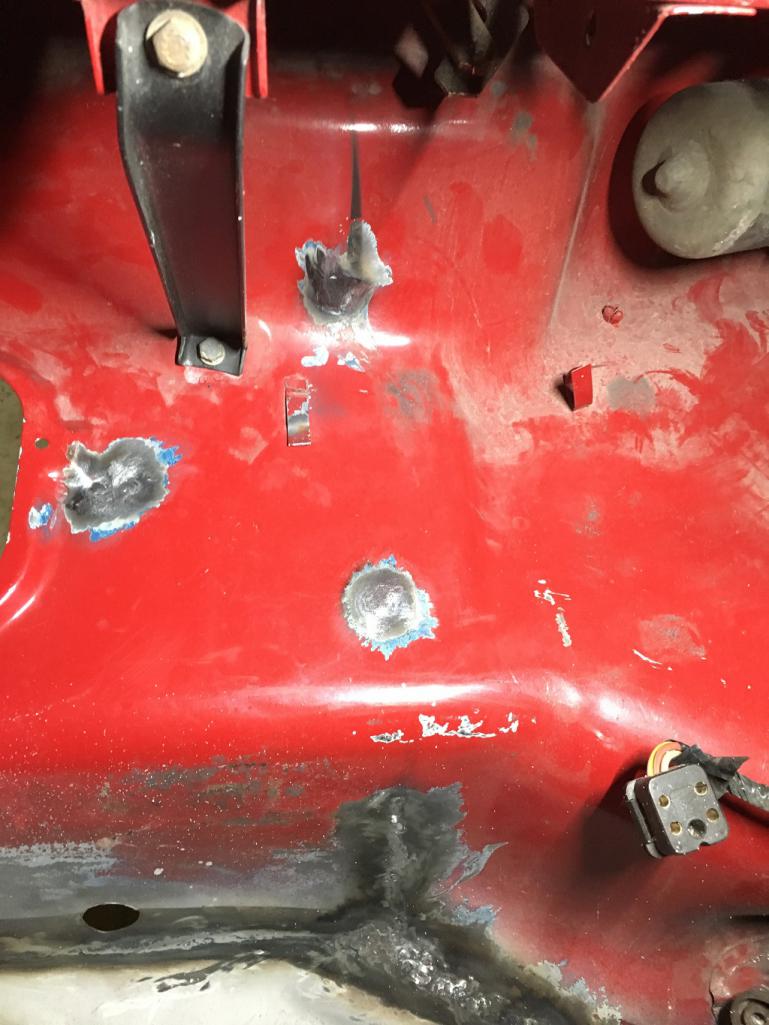 In just this photo, there are 3 holes! There are more on the driver side and one of them is about 0.5" diameter. I'm not sure what was run though that hole but is just the right size to be a a PITA. 1) it's behind / above the fuse block which will necessitate removal of the fuse block and wiring to access it. 2) 0.5" is just big enough that you can't easily trim a metal blank to fill the hole and therefore you just have to fill it by gradually adding filler around the perimeter of the hole until it can be closed up. Can't wait to get to that one. I'll defer until I start working on the driver side of the car. One point that I wanted to make as an engineer to those that might be thinking why worry about a few little holes. Don't forget that just in front of you is the gas tank. In a worst case crash / fire type accident, you don't want holes in the front cowl that could easily allow fuel and fire to enter the passenger compartment. I know that the plastic vents and paper heater tubes won't last long in a fire but they do buy you seconds to minutes of time. a big 1" hole like one of these A/C hose pass through holes would allow fuel and/or fire access to the passenger compartment completely unimpeded. Better safe than sorry! |
|
|
|
| Superhawk996 |
Apr 23 2019, 08:48 AM
Post
#77
|
|
914 Guru Group: Members Posts: 7,935 Joined: 25-August 18 From: Woods of N. Idaho Member No.: 22,428 Region Association: Galt's Gulch |
QUOTE(tygaboy @ Apr 23 2019, 10:32 AM) (IMG:style_emoticons/default/agree.gif) with all the "can't see = can't weld". I'm living some of that now, too. From my experience, I will say that in some of these situations, I've found MIG is my friend (vs TIG) in that it was easier to find a workable position, I didn't have to worry about how to work the pedal or find room/see the filler rod. If I could TIG everything, that would be my preference but... Your build is looking great, btw. Really nice work! @Tygaboy I'm a TIG lover due to the flexibility to weld so many types of metal and for the control it offers. If I burn holes I can't blame the equipment - It's my fault. But boy is it slow for this type of work! Every week I contemplate buying a MIG but I haven't rationalized it yet. I do think that if I do I would sell it once this is done and try to recoup some of the cost. For you other TiG lovers, I have to plug this product. It is a pressure sensitive Amptrol. No need to move finger to control amperage - just press harder or lighter. I really haven't done much out of position TIG welding in the past. Most of it has been on a nice comfortable bench. I couldn't live without this. When I first started to weld up my build cart, I was using my standard footpedal and doing all sorts of Yoga to try to weld and control the pedal with my knee, leg, elbow or whatever. I was pretty much impossible and led to the purchase of the TIG button. 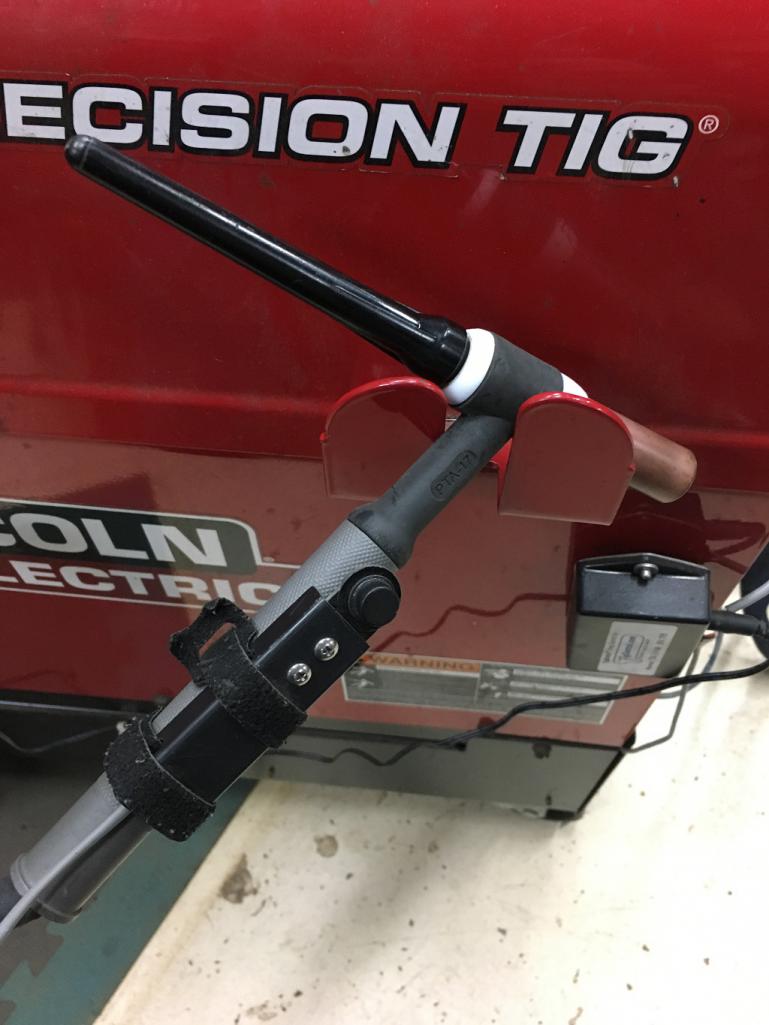 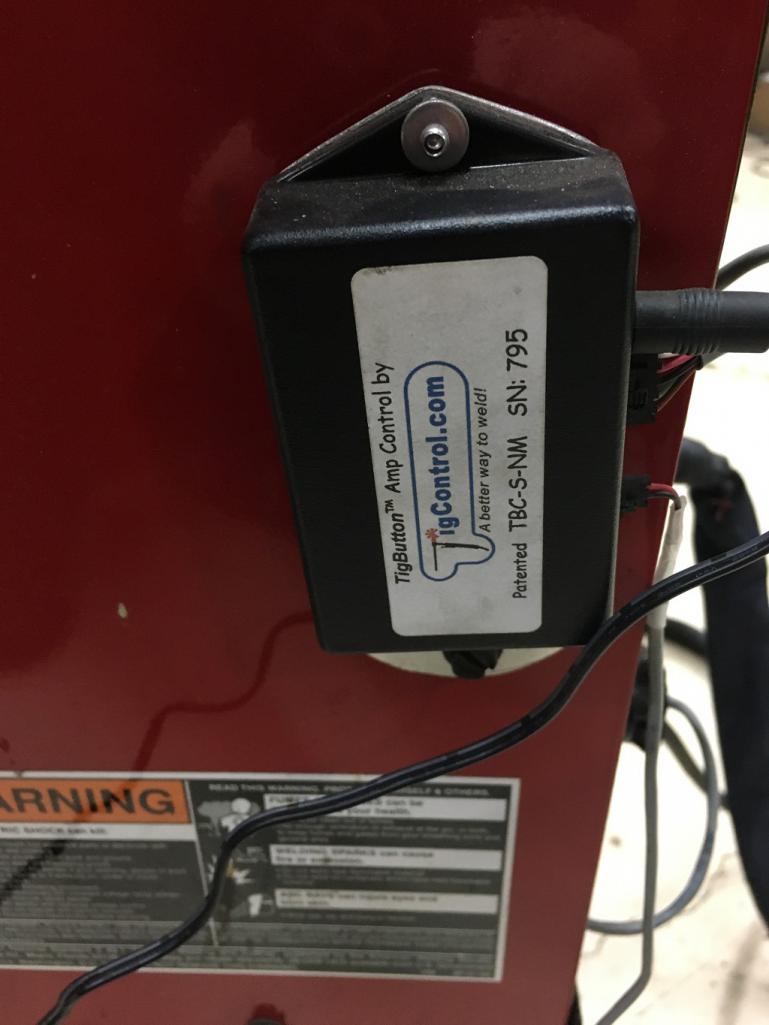 http://www.6061.com/tigbutton.htm |
|
|
|
| Superhawk996 |
Apr 23 2019, 09:04 AM
Post
#78
|
|
914 Guru Group: Members Posts: 7,935 Joined: 25-August 18 From: Woods of N. Idaho Member No.: 22,428 Region Association: Galt's Gulch |
The other work that has started in April is beginning to think about what to do with my engine.
As purchased it was setup with carbs. I've been thinking about returning to fuel injection. As part of that I pulled the tin to see if the cylinder head temperature (CHT) sensor was still there. As the subject of another thread, I found that the CHT is missing and even worse, the head isn't drilled and tapped for the CHT. It isn't on the cyl 1/2 side either. Apparently at some point the heads were swapped. Turns out that they are at least the proper 2.0L cylinder head as verified by part number. In the photo you can see the start of the proper 2.0L P/N 039 101 371A 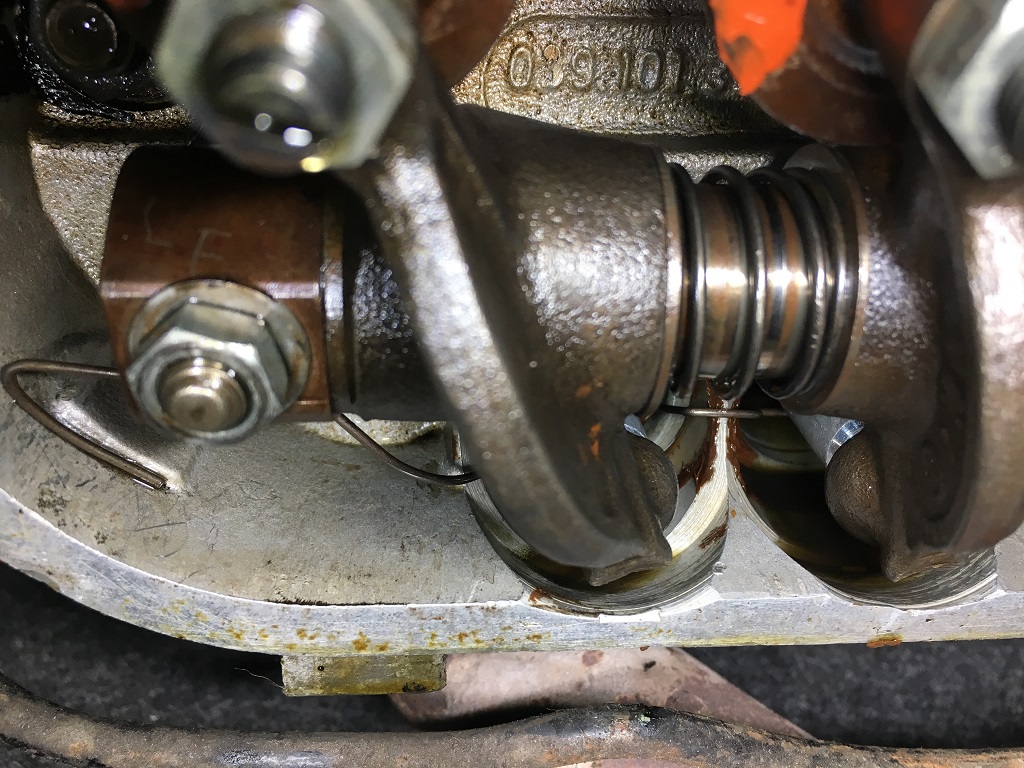 I pulled out my old broken 1.7L head from my original car just compare when I was in a panic thinking that they might not actually be a 2.0L head. Also notice that some goober welded up the breather hole. I guess I'll be doing some machine work! 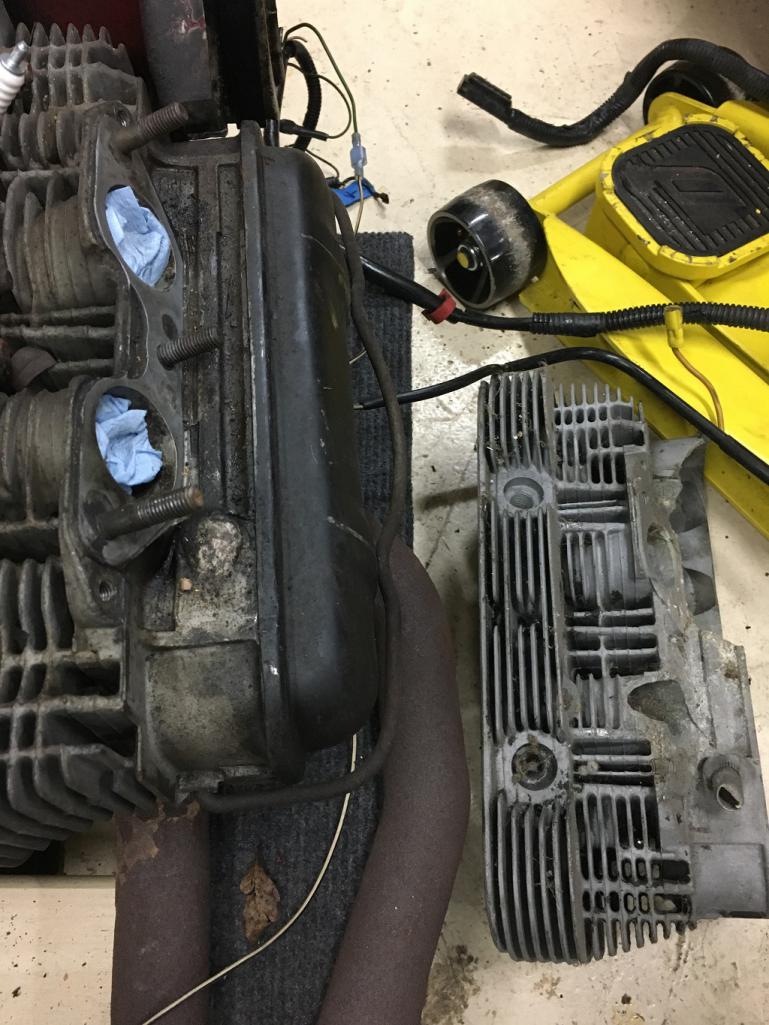 That 1.7L head was broken when my original 914 was rear ended. It has served as a learning bed for how to remove valves, valve guides, and how to weld cylinder heads! Still got some use again as a comparison to remind myself of what the difference looks like between 1.7L and 2.0L heads. My wife calls me a pack rat and can't understand why I would still have a cylinder head around from a car that was wrecked before the turn or the century. (IMG:style_emoticons/default/poke.gif) Women! (IMG:style_emoticons/default/screwy.gif) I still haven't dug into the engine but fully expect that the cam has been swapped given that the heads aren't original. My new engine yoke arrived yesterday. @Bbrock Thanks for the recommendation and helping me save $$ on this item! (IMG:style_emoticons/default/first.gif) |
|
|
|
| Superhawk996 |
Apr 23 2019, 09:27 AM
Post
#79
|
|
914 Guru Group: Members Posts: 7,935 Joined: 25-August 18 From: Woods of N. Idaho Member No.: 22,428 Region Association: Galt's Gulch |
Here is a bit of previous work. I removed the tunnel to better access the cowl for repair and because it was completely shot.
I figured it would be easier and a better repair to replace it completely rather than patch up what I had. Here is the dissection to show it's internal condition. 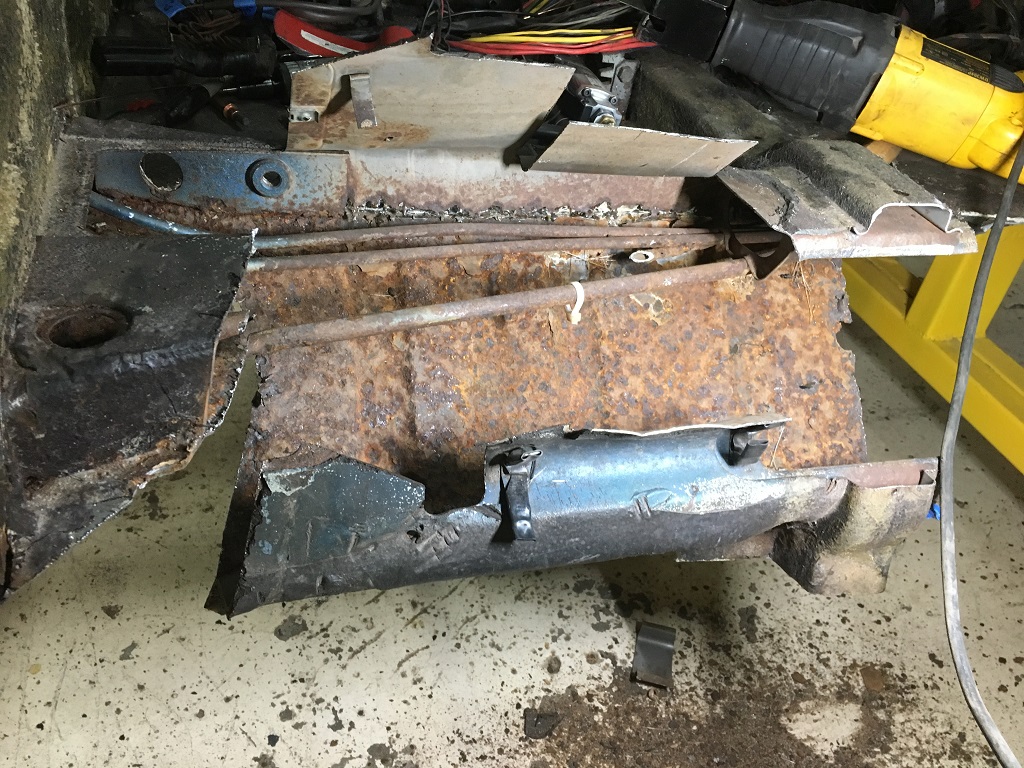 For any of you having problems removing and/or installing new throttle and/or clutch cables, don't rule out this possibility. 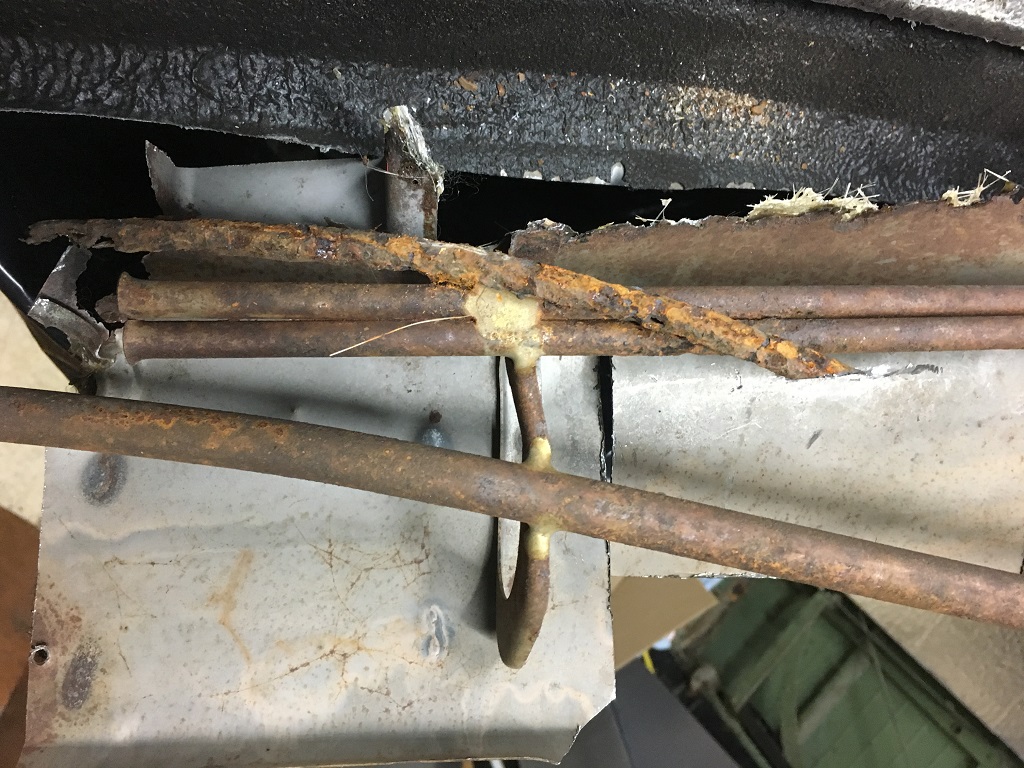 When I 1st was getting this car running, the throttle cable was stuck. When I pulled out the old cable, it hung up about half way out. I had to break it to get it out! In order to get the car running, I cut a hole in the tunnel, and cut out a section of the tube and just fished the cable up to the pedal sled. It was a quick fix but wouldn't have been a good long term solution. The photo above shows why! |
|
|
|
| Superhawk996 |
Apr 23 2019, 09:34 AM
Post
#80
|
|
914 Guru Group: Members Posts: 7,935 Joined: 25-August 18 From: Woods of N. Idaho Member No.: 22,428 Region Association: Galt's Gulch |
For all you guys that think just a little rust in the floor pan isn't a big deal, here is what the bottom of the tunnel looked like from the outside. There is always way more rust than what you can easily see.
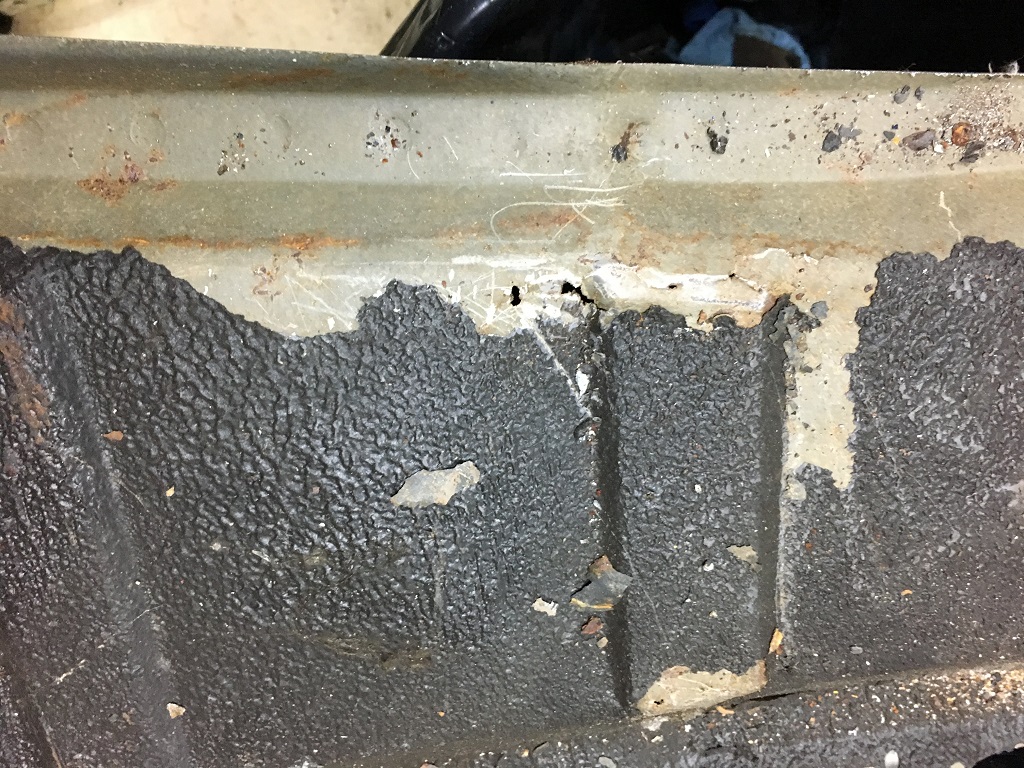 Random pin holes were hidden underneath the undercoating. Not much of the previously shown damage was visible when I purchased the car but it was there none the less. Keep in mind how pretty this car looked top side. Really nice looking cars can have extensive rust hidden within and/or not easily visible without detrimming the carpets, rocker panels, etc. Here is a reminder of how the car looked as purchased. Rust is Deceiving. (IMG:style_emoticons/default/happy11.gif) 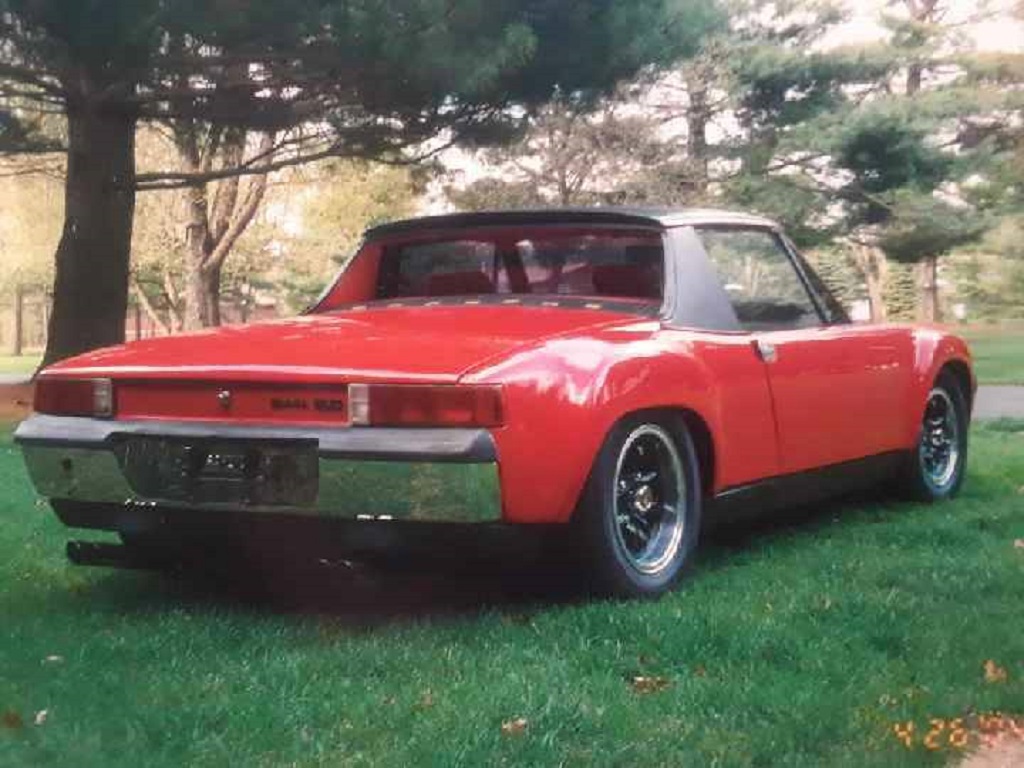 |
|
|
|
|
1 User(s) are reading this topic (1 Guests and 0 Anonymous Users)
0 Members:

|
Lo-Fi Version | Time is now: 4th July 2026 - 09:55 PM |
Invision Power Board
v9.1.4 © 2026 IPS, Inc.