|
|
|
Porsche, and the Porsche crest are registered trademarks of Dr. Ing. h.c. F. Porsche AG.
This site is not affiliated with Porsche in any way. Its only purpose is to provide an online forum for car enthusiasts. All other trademarks are property of their respective owners. |
|
|

  |

| Dave_Darling |
 Apr 23 2019, 12:05 PM Apr 23 2019, 12:05 PM
Post
#81
|
|
914 Idiot  Group: Members Posts: 15,353 Joined: 9-January 03 From: Silicon Valley / Kailua-Kona Member No.: 121 Region Association: Northern California |
Would a copper backer help with the blow-through issues? Or with some of the pin-hole problems?
I'm not a welder, but other folks on here have described how well a copper backer can help with some tricky welds. --DD |
   |

 
|
| Superhawk996 |
Apr 23 2019, 02:02 PM
Post
#82
|
|
914 Guru Group: Members Posts: 7,935 Joined: 25-August 18 From: Woods of N. Idaho Member No.: 22,428 Region Association: Galt's Gulch |
QUOTE(Dave_Darling @ Apr 23 2019, 02:05 PM)  Would a copper backer help with the blow-through issues? Or with some of the pin-hole problems? I'm not a welder, but other folks on here have described how well a copper backer can help with some tricky welds. --DD Indeed it does. That was part of my slow down and do it right solution. The problem was holding the copper in place given that I can't hold it with vise grips and I can't "reach around" the cowl to hold while I weld. I ended up using a couple of rare earth magnets to hold the copper in place. Problem is the heat of welding then destroys the magnet. Doh! If I got desperate I was going to use cleco's to hold the copper in place but that would have entailed drilling 1/8" holes to use the cleco. That seemed like two steps forward and one step back since I would have to then fill the 1/8" holes. Arguably, had I just backed the large gap with the copper in the 1st place, I could done the weld, and fixed the cleco holes all in less time then I spent blowing holes, creating pin holes, and then doing fix it work. Lesson learned (again (IMG:style_emoticons/default/blink.gif) ) - taught by the school of hard knocks. (IMG:style_emoticons/default/headbang.gif) Hopefully someone reads this and learns from it and/or maybe by writing it down I'll follow my own advice next time. |
 |
|
| Superhawk996 |
Apr 28 2019, 04:49 PM
Post
#83
|
|
914 Guru Group: Members Posts: 7,935 Joined: 25-August 18 From: Woods of N. Idaho Member No.: 22,428 Region Association: Galt's Gulch |
Well since I'm not supposed to be doing any heavy lifting per doctors orders, I decided to teardown my engine instead of doing bodywork with all the welding and grinding dust to get in the stitches in on my face.
Doc said not to lift more than 5 lbs. I didn't - the hand winch did. (IMG:style_emoticons/default/biggrin.gif) Pretty uneventful weekend but I'm still sticking with the I hate previous owners rant. (IMG:style_emoticons/default/ar15.gif) When I pulled the oil breather off the top of the case I was horrified. Here's what I saw. Worse than the rust debris / garbage there is some sort of round metal object in here. Luckily it was too big to ever fall into the case. 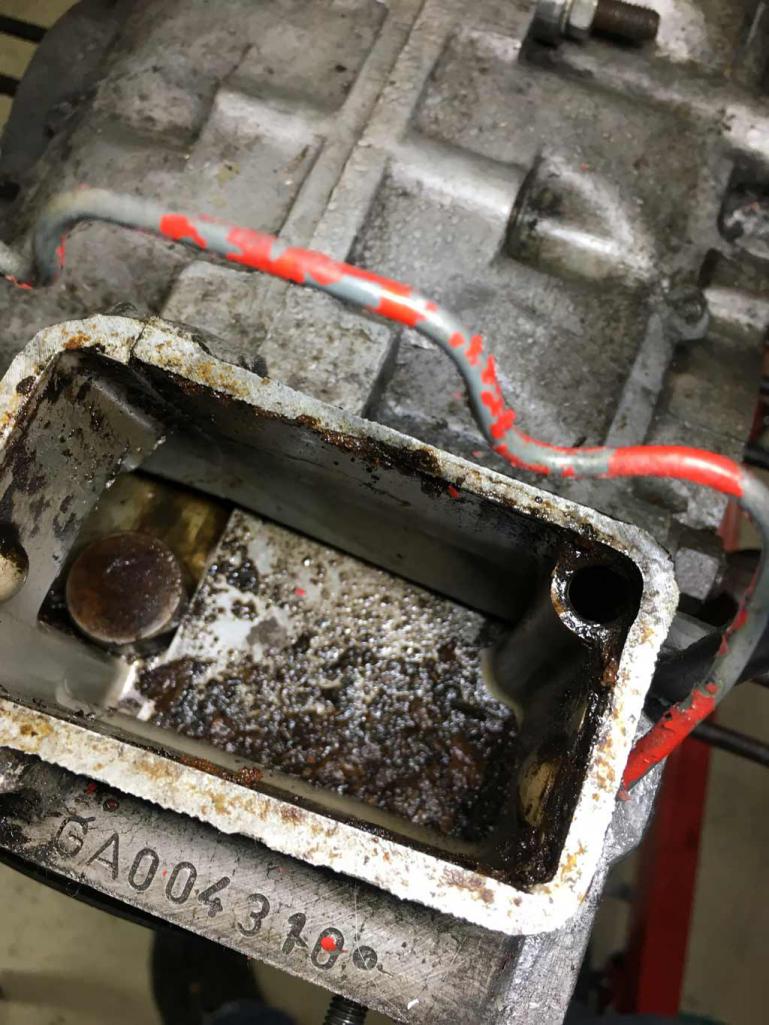 I have no idea what this is or where it came from. Any ideas? Here are two views of it 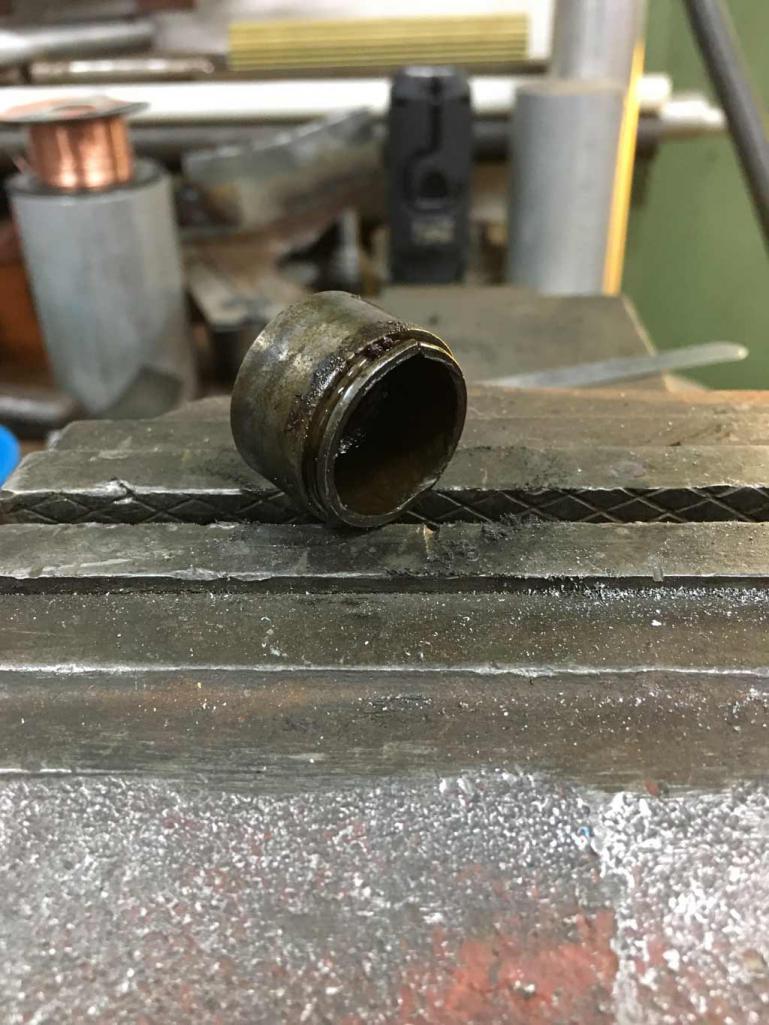 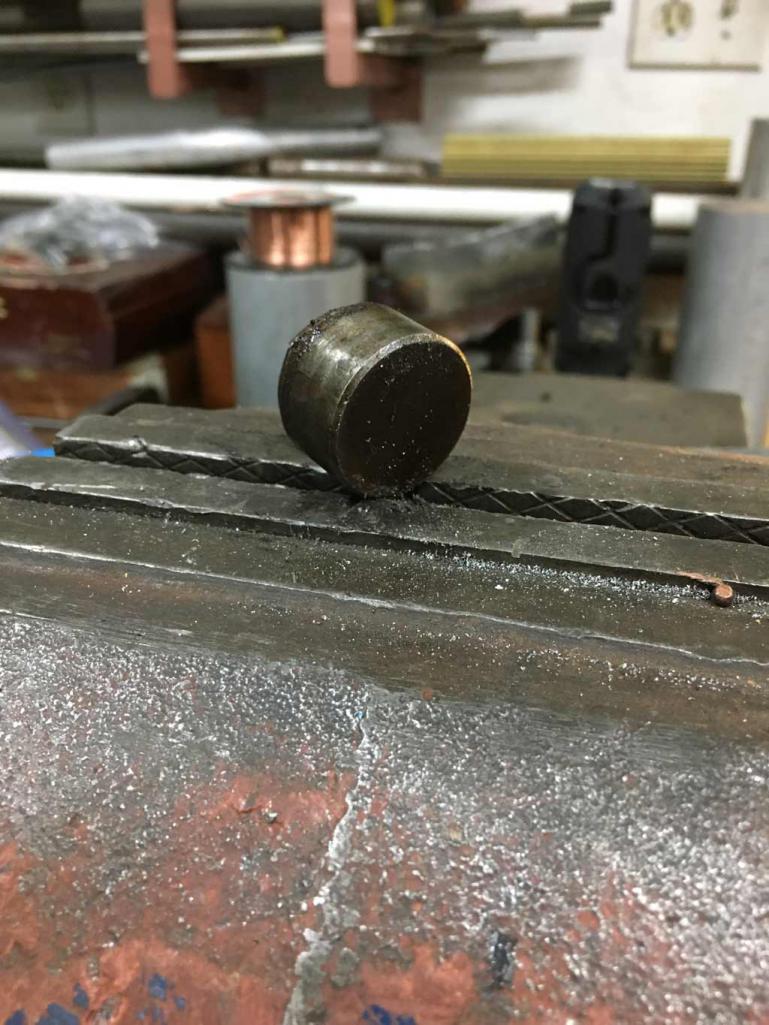 |
|
|
|
| Superhawk996 |
Apr 28 2019, 05:03 PM
Post
#84
|
|
914 Guru Group: Members Posts: 7,935 Joined: 25-August 18 From: Woods of N. Idaho Member No.: 22,428 Region Association: Galt's Gulch |
On a more positive note. Most of the other engine components are in pretty good shape upon 1st look.
Lots of oil leaking on the case from push rod tubes, some weepage at the base of the cylinders. Crank seals are hard as rocks and leaking profusely from getting it running and the brief neighborhood drive. Oil cooler seals were hard too and leaking. Oil pressure sensor hole is indeed stripped and leaking and will need to be re-tapped. Overall I'm relieved to find the cylinder heads are 2.0L parts and I think the valves may be original. IIRC the exhaust valves with the little dimple in the center are the original 2.0L sodium filled valves. I'm not sure - have to do so research on that. Regardless, all valves will get replaced at rebuild. 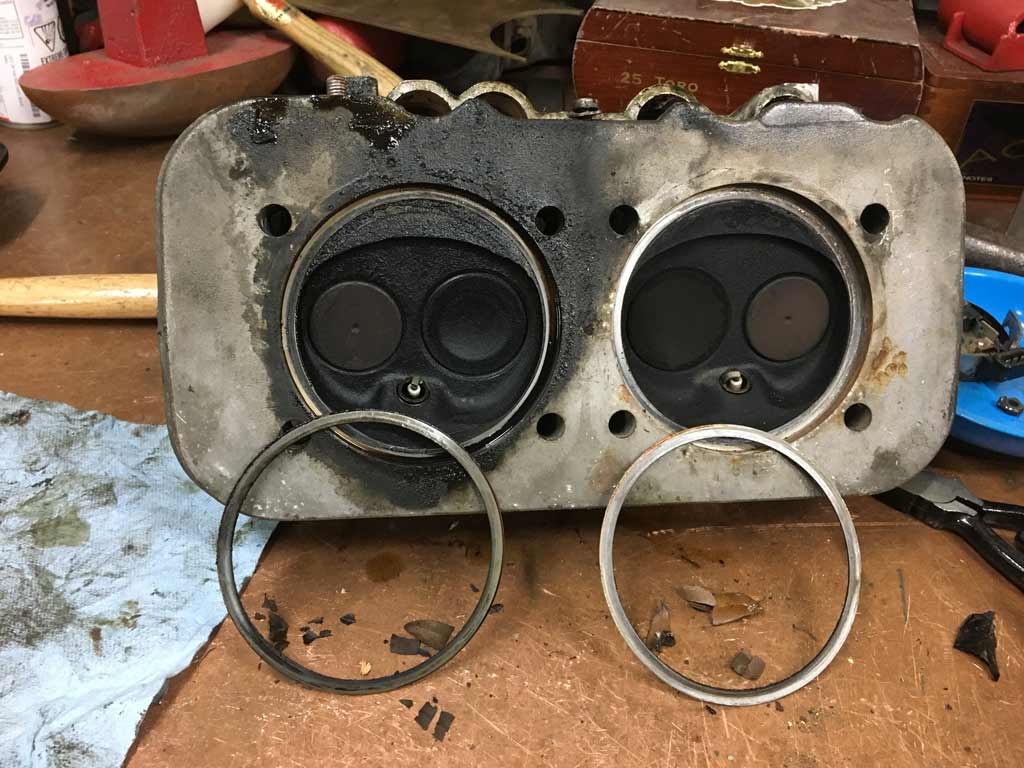 I also was happy to find the exhaust stud that I knew was missing appears to actually be a pulled timesert. The hole appears to have been drilled properly by a machine shop since it's located properly and not offset to the original stud bore. 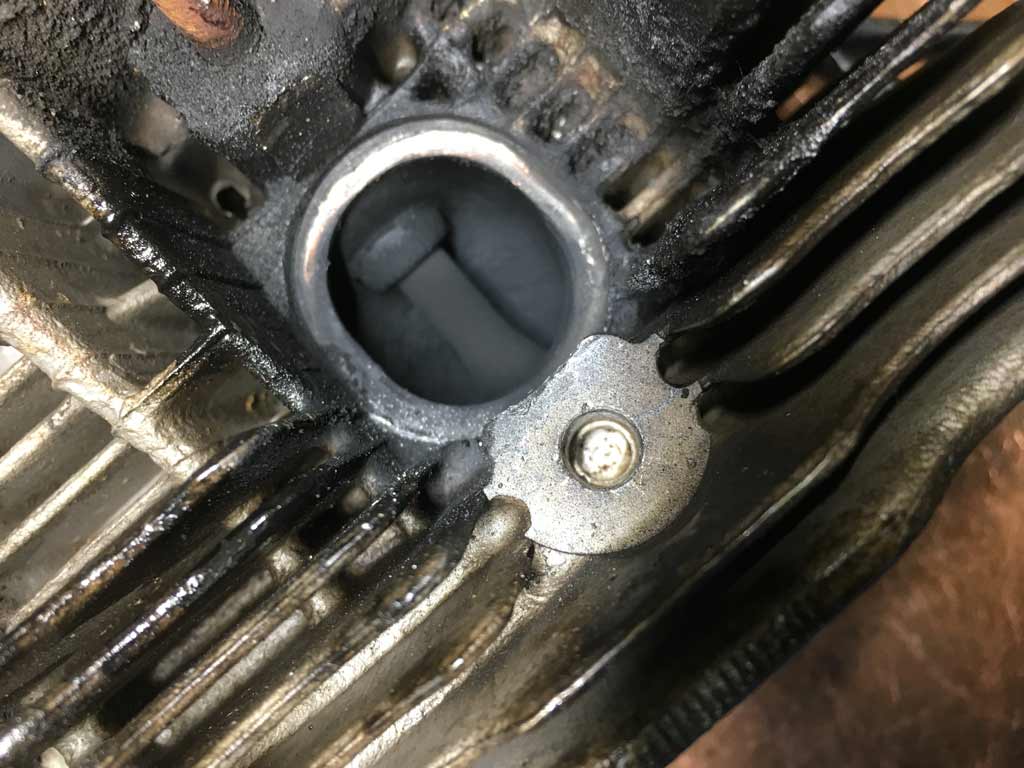 A couple of the cylinders are scored and one appear to be pretty corroded on the bottom of the bore. Probably from the long period of storage and condensation inside the cylinder forming. New pistons and cylinders planned so not a big deal. Was also happy to find the cylinders are 94mm and not some big bore conversion that machined the case or the heads. (IMG:style_emoticons/default/piratenanner.gif) 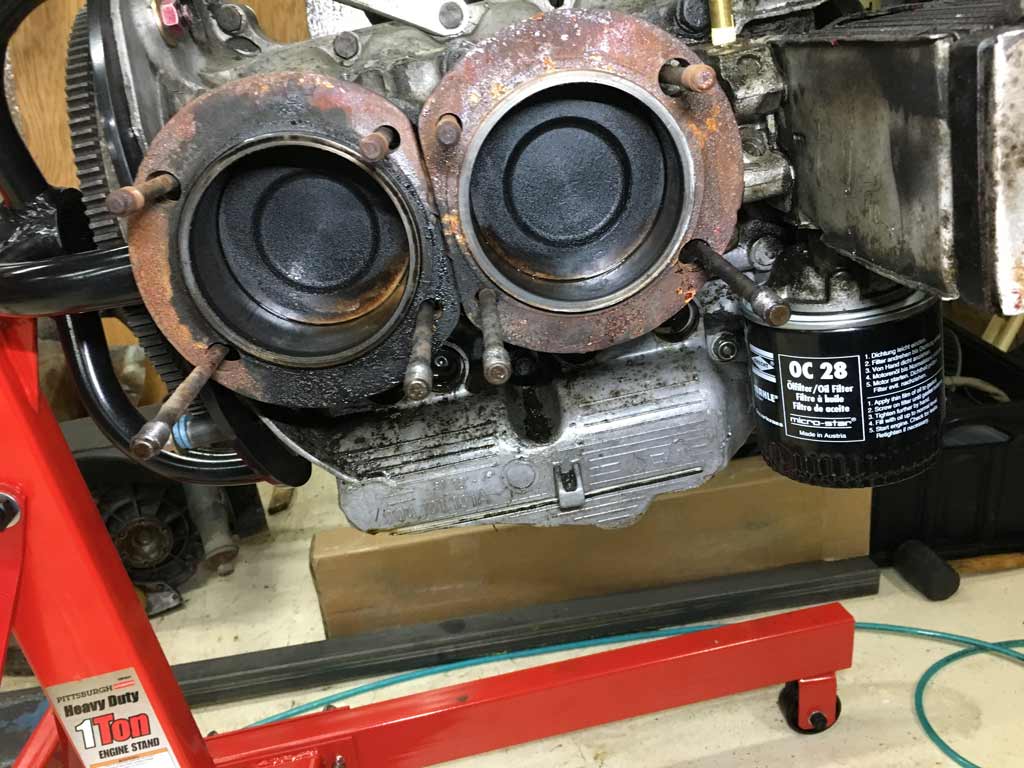 I haven't had a chance to split the case yet but after pulling the oil pump, I'm pretty sure the cam was changed based on the appearance of the cam gear. I can also see that someone covered the Cam plug and the oil galleys with epoxy or something like that. Hopefully this was a preventative measure rather than some crappy fix that I've become so accustomed to finding. |
|
|
|
| bbrock |
Apr 28 2019, 05:13 PM
Post
#85
|
|
914 Guru Group: Members Posts: 5,269 Joined: 17-February 17 From: Montana Member No.: 20,845 Region Association: Rocky Mountains |
When I rebuilt my short block, I filled all the galley plugs with JB Weld as a preventative base on a tip I read (probably in VW Porsche Magazine) at the time. Seems like that might not be the best method but it was the best info I had available then. Maybe whoever did yours read the same article...
|
|
|
|
| Superhawk996 |
Apr 28 2019, 05:24 PM
Post
#86
|
|
914 Guru Group: Members Posts: 7,935 Joined: 25-August 18 From: Woods of N. Idaho Member No.: 22,428 Region Association: Galt's Gulch |
I've gotta admit JB weld is pretty good at resisting oil.
I punched a hole in my Miata's sump going up a goat trail to a house out in Idaho. I didn't realize it until the lifters began to clatter and then I looked at the oil pressure and it was zero. (IMG:style_emoticons/default/idea.gif) Hmm, now what to do? Being quite a way from town, I used JB Weld to patch up the crack. Filled it with oil, and it turned out to be a pretty robust fix. I was always afraid the JB weld would eventually let loose - that never happened. Now in the interest of honesty . . . that is not my idea of a good fix. But the car had in excess of 220K miles on it at that point and they body was rusted away by mid-west cancer. Spending $$ to buy an new oil pan and/or for welding would have exceed the value of the car. I know . . . (IMG:style_emoticons/default/screwy.gif) |
|
|
|
| Superhawk996 |
Apr 28 2019, 05:27 PM
Post
#87
|
|
914 Guru Group: Members Posts: 7,935 Joined: 25-August 18 From: Woods of N. Idaho Member No.: 22,428 Region Association: Galt's Gulch |
Here is the Miata in it's prime as a MUV. Miata Utility Vehicle.
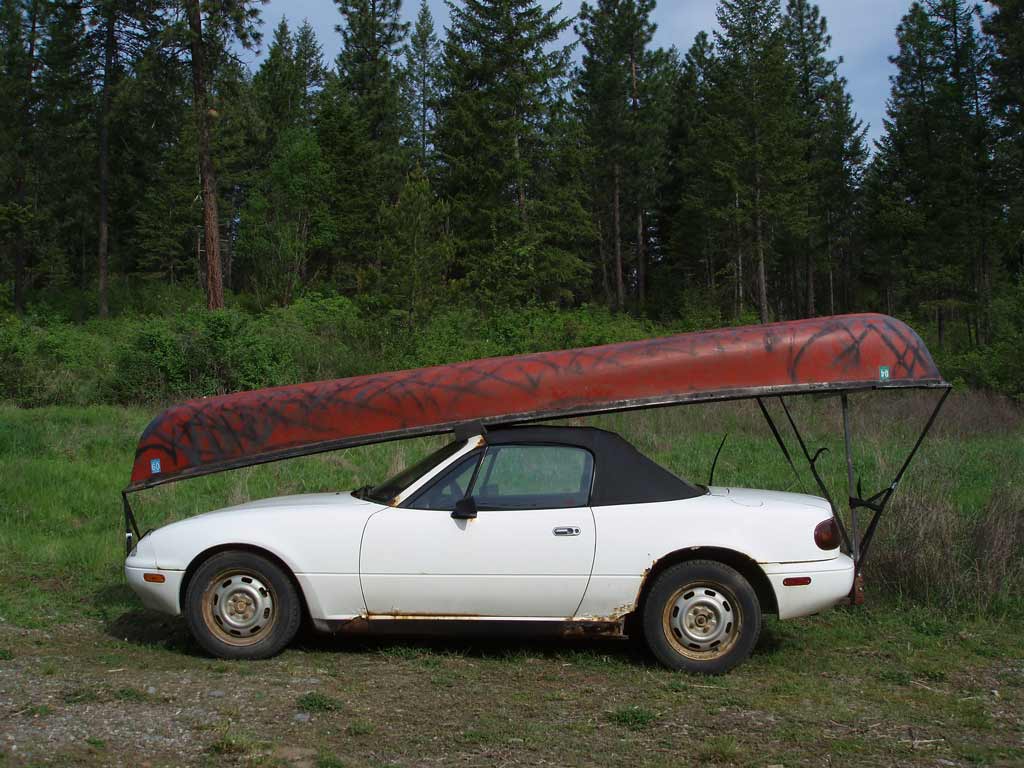 (IMG:style_emoticons/default/happy11.gif) |
|
|
|
| bbrock |
Apr 28 2019, 05:57 PM
Post
#88
|
|
914 Guru Group: Members Posts: 5,269 Joined: 17-February 17 From: Montana Member No.: 20,845 Region Association: Rocky Mountains |
QUOTE(Superhawk996 @ Apr 28 2019, 05:27 PM) Here is the Miata in it's prime as a MUV. Miata Utility Vehicle. (IMG:style_emoticons/default/happy11.gif) Love it! (IMG:style_emoticons/default/thumb3d.gif) It remains to be seen if I'll have the nerve to strap my canoe on my 914, but it would check off two of my most favorite things to do in one trip! I was exploring JB Weld as a potential high temperature filler to smooth out some pits and dents on my valve covers and was surprised to see it rated up to 500 degrees. Too bad had just run out or I would have given it a go. Great stuff. My brother lives in Sulphur Springs, TX where J-B Weld is located and has met the founder/inventor. He said the guy was sitting on a plane one day waiting for take-off and looked out to see a J-B Weld patch on the wing. (IMG:style_emoticons/default/laugh.gif) |
|
|
|
| Superhawk996 |
Apr 28 2019, 06:12 PM
Post
#89
|
|
914 Guru Group: Members Posts: 7,935 Joined: 25-August 18 From: Woods of N. Idaho Member No.: 22,428 Region Association: Galt's Gulch |
@bbrock
Wait a few years, but, you definitely should do it, I'm biased given my penchant for strapping oversize items to sports cars. |
|
|
|
| Superhawk996 |
Apr 28 2019, 06:18 PM
Post
#90
|
|
914 Guru Group: Members Posts: 7,935 Joined: 25-August 18 From: Woods of N. Idaho Member No.: 22,428 Region Association: Galt's Gulch |
Here's a video of the posted Miata turning 220,000 miles.
I had a bet with a buddy that it wouldn't make 220K the way I drove it without an engine rebuild. Video was sweet victory. https://www.youtube.com/watch?v=6-m2IT4Xojo |
|
|
|
| Dave_Darling |
Apr 28 2019, 07:02 PM
Post
#91
|
|
914 Idiot Group: Members Posts: 15,353 Joined: 9-January 03 From: Silicon Valley / Kailua-Kona Member No.: 121 Region Association: Northern California |
QUOTE(Superhawk996 @ Apr 28 2019, 03:49 PM) Worse than the rust debris / garbage there is some sort of round metal object in here. Luckily it was too big to ever fall into the case. Interesting. It looks about the right diameter for the cover over the bottom of the PCV valve, but the cover is much thinner. Perhaps it was a home-made block-off for the PCV system? The cover comes to mind because it always seems to fall off and land right in the spot you show --DD. |
|
|
|
| bbrock |
Apr 28 2019, 07:31 PM
Post
#92
|
|
914 Guru Group: Members Posts: 5,269 Joined: 17-February 17 From: Montana Member No.: 20,845 Region Association: Rocky Mountains |
QUOTE(Dave_Darling @ Apr 28 2019, 07:02 PM) QUOTE(Superhawk996 @ Apr 28 2019, 03:49 PM) Worse than the rust debris / garbage there is some sort of round metal object in here. Luckily it was too big to ever fall into the case. Interesting. It looks about the right diameter for the cover over the bottom of the PCV valve, but the cover is much thinner. Perhaps it was a home-made block-off for the PCV system? The cover comes to mind because it always seems to fall off and land right in the spot you show --DD. That was my first thought as well but I just took mine apart to clean and repaint a week ago and the cover was plastic. (IMG:style_emoticons/default/confused24.gif) |
|
|
|
| bbrock |
Apr 28 2019, 07:36 PM
Post
#93
|
|
914 Guru Group: Members Posts: 5,269 Joined: 17-February 17 From: Montana Member No.: 20,845 Region Association: Rocky Mountains |
QUOTE(Superhawk996 @ Apr 28 2019, 06:18 PM) Here's a video of the posted Miata turning 220,000 miles. I had a bet with a buddy that it wouldn't make 220K the way I drove it without an engine rebuild. Video was sweet victory. https://youtu.be/6-m2IT4Xojo Badass! (IMG:style_emoticons/default/piratenanner.gif) (IMG:style_emoticons/default/aktion035.gif) We'll just assume you weren't on a public road. (IMG:style_emoticons/default/whistle[1].gif) |
|
|
|
| Tenner |
Apr 29 2019, 02:55 AM
Post
#94
|
|
Newbie Group: Members Posts: 21 Joined: 22-June 10 From: Germany Member No.: 11,863 Region Association: Germany |
A few posts earlier, you've been talked about the repairpanel of the inner frame section and it bothers you that it's not made like the original which is two layers of steel ...
This bothered me too and I decided to build my own repaipanel. The Panel will be a combination off an own build outer layer and the Restorationdesign repiarpanel as the inner reinforcement layer. This is what I've built so far. 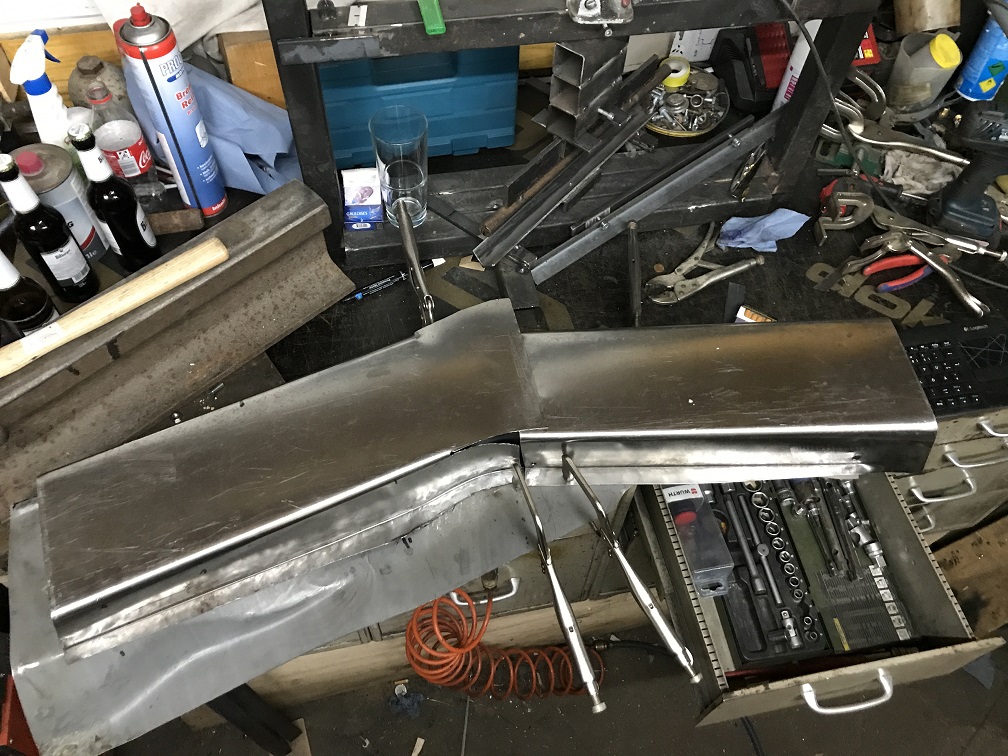 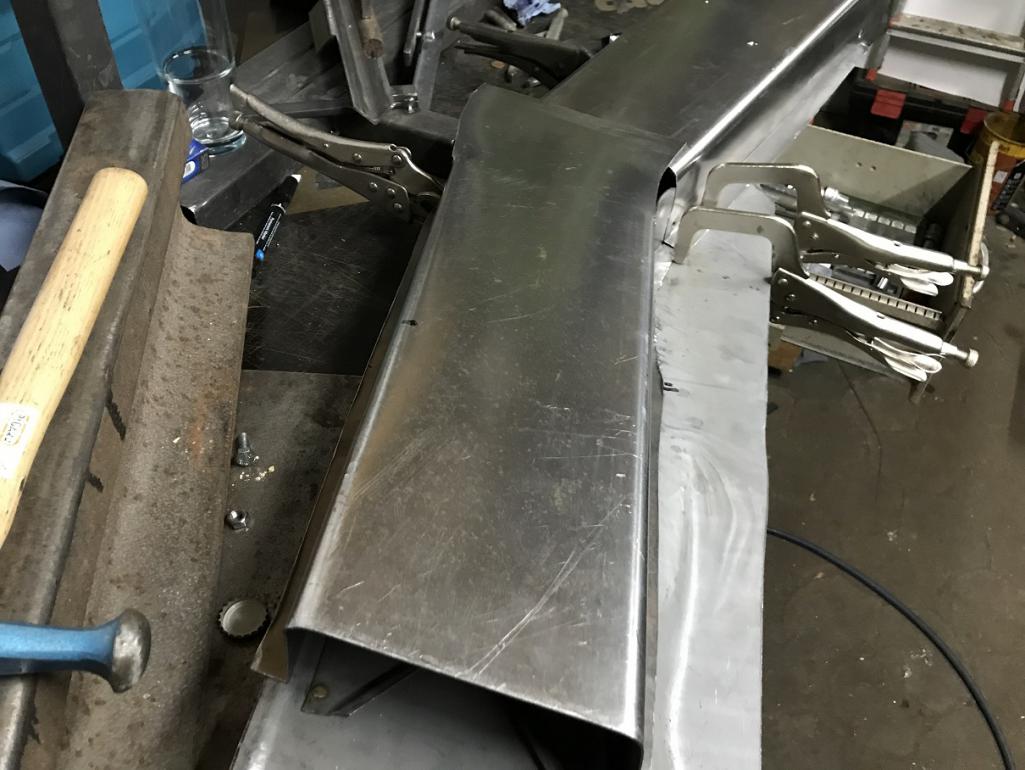 The panel is made from one piece of 1.2mm sheetmetal and fits nearly perfect to the inner wheelhouse repiarpanel. It took me about half a year and 4 tries to make it right. I ended up making my own tools to get the edges properly bended. Next step is trim the overlap, fill the gaps, fit the inner layer and finaly fit it to the car before welding it in. If anyone is interested in the building process, I will open a new thread to discribe the process |
|
|
|
| injunmort |
Apr 29 2019, 04:33 AM
Post
#95
|
|
Senior Member Group: Members Posts: 1,024 Joined: 12-April 10 From: sugarloaf ny Member No.: 11,604 Region Association: North East States |
to fill pits in rocker covers, try boiler cement. I have used for similar purposes. dries rock hard (hard to sand) but stands up well to the environment. good enough to seal boiler fireboxes good enough for some light cosmetics. way cheaper than jb weld.
|
|
|
|
| Superhawk996 |
Apr 29 2019, 04:44 AM
Post
#96
|
|
914 Guru Group: Members Posts: 7,935 Joined: 25-August 18 From: Woods of N. Idaho Member No.: 22,428 Region Association: Galt's Gulch |
@Tenner
Looks like nice work. You most definitely should open a thread. That is the biggest advantage of the site, the shared knowledge base and the ability to learn from others. I probably would have never purchased this car and/or started this level of rehab without having seen some of the other build threads particularly Jeff Hail's and Brent's. @Jeff Hail @Bbrock Both of those vehicles were just like mine - candidate for scrap. Without seeing that it could be done and more importantly, that it was worth doing, I would have never gotten started. At least here in the mid-west, good solid 914's are getting harder to find. When you do find them, they are priced such that at those price levels ($15k-25k) I'd be back to considering another Miata or a Lotus Elise with modern build quality vs. a 45 year old car that I know is going to have issues anyway. |
|
|
|
| restore2seater |
Apr 29 2019, 08:04 AM
Post
#97
|
|
Future 914 copilot. Group: Members Posts: 313 Joined: 30-October 04 From: Dunlap,IL Member No.: 3,037 Region Association: None |
I have no idea what this is or where it came from. Any ideas? Here are two views of it
Not sure the size in the picture, but it looks kind of like one of the four ends of a ujoint off of a drive shaft. |
|
|
|
| bbrock |
Apr 29 2019, 08:11 AM
Post
#98
|
|
914 Guru Group: Members Posts: 5,269 Joined: 17-February 17 From: Montana Member No.: 20,845 Region Association: Rocky Mountains |
QUOTE(Superhawk996 @ Apr 29 2019, 04:44 AM) @Tenner Looks like nice work. You most definitely should open a thread. That is the biggest advantage of the site, the shared knowledge base and the ability to learn from others. @Tenner +1 on opening a thread. I also made my own double wall patch for that inner but not as nice or complete as yours. It is a PITA job so I think sharing your approach would help a lot of people! |
|
|
|
| injunmort |
Apr 29 2019, 10:18 AM
Post
#99
|
|
Senior Member Group: Members Posts: 1,024 Joined: 12-April 10 From: sugarloaf ny Member No.: 11,604 Region Association: North East States |
brake piston
|
|
|
|
| Superhawk996 |
Apr 29 2019, 11:40 AM
Post
#100
|
|
914 Guru Group: Members Posts: 7,935 Joined: 25-August 18 From: Woods of N. Idaho Member No.: 22,428 Region Association: Galt's Gulch |
QUOTE(injunmort @ Apr 29 2019, 12:18 PM) brake piston Good guess . . . but it would have to be off a Smart Car. (IMG:style_emoticons/default/av-943.gif) Hard to see scale from the photo but it is 1" diameter and about 0.75" in height. Made of steel. Maybe from Motorcycle caliper . . . . ? I have a feeling this is going to be one of those mysteries that I just end up chalking up to "what were they thinking". Even if it were a home brew PVC block off, that doesn't even seem to fit in my engine's history since they had a EMPI type breather box hooked up to one of the heads and the other off the oil fill / breather box. Both of those lines were then fed into the top of one of the carbs. |
|
|
|
|
1 User(s) are reading this topic (1 Guests and 0 Anonymous Users)
0 Members:

|
Lo-Fi Version | Time is now: 4th July 2026 - 08:59 PM |
Invision Power Board
v9.1.4 © 2026 IPS, Inc.