|
|
|
Porsche, and the Porsche crest are registered trademarks of Dr. Ing. h.c. F. Porsche AG.
This site is not affiliated with Porsche in any way. Its only purpose is to provide an online forum for car enthusiasts. All other trademarks are property of their respective owners. |
|
|

  |

| 914_7T3 |
 Feb 14 2019, 11:57 PM Feb 14 2019, 11:57 PM
Post
#1
|
|
Please forgive me, I'm new to all of this!  Group: Members Posts: 1,846 Joined: 3-April 17 From: Los Angeles, CA Member No.: 20,991 Region Association: Southern California |
Does anyone have info or photos on the correct placement of the fuel tank pads for the tank to be positioned correctly.
My shop is having trouble seating the tank low enough for a correct installation. How much lower do the bumper pads need to be to make this work and what is the best way to install them? Here are some pics of how it sits presently. Advice is appreciated! 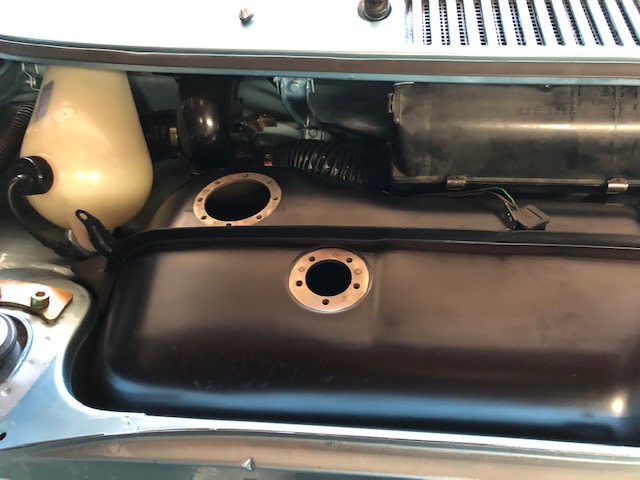 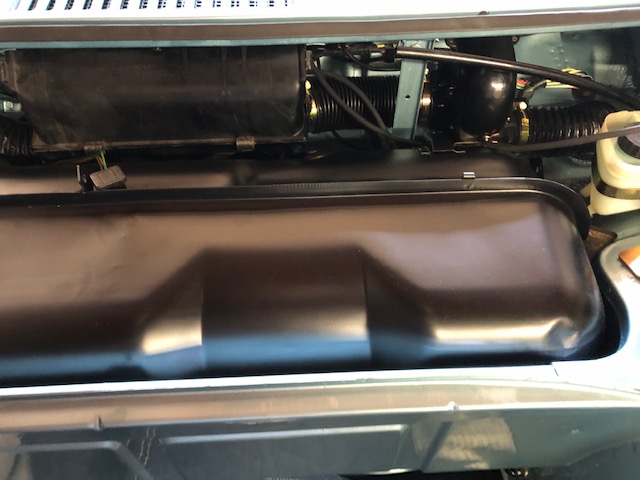 |
   |

 
|
| Larmo63 |
Feb 15 2019, 12:46 AM
Post
#2
|
|
Advanced Member Group: Members Posts: 4,264 Joined: 3-March 14 From: San Clemente, Ca Member No.: 17,068 Region Association: Southern California |
All I can suggest is that it is a balance/wiggle act to get it in there right.
Are you sure they have the rubbers in correctly? Nothing worse than an ill fitting rubber. |
|
|
|
| DaveO90s4 |
Feb 15 2019, 01:17 AM
Post
#3
|
|
Member Group: Members Posts: 149 Joined: 26-April 16 From: Australia Member No.: 19,935 Region Association: None |
Looks to me like your rubbers are not in place properly, preventing your unit from going all the way home - so to speak.
Attached image(s)  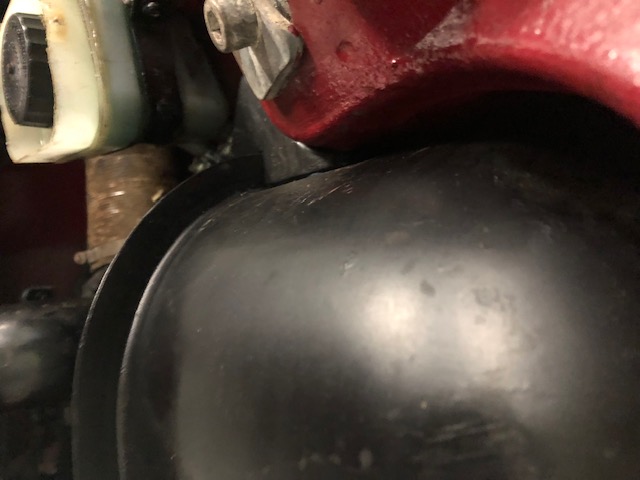
|
|
|
|
| sb914 |
Feb 15 2019, 06:05 AM
Post
#4
|
|
Surf Guru Group: Members Posts: 4,296 Joined: 25-November 12 From: Brookings,Oregon Member No.: 15,191 Region Association: Southern California |
use Tape at the top of the rubber to hold it in place,then remove tape once the tanks in place. The rubber sits about 1 inch from the top !
|
 |
|
| jim_hoyland |
Feb 15 2019, 07:06 AM
Post
#5
|
|
Get that VIN ? Group: Members Posts: 9,258 Joined: 1-May 03 From: Sunset Beach, CA Member No.: 643 Region Association: Southern California |
(IMG:style_emoticons/default/agree.gif) Hold the pads in place with tape. I marked the tank to show the pads upper edge. Also, when I have a helper lowering the tank, it's easier to make those micro adjustments.
|
|
|
|
| BIGKAT_83 |
Feb 15 2019, 08:16 AM
Post
#6
|
|
Senior Member Group: Members Posts: 1,798 Joined: 25-January 03 From: Way down south Bogart,GA Member No.: 194 Region Association: South East States |
Rubbers need to be higher up this will lower the tank. I tape them on and then remove the tape after installing the tank.
|
|
|
|
| mepstein |
Feb 15 2019, 08:32 AM
Post
#7
|
|
914-6 GT in waiting Group: Members Posts: 19,234 Joined: 19-September 09 From: Landenberg, PA/Wilmington, DE Member No.: 10,825 Region Association: MidAtlantic Region |
QUOTE(BIGKAT_83 @ Feb 15 2019, 09:16 AM)  Rubbers need to be higher up this will lower the tank. I tape them on and then remove the tape after installing the tank. Same here. Some painters tape will do the job. |
|
|
|
| whitetwinturbo |
Feb 15 2019, 10:49 AM
Post
#8
|
|
Honey, does this wing make my ass look fat? Group: Members Posts: 1,391 Joined: 22-October 11 From: Newport Beach/Kalefornya/USA Member No.: 13,704 Region Association: Southern California |
..... am I the only one thinking of all the wise-guy jokes available on this thread (IMG:style_emoticons/default/chair.gif)
|
|
|
|
| 914_7T3 |
Feb 15 2019, 01:36 PM
Post
#9
|
|
Please forgive me, I'm new to all of this! Group: Members Posts: 1,846 Joined: 3-April 17 From: Los Angeles, CA Member No.: 20,991 Region Association: Southern California |
QUOTE(whitetwinturbo @ Feb 15 2019, 08:49 AM) ..... am I the only one thinking of all the wise-guy jokes available on this thread (IMG:style_emoticons/default/chair.gif) I don't think so, Larmo already went there with "Nothing worse than an ill fitting rubber." The jokes can go on for days................but I've got serious fuel tank frustrations so I'm not in the mood. (IMG:style_emoticons/default/beer3.gif) |
|
|
|
| 914_7T3 |
Feb 15 2019, 01:38 PM
Post
#10
|
|
Please forgive me, I'm new to all of this! Group: Members Posts: 1,846 Joined: 3-April 17 From: Los Angeles, CA Member No.: 20,991 Region Association: Southern California |
Thanks to everyone who chimed in. I will take the above suggestions and try to get that sorted and provide an update.
(IMG:style_emoticons/default/beerchug.gif) |
|
|
|
| PanelBilly |
Feb 15 2019, 02:13 PM
Post
#11
|
|
914 Guru Group: Members Posts: 5,797 Joined: 23-July 06 From: Kent, Wa Member No.: 6,488 Region Association: Pacific Northwest |
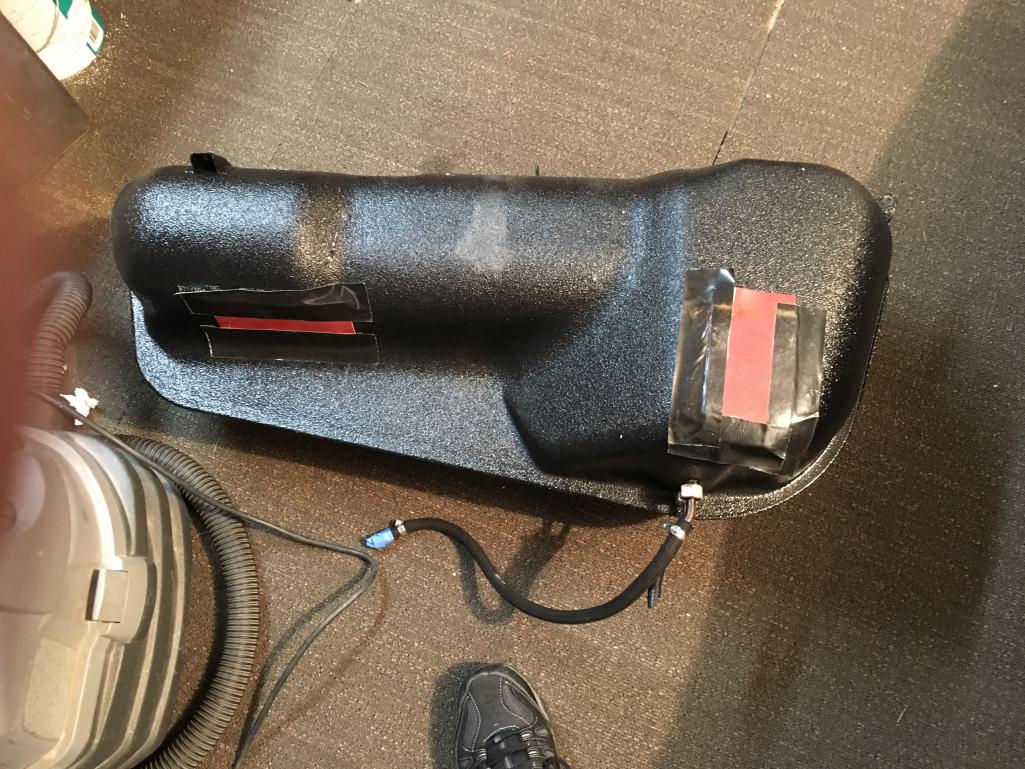
Your lucky day. My tank is out and I’m in the garage. I used a plumber’s rubber and some gorilla tape. My tank is LineX’ed so it’s a bit thicker
 |
|
|
|
| 914_7T3 |
Feb 15 2019, 02:14 PM
Post
#12
|
|
Please forgive me, I'm new to all of this! Group: Members Posts: 1,846 Joined: 3-April 17 From: Los Angeles, CA Member No.: 20,991 Region Association: Southern California |
QUOTE(sb914 @ Feb 15 2019, 04:05 AM) use Tape at the top of the rubber to hold it in place,then remove tape once the tanks in place. The rubber sits about 1 inch from the top ! @sb914 an inch from the top of the smooth edge of the tank itself or the top of the edge that slots into the groove of the pad? (IMG:style_emoticons/default/confused24.gif) |
|
|
|
| 76-914 |
Feb 15 2019, 02:18 PM
Post
#13
|
|
Repeat Offender & Resident Subaru Antagonist Group: Members Posts: 13,490 Joined: 23-January 09 From: Temecula, CA Member No.: 9,964 Region Association: Southern California |
Bob nailed it. Lift up on the tank enough to free it then lift the rubber mount a bit. Do this to both sides. The idea is to let the tank and rubber mount slide into place together. There is really only one place they will sit properly. (IMG:style_emoticons/default/beerchug.gif)
|
|
|
|
| rjames |
Feb 15 2019, 02:19 PM
Post
#14
|
|
I'm made of metal Group: Members Posts: 3,913 Joined: 24-July 05 From: Shoreline, WA Member No.: 4,467 Region Association: Pacific Northwest |
In addition to getting the rubber bits in the right spot, make sure the fuel hoses underneath aren't getting in the way.
Getting the tank in the right spot should be an easy thing to do. |
|
|
|
| ValcoOscar |
Feb 15 2019, 03:54 PM
Post
#15
|
|
Garage Life Group: Members Posts: 2,374 Joined: 19-November 13 From: SoCal Member No.: 16,669 Region Association: Southern California |
Late to the party but it seems like you know what to do now.
I'm not touching any rubber rubber jokes. Please let us know if you succeed. Oscar |
|
|
|
| sb914 |
Feb 15 2019, 04:43 PM
Post
#16
|
|
Surf Guru Group: Members Posts: 4,296 Joined: 25-November 12 From: Brookings,Oregon Member No.: 15,191 Region Association: Southern California |
QUOTE(914_7T3 @ Feb 15 2019, 12:14 PM) QUOTE(sb914 @ Feb 15 2019, 04:05 AM) use Tape at the top of the rubber to hold it in place,then remove tape once the tanks in place. The rubber sits about 1 inch from the top ! @sb914 an inch from the top of the smooth edge of the tank itself or the top of the edge that slots into the groove of the pad? (IMG:style_emoticons/default/confused24.gif) Here’s where mine sits. It’s about a inch from the top of the shock tower. It’s also a good idea to lengthen the fuel line for future removal. Makes it way easier with the extra length of hose . 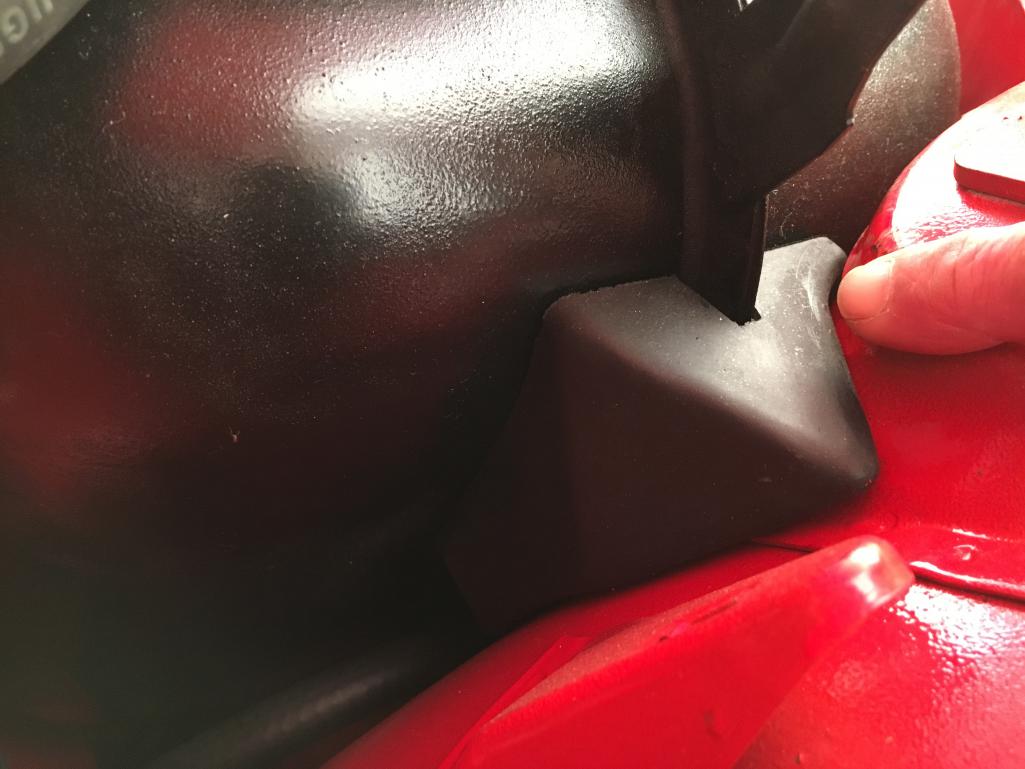 |
|
|
|
| 914_7T3 |
Feb 15 2019, 05:49 PM
Post
#17
|
|
Please forgive me, I'm new to all of this! Group: Members Posts: 1,846 Joined: 3-April 17 From: Los Angeles, CA Member No.: 20,991 Region Association: Southern California |
QUOTE(sb914 @ Feb 15 2019, 02:43 PM) QUOTE(914_7T3 @ Feb 15 2019, 12:14 PM) QUOTE(sb914 @ Feb 15 2019, 04:05 AM) use Tape at the top of the rubber to hold it in place,then remove tape once the tanks in place. The rubber sits about 1 inch from the top ! @sb914 an inch from the top of the smooth edge of the tank itself or the top of the edge that slots into the groove of the pad? (IMG:style_emoticons/default/confused24.gif) Here’s where mine sits. It’s about a inch from the top of the shock tower. It’s also a good idea to lengthen the fuel line for future removal. Makes it way easier with the extra length of hose . Perfect, this is super helpful! The fuel lines were left longer for removal and a spring was inserted so it doesn't kink. Thank you for taking the time to photograph. (IMG:style_emoticons/default/smile.gif) |
|
|
|
| Blue6 |
Feb 15 2019, 07:18 PM
Post
#18
|
|
Senior Member Group: Members Posts: 1,033 Joined: 3-October 13 From: SoCal Member No.: 16,470 Region Association: Southern California |
Now that this got straightened out, I’ll piggy back on this thread. My rubber isn’t fitting correctly either. I know posts are useless without pics. Anyone want a pic. (IMG:style_emoticons/default/biggrin.gif)
|
|
|
|
| 914_7T3 |
Feb 15 2019, 08:10 PM
Post
#19
|
|
Please forgive me, I'm new to all of this! Group: Members Posts: 1,846 Joined: 3-April 17 From: Los Angeles, CA Member No.: 20,991 Region Association: Southern California |
QUOTE(Blue6 @ Feb 15 2019, 05:18 PM) Now that this got straightened out, I’ll piggy back on this thread. My rubber isn’t fitting correctly either. I know posts are useless without pics. Anyone want a pic. (IMG:style_emoticons/default/biggrin.gif) Show us what you got! |
|
|
|
| ndfrigi |
Feb 15 2019, 09:10 PM
Post
#20
|
|
Advanced Member Group: Members Posts: 2,928 Joined: 21-August 11 From: Orange County Member No.: 13,474 Region Association: Southern California |
well I already sent this pic to Jeffery thru text last night.
But I will just share it also here. From my previous 75 1.8FI and yes original color was copper metallic and was painted to blue by previous owner. I replaced the expansion tank to fuel tank seal a day before new owner pick-up the car. 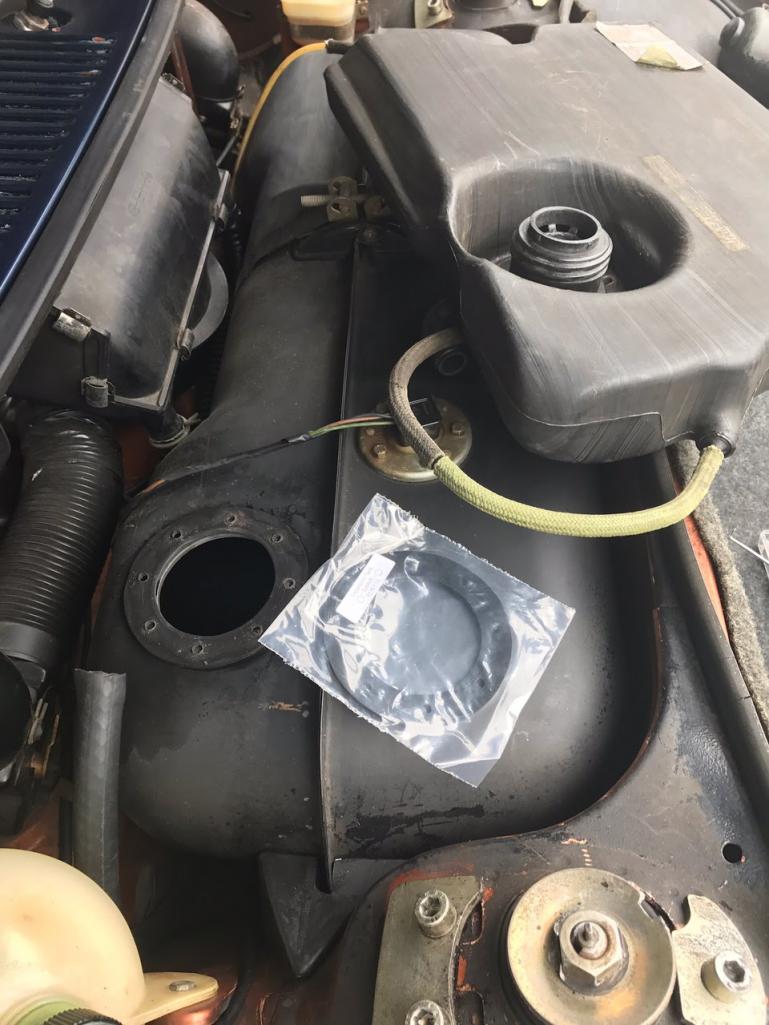 |
|
|
|
|
1 User(s) are reading this topic (1 Guests and 0 Anonymous Users)
0 Members:

|
Lo-Fi Version | Time is now: 23rd April 2024 - 05:42 PM |
Invision Power Board
v9.1.4 © 2024 IPS, Inc.