|
|
|
Porsche, and the Porsche crest are registered trademarks of Dr. Ing. h.c. F. Porsche AG.
This site is not affiliated with Porsche in any way. Its only purpose is to provide an online forum for car enthusiasts. All other trademarks are property of their respective owners. |
|
|

  |

| amfab |
 Apr 23 2019, 10:12 PM Apr 23 2019, 10:12 PM
Post
#1
|
|
Member  Group: Members Posts: 391 Joined: 17-May 16 From: Los Angeles Member No.: 20,004 Region Association: None |
So this past weekend I was using a little torch to heat up—and more than occasionally set on fire—the seam sealer so I could scrape off the big globs of it all over the car. I came to realize that the foam people speak of in the rear corner of the car is just put in there and covered with seam sealer.
How do the cool kids deal with this area when restoring? Thanks -Andrew |
   |

 
|
| Chief |
Apr 24 2019, 01:33 AM
Post
#2
|
|
Newbie Group: Members Posts: 21 Joined: 14-January 17 From: England Member No.: 20,751 Region Association: England |
I dug the expanded foam out. Then used plenty of etch primer, finally 3M stonechip and finished with body colour. I can understand why the factory used the foam method, but if compromised the rot sets in very quickly.
|
|
|
|
| defianty |
Apr 24 2019, 03:07 AM
Post
#3
|
|
Senior Member Group: Members Posts: 659 Joined: 9-August 06 From: Essex, UK Member No.: 6,621 Region Association: None |
QUOTE(Chief @ Apr 24 2019, 08:33 AM)  I dug the expanded foam out. Then used plenty of etch primer, finally 3M stonechip and finished with body colour. I can understand why the factory used the foam method, but if compromised the rot sets in very quickly. (IMG:style_emoticons/default/agree.gif) One of my corners had rotten through and I had to replace the area above the indicator. I pulled out the foam from both sides. Lots of epoxy primer and then my entire underside is coated in a product similar to Raptor. I left my underside black but that's just my preference. |
|
|
|
| mepstein |
Apr 24 2019, 04:13 AM
Post
#4
|
|
914-6 GT in waiting Group: Members Posts: 19,221 Joined: 19-September 09 From: Landenberg, PA/Wilmington, DE Member No.: 10,825 Region Association: MidAtlantic Region |
Long screwdriver to chip it out.
|
 |
|
| 914dave |
Apr 24 2019, 05:44 AM
Post
#5
|
|
914 Addict Group: Members Posts: 700 Joined: 19-October 03 From: Willow Grove Pa. Member No.: 1,262 Region Association: North East States |
I used great stuff foam to replace the original. If you don’t reapply the foam, that area created a little shelf where mud and dirt will accumulate. If you don’t reapply it just clean the area about occasionally.
|
|
|
|
| ClayPerrine |
Apr 24 2019, 05:46 AM
Post
#6
|
|
Life's been good to me so far..... Group: Admin Posts: 15,394 Joined: 11-September 03 From: Hurst, TX. Member No.: 1,143 Region Association: NineFourteenerVille |
I spray the foam with carb cleaner. It just melts away.........
Once it dries, I paint with rustoleum. |
|
|
|
| BeatNavy |
Apr 24 2019, 06:55 AM
Post
#7
|
|
Certified Professional Scapegoat Group: Members Posts: 2,924 Joined: 26-February 14 From: Easton, MD Member No.: 17,042 Region Association: MidAtlantic Region |
QUOTE(ClayPerrine @ Apr 24 2019, 07:46 AM) I spray the foam with carb cleaner. It just melts away......... Once it dries, I paint with rustoleum. That is a good tip. I chiseled it out of my project car, and it was surprisingly difficult to get it all out. May have to try this trick on my driver... Here's the biggest chunk that came out of my project car. Looks all ancient and fossilized. 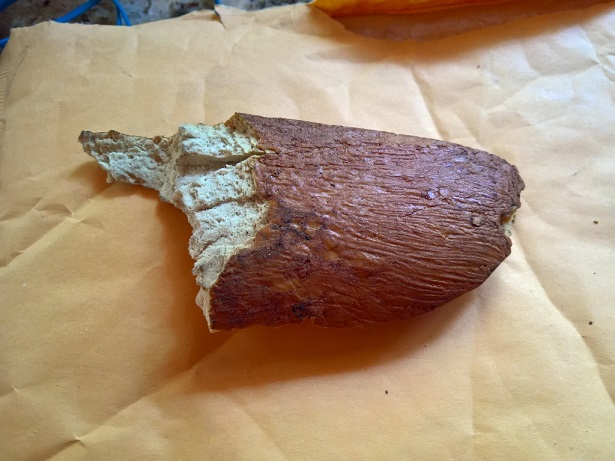 |
|
|
|
| tygaboy |
Apr 24 2019, 07:27 AM
Post
#8
|
|
914 Guru Group: Members Posts: 5,266 Joined: 6-October 15 From: Petaluma, CA Member No.: 19,241 Region Association: Northern California |
QUOTE(914dave @ Apr 24 2019, 04:44 AM) I used great stuff foam to replace the original. If you don’t reapply the foam, that area created a little shelf where mud and dirt will accumulate. If you don’t reapply it just clean the area about occasionally. I just did the repair to fix a big rust hole caused by the foam and was concerned about this very thing - the shelf, that is. Good to know folks are able to address this in various ways w/out "refoaming". |
|
|
|
| bbrock |
Apr 24 2019, 08:22 AM
Post
#9
|
|
914 Guru Group: Members Posts: 5,269 Joined: 17-February 17 From: Montana Member No.: 20,845 Region Association: Rocky Mountains |
QUOTE(914dave @ Apr 24 2019, 05:44 AM) I used great stuff foam to replace the original. If you don’t reapply the foam, that area created a little shelf where mud and dirt will accumulate. If you don’t reapply it just clean the area about occasionally. This is my concern. I have 3 miles of gravel road to drive before hitting any pavement. I'm thinking caked mud is going to cause rust faster than the foam with good body sealer over it. There is a special body foam you can buy. After digging the foam out (wish I'd known the carb cleaner trick), I shot epoxy primer and then Raptor bed liner into the cavities. It is still a dirt trap though so I'm probably going to fill with body foam and sealer and just add checking the condition of the sealer to my maintenance routine. |
|
|
|
| SirAndy |
Apr 24 2019, 11:39 AM
Post
#10
|
|
Resident German Group: Admin Posts: 41,602 Joined: 21-January 03 From: Oakland, Kalifornia Member No.: 179 Region Association: Northern California |
QUOTE(defianty @ Apr 24 2019, 02:07 AM) QUOTE(Chief @ Apr 24 2019, 08:33 AM) I dug the expanded foam out. Then used plenty of etch primer, finally 3M stonechip and finished with body colour. I can understand why the factory used the foam method, but if compromised the rot sets in very quickly. (IMG:style_emoticons/default/agree.gif) (IMG:style_emoticons/default/agree.gif) |
|
|
|
| amfab |
Apr 24 2019, 11:45 AM
Post
#11
|
|
Member Group: Members Posts: 391 Joined: 17-May 16 From: Los Angeles Member No.: 20,004 Region Association: None |
Thanks everyone, Ill try the carb cleaner to get the last bits out then just leave it open and Raptor it all. It is now a SoCal car so if I clean it out once in a while I should be ok.
-Andrew |
|
|
|
| sixnotfour |
Apr 24 2019, 12:18 PM
Post
#12
|
|
914 Wizard Group: Members Posts: 10,406 Joined: 12-September 04 From: Life Elevated..planet UT. Member No.: 2,744 Region Association: Rocky Mountains |
QUOTE This is my concern. I have 3 miles of gravel road to drive before hitting any pavement. I'm thinking caked mud is going to cause rust faster than the foam with good body sealer over it. There is a special body foam you can buy. After digging the foam out (wish I'd known the carb cleaner trick), I shot epoxy primer and then Raptor bed liner into the cavities. It is still a dirt trap though so I'm probably going to fill with body foam and sealer and just add checking the condition of the sealer to my maintenance routine. Fender Liners,,914 rubber https://shop.914rubber.com/Fender-liners-se...p3plqscsfapp001 |
|
|
|
| rudedude |
Apr 24 2019, 07:27 PM
Post
#13
|
|
Senior Member Group: Members Posts: 508 Joined: 1-January 05 From: minneapolis, mn Member No.: 3,387 Region Association: Upper MidWest |
I am waiting for a set of their fender liners for exactly the same reason, a 2 mile gravel drive. Dug out all the foam, cleaned up the rust, epoxy primed and sealed with seam sealer. Hope it all helps. Ordered the fender liners a few weeks ago and was told it would be a few weeks so hopefully soon.
|
|
|
|
|
1 User(s) are reading this topic (1 Guests and 0 Anonymous Users)
0 Members:

|
Lo-Fi Version | Time is now: 19th April 2024 - 01:04 PM |
Invision Power Board
v9.1.4 © 2024 IPS, Inc.