|
|
|
Porsche, and the Porsche crest are registered trademarks of Dr. Ing. h.c. F. Porsche AG.
This site is not affiliated with Porsche in any way. Its only purpose is to provide an online forum for car enthusiasts. All other trademarks are property of their respective owners. |
|
|

  |

| Superhawk996 |
 Jul 15 2019, 08:03 PM Jul 15 2019, 08:03 PM
Post
#21
|
|
914 Guru  Group: Members Posts: 7,309 Joined: 25-August 18 From: Woods of N. Idaho Member No.: 22,428 Region Association: Galt's Gulch |
I did notice some differences in this early 099 casting vs. the later version that came out of my car.
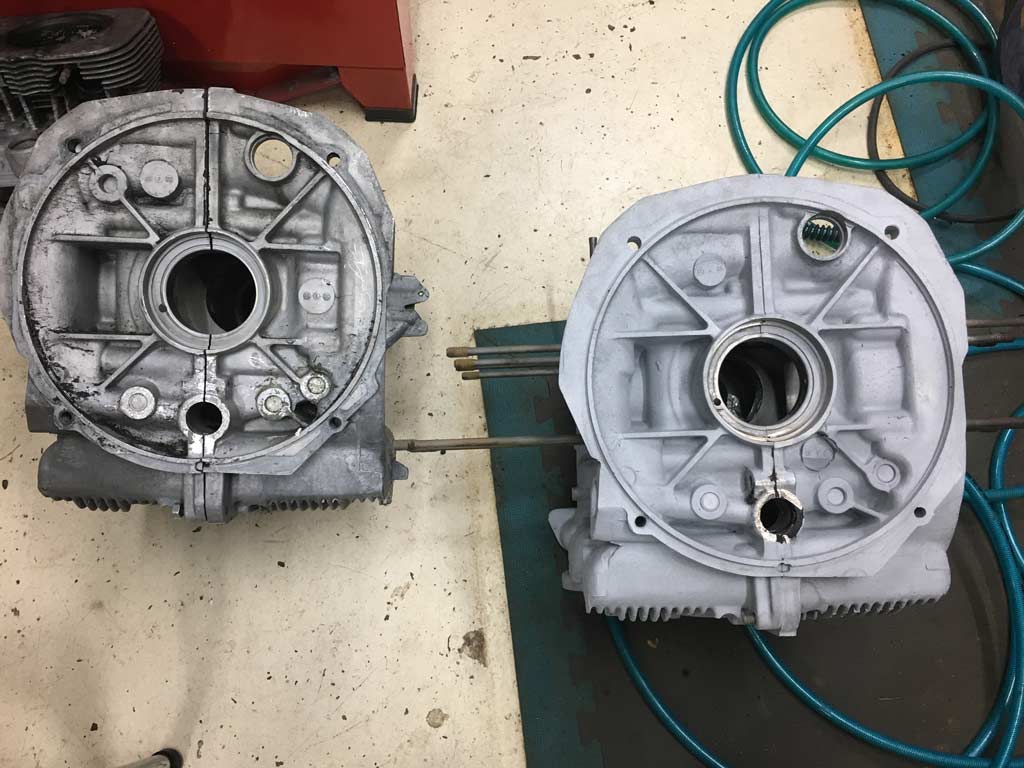 Note the differences in casting lot number/date codes There also appears to be an error in machining the flywheel end main bearing bore. 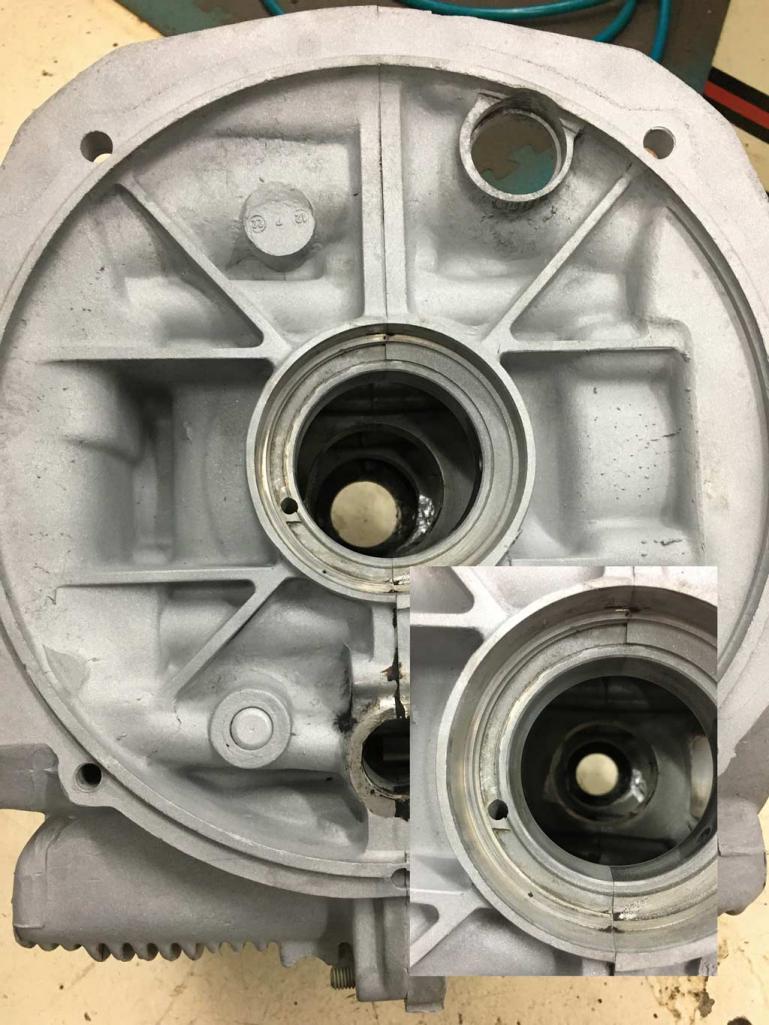 It looks to me like whatever tool they were using to face mill the case stopped short of a 360 degree revolution. I can't quite visualize what tooling they were using to cut this surface. The sharp edge, straight line and angular surface left aren't what I'd expect from fly cutting, or a face mill. Curious if anyone has seen something like this before? |
   |

 
|
| Jake Raby |
Jul 18 2019, 10:43 PM
Post
#22
|
|
Engine Surgeon Group: Members Posts: 9,398 Joined: 31-August 03 From: Lost Member No.: 1,095 Region Association: South East States |
Early GA cases have given me lots of issues. The castings are always rough, and they measure all over the place.
Their biggest issue is sagging cylinder registers. Make sure you have the cylinders registers decked, and evened up. They are always sagging at the point where the cylinders come closest to each other. |
|
|
|
| Superhawk996 |
Jul 27 2019, 03:35 AM
Post
#23
|
|
914 Guru Group: Members Posts: 7,309 Joined: 25-August 18 From: Woods of N. Idaho Member No.: 22,428 Region Association: Galt's Gulch |
QUOTE(Jake Raby @ Jul 19 2019, 12:43 AM)  Early GA cases have given me lots of issues. The castings are always rough, and they measure all over the place. Their biggest issue is sagging cylinder registers. Make sure you have the cylinders registers decked, and evened up. They are always sagging at the point where the cylinders come closest to each other. @Jake Raby Thank you for the advice and confirmation that you've seen issues on early cases too! Nice to see you posting here on 914World again! |
|
|
|
| Superhawk996 |
Jul 27 2019, 03:49 AM
Post
#24
|
|
914 Guru Group: Members Posts: 7,309 Joined: 25-August 18 From: Woods of N. Idaho Member No.: 22,428 Region Association: Galt's Gulch |
Time has come to tear down the heads to see if they might be good. On my original engine the heads turned out to be a disaster. I'll post more on those heads under my vehicle build thread.
On these heads I used my homemade valve spring tool. Just a few simple bits turned up on the lathe and the mill to use a C-Clamp. The slots allow me to fish out the keepers. 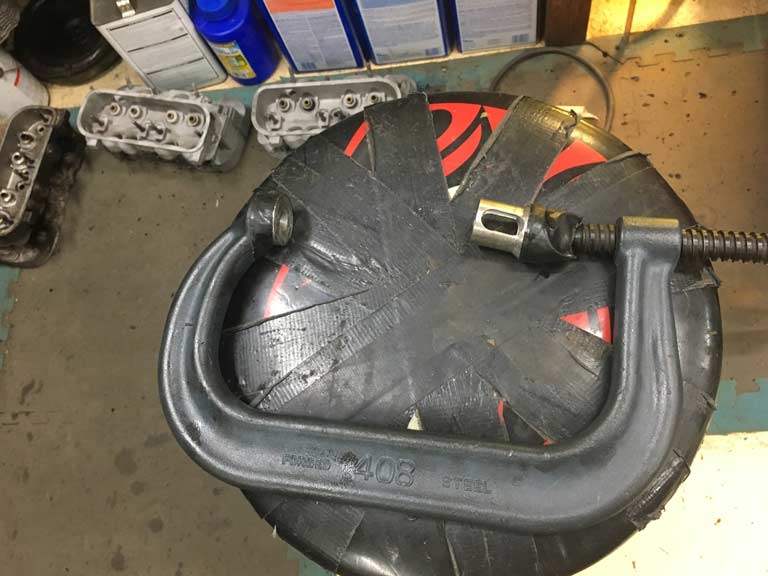 As usual, there were the typical seized exhaust studs. Ended up using one of my favorite tools to extract the studs. 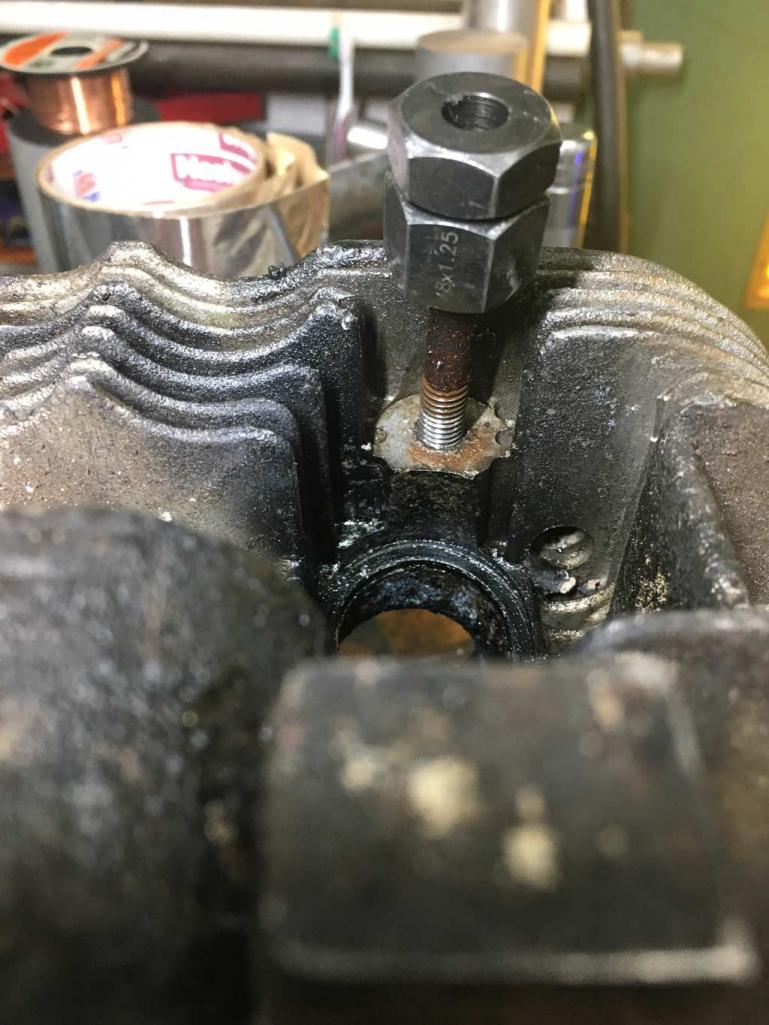 This tool plus a little heat usually works. But, of course, there is always the one stud that someone broke off leaving no threads. Tried the usual tricks. . .penetrating oils . . . heat . . . vice grips. Finally resorted to the heavy artillery & welded on a nut. 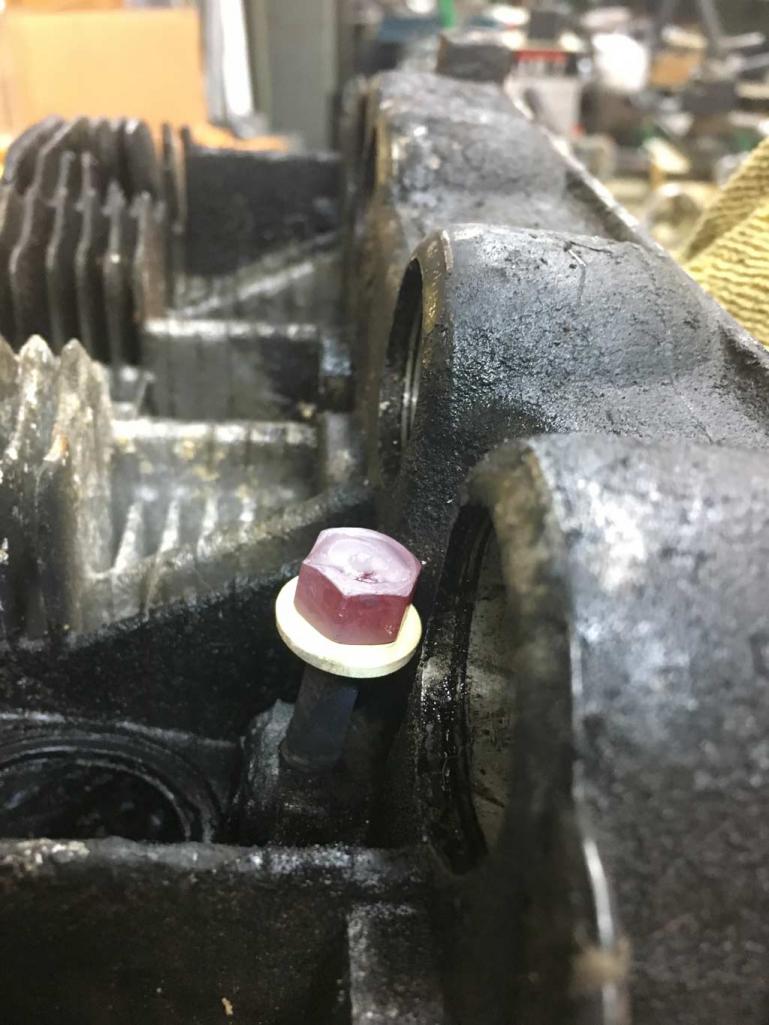 And of course the inevitable occurred.  We temporarily interrupt this post -- Clear the children from the room.  Guess we'll save that project for later. Need to bead blast the carbon off the combustion chambers and ports to see if there is cracking. If there isn't, then I'll deal with the broken stud by drilling it out in the mill using a left hand drill bit. If necessary it could be inserted but I prefer not to do that. |
|
|
|
| 76-914 |
Jul 27 2019, 09:02 AM
Post
#25
|
|
Repeat Offender & Resident Subaru Antagonist Group: Members Posts: 13,781 Joined: 23-January 09 From: Temecula, CA Member No.: 9,964 Region Association: Southern California |
I like clean. I've always said that your going to get dirty removing stuff but you don't have to get dirty putting it back. BTW, some of us CA guys grew up in the midwest and remember the humidity. My wife was astounded at how uncomfortable the cold Wx could be when humidity was part of the mix! What's your timetable for this project? (IMG:style_emoticons/default/beerchug.gif)
|
|
|
|
| Superhawk996 |
Jul 27 2019, 09:15 AM
Post
#26
|
|
914 Guru Group: Members Posts: 7,309 Joined: 25-August 18 From: Woods of N. Idaho Member No.: 22,428 Region Association: Galt's Gulch |
QUOTE(76-914 @ Jul 27 2019, 11:02 AM) What's your timetable for this project? Lot's of iron's in the fire so hard to say for sure, I'd like to have at least one engine put together by September. Right now I'm mostly burning time between Melanoma biopsy's and surgeries. Can't really get on my back and do a lot of overhead welding and grinding on the Chassis so I'm doing "easy" work. Rods are being rebuilt as we speak by my local machine shop. Crank is in good shape. P&C's are likely reusable from what I've seen so far with just a new set of rings and a cylinder hone. I have a set of new Chinese AAP heads being built by Len Hoffman so I know I have at least one good set of 2.0L 3 stud heads (IMG:style_emoticons/default/biggrin.gif) At this point it depends on this set of heads as to whether I rebuild both this engine and my original. If I can come up with a second set of heads I'll build both. When done, one, would go up for sale to offset future purchase of a six cylinder long term project. If these heads aren't good, the excess spares (case, crank, P&C's, etc.) will likely get sold off as parts. |
|
|
|
| Superhawk996 |
Jul 27 2019, 11:10 AM
Post
#27
|
|
914 Guru Group: Members Posts: 7,309 Joined: 25-August 18 From: Woods of N. Idaho Member No.: 22,428 Region Association: Galt's Gulch |
Restoration work is like a roller coaster ride.
Yesterday I was pretty mad that I couldn't get out that exhaust stud without it breaking off. Today, I'm happier than a bird with a french fry. (IMG:style_emoticons/default/piratenanner.gif) Heads are in great shape. Absolutely no cracking. Not even around the spark plug which is so common its laughable. The inset picture of the ports is typical of all cylinders. (IMG:style_emoticons/default/biggrin.gif) Looks like I'm on a path to be able to resurrect two engines! 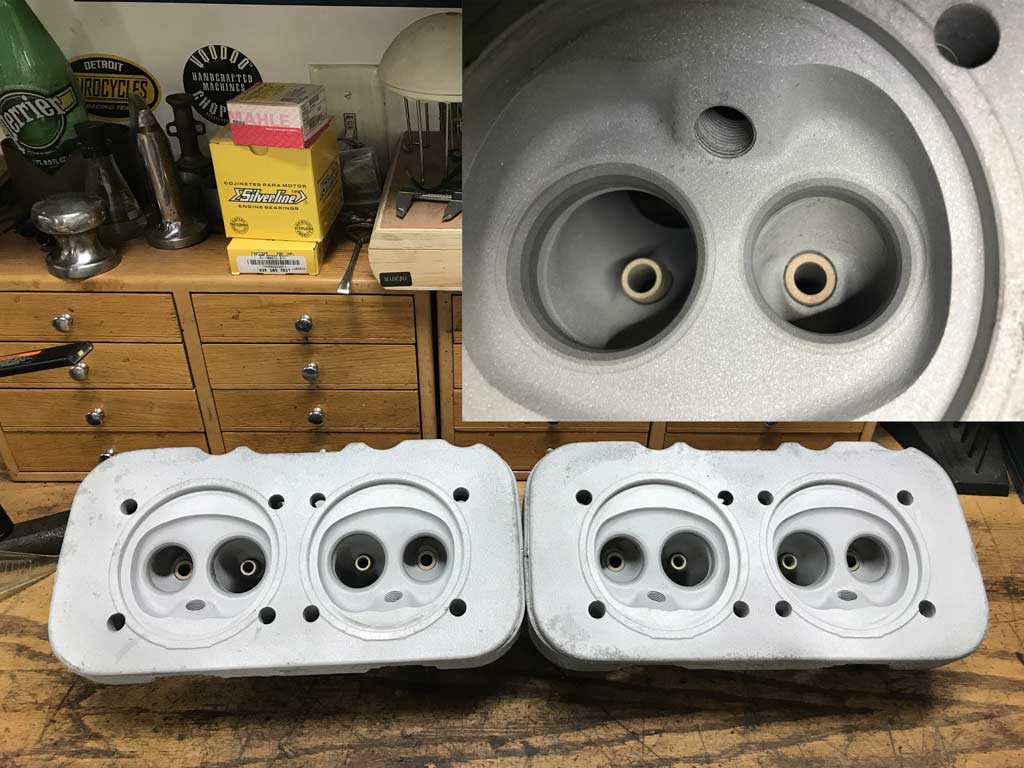 |
|
|
|
| Superhawk996 |
Jul 27 2019, 11:19 AM
Post
#28
|
|
914 Guru Group: Members Posts: 7,309 Joined: 25-August 18 From: Woods of N. Idaho Member No.: 22,428 Region Association: Galt's Gulch |
I also have a tip for those of you with sand blasters. Not really new trick, but, I'm a slow learner.
For years I've struggled with my pressure pot. Works great for 1st 10-15 lbs of media but then starts getting clogging and intermittent media supply. I've always worked around it by limiting the size of my batch to blast or by messing with various pressure setting above or below the sand to clear things out. So I finally broke down and spend a grand total of about $12 to buy a mini water separator from HF. Today is humid as can be and I had absolutely no clogging. (IMG:style_emoticons/default/biggrin.gif) How dumb is that? Only been fighting this nonsense for about 10 years! (IMG:style_emoticons/default/confused24.gif) I simply put typical air coupler's on it, now it can be moved from pressure pot to bench top booth, or whatever else might need extra water filtration. You wouldn't believe how much moisture gets this far down the line even tough I have another water trap back in the garage! 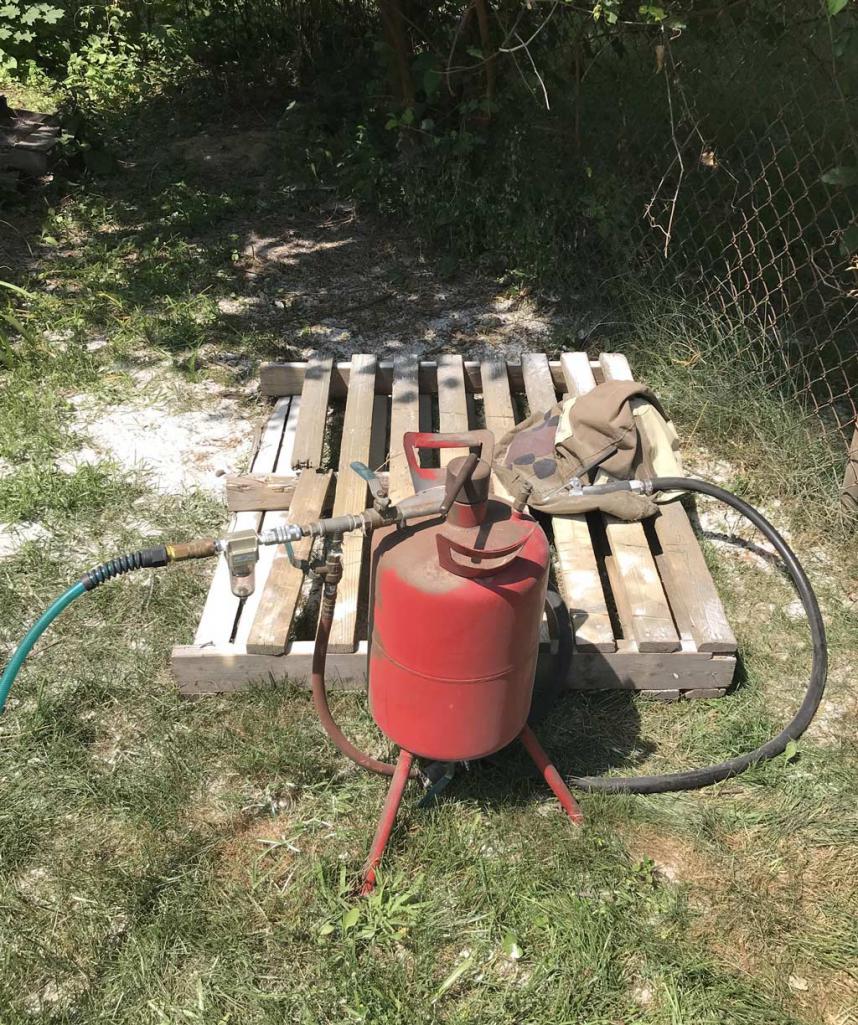 |
|
|
|
| Tdskip |
Jul 27 2019, 11:31 AM
Post
#29
|
|
Advanced Member Group: Members Posts: 3,740 Joined: 1-December 17 From: soCal Member No.: 21,666 Region Association: None |
You nailed it when you said all of this is a roller coaster ride.
Thanks for the updates and good tip on the water separator |
|
|
|
| bbrock |
Jul 27 2019, 12:57 PM
Post
#30
|
|
914 Guru Group: Members Posts: 5,269 Joined: 17-February 17 From: Montana Member No.: 20,845 Region Association: Rocky Mountains |
QUOTE(Superhawk996 @ Jul 27 2019, 11:19 AM) I also have a tip for those of you with sand blasters. Not really new trick, but, I'm a slow learner. For years I've struggled with my pressure pot. Works great for 1st 10-15 lbs of media but then starts getting clogging and intermittent media supply. I've always worked around it by limiting the size of my batch to blast or by messing with various pressure setting above or below the sand to clear things out. So I finally broke down and spend a grand total of about $12 to buy a mini water separator from HF. Today is humid as can be and I had absolutely no clogging. (IMG:style_emoticons/default/biggrin.gif) How dumb is that? Only been fighting this nonsense for about 10 years! (IMG:style_emoticons/default/confused24.gif) I simply put typical air coupler's on it, now it can be moved from pressure pot to bench top booth, or whatever else might need extra water filtration. You wouldn't believe how much moisture gets this far down the line even tough I have another water trap back in the garage! This will make you mad. I have a nice Sharpe water separator on my air supply that I moved when I left Kansas, plus an auto drain purge on the compressor tank that pops off a puff of air every 30 minutes to keep the water drained. The other day I realized I had been running my compressor a LOT for blasting but hadn't drained the separator for months. I opened up the petcock until it hissed. Nothing but dry air. I LOVE not having to deal with humidity anymore! (IMG:style_emoticons/default/piratenanner.gif) |
|
|
|
| Superhawk996 |
Jul 27 2019, 05:00 PM
Post
#31
|
|
914 Guru Group: Members Posts: 7,309 Joined: 25-August 18 From: Woods of N. Idaho Member No.: 22,428 Region Association: Galt's Gulch |
|
|
|
|
| Superhawk996 |
Jul 27 2019, 05:05 PM
Post
#32
|
|
914 Guru Group: Members Posts: 7,309 Joined: 25-August 18 From: Woods of N. Idaho Member No.: 22,428 Region Association: Galt's Gulch |
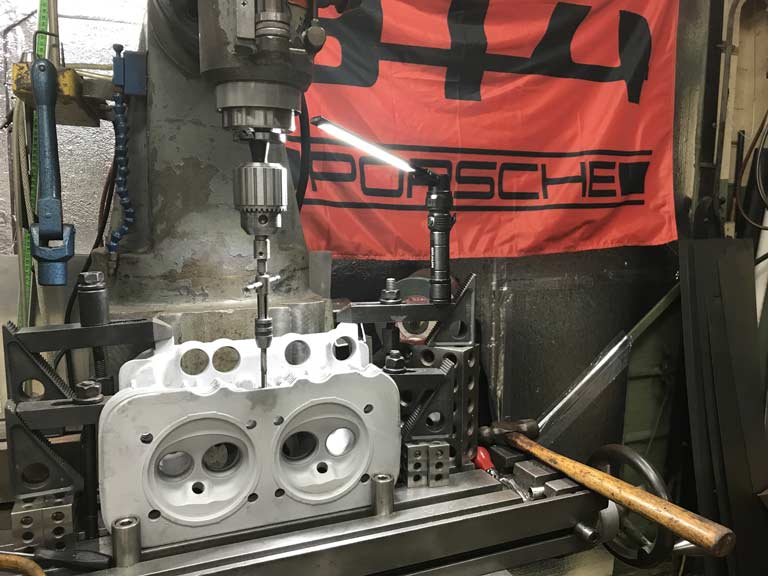
OK -- so I got the head set up in the mill and was able to get the broken stud out and salvaged the existing threads.
Here is the basic setup. 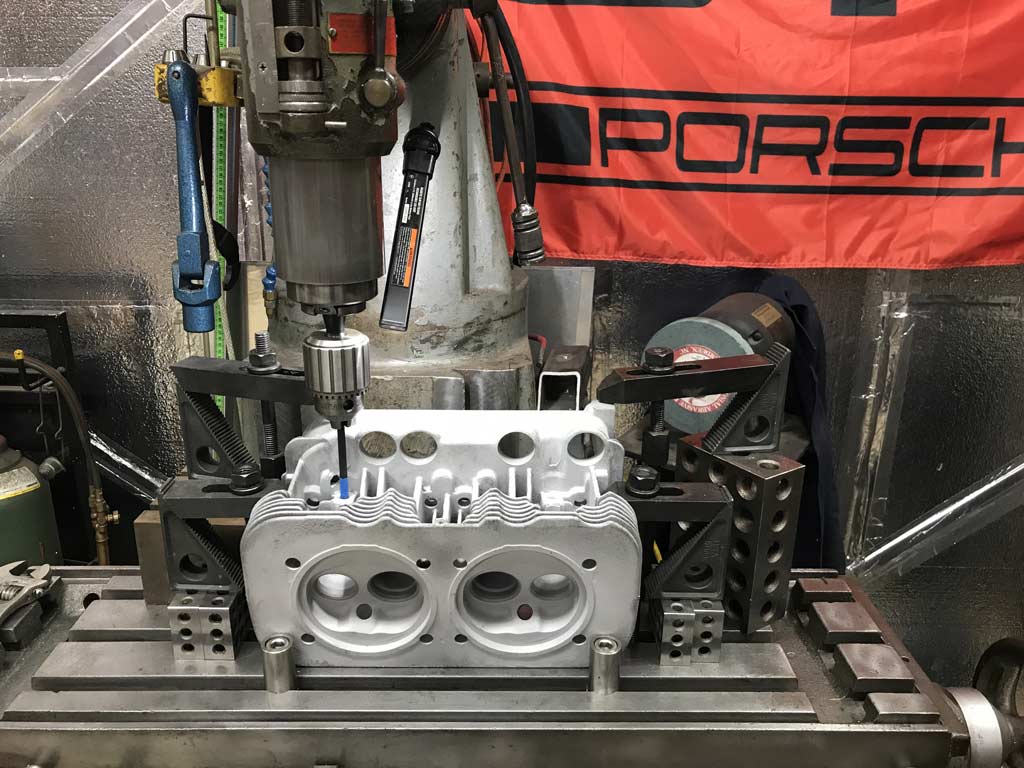 And here is the final result after a few hours of farting around. Not sure you guys want the gratuitous details on the interim steps. Will post if there is interest. 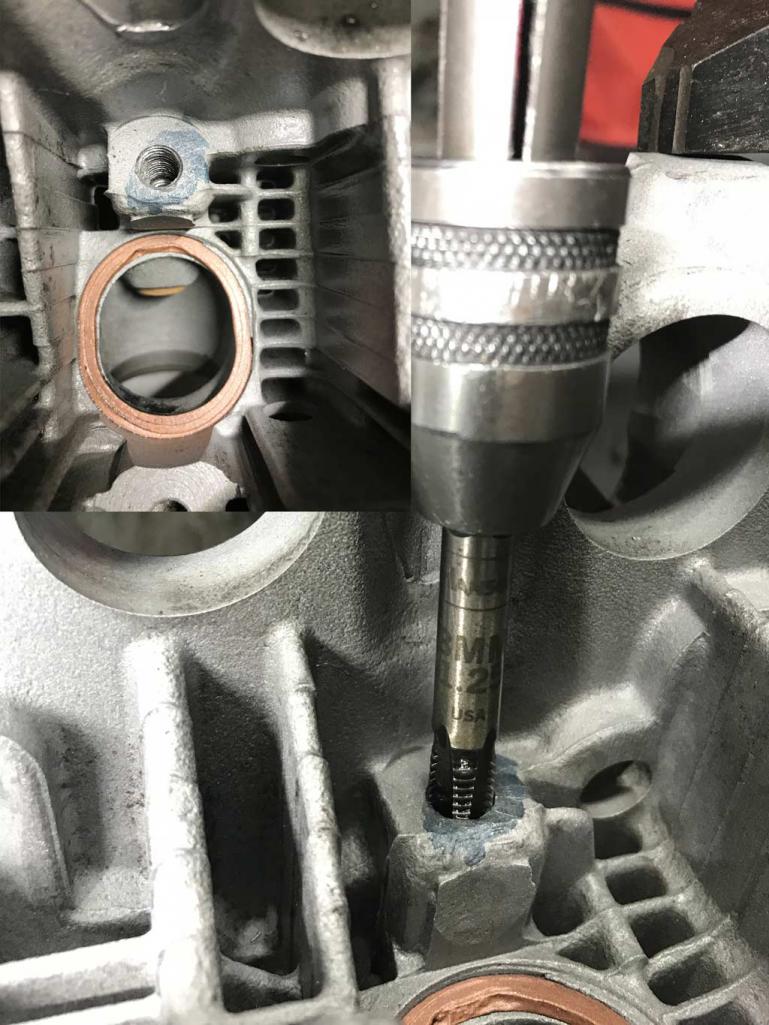 I feel better now. Two good heads - time to start sourcing new valves, springs, and valve guides. Good weekend so far! (IMG:style_emoticons/default/beerchug.gif) |
|
|
|
| bbrock |
Jul 27 2019, 05:09 PM
Post
#33
|
|
914 Guru Group: Members Posts: 5,269 Joined: 17-February 17 From: Montana Member No.: 20,845 Region Association: Rocky Mountains |
QUOTE(Superhawk996 @ Jul 27 2019, 05:05 PM) OK -- so I got the head set up in the mill and was able to get the broken stud out. Here is the basic setup. Sure, rub it in (IMG:style_emoticons/default/beer.gif) That really is awesome work. Those heads look beautiful. |
|
|
|
| Superhawk996 |
Jul 27 2019, 05:18 PM
Post
#34
|
|
914 Guru Group: Members Posts: 7,309 Joined: 25-August 18 From: Woods of N. Idaho Member No.: 22,428 Region Association: Galt's Gulch |
Now onto the last PITA on the other head. The stupid M6 cheese head screw that attaches the under cylinder tin also sheared off too.
 |
|
|
|
| Tdskip |
Jul 29 2019, 06:35 AM
Post
#35
|
|
Advanced Member Group: Members Posts: 3,740 Joined: 1-December 17 From: soCal Member No.: 21,666 Region Association: None |
Thanks for the update
|
|
|
|
| jd74914 |
Jul 29 2019, 06:54 AM
Post
#36
|
|
Its alive Group: Members Posts: 4,853 Joined: 16-February 04 From: CT Member No.: 1,659 Region Association: North East States |
Gotta ask...what kind of knee mill is that?
|
|
|
|
| Superhawk996 |
Jul 29 2019, 10:15 AM
Post
#37
|
|
914 Guru Group: Members Posts: 7,309 Joined: 25-August 18 From: Woods of N. Idaho Member No.: 22,428 Region Association: Galt's Gulch |
QUOTE(jd74914 @ Jul 29 2019, 08:54 AM) Gotta ask...what kind of knee mill is that? @jd74914 1950's vintage American Iron - about 1600 lbs worth. (IMG:style_emoticons/default/biggrin.gif) South Bend Vertical Mill. It's a bit different in that it doesn't use standard R8 collets but uses a NT30 taper but has a weird countersink in the taper for holding the taper into the spindle rather than using the threaded end like a standard NT30 or CAT40. I end up buying NT30 tooling but have to grind in the countersinks on the taper to use on this machine. I like it because NT30 is a positive drive vs. R8's that can be prone to slipping. Price was right ($500 delivered) back when I bought it a few decades back. Contemplating adding a VFD so that I can get spindle speed down to 40-45 RPM. Then I can cut my own valve seats. (IMG:style_emoticons/default/idea.gif) 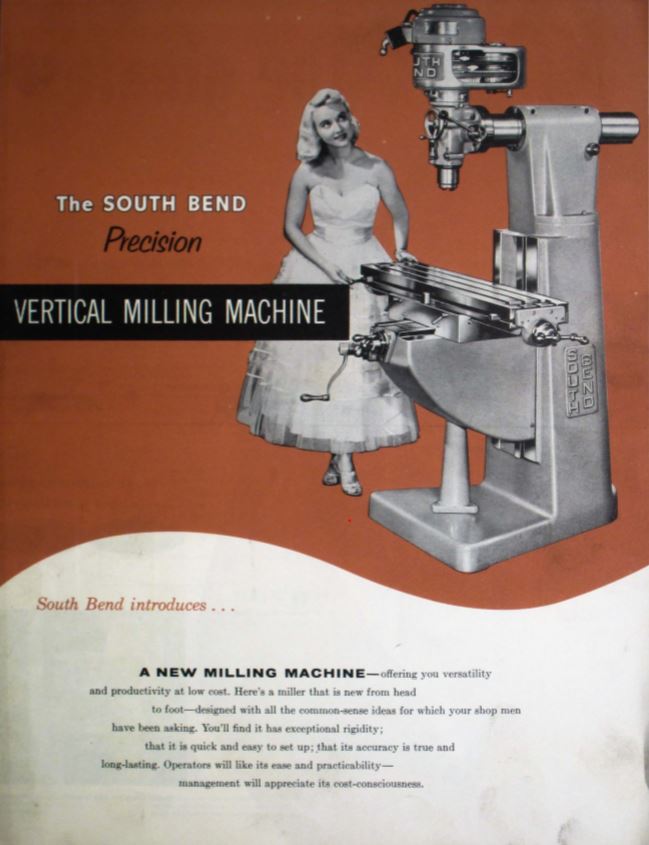 |
|
|
|
| jd74914 |
Jul 29 2019, 01:41 PM
Post
#38
|
|
Its alive Group: Members Posts: 4,853 Joined: 16-February 04 From: CT Member No.: 1,659 Region Association: North East States |
Very cool! Strange taper for a little mill but definitely better than the stuff with B&S9. Looks like it has a ton of z-travel too for having such a compact footprint, that's awesome! Do you have an equally cool lathe to go with it?
Definitely add the VFD-I've found that just being able to fine tune speeds really increases tool life and improves surface finish. It's a really nice knob to have. Little anecdote: One of the machinists I know is good friends with the owner of MasterCAM; he told me they were talking about advances in machining one day (from when they had both started in the early 70s) and his opinion was the most important change was the addition of continuous variable speed to all machining centers. |
|
|
|
| nathanxnathan |
Jul 29 2019, 04:16 PM
Post
#39
|
|
Member Group: Members Posts: 294 Joined: 16-February 18 From: Laguna Beach, CA Member No.: 21,899 Region Association: Southern California |
QUOTE(Superhawk996 @ Jul 27 2019, 04:18 PM) Now onto the last PITA on the other head. The stupid M6 cheese head screw that attaches the under cylinder tin also sheared off too. The screw for the under cylinder tin is actually 5mm, in case it matters 9 N 010 704 2 pan-head screw AM 5 X 10 |
|
|
|
| 76-914 |
Jul 29 2019, 05:03 PM
Post
#40
|
|
Repeat Offender & Resident Subaru Antagonist Group: Members Posts: 13,781 Joined: 23-January 09 From: Temecula, CA Member No.: 9,964 Region Association: Southern California |
QUOTE(nathanxnathan @ Jul 29 2019, 03:16 PM) QUOTE(Superhawk996 @ Jul 27 2019, 04:18 PM) Now onto the last PITA on the other head. The stupid M6 cheese head screw that attaches the under cylinder tin also sheared off too. The screw for the under cylinder tin is actually 5mm, in case it matters 9 N 010 704 2 pan-head screw AM 5 X 10 Yep, that's the Lone Oddball screw that usually gets misplace. BTW, you couldn't have the mill delivered for $500 today. (IMG:style_emoticons/default/hissyfit.gif) |
|
|
|
|
2 User(s) are reading this topic (2 Guests and 0 Anonymous Users)
0 Members:

|
Lo-Fi Version | Time is now: 27th August 2025 - 04:20 AM |
Invision Power Board
v9.1.4 © 2025 IPS, Inc.