|
|
|
Porsche, and the Porsche crest are registered trademarks of Dr. Ing. h.c. F. Porsche AG.
This site is not affiliated with Porsche in any way. Its only purpose is to provide an online forum for car enthusiasts. All other trademarks are property of their respective owners. |
|
|

  |

| Superhawk996 |
 Jul 29 2019, 06:28 PM Jul 29 2019, 06:28 PM
Post
#41
|
|
914 Guru  Group: Members Posts: 7,307 Joined: 25-August 18 From: Woods of N. Idaho Member No.: 22,428 Region Association: Galt's Gulch |
(IMG:style_emoticons/default/blink.gif)
Doh! (IMG:style_emoticons/default/headbang.gif) It's definately M6x1.0 now. (IMG:style_emoticons/default/confused24.gif) I quickly grabbed a standard cheese head and gauged it in the rush to get it done. Didn't realize that it was actually M5. We'll call it a custom upgrade. (IMG:style_emoticons/default/lol-2.gif) |
   |

 
|
| Superhawk996 |
Jul 29 2019, 06:38 PM
Post
#42
|
|
914 Guru Group: Members Posts: 7,307 Joined: 25-August 18 From: Woods of N. Idaho Member No.: 22,428 Region Association: Galt's Gulch |
QUOTE(76-914 @ Jul 29 2019, 07:03 PM)  BTW, you couldn't have the mill delivered for $500 today. (IMG:style_emoticons/default/hissyfit.gif) Sure you can. All about the deal & the negotiation process. In this case it was a piece of metal working equipment that a wood working shop had had for quite a while. Due to the NT30 spindle taper most of the the Bridgeport guys weren't interested and passed it over. He was basically stuck with a 1600lb paperweight taling up space in his shop. I basically bought it for $0.31 per pound. Cheaper than hot dogs. My buddy turned me on to it after it had been sitting unsold for a long while. Just struck up a deal inclusive of shipping to my driveway but the owner didn't want anything to do with placing it in the garage due to "liability" he said. He literally lifted it off the trailer with a fork lift and then left it in my driveway. It was still an awful lot of work to get that beast inside and positioned. By then my buddy regretted telling me about it in the first place. But, what are friends for. (IMG:style_emoticons/default/drunk.gif) I paid back the debt by some minor parts fab for his toy over the years.  |
|
|
|
| Superhawk996 |
Jul 29 2019, 06:58 PM
Post
#43
|
|
914 Guru Group: Members Posts: 7,307 Joined: 25-August 18 From: Woods of N. Idaho Member No.: 22,428 Region Association: Galt's Gulch |
I started cleaning up the stock pistons from this 099 engine. Overall pistons seem to be in great shape. I need to measure them to make sure but likely will reuse them with new rings for this build.
I used the ultrasonic cleaner with some simple green but it still struggled to get some of the really tough carbon off. Wondering what cleaning solutions folks are using with better results. Purple Power seemed to be in wide use based on quick troll of YouTube. (8/8/2019 post edit: Purple Power not recommended for Aluminum via their Website FAQ) Could resort to carb cleaner but the smell of that stuff will permeate the garage in a hurry. Then the wife starts to complain as it makes it's way into the house. To me, it smells like Hoppes #9 (pure heaven), but, my wife hates the smell. Women. (IMG:style_emoticons/default/rolleyes.gif) 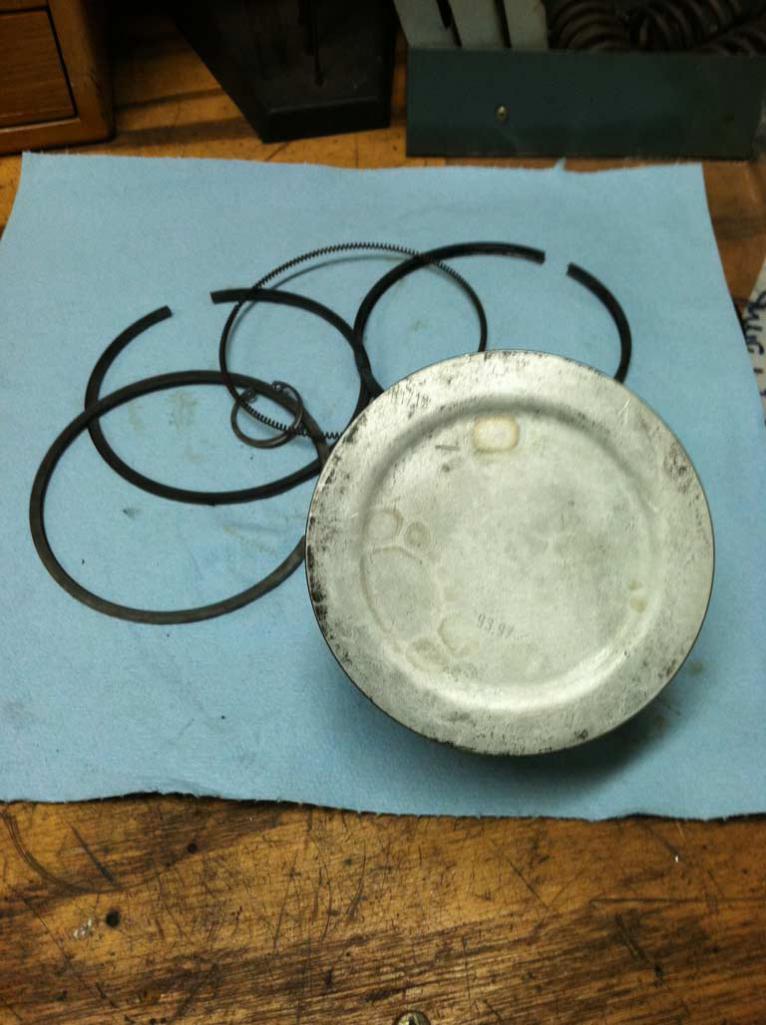 |
|
|
|
| Superhawk996 |
Aug 4 2019, 11:15 AM
Post
#44
|
|
914 Guru Group: Members Posts: 7,307 Joined: 25-August 18 From: Woods of N. Idaho Member No.: 22,428 Region Association: Galt's Gulch |
Still working on GA000099 slowly but surely.
I've been cleaning up pistons to figure out if they are worth reusing. I'd really like to reuse but the thought of building up a 2056 carburated engine has crossed my mind. I haven't ordered the cam for this engine yet so still some time to decide. In the end, I know I want a dead stock 2.0L FI engine for my project and have purchased 94mm NOS P&C's and a NOS cam to build that. But I need to decide what case I'm using. This is getting complicated. I've never done two engine rebuilds near simultaneously and the possibilities are limitless since I planned to sell off the spare engine later and I do have a set of Dell's sitting on standby that came off my original engine. For now I'm going to keep forging ahead assuming I'm using GA000099 as my engine case. But that needs machine work still to come. Cleaning pistons is a PITA. But, these seem to be low mileage, and, in good shape so I can't see tossing them. Maybe I'll offer them up on forum or Samba if I do decide to build a 2056. It is nice to get a fresh set of P&C and not have to do all this work! Measured skirts to make sure they aren't collapsed along with the ring grooves to see how much wear there is. Short answer - virtually none. All looking good on the 1 piston (cylinder #3) I measured yesterday. I'll do a few more today but expected #3 to be the worst due to location & generally running hottest. 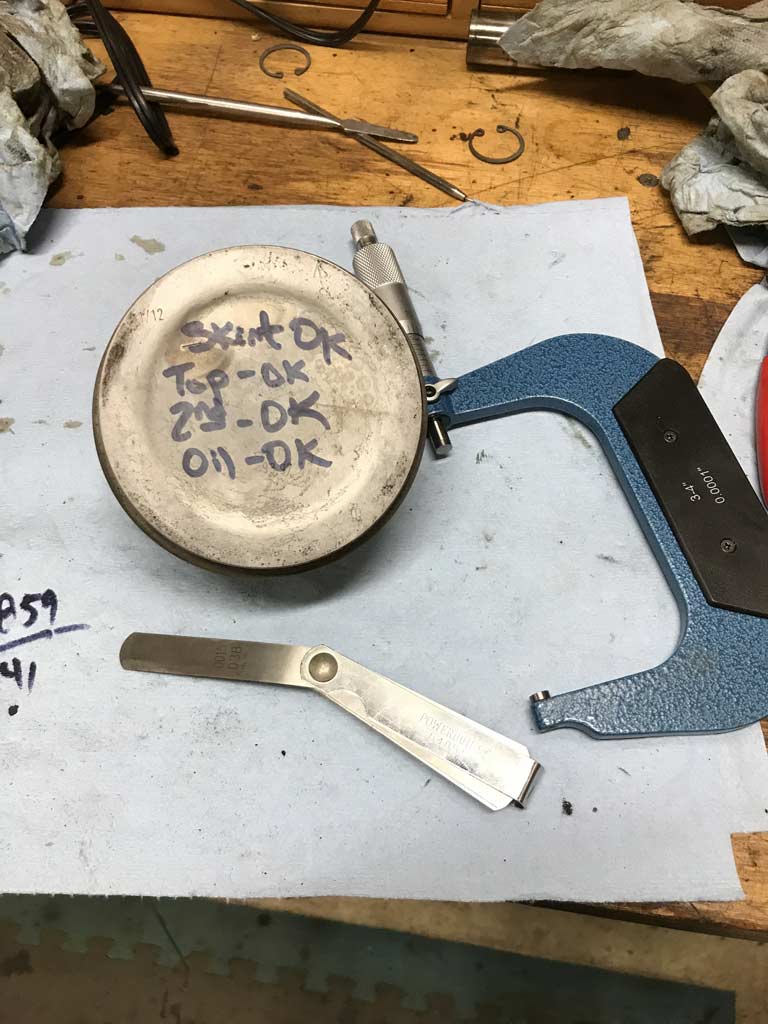 |
|
|
|
| 914_7T3 |
Aug 4 2019, 10:40 PM
Post
#45
|
|
Please forgive me, I'm new to all of this! Group: Members Posts: 1,875 Joined: 3-April 17 From: Los Angeles, CA Member No.: 20,991 Region Association: Southern California |
Phil, Keep posting on your progress. Of course its complicated, but well worth it as you get closer to the end goal. Ask me how I know (IMG:style_emoticons/default/laugh.gif)
|
 |
|
| Superhawk996 |
Aug 8 2019, 07:08 PM
Post
#46
|
|
914 Guru Group: Members Posts: 7,307 Joined: 25-August 18 From: Woods of N. Idaho Member No.: 22,428 Region Association: Galt's Gulch |
Continuation of piston and cylinder measurement.
I've been measuring pistons and cylinders and not quite believing the results. A few days ago I was measuring cylinders and comparing between the new set of KolbenSchmidt Pistons and Cylinders (P&C's) and those from GA000099. I measured 1st with a Mitutoyo snap gauge and my Chinese micrometer. Coming up right on the money for the cylinder. Right around 94mm with no real taper. 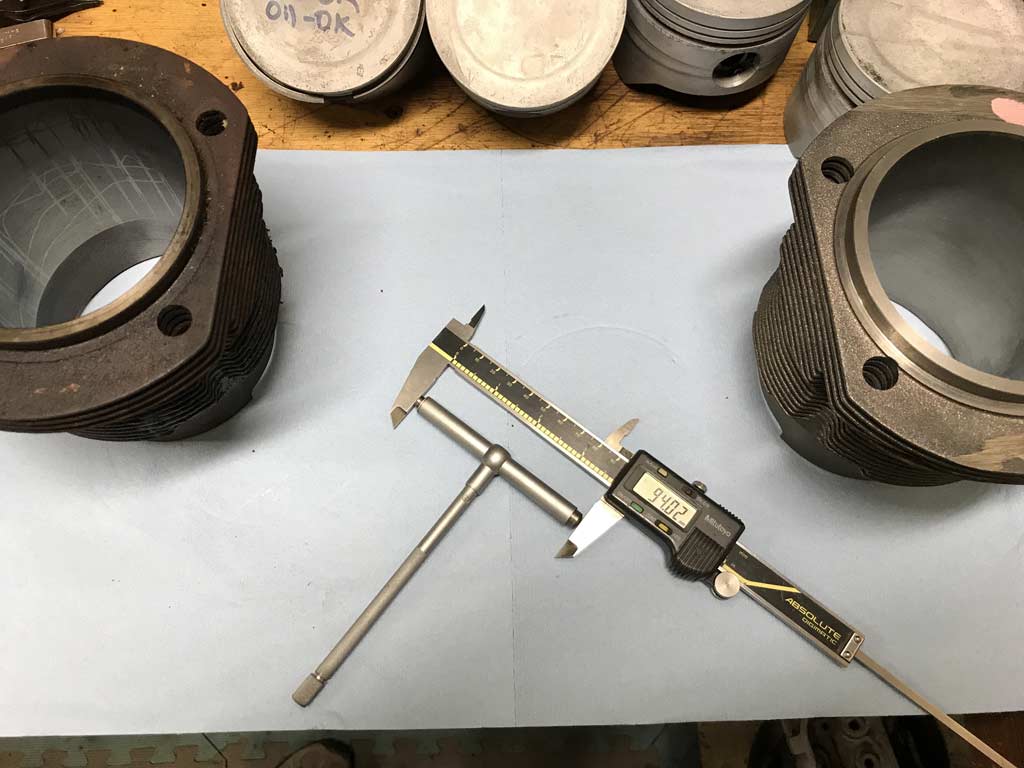 So then I did a quick check of the snap gauge with a set of Mitutoyo calipers. Same result about 94.02mm. 0.02mm = .0008" so about 0.001" over size. New cylinder size is 94mm with tolerance of 0.02mm - 0.05mm for new parts per factory manual with a upper wear limit at 0.2mm which is about .008". Not quite believing this, I took the time to set up a bore gauge at 94mm. Sure enough, still coming in about 0.001" oversize to the 94mm gauge (sorry for swapping units back and forth). 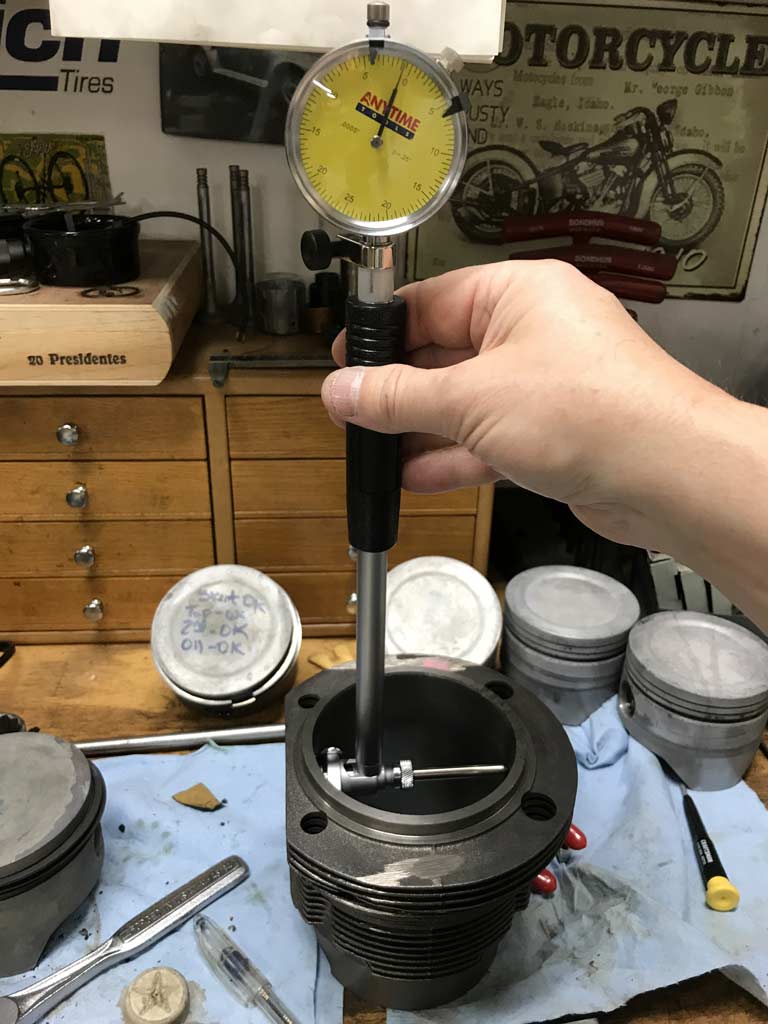 This does align pretty well to the fact that the cylinders visually look good and I can still see some of the original hone / hatch marks. Pretty amazing that these are still in great shape and can probably be cleaned up with just a light re-hone. Here's a quick video https://www.youtube.com/watch?v=-ObzdlUJhhc |
|
|
|
| Superhawk996 |
Aug 17 2019, 12:56 PM
Post
#47
|
|
914 Guru Group: Members Posts: 7,307 Joined: 25-August 18 From: Woods of N. Idaho Member No.: 22,428 Region Association: Galt's Gulch |
Received a new pair of HAM prepared AA Performance Chinese 2.0L 3 stud heads today.
Now, I know it's silly to judge by looks alone but I'm impressed. Packaging was 1st rate. UPS could have dropped these from 8 foot high and they would have been fine. The white boxes contain form fitted polystyrene foam that fits the head perfectly. These boxes are what ensured the heads got to US port in 1 piece from China so it would have been hard for UPS to screw it up with HAM's double boxing and foam packing. Great work! 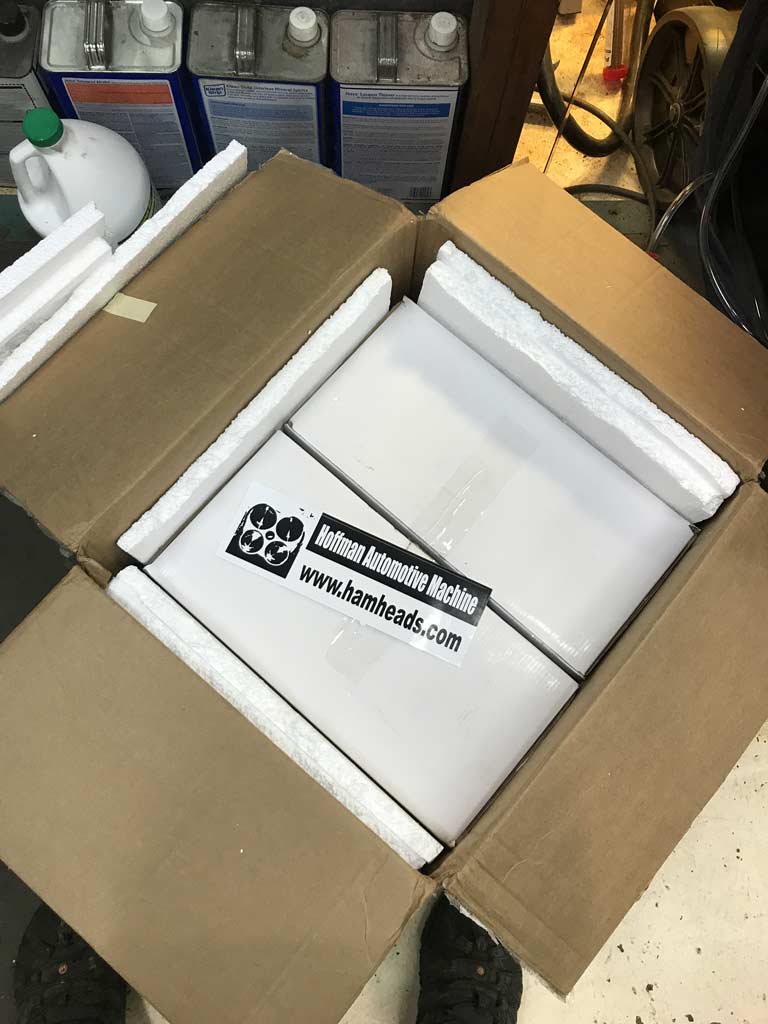 Quick side by side comparison of Chinese head (on right) vs. Porsche 2.0L Head (on left) is pretty good. As Len Hoffman describes on his website, these are basically a straight up copy of the Porsche 2.0L factory head. As he describes there is a bit more porosity and casting flash than OEM but honestly this should be expected with any Chinese knockoff. I haven't made up my mind which engine these will go on - the engine I keep for my car or the engine I sell. I'm honestly tempted to buy another set of these HAM heads and keep these GA00099 Porsche heads for later given how hard it seems to be getting to find real 2.0L heads that don't have cracking issues. Here's a couple more quick views. 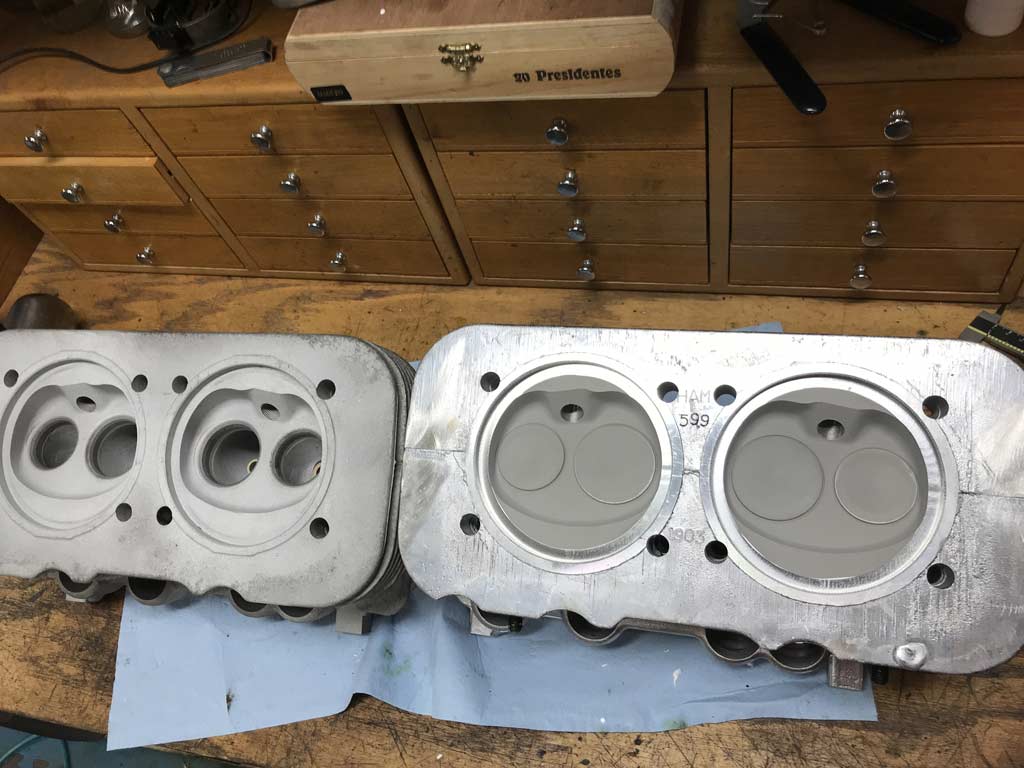 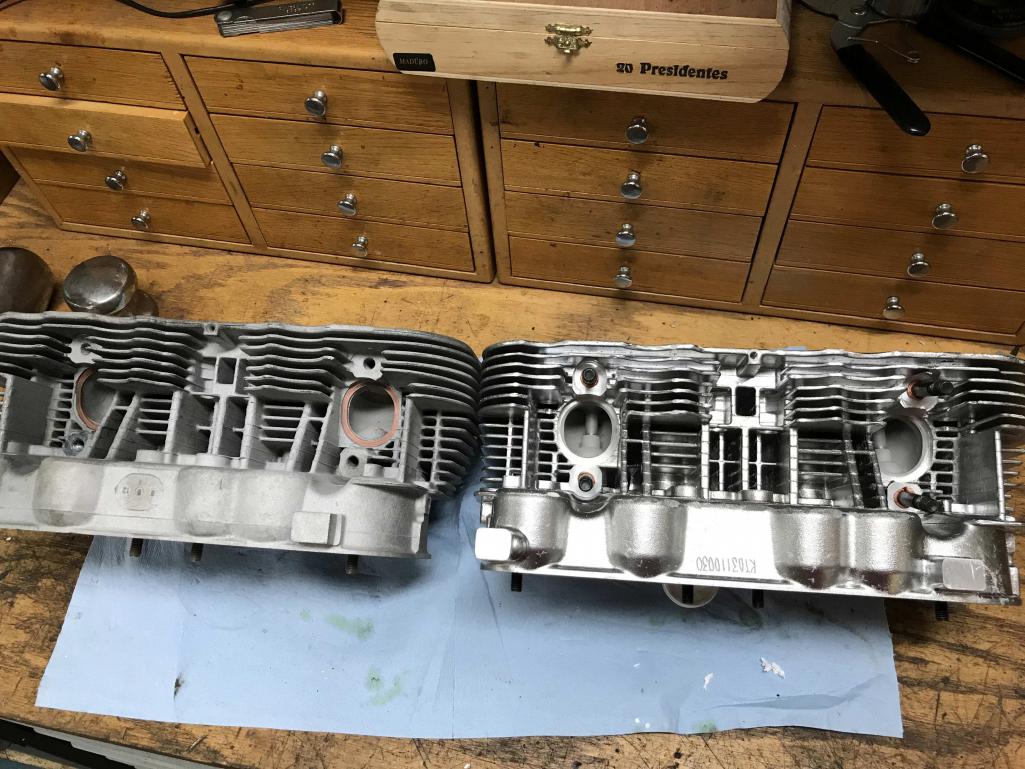 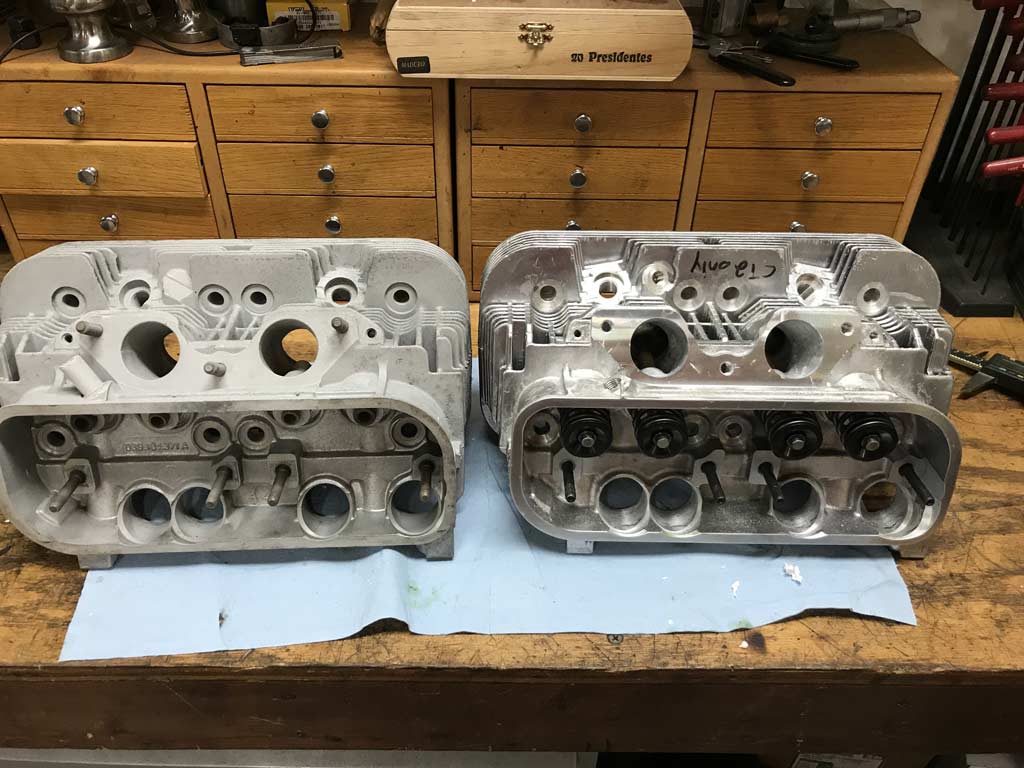 |
|
|
|
| Superhawk996 |
Aug 17 2019, 01:02 PM
Post
#48
|
|
914 Guru Group: Members Posts: 7,307 Joined: 25-August 18 From: Woods of N. Idaho Member No.: 22,428 Region Association: Galt's Gulch |
Other than the exciting arrival of heads, my 914 work this week was pretty . . . weak.
I did drop of the engine tin for degreasing. That will go to powder coat once done. I also dropped off GA000099 cylinders for degreasing now that I've determined that they are in great shape and reusable. Did get a bit of disappointing news from my machine shop. Let's just say their customer record keeping is not what it should be. Apparently they can't find a source for the rod bushings and want me to order them. Not a big deal. However, they had the rods for the past 2 weeks or more. When I finally called to check on them . . . . you guessed it. . . . they lost my phone number and were waiting for me to call them. (IMG:style_emoticons/default/chair.gif) |
|
|
|
| Superhawk996 |
Aug 21 2019, 06:09 PM
Post
#49
|
|
914 Guru Group: Members Posts: 7,307 Joined: 25-August 18 From: Woods of N. Idaho Member No.: 22,428 Region Association: Galt's Gulch |
The stork dropped off some more parts for GA000099.
Fresh Rings and valve guides. (IMG:style_emoticons/default/piratenanner.gif) 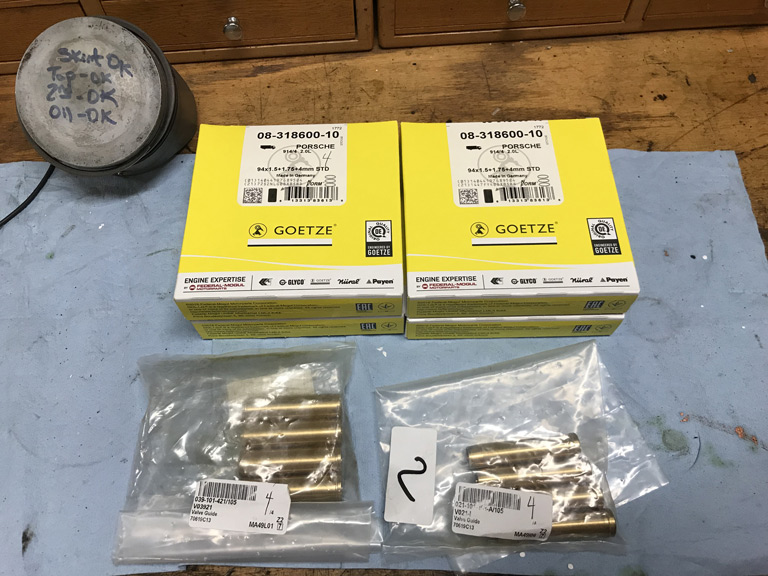 Still can't do much with a gaping hole in my shoulder. It honestly looks like something from a horror movie. Can't wait to get to the 2nd surgery on 9/17 to put a real skin layer back on it just so it looks sort of normal. Nothing to do but to collect parts in anticipation. At least it gives me something to look forward to. (IMG:style_emoticons/default/confused24.gif) |
|
|
|
| bbrock |
Aug 21 2019, 07:23 PM
Post
#50
|
|
914 Guru Group: Members Posts: 5,269 Joined: 17-February 17 From: Montana Member No.: 20,845 Region Association: Rocky Mountains |
QUOTE(Superhawk996 @ Aug 21 2019, 06:09 PM) Can't wait to get to the 2nd surgery on 9/17 to put a real skin layer back on it just so it looks sort of normal. I can't wait either. I want to see that pic! (IMG:style_emoticons/default/rolleyes.gif) |
|
|
|
| Superhawk996 |
Oct 9 2019, 05:30 PM
Post
#51
|
|
914 Guru Group: Members Posts: 7,307 Joined: 25-August 18 From: Woods of N. Idaho Member No.: 22,428 Region Association: Galt's Gulch |
It's been a while since I've updated this thread progress has been slow.
Tin is still out for media blast and powder coat. I did finally get the rods rebuilt. 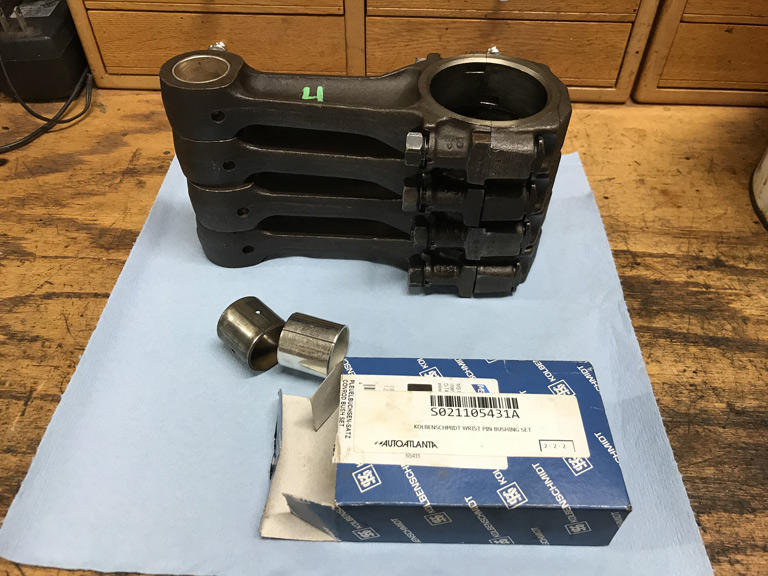 I ended up going with the KolbenSchmidt rod bushings. Initially I purchased AAP rod bushings but my machinist had some reservations about pressing them in because they seemed a little oversize. I had some reservations about the KS bushings since they seemed to lack the "interlock" design that was on the 1st rod bushing we pressed out. At the recommendation of my machinist, I ended up purchasing KS bushings at least for comparison purposes. As it turned out, the KS bushings were a bit nicer both in finish and in fit. The KS bushings were round where as the AAP bushings were a bit oval. Honestly, I'm not sure it would matter after pressing but my machine shop felt more comfortable with KS and that is what was used. Subsequent to pulling the bushings out of two rod sets (GA000099 and GA004310) it was clear that 6 of the 8 rods actually had bushings that lacked the "interlock" feature (shown on left) and appeared to more closely match the KS bushings (far right). All four of the rods from GA000099 which were known to be stock, had the KS style bushings. 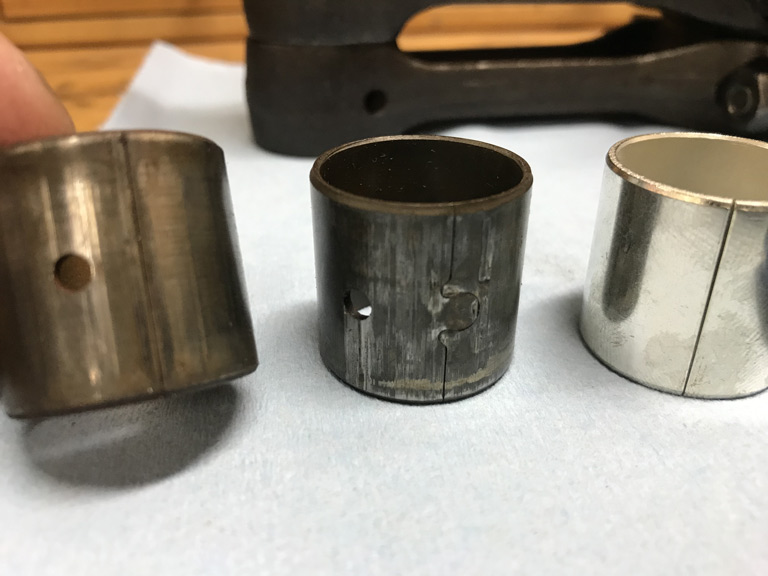 |
|
|
|
| barefoot |
Oct 9 2019, 06:11 PM
Post
#52
|
|
Senior Member Group: Members Posts: 1,426 Joined: 19-March 13 From: Charleston SC Member No.: 15,673 Region Association: South East States |
QUOTE(Superhawk996 @ Aug 17 2019, 02:56 PM) Received a new pair of HAM prepared AA Performance Chinese 2.0L 3 stud heads today. Quick side by side comparison of Chinese head (on right) vs. Porsche 2.0L Head (on left) is pretty good. As Len Hoffman describes on his website, these are basically a straight up copy of the Porsche 2.0L factory head. As he describes there is a bit more porosity and casting flash than OEM but honestly this should be expected with any Chinese knockoff. I haven't made up my mind which engine these will go on - the engine I keep for my car or the engine I sell. I'm honestly tempted to buy another set of these HAM heads and keep these GA00099 Porsche heads for later given how hard it seems to be getting to find real 2.0L heads that don't have cracking issues. For any heads, check for excess casting flash in the cooling fins. My 2L heads had lots of flash with age, junk had accumulated in the cooling passages limiting air flow considerably. Here's agter drilling out:  |
|
|
|
| Superhawk996 |
Oct 9 2019, 06:27 PM
Post
#53
|
|
914 Guru Group: Members Posts: 7,307 Joined: 25-August 18 From: Woods of N. Idaho Member No.: 22,428 Region Association: Galt's Gulch |
Have you ever noticed how one project leads to another side diversion?
As part of getting ready to rebuild GA000099, I've wanted to modify my vertical mill set up so that I can slow down the spindle to do cylinder honing and ultimately, I'd like to be able to cut my own valve seats down the road. My current slowest spindle speed is 135 RPM and that is just too fast for cutting valve seats. So I broke down and bought a Variable Frequency Drive (VFD) for my mill which operates on 220V 3 phase power. Previously I was using a static phase converter that creates 3 phase power from single phase 220VAC. The problem is that it only creates the 3rd phase for starting purposes. After starting, the 3rd phase drops out and then the mill is basically running on 2 phases. This works but it also de-rates the motor. For example my mill is 1 HP. But running on 2 phases it is only 2/3 HP at best not accounting for other inefficiencies. The VFD will get me back to rated horsepower and more importantly, it allows for variable speed control. It also has some other benefits like soft starts but those were secondary to getting the spindle slowed down. So after some rewiring of my garage and installation of proper conduit this time around to protect my mill wiring, I have the VFD wired up and operational. Still need to build a bracket to mount it to the mill or within close reach. Doh! Another project that doesn't involve the 914! (IMG:style_emoticons/default/confused24.gif) https://www.youtube.com/watch?v=cQ9_Aofg9aA |
|
|
|
| 76-914 |
Oct 11 2019, 06:56 PM
Post
#54
|
|
Repeat Offender & Resident Subaru Antagonist Group: Members Posts: 13,778 Joined: 23-January 09 From: Temecula, CA Member No.: 9,964 Region Association: Southern California |
A few years back I bought the KS main bearings from AA.I paid through the nose for them but they were the "real deal", in short supply and at that time there were some trash bearings floating around. No one minds paying for the "real deal". (IMG:style_emoticons/default/beerchug.gif)
|
|
|
|
| Superhawk996 |
Oct 20 2019, 04:32 PM
Post
#55
|
|
914 Guru Group: Members Posts: 7,307 Joined: 25-August 18 From: Woods of N. Idaho Member No.: 22,428 Region Association: Galt's Gulch |
QUOTE(Superhawk996 @ Jul 15 2019, 10:03 PM) There also appears to be an error in machining the flywheel end main bearing bore. Note the step mismatch between case halves (yes, the case half ID stamps match so this wasn't 1/2 of one case and 1/2 of another). There was also that little unmachined tab that partly obscures the main seal oil drain back hole.  I finally got around to setting this GA000099 case up on the mill to fix the mismatch in the Rear Main Seal counter bore area. Setup and dialed in the bearing bore. 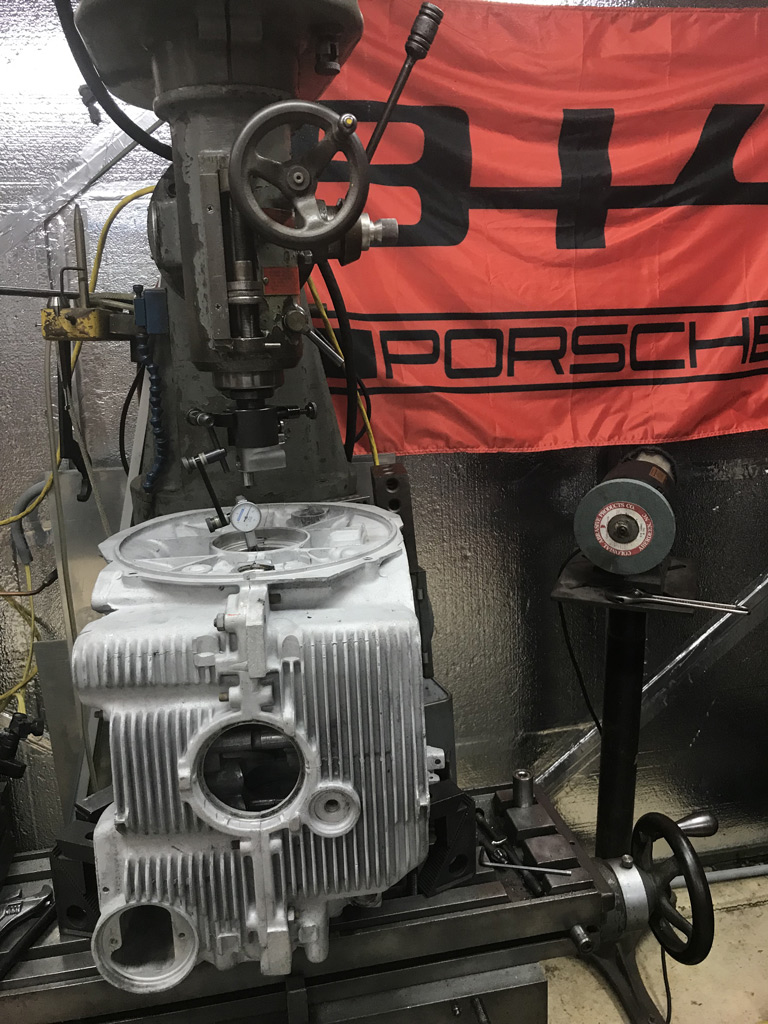 Finished product. 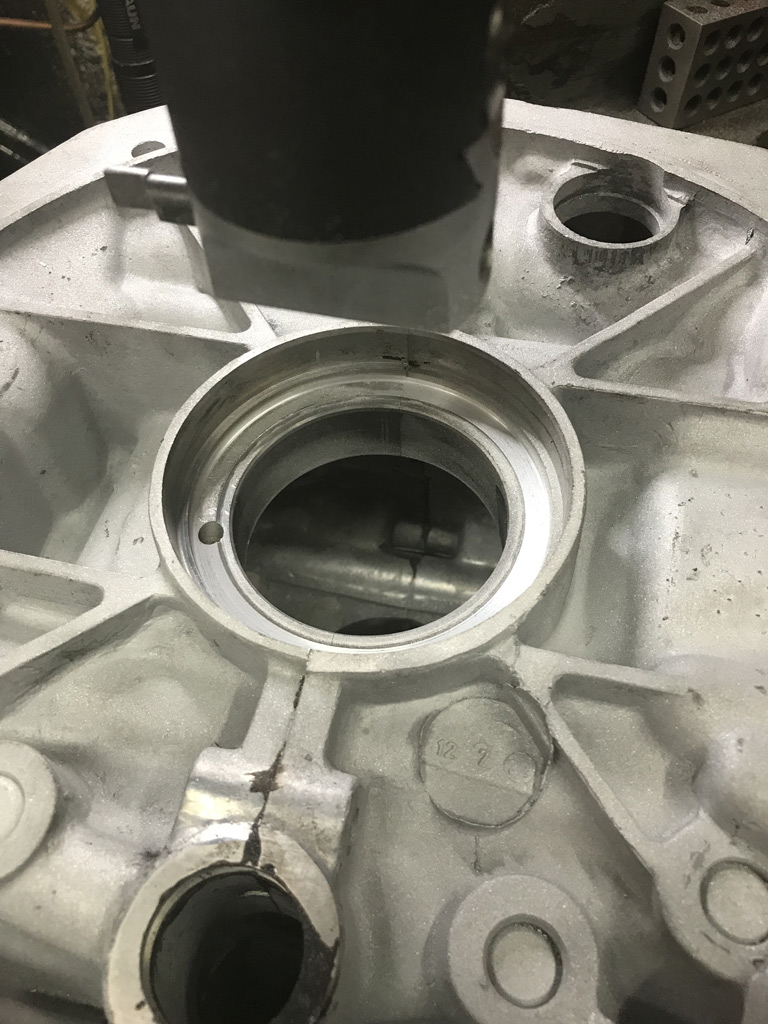 If anyone is interested, I can post a few more details and a short video but mostly wanted to get this fix documented. Next up: Need to pull all the oil galley plugs in order to get full access for galley cleaning. |
|
|
|
| Superhawk996 |
Oct 27 2019, 10:54 AM
Post
#56
|
|
914 Guru Group: Members Posts: 7,307 Joined: 25-August 18 From: Woods of N. Idaho Member No.: 22,428 Region Association: Galt's Gulch |
GA000099 galley Plugs pulled.
 For those not convinced that galley plugs should be pulled I offer up the following pictures. First is a dark view of the sludge piled up against the end of the galley plug. 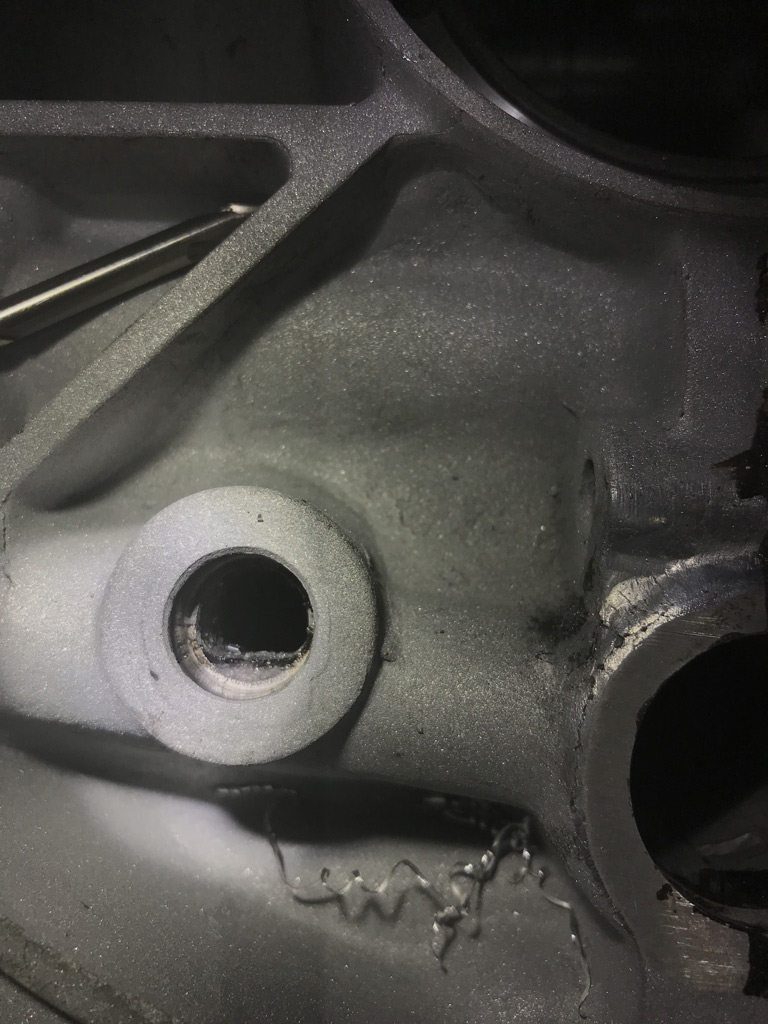 The second is the goop scooped out.  After I finish machining the case, all galleys will get a good scrubbing with a galley brush! |
|
|
|
| Superhawk996 |
Oct 27 2019, 11:05 AM
Post
#57
|
|
914 Guru Group: Members Posts: 7,307 Joined: 25-August 18 From: Woods of N. Idaho Member No.: 22,428 Region Association: Galt's Gulch |
Check of cylinder deck shows that we have some flatness issues that need to be corrected.
I was able to easily get a .004" feeler under my straight edge. Straight edge is .0005" out of flat as judged against my granite surface plate.  My flat edge spans both cylinder spigots which is the best way to judge this surface since both cylinders need to be on the same plane for the heads to seal. They could be corrected later via cylinder base shims. However, in theory they should be on the same plane to minimize downstream problems later with sealing, valve geometry, and compression ratios. I will fly cut this deck surface once I finish pulling the various studs from the case halves and get around to Tramming my mill to ensure that they are surfaced flat. |
|
|
|
| 914werke |
Oct 27 2019, 12:06 PM
Post
#58
|
|
"I got blisters on me fingers" Group: Members Posts: 11,347 Joined: 22-March 03 From: USofA Member No.: 453 Region Association: Pacific Northwest |
Nice! following..
not to (IMG:style_emoticons/default/hijacked.gif) but though this would be of interest. Attached thumbnail(s) 
|
|
|
|
| Superhawk996 |
Oct 27 2019, 01:16 PM
Post
#59
|
|
914 Guru Group: Members Posts: 7,307 Joined: 25-August 18 From: Woods of N. Idaho Member No.: 22,428 Region Association: Galt's Gulch |
(IMG:style_emoticons/default/aktion035.gif) Right on.
Earlier in the year I had someone PM me about another low serial # GA engine. I think it was in the 40's! 11/4/2009 update: I went back though my PM's. the early case referenced was GA000004. Holy Cow! That is cool. What is your plan for it? I recommend Get Er' running! Do you happen to have a photo of the rear main seal end? I'm curious if other early cases had the machining error that mine had. We need to find GA000001 (IMG:style_emoticons/default/cheer.gif) Come on guys who has the lowest serial # GA engine? |
|
|
|
| Superhawk996 |
Oct 27 2019, 07:12 PM
Post
#60
|
|
914 Guru Group: Members Posts: 7,307 Joined: 25-August 18 From: Woods of N. Idaho Member No.: 22,428 Region Association: Galt's Gulch |
So I spent some time to make sure my mill was set up perfectly. When fly cutting surfaces, if the head of the mill isn't perfectly square to the table, you will end up with an imperfect surface finish that will be prone to leaking.
For any of the guys doing machine work, I love this EDGE Technology head tram. Makes the work pretty quick and easy . . . relatively speaking vs. old school singe dial indicator.  Dual dial indicators make the job so much easier. The only problem was that I chickened out on cutting GA000099 1st. I decided that I had better make sure I liked the result before committing to cut 099. Instead I cut GA004310 that I viewed as a little more disposable. As it turns out, everything worked out OK. Here is a partial cut at about 0.004". You can see the surface cleaning up but still haven't got into all the old material. 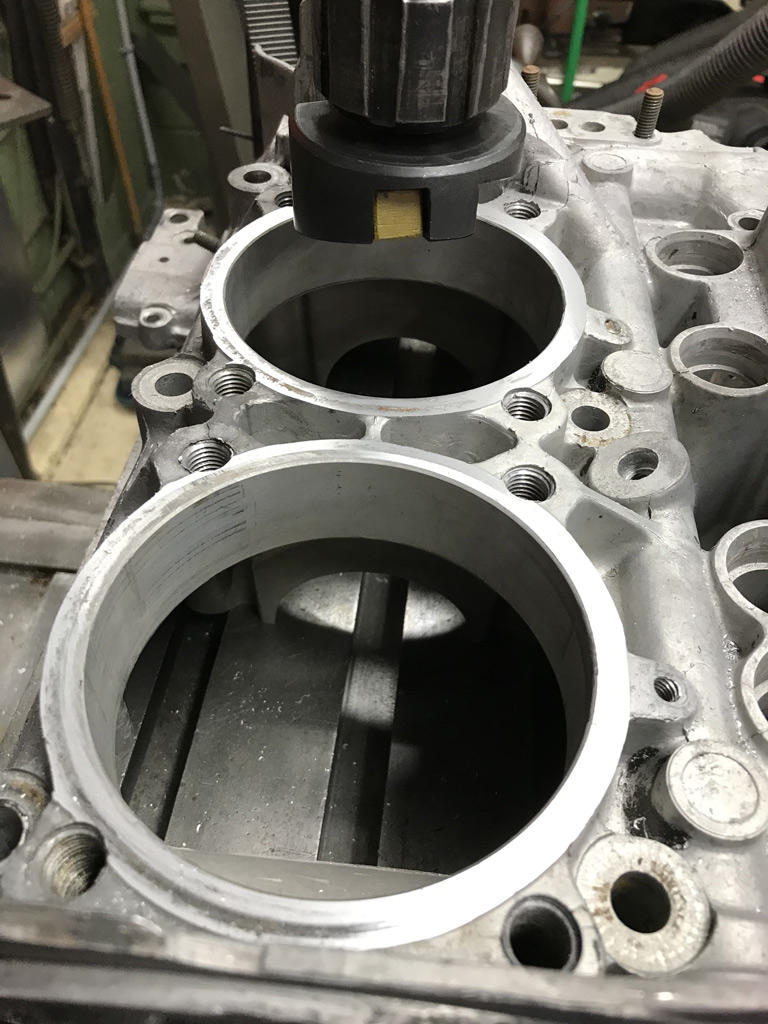 Ultimately, I had to cut a bit more than I was hoping. This case showed about the same 0.004" from flat as I showed earlier on the GA000099 case. However, it took 0.010" to clean it up fully which isn't a big deal since shims are easily available in 0.010" increments. Here's the final clean up. 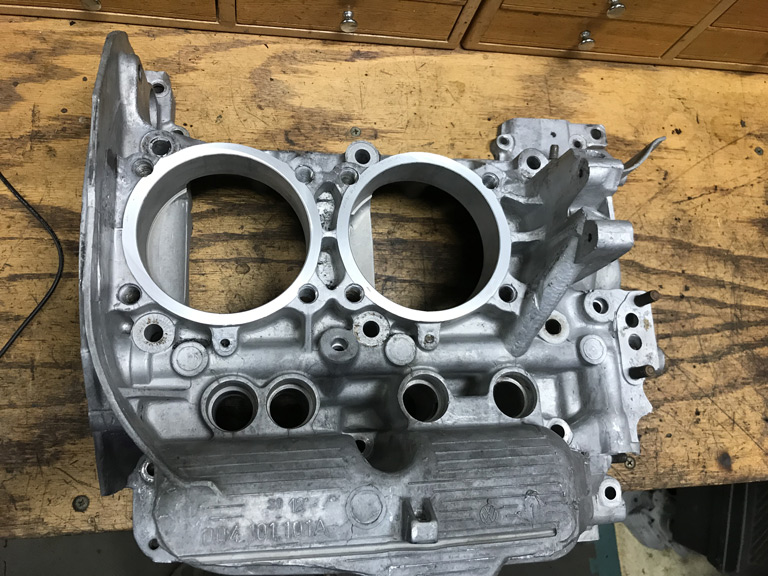 Happy with the result. Next time I'll cut GA000099! |
|
|
|
|
1 User(s) are reading this topic (1 Guests and 0 Anonymous Users)
0 Members:

|
Lo-Fi Version | Time is now: 25th August 2025 - 01:39 PM |
Invision Power Board
v9.1.4 © 2025 IPS, Inc.