|
|
|
Porsche, and the Porsche crest are registered trademarks of Dr. Ing. h.c. F. Porsche AG.
This site is not affiliated with Porsche in any way. Its only purpose is to provide an online forum for car enthusiasts. All other trademarks are property of their respective owners. |
|
|

  |

| cassmcentee |
 Oct 28 2019, 08:54 AM Oct 28 2019, 08:54 AM
Post
#61
|
|
Member  Group: Members Posts: 230 Joined: 12-July 18 From: Squaw Valley, CA Member No.: 22,304 Region Association: Central California |
Thank you for this thread!
I'm breaking down GA000130 and am learning from your work. So appreciative! |
   |

 
|
| Superhawk996 |
Nov 2 2019, 10:30 PM
Post
#62
|
|
914 Guru Group: Members Posts: 7,309 Joined: 25-August 18 From: Woods of N. Idaho Member No.: 22,428 Region Association: Galt's Gulch |
Burning the late night oil.
So many other obligations for the weekend pushed machine work on GA000099 case into the late evening as the only means to get something productive done this weekend. The past couple weekend have been occupied with getting MIL moved into an assisted care facility after a fall. Nothing broken but her days of living alone and 90 miles away are over. (IMG:style_emoticons/default/sad.gif) Hard to see loved ones aging. Hard enough to see myself aging. (IMG:style_emoticons/default/blink.gif) As predicted based on initial measurements it took 0.010" of clean up to get a completely clean cylinder deck surface. 0.005" pretty much cleaned things up (recall I could get a 0.004" feeler under my straight edge) so I feel comfortable about the work. The last 0.005" is pretty much just to ensure complete flatness and to easily coincide with the availability of cylinder base shims in 0.010" thickness. Here are the final pic's of the Cylinder 1/2 side: 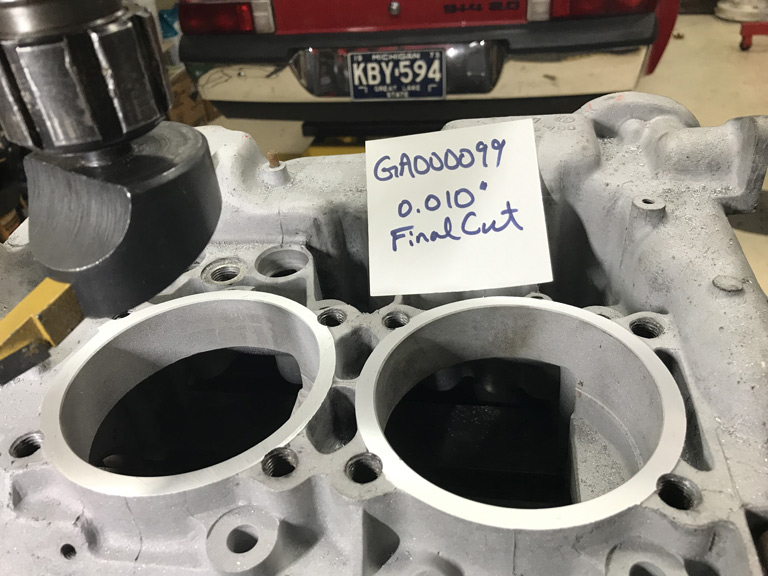 And the 3/4 cylinder side: 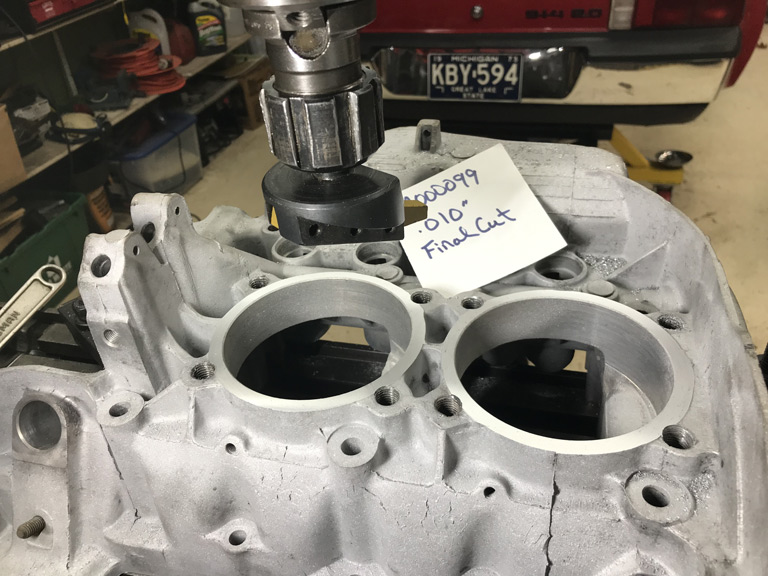 Need to follow up with my powder coat guy. Engine tin is past due It should have been complete a week or two ago. (IMG:style_emoticons/default/dry.gif) Also need to get my own butt in gear. I need to get the original cam out of this engine sent to Elgin for a weld and regrind back to stock. There isn't a terrible amount of wear on it but there is some on the lobes that share lifters. |
|
|
|
| Superhawk996 |
Nov 4 2019, 07:03 PM
Post
#63
|
|
914 Guru Group: Members Posts: 7,309 Joined: 25-August 18 From: Woods of N. Idaho Member No.: 22,428 Region Association: Galt's Gulch |
QUOTE(Superhawk996 @ Oct 27 2019, 02:16 PM)  Earlier in the year I had someone PM me about another low serial # GA engine. I think it was in the 40's! That is cool. What is your plan for it? I recommend Get Er' running! Do you happen to have a photo of the rear main seal end? I'm curious if other early cases had the machining error that mine had. We need to find GA000001 (IMG:style_emoticons/default/cheer.gif) Come on guys who has the lowest serial # GA engine? 11/4/2009 update on low GA cases: I went back though my PM's, the early case referenced was GA000004. Holy Cow! It may be for sale if someone is seriously interested in a super early 73' GA case. Not sure anyone can top that! (IMG:style_emoticons/default/smile.gif) If you're seriously interested I'll pass along member contact info to you via PM if you wish to locate GA000004. Its not for me. I'm already over committed on 3 simultaneous engine builds that are currently Work-in-Progress. I need to get back to rust repair work now that my shoulder is healed but I'm on a temporary hold for a pinched nerve and then I can get back at it. |
|
|
|
| wndsrfr |
Nov 5 2019, 07:33 AM
Post
#64
|
|
Senior Member Group: Members Posts: 1,456 Joined: 30-April 09 From: Rescue, Virginia Member No.: 10,318 Region Association: MidAtlantic Region |
When you get the cylinder base shims, order in twice as many as you think you need and carefully deburr them then measure...I found significant variation within one package....
|
|
|
|
| Superhawk996 |
Nov 5 2019, 06:46 PM
Post
#65
|
|
914 Guru Group: Members Posts: 7,309 Joined: 25-August 18 From: Woods of N. Idaho Member No.: 22,428 Region Association: Galt's Gulch |
QUOTE(wndsrfr @ Nov 5 2019, 08:33 AM) When you get the cylinder base shims, order in twice as many as you think you need and carefully deburr them then measure...I found significant variation within one package.... Thanks! I haven't gotten that far but sounds like great advice. |
|
|
|
| Superhawk996 |
Nov 16 2019, 11:48 PM
Post
#66
|
|
914 Guru Group: Members Posts: 7,309 Joined: 25-August 18 From: Woods of N. Idaho Member No.: 22,428 Region Association: Galt's Gulch |
Here's a continuation of the case machine work that is ongoing on this GA000099 case and GA004310. It's easier to do both cases simultaneously as batch work to minimize set up time.
There are 11 galley plugs on each case that need to be bored and tapped. Tonight I managed to get six on each knocked out on each case. The 3/8" NPT plugs are a bear. Due to the size of the tap and especially since they are cutting a tapered bore out of stright hole, they take a lot of muscle to get them tapped to the proper depth. This job would be a whole lot easier if I had a NPT tapered reamer to clear out some of the material but I don't so it's just a good workout for the arms and shoulders. Typical process. Locate the center of the galley bore. 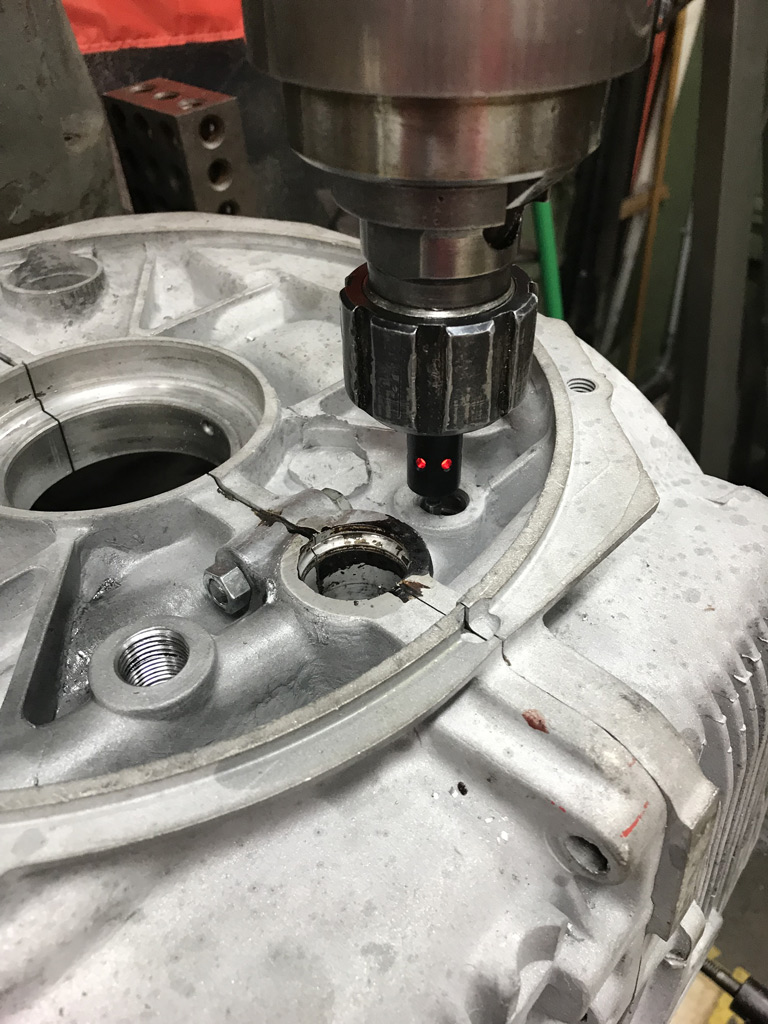 Bore the galley end to 3/8" NPT size. 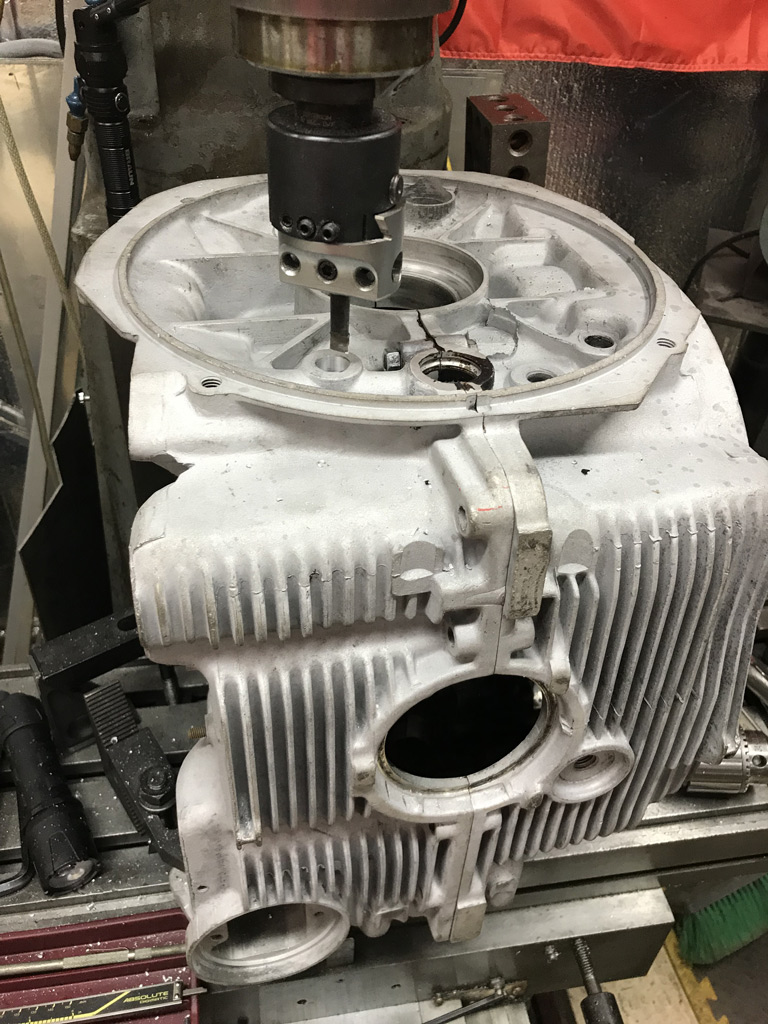 And then the worst part, tapping the hole. 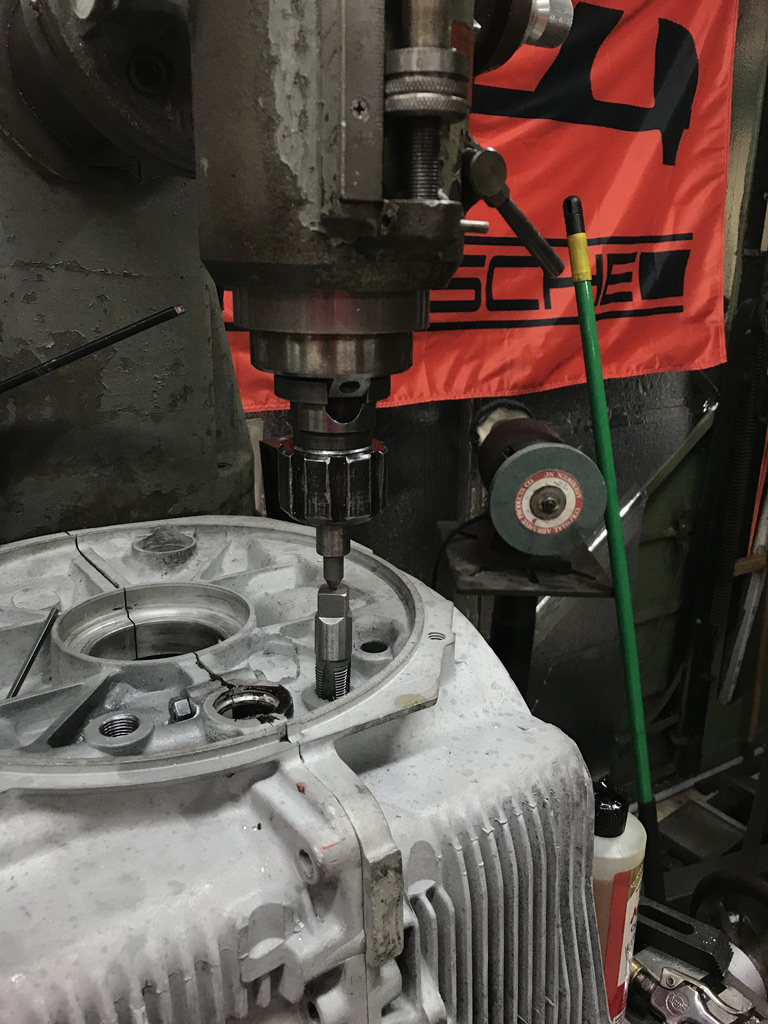 I contemplated using an impact gun to drive the tap but since the tap is tapered there is a risk of cracking the case if you try to drive too much tap too fast. Cutting the taper is a time consuming back and forth affair of advancing the tap only about 90 degrees at a time and making sure the threads and the taper is cut before advancing another 90 degrees or so. Finished the rear galley plugs. 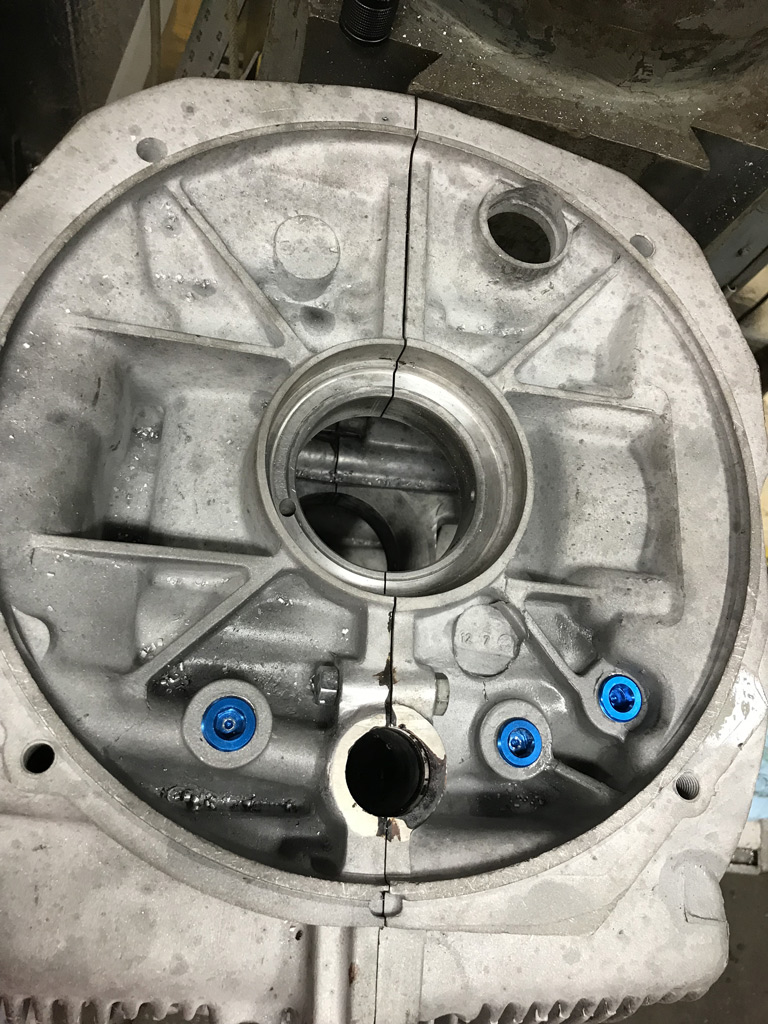 And got three of the front end plugs in place. 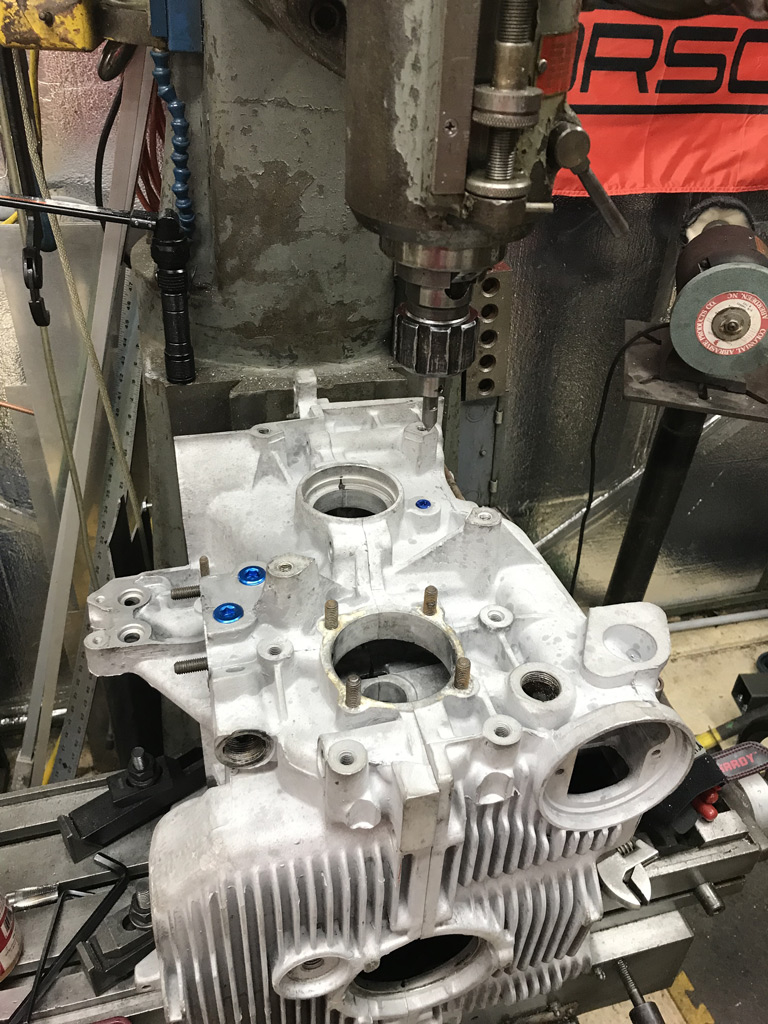 Hope to finish up the other 5 tomorrow but those will require more complicated set ups on the mill due to the galleys being at an angle. |
|
|
|
| Superhawk996 |
Nov 18 2019, 07:52 PM
Post
#67
|
|
914 Guru Group: Members Posts: 7,309 Joined: 25-August 18 From: Woods of N. Idaho Member No.: 22,428 Region Association: Galt's Gulch |
Work on the galley plugs continues . . . .
 Simply takes longer when you can only drill and tap a hole or two before having to put my mill into another Yoga pose. The compound angle on this one has me near the limits of my table travel. 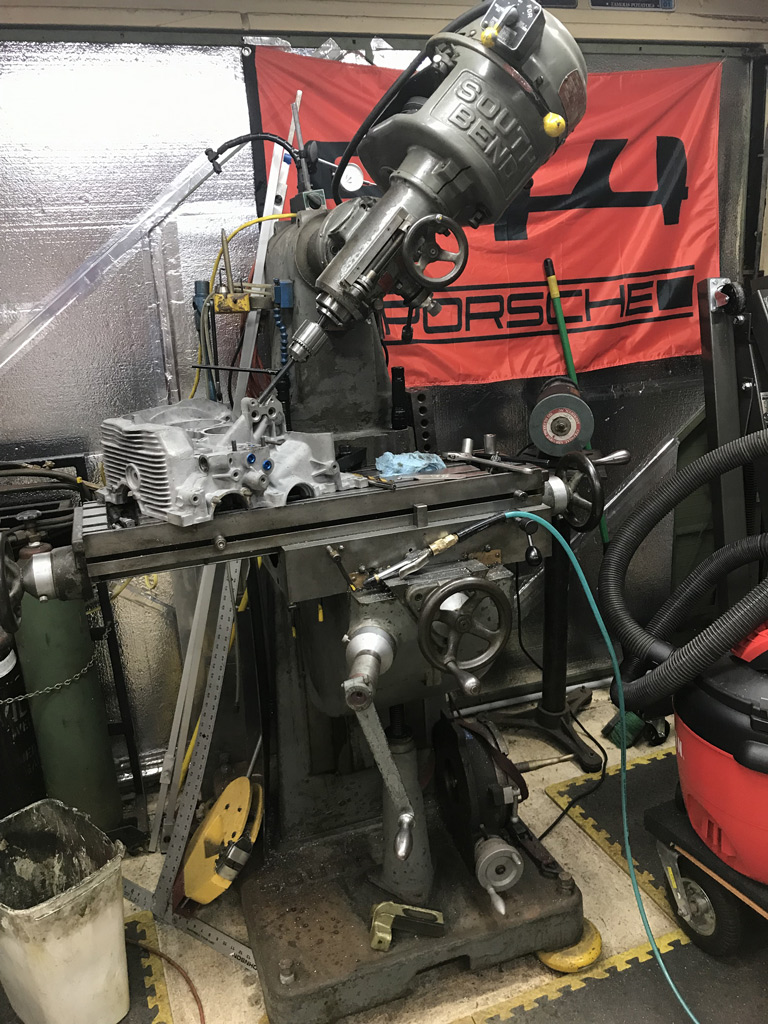 |
|
|
|
| Superhawk996 |
Nov 18 2019, 08:01 PM
Post
#68
|
|
914 Guru Group: Members Posts: 7,309 Joined: 25-August 18 From: Woods of N. Idaho Member No.: 22,428 Region Association: Galt's Gulch |
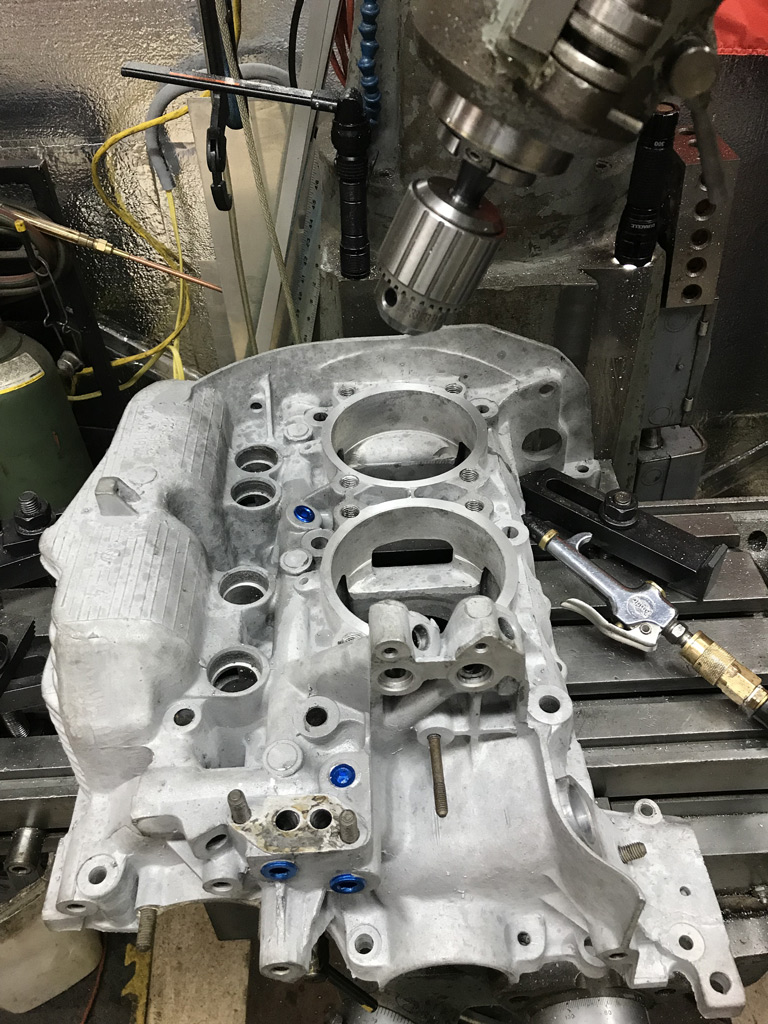
Started stacking up some parts in anticipation of putting things back together once I finish the case work.
I found one of the stock 94mm cylinders has a bit of corrosion pitting in it that I missed upon initial inspection. I think it can be honed out, but, given that I'm falling behind on getting at least one engine built this fall, I opted to order a set of new 94mm cylinders. If I can get it honed out later on without taking off more than 25% of the wear tolerance, I'll have an "extra" set of 94mm cylinders that might go up on Samba or on classifieds if someone is in need. The stock cam from GA000099 was sent to Elgin to see if they can regrind but I'll be surprised if they can do it given two of the lobes had wear I could feel. I ordered a new Web Stock cam, gear, and lifters just in case Elgin doesn't come thorough. 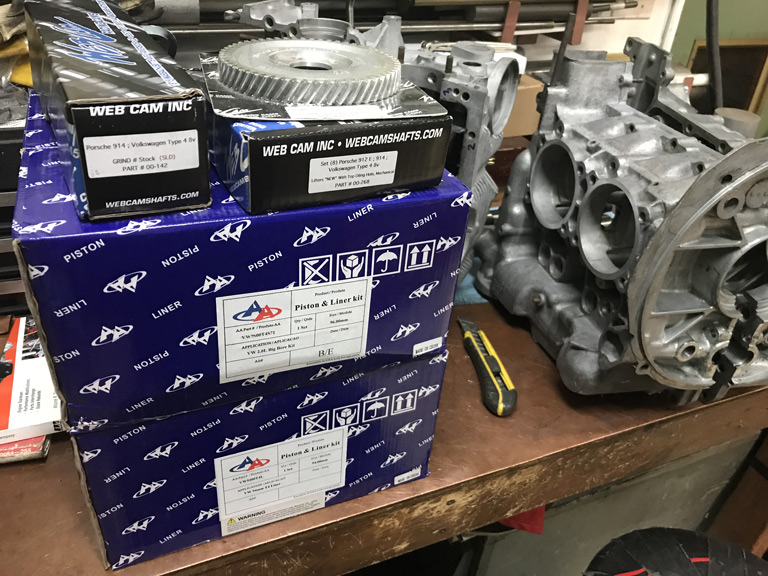 The 96mm pistons and cylinders will go to GA004310. @914_7T3 Per previous agreement with Jeffrey, the NOS 94mm KS pistons and NOS cam go on the self until someone wants to build up a bone stock 2.0 using NOS parts given that GA000099 won't be my forever engine. |
|
|
|
| Superhawk996 |
Nov 18 2019, 08:11 PM
Post
#69
|
|
914 Guru Group: Members Posts: 7,309 Joined: 25-August 18 From: Woods of N. Idaho Member No.: 22,428 Region Association: Galt's Gulch |
And what looks to be the best surprise I found on my doorstep this evening.
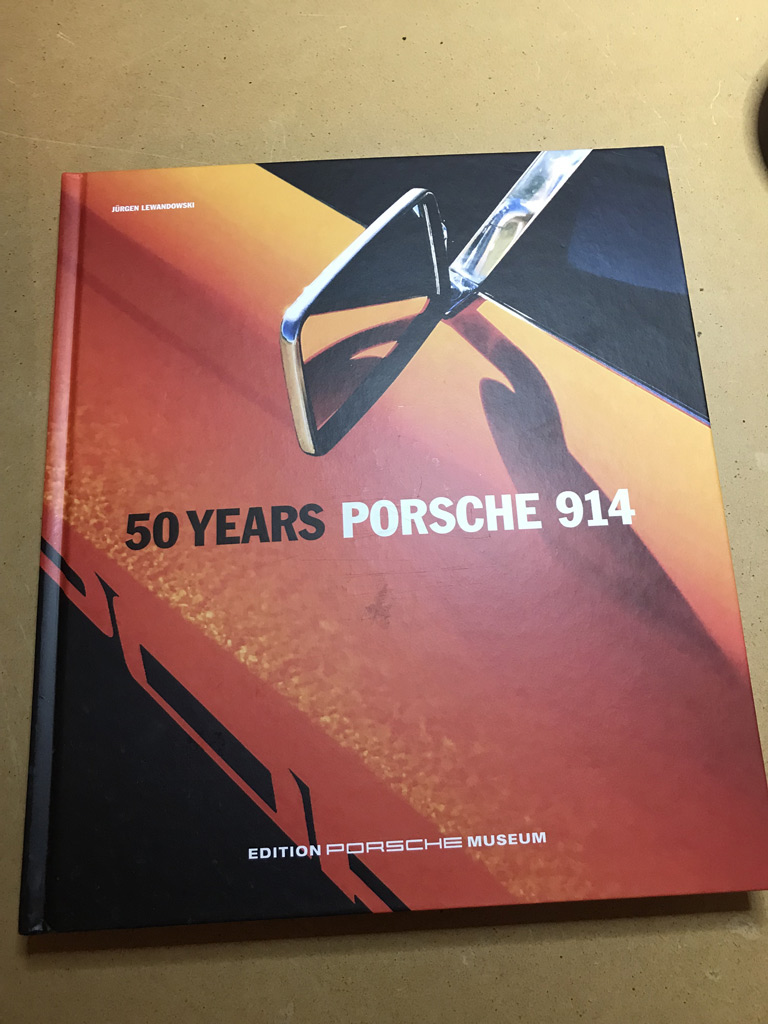 I mistakenly ordered the 1st one in German. I cancelled the order but I never really could tell if the seller actually cancelled. If it delivered, my plan was to give it to my German neighbor as a joke. He actually seems to prefer Audi's (IMG:style_emoticons/default/WTF.gif) (IMG:style_emoticons/default/confused24.gif) I then placed the order for this one in English but it took forever to arrive and it finally arrived with some miscellaneous wife stuff! (IMG:style_emoticons/default/piratenanner.gif) |
|
|
|
| Superhawk996 |
Nov 24 2019, 09:18 AM
Post
#70
|
|
914 Guru Group: Members Posts: 7,309 Joined: 25-August 18 From: Woods of N. Idaho Member No.: 22,428 Region Association: Galt's Gulch |
While I'm waiting on my garage to heat up this morning I thought I'd post the setup for the last galley plug and short video making chips.
https://www.youtube.com/watch?v=y0OtYHrOzqo In the case of this galley hole, I couldn't go as deep as I would normally without intersecting the oil pressure relief valve bore. That meant using a drill was out since it has a tapered point that simply adds unnecessary length to the hole bore. A 7/16" center cutting end mill is the solution that allows the bore to be flat bottomed and as short as possible. Once the bore was done I started the 1/4" NPT tap as usual but in the case of this bore, I couldn't go as deep as I would normally would. This meant that the 1/4" tap couldn't be inserted deep enough to get the plug to sit flush with the surface. 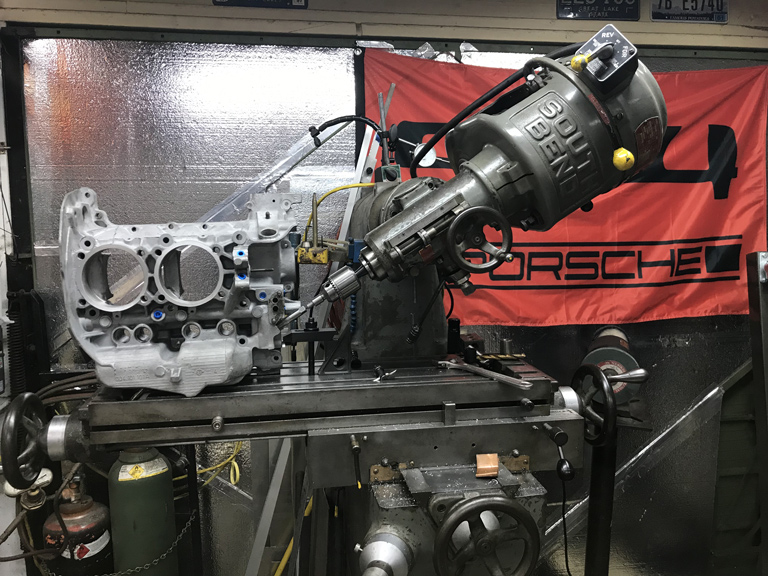 The solution to this problem is to start the tap normally, and, get as many threads cut as possible before the tap bottoms in the bore. Once those initial threads were formed, I then had to convert my tap to a bottoming tap. If you're not familiar with the various types of taps here is a quick link: https://www.yamawa.com/Portals/0/resource/e...df/tips-007.pdf Since I didn't have a 1/4" NPT bottoming tap on hand and knew that this was the last hole I was going to tap, I made one by using a cut-off wheel to take off the chamfered portion of the plug tap. 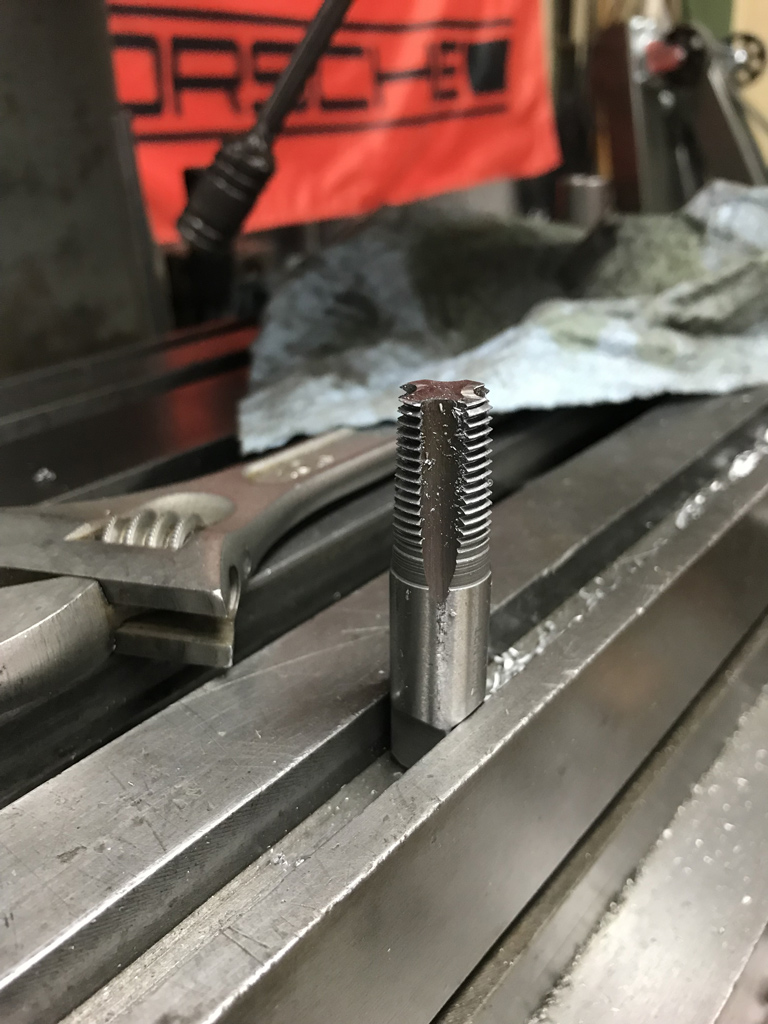 The main downside to this approach is that I will need to buy another 1/4" NPT tap to repace this one, but, it works in a pinch. The upside is that I now have a 1/4" NPT bottoming tap should I ever need one again! |
|
|
|
| Superhawk996 |
Jan 14 2020, 07:21 PM
Post
#71
|
|
914 Guru Group: Members Posts: 7,309 Joined: 25-August 18 From: Woods of N. Idaho Member No.: 22,428 Region Association: Galt's Gulch |
Hasn't been a lot of action on the engine front lately. I'm not sure if that is a bad thing or not since I was largely using it as filler work during the summer surgeries until I could get back to my rusted chassis which has finally happened.
Still have a few parts that were outstanding - the camshaft being one of them. The orginal OEM cam from this engine was still in it when I did the teardown. The cam appeared to have very little wear as compared to the others I've typically seen where the lobes with shared lifters tend to wear a deep notch at the center where both the lifter lobes overlap. Given that I wanted to put this engine back together with as many original parts as I could I sent the cam to Elgin to see if it could be reground. I sent the cam out to Elgin for inspection back toward the end of November. I hadn't heard anything so a few days after Christmas I decided to give them a call. The phone rang, and rang, and just about as I was going to hang up. An older guy answers. He says, were closed for the Christmas holiday period. No worries, so I say I'll call back after the New Year. He then says, "well you got me on the phone now, what can I do for you?". I ask about the cam and right off the top of his head he says it's over at the inspection area and tell's me he's already taken a look at it, it looks really good unlike most of the 914 cam's they get and/or reject for regrinding. We have a little chat about what it came out of, what I want to do with it (street use, race, etc.) and then he reconfirms that I just want a regrind to stock. "It'll be done right after we get back after the New Year when we get back to work". (IMG:style_emoticons/default/biggrin.gif) Now I know Dema Elgin has got to be getting up there in years but I'm sort of suspecting I talked to the man himself. Regardless, who ever it was . . . he was incredibly nice to talk with. Stuff like that seems to be getting rare nowaday's but it is why I like dealing with Mom & Pop shops (IMG:style_emoticons/default/piratenanner.gif) Well, anyway here is the reground and parkerized cam. Looks good as new. 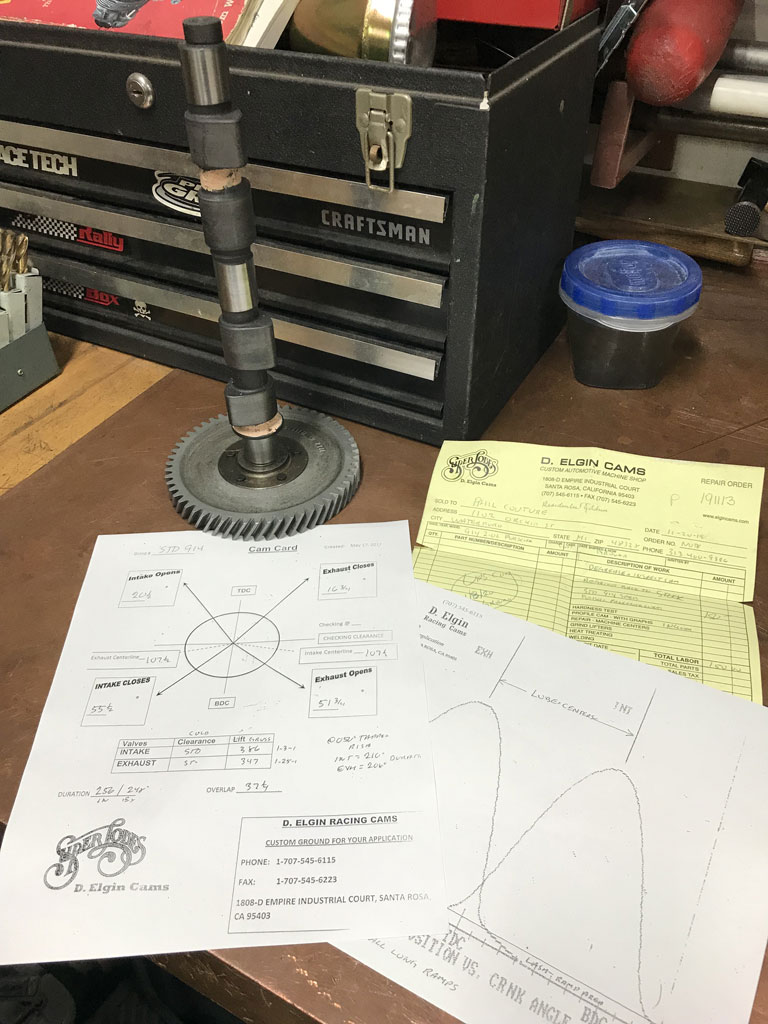 Now before ya'all start in on the routine of regrinding isn't as good, that it takes off part of the OEM case hardened surface, yadda yadda. I know all that. The purpose of this GA000099 build is to put a low mileage low serial number engine back together using as many of the original parts as I can without compromising the overall durability of a engine for a hobby car that will lucky to accumulate 5,000 miles per year. IF I'm lucky and we don't have crazy hot, crazy humid summers, or snow in June. (IMG:style_emoticons/default/happy11.gif) Next up . . . I need to get the heads checked for cracks with dye pentrant and then start thinking about new valve guides, springs, valves, etc. |
|
|
|
|
1 User(s) are reading this topic (1 Guests and 0 Anonymous Users)
0 Members:

|
Lo-Fi Version | Time is now: 27th August 2025 - 04:20 AM |
Invision Power Board
v9.1.4 © 2025 IPS, Inc.