|
|
|
Porsche, and the Porsche crest are registered trademarks of Dr. Ing. h.c. F. Porsche AG.
This site is not affiliated with Porsche in any way. Its only purpose is to provide an online forum for car enthusiasts. All other trademarks are property of their respective owners. |
|
|


| John |
 Aug 13 2019, 09:09 AM Aug 13 2019, 09:09 AM
Post
#1
|
|
member? what's a member?  Group: Members Posts: 3,393 Joined: 30-January 04 From: Evansville, IN (SIRPCA) Member No.: 1,615 Region Association: None |
I tried searching, but didn't get much.
What is involved with fitting a 2.7 with CIS in a 914? I can figure out the plumbing and the electrical, but I believe that I had read long ago that it was a PITA to fit CIS without cutting anything or perhaps a mixture of different parts could be used or parts of the intake could be relocated in order to get it all to fit. I'd prefer to avoid cutting this 914 engine compartment since I'm trying to make this one appear mostly factory. Any advice or better yet pictures would be appreciated. I'd rather not go with carbs, since I believe that I'd need to swap cams and pistons in order to do it right. This one is only going to be a fun street car (I already have a dedicated track car) (All my conversion experience has been with 3.2s, but I have this body, and I have this engine...) Thanks in advance! |
   |

 
|
  |
Replies
| morgan_harwell |
Aug 13 2019, 10:22 AM
Post
#2
|
|
Ha! Finally snuck up on a camera! Group: Members Posts: 126 Joined: 28-January 03 From: Santa Cruz Mtns., Ca. Member No.: 203 Region Association: Northern California |
I did this in 1987 with a 2.4L CIS engine. I did not need to cut up the engine bay or rotate the injection system in any direction.
1. I moved the engine lid latch assembly from the Driver's side to the Passenger side of the engine bay to make room for the CIS (requires some spot welds and making a longer release cable). The engine lid is designed for the latch pin assembly to be mounted on Driver's or Passenger side, so I moved it to the Passenger side on my original lid(again a couple of spot welds involved). Many years later, when I ordered a GT Lid from PCA7GGR, I had Sergio perform the same modification to the GT Lid before he painted it. 2. I relocated a CIS item from the rear-top of the CIS assembly (I think an altitude compensation part, has 3 hoses attached to it) to below the CIS assembly. I attached it to the lower part of the #6 intake manifold. 3. I replaced the fuel fitting on the back of the CIS Fuel Distributor. The original fitting came straight out of the FD directly into the rear firewall, so I replaced it with a welded up 90 degree banjo fitting. 4. I used the Becker Engineering 6-conversion mount at the time (1987). I will be switching that out this year (2019) for the Naro Mount, so that I can install the MB911 Heat Exchangers I bought a couple of years ago. 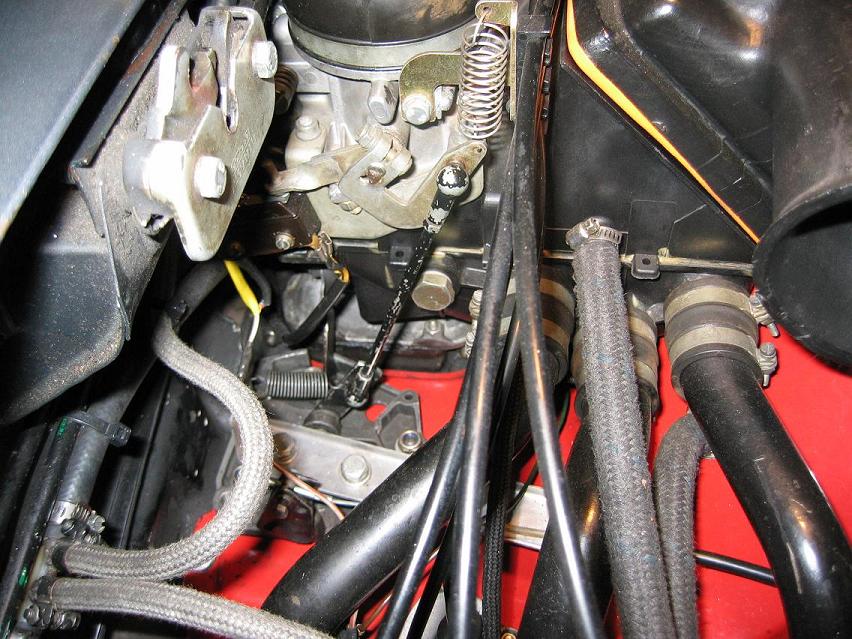 |
|
|
|
| John |
Aug 28 2019, 11:48 AM
Post
#3
|
|
member? what's a member? Group: Members Posts: 3,393 Joined: 30-January 04 From: Evansville, IN (SIRPCA) Member No.: 1,615 Region Association: None |
QUOTE(morgan_harwell @ Aug 13 2019, 08:22 AM)  I did this in 1987 with a 2.4L CIS engine. I did not need to cut up the engine bay or rotate the injection system in any direction. 1. I moved the engine lid latch assembly from the Driver's side to the Passenger side of the engine bay to make room for the CIS (requires some spot welds and making a longer release cable). The engine lid is designed for the latch pin assembly to be mounted on Driver's or Passenger side, so I moved it to the Passenger side on my original lid(again a couple of spot welds involved). Many years later, when I ordered a GT Lid from PCA7GGR, I had Sergio perform the same modification to the GT Lid before he painted it. 2. I relocated a CIS item from the rear-top of the CIS assembly (I think an altitude compensation part, has 3 hoses attached to it) to below the CIS assembly. I attached it to the lower part of the #6 intake manifold. 3. I replaced the fuel fitting on the back of the CIS Fuel Distributor. The original fitting came straight out of the FD directly into the rear firewall, so I replaced it with a welded up 90 degree banjo fitting. 4. I used the Becker Engineering 6-conversion mount at the time (1987). I will be switching that out this year (2019) for the Naro Mount, so that I can install the MB911 Heat Exchangers I bought a couple of years ago. I like the thought of leaving most of the CIS as is. Does that car still use a stock air filter? (I know it is a 2.4 and mine is a 2.7, but they should be similar) I'm going to have to get off my butt and pull the big dent and get this project moving forward. I suppose I will bolt a trans onto the engine and see what it looks like jacked up into position. I could easily move the engine lid latch and release mech to the passenger side. The franken-tub is cleaner than I remembered. The guy in Mason City did claim it was a CA car, but it has (2) two 76/76 front fenders and front panel on it. |
|
|
|
| ClayPerrine |
Dec 9 2020, 04:01 PM
Post
#4
|
|
Life's been good to me so far..... Group: Admin Posts: 15,443 Joined: 11-September 03 From: Hurst, TX. Member No.: 1,143 Region Association: NineFourteenerVille |
QUOTE(John @ Aug 28 2019, 11:48 AM) QUOTE(morgan_harwell @ Aug 13 2019, 08:22 AM) I did this in 1987 with a 2.4L CIS engine. I did not need to cut up the engine bay or rotate the injection system in any direction. 1. I moved the engine lid latch assembly from the Driver's side to the Passenger side of the engine bay to make room for the CIS (requires some spot welds and making a longer release cable). The engine lid is designed for the latch pin assembly to be mounted on Driver's or Passenger side, so I moved it to the Passenger side on my original lid(again a couple of spot welds involved). Many years later, when I ordered a GT Lid from PCA7GGR, I had Sergio perform the same modification to the GT Lid before he painted it. 2. I relocated a CIS item from the rear-top of the CIS assembly (I think an altitude compensation part, has 3 hoses attached to it) to below the CIS assembly. I attached it to the lower part of the #6 intake manifold. 3. I replaced the fuel fitting on the back of the CIS Fuel Distributor. The original fitting came straight out of the FD directly into the rear firewall, so I replaced it with a welded up 90 degree banjo fitting. 4. I used the Becker Engineering 6-conversion mount at the time (1987). I will be switching that out this year (2019) for the Naro Mount, so that I can install the MB911 Heat Exchangers I bought a couple of years ago. I like the thought of leaving most of the CIS as is. Does that car still use a stock air filter? (I know it is a 2.4 and mine is a 2.7, but they should be similar) I'm going to have to get off my butt and pull the big dent and get this project moving forward. I suppose I will bolt a trans onto the engine and see what it looks like jacked up into position. I could easily move the engine lid latch and release mech to the passenger side. The franken-tub is cleaner than I remembered. The guy in Mason City did claim it was a CA car, but it has (2) two 76/76 front fenders and front panel on it. I would suggest you look at this thread: http://www.914world.com/bbs2/index.php?sho...engine&st=0 Pictures of the setup are on page 2. This is a CIS install, using an VW GTI airbox and some fittings. It doesn't require you to remove the engine lid latch or modify the engine compartment. Clay |
|
|
|
| John |
Dec 12 2020, 12:05 AM
Post
#5
|
|
member? what's a member? Group: Members Posts: 3,393 Joined: 30-January 04 From: Evansville, IN (SIRPCA) Member No.: 1,615 Region Association: None |
QUOTE(ClayPerrine @ Dec 9 2020, 02:01 PM) I would suggest you look at this thread: http://www.914world.com/bbs2/index.php?sho...engine&st=0 Pictures of the setup are on page 2. This is a CIS install, using an VW GTI airbox and some fittings. It doesn't require you to remove the engine lid latch or modify the engine compartment. Clay I looked at the thread and it is interesting. I can't find what airbox was used in that example, nor could I find the elbow that attaches to the throttle valve. In a similar thread, I read that DrEvil simply rotated the fuel distributor 60 degrees and things cleared, but I couldn't find a picture of that. The other problem I see with an airbox like in the thread that you referred to, is that it appears access to the air filter would be less than ideal. Do you know who pieced that system together? |
|
|
|
| ClayPerrine |
Dec 12 2020, 06:57 AM
Post
#6
|
|
Life's been good to me so far..... Group: Admin Posts: 15,443 Joined: 11-September 03 From: Hurst, TX. Member No.: 1,143 Region Association: NineFourteenerVille |
QUOTE(John @ Dec 12 2020, 12:05 AM) QUOTE(ClayPerrine @ Dec 9 2020, 02:01 PM) I would suggest you look at this thread: http://www.914world.com/bbs2/index.php?sho...engine&st=0 Pictures of the setup are on page 2. This is a CIS install, using an VW GTI airbox and some fittings. It doesn't require you to remove the engine lid latch or modify the engine compartment. Clay I looked at the thread and it is interesting. I can't find what airbox was used in that example, nor could I find the elbow that attaches to the throttle valve. In a similar thread, I read that DrEvil simply rotated the fuel distributor 60 degrees and things cleared, but I couldn't find a picture of that. The other problem I see with an airbox like in the thread that you referred to, is that it appears access to the air filter would be less than ideal. Do you know who pieced that system together? When I helped him out, the car was already like that. I do know the airbox was off a VW GTI, and I think the hose was too. The fuel distributor was from the 911, but it bolts to the airbox with no issues. Changing the air filter is easy, just raise up the fuel distributor assembly. There is enough length in the hoses to allow it. Clay |
|
|
|
Posts in this topic
 John 2.7 CIS Aug 13 2019, 09:09 AM
 GregAmy Contact Chris Foley, Tangerine Racing. He was invo... Aug 13 2019, 09:16 AM
 Porschef
I still kick myself daily for not buying that car... Aug 13 2019, 09:29 AM
Porschef
I still kick myself daily for not buying that car... Aug 13 2019, 09:29 AM John
Contact Chris Foley, Tangerine Racing. He was inv... Aug 13 2019, 10:23 AM Tdskip Subscribing. I have been told it is possible, mayb... Aug 13 2019, 09:19 AM mb911 You actually rotate the cis 180 degrees and rebolt... Aug 13 2019, 10:14 AM John
You actually rotate the cis 180 degrees and rebol... Aug 13 2019, 10:28 AM Dr Evil
You actually rotate the cis 180 degrees and rebo... Aug 13 2019, 11:01 AM John
Tried searching, but came up with nothing. You ... Aug 13 2019, 11:31 AM Dr Evil
Tried searching, but came up with nothing. You... Aug 13 2019, 11:41 AM mepstein
Tried searching, but came up with nothing. Yo... Aug 13 2019, 02:39 PM sixnotfour
[quote name='Dr Evil' post='2738008' date='Aug 13... Aug 13 2019, 02:59 PM Dr Evil
[quote name='Dr Evil' post='2738008' date='Aug 1... Aug 14 2019, 06:13 AM Jetsetsurfshop
You actually rotate the cis 180 degrees and rebol... Aug 13 2019, 11:48 AM mb911
You actually rotate the cis 180 degrees and rebo... Aug 13 2019, 11:51 AM Jetsetsurfshop
[quote name='Jetsetsurfshop' post='2738012' date=... Aug 13 2019, 12:10 PM mb911 If you want to make your engine sheet metal let me... Aug 13 2019, 11:49 AM sixnotfour one way to do it...
http://www.914world.com/bbs2/i... Aug 13 2019, 01:00 PM 914_teener Slits (RIP) had a 2.7 with CIS IIRC.
I don't... Aug 13 2019, 01:07 PM sixnotfour Jeff Tucker wrote;
Aug 13 2019, 01:22 PM sixnotfour last Aug 13 2019, 01:23 PM sixnotfour @Dr Evil
http://www.914world.com/bbs2/index.php?sh... Aug 13 2019, 01:52 PM billh1963 Send member adidas a PM. He is working on my ‘72... Aug 14 2019, 01:13 PM morgan_harwell
I did this in 1987 with a 2.4L CIS engine. I did... Aug 28 2019, 02:59 PM johnlush The car referenced in posts 2 and 7 is mine. I sta... Aug 28 2019, 05:53 PM live free & drive " Also note the naro mount drops the height o... Aug 31 2019, 10:34 AM mb911
" Also note the naro mount drops the height ... Aug 31 2019, 10:49 AM John Well, I repaired the passenger side outer longitud... Sep 2 2019, 08:33 PM mepstein Ben/914-6Werkshop.com has the GT hard lines and st... Sep 2 2019, 08:51 PM John A couple of pictures of what I'm dealing with.... Sep 10 2019, 02:50 PM John Were all 914 Bodies painted white before color was... Sep 23 2019, 08:35 AM mepstein No Sep 23 2019, 08:46 AM mb911 Maybe just white primer? Sep 23 2019, 09:22 AM John I don't believe it to be primer as it seems to... Sep 24 2019, 08:43 AM mepstein So many things done to these cars over 50 years. Sep 24 2019, 09:34 AM John
So many things done to these cars over 50 years.
... Sep 27 2019, 11:34 AM stevesc_us Forget all that CIS crap and make it look old scho... Sep 28 2019, 08:21 AM JmuRiz
Forget all that CIS crap and make it look old sch... Oct 1 2019, 12:56 PM 914Toy
Forget all that CIS crap and make it look old sch... Oct 2 2019, 12:43 PM John That is certainly one way to go.
I already have w... Oct 1 2019, 03:05 PM Justinp71 My uncle and I did a 2.7 install 15 years ago. We ... Oct 1 2019, 05:48 PM Dr Evil
My uncle and I did a 2.7 install 15 years ago. We... Oct 2 2019, 10:07 AM John Started doing the flares thing on this car.
Befor... Sep 25 2020, 06:57 AM Tdskip Thanks for the update.
Where did you source the f... Sep 25 2020, 07:20 AM John
Thanks for the update.
Where did you source the ... Sep 25 2020, 08:52 AM Tdskip
Thanks for the update.
Where did you source the... Sep 25 2020, 08:57 AM John
Are you happy with the Naro engine mount? I am a... Sep 25 2020, 09:07 AM Root_Werks CIS is a better choice than most give it credit. ... Sep 25 2020, 09:07 AM Root_Werks Here's a shot of the engine: Sep 25 2020, 09:11 AM Tdskip Thank you @John
Enjoy your updates, thanks for... Sep 25 2020, 09:14 AM naro914 Hey guys - someone pointed me to this thread as th... Sep 28 2020, 01:38 PM Steve
Hey guys - someone pointed me to this thread as t... Sep 28 2020, 09:51 PM Maltese Falcon Enough real estate under that lid to stuff a 2.7L ... Sep 28 2020, 05:19 PM John Anyone know or remember a member here REZRON? Thi... Nov 5 2020, 10:34 PM John So, nobody knows Rezron. Hmm. Anyway back to the... Dec 5 2020, 09:30 PM Tdskip Press on, it’s going to be great. Dec 6 2020, 09:44 AM watsonrx13 Well done John. Do you have any in progress photos... Dec 8 2020, 07:50 AM Root_Werks
Well done John. Do you have any in progress photo... Dec 8 2020, 10:05 AM John
Well done John. Do you have any in progress phot... Dec 8 2020, 10:14 PM mb911
[quote name='Root_Werks' post='2873157' date='Dec... Dec 9 2020, 07:38 AM watsonrx13 Thanks everyone. Dec 9 2020, 06:57 AM John More progress being made and I have moved along to... Dec 18 2020, 01:38 PM John From various threads, I see a range of sizes for h... Dec 18 2020, 07:12 PM mb911
From various threads, I see a range of sizes for ... Dec 18 2020, 08:45 PM mepstein Does the fitting for the return line in the lower ... Dec 18 2020, 08:21 PM John
Does the fitting for the return line in the lower... Dec 19 2020, 12:55 PM mepstein
Does the fitting for the return line in the lowe... Dec 19 2020, 01:29 PM John Started cutting the holes and they turned out well... Dec 23 2020, 11:28 AM mepstein Eric at PMB has the GT style pressure relief line ... Dec 23 2020, 12:03 PM mb911
Eric at PMB has the GT style pressure relief line... Dec 23 2020, 03:42 PM John The only reasoning I can come up with for the pres... Dec 24 2020, 03:43 PM mepstein I recently sent Ben an oil filter console just lik... Dec 24 2020, 04:06 PM John
I recently sent Ben an oil filter console just li... Dec 26 2020, 09:28 PM
John
Contact Chris Foley, Tangerine Racing. He was inv... Aug 13 2019, 10:23 AM Tdskip Subscribing. I have been told it is possible, mayb... Aug 13 2019, 09:19 AM mb911 You actually rotate the cis 180 degrees and rebolt... Aug 13 2019, 10:14 AM John
You actually rotate the cis 180 degrees and rebol... Aug 13 2019, 10:28 AM Dr Evil
You actually rotate the cis 180 degrees and rebo... Aug 13 2019, 11:01 AM John
Tried searching, but came up with nothing. You ... Aug 13 2019, 11:31 AM Dr Evil
Tried searching, but came up with nothing. You... Aug 13 2019, 11:41 AM mepstein
Tried searching, but came up with nothing. Yo... Aug 13 2019, 02:39 PM sixnotfour
[quote name='Dr Evil' post='2738008' date='Aug 13... Aug 13 2019, 02:59 PM Dr Evil
[quote name='Dr Evil' post='2738008' date='Aug 1... Aug 14 2019, 06:13 AM Jetsetsurfshop
You actually rotate the cis 180 degrees and rebol... Aug 13 2019, 11:48 AM mb911
You actually rotate the cis 180 degrees and rebo... Aug 13 2019, 11:51 AM Jetsetsurfshop
[quote name='Jetsetsurfshop' post='2738012' date=... Aug 13 2019, 12:10 PM mb911 If you want to make your engine sheet metal let me... Aug 13 2019, 11:49 AM sixnotfour one way to do it...
http://www.914world.com/bbs2/i... Aug 13 2019, 01:00 PM 914_teener Slits (RIP) had a 2.7 with CIS IIRC.
I don't... Aug 13 2019, 01:07 PM sixnotfour Jeff Tucker wrote;
Aug 13 2019, 01:22 PM sixnotfour last Aug 13 2019, 01:23 PM sixnotfour @Dr Evil
http://www.914world.com/bbs2/index.php?sh... Aug 13 2019, 01:52 PM billh1963 Send member adidas a PM. He is working on my ‘72... Aug 14 2019, 01:13 PM morgan_harwell
I did this in 1987 with a 2.4L CIS engine. I did... Aug 28 2019, 02:59 PM johnlush The car referenced in posts 2 and 7 is mine. I sta... Aug 28 2019, 05:53 PM live free & drive " Also note the naro mount drops the height o... Aug 31 2019, 10:34 AM mb911
" Also note the naro mount drops the height ... Aug 31 2019, 10:49 AM John Well, I repaired the passenger side outer longitud... Sep 2 2019, 08:33 PM mepstein Ben/914-6Werkshop.com has the GT hard lines and st... Sep 2 2019, 08:51 PM John A couple of pictures of what I'm dealing with.... Sep 10 2019, 02:50 PM John Were all 914 Bodies painted white before color was... Sep 23 2019, 08:35 AM mepstein No Sep 23 2019, 08:46 AM mb911 Maybe just white primer? Sep 23 2019, 09:22 AM John I don't believe it to be primer as it seems to... Sep 24 2019, 08:43 AM mepstein So many things done to these cars over 50 years. Sep 24 2019, 09:34 AM John
So many things done to these cars over 50 years.
... Sep 27 2019, 11:34 AM stevesc_us Forget all that CIS crap and make it look old scho... Sep 28 2019, 08:21 AM JmuRiz
Forget all that CIS crap and make it look old sch... Oct 1 2019, 12:56 PM 914Toy
Forget all that CIS crap and make it look old sch... Oct 2 2019, 12:43 PM John That is certainly one way to go.
I already have w... Oct 1 2019, 03:05 PM Justinp71 My uncle and I did a 2.7 install 15 years ago. We ... Oct 1 2019, 05:48 PM Dr Evil
My uncle and I did a 2.7 install 15 years ago. We... Oct 2 2019, 10:07 AM John Started doing the flares thing on this car.
Befor... Sep 25 2020, 06:57 AM Tdskip Thanks for the update.
Where did you source the f... Sep 25 2020, 07:20 AM John
Thanks for the update.
Where did you source the ... Sep 25 2020, 08:52 AM Tdskip
Thanks for the update.
Where did you source the... Sep 25 2020, 08:57 AM John
Are you happy with the Naro engine mount? I am a... Sep 25 2020, 09:07 AM Root_Werks CIS is a better choice than most give it credit. ... Sep 25 2020, 09:07 AM Root_Werks Here's a shot of the engine: Sep 25 2020, 09:11 AM Tdskip Thank you @John
Enjoy your updates, thanks for... Sep 25 2020, 09:14 AM naro914 Hey guys - someone pointed me to this thread as th... Sep 28 2020, 01:38 PM Steve
Hey guys - someone pointed me to this thread as t... Sep 28 2020, 09:51 PM Maltese Falcon Enough real estate under that lid to stuff a 2.7L ... Sep 28 2020, 05:19 PM John Anyone know or remember a member here REZRON? Thi... Nov 5 2020, 10:34 PM John So, nobody knows Rezron. Hmm. Anyway back to the... Dec 5 2020, 09:30 PM Tdskip Press on, it’s going to be great. Dec 6 2020, 09:44 AM watsonrx13 Well done John. Do you have any in progress photos... Dec 8 2020, 07:50 AM Root_Werks
Well done John. Do you have any in progress photo... Dec 8 2020, 10:05 AM John
Well done John. Do you have any in progress phot... Dec 8 2020, 10:14 PM mb911
[quote name='Root_Werks' post='2873157' date='Dec... Dec 9 2020, 07:38 AM watsonrx13 Thanks everyone. Dec 9 2020, 06:57 AM John More progress being made and I have moved along to... Dec 18 2020, 01:38 PM John From various threads, I see a range of sizes for h... Dec 18 2020, 07:12 PM mb911
From various threads, I see a range of sizes for ... Dec 18 2020, 08:45 PM mepstein Does the fitting for the return line in the lower ... Dec 18 2020, 08:21 PM John
Does the fitting for the return line in the lower... Dec 19 2020, 12:55 PM mepstein
Does the fitting for the return line in the lowe... Dec 19 2020, 01:29 PM John Started cutting the holes and they turned out well... Dec 23 2020, 11:28 AM mepstein Eric at PMB has the GT style pressure relief line ... Dec 23 2020, 12:03 PM mb911
Eric at PMB has the GT style pressure relief line... Dec 23 2020, 03:42 PM John The only reasoning I can come up with for the pres... Dec 24 2020, 03:43 PM mepstein I recently sent Ben an oil filter console just lik... Dec 24 2020, 04:06 PM John
I recently sent Ben an oil filter console just li... Dec 26 2020, 09:28 PM |
1 User(s) are reading this topic (1 Guests and 0 Anonymous Users)
0 Members:

|
Lo-Fi Version | Time is now: 9th May 2024 - 03:51 PM |
Invision Power Board
v9.1.4 © 2024 IPS, Inc.