|
|
|
Porsche, and the Porsche crest are registered trademarks of Dr. Ing. h.c. F. Porsche AG.
This site is not affiliated with Porsche in any way. Its only purpose is to provide an online forum for car enthusiasts. All other trademarks are property of their respective owners. |
|
|

  |

| GTSandberg |
 Aug 23 2019, 08:08 AM Aug 23 2019, 08:08 AM
Post
#1
|
|
Member  Group: Members Posts: 63 Joined: 16-August 19 From: Drammen, Norway Member No.: 23,373 Region Association: Europe |
I am starting this thread "in medias res" with the car as it is today.
Then I will post a confusing mix of past and present, showing the project updates and process. Promise to nerd out on the details. (IMG:style_emoticons/default/welder.gif) . 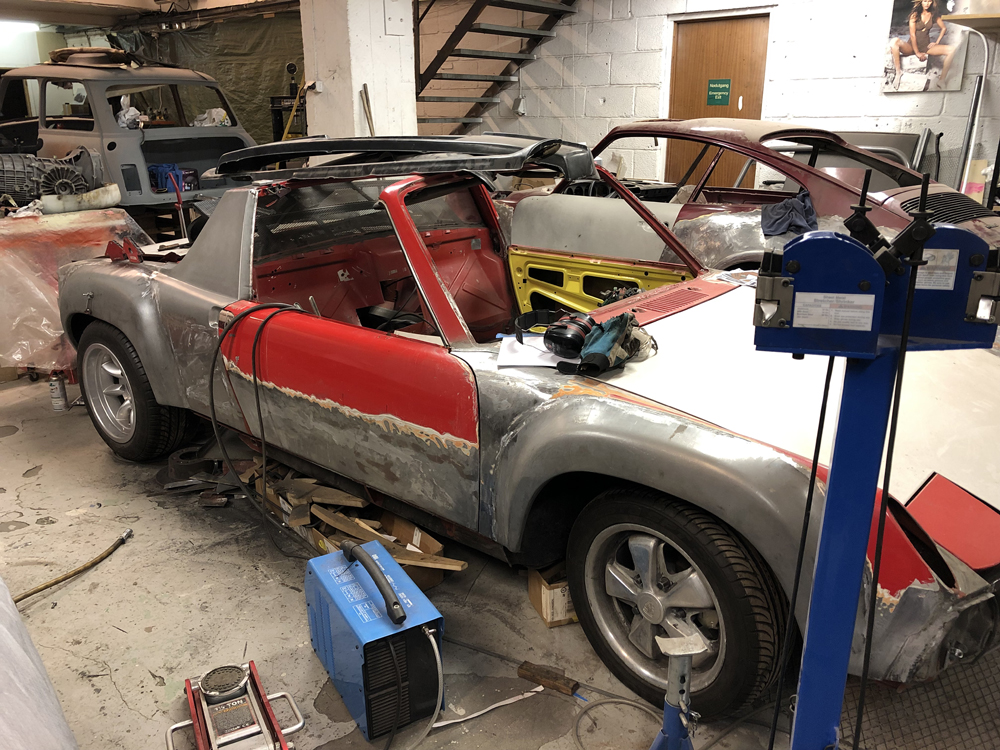 |
   |

 
|
| mb911 |
Aug 23 2019, 08:29 AM
Post
#2
|
|
914 Guru Group: Members Posts: 7,612 Joined: 2-January 09 From: Burlington wi Member No.: 9,892 Region Association: Upper MidWest |
Will be watching.
|
|
|
|
| Retroracer |
Aug 23 2019, 12:59 PM
Post
#3
|
|
Senior Member Group: Members Posts: 641 Joined: 7-July 13 From: Bend OR Member No.: 16,100 Region Association: Pacific Northwest |
Ditto. Keep the posts coming!
- Tony |
|
|
|
| Cairo94507 |
Aug 23 2019, 05:30 PM
Post
#4
|
|
Michael Group: Members Posts: 10,388 Joined: 1-November 08 From: Auburn, CA Member No.: 9,712 Region Association: Northern California |
Love the build threads. (IMG:style_emoticons/default/beerchug.gif)
|
|
|
|
| tygaboy |
Aug 23 2019, 08:07 PM
Post
#5
|
|
914 Guru Group: Members Posts: 5,603 Joined: 6-October 15 From: Petaluma, CA Member No.: 19,241 Region Association: Northern California |
Great looking with the Minilites/Fuchs mix! And it looks like there's been a lot of metal work done. I'd love to see details on all that, if you have it.
Keep the posts coming and best of luck with your build. (IMG:style_emoticons/default/sawzall-smiley.gif) (IMG:style_emoticons/default/smash.gif) (IMG:style_emoticons/default/welder.gif) |
 |
|
| GTSandberg |
Aug 26 2019, 07:55 AM
Post
#6
|
|
Member Group: Members Posts: 63 Joined: 16-August 19 From: Drammen, Norway Member No.: 23,373 Region Association: Europe |
Ok, so the hell hole, turns out it was not rust free.. Hælveteshøl it would be called in Norwegian btw.
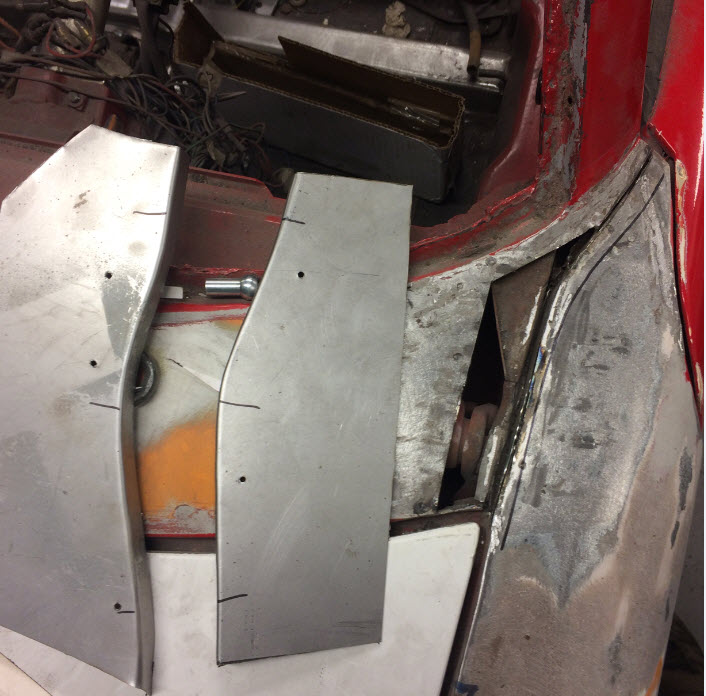
It seemed to be solid, but some closer investigation revealed sloppy previous rust repairs. (x2) 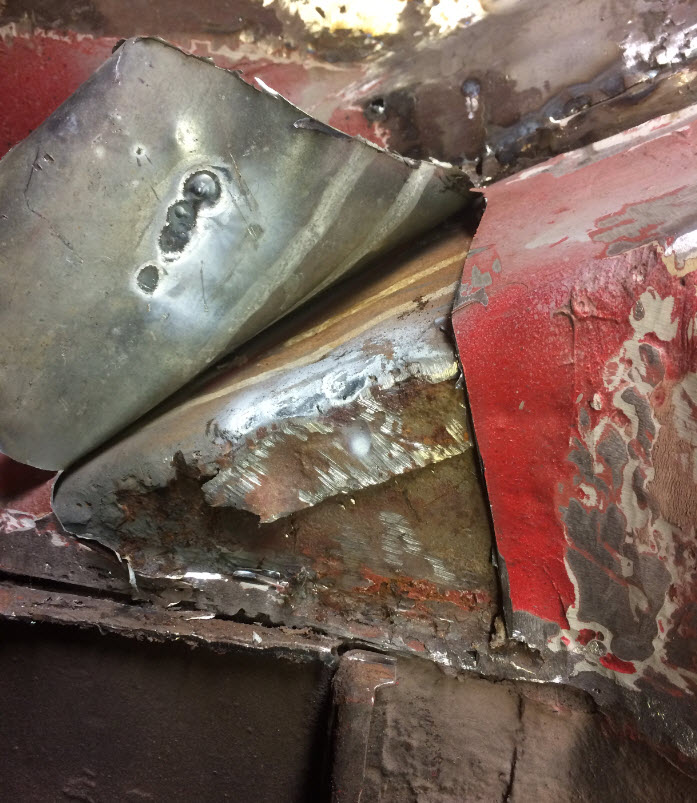 Not one, but two layers of new metal without removing the original disaster area. After removing the old crap I started fabricating the new parts. It is not really very complex geometry, and only two areas needed "special tooling". 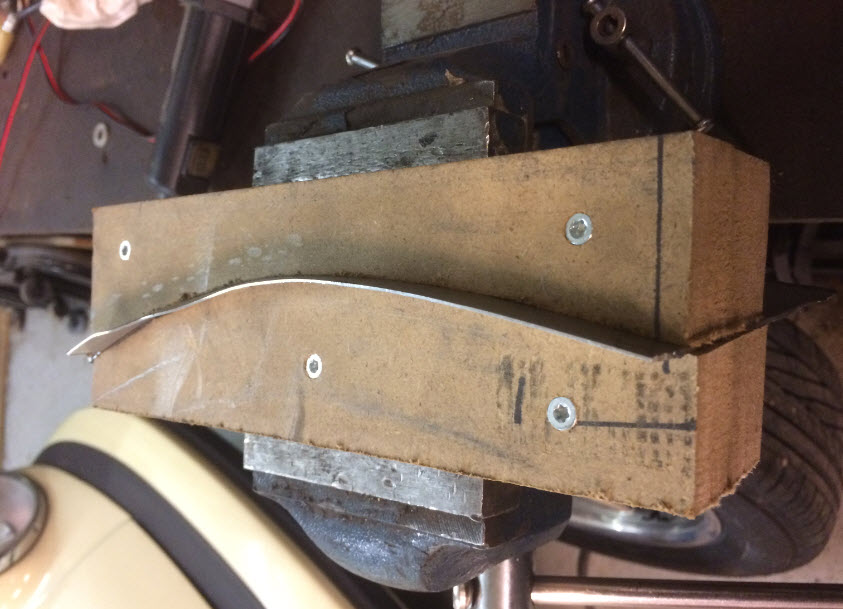  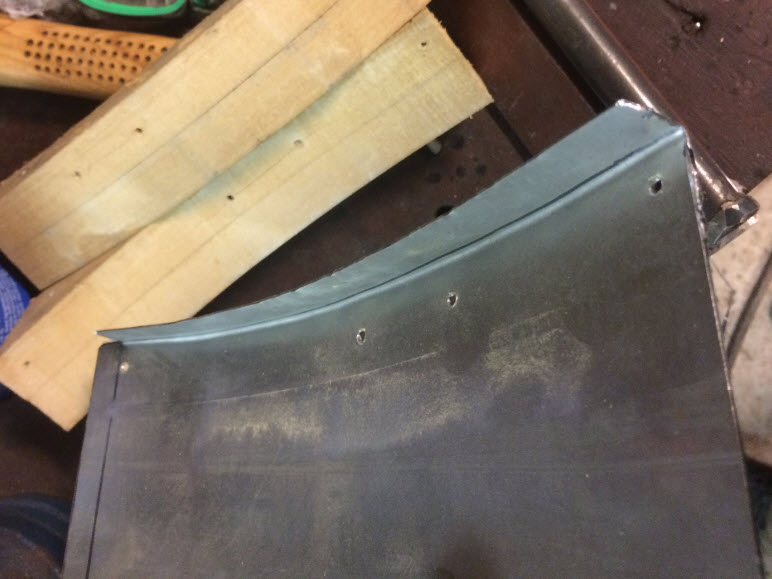 This is the bottom of the hole, and the flange towards the side. 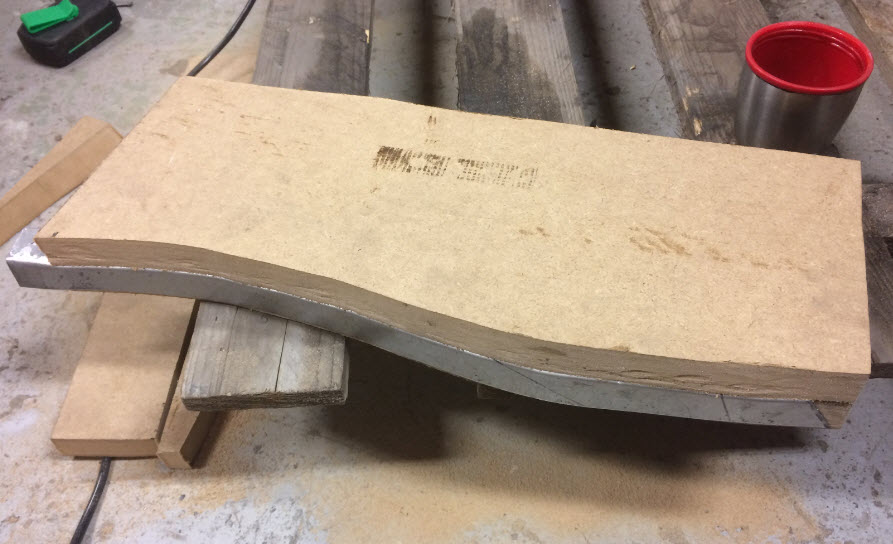 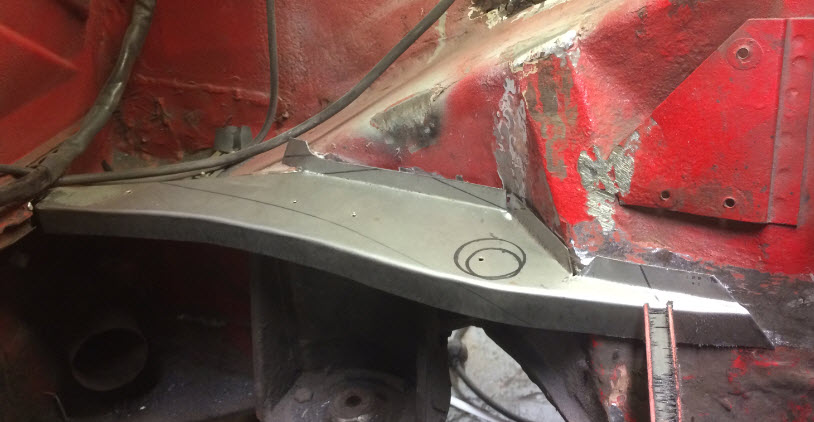 And the shelf. 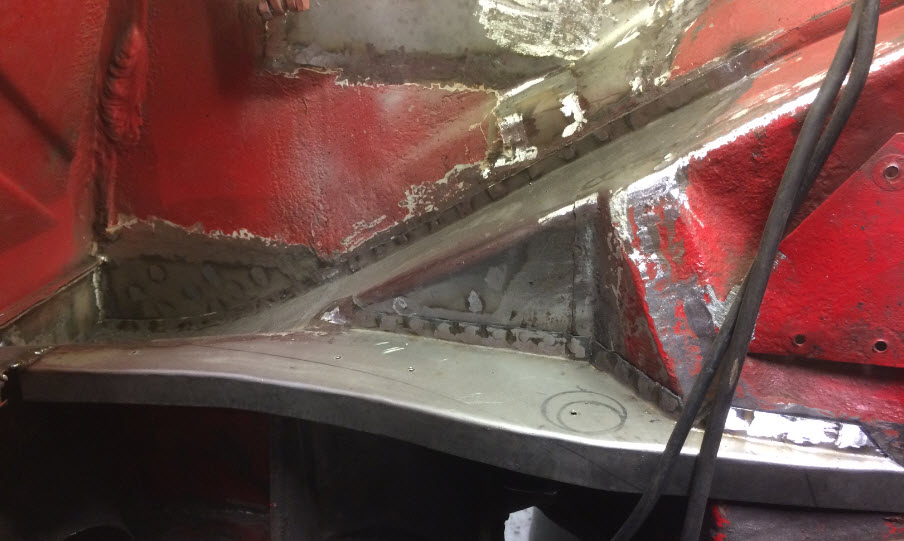 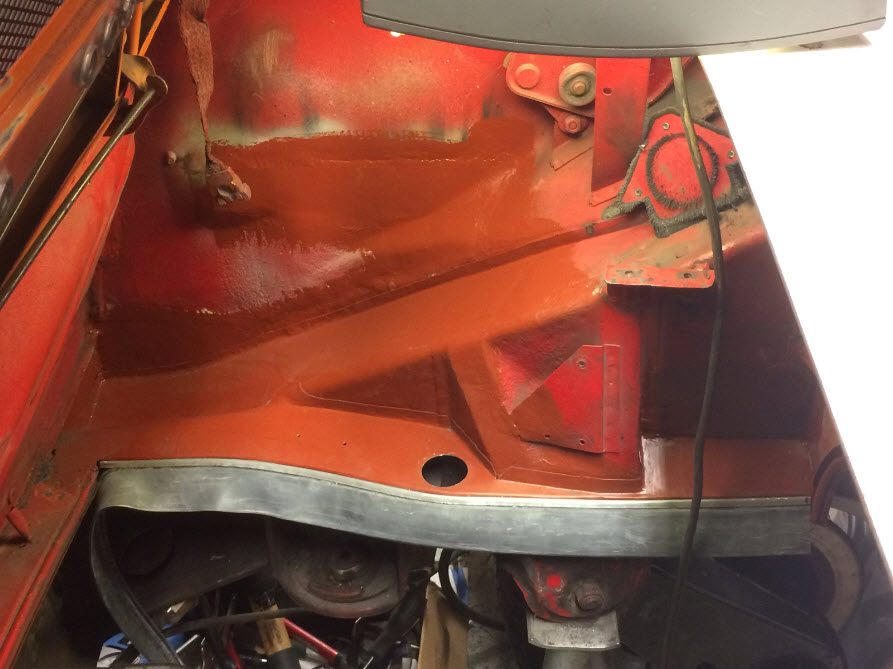 I would not call it hell, but more like tedious and annoying-hole. |
|
|
|
| Dion |
Aug 26 2019, 08:50 AM
Post
#7
|
|
RN Group: Members Posts: 2,901 Joined: 16-September 04 From: Audubon,PA Member No.: 2,766 Region Association: MidAtlantic Region |
Fantastic work. Obviously not your first rodeo.
I’m tuned in. I’ll have to consult with my Norwegian Elghund to interpret for me. (IMG:style_emoticons/default/beerchug.gif) |
|
|
|
| Literati914 |
Aug 26 2019, 10:00 AM
Post
#8
|
|
Advanced Member Group: Members Posts: 2,023 Joined: 16-November 06 From: Dallas, TX Member No.: 7,222 Region Association: Southwest Region |
QUOTE(GTSandberg @ Aug 26 2019, 08:55 AM)  That's about the cleanest looking HH repair I've seen, great job! Did you put a drain hole down towards the bottom of it, as stock? . |
|
|
|
| GTSandberg |
Aug 27 2019, 06:59 AM
Post
#9
|
|
Member Group: Members Posts: 63 Joined: 16-August 19 From: Drammen, Norway Member No.: 23,373 Region Association: Europe |
QUOTE(Literati914 @ Aug 26 2019, 04:00 PM) QUOTE(GTSandberg @ Aug 26 2019, 08:55 AM) That's about the cleanest looking HH repair I've seen, great job! Did you put a drain hole down towards the bottom of it, as stock? . Thank you! Also a good point, The drain hole is in place, important to make it the lowest point, as indicated by the two red lines. As seen in the picture small parts tend to gather in the HH, neat. 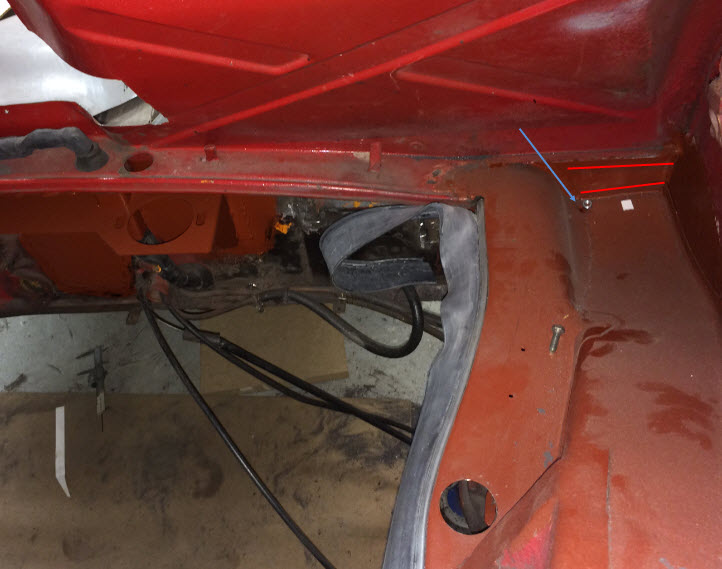 |
|
|
|
| GTSandberg |
Aug 27 2019, 07:01 AM
Post
#10
|
|
Member Group: Members Posts: 63 Joined: 16-August 19 From: Drammen, Norway Member No.: 23,373 Region Association: Europe |
QUOTE(Dion @ Aug 26 2019, 02:50 PM) Fantastic work. Obviously not your first rodeo. I’m tuned in. I’ll have to consult with my Norwegian Elghund to interpret for me. (IMG:style_emoticons/default/beerchug.gif) Thank you, say hello to the Elghund! (IMG:style_emoticons/default/bye1.gif) |
|
|
|
| mepstein |
Aug 27 2019, 07:12 AM
Post
#11
|
|
914-6 GT in waiting Group: Members Posts: 19,970 Joined: 19-September 09 From: Landenberg, PA/Wilmington, DE Member No.: 10,825 Region Association: MidAtlantic Region |
|
|
|
|
| Cairo94507 |
Aug 27 2019, 07:25 AM
Post
#12
|
|
Michael Group: Members Posts: 10,388 Joined: 1-November 08 From: Auburn, CA Member No.: 9,712 Region Association: Northern California |
Beautiful repair. (IMG:style_emoticons/default/beerchug.gif)
|
|
|
|
| GTSandberg |
Aug 28 2019, 03:22 AM
Post
#13
|
|
Member Group: Members Posts: 63 Joined: 16-August 19 From: Drammen, Norway Member No.: 23,373 Region Association: Europe |
Appreciate all feedback (IMG:style_emoticons/default/smile.gif)
Here are two pictures of the car before I started cutting in it. Quite complete, but not pretty. Solid but a bit rough..  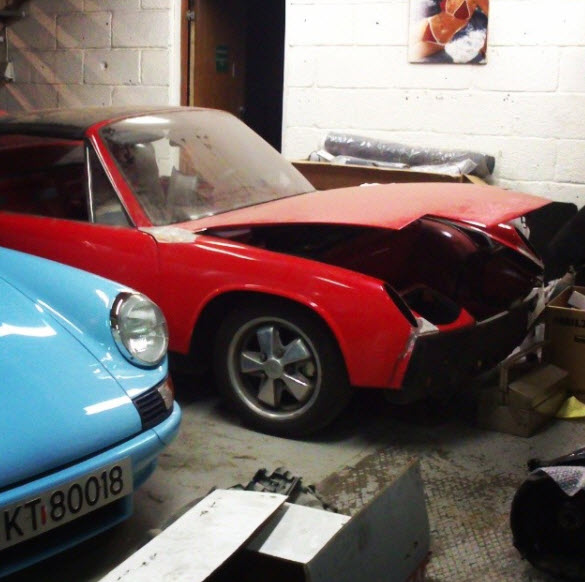 |
|
|
|
| GTSandberg |
Aug 29 2019, 07:55 AM
Post
#14
|
|
Member Group: Members Posts: 63 Joined: 16-August 19 From: Drammen, Norway Member No.: 23,373 Region Association: Europe |
The front fenders has been a lot of work, 914s are not very common in Norway and spare parts are not easy to come by. There were some previous rust repairs that needed to be redone.
 The gap between the fender and the part infront of the windshield was welded together, and was not straight. Here I am making the two parts to weld in. 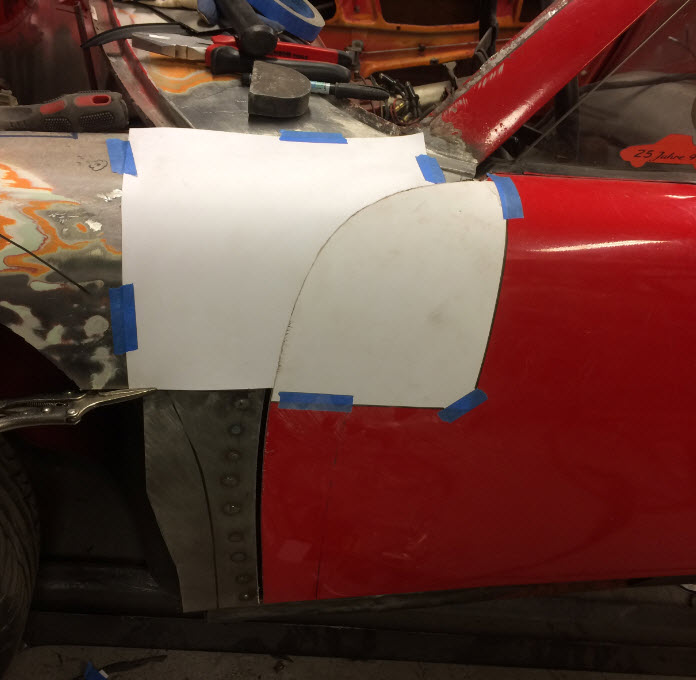 There was also something odd with the door gap.. 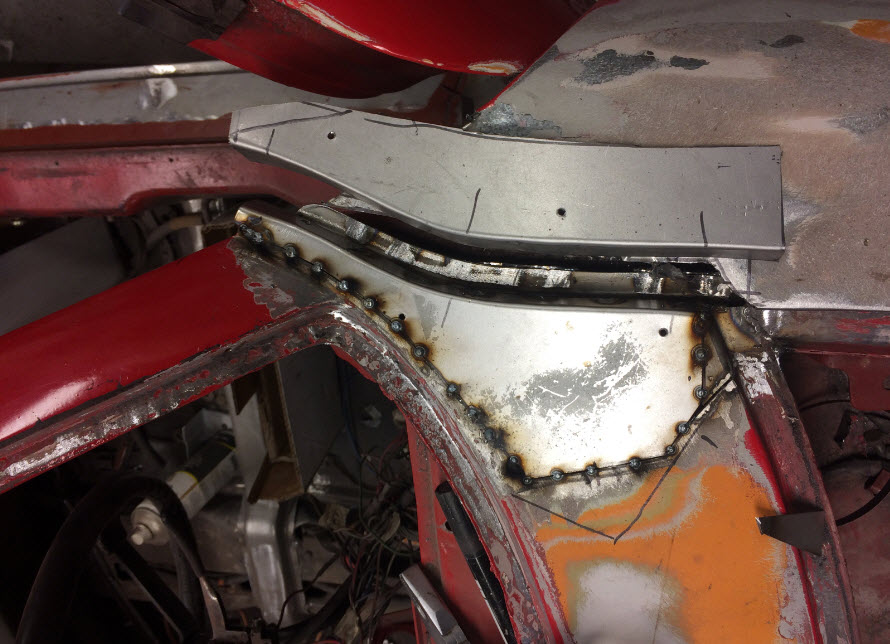 In progress.. 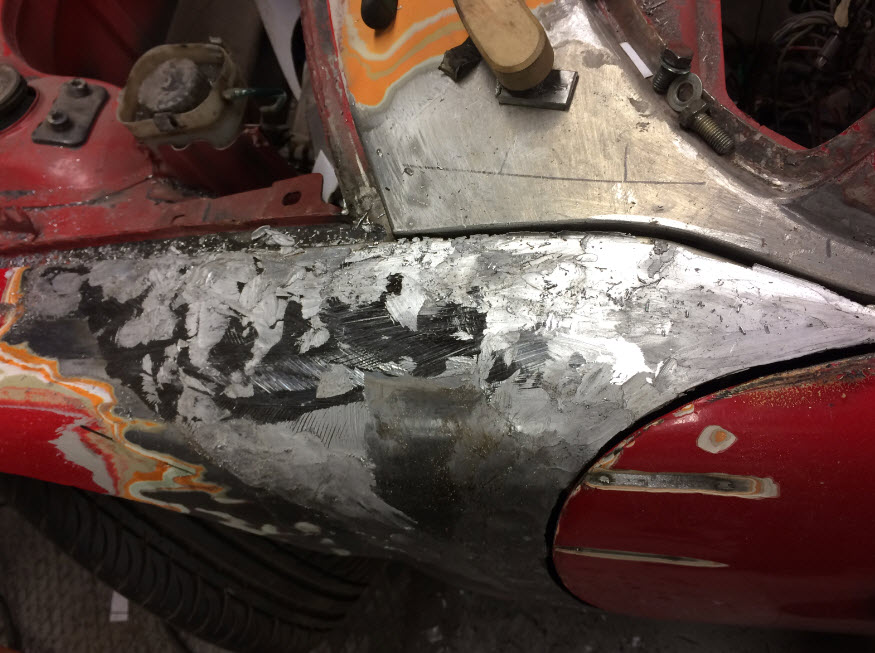 Welded in place, and doing some body soldering with lead 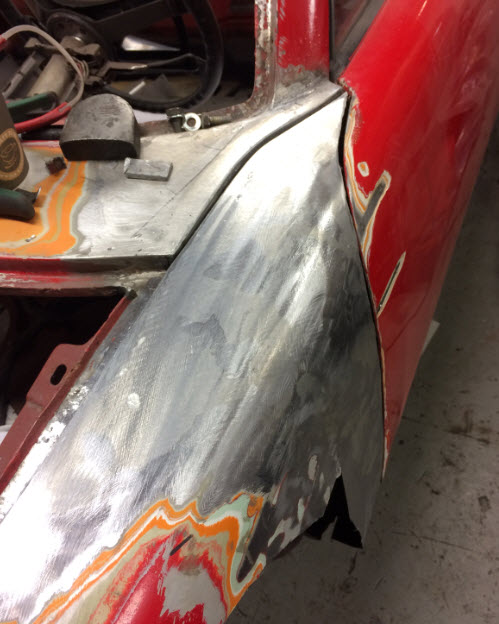 More or less finished, how many layers of paint can you see? (IMG:style_emoticons/default/biggrin.gif) |
|
|
|
| GTSandberg |
Sep 5 2019, 08:11 AM
Post
#15
|
|
Member Group: Members Posts: 63 Joined: 16-August 19 From: Drammen, Norway Member No.: 23,373 Region Association: Europe |
Here is a good example of doing things the hard way.. The goal is to modify the sheet metal structure around the jack mounts to make room for the GT-oil lines. To do this modification I would recomend the following. Buy the replacement sheet metal part, cut and weld. I choose to make a stamping tool (IMG:style_emoticons/default/screwy.gif)
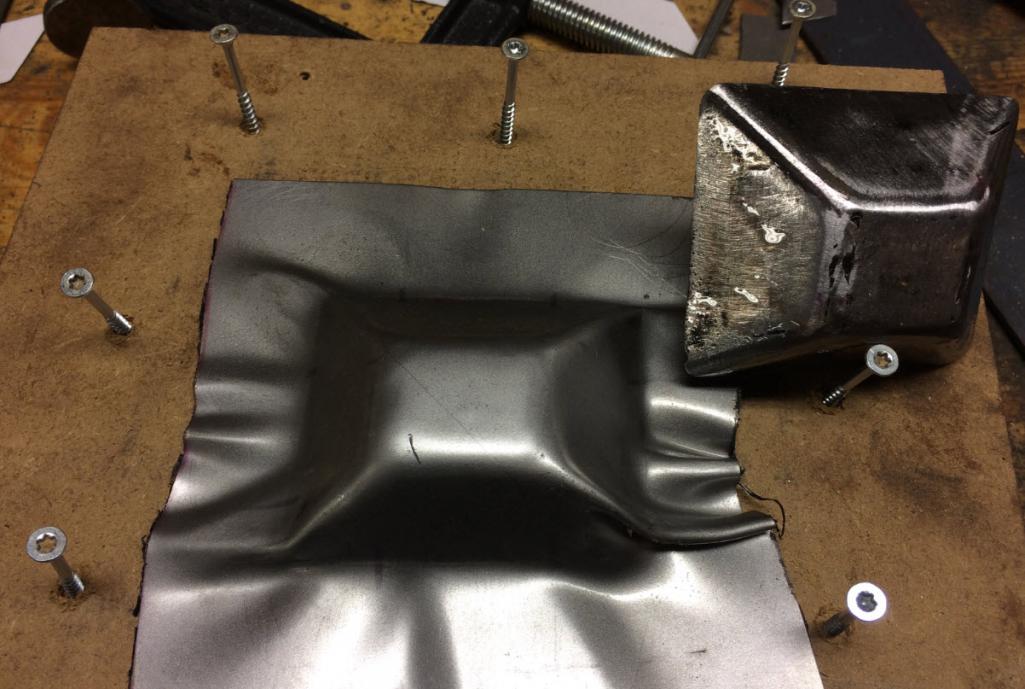 One of the failed attemts and the male tool. 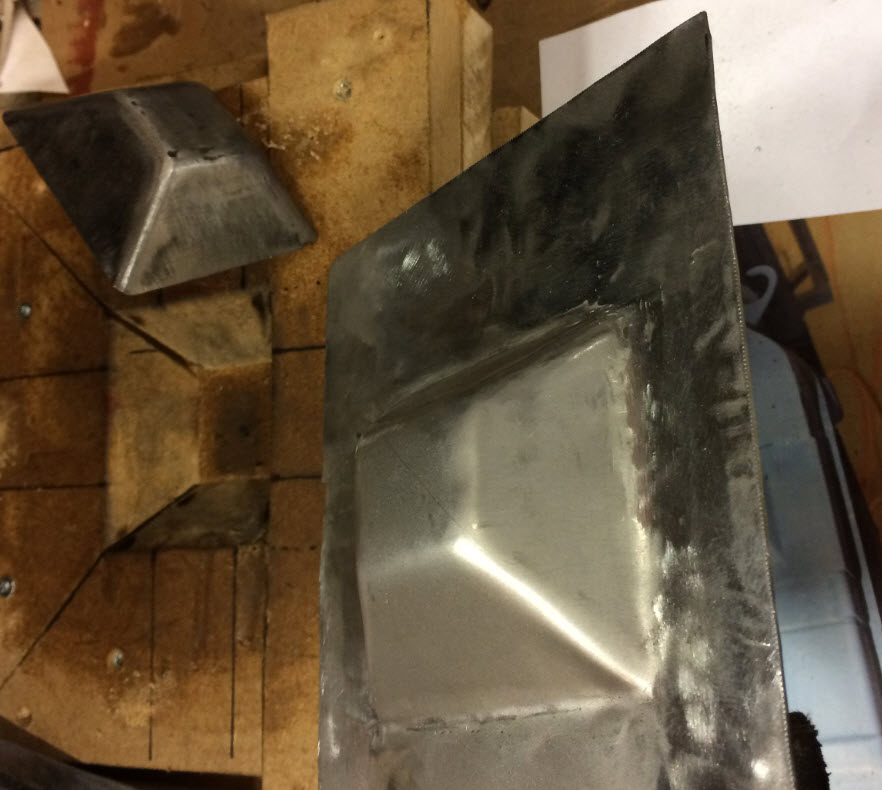 One of the almost good parts after some work, and the female tool. 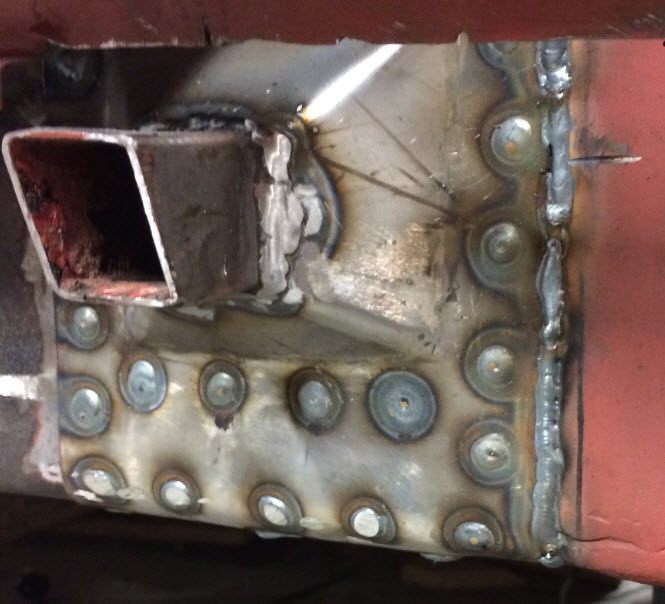 Welding in the fabricated part. 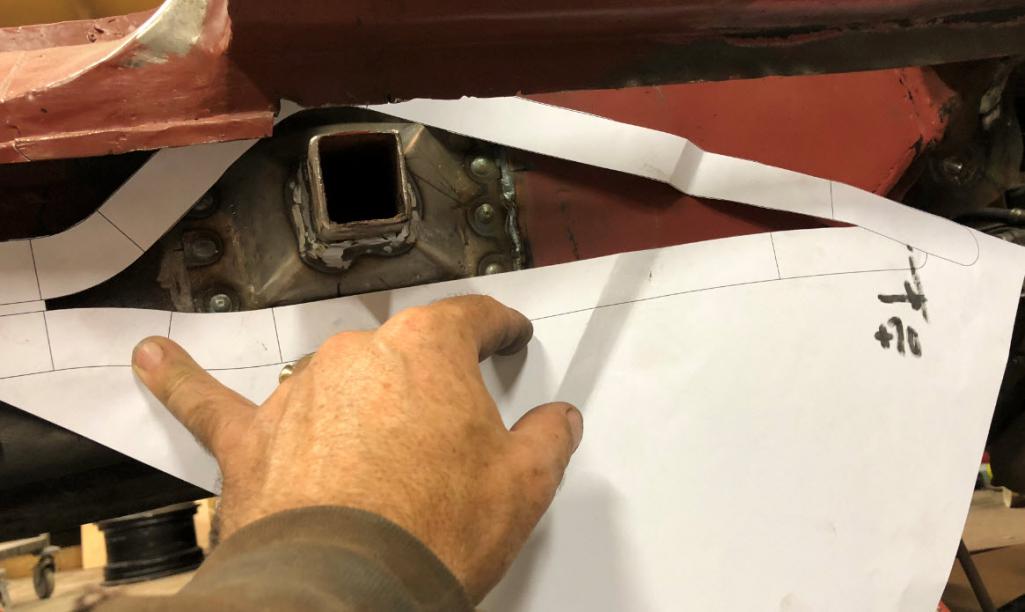 Test fitting my brand new paper oil lines. |
|
|
|
| bbrock |
Sep 5 2019, 08:24 AM
Post
#16
|
|
914 Guru Group: Members Posts: 5,269 Joined: 17-February 17 From: Montana Member No.: 20,845 Region Association: Rocky Mountains |
I'm just catching up on your build thread. Loving your fabrication work! Keep 'em coming. (IMG:style_emoticons/default/aktion035.gif)
|
|
|
|
| 76-914 |
Sep 5 2019, 08:35 AM
Post
#17
|
|
Repeat Offender & Resident Subaru Antagonist Group: Members Posts: 13,742 Joined: 23-January 09 From: Temecula, CA Member No.: 9,964 Region Association: Southern California |
|
|
|
|
| GTSandberg |
Sep 5 2019, 01:16 PM
Post
#18
|
|
Member Group: Members Posts: 63 Joined: 16-August 19 From: Drammen, Norway Member No.: 23,373 Region Association: Europe |
QUOTE(bbrock @ Sep 5 2019, 02:24 PM) I'm just catching up on your build thread. Loving your fabrication work! Keep 'em coming. (IMG:style_emoticons/default/aktion035.gif) Thanks! I will keep posting (IMG:style_emoticons/default/type.gif) Your build thread has been a true inspiration to me btw! |
|
|
|
| defianty |
Sep 5 2019, 01:20 PM
Post
#19
|
|
Senior Member Group: Members Posts: 659 Joined: 9-August 06 From: Essex, UK Member No.: 6,621 Region Association: None |
Nice work, look forward to seeing more.
|
|
|
|
| mb911 |
Sep 5 2019, 02:15 PM
Post
#20
|
|
914 Guru Group: Members Posts: 7,612 Joined: 2-January 09 From: Burlington wi Member No.: 9,892 Region Association: Upper MidWest |
Just a note as I have had made and sold 38 sets of GT hard lines the indent really is not required.. I had no issues fitting mine personally ..
|
|
|
|
|
1 User(s) are reading this topic (1 Guests and 0 Anonymous Users)
0 Members:

|
Lo-Fi Version | Time is now: 18th July 2025 - 07:09 PM |
Invision Power Board
v9.1.4 © 2025 IPS, Inc.