|
|
|
Porsche, and the Porsche crest are registered trademarks of Dr. Ing. h.c. F. Porsche AG.
This site is not affiliated with Porsche in any way. Its only purpose is to provide an online forum for car enthusiasts. All other trademarks are property of their respective owners. |
|
|


| GTSandberg |
 Aug 23 2019, 08:08 AM Aug 23 2019, 08:08 AM
Post
#41
|
|
Member  Group: Members Posts: 63 Joined: 16-August 19 From: Drammen, Norway Member No.: 23,373 Region Association: Europe |
I am starting this thread "in medias res" with the car as it is today.
Then I will post a confusing mix of past and present, showing the project updates and process. Promise to nerd out on the details. (IMG:style_emoticons/default/welder.gif) . 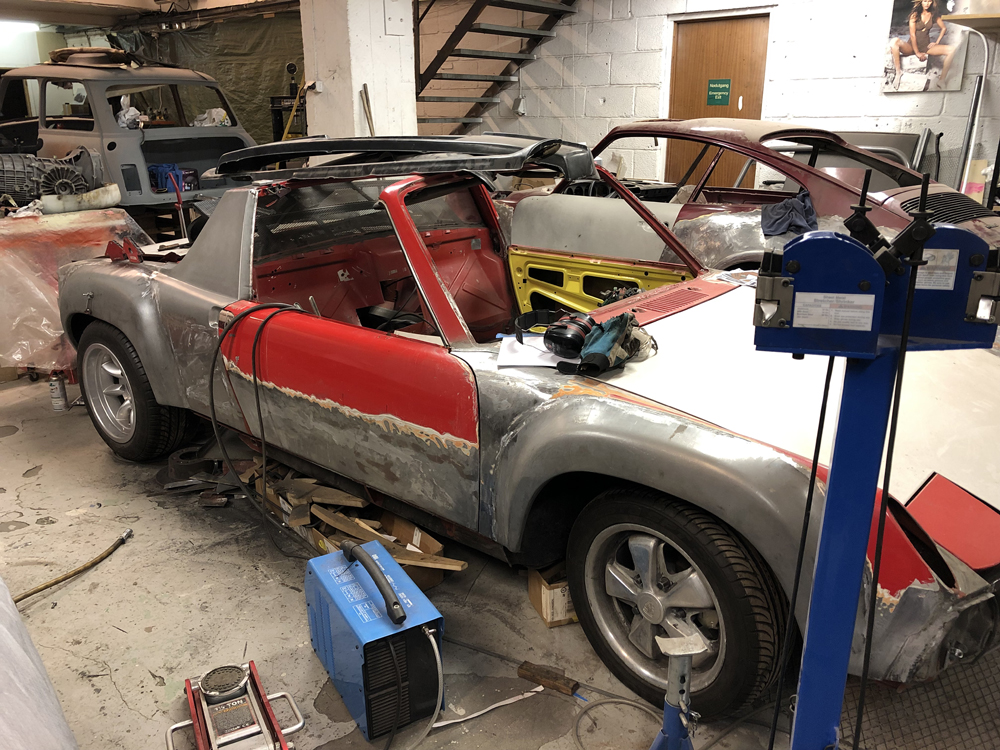 |
   |

 
|
Posts in this topic
GTSandberg Project Thread Fredriks GT build Aug 23 2019, 08:08 AM mb911 Will be watching. Aug 23 2019, 08:29 AM Retroracer Ditto. Keep the posts coming!
- Tony Aug 23 2019, 12:59 PM Cairo94507 Love the build threads. :beer2: Aug 23 2019, 05:30 PM tygaboy Great looking with the Minilites/Fuchs mix! An... Aug 23 2019, 08:07 PM GTSandberg Ok, so the hell hole, turns out it was not rust fr... Aug 26 2019, 07:55 AM Dion Fantastic work. Obviously not your first rodeo.
... Aug 26 2019, 08:50 AM
mb911 Will be watching. Aug 23 2019, 08:29 AM Retroracer Ditto. Keep the posts coming!
- Tony Aug 23 2019, 12:59 PM Cairo94507 Love the build threads. :beer2: Aug 23 2019, 05:30 PM tygaboy Great looking with the Minilites/Fuchs mix! An... Aug 23 2019, 08:07 PM GTSandberg Ok, so the hell hole, turns out it was not rust fr... Aug 26 2019, 07:55 AM Dion Fantastic work. Obviously not your first rodeo.
... Aug 26 2019, 08:50 AM
 GTSandberg
Fantastic work. Obviously not your first rodeo.
... Aug 27 2019, 07:01 AM Literati914
That's about the cleanest looking HH re... Aug 26 2019, 10:00 AM GTSandberg
That's about the cleanest looking HH r... Aug 27 2019, 06:59 AM mepstein :wttc: Aug 27 2019, 07:12 AM Cairo94507 Beautiful repair. :beer2: Aug 27 2019, 07:25 AM GTSandberg Appreciate all feedback :)
Here are two picture... Aug 28 2019, 03:22 AM GTSandberg The front fenders has been a lot of work, 914s are... Aug 29 2019, 07:55 AM GTSandberg Here is a good example of doing things the hard wa... Sep 5 2019, 08:11 AM bbrock I'm just catching up on your build thread. Lo... Sep 5 2019, 08:24 AM GTSandberg
I'm just catching up on your build thread. L... Sep 5 2019, 01:16 PM 76-914 :agree: Sep 5 2019, 08:35 AM defianty Nice work, look forward to seeing more. Sep 5 2019, 01:20 PM GTSandberg
Nice work, look forward to seeing more.
I may sa... Sep 5 2019, 02:23 PM mb911 Just a note as I have had made and sold 38 sets of... Sep 5 2019, 02:15 PM GTSandberg
Just a note as I have had made and sold 38 sets o... Sep 5 2019, 02:21 PM GTSandberg The GT oil system is of course a challenge.
Th... Sep 6 2019, 08:11 AM jd74914
Plugs (is it called that..?) for sand casting (I ... Sep 6 2019, 09:34 AM GTSandberg
Plugs (is it called that..?) for sand casting (I... Sep 10 2019, 07:34 AM raynekat
The GT oil system is of course a challenge.
T... Sep 6 2019, 01:37 PM GTSandberg
[quote name='GTSandberg' post='2744545' date='Sep... Sep 10 2019, 07:57 AM Mueller Impressive amount of sheet metal, and casting your... Sep 6 2019, 09:45 AM GTSandberg
Impressive amount of sheet metal, and casting you... Sep 10 2019, 07:48 AM tygaboy Stamping dies! :headbanger: Really impressiv... Sep 6 2019, 09:50 AM GTSandberg
Stamping dies! :headbanger: Really impressi... Sep 10 2019, 07:51 AM bbrock What???!!! :shocked: Truly next level... Sep 6 2019, 09:59 AM GTSandberg
What???!!! :shocked: Truly next leve... Sep 10 2019, 07:53 AM sixnotfour you can get the thermo, with ear repo. germany and... Sep 6 2019, 03:56 PM GTSandberg
you can get the thermo, with ear repo. germany an... Sep 10 2019, 07:59 AM GTSandberg And then, some pictures of the brake set up. Not h... Sep 10 2019, 08:09 AM GTSandberg I bought the project in 2012 (I think..) and most ... Sep 11 2019, 07:35 AM mepstein Sunoco/Duval livery - great choice.
I fduval is h... Sep 11 2019, 08:04 AM GTSandberg
Sunoco/Duval livery - great choice.
I fduval is ... Sep 12 2019, 07:35 AM defianty Looks like this is going to be a great build. I... Sep 12 2019, 08:15 AM GTSandberg I have been busy with non Porsche activities last ... Oct 4 2019, 03:46 AM rick 918-S :sawzall: :welder: :smash: :beer2: Oct 4 2019, 04:35 AM 914forme That is some nice work right there - welding mag i... Oct 4 2019, 06:55 AM GTSandberg
That is some nice work right there - welding mag ... Oct 4 2019, 07:30 AM Norskpole Very impressive! :worship: Oct 4 2019, 07:37 PM GTSandberg
Very impressive! :worship:
Thank you for a... Oct 23 2019, 07:49 AM GTSandberg Finished some details around the oil cooler setup.... Oct 23 2019, 07:59 AM Cairo94507 Nice work and I love the grill. :beer2: Oct 23 2019, 08:00 AM GTSandberg
Nice work and I love the grill. :beer2:
Thank ... Oct 23 2019, 10:28 AM gereed75 This project displays some great cradtmanship... Oct 23 2019, 09:22 AM GTSandberg
This project displays some great cradtmanship... Oct 23 2019, 10:33 AM raynekat Looking awesome. Oct 23 2019, 05:14 PM GTSandberg
Looking awesome.
Thank you, I also have an 73 i... Oct 24 2019, 08:00 AM ValcoOscar :beer2:
Sent you a PM
Oscar Oct 24 2019, 08:28 AM GTSandberg Some quick updates before the weekend.
Fabricated... Oct 25 2019, 08:09 AM GTSandberg Finaly got the steering wheel finished. Home made ... Nov 7 2019, 04:00 AM Dion Beautiful work on the steering wheel! There’... Nov 7 2019, 05:31 AM whitetwinturbo ......wow, just awesome skill!
:blink: :blin... Dec 2 2019, 11:43 PM GTSandberg The wiper assembly mechanism arm hole.. thing.. wa... Dec 6 2019, 06:44 AM AZBanks Great work! Dec 6 2019, 07:46 PM Dragoa914-6 Any idea who makes a rear tail light mod for 914... Dec 8 2019, 12:40 AM GTSandberg Really tired of rust repair, so doing some fun det... Dec 11 2019, 09:04 AM sixnotfour :headbanger: :beer2: Dec 11 2019, 12:01 PM sixnotfour Series 9 did this on Jon Nelson 914....
@[url=htt... Dec 11 2019, 12:36 PM mepstein
Series 9 did this on Jon Nelson 914....
He made ... Dec 11 2019, 12:45 PM sixnotfour Here is a link to kits and install
http://www.914w... Dec 11 2019, 12:51 PM sixnotfour here is who made the fiberglass sets,,,,
Mike Swan... Dec 11 2019, 12:46 PM sixnotfour :beer2: Dec 11 2019, 12:49 PM mepstein Here’s the thread of the metal ones - http://www... Dec 11 2019, 01:52 PM GTSandberg
Here’s the thread of the metal ones - http://ww... Dec 13 2019, 08:15 AM GTSandberg As its close to the weekend, here are some picture... Dec 13 2019, 08:37 AM sixnotfour Damn dog, cant wait to see your tail lights .. :DR... Dec 14 2019, 01:23 AM GTSandberg
Damn dog, cant wait to see your tail lights .. :D... Jan 2 2020, 08:51 AM GTSandberg Fuchs Friday.
bought some 8x15 fuchs wheels some t... Jan 3 2020, 09:11 AM GTSandberg The definitive highlight this Christmas was first ... Jan 10 2020, 08:50 AM Norskpole Mad skills there! Jan 10 2020, 09:00 PM GTSandberg
Mad skills there!
Thank you John, say hello ... Jan 14 2020, 07:48 AM jd74914 Wow, that came out great! I'm amazed at th... Jan 10 2020, 10:36 AM GTSandberg
Wow, that came out great! I'm amazed at t... Jan 10 2020, 10:43 AM Sway Bar
Wow, that came out great! I'm amazed at ... Jan 10 2020, 03:03 PM GTSandberg
[quote name='GTSandberg' post='2776210' date='Jan... Jan 14 2020, 06:47 AM Cairo94507 The wheels look terrific. As for the sand casting... Jan 10 2020, 07:38 PM GTSandberg
The wheels look terrific. As for the sand castin... Jan 14 2020, 07:35 AM sixnotfour Very Nice..... Jan 10 2020, 10:33 PM GTSandberg
Very Nice.....
:welder: Jan 14 2020, 07:49 AM GTSandberg A little spin off series on the home made hockey p... Jan 14 2020, 08:32 AM GTSandberg A quick update before the weekend. Here are some p... Jan 17 2020, 09:24 AM Retroracer Excellent work, and a nice variation on the GT lid... Jan 17 2020, 11:26 AM GTSandberg Wishing everyone a nice weekend :beer2:
Feb 7 2020, 09:03 AM GTSandberg So, got a "Covid"-child.. And progress k... Dec 11 2023, 01:47 PM 930cabman
So, got a "Covid"-child.. And progress ... Dec 14 2023, 05:23 PM gereed75 Great to see you back posting. Your work is fabulo... Dec 11 2023, 03:38 PM GTSandberg
Great to see you back posting. Your work is fabul... Dec 12 2023, 04:27 AM gereed75 Thanks. Great looking car in a fabulous color. Sor... Dec 12 2023, 07:13 AM GTSandberg
Thanks. Great looking car in a fabulous color. So... Dec 12 2023, 08:08 AM Justinp71 Stance and wheel tire combo on the 914 is perfect... Dec 13 2023, 11:01 AM gereed75 911 is pretty sweet also!! Dec 13 2023, 01:54 PM TRS63 Can't believe I never saw your thread before. ... Dec 14 2023, 06:54 AM Dion Welcome back!! Great work as usual.
You ... Dec 15 2023, 09:30 AM
GTSandberg
Fantastic work. Obviously not your first rodeo.
... Aug 27 2019, 07:01 AM Literati914
That's about the cleanest looking HH re... Aug 26 2019, 10:00 AM GTSandberg
That's about the cleanest looking HH r... Aug 27 2019, 06:59 AM mepstein :wttc: Aug 27 2019, 07:12 AM Cairo94507 Beautiful repair. :beer2: Aug 27 2019, 07:25 AM GTSandberg Appreciate all feedback :)
Here are two picture... Aug 28 2019, 03:22 AM GTSandberg The front fenders has been a lot of work, 914s are... Aug 29 2019, 07:55 AM GTSandberg Here is a good example of doing things the hard wa... Sep 5 2019, 08:11 AM bbrock I'm just catching up on your build thread. Lo... Sep 5 2019, 08:24 AM GTSandberg
I'm just catching up on your build thread. L... Sep 5 2019, 01:16 PM 76-914 :agree: Sep 5 2019, 08:35 AM defianty Nice work, look forward to seeing more. Sep 5 2019, 01:20 PM GTSandberg
Nice work, look forward to seeing more.
I may sa... Sep 5 2019, 02:23 PM mb911 Just a note as I have had made and sold 38 sets of... Sep 5 2019, 02:15 PM GTSandberg
Just a note as I have had made and sold 38 sets o... Sep 5 2019, 02:21 PM GTSandberg The GT oil system is of course a challenge.
Th... Sep 6 2019, 08:11 AM jd74914
Plugs (is it called that..?) for sand casting (I ... Sep 6 2019, 09:34 AM GTSandberg
Plugs (is it called that..?) for sand casting (I... Sep 10 2019, 07:34 AM raynekat
The GT oil system is of course a challenge.
T... Sep 6 2019, 01:37 PM GTSandberg
[quote name='GTSandberg' post='2744545' date='Sep... Sep 10 2019, 07:57 AM Mueller Impressive amount of sheet metal, and casting your... Sep 6 2019, 09:45 AM GTSandberg
Impressive amount of sheet metal, and casting you... Sep 10 2019, 07:48 AM tygaboy Stamping dies! :headbanger: Really impressiv... Sep 6 2019, 09:50 AM GTSandberg
Stamping dies! :headbanger: Really impressi... Sep 10 2019, 07:51 AM bbrock What???!!! :shocked: Truly next level... Sep 6 2019, 09:59 AM GTSandberg
What???!!! :shocked: Truly next leve... Sep 10 2019, 07:53 AM sixnotfour you can get the thermo, with ear repo. germany and... Sep 6 2019, 03:56 PM GTSandberg
you can get the thermo, with ear repo. germany an... Sep 10 2019, 07:59 AM GTSandberg And then, some pictures of the brake set up. Not h... Sep 10 2019, 08:09 AM GTSandberg I bought the project in 2012 (I think..) and most ... Sep 11 2019, 07:35 AM mepstein Sunoco/Duval livery - great choice.
I fduval is h... Sep 11 2019, 08:04 AM GTSandberg
Sunoco/Duval livery - great choice.
I fduval is ... Sep 12 2019, 07:35 AM defianty Looks like this is going to be a great build. I... Sep 12 2019, 08:15 AM GTSandberg I have been busy with non Porsche activities last ... Oct 4 2019, 03:46 AM rick 918-S :sawzall: :welder: :smash: :beer2: Oct 4 2019, 04:35 AM 914forme That is some nice work right there - welding mag i... Oct 4 2019, 06:55 AM GTSandberg
That is some nice work right there - welding mag ... Oct 4 2019, 07:30 AM Norskpole Very impressive! :worship: Oct 4 2019, 07:37 PM GTSandberg
Very impressive! :worship:
Thank you for a... Oct 23 2019, 07:49 AM GTSandberg Finished some details around the oil cooler setup.... Oct 23 2019, 07:59 AM Cairo94507 Nice work and I love the grill. :beer2: Oct 23 2019, 08:00 AM GTSandberg
Nice work and I love the grill. :beer2:
Thank ... Oct 23 2019, 10:28 AM gereed75 This project displays some great cradtmanship... Oct 23 2019, 09:22 AM GTSandberg
This project displays some great cradtmanship... Oct 23 2019, 10:33 AM raynekat Looking awesome. Oct 23 2019, 05:14 PM GTSandberg
Looking awesome.
Thank you, I also have an 73 i... Oct 24 2019, 08:00 AM ValcoOscar :beer2:
Sent you a PM
Oscar Oct 24 2019, 08:28 AM GTSandberg Some quick updates before the weekend.
Fabricated... Oct 25 2019, 08:09 AM GTSandberg Finaly got the steering wheel finished. Home made ... Nov 7 2019, 04:00 AM Dion Beautiful work on the steering wheel! There’... Nov 7 2019, 05:31 AM whitetwinturbo ......wow, just awesome skill!
:blink: :blin... Dec 2 2019, 11:43 PM GTSandberg The wiper assembly mechanism arm hole.. thing.. wa... Dec 6 2019, 06:44 AM AZBanks Great work! Dec 6 2019, 07:46 PM Dragoa914-6 Any idea who makes a rear tail light mod for 914... Dec 8 2019, 12:40 AM GTSandberg Really tired of rust repair, so doing some fun det... Dec 11 2019, 09:04 AM sixnotfour :headbanger: :beer2: Dec 11 2019, 12:01 PM sixnotfour Series 9 did this on Jon Nelson 914....
@[url=htt... Dec 11 2019, 12:36 PM mepstein
Series 9 did this on Jon Nelson 914....
He made ... Dec 11 2019, 12:45 PM sixnotfour Here is a link to kits and install
http://www.914w... Dec 11 2019, 12:51 PM sixnotfour here is who made the fiberglass sets,,,,
Mike Swan... Dec 11 2019, 12:46 PM sixnotfour :beer2: Dec 11 2019, 12:49 PM mepstein Here’s the thread of the metal ones - http://www... Dec 11 2019, 01:52 PM GTSandberg
Here’s the thread of the metal ones - http://ww... Dec 13 2019, 08:15 AM GTSandberg As its close to the weekend, here are some picture... Dec 13 2019, 08:37 AM sixnotfour Damn dog, cant wait to see your tail lights .. :DR... Dec 14 2019, 01:23 AM GTSandberg
Damn dog, cant wait to see your tail lights .. :D... Jan 2 2020, 08:51 AM GTSandberg Fuchs Friday.
bought some 8x15 fuchs wheels some t... Jan 3 2020, 09:11 AM GTSandberg The definitive highlight this Christmas was first ... Jan 10 2020, 08:50 AM Norskpole Mad skills there! Jan 10 2020, 09:00 PM GTSandberg
Mad skills there!
Thank you John, say hello ... Jan 14 2020, 07:48 AM jd74914 Wow, that came out great! I'm amazed at th... Jan 10 2020, 10:36 AM GTSandberg
Wow, that came out great! I'm amazed at t... Jan 10 2020, 10:43 AM Sway Bar
Wow, that came out great! I'm amazed at ... Jan 10 2020, 03:03 PM GTSandberg
[quote name='GTSandberg' post='2776210' date='Jan... Jan 14 2020, 06:47 AM Cairo94507 The wheels look terrific. As for the sand casting... Jan 10 2020, 07:38 PM GTSandberg
The wheels look terrific. As for the sand castin... Jan 14 2020, 07:35 AM sixnotfour Very Nice..... Jan 10 2020, 10:33 PM GTSandberg
Very Nice.....
:welder: Jan 14 2020, 07:49 AM GTSandberg A little spin off series on the home made hockey p... Jan 14 2020, 08:32 AM GTSandberg A quick update before the weekend. Here are some p... Jan 17 2020, 09:24 AM Retroracer Excellent work, and a nice variation on the GT lid... Jan 17 2020, 11:26 AM GTSandberg Wishing everyone a nice weekend :beer2:
Feb 7 2020, 09:03 AM GTSandberg So, got a "Covid"-child.. And progress k... Dec 11 2023, 01:47 PM 930cabman
So, got a "Covid"-child.. And progress ... Dec 14 2023, 05:23 PM gereed75 Great to see you back posting. Your work is fabulo... Dec 11 2023, 03:38 PM GTSandberg
Great to see you back posting. Your work is fabul... Dec 12 2023, 04:27 AM gereed75 Thanks. Great looking car in a fabulous color. Sor... Dec 12 2023, 07:13 AM GTSandberg
Thanks. Great looking car in a fabulous color. So... Dec 12 2023, 08:08 AM Justinp71 Stance and wheel tire combo on the 914 is perfect... Dec 13 2023, 11:01 AM gereed75 911 is pretty sweet also!! Dec 13 2023, 01:54 PM TRS63 Can't believe I never saw your thread before. ... Dec 14 2023, 06:54 AM Dion Welcome back!! Great work as usual.
You ... Dec 15 2023, 09:30 AM  |
1 User(s) are reading this topic (1 Guests and 0 Anonymous Users)
0 Members:

|
Lo-Fi Version | Time is now: 26th June 2026 - 08:42 PM |
Invision Power Board
v9.1.4 © 2026 IPS, Inc.