|
|
|
Porsche, and the Porsche crest are registered trademarks of Dr. Ing. h.c. F. Porsche AG.
This site is not affiliated with Porsche in any way. Its only purpose is to provide an online forum for car enthusiasts. All other trademarks are property of their respective owners. |
|
|


| bkrantz |
 Oct 16 2019, 08:47 PM Oct 16 2019, 08:47 PM
Post
#41
|
|
914 Guru  Group: Members Posts: 8,741 Joined: 3-August 19 From: SW Colorado Member No.: 23,343 Region Association: Rocky Mountains |
I realize most rebuilds go from the inside to the outside, but I am struck by how straight and clean the outer panels, including paint, look on my 73 2.0. And all the nasty stuff is hidden underneath--which I know is also not unusual.
Any way, I bought the car knowing most of what it was: a 2.0 with all the sport and appearance group equipment, including 5 good Fuchs, and the original fuel injection. The original engine is confirmed by a COA. In contrast to the exterior the interior was mixed at best, with some funky carpet. And the front and rear trunks (and engine compartment, and interior) had been sprayed with black undercoating. So after a month, I have the car stripped to a bare shell, except for suspension and steering. I measured everything I could, and the body is very square and on spec. I need to patch some local rust spots, and replace the rear floor. And then do some minor straightening: right headlight bucket, front edge of right front fender, rear panel, etc. Attached thumbnail(s) 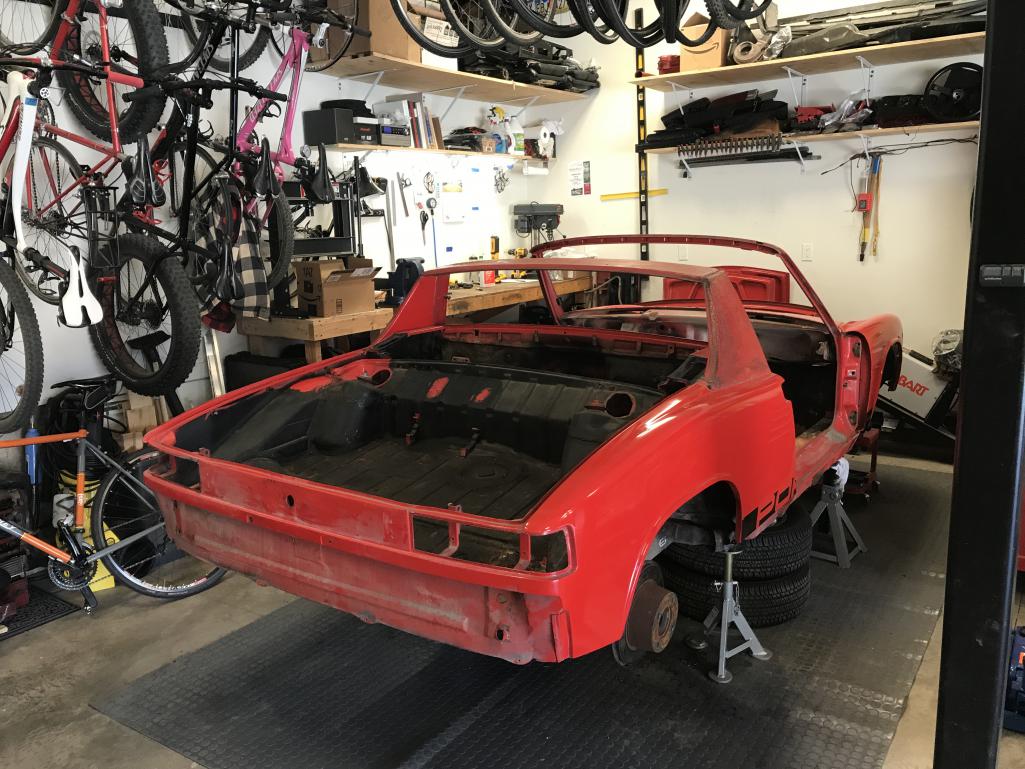
|
   |

 
|
Posts in this topic
 bkrantz Rebuiding Inside-out Oct 16 2019, 08:47 PM
 bkrantz I forgot to mention that I will add some door brac... Oct 16 2019, 08:49 PM bkrantz And I testing the Fein for cutting the floor sheet... Oct 16 2019, 08:53 PM Mikey914 Use the dry ice method if you need to remove more ... Oct 16 2019, 09:31 PM bkrantz Been a couple of days and I have nearly completed ... Oct 20 2019, 08:22 PM raynekat Been there, done that (or at least Cary who did al... Oct 20 2019, 11:49 PM
 bkrantz
Been there, done that (or at least Cary who did a... Oct 21 2019, 08:20 PM pploco
Use the dry ice method if you need to remove more... Oct 21 2019, 08:31 AM bbrock The body plugs are important for separating the me... Oct 21 2019, 08:50 PM bkrantz I have been out of town a bit, but needed to make ... Oct 28 2019, 08:55 PM bkrantz I was waiting for a delivery truck, so decided to ... Oct 28 2019, 09:01 PM bkrantz Cleaner cut for the rear trunk floor. Looks like ... Nov 4 2019, 09:08 PM Garland
Cleaner cut for the rear trunk floor. Looks like... Nov 11 2019, 10:37 PM bkrantz Testing my spot weld drill bit. Nov 5 2019, 09:34 PM bkrantz The bumpers, and all trim, were painted black. I ... Nov 11 2019, 09:46 PM bkrantz Brought home a donor clip to use to replace my rig... Nov 15 2019, 09:19 PM bkrantz Also a rear trunk lid, straighter than mine and wi... Nov 15 2019, 09:20 PM bkrantz Starting surgery on the donor clip. Nov 16 2019, 10:08 PM Superhawk996 Watching this build. Keep going! :cheer: Nov 17 2019, 12:22 PM bkrantz Cut the donor clip down more. This is the largest... Nov 17 2019, 10:21 PM bkrantz Started surgery on the receiver car. Removed the ... Nov 18 2019, 09:34 PM bkrantz Here are the parts removed. I will reuse the circ... Nov 18 2019, 09:35 PM bbrock Are you still using your Fein for the cutting? Th... Nov 18 2019, 09:51 PM bkrantz The Fein works best where I can cut from an expose... Nov 19 2019, 09:19 PM bkrantz First pass at reforming the floor corner. Nov 19 2019, 09:21 PM bkrantz And progress on the rear, removing the rear panel ... Nov 19 2019, 09:24 PM bkrantz Left corner detail. Pretty nasty work done when t... Nov 19 2019, 09:25 PM bkrantz Quick adjustments of the inner fender corners, lef... Nov 20 2019, 05:45 PM bkrantz and right: Nov 20 2019, 05:45 PM bkrantz Now the panel fits. Nov 20 2019, 05:46 PM bkrantz Back at the front, I am probably done working the ... Nov 20 2019, 05:48 PM bkrantz And started to dissect the donor clip. All I need... Nov 20 2019, 05:51 PM bkrantz Here's how the front corner started. I feel p... Nov 20 2019, 05:56 PM FourBlades Some great progress! :trophy:
Nice work... Nov 20 2019, 05:57 PM jim_hoyland Impressive ! :) :beer1: Nov 20 2019, 06:05 PM bbrock :worship: Nice work! Nov 20 2019, 09:41 PM bkrantz Thanks, everyone.
Donor part down to inner fender... Nov 21 2019, 09:51 PM raynekat Looking good there Bob. Nov 22 2019, 12:31 AM bkrantz Thanks, Doug. I am in deeper than I wanted, but k... Nov 22 2019, 09:21 PM Cairo94507 Nice work and skills. :beer2: Nov 23 2019, 08:17 AM bkrantz After a long trip to Tucson for turkey and visitin... Dec 5 2019, 09:15 PM bkrantz More work to do on the right end of the front pane... Dec 5 2019, 09:18 PM GTSandberg Craftmanship and attention to details, Im in :pop... Dec 6 2019, 06:13 AM bkrantz Still working the fit. Made a cardboard template ... Dec 7 2019, 09:37 PM bkrantz Work to do. Gap seen from below. Dec 7 2019, 09:38 PM FourBlades Looking good!
Do some diagonal measurements f... Dec 8 2019, 11:26 AM bkrantz
Looking good!
Do some diagonal measurements ... Dec 8 2019, 09:35 PM bkrantz More metal work, and the fit is getting closer--of... Dec 8 2019, 09:37 PM bkrantz Last bit of mis-alignment is the outermost end of ... Dec 8 2019, 09:42 PM bkrantz After a few more hours today, I am claiming victor... Dec 9 2019, 09:16 PM bkrantz Of course, I might tap on things a bit more, just ... Dec 9 2019, 09:17 PM bkrantz Now starting on the rear. Weeks ago, I cut out th... Dec 10 2019, 09:45 PM bkrantz And here is the lumpy right side. Previous repair... Dec 10 2019, 09:47 PM bkrantz First effort, left side. Almost good. Dec 11 2019, 08:38 PM bkrantz And right side. Still needs work. Dec 11 2019, 08:40 PM bbrock You are a wizard. :worship: Dec 11 2019, 09:19 PM bkrantz Right side done enough for now. Dec 12 2019, 10:40 PM bkrantz Time to start on the rear panel.
And yes, almost ... Dec 12 2019, 10:43 PM bkrantz Getting back to work, and a real milestone today: ... Dec 17 2019, 09:05 PM bkrantz And the first parts of the bracing for the open bo... Dec 17 2019, 09:08 PM bkrantz Completed the interior bracing with some diagonals... Dec 22 2019, 09:27 PM bkrantz And completed the patches on the right front inner... Dec 22 2019, 09:29 PM bkrantz Two steps forward, at least one back!
I knew ... Dec 22 2019, 09:32 PM bkrantz Decided to separate, in order to make it right. T... Dec 22 2019, 09:35 PM Superhawk996 :Qarl:
Yea! Coming along nicely.
Saw you... Dec 23 2019, 02:50 AM bkrantz
:Qarl:
Yea! Coming along nicely.
Saw yo... Dec 23 2019, 09:27 PM bkrantz Here's the front corner mostly welded in place... Dec 23 2019, 09:29 PM bkrantz Meanwhile, getting started on the rear. First tri... Dec 23 2019, 09:32 PM bkrantz And starting the fit for the rear panel. This wil... Dec 23 2019, 09:34 PM bkrantz Right side is looking better, with access after re... Dec 23 2019, 09:35 PM djway AWESOME
There has got to be some Satisfaction ther... Dec 23 2019, 10:49 PM bkrantz
AWESOME
There has got to be some Satisfaction the... Dec 24 2019, 09:56 PM sixnotfour :agree:
:smash: :welder: :beer2: Dec 23 2019, 11:09 PM bkrantz Got the outer fender cut and fit. A few more twea... Dec 24 2019, 09:58 PM bkrantz And...here's the last dodgy previous repair, w... Dec 24 2019, 10:00 PM bkrantz Only a half-day for xmas, since I want to get as m... Dec 25 2019, 09:16 PM bkrantz And a further adjustment and test fit for all the ... Dec 25 2019, 09:21 PM Superhawk996 :trophy:
Looking better.
My car has been clip... Dec 26 2019, 09:19 AM bkrantz
:trophy:
Looking better.
My car has been cli... Dec 26 2019, 09:07 PM bkrantz Got the rear panel and outer fender welds mostly d... Dec 26 2019, 09:09 PM bkrantz Left side needed a 3/4 inch wide filler for the ga... Dec 26 2019, 09:11 PM bkrantz Same on the right side, but the gap was only 3/16 ... Dec 26 2019, 09:12 PM bkrantz And what was the lap joint in the front panel, now... Dec 26 2019, 09:14 PM FourBlades Nice work! :first:
Great to fix things the... Dec 27 2019, 09:47 AM bkrantz
Nice work! :first:
Great to fix things th... Dec 27 2019, 09:48 PM bkrantz Getting the front seam stitched up, along with the... Dec 27 2019, 09:52 PM bkrantz Here are the accessory pieces I made for the rear:... Dec 27 2019, 09:57 PM Kansas 914 Bob - you are doing everything right.
It was nic... Dec 28 2019, 06:29 AM FourBlades What are the reinforcement pieces for?
John Dec 28 2019, 08:28 AM bkrantz John, the 1/8 inch thick L-braces are for the bump... Dec 28 2019, 09:45 PM bkrantz Got the trunk floor welded in, with plug welds all... Dec 28 2019, 09:48 PM bkrantz Lower bumper mount hole reinforcement, using 1/8 i... Dec 28 2019, 09:50 PM bkrantz And my own additional brace for the upper bumper m... Dec 28 2019, 09:51 PM bkrantz And a simple bent strip to bridge the gap between ... Dec 28 2019, 09:54 PM bkrantz Now the fun part: fabricating brackets from 2 inch... Dec 28 2019, 09:57 PM bkrantz And the front, where greater curvature requires lo... Dec 28 2019, 09:58 PM bkrantz Here's the rear, with the horizontal mount fro... Dec 28 2019, 09:59 PM bkrantz Finally! The car is on the rotisserie lift. ... Dec 28 2019, 10:02 PM ndfrigi wow @bkrantz you and your son are doing a lot of... Dec 28 2019, 10:10 PM bkrantz Final steps. First, we detached the suspension--t... Dec 29 2019, 10:03 PM
bkrantz
Been there, done that (or at least Cary who did a... Oct 21 2019, 08:20 PM pploco
Use the dry ice method if you need to remove more... Oct 21 2019, 08:31 AM bbrock The body plugs are important for separating the me... Oct 21 2019, 08:50 PM bkrantz I have been out of town a bit, but needed to make ... Oct 28 2019, 08:55 PM bkrantz I was waiting for a delivery truck, so decided to ... Oct 28 2019, 09:01 PM bkrantz Cleaner cut for the rear trunk floor. Looks like ... Nov 4 2019, 09:08 PM Garland
Cleaner cut for the rear trunk floor. Looks like... Nov 11 2019, 10:37 PM bkrantz Testing my spot weld drill bit. Nov 5 2019, 09:34 PM bkrantz The bumpers, and all trim, were painted black. I ... Nov 11 2019, 09:46 PM bkrantz Brought home a donor clip to use to replace my rig... Nov 15 2019, 09:19 PM bkrantz Also a rear trunk lid, straighter than mine and wi... Nov 15 2019, 09:20 PM bkrantz Starting surgery on the donor clip. Nov 16 2019, 10:08 PM Superhawk996 Watching this build. Keep going! :cheer: Nov 17 2019, 12:22 PM bkrantz Cut the donor clip down more. This is the largest... Nov 17 2019, 10:21 PM bkrantz Started surgery on the receiver car. Removed the ... Nov 18 2019, 09:34 PM bkrantz Here are the parts removed. I will reuse the circ... Nov 18 2019, 09:35 PM bbrock Are you still using your Fein for the cutting? Th... Nov 18 2019, 09:51 PM bkrantz The Fein works best where I can cut from an expose... Nov 19 2019, 09:19 PM bkrantz First pass at reforming the floor corner. Nov 19 2019, 09:21 PM bkrantz And progress on the rear, removing the rear panel ... Nov 19 2019, 09:24 PM bkrantz Left corner detail. Pretty nasty work done when t... Nov 19 2019, 09:25 PM bkrantz Quick adjustments of the inner fender corners, lef... Nov 20 2019, 05:45 PM bkrantz and right: Nov 20 2019, 05:45 PM bkrantz Now the panel fits. Nov 20 2019, 05:46 PM bkrantz Back at the front, I am probably done working the ... Nov 20 2019, 05:48 PM bkrantz And started to dissect the donor clip. All I need... Nov 20 2019, 05:51 PM bkrantz Here's how the front corner started. I feel p... Nov 20 2019, 05:56 PM FourBlades Some great progress! :trophy:
Nice work... Nov 20 2019, 05:57 PM jim_hoyland Impressive ! :) :beer1: Nov 20 2019, 06:05 PM bbrock :worship: Nice work! Nov 20 2019, 09:41 PM bkrantz Thanks, everyone.
Donor part down to inner fender... Nov 21 2019, 09:51 PM raynekat Looking good there Bob. Nov 22 2019, 12:31 AM bkrantz Thanks, Doug. I am in deeper than I wanted, but k... Nov 22 2019, 09:21 PM Cairo94507 Nice work and skills. :beer2: Nov 23 2019, 08:17 AM bkrantz After a long trip to Tucson for turkey and visitin... Dec 5 2019, 09:15 PM bkrantz More work to do on the right end of the front pane... Dec 5 2019, 09:18 PM GTSandberg Craftmanship and attention to details, Im in :pop... Dec 6 2019, 06:13 AM bkrantz Still working the fit. Made a cardboard template ... Dec 7 2019, 09:37 PM bkrantz Work to do. Gap seen from below. Dec 7 2019, 09:38 PM FourBlades Looking good!
Do some diagonal measurements f... Dec 8 2019, 11:26 AM bkrantz
Looking good!
Do some diagonal measurements ... Dec 8 2019, 09:35 PM bkrantz More metal work, and the fit is getting closer--of... Dec 8 2019, 09:37 PM bkrantz Last bit of mis-alignment is the outermost end of ... Dec 8 2019, 09:42 PM bkrantz After a few more hours today, I am claiming victor... Dec 9 2019, 09:16 PM bkrantz Of course, I might tap on things a bit more, just ... Dec 9 2019, 09:17 PM bkrantz Now starting on the rear. Weeks ago, I cut out th... Dec 10 2019, 09:45 PM bkrantz And here is the lumpy right side. Previous repair... Dec 10 2019, 09:47 PM bkrantz First effort, left side. Almost good. Dec 11 2019, 08:38 PM bkrantz And right side. Still needs work. Dec 11 2019, 08:40 PM bbrock You are a wizard. :worship: Dec 11 2019, 09:19 PM bkrantz Right side done enough for now. Dec 12 2019, 10:40 PM bkrantz Time to start on the rear panel.
And yes, almost ... Dec 12 2019, 10:43 PM bkrantz Getting back to work, and a real milestone today: ... Dec 17 2019, 09:05 PM bkrantz And the first parts of the bracing for the open bo... Dec 17 2019, 09:08 PM bkrantz Completed the interior bracing with some diagonals... Dec 22 2019, 09:27 PM bkrantz And completed the patches on the right front inner... Dec 22 2019, 09:29 PM bkrantz Two steps forward, at least one back!
I knew ... Dec 22 2019, 09:32 PM bkrantz Decided to separate, in order to make it right. T... Dec 22 2019, 09:35 PM Superhawk996 :Qarl:
Yea! Coming along nicely.
Saw you... Dec 23 2019, 02:50 AM bkrantz
:Qarl:
Yea! Coming along nicely.
Saw yo... Dec 23 2019, 09:27 PM bkrantz Here's the front corner mostly welded in place... Dec 23 2019, 09:29 PM bkrantz Meanwhile, getting started on the rear. First tri... Dec 23 2019, 09:32 PM bkrantz And starting the fit for the rear panel. This wil... Dec 23 2019, 09:34 PM bkrantz Right side is looking better, with access after re... Dec 23 2019, 09:35 PM djway AWESOME
There has got to be some Satisfaction ther... Dec 23 2019, 10:49 PM bkrantz
AWESOME
There has got to be some Satisfaction the... Dec 24 2019, 09:56 PM sixnotfour :agree:
:smash: :welder: :beer2: Dec 23 2019, 11:09 PM bkrantz Got the outer fender cut and fit. A few more twea... Dec 24 2019, 09:58 PM bkrantz And...here's the last dodgy previous repair, w... Dec 24 2019, 10:00 PM bkrantz Only a half-day for xmas, since I want to get as m... Dec 25 2019, 09:16 PM bkrantz And a further adjustment and test fit for all the ... Dec 25 2019, 09:21 PM Superhawk996 :trophy:
Looking better.
My car has been clip... Dec 26 2019, 09:19 AM bkrantz
:trophy:
Looking better.
My car has been cli... Dec 26 2019, 09:07 PM bkrantz Got the rear panel and outer fender welds mostly d... Dec 26 2019, 09:09 PM bkrantz Left side needed a 3/4 inch wide filler for the ga... Dec 26 2019, 09:11 PM bkrantz Same on the right side, but the gap was only 3/16 ... Dec 26 2019, 09:12 PM bkrantz And what was the lap joint in the front panel, now... Dec 26 2019, 09:14 PM FourBlades Nice work! :first:
Great to fix things the... Dec 27 2019, 09:47 AM bkrantz
Nice work! :first:
Great to fix things th... Dec 27 2019, 09:48 PM bkrantz Getting the front seam stitched up, along with the... Dec 27 2019, 09:52 PM bkrantz Here are the accessory pieces I made for the rear:... Dec 27 2019, 09:57 PM Kansas 914 Bob - you are doing everything right.
It was nic... Dec 28 2019, 06:29 AM FourBlades What are the reinforcement pieces for?
John Dec 28 2019, 08:28 AM bkrantz John, the 1/8 inch thick L-braces are for the bump... Dec 28 2019, 09:45 PM bkrantz Got the trunk floor welded in, with plug welds all... Dec 28 2019, 09:48 PM bkrantz Lower bumper mount hole reinforcement, using 1/8 i... Dec 28 2019, 09:50 PM bkrantz And my own additional brace for the upper bumper m... Dec 28 2019, 09:51 PM bkrantz And a simple bent strip to bridge the gap between ... Dec 28 2019, 09:54 PM bkrantz Now the fun part: fabricating brackets from 2 inch... Dec 28 2019, 09:57 PM bkrantz And the front, where greater curvature requires lo... Dec 28 2019, 09:58 PM bkrantz Here's the rear, with the horizontal mount fro... Dec 28 2019, 09:59 PM bkrantz Finally! The car is on the rotisserie lift. ... Dec 28 2019, 10:02 PM ndfrigi wow @bkrantz you and your son are doing a lot of... Dec 28 2019, 10:10 PM bkrantz Final steps. First, we detached the suspension--t... Dec 29 2019, 10:03 PM  |
3 User(s) are reading this topic (3 Guests and 0 Anonymous Users)
0 Members:

|
Lo-Fi Version | Time is now: 26th July 2026 - 04:57 AM |
Invision Power Board
v9.1.4 © 2026 IPS, Inc.