|
|
|
Porsche, and the Porsche crest are registered trademarks of Dr. Ing. h.c. F. Porsche AG.
This site is not affiliated with Porsche in any way. Its only purpose is to provide an online forum for car enthusiasts. All other trademarks are property of their respective owners. |
|
|

  |

| bkrantz |
 Nov 8 2021, 07:53 PM Nov 8 2021, 07:53 PM
Post
#4101
|
|
914 Guru  Group: Members Posts: 8,530 Joined: 3-August 19 From: SW Colorado Member No.: 23,343 Region Association: Rocky Mountains |
New fuzzy channel for the window guide.
Attached thumbnail(s) 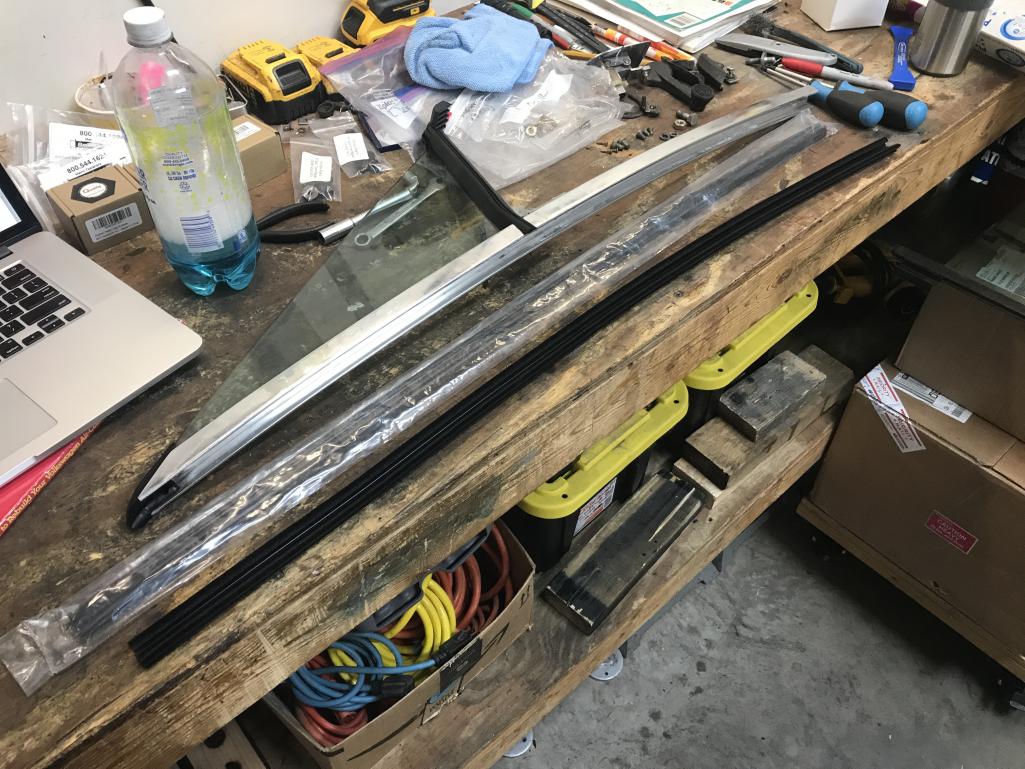
|
   |

 
|
| bkrantz |
Nov 8 2021, 07:54 PM
Post
#4102
|
|
914 Guru Group: Members Posts: 8,530 Joined: 3-August 19 From: SW Colorado Member No.: 23,343 Region Association: Rocky Mountains |
Installed.
Attached thumbnail(s) 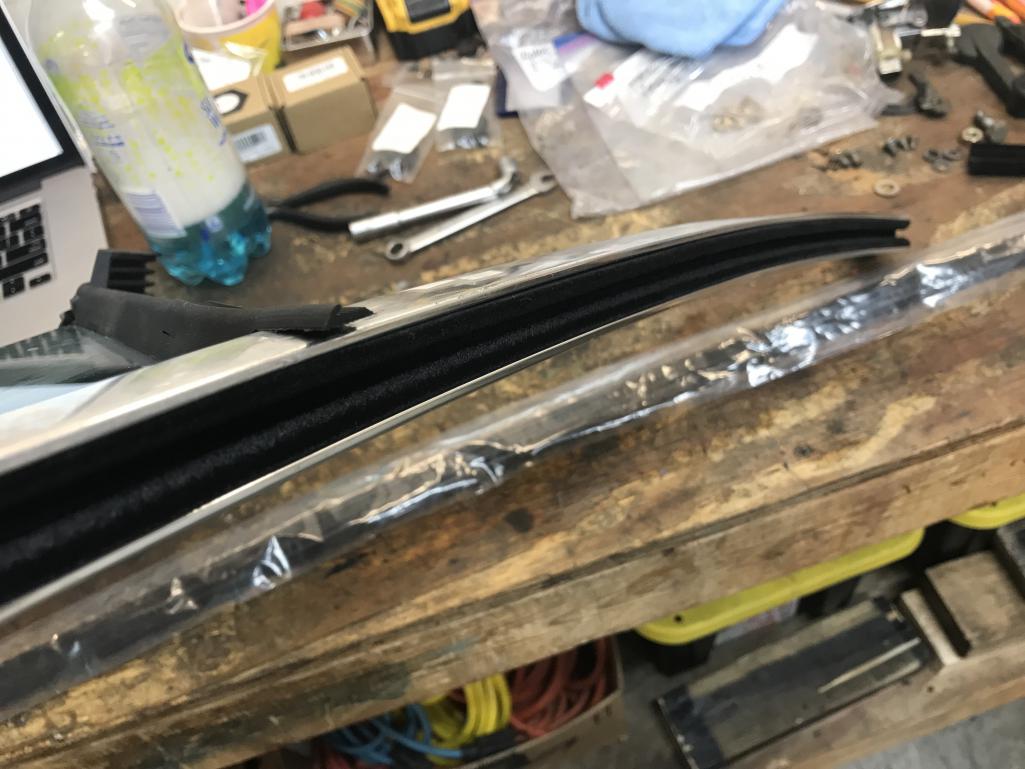
|
|
|
|
| bkrantz |
Nov 8 2021, 07:56 PM
Post
#4103
|
|
914 Guru Group: Members Posts: 8,530 Joined: 3-August 19 From: SW Colorado Member No.: 23,343 Region Association: Rocky Mountains |
Now the fun part: trying to get the seal seated in the door.
Attached thumbnail(s) 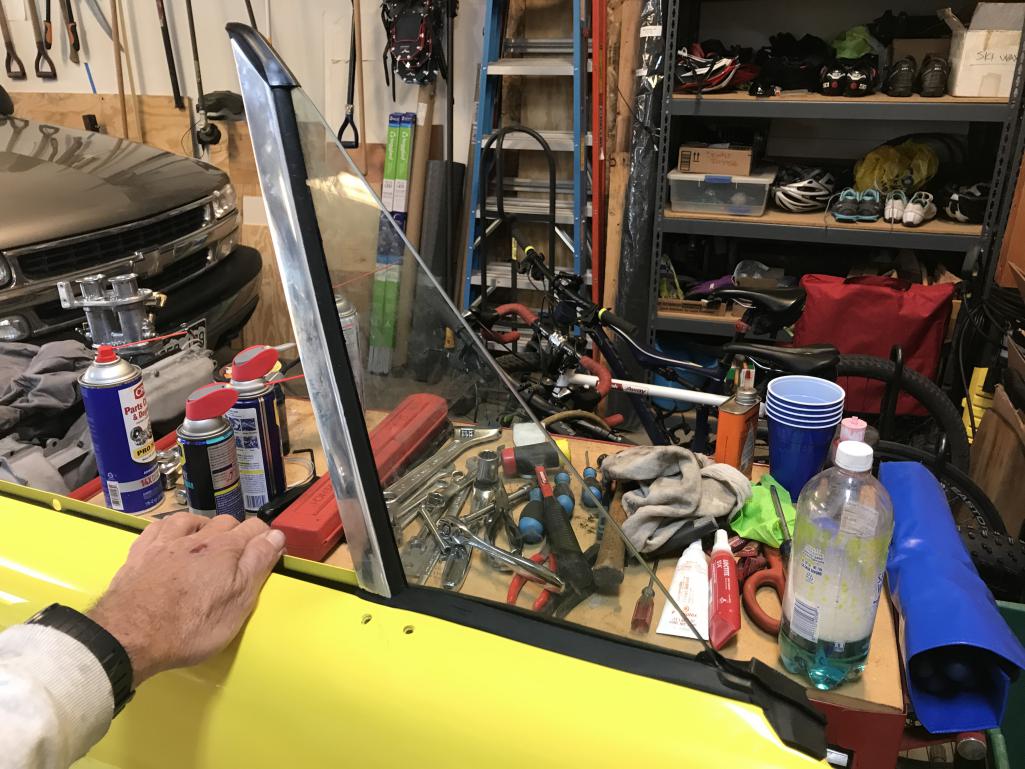
|
|
|
|
| bkrantz |
Nov 8 2021, 07:57 PM
Post
#4104
|
|
914 Guru Group: Members Posts: 8,530 Joined: 3-August 19 From: SW Colorado Member No.: 23,343 Region Association: Rocky Mountains |
After lots of struggle, I could not get the front end to seat properly.
Attached thumbnail(s) 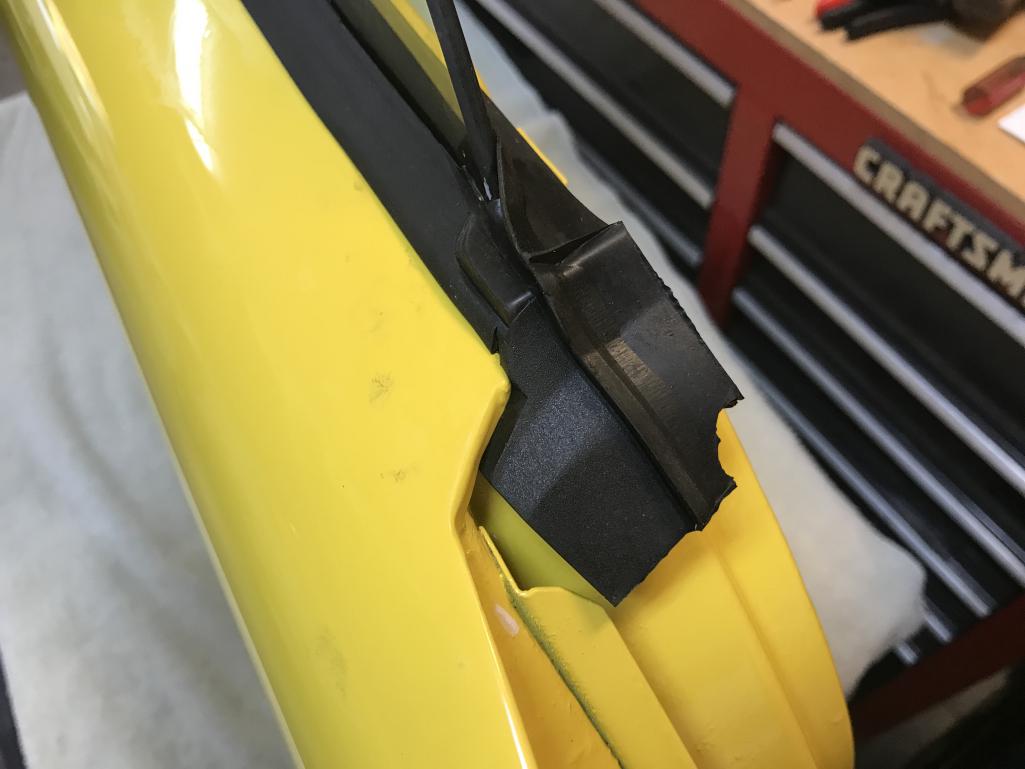
|
|
|
|
| bkrantz |
Nov 8 2021, 07:59 PM
Post
#4105
|
|
914 Guru Group: Members Posts: 8,530 Joined: 3-August 19 From: SW Colorado Member No.: 23,343 Region Association: Rocky Mountains |
And the outer part of the seal will not seat horizontal, with a bulge next to the retainer tab.
Attached thumbnail(s) 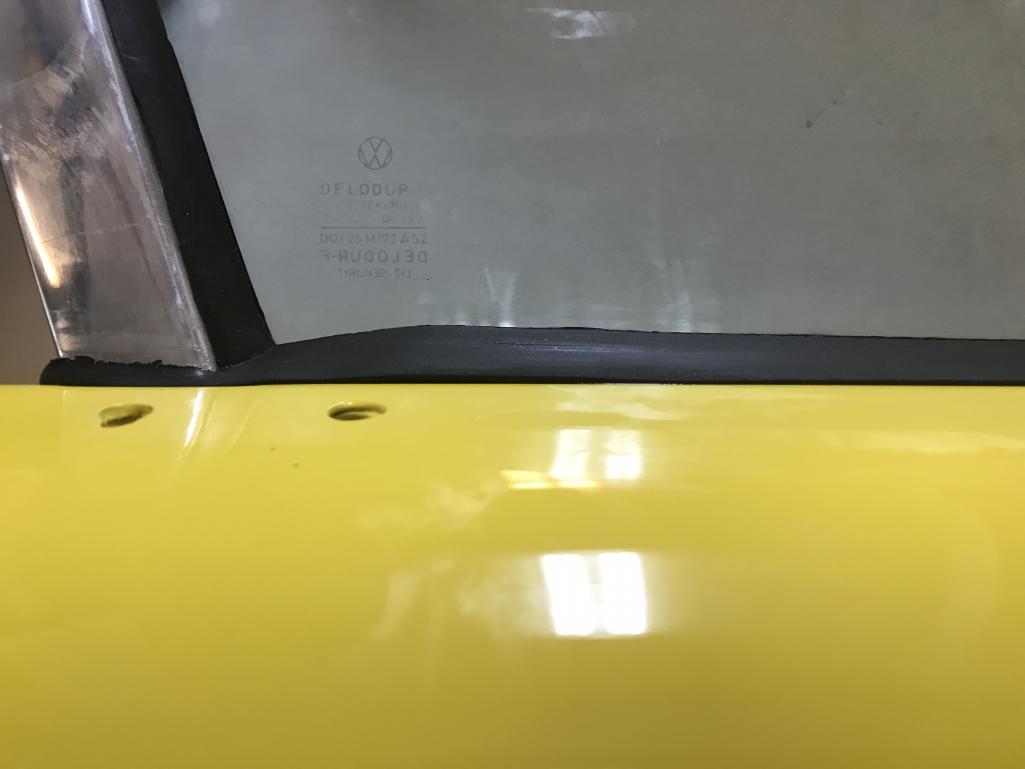
|
|
|
|
| bkrantz |
Nov 8 2021, 08:01 PM
Post
#4106
|
|
914 Guru Group: Members Posts: 8,530 Joined: 3-August 19 From: SW Colorado Member No.: 23,343 Region Association: Rocky Mountains |
And worst of all, I split the outer seal above the slit I made for the tab.
I know others have done this by cutting the tab off the retainer, but I figure Porsche put that there for a reason. I will have to consider options. Attached thumbnail(s) 
|
|
|
|
| iankarr |
Nov 8 2021, 08:32 PM
Post
#4107
|
|
The wrencher formerly known as Cuddy_K Group: Members Posts: 2,578 Joined: 22-May 15 From: Heber City, UT Member No.: 18,749 Region Association: Intermountain Region |
Definitely tricky business. Mark at 914rubber provided the best tip...wrap the triangle glass and channel with cellophane pack-wrap. It keeps everything together and stable while you muscle things in. I also needed to to trim things a bit to get everythng to seat properly. You may want to check that the glass isn't hitting the frame, keeping the seal from being far enough forward for it to fit in the channel.
|
|
|
|
| bkrantz |
Nov 9 2021, 08:04 PM
Post
#4108
|
|
914 Guru Group: Members Posts: 8,530 Joined: 3-August 19 From: SW Colorado Member No.: 23,343 Region Association: Rocky Mountains |
Thanks, Ian. I tried a few times with different approaches, but will never get the bottom edge to sit evenly because of the tab on the retaining bracket. I have ordered the factory part, which should have a groove for the tab.
|
|
|
|
| raynekat |
Nov 10 2021, 03:06 AM
Post
#4109
|
|
Advanced Member Group: Members Posts: 2,170 Joined: 30-December 14 From: Coeur d'Alene, Idaho Member No.: 18,263 Region Association: Pacific Northwest |
Bob....I must have tried installing this triangle window 20 times. Couldn't get the 914Rubber seal to work.
Eventually went back to the factory seal and finally had a satisfactory result. Getting the door seals to work correctly on the A, B pillars and targa top is definitely a challenge. Takes a lot of patience and cyphering. (IMG:style_emoticons/default/wink.gif) Hopefully you won't have fitment issues when you go about mounting the door on the car. I had my doors installed, such that I could check fitment against the A pillar. There is definitely a lot of tweaking that took place in my case. |
|
|
|
| bkrantz |
Nov 10 2021, 09:01 PM
Post
#4110
|
|
914 Guru Group: Members Posts: 8,530 Joined: 3-August 19 From: SW Colorado Member No.: 23,343 Region Association: Rocky Mountains |
You are right, Doug. If there is any general category of jobs, anything that involves rubber seems to be most challenging. And especially where multiple parts have to align properly. Best to do those on positive karma days. And as you will see, I have decided to try the doors-on method.
|
|
|
|
| bkrantz |
Nov 10 2021, 09:05 PM
Post
#4111
|
|
914 Guru Group: Members Posts: 8,530 Joined: 3-August 19 From: SW Colorado Member No.: 23,343 Region Association: Rocky Mountains |
Yup, doors (at least right door), going on the car. How about some new door stop retaining pins? The ones from 914Rubber measure .01 inch larger diameter than stock. To make them fit, I had to drill the stay arm, and ream out the paint from the holes in the tabs on the door jamb.
Attached thumbnail(s) 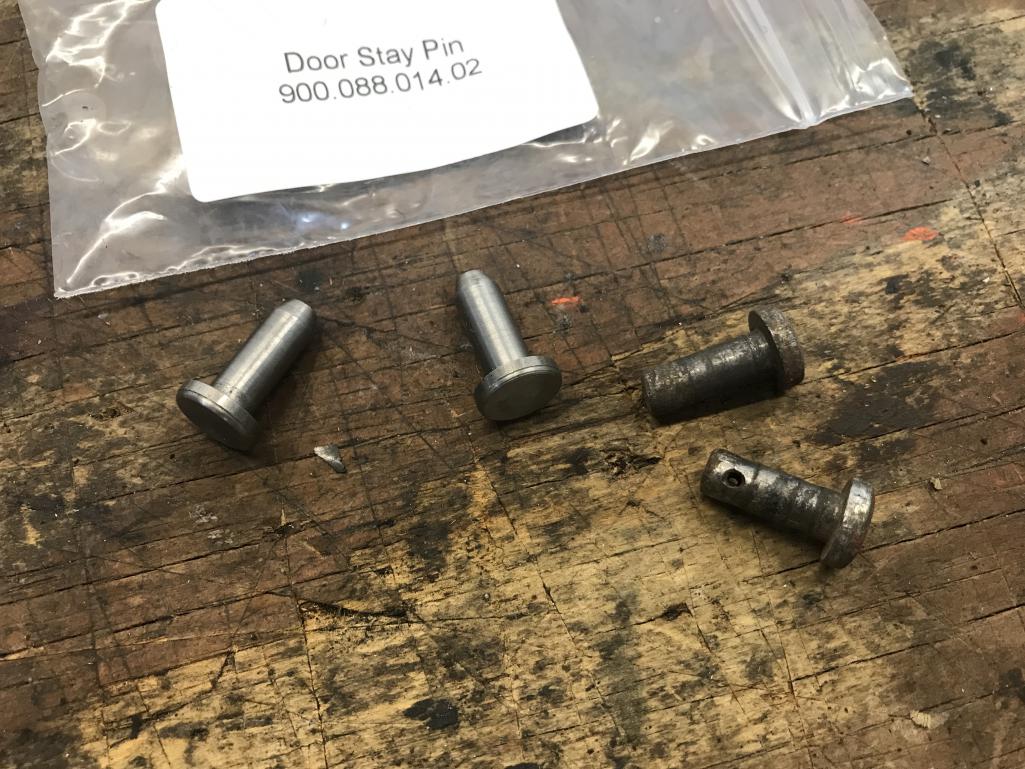
|
|
|
|
| bkrantz |
Nov 10 2021, 09:05 PM
Post
#4112
|
|
914 Guru Group: Members Posts: 8,530 Joined: 3-August 19 From: SW Colorado Member No.: 23,343 Region Association: Rocky Mountains |
Tidy fit with no slop.
Attached thumbnail(s) 
|
|
|
|
| bkrantz |
Nov 10 2021, 09:07 PM
Post
#4113
|
|
914 Guru Group: Members Posts: 8,530 Joined: 3-August 19 From: SW Colorado Member No.: 23,343 Region Association: Rocky Mountains |
Quick adjustment of hinge positions and latch looks pretty good. Once I get the new vent window seals I can try that again.
Attached thumbnail(s) 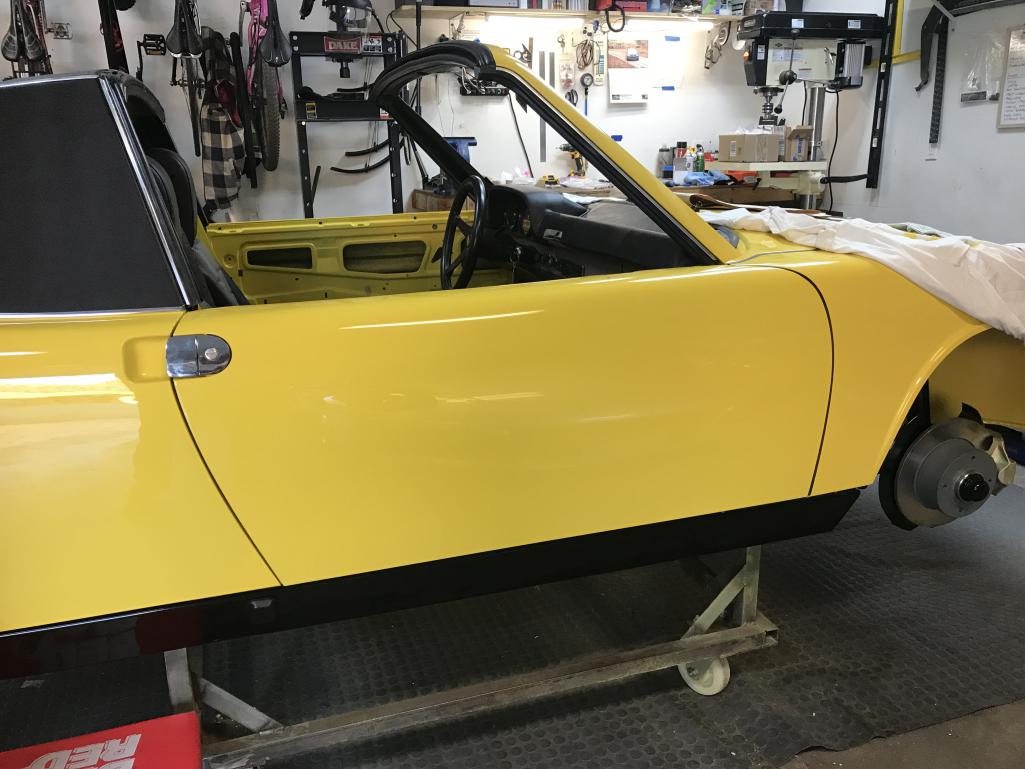
|
|
|
|
| bkrantz |
Nov 10 2021, 09:12 PM
Post
#4114
|
|
914 Guru Group: Members Posts: 8,530 Joined: 3-August 19 From: SW Colorado Member No.: 23,343 Region Association: Rocky Mountains |
Meanwhile, back to the engine. Here is the new (used) alternator front seal, plus some more hardware.
Attached thumbnail(s) 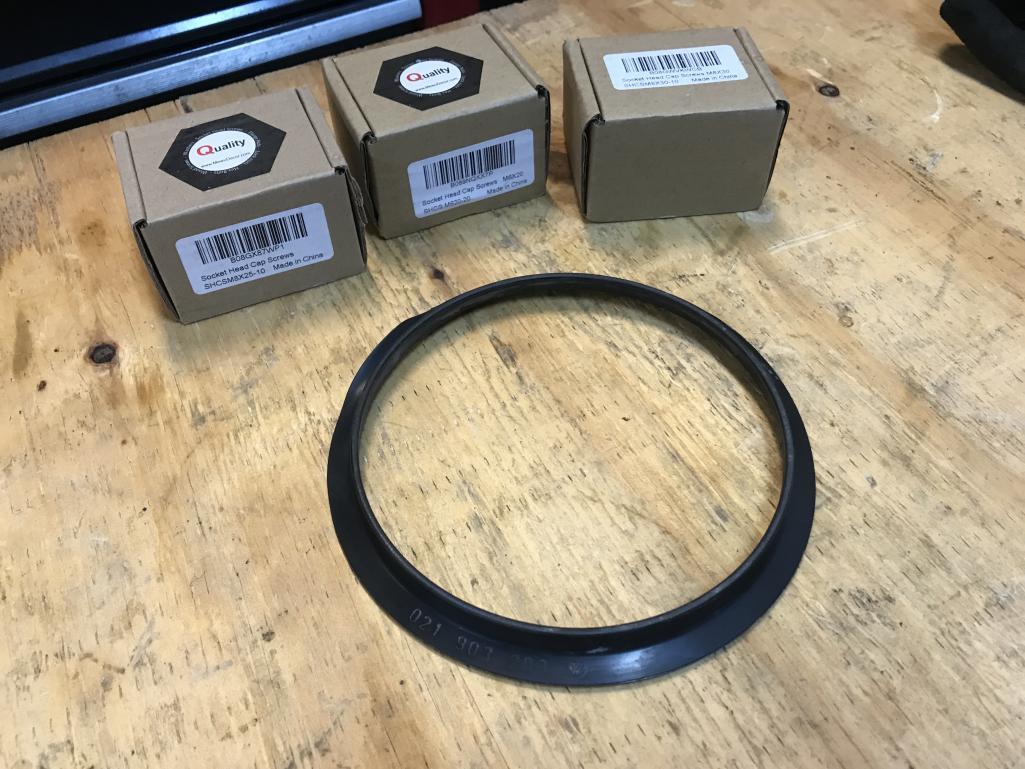
|
|
|
|
| bkrantz |
Nov 10 2021, 09:14 PM
Post
#4115
|
|
914 Guru Group: Members Posts: 8,530 Joined: 3-August 19 From: SW Colorado Member No.: 23,343 Region Association: Rocky Mountains |
The hardware furthers my quest to replace all the slotted fasteners on the engine with Allen heads. Note the big Philliips screws are not original but I used them when I first put the blower housing together.
Attached thumbnail(s) 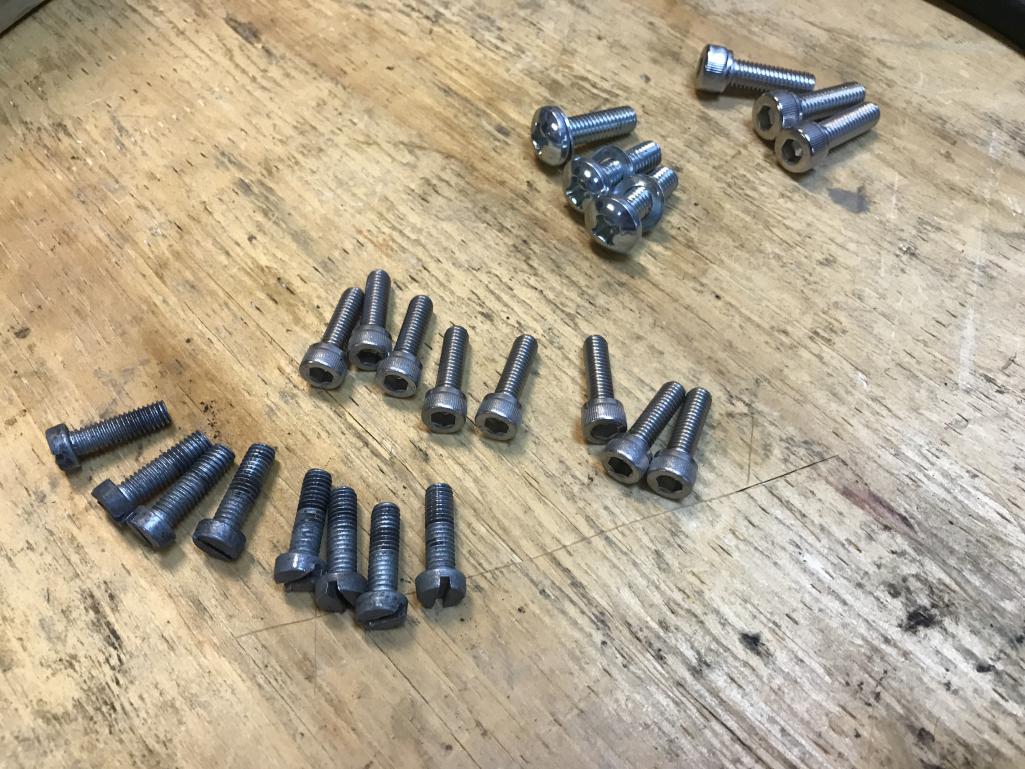
|
|
|
|
| bkrantz |
Nov 10 2021, 09:16 PM
Post
#4116
|
|
914 Guru Group: Members Posts: 8,530 Joined: 3-August 19 From: SW Colorado Member No.: 23,343 Region Association: Rocky Mountains |
I pulled all the sheet metal off the front, just so you can see the housing with Allen fasteners.
Attached thumbnail(s) 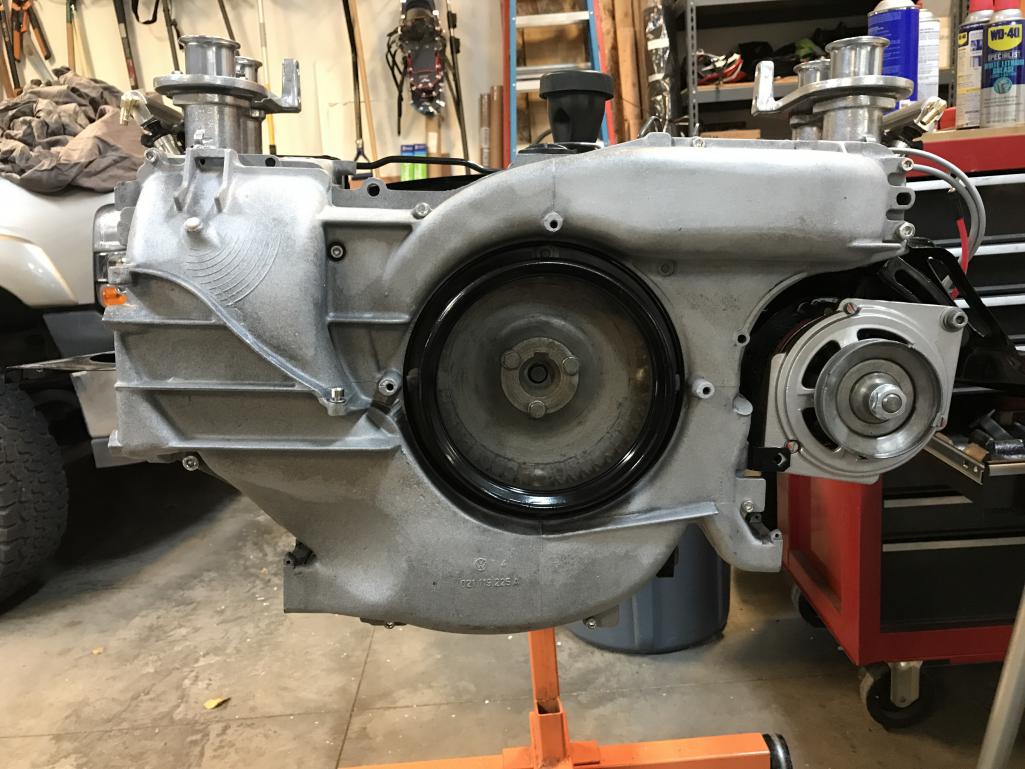
|
|
|
|
| bkrantz |
Nov 10 2021, 09:17 PM
Post
#4117
|
|
914 Guru Group: Members Posts: 8,530 Joined: 3-August 19 From: SW Colorado Member No.: 23,343 Region Association: Rocky Mountains |
Alternator ring in place.
Attached thumbnail(s) 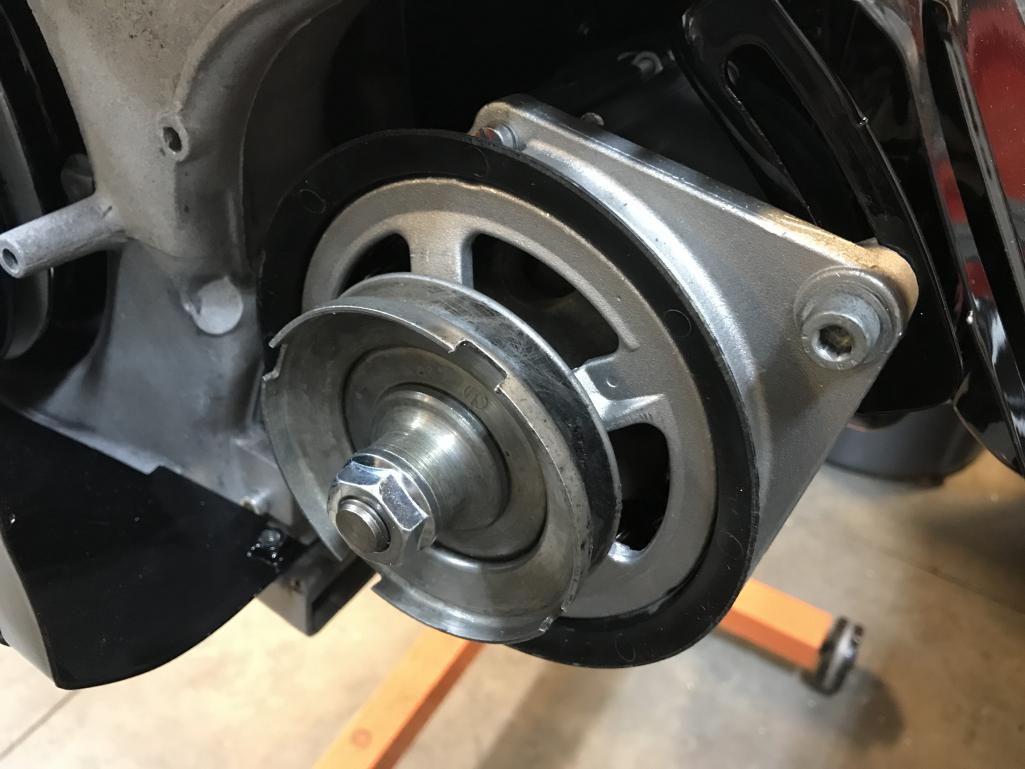
|
|
|
|
| bkrantz |
Nov 10 2021, 09:18 PM
Post
#4118
|
|
914 Guru Group: Members Posts: 8,530 Joined: 3-August 19 From: SW Colorado Member No.: 23,343 Region Association: Rocky Mountains |
With all the sheet metal back in place, it was time for a new V-belt.
Attached thumbnail(s) 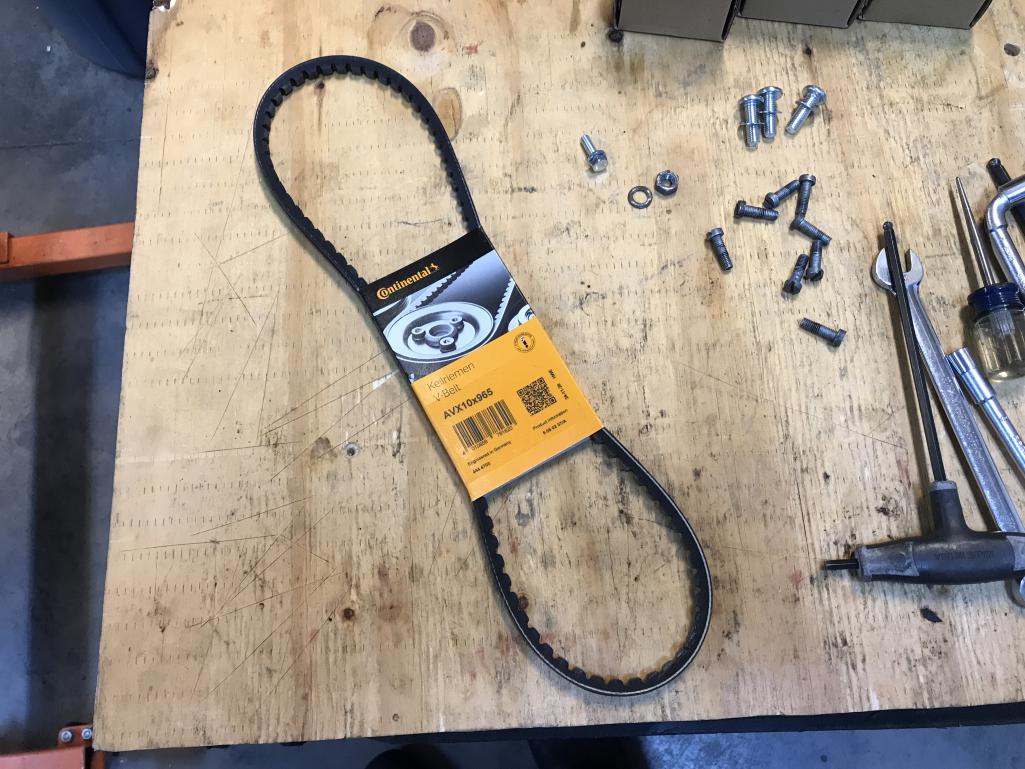
|
|
|
|
| bkrantz |
Nov 10 2021, 09:20 PM
Post
#4119
|
|
914 Guru Group: Members Posts: 8,530 Joined: 3-August 19 From: SW Colorado Member No.: 23,343 Region Association: Rocky Mountains |
Just a bit of tension, and ready.
Attached thumbnail(s) 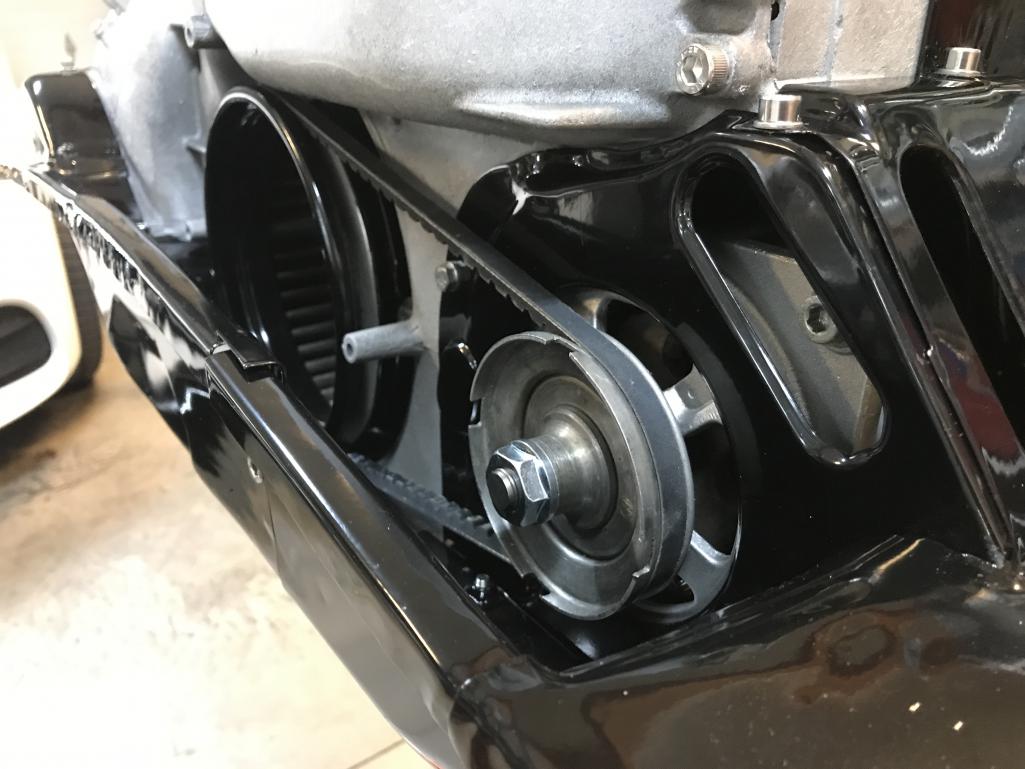
|
|
|
|
| TX914 |
Nov 11 2021, 06:19 AM
Post
#4120
|
|
Alan-B Group: Members Posts: 177 Joined: 27-July 14 From: USA Member No.: 17,689 Region Association: None |
QUOTE(bkrantz @ Nov 10 2021, 10:14 PM)  The hardware furthers my quest to replace all the slotted fasteners on the engine with Allen heads. Note the big Philliips screws are not original but I used them when I first put the blower housing together. Funny story - Many years ago I replaced every slotted fastener on the sheet metal with Allen heads because I thought they were easier to work with and looked cool. The next time I had the car in the shop the mechanic replaced every one of them with the original slotted fasteners without even asking. I guess he did not agree with that mod. (IMG:style_emoticons/default/smile.gif) I think they were not tapered and were thus harder to thread. |
|
|
|
|
1 User(s) are reading this topic (1 Guests and 0 Anonymous Users)
0 Members:

|
Lo-Fi Version | Time is now: 17th November 2025 - 07:28 AM |
Invision Power Board
v9.1.4 © 2025 IPS, Inc.