|
|
|
Porsche, and the Porsche crest are registered trademarks of Dr. Ing. h.c. F. Porsche AG.
This site is not affiliated with Porsche in any way. Its only purpose is to provide an online forum for car enthusiasts. All other trademarks are property of their respective owners. |
|
|


| bkrantz |
 Oct 16 2019, 08:47 PM Oct 16 2019, 08:47 PM
Post
#1
|
|
914 Guru  Group: Members Posts: 8,565 Joined: 3-August 19 From: SW Colorado Member No.: 23,343 Region Association: Rocky Mountains |
I realize most rebuilds go from the inside to the outside, but I am struck by how straight and clean the outer panels, including paint, look on my 73 2.0. And all the nasty stuff is hidden underneath--which I know is also not unusual.
Any way, I bought the car knowing most of what it was: a 2.0 with all the sport and appearance group equipment, including 5 good Fuchs, and the original fuel injection. The original engine is confirmed by a COA. In contrast to the exterior the interior was mixed at best, with some funky carpet. And the front and rear trunks (and engine compartment, and interior) had been sprayed with black undercoating. So after a month, I have the car stripped to a bare shell, except for suspension and steering. I measured everything I could, and the body is very square and on spec. I need to patch some local rust spots, and replace the rear floor. And then do some minor straightening: right headlight bucket, front edge of right front fender, rear panel, etc. Attached thumbnail(s) 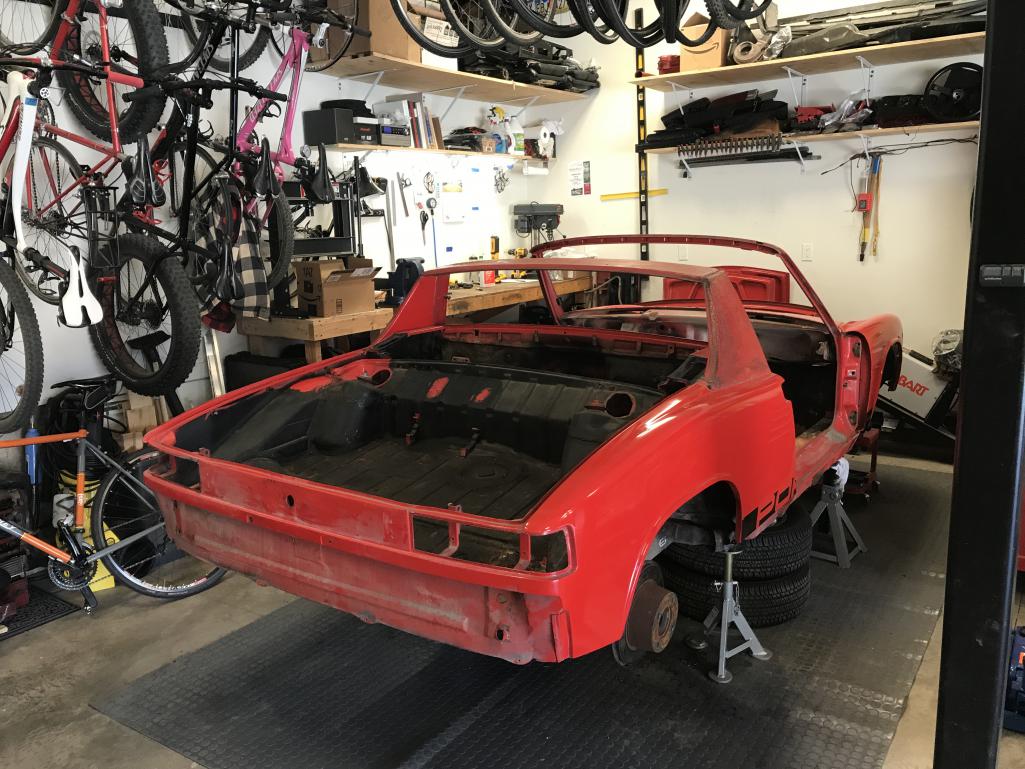
|
   |

 
|
Posts in this topic
bkrantz Rebuiding Inside-out Oct 16 2019, 08:47 PM bkrantz Thanks, Blown. I enjoy stopping to take phots, an... Sep 13 2020, 06:53 PM bkrantz I inspected the shift rods today. The both look f... Sep 13 2020, 06:55 PM bkrantz The linkage, though, looks a bit (or more) loose. ... Sep 13 2020, 06:56 PM bkrantz It took about 30 seconds to remove the pivot shaft... Sep 13 2020, 06:58 PM bkrantz Speaking of the press, I installed the rear wheel ... Sep 13 2020, 07:01 PM bkrantz I like using a press with a pressure gauge, so tha... Sep 13 2020, 07:02 PM bkrantz Bearing in place. Sep 13 2020, 07:04 PM bkrantz And retainer with shiny new hardware. Mmmm. Sep 13 2020, 07:05 PM bkrantz Good reason to tap into my newly created home hard... Sep 13 2020, 07:06 PM bkrantz Lots of shiny stuff! Sep 13 2020, 07:06 PM bkrantz Then time to press in the wheel flanges. Note: in... Sep 13 2020, 07:07 PM bkrantz Flange in place. Sep 13 2020, 07:09 PM bkrantz Trailing arms done! Sep 13 2020, 07:10 PM
 Kansas 914 Terrific work Bob.
I have a bead blaster you are ... Sep 13 2020, 08:01 PM djway Tools are Swell! Sep 13 2020, 11:37 PM bkrantz
Tools are Swell!
Agreed. Here's my lat... Sep 14 2020, 07:30 PM bkrantz Another batch of parts after Evaporators-rust trea... Sep 14 2020, 07:33 PM bkrantz One of the half-shaft flanges has some upturned ed... Sep 14 2020, 07:36 PM bkrantz Took care of those with a flat file. Sep 14 2020, 07:37 PM bkrantz To test the flange flatness, as was discussed in a... Sep 14 2020, 07:40 PM brant I just went through the whole thread
amazing
real... Sep 15 2020, 03:27 PM bkrantz
I just went through the whole thread
amazing
rea... Sep 15 2020, 07:39 PM bkrantz I took a closer look at one of the CV joints, with... Sep 15 2020, 07:41 PM bkrantz And the cage. Sep 15 2020, 07:41 PM bkrantz And the inner flange. I suspect these show extrem... Sep 15 2020, 07:43 PM bkrantz With all the parts and supplies in hand, I started... Sep 15 2020, 07:45 PM bkrantz I never removed the inner pivot bearing, just clea... Sep 15 2020, 07:45 PM bkrantz I made my own grease injector, to fill below the l... Sep 15 2020, 07:46 PM bkrantz Then I greased up the rack, and slid that into pla... Sep 15 2020, 07:48 PM bkrantz Here's the pivot, with the upper bearing in pl... Sep 15 2020, 07:50 PM bkrantz Then packed the interior with more grease. Sep 15 2020, 07:51 PM bkrantz With the rack centered, I installed the pivot. Th... Sep 15 2020, 07:53 PM bkrantz Next, the shims I removed and the lock ring. Sep 15 2020, 07:54 PM bkrantz With everything installed, I checked for end play:... Sep 15 2020, 07:56 PM Kansas 914
With everything installed, I checked for end play... Sep 15 2020, 07:59 PM bkrantz Then the pivot shaft seal, which I found based on ... Sep 15 2020, 07:57 PM bkrantz Seal in place. Sep 15 2020, 07:57 PM bkrantz Then center the rack... Sep 15 2020, 07:58 PM bkrantz ...and install the yoke, oriented vertically. Sep 15 2020, 07:59 PM bkrantz With the rack flipped over, I installed the pressu... Sep 15 2020, 07:59 PM bkrantz The end of the block sits just below the housing f... Sep 15 2020, 08:01 PM bkrantz Next, I measured the recess in the cover plate, 1.... Sep 15 2020, 08:02 PM bkrantz Then I measured the thickness of the original shim... Sep 15 2020, 08:04 PM bkrantz Here's the math. The total gap, including the... Sep 15 2020, 08:07 PM bkrantz Here's the pressure spring, and the cover plat... Sep 15 2020, 08:08 PM bkrantz Finally, here is the rack all done. Sep 15 2020, 08:08 PM autopro This is awesome, I will be doing this to my rack s... Sep 16 2020, 11:59 AM bkrantz Steering rack, part 2.
I started with the eye-bol... Sep 16 2020, 07:40 PM bkrantz No instructions, so I made up my own.
Here's ... Sep 16 2020, 07:42 PM bkrantz After the first attempt to press in the bushing. ... Sep 16 2020, 07:44 PM bkrantz Another squeeze, just to the limit of pinching. Sep 16 2020, 07:46 PM bkrantz With the pressure released, the bushing rebounded ... Sep 16 2020, 07:48 PM bkrantz I then pressed into a 27mm socket, matching the ou... Sep 16 2020, 07:49 PM bkrantz That was enough to get just a bit of the bushing e... Sep 16 2020, 07:50 PM bkrantz I then used my blunt ex-screw driver pry tool to e... Sep 16 2020, 07:51 PM bkrantz Done. Sep 16 2020, 07:51 PM bkrantz Then I pressed in the metal center bushing. Again... Sep 16 2020, 07:52 PM bkrantz And then a smaller socket to press against the rub... Sep 16 2020, 07:53 PM bkrantz Centered. Sep 16 2020, 07:54 PM bkrantz Ready for the final assembly. The specs come from... Sep 16 2020, 07:57 PM bkrantz I then put on the bellows (small end to the inside... Sep 16 2020, 07:58 PM bkrantz And the eye bolts with the stop plates. Sep 16 2020, 07:59 PM bkrantz To get the rack to sit properly horizontal, I made... Sep 16 2020, 08:00 PM bkrantz With a little adjustment, the rack now sits horizo... Sep 16 2020, 08:01 PM bkrantz To measure the angles of the eye bolts, I grabbed ... Sep 16 2020, 08:03 PM bkrantz Here's a top view, with the bolts propped up o... Sep 16 2020, 08:04 PM bkrantz Lucky 2x4 thickness! The angle is right on 9 ... Sep 16 2020, 08:05 PM bkrantz Next is to measure the lateral dimension, with the... Sep 16 2020, 08:09 PM bkrantz I set both sides. Interesting that the left side ... Sep 16 2020, 08:11 PM bkrantz I snugged up the lock rings, but will check dimens... Sep 16 2020, 08:12 PM bkrantz Final bits today for the steering rack. I did dou... Sep 17 2020, 06:45 PM bkrantz Here's all the parts gathered for installing t... Sep 17 2020, 06:47 PM bkrantz The coupler first mounts to the lower shaft. Sep 17 2020, 06:48 PM bkrantz After torquing to proper spec, the ends of the loc... Sep 17 2020, 06:49 PM bkrantz And then the coupler bolts onto the rack input yok... Sep 17 2020, 06:51 PM bkrantz Lock these bolts in place, too. Sep 17 2020, 06:51 PM bkrantz Then comes the plastic cover and the lower shaft b... Sep 17 2020, 06:53 PM bkrantz Just some minor progress today. I took another bat... Sep 18 2020, 07:40 PM bkrantz Also from the bucket, the transaxle mount pieces. Sep 18 2020, 07:42 PM bkrantz And starting on the parking brake lever. A bit ug... Sep 18 2020, 07:44 PM bkrantz A bit of garage cooking, to warm up the plastic gr... Sep 19 2020, 07:18 PM bkrantz Grip removed, and a bit more cleanup. Sep 19 2020, 07:19 PM bkrantz Primed and painted. Sep 19 2020, 07:24 PM raynekat Much better looking there Bob. Nice Sep 19 2020, 07:29 PM bkrantz Now for the big job of the day: installing the rub... Sep 19 2020, 07:31 PM bkrantz Here's my process.
1. Press the bushing into ... Sep 19 2020, 07:34 PM bkrantz 2. Bushing pressed in. Sep 19 2020, 07:36 PM bkrantz Here's the 914 Rubber inner guide, to ease the... Sep 19 2020, 07:37 PM bkrantz The guide in place. Sep 19 2020, 07:38 PM bkrantz 3. Starting to press the bushing on, over the guid... Sep 19 2020, 07:40 PM bkrantz Pressed all the way on. With the pressure release... Sep 19 2020, 07:43 PM bkrantz So I reversed the guide and pressed again against ... Sep 19 2020, 07:46 PM bkrantz 4. Once installed, the bushing and housing must be... Sep 19 2020, 07:48 PM bkrantz Then, check the angle of the housing. It should b... Sep 19 2020, 07:50 PM bkrantz A bit of twisting. Sep 19 2020, 07:51 PM bkrantz Now 14 degrees. Sep 19 2020, 07:51 PM bkrantz 5. Install the rubber bushings into the front A-a... Sep 19 2020, 07:54 PM bkrantz Like the rears, lots of soap, and press the rubber... Sep 19 2020, 07:56 PM bkrantz Ready for the A-arms. Sep 19 2020, 07:56 PM bkrantz 6. Pressed into place. Sep 19 2020, 07:59 PM
Kansas 914 Terrific work Bob.
I have a bead blaster you are ... Sep 13 2020, 08:01 PM djway Tools are Swell! Sep 13 2020, 11:37 PM bkrantz
Tools are Swell!
Agreed. Here's my lat... Sep 14 2020, 07:30 PM bkrantz Another batch of parts after Evaporators-rust trea... Sep 14 2020, 07:33 PM bkrantz One of the half-shaft flanges has some upturned ed... Sep 14 2020, 07:36 PM bkrantz Took care of those with a flat file. Sep 14 2020, 07:37 PM bkrantz To test the flange flatness, as was discussed in a... Sep 14 2020, 07:40 PM brant I just went through the whole thread
amazing
real... Sep 15 2020, 03:27 PM bkrantz
I just went through the whole thread
amazing
rea... Sep 15 2020, 07:39 PM bkrantz I took a closer look at one of the CV joints, with... Sep 15 2020, 07:41 PM bkrantz And the cage. Sep 15 2020, 07:41 PM bkrantz And the inner flange. I suspect these show extrem... Sep 15 2020, 07:43 PM bkrantz With all the parts and supplies in hand, I started... Sep 15 2020, 07:45 PM bkrantz I never removed the inner pivot bearing, just clea... Sep 15 2020, 07:45 PM bkrantz I made my own grease injector, to fill below the l... Sep 15 2020, 07:46 PM bkrantz Then I greased up the rack, and slid that into pla... Sep 15 2020, 07:48 PM bkrantz Here's the pivot, with the upper bearing in pl... Sep 15 2020, 07:50 PM bkrantz Then packed the interior with more grease. Sep 15 2020, 07:51 PM bkrantz With the rack centered, I installed the pivot. Th... Sep 15 2020, 07:53 PM bkrantz Next, the shims I removed and the lock ring. Sep 15 2020, 07:54 PM bkrantz With everything installed, I checked for end play:... Sep 15 2020, 07:56 PM Kansas 914
With everything installed, I checked for end play... Sep 15 2020, 07:59 PM bkrantz Then the pivot shaft seal, which I found based on ... Sep 15 2020, 07:57 PM bkrantz Seal in place. Sep 15 2020, 07:57 PM bkrantz Then center the rack... Sep 15 2020, 07:58 PM bkrantz ...and install the yoke, oriented vertically. Sep 15 2020, 07:59 PM bkrantz With the rack flipped over, I installed the pressu... Sep 15 2020, 07:59 PM bkrantz The end of the block sits just below the housing f... Sep 15 2020, 08:01 PM bkrantz Next, I measured the recess in the cover plate, 1.... Sep 15 2020, 08:02 PM bkrantz Then I measured the thickness of the original shim... Sep 15 2020, 08:04 PM bkrantz Here's the math. The total gap, including the... Sep 15 2020, 08:07 PM bkrantz Here's the pressure spring, and the cover plat... Sep 15 2020, 08:08 PM bkrantz Finally, here is the rack all done. Sep 15 2020, 08:08 PM autopro This is awesome, I will be doing this to my rack s... Sep 16 2020, 11:59 AM bkrantz Steering rack, part 2.
I started with the eye-bol... Sep 16 2020, 07:40 PM bkrantz No instructions, so I made up my own.
Here's ... Sep 16 2020, 07:42 PM bkrantz After the first attempt to press in the bushing. ... Sep 16 2020, 07:44 PM bkrantz Another squeeze, just to the limit of pinching. Sep 16 2020, 07:46 PM bkrantz With the pressure released, the bushing rebounded ... Sep 16 2020, 07:48 PM bkrantz I then pressed into a 27mm socket, matching the ou... Sep 16 2020, 07:49 PM bkrantz That was enough to get just a bit of the bushing e... Sep 16 2020, 07:50 PM bkrantz I then used my blunt ex-screw driver pry tool to e... Sep 16 2020, 07:51 PM bkrantz Done. Sep 16 2020, 07:51 PM bkrantz Then I pressed in the metal center bushing. Again... Sep 16 2020, 07:52 PM bkrantz And then a smaller socket to press against the rub... Sep 16 2020, 07:53 PM bkrantz Centered. Sep 16 2020, 07:54 PM bkrantz Ready for the final assembly. The specs come from... Sep 16 2020, 07:57 PM bkrantz I then put on the bellows (small end to the inside... Sep 16 2020, 07:58 PM bkrantz And the eye bolts with the stop plates. Sep 16 2020, 07:59 PM bkrantz To get the rack to sit properly horizontal, I made... Sep 16 2020, 08:00 PM bkrantz With a little adjustment, the rack now sits horizo... Sep 16 2020, 08:01 PM bkrantz To measure the angles of the eye bolts, I grabbed ... Sep 16 2020, 08:03 PM bkrantz Here's a top view, with the bolts propped up o... Sep 16 2020, 08:04 PM bkrantz Lucky 2x4 thickness! The angle is right on 9 ... Sep 16 2020, 08:05 PM bkrantz Next is to measure the lateral dimension, with the... Sep 16 2020, 08:09 PM bkrantz I set both sides. Interesting that the left side ... Sep 16 2020, 08:11 PM bkrantz I snugged up the lock rings, but will check dimens... Sep 16 2020, 08:12 PM bkrantz Final bits today for the steering rack. I did dou... Sep 17 2020, 06:45 PM bkrantz Here's all the parts gathered for installing t... Sep 17 2020, 06:47 PM bkrantz The coupler first mounts to the lower shaft. Sep 17 2020, 06:48 PM bkrantz After torquing to proper spec, the ends of the loc... Sep 17 2020, 06:49 PM bkrantz And then the coupler bolts onto the rack input yok... Sep 17 2020, 06:51 PM bkrantz Lock these bolts in place, too. Sep 17 2020, 06:51 PM bkrantz Then comes the plastic cover and the lower shaft b... Sep 17 2020, 06:53 PM bkrantz Just some minor progress today. I took another bat... Sep 18 2020, 07:40 PM bkrantz Also from the bucket, the transaxle mount pieces. Sep 18 2020, 07:42 PM bkrantz And starting on the parking brake lever. A bit ug... Sep 18 2020, 07:44 PM bkrantz A bit of garage cooking, to warm up the plastic gr... Sep 19 2020, 07:18 PM bkrantz Grip removed, and a bit more cleanup. Sep 19 2020, 07:19 PM bkrantz Primed and painted. Sep 19 2020, 07:24 PM raynekat Much better looking there Bob. Nice Sep 19 2020, 07:29 PM bkrantz Now for the big job of the day: installing the rub... Sep 19 2020, 07:31 PM bkrantz Here's my process.
1. Press the bushing into ... Sep 19 2020, 07:34 PM bkrantz 2. Bushing pressed in. Sep 19 2020, 07:36 PM bkrantz Here's the 914 Rubber inner guide, to ease the... Sep 19 2020, 07:37 PM bkrantz The guide in place. Sep 19 2020, 07:38 PM bkrantz 3. Starting to press the bushing on, over the guid... Sep 19 2020, 07:40 PM bkrantz Pressed all the way on. With the pressure release... Sep 19 2020, 07:43 PM bkrantz So I reversed the guide and pressed again against ... Sep 19 2020, 07:46 PM bkrantz 4. Once installed, the bushing and housing must be... Sep 19 2020, 07:48 PM bkrantz Then, check the angle of the housing. It should b... Sep 19 2020, 07:50 PM bkrantz A bit of twisting. Sep 19 2020, 07:51 PM bkrantz Now 14 degrees. Sep 19 2020, 07:51 PM bkrantz 5. Install the rubber bushings into the front A-a... Sep 19 2020, 07:54 PM bkrantz Like the rears, lots of soap, and press the rubber... Sep 19 2020, 07:56 PM bkrantz Ready for the A-arms. Sep 19 2020, 07:56 PM bkrantz 6. Pressed into place. Sep 19 2020, 07:59 PM  |
2 User(s) are reading this topic (2 Guests and 0 Anonymous Users)
0 Members:

|
Lo-Fi Version | Time is now: 2nd January 2026 - 06:46 AM |
Invision Power Board
v9.1.4 © 2026 IPS, Inc.