|
|
|
Porsche, and the Porsche crest are registered trademarks of Dr. Ing. h.c. F. Porsche AG.
This site is not affiliated with Porsche in any way. Its only purpose is to provide an online forum for car enthusiasts. All other trademarks are property of their respective owners. |
|
|


| bkrantz |
 Oct 16 2019, 08:47 PM Oct 16 2019, 08:47 PM
Post
#1
|
|
914 Guru  Group: Members Posts: 8,565 Joined: 3-August 19 From: SW Colorado Member No.: 23,343 Region Association: Rocky Mountains |
I realize most rebuilds go from the inside to the outside, but I am struck by how straight and clean the outer panels, including paint, look on my 73 2.0. And all the nasty stuff is hidden underneath--which I know is also not unusual.
Any way, I bought the car knowing most of what it was: a 2.0 with all the sport and appearance group equipment, including 5 good Fuchs, and the original fuel injection. The original engine is confirmed by a COA. In contrast to the exterior the interior was mixed at best, with some funky carpet. And the front and rear trunks (and engine compartment, and interior) had been sprayed with black undercoating. So after a month, I have the car stripped to a bare shell, except for suspension and steering. I measured everything I could, and the body is very square and on spec. I need to patch some local rust spots, and replace the rear floor. And then do some minor straightening: right headlight bucket, front edge of right front fender, rear panel, etc. Attached thumbnail(s) 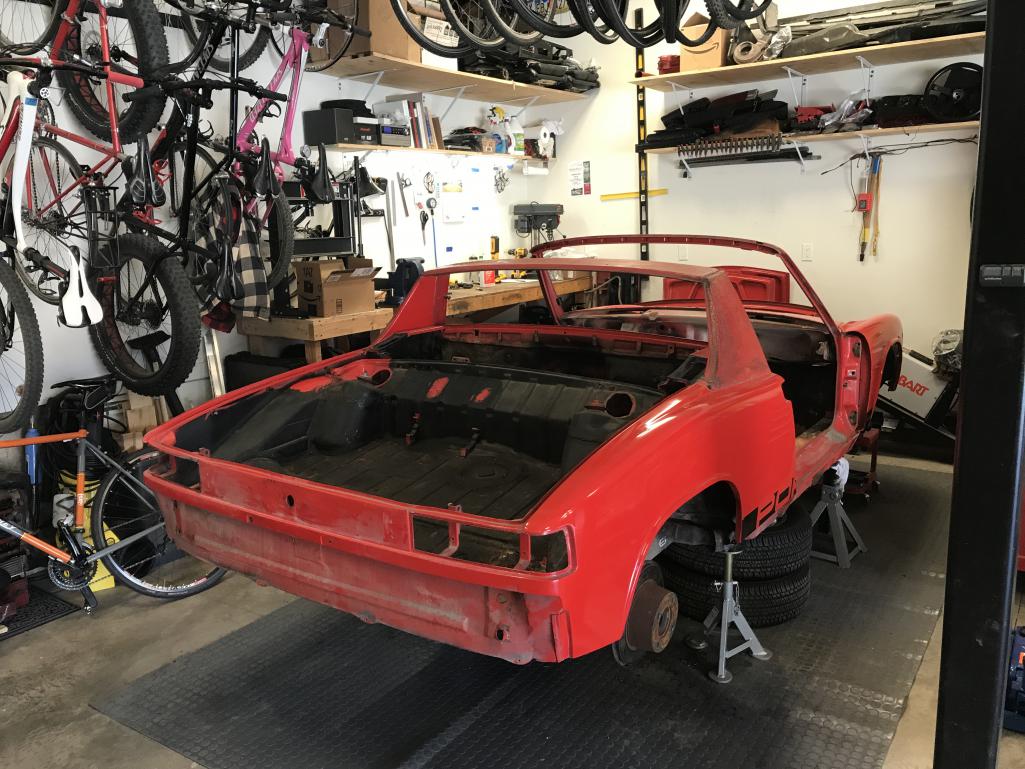
|
   |

 
|
Posts in this topic
bkrantz Rebuiding Inside-out Oct 16 2019, 08:47 PM bkrantz Looks good in the car. Mar 3 2021, 08:15 PM bkrantz Among parts that arrived while I was gone are some... Mar 3 2021, 08:17 PM bkrantz These have the right ID to slide tightly onto the ... Mar 3 2021, 08:19 PM bkrantz With the rear shock assemblies done for now, I was... Mar 3 2021, 08:20 PM bkrantz More parts: stainless steel screws. Mar 3 2021, 08:21 PM bkrantz These are for the rear brake disks, replacing the ... Mar 3 2021, 08:22 PM bkrantz And more stainless hardware. Mar 3 2021, 08:24 PM bkrantz These are for the headlamp retaining rings. Mar 3 2021, 08:25 PM bkrantz So now I have both headlamps installed. Mar 3 2021, 08:25 PM bkrantz Today was my first play time with spray adhesive (... Mar 4 2021, 08:36 PM bkrantz Here are the vinyl piece, taped to keep it straigh... Mar 4 2021, 08:39 PM bkrantz Joined and after initial trim, and compared to the... Mar 4 2021, 08:40 PM bkrantz The vinyl must be wrapped over the edge of the rad... Mar 4 2021, 08:42 PM bkrantz A little messy but it works. Mar 4 2021, 08:43 PM bkrantz After cutting all the holes. Not bad. Mar 4 2021, 08:44 PM bkrantz Next up was the glove box door. This is a bit more... Mar 4 2021, 08:46 PM bkrantz I also needed to make the perforations line up wit... Mar 4 2021, 08:47 PM
 raynekat
I also needed to make the perforations line up wi... Mar 5 2021, 05:30 PM bkrantz Sprayed. Mar 4 2021, 08:49 PM bkrantz Adhered using the jig. Mar 4 2021, 08:49 PM bkrantz Trimmed close for wrapping on 3 sides, and longer ... Mar 4 2021, 08:51 PM bkrantz Plate edges wrapped. Mar 4 2021, 08:52 PM bkrantz I used 3M high strength auto tape to attach the pl... Mar 4 2021, 08:53 PM bkrantz Final product: plate attached to the door, and the... Mar 4 2021, 08:55 PM Puebloswatcop
Final product: plate attached to the door, and th... Mar 5 2021, 09:21 AM CptTripps Your build looks amazing. Really well done.
Lovin... Mar 5 2021, 07:39 AM bkrantz I had about an hour today, and felt calm, so I too... Mar 5 2021, 08:36 PM bkrantz I tried a few things, including simple pressing, t... Mar 5 2021, 08:38 PM bkrantz I then muscled the remaining part of the open rim ... Mar 5 2021, 08:40 PM bkrantz After that is was fairly easy to press the bushing... Mar 5 2021, 08:42 PM bkrantz Then I pressed the links onto the sway bar. Helps... Mar 5 2021, 08:43 PM bkrantz And then I pressed the other ends of the links ont... Mar 5 2021, 08:44 PM bkrantz That is the last of the chassis work, including br... Mar 5 2021, 08:46 PM Puebloswatcop
That is the last of the chassis work, including b... Mar 6 2021, 11:58 AM Cairo94507 Can't wait to see your car back on all 4 wheel... Mar 6 2021, 09:05 AM bkrantz Thanks, guys. It feels good to see progress, but ... Mar 6 2021, 09:01 PM Puebloswatcop
Thanks, guys. It feels good to see progress, but... Mar 7 2021, 11:05 AM horizontally-opposed Satisfying just to see pics under the car—has to... Mar 7 2021, 11:26 AM bkrantz
Satisfying just to see pics under the car—has t... Mar 7 2021, 07:22 PM bkrantz Speaking of the interior, I made some progress tow... Mar 7 2021, 07:24 PM bkrantz First step was to spray the dash and underside of ... Mar 7 2021, 07:25 PM bkrantz Padding in place, with lots of overhang on all sid... Mar 7 2021, 07:26 PM bkrantz Padding all stuck down. Very good adhesion. Mar 7 2021, 07:28 PM bkrantz And then trimmed all around with a new utility bla... Mar 7 2021, 07:29 PM bkrantz After that, I got out the liquid Weldwood. I deci... Mar 7 2021, 07:30 PM bkrantz Test fitting the vinyl. Again, lots of overlap. Mar 7 2021, 07:32 PM bkrantz I taped the ends to add some gentle tension.
Then... Mar 7 2021, 07:36 PM bkrantz Once the inner edge was stuck on, I brushed adhesi... Mar 7 2021, 07:38 PM bkrantz While smoothing and gently stretching, I folded th... Mar 7 2021, 07:42 PM bkrantz Cleaned up and almost ready to install. Mar 7 2021, 07:43 PM bkrantz Next step on the dash: installing the front plate.... Mar 8 2021, 08:32 PM bkrantz Stuck on, located by the holes for switches, etc. Mar 8 2021, 08:33 PM bkrantz Dash is starting to look like a dash. Mar 8 2021, 08:34 PM bkrantz I pulled out the original glove box. Its in prett... Mar 8 2021, 08:36 PM bkrantz I let the fiberboard soak and absorb some water, a... Mar 8 2021, 08:37 PM djway
I let the fiberboard soak and absorb some water, ... Mar 8 2021, 10:05 PM bkrantz
I let the fiberboard soak and absorb some water,... Mar 9 2021, 08:54 PM djway
[quote name='djway' post='2897577' date='Mar 8 20... Mar 9 2021, 10:37 PM gereed75 I have thought of the thinned penetrating epoxies ... Mar 8 2021, 10:08 PM bbrock
I have thought of the thinned penetrating epoxies... Mar 9 2021, 10:59 PM gereed75 I’ve used old fashioned wood glue to reinforce... Mar 10 2021, 07:48 AM bkrantz Well, here's my glove box after drying in the ... Mar 10 2021, 08:25 PM bkrantz Before I started working on the dash, I installed ... Mar 10 2021, 08:27 PM bkrantz After cleaning up the old glue and a bit of sandin... Mar 10 2021, 08:29 PM bkrantz Now, on to the dash. Here are the pieces for the ... Mar 10 2021, 08:30 PM bkrantz Lock installed Mar 10 2021, 08:31 PM bkrantz Door with handle, and mounting hardware. The ... Mar 10 2021, 08:31 PM bkrantz Here's the door installed. Much easier with t... Mar 10 2021, 08:34 PM bkrantz Viewed from the outside--looks even. Mar 10 2021, 08:35 PM bkrantz Also easier to install the actual box now. Mar 10 2021, 08:35 PM bkrantz OK, time for the 914 Rubber replacement dash top. ... Mar 10 2021, 08:37 PM bkrantz First fitting attempt. The nylon mounting studs a... Mar 10 2021, 08:39 PM bkrantz I also realized that the ash tray bracket has to g... Mar 10 2021, 08:40 PM bkrantz Fitting attempt number two. All the studs and hol... Mar 10 2021, 08:41 PM bkrantz The windshield side is not bad, but a few spots ar... Mar 10 2021, 08:42 PM bkrantz The match between the top and the new padded vinyl... Mar 10 2021, 08:46 PM bkrantz But along the instrument cowl, the gap is a bit la... Mar 10 2021, 08:47 PM bkrantz The biggest gap is on the sides of the cowl. I ha... Mar 10 2021, 08:48 PM bkrantz Just for fun, and to check the fit, I installed th... Mar 10 2021, 08:51 PM bkrantz I know the lower bolster has to come off to instal... Mar 10 2021, 08:53 PM bkrantz A few more things to deal with. The ash tray fron... Mar 10 2021, 08:54 PM bkrantz And the side gaps are a bit big. Mar 10 2021, 08:54 PM raynekat
And the side gaps are a bit big.
Compared to my... Mar 10 2021, 09:49 PM bkrantz
And the side gaps are a bit big.
Compared to m... Mar 11 2021, 08:28 PM euro911 Looks great. After the fact, there's a re-floc... Mar 11 2021, 03:10 AM bkrantz Big day today--installing the dash. I got the top... Mar 11 2021, 08:30 PM bkrantz Then the top studs, accessed from the frunk side. Mar 11 2021, 08:31 PM bkrantz Then the side screws. Mar 11 2021, 08:31 PM bkrantz And done! (I hope) Mar 11 2021, 08:32 PM bkrantz From the front. I still need to deal with the gap... Mar 11 2021, 08:33 PM NS914
From the front. I still need to deal with the ga... Mar 12 2021, 09:03 AM bkrantz One more! I am excited since I have been wait... Mar 11 2021, 08:34 PM ElCee You better paint these two spots black. Mar 12 2021, 02:20 AM bkrantz Thanks for the tip, ElCee.
And thanks, Grant. Gl... Mar 12 2021, 08:23 PM bkrantz OK, add another error to my record. As I started ... Mar 12 2021, 08:26 PM bkrantz After I mounted the front plate to the dash frame,... Mar 12 2021, 08:29 PM bkrantz While I think about what to do with the dash, I go... Mar 12 2021, 08:34 PM bkrantz We will see how this stuff holds up to time and we... Mar 12 2021, 08:34 PM bkrantz On to installing the vinyl. I started with the to... Mar 12 2021, 08:35 PM
raynekat
I also needed to make the perforations line up wi... Mar 5 2021, 05:30 PM bkrantz Sprayed. Mar 4 2021, 08:49 PM bkrantz Adhered using the jig. Mar 4 2021, 08:49 PM bkrantz Trimmed close for wrapping on 3 sides, and longer ... Mar 4 2021, 08:51 PM bkrantz Plate edges wrapped. Mar 4 2021, 08:52 PM bkrantz I used 3M high strength auto tape to attach the pl... Mar 4 2021, 08:53 PM bkrantz Final product: plate attached to the door, and the... Mar 4 2021, 08:55 PM Puebloswatcop
Final product: plate attached to the door, and th... Mar 5 2021, 09:21 AM CptTripps Your build looks amazing. Really well done.
Lovin... Mar 5 2021, 07:39 AM bkrantz I had about an hour today, and felt calm, so I too... Mar 5 2021, 08:36 PM bkrantz I tried a few things, including simple pressing, t... Mar 5 2021, 08:38 PM bkrantz I then muscled the remaining part of the open rim ... Mar 5 2021, 08:40 PM bkrantz After that is was fairly easy to press the bushing... Mar 5 2021, 08:42 PM bkrantz Then I pressed the links onto the sway bar. Helps... Mar 5 2021, 08:43 PM bkrantz And then I pressed the other ends of the links ont... Mar 5 2021, 08:44 PM bkrantz That is the last of the chassis work, including br... Mar 5 2021, 08:46 PM Puebloswatcop
That is the last of the chassis work, including b... Mar 6 2021, 11:58 AM Cairo94507 Can't wait to see your car back on all 4 wheel... Mar 6 2021, 09:05 AM bkrantz Thanks, guys. It feels good to see progress, but ... Mar 6 2021, 09:01 PM Puebloswatcop
Thanks, guys. It feels good to see progress, but... Mar 7 2021, 11:05 AM horizontally-opposed Satisfying just to see pics under the car—has to... Mar 7 2021, 11:26 AM bkrantz
Satisfying just to see pics under the car—has t... Mar 7 2021, 07:22 PM bkrantz Speaking of the interior, I made some progress tow... Mar 7 2021, 07:24 PM bkrantz First step was to spray the dash and underside of ... Mar 7 2021, 07:25 PM bkrantz Padding in place, with lots of overhang on all sid... Mar 7 2021, 07:26 PM bkrantz Padding all stuck down. Very good adhesion. Mar 7 2021, 07:28 PM bkrantz And then trimmed all around with a new utility bla... Mar 7 2021, 07:29 PM bkrantz After that, I got out the liquid Weldwood. I deci... Mar 7 2021, 07:30 PM bkrantz Test fitting the vinyl. Again, lots of overlap. Mar 7 2021, 07:32 PM bkrantz I taped the ends to add some gentle tension.
Then... Mar 7 2021, 07:36 PM bkrantz Once the inner edge was stuck on, I brushed adhesi... Mar 7 2021, 07:38 PM bkrantz While smoothing and gently stretching, I folded th... Mar 7 2021, 07:42 PM bkrantz Cleaned up and almost ready to install. Mar 7 2021, 07:43 PM bkrantz Next step on the dash: installing the front plate.... Mar 8 2021, 08:32 PM bkrantz Stuck on, located by the holes for switches, etc. Mar 8 2021, 08:33 PM bkrantz Dash is starting to look like a dash. Mar 8 2021, 08:34 PM bkrantz I pulled out the original glove box. Its in prett... Mar 8 2021, 08:36 PM bkrantz I let the fiberboard soak and absorb some water, a... Mar 8 2021, 08:37 PM djway
I let the fiberboard soak and absorb some water, ... Mar 8 2021, 10:05 PM bkrantz
I let the fiberboard soak and absorb some water,... Mar 9 2021, 08:54 PM djway
[quote name='djway' post='2897577' date='Mar 8 20... Mar 9 2021, 10:37 PM gereed75 I have thought of the thinned penetrating epoxies ... Mar 8 2021, 10:08 PM bbrock
I have thought of the thinned penetrating epoxies... Mar 9 2021, 10:59 PM gereed75 I’ve used old fashioned wood glue to reinforce... Mar 10 2021, 07:48 AM bkrantz Well, here's my glove box after drying in the ... Mar 10 2021, 08:25 PM bkrantz Before I started working on the dash, I installed ... Mar 10 2021, 08:27 PM bkrantz After cleaning up the old glue and a bit of sandin... Mar 10 2021, 08:29 PM bkrantz Now, on to the dash. Here are the pieces for the ... Mar 10 2021, 08:30 PM bkrantz Lock installed Mar 10 2021, 08:31 PM bkrantz Door with handle, and mounting hardware. The ... Mar 10 2021, 08:31 PM bkrantz Here's the door installed. Much easier with t... Mar 10 2021, 08:34 PM bkrantz Viewed from the outside--looks even. Mar 10 2021, 08:35 PM bkrantz Also easier to install the actual box now. Mar 10 2021, 08:35 PM bkrantz OK, time for the 914 Rubber replacement dash top. ... Mar 10 2021, 08:37 PM bkrantz First fitting attempt. The nylon mounting studs a... Mar 10 2021, 08:39 PM bkrantz I also realized that the ash tray bracket has to g... Mar 10 2021, 08:40 PM bkrantz Fitting attempt number two. All the studs and hol... Mar 10 2021, 08:41 PM bkrantz The windshield side is not bad, but a few spots ar... Mar 10 2021, 08:42 PM bkrantz The match between the top and the new padded vinyl... Mar 10 2021, 08:46 PM bkrantz But along the instrument cowl, the gap is a bit la... Mar 10 2021, 08:47 PM bkrantz The biggest gap is on the sides of the cowl. I ha... Mar 10 2021, 08:48 PM bkrantz Just for fun, and to check the fit, I installed th... Mar 10 2021, 08:51 PM bkrantz I know the lower bolster has to come off to instal... Mar 10 2021, 08:53 PM bkrantz A few more things to deal with. The ash tray fron... Mar 10 2021, 08:54 PM bkrantz And the side gaps are a bit big. Mar 10 2021, 08:54 PM raynekat
And the side gaps are a bit big.
Compared to my... Mar 10 2021, 09:49 PM bkrantz
And the side gaps are a bit big.
Compared to m... Mar 11 2021, 08:28 PM euro911 Looks great. After the fact, there's a re-floc... Mar 11 2021, 03:10 AM bkrantz Big day today--installing the dash. I got the top... Mar 11 2021, 08:30 PM bkrantz Then the top studs, accessed from the frunk side. Mar 11 2021, 08:31 PM bkrantz Then the side screws. Mar 11 2021, 08:31 PM bkrantz And done! (I hope) Mar 11 2021, 08:32 PM bkrantz From the front. I still need to deal with the gap... Mar 11 2021, 08:33 PM NS914
From the front. I still need to deal with the ga... Mar 12 2021, 09:03 AM bkrantz One more! I am excited since I have been wait... Mar 11 2021, 08:34 PM ElCee You better paint these two spots black. Mar 12 2021, 02:20 AM bkrantz Thanks for the tip, ElCee.
And thanks, Grant. Gl... Mar 12 2021, 08:23 PM bkrantz OK, add another error to my record. As I started ... Mar 12 2021, 08:26 PM bkrantz After I mounted the front plate to the dash frame,... Mar 12 2021, 08:29 PM bkrantz While I think about what to do with the dash, I go... Mar 12 2021, 08:34 PM bkrantz We will see how this stuff holds up to time and we... Mar 12 2021, 08:34 PM bkrantz On to installing the vinyl. I started with the to... Mar 12 2021, 08:35 PM  |
3 User(s) are reading this topic (3 Guests and 0 Anonymous Users)
0 Members:

|
Lo-Fi Version | Time is now: 2nd January 2026 - 02:46 PM |
Invision Power Board
v9.1.4 © 2026 IPS, Inc.