|
|
|
Porsche, and the Porsche crest are registered trademarks of Dr. Ing. h.c. F. Porsche AG.
This site is not affiliated with Porsche in any way. Its only purpose is to provide an online forum for car enthusiasts. All other trademarks are property of their respective owners. |
|
|


| bkrantz |
 Oct 16 2019, 08:47 PM Oct 16 2019, 08:47 PM
Post
#1
|
|
914 Guru  Group: Members Posts: 8,565 Joined: 3-August 19 From: SW Colorado Member No.: 23,343 Region Association: Rocky Mountains |
I realize most rebuilds go from the inside to the outside, but I am struck by how straight and clean the outer panels, including paint, look on my 73 2.0. And all the nasty stuff is hidden underneath--which I know is also not unusual.
Any way, I bought the car knowing most of what it was: a 2.0 with all the sport and appearance group equipment, including 5 good Fuchs, and the original fuel injection. The original engine is confirmed by a COA. In contrast to the exterior the interior was mixed at best, with some funky carpet. And the front and rear trunks (and engine compartment, and interior) had been sprayed with black undercoating. So after a month, I have the car stripped to a bare shell, except for suspension and steering. I measured everything I could, and the body is very square and on spec. I need to patch some local rust spots, and replace the rear floor. And then do some minor straightening: right headlight bucket, front edge of right front fender, rear panel, etc. Attached thumbnail(s) 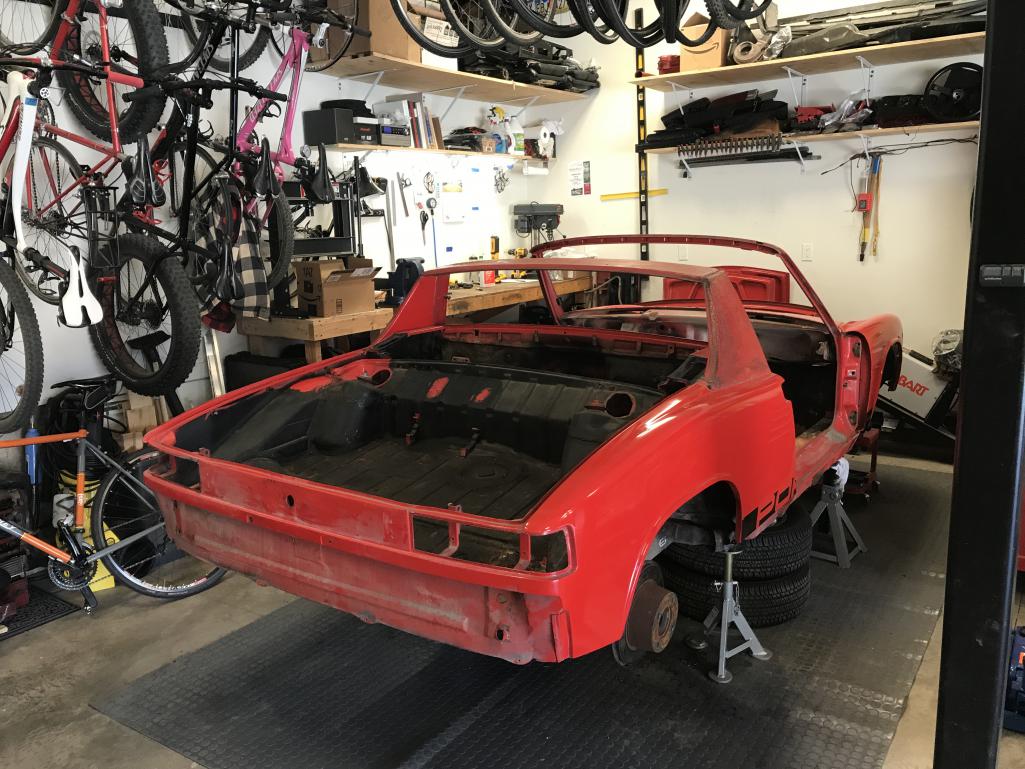
|
   |

 
|
Posts in this topic
bkrantz Rebuiding Inside-out Oct 16 2019, 08:47 PM bkrantz After making a small cut so the trim piece can sea... Jun 20 2021, 06:58 PM bkrantz And then after about an hour of pushing and prying... Jun 20 2021, 07:02 PM bkrantz And another half-hour for the right side. Jun 20 2021, 07:02 PM bkrantz And then 5 minutes to get the top seated. Jun 20 2021, 07:03 PM bkrantz And then time for the lower strip. Jun 20 2021, 07:05 PM bkrantz That was a pretty easy install, with some care to ... Jun 20 2021, 07:06 PM bkrantz I decided to get back to some engine work, hoping ... Jun 21 2021, 07:07 PM bkrantz I removed the compression rings from each piston i... Jun 21 2021, 07:10 PM bkrantz I measured the ring gaps in the cylinders. All we... Jun 21 2021, 07:11 PM ddire333 Wow great work, giving me inspiration! Hope to... Jun 22 2021, 05:01 AM raynekat Bob is quite the 914 guy....I must say. Jun 22 2021, 04:46 PM 930cabman I would bet Bob understands "fit" very w... Jun 22 2021, 05:29 PM bkrantz Thanks, guys. Sure is more fun without worrying a... Jun 22 2021, 07:19 PM bkrantz Another diversion today: I got out the trunk lock.... Jun 22 2021, 07:23 PM bkrantz But that means re-keying the lock to match the res... Jun 22 2021, 07:24 PM bkrantz And the cylinder with all the original pins. I di... Jun 22 2021, 07:27 PM bkrantz After some pin swapping, and just a bit of filing,... Jun 22 2021, 07:29 PM bkrantz I substituted an O-ring for the original bushing. Jun 22 2021, 07:30 PM bkrantz And then got the lock itself back together. (Yes,... Jun 22 2021, 07:34 PM bkrantz The new rubber gasket from 914Rubber needed one no... Jun 22 2021, 07:39 PM bkrantz And then installed in the car. Jun 22 2021, 07:40 PM bkrantz And on the inside, with the lock release pin point... Jun 22 2021, 07:42 PM bkrantz And then the latch pin receiver. Jun 22 2021, 07:43 PM bkrantz To test the function, I got out the trunk lid pin. Jun 22 2021, 07:44 PM bkrantz A quick disassemble for cleaning. Jun 22 2021, 07:45 PM bkrantz And then back together, with a new bushing. Jun 22 2021, 07:46 PM bkrantz A quick test: it locks and releases! Jun 22 2021, 07:50 PM bkrantz And the key locks and unlocks. Jun 22 2021, 07:52 PM bkrantz While in the mood to play with locks, I got out th... Jun 22 2021, 07:54 PM bkrantz Fortunately, I have new repro handles. Jun 22 2021, 07:55 PM bkrantz Again, step 1 was to remove the lock cylinder. Th... Jun 22 2021, 07:57 PM bkrantz Although these are the original locks and keys, on... Jun 22 2021, 07:58 PM bkrantz And then more filing. To start, the small end of ... Jun 22 2021, 08:02 PM bkrantz But the cylinder will still not fit into the handl... Jun 22 2021, 08:04 PM bkrantz While I try to figure out what to do with the door... Jun 23 2021, 07:03 PM bkrantz With the thinner new shim (plus two of the origina... Jun 23 2021, 07:05 PM bkrantz After spinning the crank a few times, I mounted th... Jun 23 2021, 07:07 PM bkrantz After shoving the flywheel in (and feeling a sligh... Jun 23 2021, 07:09 PM bkrantz I pulled the flywheel off, and coated all the shim... Jun 23 2021, 07:10 PM bkrantz I put the shims back in, cleaned the recess for th... Jun 23 2021, 07:12 PM bkrantz Next, I installed the seal. I was able to start i... Jun 23 2021, 07:14 PM bkrantz Then I got out all the parts for installing the fl... Jun 23 2021, 07:15 PM bkrantz Here's the big O-ring. Jun 23 2021, 07:16 PM bkrantz Installed. And some assembly lube on the face and... Jun 23 2021, 07:17 PM bkrantz Pilot bearing, with some moly grease. Jun 23 2021, 07:19 PM bkrantz The bearing is a tight fit in the flywheel. Jun 23 2021, 07:19 PM bkrantz So time for the press. Jun 23 2021, 07:20 PM bkrantz I left the bearing sticking out a bit more than th... Jun 23 2021, 07:22 PM bkrantz Then the felt washer, dampened with engine oil, as... Jun 23 2021, 07:24 PM bkrantz The felt washer in place. Note the marks on the f... Jun 23 2021, 07:25 PM bkrantz Then new bolts and the retaining washer. Jun 23 2021, 07:26 PM bkrantz After torquing the new bolts, all done with the fl... Jun 23 2021, 07:27 PM bkrantz A few more things crossed off the list. Jun 23 2021, 07:27 PM bkrantz I decided to see if I could make my uncooperative ... Jun 24 2021, 07:43 PM bkrantz On the left handle, the out hole was a bit small. Jun 24 2021, 07:44 PM bkrantz I used a "big" drum sander on my Dremel ... Jun 24 2021, 07:45 PM bkrantz Then I used a hand file to knock off the sharp edg... Jun 24 2021, 07:47 PM bkrantz The cylinder fit OK, but the recess on the inner e... Jun 24 2021, 07:49 PM bkrantz A bit more hand filing. Jun 24 2021, 07:49 PM bkrantz On the right handle, the entire opening for the cy... Jun 24 2021, 07:50 PM bkrantz After about 2 hours I have both handles working OK... Jun 24 2021, 07:55 PM bkrantz Getting ready to install the gas tank and plumbing... Jun 25 2021, 07:12 PM bkrantz Here's the supply line, with a brass adapter t... Jun 25 2021, 07:13 PM bkrantz Supply line connected to the pump inlet, and the e... Jun 25 2021, 07:15 PM bkrantz From underneath, the supply line and also the retu... Jun 25 2021, 07:16 PM bkrantz Fuel filter, attached from underneath. I can imag... Jun 25 2021, 07:17 PM bkrantz Fuel filter tucked inside, where it will live most... Jun 25 2021, 07:18 PM bkrantz Checking access to the gas tank fittings. This mi... Jun 25 2021, 07:20 PM bkrantz But before installing the tank, I need to repaint ... Jun 25 2021, 07:22 PM bkrantz Primer. Jun 25 2021, 07:23 PM bkrantz And new paint. Jun 25 2021, 07:27 PM bkrantz While waiting for paint to fully dry, I refilled t... Jun 25 2021, 07:30 PM bkrantz Here's the new charcoal. The pellets are a bi... Jun 25 2021, 07:31 PM bkrantz With both internal baffle plates in place, I fille... Jun 25 2021, 07:32 PM bkrantz Rubber plug in the fill end. Jun 25 2021, 07:32 PM bkrantz Here's the spring that keeps pressure on the e... Jun 25 2021, 07:33 PM bkrantz Feeding into the hole. Jun 25 2021, 07:34 PM bkrantz And then shoved over to the middle of the space. Jun 25 2021, 07:34 PM bkrantz Second rubber plug. Jun 25 2021, 07:35 PM bkrantz Ready to use. Jun 25 2021, 07:35 PM bkrantz Here's all the stuff that goes on the tank. S... Jun 26 2021, 07:29 PM bkrantz I cleaned paint and undercoating from the felt pad... Jun 26 2021, 07:30 PM bkrantz Rear strap half installed. Jun 26 2021, 07:31 PM bkrantz Also powder-coated: the filler neck and expansion ... Jun 26 2021, 07:32 PM bkrantz New gasket for the fuel lever sender. Jun 26 2021, 07:33 PM bkrantz Sender installed. The bolt spacing is not even, s... Jun 26 2021, 07:34 PM bkrantz Filler neck, with another new gasket. Jun 26 2021, 07:34 PM bkrantz I replaced the gasket in the cap a while ago. Jun 26 2021, 07:35 PM bkrantz Cap in place. Jun 26 2021, 07:36 PM bkrantz Lower tank connections and hardware, including a n... Jun 26 2021, 07:38 PM bkrantz Fittings in place, but loose for now. Jun 26 2021, 07:40 PM bkrantz I dropped the tank in, but can't install it ye... Jun 26 2021, 07:42 PM bkrantz View from the underneath. Jun 26 2021, 07:45 PM bkrantz I progressively trimmed the fuel lines, and got th... Jun 26 2021, 07:47 PM bkrantz Back to engine work today, lots of time but not ma... Jun 27 2021, 06:33 PM bkrantz Before mounting the cylinders I had to re-install ... Jun 27 2021, 06:36 PM bkrantz P&C numbers 1 and 2 mounted for measurement, n... Jun 27 2021, 06:38 PM bkrantz A quick look at number 2 at TDC. I will do some m... Jun 27 2021, 06:39 PM bkrantz This arrived today, from Mario at the Dub Shop: co... Jun 28 2021, 07:08 PM
 djway :blink: :chow: Jun 28 2021, 10:34 PM
  |
2 User(s) are reading this topic (2 Guests and 0 Anonymous Users)
0 Members:

|
Lo-Fi Version | Time is now: 2nd January 2026 - 09:09 PM |
Invision Power Board
v9.1.4 © 2026 IPS, Inc.