|
|
|
Porsche, and the Porsche crest are registered trademarks of Dr. Ing. h.c. F. Porsche AG.
This site is not affiliated with Porsche in any way. Its only purpose is to provide an online forum for car enthusiasts. All other trademarks are property of their respective owners. |
|
|


| bkrantz |
 Oct 16 2019, 08:47 PM Oct 16 2019, 08:47 PM
Post
#1
|
|
914 Guru  Group: Members Posts: 8,567 Joined: 3-August 19 From: SW Colorado Member No.: 23,343 Region Association: Rocky Mountains |
I realize most rebuilds go from the inside to the outside, but I am struck by how straight and clean the outer panels, including paint, look on my 73 2.0. And all the nasty stuff is hidden underneath--which I know is also not unusual.
Any way, I bought the car knowing most of what it was: a 2.0 with all the sport and appearance group equipment, including 5 good Fuchs, and the original fuel injection. The original engine is confirmed by a COA. In contrast to the exterior the interior was mixed at best, with some funky carpet. And the front and rear trunks (and engine compartment, and interior) had been sprayed with black undercoating. So after a month, I have the car stripped to a bare shell, except for suspension and steering. I measured everything I could, and the body is very square and on spec. I need to patch some local rust spots, and replace the rear floor. And then do some minor straightening: right headlight bucket, front edge of right front fender, rear panel, etc. Attached thumbnail(s) 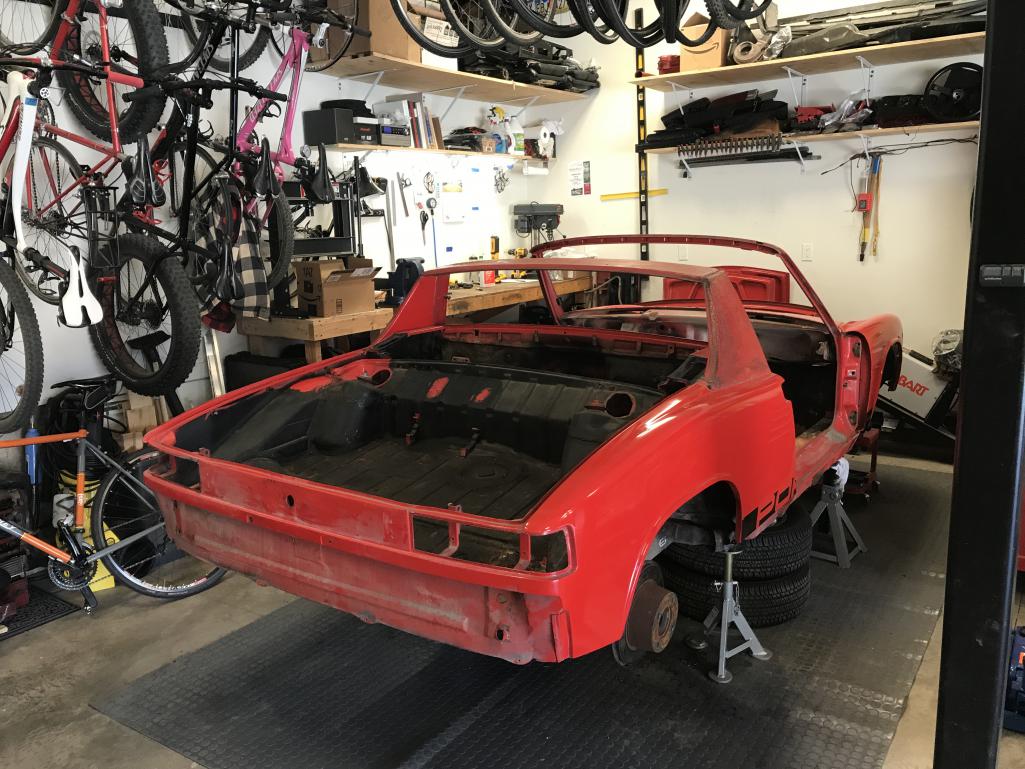
|
   |

 
|
Posts in this topic
bkrantz Rebuiding Inside-out Oct 16 2019, 08:47 PM bkrantz New fuzzy channel for the window guide. Nov 8 2021, 07:53 PM bkrantz Installed. Nov 8 2021, 07:54 PM bkrantz Now the fun part: trying to get the seal seated in... Nov 8 2021, 07:56 PM bkrantz After lots of struggle, I could not get the front ... Nov 8 2021, 07:57 PM bkrantz And the outer part of the seal will not seat horiz... Nov 8 2021, 07:59 PM bkrantz And worst of all, I split the outer seal above the... Nov 8 2021, 08:01 PM iankarr Definitely tricky business. Mark at 914rubber prov... Nov 8 2021, 08:32 PM bkrantz Thanks, Ian. I tried a few times with different a... Nov 9 2021, 08:04 PM raynekat Bob....I must have tried installing this triangle ... Nov 10 2021, 03:06 AM bkrantz You are right, Doug. If there is any general cate... Nov 10 2021, 09:01 PM bkrantz Yup, doors (at least right door), going on the car... Nov 10 2021, 09:05 PM bkrantz Tidy fit with no slop. Nov 10 2021, 09:05 PM bkrantz Quick adjustment of hinge positions and latch look... Nov 10 2021, 09:07 PM bkrantz Meanwhile, back to the engine. Here is the new (u... Nov 10 2021, 09:12 PM bkrantz The hardware furthers my quest to replace all the ... Nov 10 2021, 09:14 PM
 TX914
The hardware furthers my quest to replace all the... Nov 11 2021, 06:19 AM bkrantz
The hardware furthers my quest to replace all th... Nov 11 2021, 08:28 PM bkrantz I pulled all the sheet metal off the front, just s... Nov 10 2021, 09:16 PM bkrantz Alternator ring in place. Nov 10 2021, 09:17 PM bkrantz With all the sheet metal back in place, it was tim... Nov 10 2021, 09:18 PM bkrantz Just a bit of tension, and ready. Nov 10 2021, 09:20 PM Puebloswatcop Beautiful work Bob. Nov 11 2021, 02:30 PM bkrantz I took the left door off to get that side started. Nov 11 2021, 08:30 PM bkrantz Locks and levers in place, and working. Nov 11 2021, 08:31 PM bkrantz I need a few bits to finish the door, so instead I... Nov 11 2021, 08:33 PM bkrantz First, I made a trial assembly of the brackets and... Nov 12 2021, 08:22 PM bkrantz Close-up of the brackets. The fit and machine wor... Nov 12 2021, 08:23 PM bkrantz The Tangerine kit includes longer manifold studs, ... Nov 12 2021, 08:27 PM bkrantz The longer studs go on the insides of the manifold... Nov 12 2021, 08:29 PM bkrantz Check fit with the left throttle body and bracket. Nov 12 2021, 08:30 PM bkrantz Now for some fun! Here is the right throttle ... Nov 12 2021, 08:32 PM bkrantz Lever arm and washers removed, and the throttle st... Nov 12 2021, 08:34 PM bkrantz Here's the recommended pulley position. I pla... Nov 12 2021, 08:37 PM bkrantz The small dimple is the pin location, marked with ... Nov 12 2021, 08:42 PM bkrantz So I moved the hole position slightly to the left. Nov 12 2021, 08:43 PM bkrantz I then chamfered the hole so the split pin can sli... Nov 12 2021, 08:43 PM bkrantz Here's the throttle stop back on the shaft, wi... Nov 12 2021, 08:44 PM bkrantz Using the press to install the split pin in the pu... Nov 12 2021, 08:45 PM bkrantz I pushed the split pin through the pulley just far... Nov 12 2021, 08:47 PM bkrantz New return spring on the back side of the pulley. Nov 12 2021, 08:48 PM bkrantz Pulley in place, but I need a couple of washers (M... Nov 12 2021, 08:50 PM bkrantz Still waiting on washers, so I started on my left ... Nov 15 2021, 08:44 PM bkrantz Throttle stop marked for pin. Nov 15 2021, 08:45 PM bkrantz Again, the pin position was too close to the edge,... Nov 15 2021, 08:46 PM bkrantz Hole drilled and chamfered. Nov 15 2021, 08:47 PM bkrantz Split pin pressed into slave pulley, again just en... Nov 15 2021, 08:49 PM bkrantz Getting closer to mounting everything on the engin... Nov 15 2021, 08:49 PM bkrantz One thing I did get is a replacement door stay spr... Nov 15 2021, 08:51 PM bkrantz Door stay ready. Nov 15 2021, 08:52 PM bkrantz Some light lube, and then installed. Nov 15 2021, 08:53 PM bkrantz I then hung the door, and made a first alignment o... Nov 15 2021, 08:54 PM bkrantz Rear gap better. I will work on this more later o... Nov 15 2021, 08:55 PM bkrantz With the door mounted, I installed the window wind... Nov 15 2021, 08:56 PM bkrantz With both doors on, I could not resist some glamou... Nov 15 2021, 08:57 PM bkrantz One more. Nov 15 2021, 08:58 PM raynekat Perhaps plexiglass hoods? Then you'd know what... Nov 15 2021, 10:25 PM bkrantz
Perhaps plexiglass hoods? Then you'd know wha... Nov 16 2021, 08:12 PM Puebloswatcop Looking awesome Bob, :driving: Nov 16 2021, 07:40 AM bkrantz Got my M7 washers, just the size for the throttle ... Nov 17 2021, 07:58 PM bkrantz Slave pulley mount test. Two washes do the job. Nov 17 2021, 07:59 PM bkrantz Here's the slave pulley, set up with the mount... Nov 17 2021, 08:01 PM bkrantz All together on the left throttle body. Nov 17 2021, 08:02 PM bkrantz Then I got the cable stop aligned with the pulley. Nov 17 2021, 08:04 PM bkrantz I also swapped out the bottom plates for the air f... Nov 17 2021, 08:08 PM bkrantz Right side with the master pulley. Nov 17 2021, 08:10 PM bkrantz Again, I lined up the cable stops with the pulley. Nov 17 2021, 08:11 PM bkrantz Now its time for the auxiliary cable that connects... Nov 17 2021, 08:12 PM bkrantz Obvious route for the cable, from right to left. Nov 17 2021, 08:13 PM bkrantz But this leaves the middle hanging unsupported, wh... Nov 17 2021, 08:16 PM bkrantz So I made a small bracket to support the middle of... Nov 17 2021, 08:17 PM bkrantz As a straight line, the cable housing is about an ... Nov 17 2021, 08:19 PM bkrantz Time to get out the bike tools again, this time a ... Nov 17 2021, 08:20 PM bkrantz That leaves the housing end a bit jagged. Nov 17 2021, 08:21 PM bkrantz Filed flat, so the cable housing sits even in the ... Nov 17 2021, 08:22 PM bkrantz Cable housing installed. Nov 17 2021, 08:23 PM bkrantz Cross cable end on the master pulley. Nov 17 2021, 08:24 PM bkrantz And on the slave side. I made a preliminary tensi... Nov 17 2021, 08:25 PM bkrantz Once the engine is installed, I will connect the t... Nov 17 2021, 08:43 PM bkrantz In order to reach the right rear, the accelerator ... Nov 17 2021, 08:47 PM bkrantz Rubber grommet. Nov 17 2021, 08:47 PM bkrantz Should work. Nov 17 2021, 08:48 PM bkrantz I got out the new coil, to explore location and mo... Nov 17 2021, 08:49 PM bkrantz My first idea is to mount it on top of the engine ... Nov 17 2021, 08:51 PM ClayPerrine
My first idea is to mount it on top of the engine... Nov 18 2021, 09:51 AM bkrantz Clay, do you have a photo of one? Nov 18 2021, 09:51 PM bkrantz I laid out the pattern on some 10 gauge aluminum. Nov 19 2021, 07:50 PM bkrantz Cut and bent. Nov 19 2021, 07:50 PM bkrantz Ready to mount the new coil. Nov 19 2021, 07:51 PM bkrantz This should work, but I need some longer case bolt... Nov 19 2021, 07:52 PM bkrantz The engine is just about dressed. Nov 19 2021, 07:53 PM Morph914 Great work! This is going to be one very clean... Nov 20 2021, 06:44 PM bkrantz
Great work! This is going to be one very clea... Nov 20 2021, 08:39 PM bkrantz Another neglected detail: the wire for the oil tem... Nov 20 2021, 08:41 PM bkrantz My new wire (green, with a hand-drawn black stripe... Nov 20 2021, 08:41 PM bkrantz Through the grommet in the taco plate cover. Nov 20 2021, 08:43 PM bkrantz New crush washers and a dab of gasket sealant. Nov 20 2021, 08:44 PM bkrantz Cover plate installed, and wire crimped in the hol... Nov 20 2021, 08:45 PM bkrantz Next job: new plug wires. This is the MSD kit tha... Nov 20 2021, 08:47 PM bkrantz Plug wires laid out, from spark plugs to the new c... Nov 20 2021, 08:48 PM bkrantz Now to cut each wire to length. Nov 20 2021, 08:49 PM
TX914
The hardware furthers my quest to replace all the... Nov 11 2021, 06:19 AM bkrantz
The hardware furthers my quest to replace all th... Nov 11 2021, 08:28 PM bkrantz I pulled all the sheet metal off the front, just s... Nov 10 2021, 09:16 PM bkrantz Alternator ring in place. Nov 10 2021, 09:17 PM bkrantz With all the sheet metal back in place, it was tim... Nov 10 2021, 09:18 PM bkrantz Just a bit of tension, and ready. Nov 10 2021, 09:20 PM Puebloswatcop Beautiful work Bob. Nov 11 2021, 02:30 PM bkrantz I took the left door off to get that side started. Nov 11 2021, 08:30 PM bkrantz Locks and levers in place, and working. Nov 11 2021, 08:31 PM bkrantz I need a few bits to finish the door, so instead I... Nov 11 2021, 08:33 PM bkrantz First, I made a trial assembly of the brackets and... Nov 12 2021, 08:22 PM bkrantz Close-up of the brackets. The fit and machine wor... Nov 12 2021, 08:23 PM bkrantz The Tangerine kit includes longer manifold studs, ... Nov 12 2021, 08:27 PM bkrantz The longer studs go on the insides of the manifold... Nov 12 2021, 08:29 PM bkrantz Check fit with the left throttle body and bracket. Nov 12 2021, 08:30 PM bkrantz Now for some fun! Here is the right throttle ... Nov 12 2021, 08:32 PM bkrantz Lever arm and washers removed, and the throttle st... Nov 12 2021, 08:34 PM bkrantz Here's the recommended pulley position. I pla... Nov 12 2021, 08:37 PM bkrantz The small dimple is the pin location, marked with ... Nov 12 2021, 08:42 PM bkrantz So I moved the hole position slightly to the left. Nov 12 2021, 08:43 PM bkrantz I then chamfered the hole so the split pin can sli... Nov 12 2021, 08:43 PM bkrantz Here's the throttle stop back on the shaft, wi... Nov 12 2021, 08:44 PM bkrantz Using the press to install the split pin in the pu... Nov 12 2021, 08:45 PM bkrantz I pushed the split pin through the pulley just far... Nov 12 2021, 08:47 PM bkrantz New return spring on the back side of the pulley. Nov 12 2021, 08:48 PM bkrantz Pulley in place, but I need a couple of washers (M... Nov 12 2021, 08:50 PM bkrantz Still waiting on washers, so I started on my left ... Nov 15 2021, 08:44 PM bkrantz Throttle stop marked for pin. Nov 15 2021, 08:45 PM bkrantz Again, the pin position was too close to the edge,... Nov 15 2021, 08:46 PM bkrantz Hole drilled and chamfered. Nov 15 2021, 08:47 PM bkrantz Split pin pressed into slave pulley, again just en... Nov 15 2021, 08:49 PM bkrantz Getting closer to mounting everything on the engin... Nov 15 2021, 08:49 PM bkrantz One thing I did get is a replacement door stay spr... Nov 15 2021, 08:51 PM bkrantz Door stay ready. Nov 15 2021, 08:52 PM bkrantz Some light lube, and then installed. Nov 15 2021, 08:53 PM bkrantz I then hung the door, and made a first alignment o... Nov 15 2021, 08:54 PM bkrantz Rear gap better. I will work on this more later o... Nov 15 2021, 08:55 PM bkrantz With the door mounted, I installed the window wind... Nov 15 2021, 08:56 PM bkrantz With both doors on, I could not resist some glamou... Nov 15 2021, 08:57 PM bkrantz One more. Nov 15 2021, 08:58 PM raynekat Perhaps plexiglass hoods? Then you'd know what... Nov 15 2021, 10:25 PM bkrantz
Perhaps plexiglass hoods? Then you'd know wha... Nov 16 2021, 08:12 PM Puebloswatcop Looking awesome Bob, :driving: Nov 16 2021, 07:40 AM bkrantz Got my M7 washers, just the size for the throttle ... Nov 17 2021, 07:58 PM bkrantz Slave pulley mount test. Two washes do the job. Nov 17 2021, 07:59 PM bkrantz Here's the slave pulley, set up with the mount... Nov 17 2021, 08:01 PM bkrantz All together on the left throttle body. Nov 17 2021, 08:02 PM bkrantz Then I got the cable stop aligned with the pulley. Nov 17 2021, 08:04 PM bkrantz I also swapped out the bottom plates for the air f... Nov 17 2021, 08:08 PM bkrantz Right side with the master pulley. Nov 17 2021, 08:10 PM bkrantz Again, I lined up the cable stops with the pulley. Nov 17 2021, 08:11 PM bkrantz Now its time for the auxiliary cable that connects... Nov 17 2021, 08:12 PM bkrantz Obvious route for the cable, from right to left. Nov 17 2021, 08:13 PM bkrantz But this leaves the middle hanging unsupported, wh... Nov 17 2021, 08:16 PM bkrantz So I made a small bracket to support the middle of... Nov 17 2021, 08:17 PM bkrantz As a straight line, the cable housing is about an ... Nov 17 2021, 08:19 PM bkrantz Time to get out the bike tools again, this time a ... Nov 17 2021, 08:20 PM bkrantz That leaves the housing end a bit jagged. Nov 17 2021, 08:21 PM bkrantz Filed flat, so the cable housing sits even in the ... Nov 17 2021, 08:22 PM bkrantz Cable housing installed. Nov 17 2021, 08:23 PM bkrantz Cross cable end on the master pulley. Nov 17 2021, 08:24 PM bkrantz And on the slave side. I made a preliminary tensi... Nov 17 2021, 08:25 PM bkrantz Once the engine is installed, I will connect the t... Nov 17 2021, 08:43 PM bkrantz In order to reach the right rear, the accelerator ... Nov 17 2021, 08:47 PM bkrantz Rubber grommet. Nov 17 2021, 08:47 PM bkrantz Should work. Nov 17 2021, 08:48 PM bkrantz I got out the new coil, to explore location and mo... Nov 17 2021, 08:49 PM bkrantz My first idea is to mount it on top of the engine ... Nov 17 2021, 08:51 PM ClayPerrine
My first idea is to mount it on top of the engine... Nov 18 2021, 09:51 AM bkrantz Clay, do you have a photo of one? Nov 18 2021, 09:51 PM bkrantz I laid out the pattern on some 10 gauge aluminum. Nov 19 2021, 07:50 PM bkrantz Cut and bent. Nov 19 2021, 07:50 PM bkrantz Ready to mount the new coil. Nov 19 2021, 07:51 PM bkrantz This should work, but I need some longer case bolt... Nov 19 2021, 07:52 PM bkrantz The engine is just about dressed. Nov 19 2021, 07:53 PM Morph914 Great work! This is going to be one very clean... Nov 20 2021, 06:44 PM bkrantz
Great work! This is going to be one very clea... Nov 20 2021, 08:39 PM bkrantz Another neglected detail: the wire for the oil tem... Nov 20 2021, 08:41 PM bkrantz My new wire (green, with a hand-drawn black stripe... Nov 20 2021, 08:41 PM bkrantz Through the grommet in the taco plate cover. Nov 20 2021, 08:43 PM bkrantz New crush washers and a dab of gasket sealant. Nov 20 2021, 08:44 PM bkrantz Cover plate installed, and wire crimped in the hol... Nov 20 2021, 08:45 PM bkrantz Next job: new plug wires. This is the MSD kit tha... Nov 20 2021, 08:47 PM bkrantz Plug wires laid out, from spark plugs to the new c... Nov 20 2021, 08:48 PM bkrantz Now to cut each wire to length. Nov 20 2021, 08:49 PM  |
2 User(s) are reading this topic (2 Guests and 0 Anonymous Users)
0 Members:

|
Lo-Fi Version | Time is now: 9th January 2026 - 11:11 PM |
Invision Power Board
v9.1.4 © 2026 IPS, Inc.