|
|
|
Porsche, and the Porsche crest are registered trademarks of Dr. Ing. h.c. F. Porsche AG.
This site is not affiliated with Porsche in any way. Its only purpose is to provide an online forum for car enthusiasts. All other trademarks are property of their respective owners. |
|
|


| bkrantz |
 Oct 16 2019, 08:47 PM Oct 16 2019, 08:47 PM
Post
#1
|
|
914 Guru  Group: Members Posts: 8,671 Joined: 3-August 19 From: SW Colorado Member No.: 23,343 Region Association: Rocky Mountains |
I realize most rebuilds go from the inside to the outside, but I am struck by how straight and clean the outer panels, including paint, look on my 73 2.0. And all the nasty stuff is hidden underneath--which I know is also not unusual.
Any way, I bought the car knowing most of what it was: a 2.0 with all the sport and appearance group equipment, including 5 good Fuchs, and the original fuel injection. The original engine is confirmed by a COA. In contrast to the exterior the interior was mixed at best, with some funky carpet. And the front and rear trunks (and engine compartment, and interior) had been sprayed with black undercoating. So after a month, I have the car stripped to a bare shell, except for suspension and steering. I measured everything I could, and the body is very square and on spec. I need to patch some local rust spots, and replace the rear floor. And then do some minor straightening: right headlight bucket, front edge of right front fender, rear panel, etc. Attached thumbnail(s) 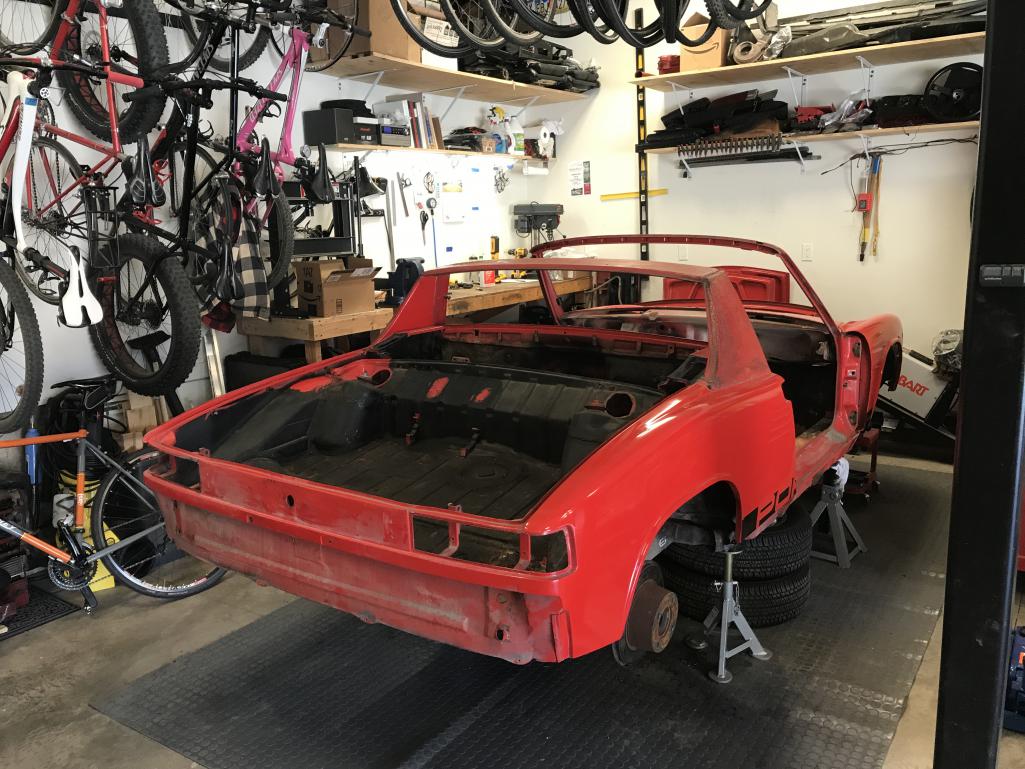
|
   |

 
|
Posts in this topic
bkrantz Rebuiding Inside-out Oct 16 2019, 08:47 PM bkrantz Left headlight box. Apr 18 2020, 08:49 PM bkrantz Detail: Apr 18 2020, 08:50 PM bkrantz Right headlight box: Apr 18 2020, 08:51 PM bkrantz More ugly details: Apr 18 2020, 08:53 PM bkrantz Time for surgical removal. I am trying to minimiz... Apr 18 2020, 08:54 PM bkrantz More: Apr 18 2020, 08:55 PM bkrantz And more: Apr 18 2020, 08:56 PM bkrantz The biggest section I removed was the inner side o... Apr 18 2020, 08:58 PM bkrantz Today, the hero tool was the Dremel. We will see ... Apr 18 2020, 09:00 PM bkrantz I started piecing the channel back together today,... Apr 19 2020, 08:30 PM bkrantz The piece cut for the front left corner. Apr 19 2020, 08:32 PM bkrantz I managed to get a bit of curvature, to match the ... Apr 19 2020, 08:33 PM bkrantz Fit in place. Apr 19 2020, 08:34 PM bkrantz And welded in. I had pretty good luck with the th... Apr 19 2020, 08:36 PM bkrantz Right front corner piece. Apr 19 2020, 08:37 PM bkrantz In place. Apr 19 2020, 08:37 PM bkrantz I started to tack weld this, and...the wire ran ou... Apr 19 2020, 08:39 PM bkrantz Back to welding. I can grind these first corner p... Apr 19 2020, 08:40 PM Baker17 Your work is inspiring and will be a reference whe... Apr 20 2020, 09:07 PM bkrantz My delay in blasting was a combination of poor pla... Apr 21 2020, 08:53 PM bkrantz Back to work, just an hour yesterday and a couple ... Apr 21 2020, 08:55 PM bkrantz Right side: Apr 21 2020, 08:57 PM bkrantz Next piece for the left side. Apr 21 2020, 08:58 PM bkrantz Welded in place. Apr 21 2020, 08:59 PM bkrantz Same piece for the right side. Apr 21 2020, 09:00 PM bkrantz Welded in place. Apr 21 2020, 09:00 PM bkrantz Inner corner piece for the right side. Apr 21 2020, 09:03 PM bkrantz Welded. Apr 21 2020, 09:03 PM bkrantz Last piece for the right side? Apr 21 2020, 09:04 PM bkrantz Welded. Apr 21 2020, 09:05 PM bkrantz Here's the right side, almost done. Apr 21 2020, 09:06 PM bkrantz First, I caught up with grinding the pieces from y... Apr 22 2020, 07:39 PM bkrantz More grinding. Apr 22 2020, 07:40 PM bkrantz And more grinding. Apr 22 2020, 07:41 PM bkrantz The last bit is the inner edge of the channel all ... Apr 22 2020, 07:44 PM bkrantz Got it tacked in place before quitting time. Apr 22 2020, 07:45 PM bkrantz I finished up the frunk channel today. Before fin... Apr 23 2020, 08:11 PM bkrantz Here's the latch welded on. Don't worry, ... Apr 23 2020, 08:13 PM bkrantz After welding the front channel "seam" a... Apr 23 2020, 08:16 PM bkrantz Frunk channel all done, and another item crossed o... Apr 23 2020, 08:17 PM bkrantz With the frunk channel done, I switched to the rea... Apr 24 2020, 08:33 PM bkrantz And after. Apr 24 2020, 08:34 PM bkrantz Some dents and dings, and holes from the PORSCHE r... Apr 24 2020, 08:36 PM bkrantz The reflector panel holes will get welded, and the... Apr 24 2020, 08:38 PM bkrantz For access to the inside of the panel, I removed t... Apr 24 2020, 08:40 PM bkrantz Here's the mounting plate. Pretty lumpy. Apr 24 2020, 08:41 PM
 raynekat
Here's the mounting plate. Pretty lumpy.
H... Apr 24 2020, 09:27 PM bkrantz
Here's the mounting plate. Pretty lumpy.
... Apr 25 2020, 08:20 PM bkrantz For better access I unbolted the rotisserie rear u... Apr 25 2020, 08:23 PM bkrantz Now I can see the worst spots. Apr 25 2020, 08:24 PM bkrantz And this. Apr 25 2020, 08:25 PM bkrantz I propped the trunk lid in place, to compare align... Apr 25 2020, 08:27 PM bkrantz Right side looks pretty good. Apr 25 2020, 08:28 PM bkrantz Left side not so great. The problem is mostly a ... Apr 25 2020, 08:29 PM bkrantz I worked more today to get things "straight... Apr 26 2020, 08:58 PM bkrantz Eye-balling along the lower edge of the boss. Ig... Apr 26 2020, 08:59 PM bkrantz Watching the angles. Apr 26 2020, 09:00 PM bkrantz When things where looking nearly straight by eye, ... Apr 26 2020, 09:02 PM bkrantz But the trunk lid has its own problems, especially... Apr 26 2020, 09:04 PM bkrantz As I started to work the trunk lid edge, I heard a... Apr 26 2020, 09:06 PM bkrantz Anyway, I kept working the lid edge and got things... Apr 26 2020, 09:07 PM raynekat Great pic here Bob.
Well...spend a bit more time t... Apr 26 2020, 09:59 PM bkrantz Looks good enough for a 10 foot car, but I want be... Apr 26 2020, 09:08 PM bkrantz
Great pic here Bob.
Well...spend a bit more time ... Apr 27 2020, 08:18 PM bkrantz I decided to take a break from the rear, and work ... Apr 27 2020, 08:22 PM bkrantz Next, I welded all the puller holes from the PO re... Apr 27 2020, 08:24 PM bbrock
Next, I welded all the puller holes from the PO r... Apr 27 2020, 08:29 PM bkrantz After grinding the welds, I got the fender shape a... Apr 27 2020, 08:30 PM bkrantz To get the next 5% I am going beyond where I stopp... Apr 28 2020, 08:16 PM bkrantz Take the curve from here... Apr 28 2020, 08:17 PM bkrantz And use it to judge the work here. Gaps still nee... Apr 28 2020, 08:18 PM bkrantz Getting closer to 95%. Apr 28 2020, 08:19 PM bkrantz And after some additional work by eye and feel. I... Apr 28 2020, 08:20 PM bkrantz But meanwhile, plugging the wart holes on the righ... Apr 28 2020, 08:21 PM bkrantz This fender also needs some shaping, especially al... Apr 28 2020, 08:22 PM bkrantz Working through the welding list. Apr 28 2020, 08:23 PM bkrantz And getting started on the shaping list. Apr 28 2020, 08:24 PM raynekat This man knows no fear.....go get 'em Bob. Apr 28 2020, 08:45 PM bkrantz
This man knows no fear.....go get 'em Bob.
... Apr 29 2020, 07:44 PM bkrantz I only had about 30 minutes in the garage today. ... Apr 29 2020, 07:47 PM bkrantz Got to use the magic tool again today (shrinking d... Apr 30 2020, 08:22 PM bkrantz Then I got on to shaping, and things are close to ... Apr 30 2020, 08:22 PM aggiezig Just dropping in to admire your progress. You have... May 1 2020, 12:23 AM bkrantz Thanks--just learning as I go. My secret weapon i... May 1 2020, 08:51 PM bkrantz On the the next phase, trying to get the fender as... May 1 2020, 08:53 PM bkrantz That provides a uniform matte black coat. The sur... May 1 2020, 08:55 PM bkrantz Then a a light sanding, to reveal the highs and lo... May 1 2020, 08:57 PM bkrantz I also got started on the right rear fender, layin... May 1 2020, 08:59 PM bkrantz Here are the some lines on the left side to use as... May 1 2020, 09:00 PM bkrantz Had a fun visit by a local 914 friend today, who b... May 2 2020, 09:09 PM Kansas 914
Had a fun visit by a local 914 friend today, who ... May 3 2020, 08:19 AM bkrantz Of course, that means re-grinding, re-shaping, and... May 2 2020, 09:11 PM BeatNavy If it's not too much trouble at some point can... May 3 2020, 06:27 AM bkrantz Just for you, Rob, I took some photos of my proced... May 4 2020, 08:18 PM bkrantz Step 2: press against the fender, holding the gaug... May 4 2020, 08:19 PM bkrantz Step 3: Now hold the gauge (gently) along the same... May 4 2020, 08:21 PM bkrantz Step 4: repeat the process along all the lines. I... May 4 2020, 08:22 PM bkrantz After about an hour, I got the right fender profil... May 4 2020, 08:23 PM bkrantz I then went back to the front fenders, trying to l... May 4 2020, 08:25 PM bkrantz And the right side. May 4 2020, 08:25 PM
raynekat
Here's the mounting plate. Pretty lumpy.
H... Apr 24 2020, 09:27 PM bkrantz
Here's the mounting plate. Pretty lumpy.
... Apr 25 2020, 08:20 PM bkrantz For better access I unbolted the rotisserie rear u... Apr 25 2020, 08:23 PM bkrantz Now I can see the worst spots. Apr 25 2020, 08:24 PM bkrantz And this. Apr 25 2020, 08:25 PM bkrantz I propped the trunk lid in place, to compare align... Apr 25 2020, 08:27 PM bkrantz Right side looks pretty good. Apr 25 2020, 08:28 PM bkrantz Left side not so great. The problem is mostly a ... Apr 25 2020, 08:29 PM bkrantz I worked more today to get things "straight... Apr 26 2020, 08:58 PM bkrantz Eye-balling along the lower edge of the boss. Ig... Apr 26 2020, 08:59 PM bkrantz Watching the angles. Apr 26 2020, 09:00 PM bkrantz When things where looking nearly straight by eye, ... Apr 26 2020, 09:02 PM bkrantz But the trunk lid has its own problems, especially... Apr 26 2020, 09:04 PM bkrantz As I started to work the trunk lid edge, I heard a... Apr 26 2020, 09:06 PM bkrantz Anyway, I kept working the lid edge and got things... Apr 26 2020, 09:07 PM raynekat Great pic here Bob.
Well...spend a bit more time t... Apr 26 2020, 09:59 PM bkrantz Looks good enough for a 10 foot car, but I want be... Apr 26 2020, 09:08 PM bkrantz
Great pic here Bob.
Well...spend a bit more time ... Apr 27 2020, 08:18 PM bkrantz I decided to take a break from the rear, and work ... Apr 27 2020, 08:22 PM bkrantz Next, I welded all the puller holes from the PO re... Apr 27 2020, 08:24 PM bbrock
Next, I welded all the puller holes from the PO r... Apr 27 2020, 08:29 PM bkrantz After grinding the welds, I got the fender shape a... Apr 27 2020, 08:30 PM bkrantz To get the next 5% I am going beyond where I stopp... Apr 28 2020, 08:16 PM bkrantz Take the curve from here... Apr 28 2020, 08:17 PM bkrantz And use it to judge the work here. Gaps still nee... Apr 28 2020, 08:18 PM bkrantz Getting closer to 95%. Apr 28 2020, 08:19 PM bkrantz And after some additional work by eye and feel. I... Apr 28 2020, 08:20 PM bkrantz But meanwhile, plugging the wart holes on the righ... Apr 28 2020, 08:21 PM bkrantz This fender also needs some shaping, especially al... Apr 28 2020, 08:22 PM bkrantz Working through the welding list. Apr 28 2020, 08:23 PM bkrantz And getting started on the shaping list. Apr 28 2020, 08:24 PM raynekat This man knows no fear.....go get 'em Bob. Apr 28 2020, 08:45 PM bkrantz
This man knows no fear.....go get 'em Bob.
... Apr 29 2020, 07:44 PM bkrantz I only had about 30 minutes in the garage today. ... Apr 29 2020, 07:47 PM bkrantz Got to use the magic tool again today (shrinking d... Apr 30 2020, 08:22 PM bkrantz Then I got on to shaping, and things are close to ... Apr 30 2020, 08:22 PM aggiezig Just dropping in to admire your progress. You have... May 1 2020, 12:23 AM bkrantz Thanks--just learning as I go. My secret weapon i... May 1 2020, 08:51 PM bkrantz On the the next phase, trying to get the fender as... May 1 2020, 08:53 PM bkrantz That provides a uniform matte black coat. The sur... May 1 2020, 08:55 PM bkrantz Then a a light sanding, to reveal the highs and lo... May 1 2020, 08:57 PM bkrantz I also got started on the right rear fender, layin... May 1 2020, 08:59 PM bkrantz Here are the some lines on the left side to use as... May 1 2020, 09:00 PM bkrantz Had a fun visit by a local 914 friend today, who b... May 2 2020, 09:09 PM Kansas 914
Had a fun visit by a local 914 friend today, who ... May 3 2020, 08:19 AM bkrantz Of course, that means re-grinding, re-shaping, and... May 2 2020, 09:11 PM BeatNavy If it's not too much trouble at some point can... May 3 2020, 06:27 AM bkrantz Just for you, Rob, I took some photos of my proced... May 4 2020, 08:18 PM bkrantz Step 2: press against the fender, holding the gaug... May 4 2020, 08:19 PM bkrantz Step 3: Now hold the gauge (gently) along the same... May 4 2020, 08:21 PM bkrantz Step 4: repeat the process along all the lines. I... May 4 2020, 08:22 PM bkrantz After about an hour, I got the right fender profil... May 4 2020, 08:23 PM bkrantz I then went back to the front fenders, trying to l... May 4 2020, 08:25 PM bkrantz And the right side. May 4 2020, 08:25 PM  |
5 User(s) are reading this topic (5 Guests and 0 Anonymous Users)
0 Members:

|
Lo-Fi Version | Time is now: 25th April 2026 - 06:35 AM |
Invision Power Board
v9.1.4 © 2026 IPS, Inc.