|
|
|
Porsche, and the Porsche crest are registered trademarks of Dr. Ing. h.c. F. Porsche AG.
This site is not affiliated with Porsche in any way. Its only purpose is to provide an online forum for car enthusiasts. All other trademarks are property of their respective owners. |
|
|

  |

| AKFish |
 Dec 9 2019, 07:36 PM Dec 9 2019, 07:36 PM
Post
#41
|
|
Newbie  Group: Members Posts: 29 Joined: 10-December 18 From: Nampa, Idaho Member No.: 22,714 Region Association: Rocky Mountains |
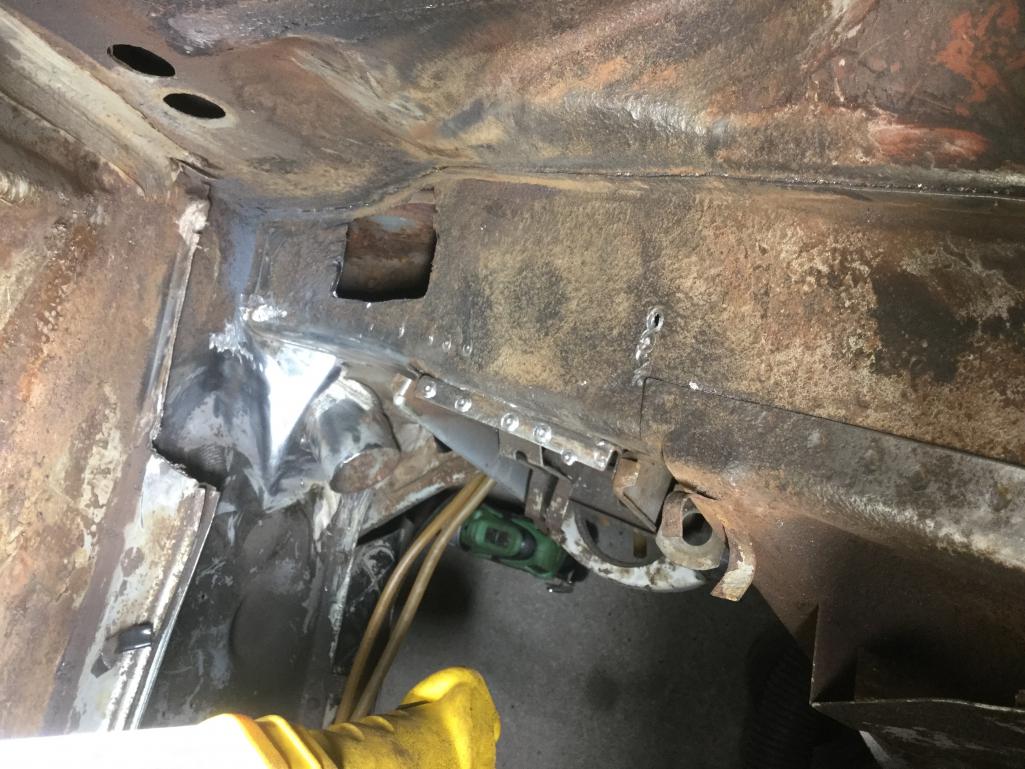
OK, enough “analysis paralysis”! Bought a grinder, some cutting wheels and a spot weld bit set and went to work. I removed the battery tray, rusted engine shelf and cut out the rusted holes on the hell hole ramp. This is double thickness sheet metal and I haven’t found a thread that addresses how to repair this correctly....do I cut two pieces of sheet metal to size and spot weld them together, then butt weld them in?
 |
   |

 
|
| AKFish |
Dec 9 2019, 07:45 PM
Post
#42
|
|
Newbie Group: Members Posts: 29 Joined: 10-December 18 From: Nampa, Idaho Member No.: 22,714 Region Association: Rocky Mountains |
Today I went digging around the jack post area....I clearly need to replace a 10” section of the outer long. I have seen some pretty masterful repairs done to this area, including sleeves etc...
Is it necessary to cut the quarter panel and or door jamb to make this repair? I’d like to make this car a nice safe driver, so whatever the right path is...I’m open to suggestions. Thanks very much! 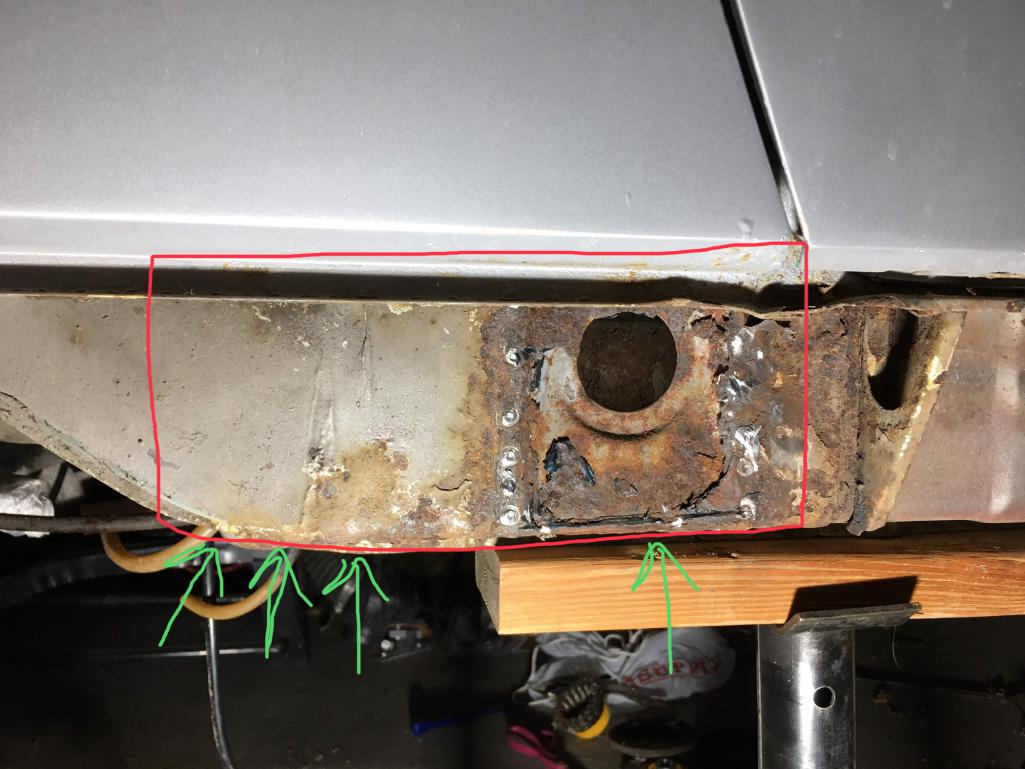 |
|
|
|
| rjames |
Dec 9 2019, 08:41 PM
Post
#43
|
|
I'm made of metal Group: Members Posts: 4,464 Joined: 24-July 05 From: Shoreline, WA Member No.: 4,467 Region Association: Pacific Northwest |
QUOTE(AKFish @ Dec 9 2019, 05:45 PM)  Today I went digging around the jack post area....I clearly need to replace a 10” section of the outer long. I have seen some pretty masterful repairs done to this area, including sleeves etc... Is it necessary to cut the quarter panel and or door jamb to make this repair? I’d like to make this car a nice safe driver, so whatever the right path is...I’m open to suggestions. Thanks very much! I'd remove just the outer skin of the area circled in red to see how the layer looks underneath, bracing the car first of course. No sense in cutting out metal if it turns out it's not bad. I'm betting you won't need to fully cut out both layers. |
|
|
|
| jmitro |
Dec 9 2019, 09:32 PM
Post
#44
|
|
Senior Member Group: Members Posts: 713 Joined: 23-July 15 From: Oklahoma Member No.: 18,986 Region Association: None |
I removed part of the rear quarter panel to repair my hellhole. It's not what I wanted to do, but I had much better access that way. You can see a lot of my repairs here:
http://www.914world.com/bbs2/index.php?sho...60933&st=40 I agree with the above recommendation to go layer by layer to see what is bad. You may be able to keep the inner sheetmetal and replace only the outer layer. Trouble is, it's very tedious and time consuming to dissect the car layer by layer |
|
|
|
| AKFish |
Dec 9 2019, 09:50 PM
Post
#45
|
|
Newbie Group: Members Posts: 29 Joined: 10-December 18 From: Nampa, Idaho Member No.: 22,714 Region Association: Rocky Mountains |
@jmitro your project is an impressive feat to be sure.
I guess I need to remove sill plate and cut away a section and see what’s going on in there. All of the rodent bedding nearly caught fire while I was cutting on the hell hole ramp... |
|
|
|
| AKFish |
Dec 9 2019, 10:17 PM
Post
#46
|
|
Newbie Group: Members Posts: 29 Joined: 10-December 18 From: Nampa, Idaho Member No.: 22,714 Region Association: Rocky Mountains |
QUOTE(rjames @ Dec 9 2019, 09:41 PM) QUOTE(AKFish @ Dec 9 2019, 05:45 PM) Today I went digging around the jack post area....I clearly need to replace a 10” section of the outer long. I have seen some pretty masterful repairs done to this area, including sleeves etc... Is it necessary to cut the quarter panel and or door jamb to make this repair? I’d like to make this car a nice safe driver, so whatever the right path is...I’m open to suggestions. Thanks very much! I'd remove just the outer skin of the area circled in red to see how the layer looks underneath, bracing the car first of course. No sense in cutting out metal if it turns out it's not bad. I'm betting you won't need to fully cut out both layers. @rjames thanks for the suggestion. Does this technique involve making very shallow cuts and “peeling” away the outer skin? Thanks again! |
|
|
|
| rjames |
Dec 9 2019, 11:50 PM
Post
#47
|
|
I'm made of metal Group: Members Posts: 4,464 Joined: 24-July 05 From: Shoreline, WA Member No.: 4,467 Region Association: Pacific Northwest |
Yes. I was in a similar situation. The outer layer around the jackpost on my car was bad, but I couldn’t tell if the rust went through to the inner layer. I used a Dremel with a small cutoff wheel to cut the outside layer away. I ended up only having to replace a small piece of the inner layer and a larger part of the outer. Luckily my repairs were pretty minor overall.
Link with a few pictures of my repairs. LongRepair |
|
|
|
| dlee6204 |
Dec 10 2019, 03:32 AM
Post
#48
|
|
Howdy Group: Members Posts: 2,162 Joined: 30-April 06 From: Burnsville, NC Member No.: 5,956 |
QUOTE(rjames @ Dec 10 2019, 12:50 AM) Yes. I was in a similar situation. The outer layer around the jackpost on my car was bad, but I couldn’t tell if the rust went through to the inner layer. I used a Dremel with a small cutoff wheel to cut the outside layer away. I ended up only having to replace a small piece of the inner layer and a larger part of the outer. Luckily my repairs were pretty minor overall. Link with a few pictures of my repairs. LongRepair (IMG:style_emoticons/default/agree.gif) This is typically how I approach repairs in this area. I always try to leave some of the inner structure in place and only replace if necessary. If it was double walled from the factory, you’ll want to repair it that way too. |
|
|
|
| bbrock |
Dec 10 2019, 08:22 AM
Post
#49
|
|
914 Guru Group: Members Posts: 5,269 Joined: 17-February 17 From: Montana Member No.: 20,845 Region Association: Rocky Mountains |
On double-walled repairs, I took two approaches. My preferred option was to cut the outer layer oversized so that the patch for the inner layer was smaller than the outer and weld the patches in separately. If the original layers were spot welded together at the patch location, I would punch the outer layer patch before butt welding it in so I could plug weld the patches together after the butt welding was done. That option may have been overkill, but I felt it got me closest to how the original structure was built.
Option 2 was done when there was not enough room for option 1, and was what you are thinking. Spot/plug weld the two layers of metal in the patch together and then butt weld them in as a unit. When I did that, I ground the edges of the openings and the patch to make a 'V' and made sure my welds were striking the bottom layers to make sure both layers of the patch were solidly butt welded to the structure. It does no good to install a double-layer patch if only the top layer is welded to the surrounding structure. Make sure you treat the rust inside those longs while you have them open. I sprayed the insides of my longs with phosphoric acid using a garden sprayer. After that sat for a day, I rinsed them out with water and very thoroughly dried them with a heat gun, making sure to bake all of the seams dry. My longs were opened wide so I followed the acid treatment with two coats of epoxy primer. After everything was welded shut again, I coated the internals with Eastwood Internal Frame Coating. Then after I had painted, I coated all the internals with 3M Cavity Wax Plus. Again, probably overkill but after all the rust I had seen, multiple belts and suspenders didn't seem so crazy. |
|
|
|
| AKFish |
Jan 29 2022, 08:58 PM
Post
#50
|
|
Newbie Group: Members Posts: 29 Joined: 10-December 18 From: Nampa, Idaho Member No.: 22,714 Region Association: Rocky Mountains |
Well, its been a little over two years since I updated this project….a few things have happened.
In October of 2020 we delivered the car to Cary at Middle Motors and in February 2021 he brought it back to Nampa (where we live). New drivers side floor pan, drivers side jack post and long repair, complete hell hole and passenger side long rustoration, as well as holes in trunk repaired and new frunk to complete the AC uninstall. Then I pressed pause for a year… Now…Along with finishing the engine bay, my next step is to determine what to do with the engine. I performed a compression test today and found the following results. #1 Cylinder 110 psi #2 Cylinder 90 psi #3 Cylinder 100 psi #4 Cylinder 110 psi The engine was pretty cold during this test. 17F. Not sure if that plays a role or not. Also, engine has not run for at least 5 years, but probably longer. Number 2 seems pretty low, so I did a basic leak down check on that cylinder. I checked the valve adjustment and at TDC and pressurized the cylinder to 100 psi. I cannot hear any air escaping from the intake or the exhaust. Maybe, possibly a slight audible hissing from the oil filler neck. Otherwise, it sure seemed to hold pretty well. The engine was supposedly removed from the car to repair oil leaks and it seems that there were a few. I am going to replace at a minimum, the following: 1. Oil cooler seals. 2. Front crank seal 3. Rear crank seal And anything else that appears to be leaking once its exposed… Any other advice on what to address “while I’m in there” would be deeply appreciated. I’ve read dozens and dozens of posts and watch all of Ian Karr’s videos multiple times, just don't want to miss anything. Thanks all! |
|
|
|
|
2 User(s) are reading this topic (2 Guests and 0 Anonymous Users)
0 Members:

|
Lo-Fi Version | Time is now: 30th June 2026 - 03:39 PM |
Invision Power Board
v9.1.4 © 2026 IPS, Inc.