|
|
|
Porsche, and the Porsche crest are registered trademarks of Dr. Ing. h.c. F. Porsche AG.
This site is not affiliated with Porsche in any way. Its only purpose is to provide an online forum for car enthusiasts. All other trademarks are property of their respective owners. |
|
|


| Montreal914 |
 Dec 22 2019, 01:53 PM Dec 22 2019, 01:53 PM
Post
#1
|
|
Senior Member  Group: Members Posts: 1,854 Joined: 8-August 10 From: Claremont, CA Member No.: 12,023 Region Association: Southern California |
After reading and reading some more, I finally decided a few months ago to challenge myself with a Microsquirt conversion. Many members here were very inspirational. (IMG:style_emoticons/default/smilie_pokal.gif) I want to thank the ones who have shared their builds and issues as they are very helpful. I hope my build can contribute to others and add to this wealth of information. I'm also aware that I might run into issues but that is part of the process.
First, a little background. A few years back I rebuilt my 2.0 due to a spun rod bearing on my last run of my first DE event with POC at Streets of Willows. (IMG:style_emoticons/default/driving.gif) While this was an unpleasant outcome, the day still remains a fantastic moment with my 914. (IMG:style_emoticons/default/smile.gif) I did the rebuild myself with all of the valuable information here. (IMG:style_emoticons/default/first.gif) I like to think that I did things right and the outcome is a fun 2056 with mild cam, D-Jet oblige, that I have enjoyed commuting with for many years and took along the coast all the way to Monterey four times, two of which were to attend the amazing Rennsport Reunion V and VI. (IMG:style_emoticons/default/pray.gif) One of the reasons I want to upgrade to a modern FI system is to be able to better tune the engine which is limited on the D-Jet, especially when engine displacement is increased as we know. This is the first step in my ultimate build which would be a 78x96 stroker engine. But that will be later. (IMG:style_emoticons/default/drooley.gif) So here we go! I bought my Microsquirt and crank trigger sensor sensor setup from Mario at the Dubshop. I like the way the trigger is engineered and it allows the installation of remote oil plumbing (full-er flow setup). Being on a very tight budget (I know this doesn't rimes with 914 anymore) I bought all my new individual components from ebay with matching pigtail connectors to build my own harness. VW waste spark coil pack GM 1 bar MAP sensor Hyundai (and others) TPS BMW ICV BMW air cooled motorcycle CHT sensor (used). Same M10 thread as the D-Jet CHT. I will be reusing: Stock green injectors, with additional resistors Stock IAT sensor I also bought new connectors and crimp terminals and boots for all reused stock components. To begin the build, I elected to prepare a development harness with extra wire length and build a bread board setup. This will allow me to make sure that all components are functioning. Once the engine is running, I will rebuild the harness with the proper wire length and sleeves to ensure a clean and reliable installation. Enough writing... On with what people want! Pictures (IMG:style_emoticons/default/biggrin.gif) Bread Board setup: 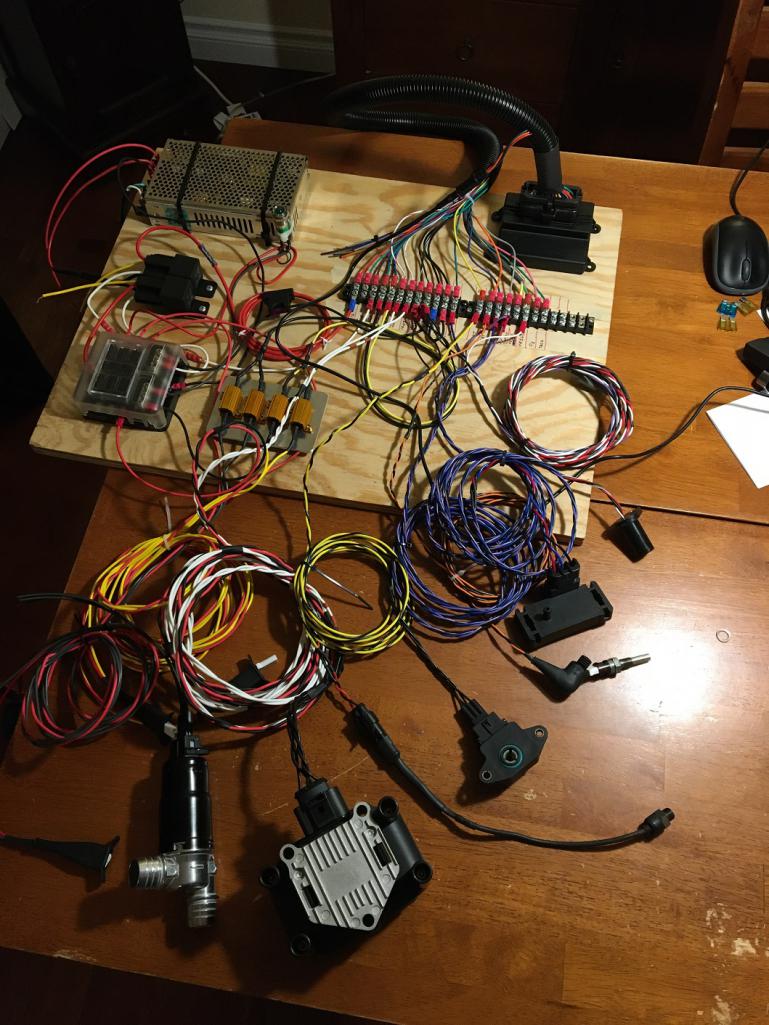 1 Bar GM MAP Sensor: 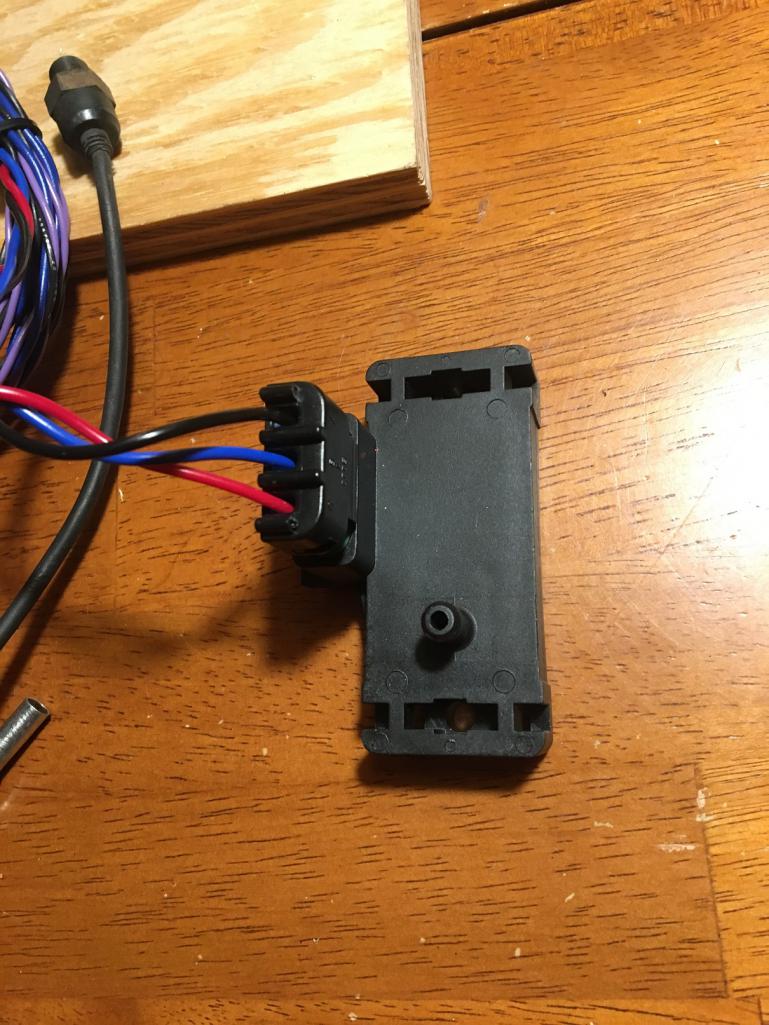 Resistance pack for low impedance green stock injectors. The resistances are not needed if you use modern high impedance injectors. 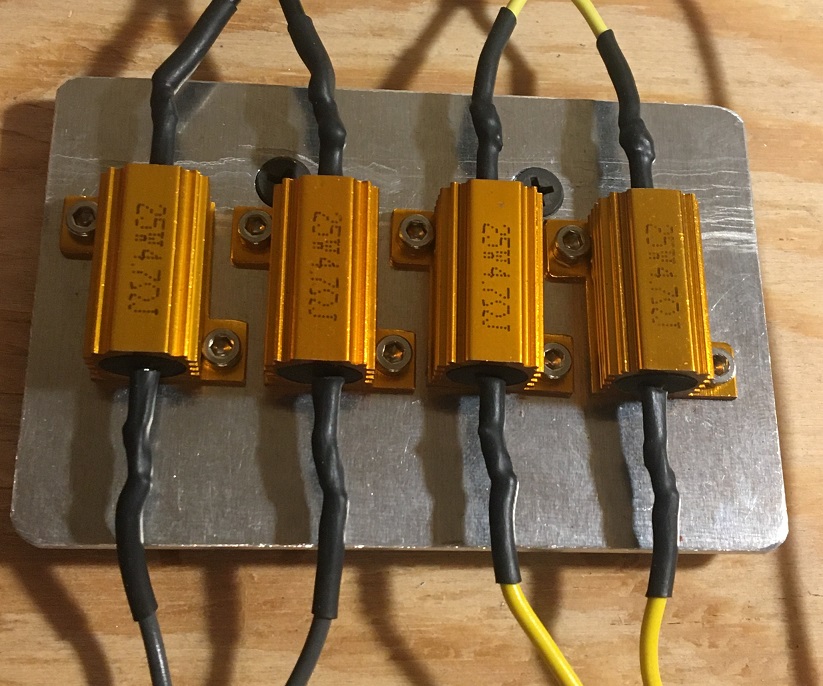 Used BMW Motorcycle Cylinder Head Temp sensor with M10 thread which will screw in the stock 2.0 head CHT location. 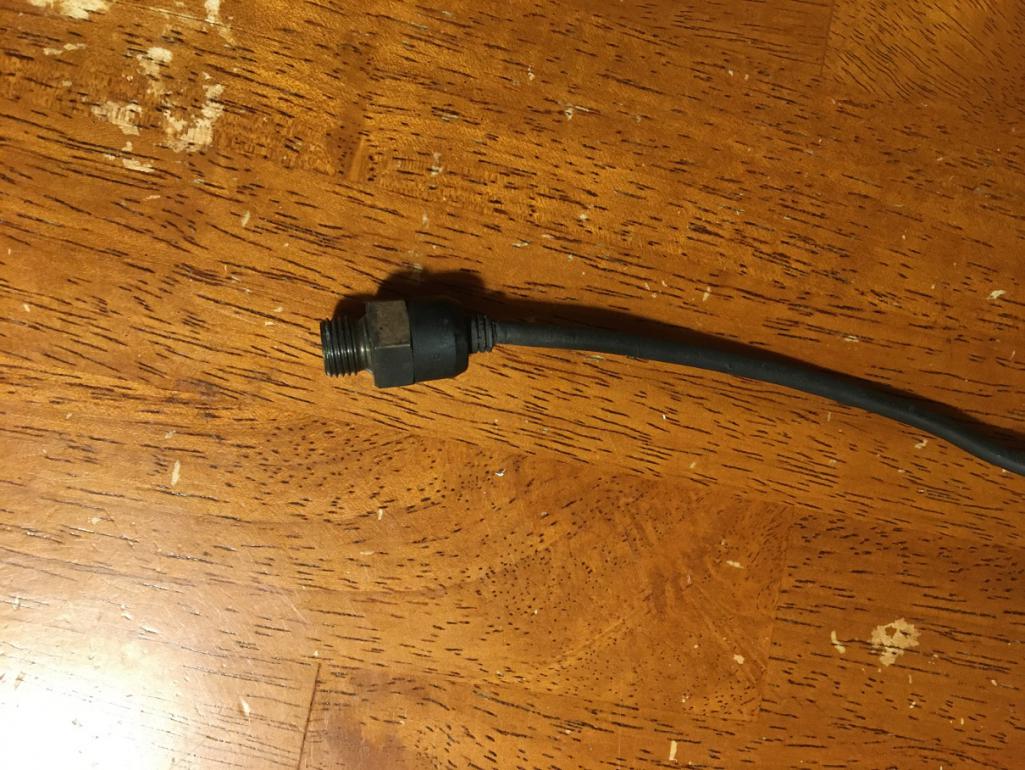 Throttle position switch compatible with the stock 914 throttle body with its 8mm D shape shaft. 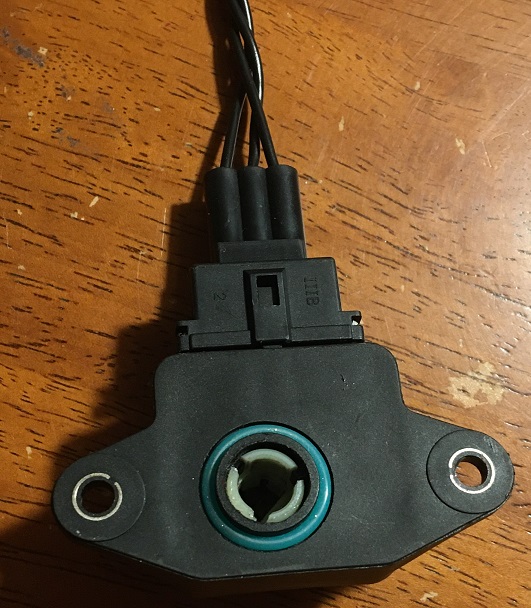 Stock intake air temp sensor with new crimp and connector: 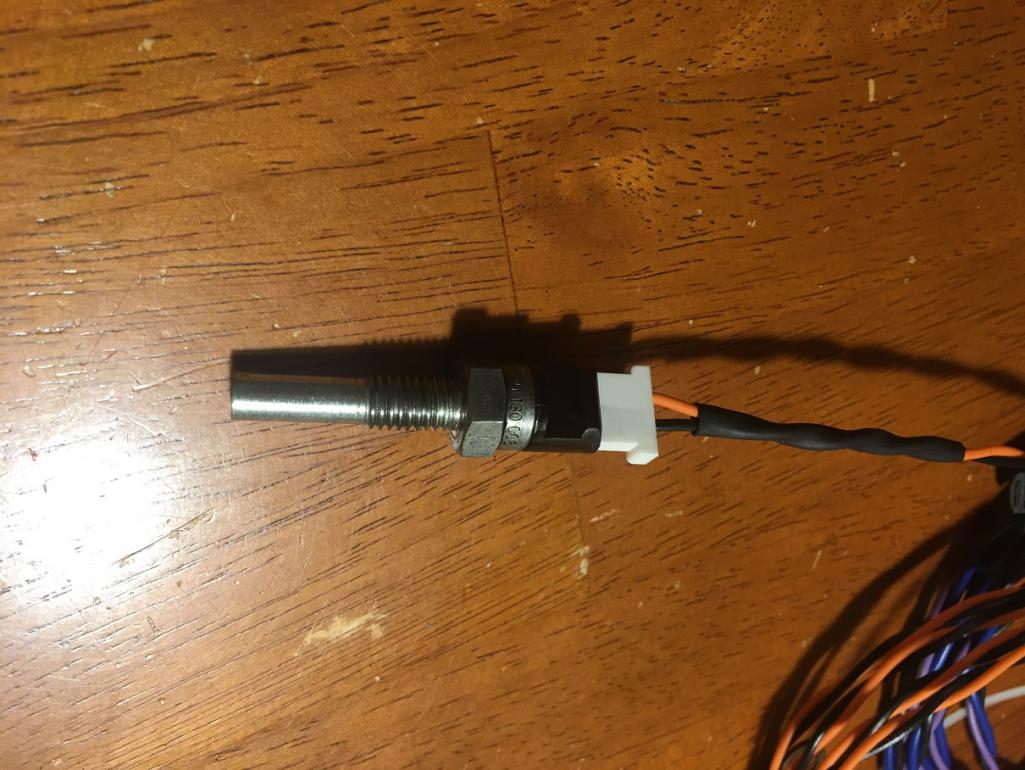 |
   |

 
|
  |
Replies(1 - 19)
| Montreal914 |
Dec 22 2019, 02:04 PM
Post
#2
|
|
Senior Member Group: Members Posts: 1,854 Joined: 8-August 10 From: Claremont, CA Member No.: 12,023 Region Association: Southern California |
The resistors, as per delivered directly from China, were not up to my standards as far as surface for thermal management. The aluminum mounting plate will act as supplementary cooling. So I sanded their base on a flat surface. I will use thermal paste between the resistors and aluminum mounting plate to ensure good thermal conductivity.
Before:  After: 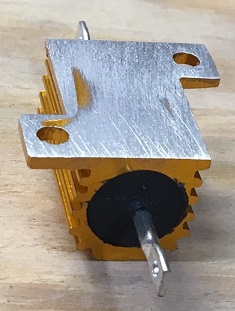 |
|
|
|
| jimkelly |
Dec 22 2019, 02:09 PM
Post
#3
|
|
Delaware USA Group: Members Posts: 4,969 Joined: 5-August 04 From: Delaware, USA Member No.: 2,460 Region Association: MidAtlantic Region |
looking sweet so far. (IMG:style_emoticons/default/popcorn[1].gif)
|
|
|
|
| Montreal914 |
Dec 22 2019, 02:28 PM
Post
#4
|
|
Senior Member Group: Members Posts: 1,854 Joined: 8-August 10 From: Claremont, CA Member No.: 12,023 Region Association: Southern California |
Here I am calibrating the intake air temp sensor. MS requires 3 data points to establish the sensor curve.
Easy way to do this: Room temperature resistance Boiling water resistance Cold water resistance. Using a K type thermocouple and a reader, I positionned the TC tip next to the sensor in the water (same depth). Interesting to see how the water isn't reaching the 100C mark at that level in the pot, even after a few minutes.   Same process for the cold water.  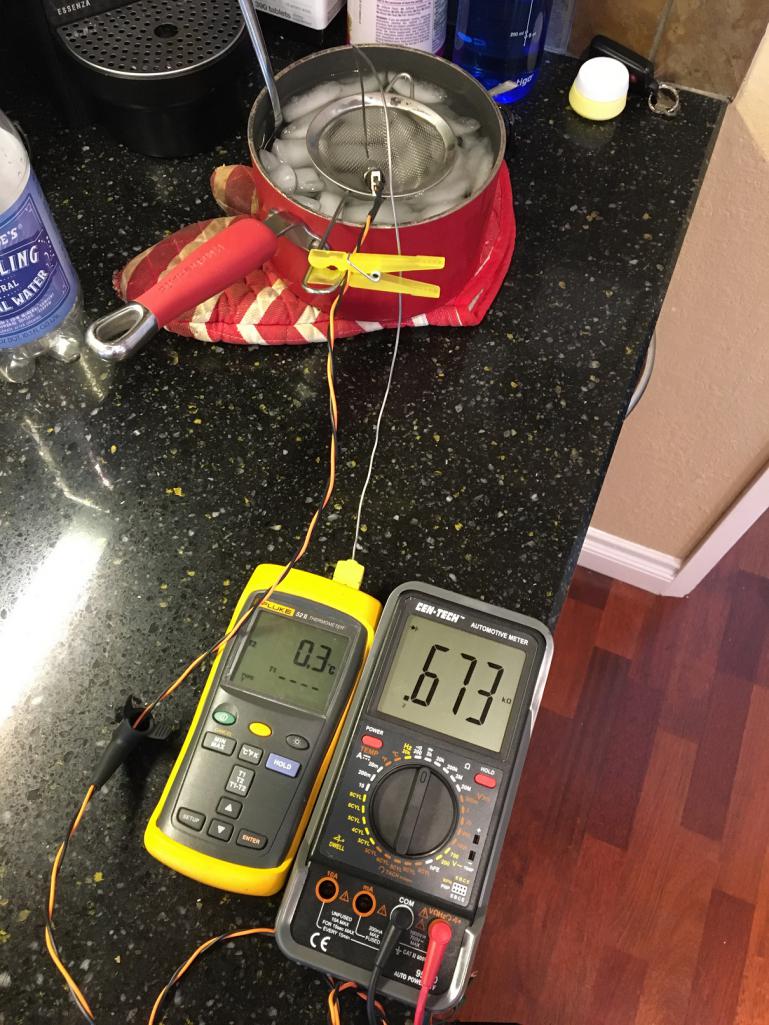 Same process was repeated with the BMW motorcycle CHT. Well, you get the idea... (IMG:style_emoticons/default/rolleyes.gif)  |
|
|
|
| Superhawk996 |
Dec 22 2019, 03:26 PM
Post
#5
|
|
914 Guru Group: Members Posts: 7,197 Joined: 25-August 18 From: Woods of N. Idaho Member No.: 22,428 Region Association: Galt's Gulch |
Curious, are you using the Dubshop Individual Throttle Bodies too or are you modifying to work with the stock plenum and runners?
That Dubshop ITB setup looks very promising but I have only seen one YouTube video of it on a 914 but it seemed to run nice. |
|
|
|
| Montreal914 |
Dec 22 2019, 03:31 PM
Post
#6
|
|
Senior Member Group: Members Posts: 1,854 Joined: 8-August 10 From: Claremont, CA Member No.: 12,023 Region Association: Southern California |
Moving on to the TPS bracket. As mentioned before, the TPS fits properly on the throttle body 8mm D shaped shaft, but it needs to be at the right angle, also the TB shaft is a little long.
So the bracket also needs to act as a spacer. One way around that could be to cut the butterfly shaft but I didn't want to do that. Another way would be to drill a hole in the TPS so that the shaft went through it. By design, the TPS is sealed, and I didn't want to change that, so no hole. Looking at the TPS, it was designed to be mounted on a flat surface, centered in a bore and sealed with the green O-ring. 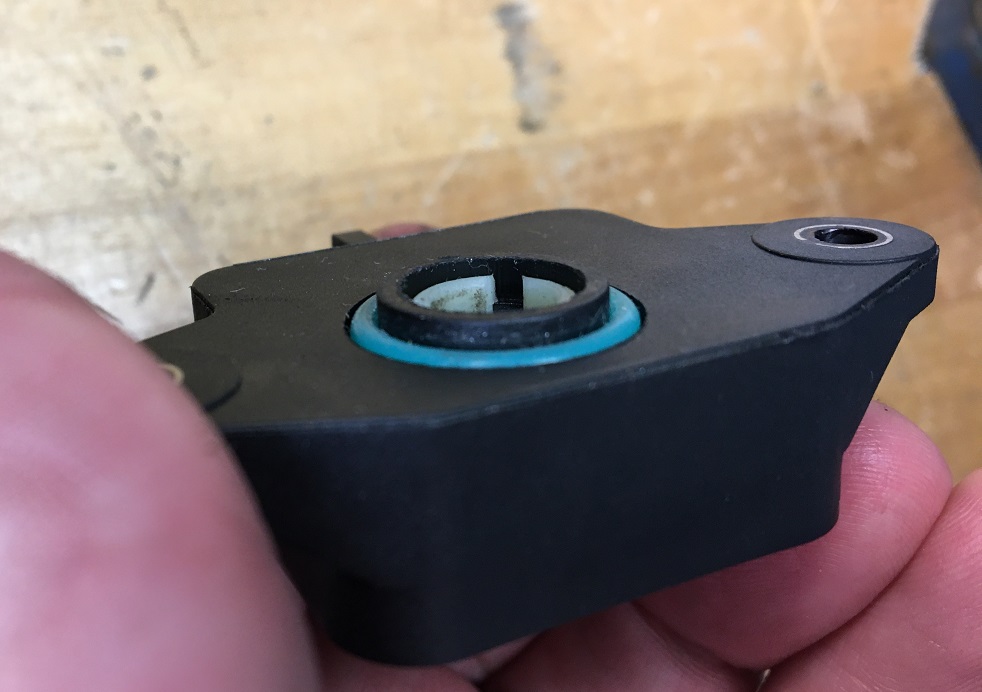 I started taking measurement and designing the bracket. Then using my Bridgeport milling machine (IMG:style_emoticons/default/rolleyes.gif) , I meant hack saw, step drill, HF hand drill and my trusted file, I prepared the bracket. (IMG:style_emoticons/default/smash.gif) 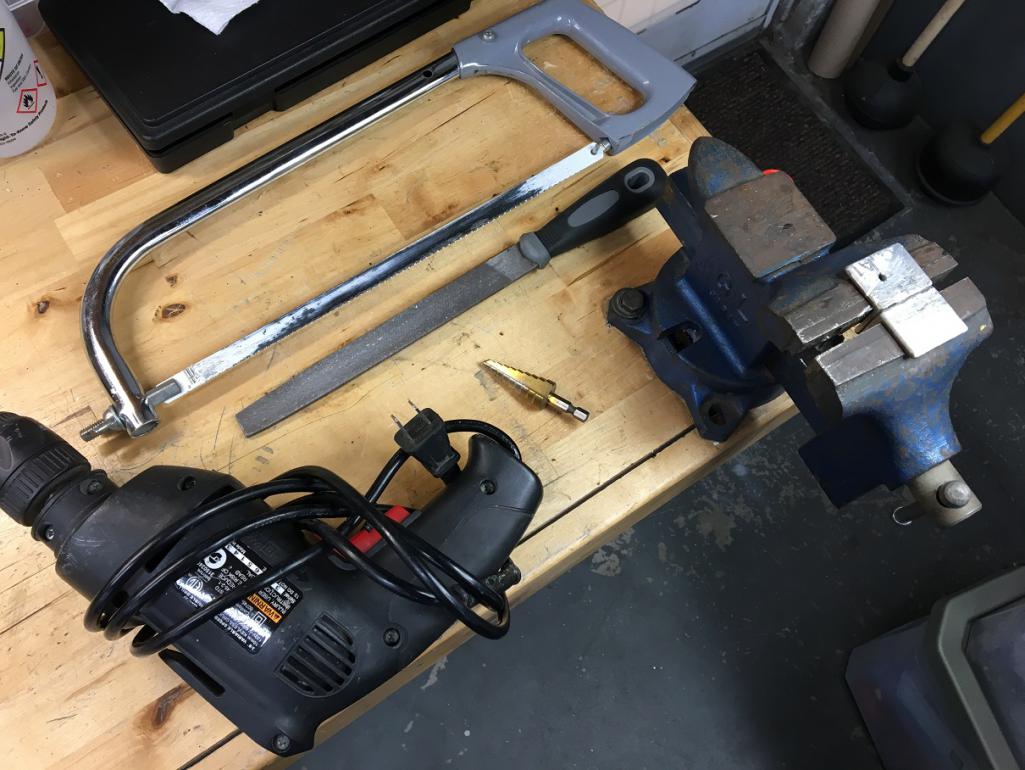 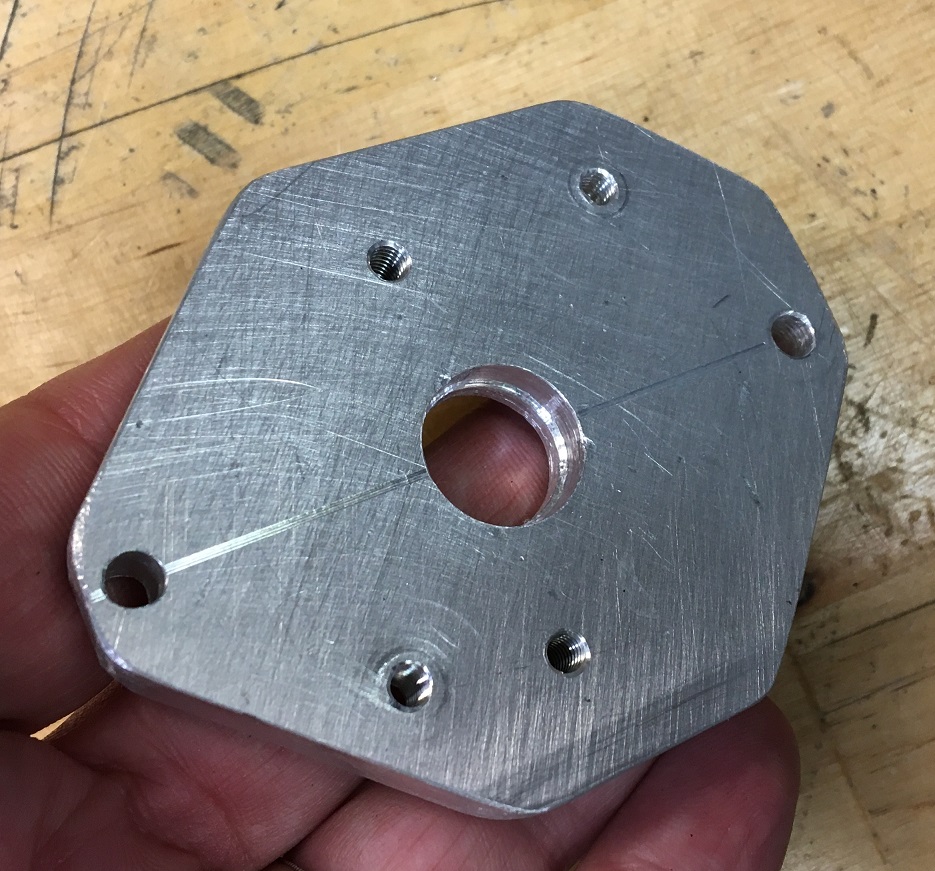 Luckily the step drill was the right dimension to center the TPS and offer the right surface for the o-ring to seal (IMG:style_emoticons/default/sunglasses.gif)  I installed the bracket on my mockup spare TB then push on the TPS centered on the bore. Holding the TPS, I opened and closed the butterfly to ensure the TPS had enough travel and was not reaching its limits before the butterfly did. Everything checked out good and there was even room for more travel. I centered the backlash of the TPS over the butterfly travel and mark my bracket to make the TPS mounting holes. Once tapped, the bracket was ready and fitted with metric screws. 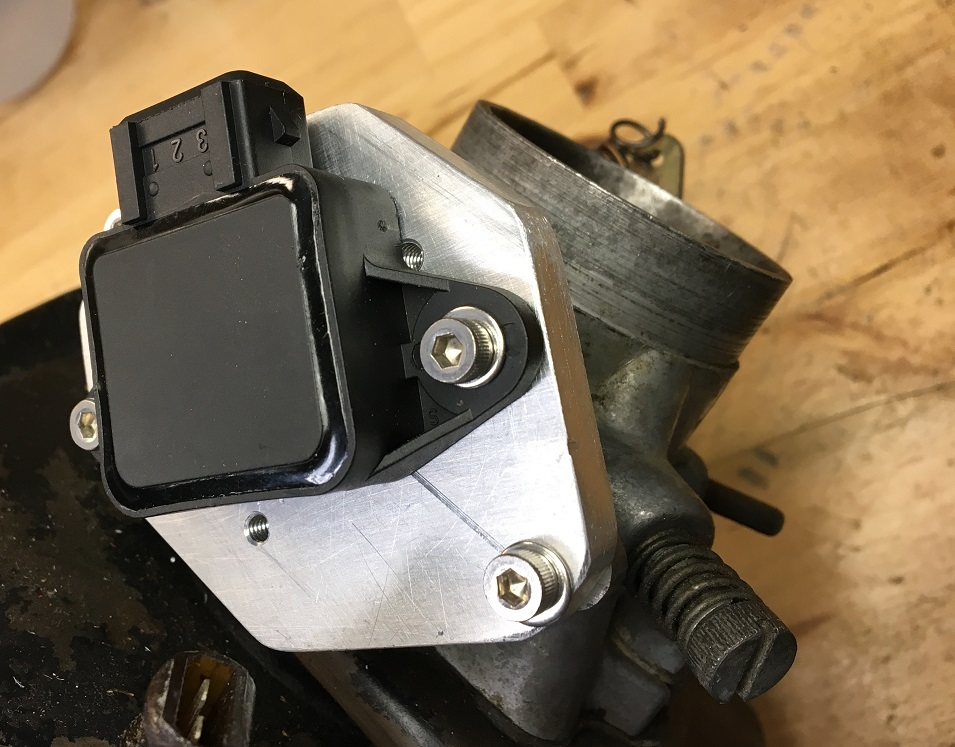 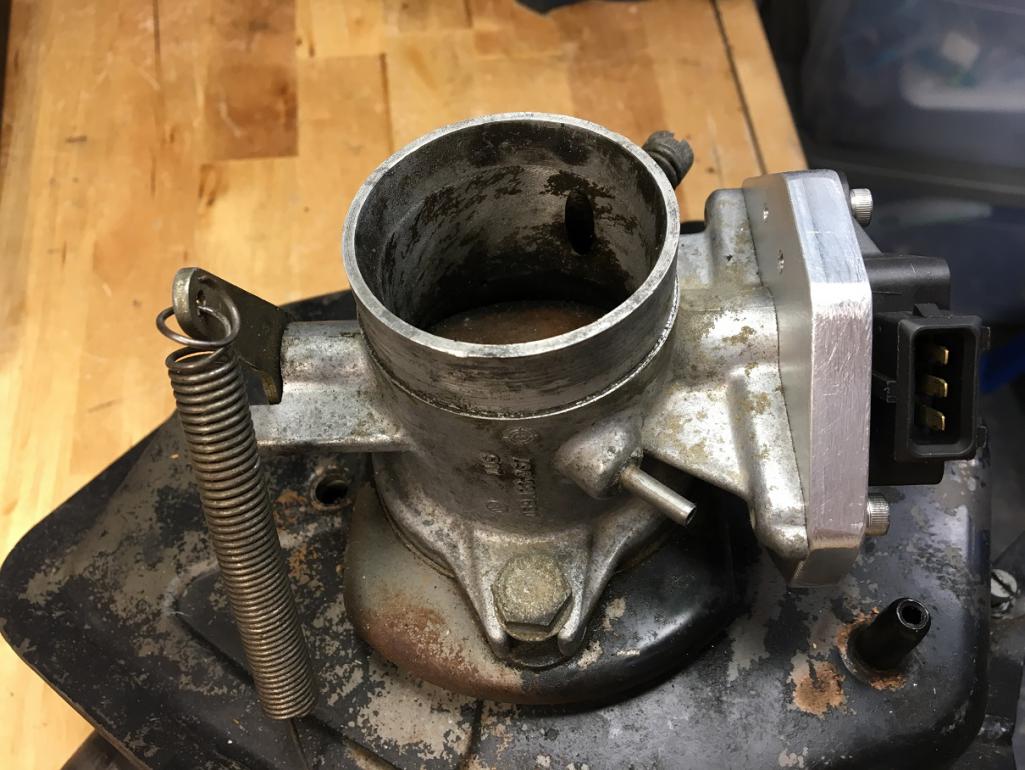 (IMG:style_emoticons/default/beer3.gif) |
|
|
|
| Montreal914 |
Dec 22 2019, 03:33 PM
Post
#7
|
|
Senior Member Group: Members Posts: 1,854 Joined: 8-August 10 From: Claremont, CA Member No.: 12,023 Region Association: Southern California |
QUOTE(Superhawk996 @ Dec 22 2019, 01:26 PM)  Curious, are you using the Dubshop Individual Throttle Bodies too or are you modifying to work with the stock plenum and runners? That Dubshop ITB setup looks very promising but I have only seen one YouTube video of it on a 914 but it seemed to run nice. This is a very limited funds build. I am reusing all of my D-Jet induction setup. TB, plenum, runners, injectors,... |
|
|
|
| Montreal914 |
Dec 22 2019, 03:40 PM
Post
#8
|
|
Senior Member Group: Members Posts: 1,854 Joined: 8-August 10 From: Claremont, CA Member No.: 12,023 Region Association: Southern California |
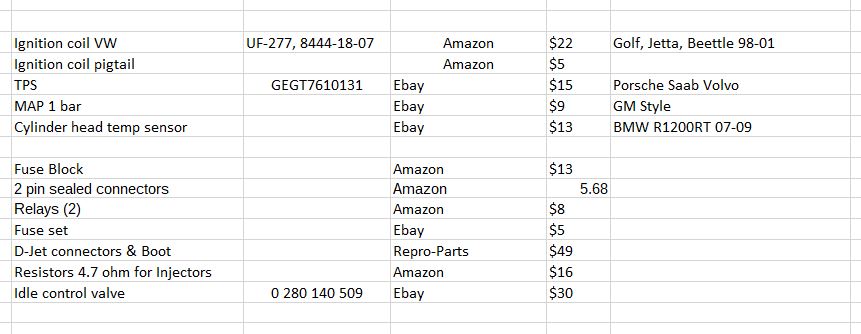
Here is a snapshot of my Excel spreadsheet. I obviously have all the receipts from my various purchases and will gladly share them if someone would like more info. (IMG:style_emoticons/default/beerchug.gif)
 |
|
|
|
| Superhawk996 |
Dec 22 2019, 04:23 PM
Post
#9
|
|
914 Guru Group: Members Posts: 7,197 Joined: 25-August 18 From: Woods of N. Idaho Member No.: 22,428 Region Association: Galt's Gulch |
QUOTE(Montreal914 @ Dec 22 2019, 04:31 PM) I started taking measurement and designing the bracket. Then using my Bridgeport milling machine (IMG:style_emoticons/default/rolleyes.gif) , I meant hack saw, step drill, HF hand drill and my trusted file, I prepared the bracket. (IMG:style_emoticons/default/smash.gif) (IMG:style_emoticons/default/smilie_pokal.gif) I like it. Far too many think you have to have the machine tools to do stuff. They are nice but not necessary. Great job making that bracket and making the TPS work with simple hand tools! |
|
|
|
| HansJan |
Dec 22 2019, 05:43 PM
Post
#10
|
|
Member Group: Members Posts: 401 Joined: 5-April 16 From: Sugar Land TX Member No.: 19,860 Region Association: Southwest Region |
95% of what is being said here is beyond my apprehension, but I totally love it. And its completely in the 914 spirit.
I can only dream about FI (not liking my carbs). Good luck with this, and please keep the thread updated. |
|
|
|
| 914werke |
Dec 22 2019, 07:22 PM
Post
#11
|
|
"I got blisters on me fingers" Group: Members Posts: 11,293 Joined: 22-March 03 From: USofA Member No.: 453 Region Association: Pacific Northwest |
QUOTE Used BMW Motorcycle CHT sensor w/ M10 thread which will screw in the stock 2.0 head location. Curious why did you go this way vs a new CHT & a new connector? Is there some advantage Im not seeing (IMG:style_emoticons/default/idea.gif) |
|
|
|
| KevinW |
Dec 22 2019, 08:19 PM
Post
#12
|
|
Newbie Group: Members Posts: 42 Joined: 25-May 15 From: Winona, Minnesota Member No.: 18,761 Region Association: Upper MidWest |
PM sent
|
|
|
|
| Montreal914 |
Dec 22 2019, 08:24 PM
Post
#13
|
|
Senior Member Group: Members Posts: 1,854 Joined: 8-August 10 From: Claremont, CA Member No.: 12,023 Region Association: Southern California |
QUOTE(914werke @ Dec 22 2019, 05:22 PM) QUOTE Used BMW Motorcycle CHT sensor w/ M10 thread which will screw in the stock 2.0 head location. Curious why did you go this way vs a new CHT & a new connector? Is there some advantage Im not seeing (IMG:style_emoticons/default/idea.gif) Which new CHT would you be referring to? (IMG:style_emoticons/default/confused24.gif) A stock CHT is grounded to the head which can cause issues with MS (from what I read). All sensor grounds must be connected to the MS sensor ground lead. So, you need a 2 wire thermistor sensor. The Dubshop makes one that screws on the surface but I preferred the BMW which can be installed in the stock D-Jet CHT location. I found the BMW motorcycle idea from ShopTalkForum. There is a good amount of information on MS stuff there. Hope this answers your question. (IMG:style_emoticons/default/beerchug.gif) |
|
|
|
| GregAmy |
Dec 23 2019, 06:16 AM
Post
#14
|
|
Advanced Member Group: Members Posts: 2,504 Joined: 22-February 13 From: Middletown CT Member No.: 15,565 Region Association: North East States |
What is the source/application of that TPS? And will that installation clear the stock air filter assembly?
|
|
|
|
| Mark Henry |
Dec 23 2019, 09:47 AM
Post
#15
|
|
that's what I do! Group: Members Posts: 20,065 Joined: 27-December 02 From: Port Hope, Ontario Member No.: 26 Region Association: Canada |
QUOTE(Montreal914 @ Dec 22 2019, 04:40 PM) Here is a snapshot of my Excel spreadsheet. I obviously have all the receipts from my various purchases and will gladly share them if someone would like more info. (IMG:style_emoticons/default/beerchug.gif) Could you post all expenses including the MS, wiring, etc. |
|
|
|
| ChrisFoley |
Dec 23 2019, 11:30 AM
Post
#16
|
|
I am Tangerine Racing Group: Members Posts: 7,990 Joined: 29-January 03 From: Bolton, CT Member No.: 209 Region Association: None |
Really interested in following this as I have a customer 2L car here that may get Microsquirt as part of the engine upgrade.
|
|
|
|
| JeffBowlsby |
Dec 23 2019, 11:39 AM
Post
#17
|
|
914 Wiring Harnesses & Beekeeper Group: Members Posts: 8,967 Joined: 7-January 03 From: San Ramon CA Member No.: 104 Region Association: None |
QUOTE Could you post all expenses including the MS, wiring, etc. And please track/post your time committed to this endeavor. Maybe categorize it as: -fabrication/assembly -tuning |
|
|
|
| JamesM |
Dec 23 2019, 05:31 PM
Post
#18
|
|
Advanced Member Group: Members Posts: 2,094 Joined: 6-April 06 From: Kearns, UT Member No.: 5,834 Region Association: Intermountain Region |
QUOTE(Montreal914 @ Dec 22 2019, 02:33 PM) QUOTE(Superhawk996 @ Dec 22 2019, 01:26 PM) Curious, are you using the Dubshop Individual Throttle Bodies too or are you modifying to work with the stock plenum and runners? That Dubshop ITB setup looks very promising but I have only seen one YouTube video of it on a 914 but it seemed to run nice. This is a very limited funds build. I am reusing all of my D-Jet induction setup. TB, plenum, runners, injectors,... For a 2056 with mild cam I feel this is the preferred way to go for pretty much every reason. ITBs on that motor are more cons than pros. You will probably wind up wanting them when you go to a 2.2 though. Personally there are a couple minor differences I prefer in my builds but given your goals and sticking to a tight budget I think you are pretty spot-on with your choices here. Could have saved a little money, fabrication, and tuning effort by keeping the stock Aux air regulator (or deleting that air circuit completely) instead of a programmable ICV. I suspect you will find it unnecessary, especially given your location, but no harm in eliminating one more 50 year old mechanical part. |
|
|
|
| JamesM |
Dec 23 2019, 06:00 PM
Post
#19
|
|
Advanced Member Group: Members Posts: 2,094 Joined: 6-April 06 From: Kearns, UT Member No.: 5,834 Region Association: Intermountain Region |
Another thing i should add.... Before you get to far you may want to consider adding a 2nd MAP sensor to your build for real time barometric correction. Its a minor addition but you are going to want it if you ever head up any passes.
Also, didnt see it mentioned anywhere in your list but you are going to want a Wideband O2 sensor in there as well. Its false economy to not have one. |
|
|
|
| Montreal914 |
Dec 23 2019, 11:12 PM
Post
#20
|
|
Senior Member Group: Members Posts: 1,854 Joined: 8-August 10 From: Claremont, CA Member No.: 12,023 Region Association: Southern California |
I will try to answer all the questions but before I would like to say that I am flattered by the interest and the comments shared by the knowledgeable and highly respected members here. (IMG:style_emoticons/default/pray.gif)
I will try to do this in order... @GregAmy : Source eBay, Bosch knockoff used on Volvo, Saab, Porsche. P/N GEGT610131, $13.34 including the pigtail connector. Clearance with air filter, a picture = 1000 words 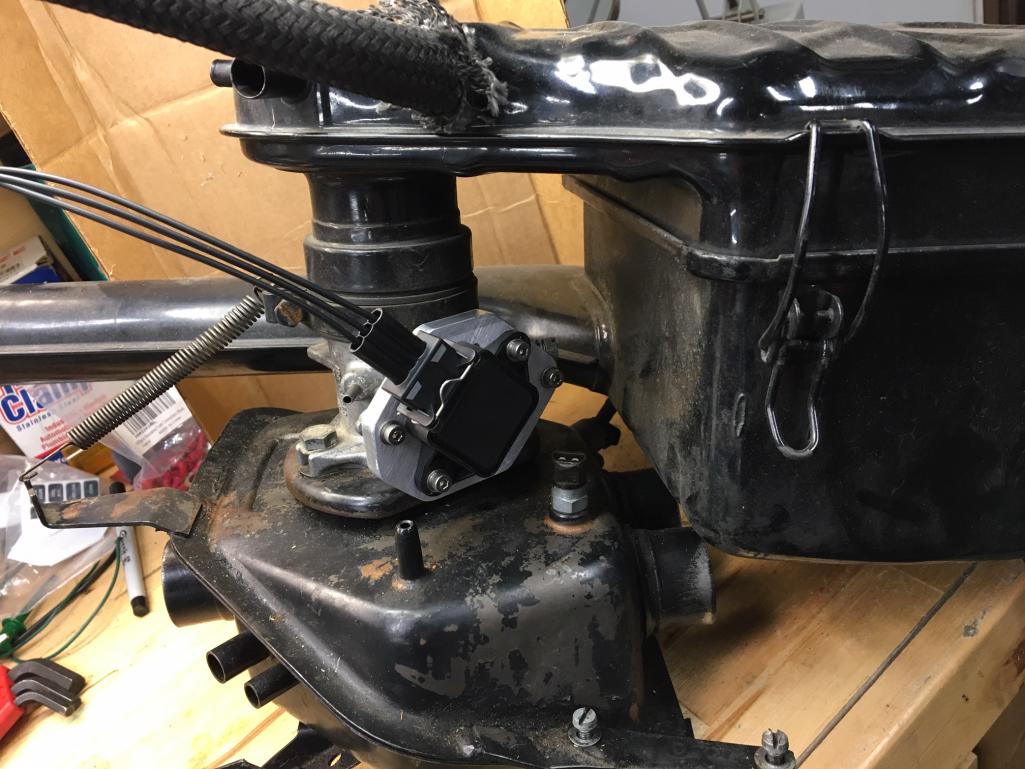 @MarkHenry: (Don't remember how to ping someone with the @ and space in username...) This is all I have purchased so far. The rest, I had accumulated over the years (wires, transformer for breadboard setup). I also already have an AFR gauge on the car that I will reuse. 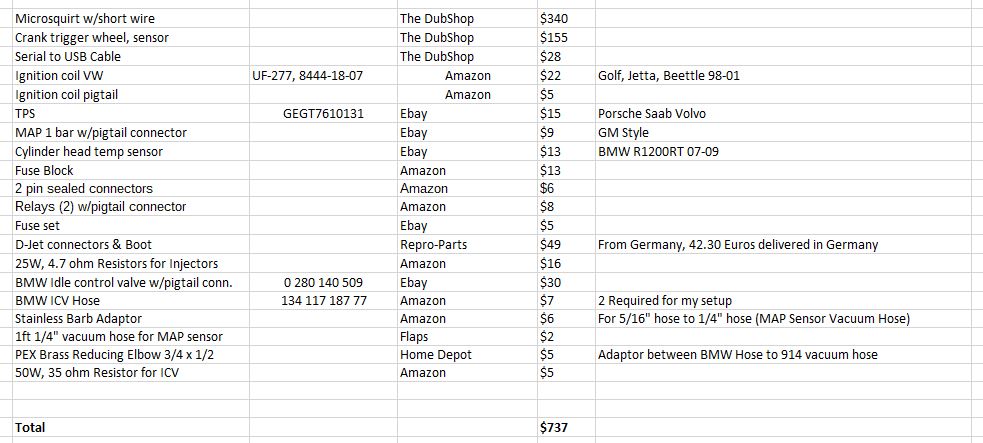 @JeffBowlsby : It would be very difficult to track time because I have been reading about MS conversion for about 2-3 years and I will still need to read more as I go along. For me, this is not about time spent, it's about the journey... (IMG:style_emoticons/default/biggrin.gif) @JamesM : Thank you for commenting, I highly value your input on the MS. (IMG:style_emoticons/default/beerchug.gif) Based on what you said, I will not use the ICV in the beginning. check. I will order a second MAP immediately. check. I already have an AEM wideband O2 sensor that I bought and installed when I built my 2056. Since I have SS heat exchangers and a banana muffler, its location is far from ideal. It's in the tailpipe as close to the muffler as possible... (IMG:style_emoticons/default/dry.gif) 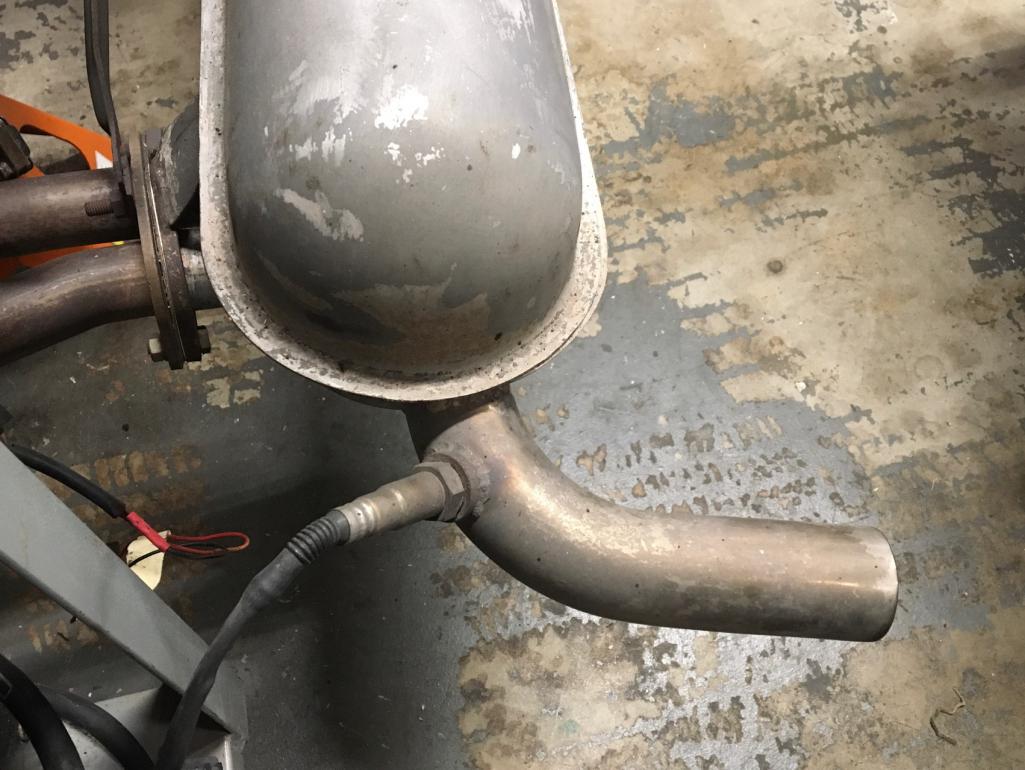 |
|
|
|
|
1 User(s) are reading this topic (1 Guests and 0 Anonymous Users)
0 Members:

|
Lo-Fi Version | Time is now: 3rd July 2025 - 12:15 AM |
Invision Power Board
v9.1.4 © 2025 IPS, Inc.