|
|
|
Porsche, and the Porsche crest are registered trademarks of Dr. Ing. h.c. F. Porsche AG.
This site is not affiliated with Porsche in any way. Its only purpose is to provide an online forum for car enthusiasts. All other trademarks are property of their respective owners. |
|
|

  |

| jaredmcginness |
 May 10 2020, 06:34 PM May 10 2020, 06:34 PM
Post
#141
|
|
...  Group: Members Posts: 510 Joined: 12-June 19 From: Baltimore Member No.: 23,209 Region Association: MidAtlantic Region |
Ok fun stuff.
Fitting the door panels I made: (IMG:http://www.914world.com/bbs2/uploads_offsite/i.imgur.com-23209-1589157282.1.jpg) You might note the handle. '73 RSR style. Welded nuts behind the door frame. (IMG:http://www.914world.com/bbs2/uploads_offsite/i.imgur.com-23209-1589157283.2.jpg) Laying the vinyls together. 1/8th" foam backing. (IMG:http://www.914world.com/bbs2/uploads_offsite/i.imgur.com-23209-1589157283.3.jpg) Sewn and adhesed (? Still don't know this word... I will always type it wrong...) adhered. (IMG:http://www.914world.com/bbs2/uploads_offsite/i.imgur.com-23209-1589157283.4.jpg) Gotta say I had thrown a few F bombs around while making these. The vinyl on top gets tacky in about -1 second and sticks in about 1 millisecond. (IMG:style_emoticons/default/rolleyes.gif) Freakin EYEROLL. If you try and pull it up to reapply, it destroys the foam underneath. Better than no panel right? I gotta try and think if I bought the car like this would I be worried right away? Not at all... Just want it to be top tier with all the effort. Total on materials for the panels is $58.00. Cheaper than any on the classifieds! (IMG:http://www.914world.com/bbs2/uploads_offsite/i.imgur.com-23209-1589157283.5.jpg) Here I have added the tartan seats and installed the rear window. (IMG:http://www.914world.com/bbs2/uploads_offsite/i.imgur.com-23209-1589157283.6.jpg) More photos. (IMG:http://www.914world.com/bbs2/uploads_offsite/i.imgur.com-23209-1589157283.7.jpg) (IMG:http://www.914world.com/bbs2/uploads_offsite/i.imgur.com-23209-1589157283.8.jpg) Carpeted firewall looks damn good! (IMG:http://www.914world.com/bbs2/uploads_offsite/i.imgur.com-23209-1589157283.9.jpg) Still... a lot of things accomplished this weekend. Window, floor vinyl, carpet etc. Next is dash. 5 Lug swap should be shipping from PMB Performance mid next week! |
   |

 
|
| jaredmcginness |
May 13 2020, 06:42 AM
Post
#142
|
|
... Group: Members Posts: 510 Joined: 12-June 19 From: Baltimore Member No.: 23,209 Region Association: MidAtlantic Region |
Hey guys,
Criticism is always welcome here. I still plan to redo the top vinyl on the door panels. Some time... Last couple days I added Dash Top, Lower dash, Windshield seal, Main Targa seal, back glass. A few pain in the butt items! I almost forgot those two pesky dash nuts behind the gauge cluster. I will never understand the idea behind the placement of those! (IMG:http://www.914world.com/bbs2/uploads_offsite/i.imgur.com-23209-1589373732.1.jpg) (IMG:http://www.914world.com/bbs2/uploads_offsite/i.imgur.com-23209-1589373732.2.jpg) Dashboard vinyl. Easy project with the windscreen out. (IMG:http://www.914world.com/bbs2/uploads_offsite/i.imgur.com-23209-1589373732.3.jpg) Here's a throw back to last June. The day I bought the car. Ashamed to say I was even "proud" to have it then. I had a vision for what it could be! (IMG:http://www.914world.com/bbs2/uploads_offsite/i.imgur.com-23209-1589373733.4.jpg) (IMG:http://www.914world.com/bbs2/uploads_offsite/i.imgur.com-23209-1589373733.5.jpg) Feels fantastic to sit in there and close the door to a nice THUD. Nice and quiet (even without the front glass) I think this is a respectable interior so far! Even smells like fresh vinyl too. Thanks for reading. |
|
|
|
| kroelofsen |
May 13 2020, 07:10 AM
Post
#143
|
|
Member Group: Members Posts: 102 Joined: 27-June 19 From: The Netherlands Member No.: 23,255 Region Association: Europe |
(IMG:style_emoticons/default/piratenanner.gif) Nice work...! Looks great!
|
|
|
|
| Cairo94507 |
May 13 2020, 07:16 AM
Post
#144
|
|
Michael Group: Members Posts: 10,675 Joined: 1-November 08 From: Auburn, CA Member No.: 9,712 Region Association: Northern California |
Amazing progress. You will be driving before you know it. (IMG:style_emoticons/default/beerchug.gif)
|
|
|
|
| bbrock |
May 13 2020, 07:33 AM
Post
#145
|
|
914 Guru Group: Members Posts: 5,269 Joined: 17-February 17 From: Montana Member No.: 20,845 Region Association: Rocky Mountains |
Fantastic work in record time (IMG:style_emoticons/default/cheer.gif) I think you had the mother of all cracked dashes. Almost artistic in its own way.
I learned those dash nuts under the instrument pod are not a problem at all when installing the dash with the subframe out of the car and on a bench the way the factory probably did. Installing them with the dash in the car is a real f-bomb factory. Nice work! |
|
|
|
| BeatNavy |
May 13 2020, 07:34 AM
Post
#146
|
|
Certified Professional Scapegoat Group: Members Posts: 2,965 Joined: 26-February 14 From: Easton, MD Member No.: 17,042 Region Association: MidAtlantic Region |
Wow, that dashtop was a disaster! (IMG:style_emoticons/default/barf.gif) And now everything looks great!
You removed the center dash vent you had. Did you want to account for that with the top vinyl? |
|
|
|
| jaredmcginness |
May 13 2020, 07:43 AM
Post
#147
|
|
... Group: Members Posts: 510 Joined: 12-June 19 From: Baltimore Member No.: 23,209 Region Association: MidAtlantic Region |
QUOTE(bbrock @ May 13 2020, 09:33 AM)  Almost artistic in its own way. . Installing them with the dash in the car is a real f-bomb factory. Nice work! I agree artistic. Maybe good for the garage wall, but at the time i had no problem stomping it into a trashbag. F-bomb factory it was! (IMG:style_emoticons/default/biggrin.gif) QUOTE(BeatNavy @ May 13 2020, 09:34 AM) You removed the center dash vent you had. Did you want to account for that with the top vinyl? I used a block off plate, sealer and hvac aluminum tape on the outside. I don't see it being an issue down the road. Thanks so much guys! |
|
|
|
| jaredmcginness |
May 17 2020, 06:28 PM
Post
#148
|
|
... Group: Members Posts: 510 Joined: 12-June 19 From: Baltimore Member No.: 23,209 Region Association: MidAtlantic Region |
Hey ladies,
I got some good work accomplished this week. A lot of simple small jobs. Here's the cliff notes. We pressed the glass in. No breaks! Pretty proud of that. I used the 914rubber "Rubber Windshield seal" that goes in place of the chrome. I like it more.... less chrome is good for me. New Main Targa seal as well. Fresh. (IMG:http://www.914world.com/bbs2/uploads_offsite/i.imgur.com-23209-1589761720.1.jpg) Finished my engine shelf, battery tray, paint, etc. (IMG:http://www.914world.com/bbs2/uploads_offsite/i.imgur.com-23209-1589761720.2.jpg) Totally respectable, IMO. (IMG:http://www.914world.com/bbs2/uploads_offsite/i.imgur.com-23209-1589762278.1.jpg) Finished up the driver's side door jamb: (IMG:http://www.914world.com/bbs2/uploads_offsite/i.imgur.com-23209-1589761721.4.jpg) Added the rest of the interior trim and a vinyl strip I made for the rear window to carpet transition: (IMG:http://www.914world.com/bbs2/uploads_offsite/i.imgur.com-23209-1589761721.5.jpg) I replaced all of the shifter bushings.... this was easy.... because there were not any bushings to replace! 3 of 4 were missing! I was going to say... when I first tried out the gears, I couldn't imagine the tail shift was THAT bad. ha! Example: Nothing there. (IMG:http://www.914world.com/bbs2/uploads_offsite/i.imgur.com-23209-1589761721.6.jpg) Also purchased this great Personal Shift knob from @literati914 . Love it: (IMG:http://www.914world.com/bbs2/uploads_offsite/i.imgur.com-23209-1589761721.7.jpg) Added sail vinyl on both sides: (IMG:http://www.914world.com/bbs2/uploads_offsite/i.imgur.com-23209-1589761721.8.jpg) Interior as it sits now: (IMG:http://www.914world.com/bbs2/uploads_offsite/i.imgur.com-23209-1589761721.9.jpg) Come a seriously long way! Thanks for reading. |
|
|
|
| bkrantz |
May 17 2020, 09:18 PM
Post
#149
|
|
914 Guru Group: Members Posts: 8,722 Joined: 3-August 19 From: SW Colorado Member No.: 23,343 Region Association: Rocky Mountains |
Give us another photo of your white board!
|
|
|
|
| ndfrigi |
May 17 2020, 11:44 PM
Post
#150
|
|
Advanced Member Group: Members Posts: 2,983 Joined: 21-August 11 From: Orange County Member No.: 13,474 Region Association: Southern California |
Nice work! still like those seats you got after removing the corduroy cover. Really match my 74 Bahia Red.
Regarding the engine mount bar, are you keeping that tranny mount instead of the stock bracket type? bdstone or 914rubber has them. 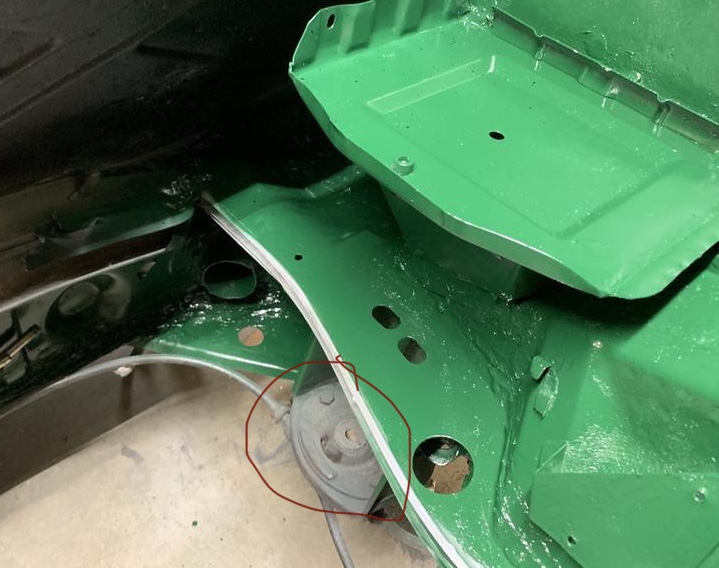 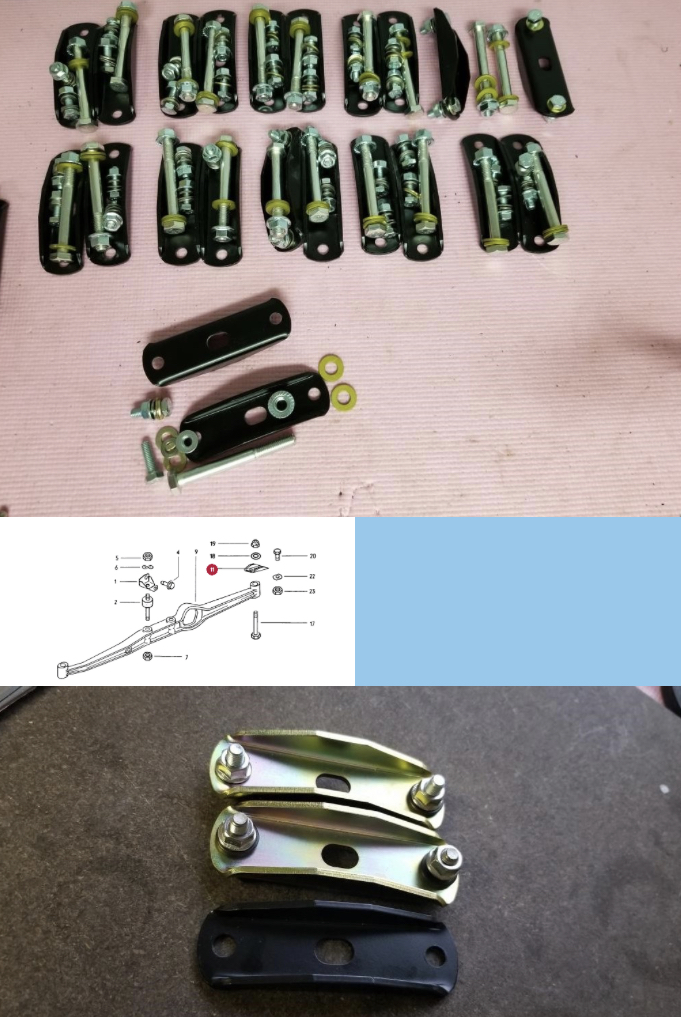 |
|
|
|
| jaredmcginness |
May 18 2020, 04:41 AM
Post
#151
|
|
... Group: Members Posts: 510 Joined: 12-June 19 From: Baltimore Member No.: 23,209 Region Association: MidAtlantic Region |
QUOTE(bkrantz @ May 17 2020, 11:18 PM) Give us another photo of your white board! @bkrantz I was thinking the same and already snapped a photo! (IMG:http://www.914world.com/bbs2/uploads_offsite/i.imgur.com-23209-1589798462.1.jpg) To be fair, I should probably make another one, there will be a decent sized list of engine stuff, little linkage, soft fuel lines, brake lines, master cyl, adjustments etc. Great to see so many checks though. QUOTE(ndfrigi @ May 18 2020, 01:44 AM) Thanks! Regarding the engine mount bar, are you keeping that tranny mount instead of the stock bracket type? bdstone or 914rubber has them. I have to say I am a bit confused here @ndfrigi , do I have the wrong mount here? If it should be the straight bracket type you have pictured, I'll make sure to order one and get it in there. Not sure why it would have the wrong style. Seemed to bolt up okay when I removed the motor. Always something to knock out (IMG:style_emoticons/default/ar15.gif) EDIT: I found a quote from @Dr914 on the samba "the round mounts with the rubber insert that fit in this position are for the 70-72 914-4 models" So potentially this round style came in early 4 cars. |
|
|
|
| BeatNavy |
May 18 2020, 05:09 AM
Post
#152
|
|
Certified Professional Scapegoat Group: Members Posts: 2,965 Joined: 26-February 14 From: Easton, MD Member No.: 17,042 Region Association: MidAtlantic Region |
You have the correct mount for early cars.
|
|
|
|
| twistedstang |
May 18 2020, 05:22 AM
Post
#153
|
|
Member Group: Members Posts: 229 Joined: 9-January 06 From: Port Huron, MI Member No.: 5,395 Region Association: None |
Looking good. I love those seats against the green!
|
|
|
|
| Tbrown4x4 |
May 18 2020, 06:34 AM
Post
#154
|
|
Senior Member Group: Members Posts: 708 Joined: 13-May 14 From: Port Orchard, WA Member No.: 17,338 Region Association: None |
You have the early mounts. The later cars had the rubber mounts on the engine, and the solid mounts to the outer ends of the bar.
I always thought it made more sense to have the rubber mounts farther apart, but I'm no engineer. *edit* How long did I take to post this? I must have been working instead of posting! haha |
|
|
|
| ndfrigi |
May 18 2020, 11:37 AM
Post
#155
|
|
Advanced Member Group: Members Posts: 2,983 Joined: 21-August 11 From: Orange County Member No.: 13,474 Region Association: Southern California |
Oooops never seen on my previous 2 early 914 I’ve owned with that mount but probably because bought are converted to side shift. I guess it still work for side shift conversion.
Learned another thing about this 914. |
|
|
|
| jaredmcginness |
May 20 2020, 03:30 PM
Post
#156
|
|
... Group: Members Posts: 510 Joined: 12-June 19 From: Baltimore Member No.: 23,209 Region Association: MidAtlantic Region |
Hey Guys,
Took a couple days off work, while we are getting some of our main machines repaired. So I might as well work on the car... Today's update is more of a question to see how F***ked I am. I bought this 1.7 off a 914 guy up in Philly last year. He said its a really nice runner, no leaks. He said he put the gummy carb on there and kept the duals it had for himself... So I finally get around to taking the tins off - I was going to clean it up. Get rid of the tacky red on the tins, new belt, plugs, wires, etc. They were sprayed while on the motor. Over spray all over the place. (IMG:style_emoticons/default/screwy.gif) (IMG:http://www.914world.com/bbs2/uploads_offsite/i.imgur.com-23209-1590010245.1.jpg) This half looks OK... besides the loose spark plug I found. Aftermarket valve cover? So someone has been in here before. (IMG:http://www.914world.com/bbs2/uploads_offsite/i.imgur.com-23209-1590010246.2.jpg) (IMG:http://www.914world.com/bbs2/uploads_offsite/i.imgur.com-23209-1590010246.3.jpg) Other half looks like dog crap. (IMG:style_emoticons/default/headbang.gif) (IMG:http://www.914world.com/bbs2/uploads_offsite/i.imgur.com-23209-1590010246.4.jpg) Was jammed full of leaves, feathers and gunk. No way this thing cooled right. Photo of the valves: (IMG:http://www.914world.com/bbs2/uploads_offsite/i.imgur.com-23209-1590010246.5.jpg) Push rods. I'm assuming there was a leak here: (IMG:http://www.914world.com/bbs2/uploads_offsite/i.imgur.com-23209-1590010246.6.jpg) Opened valve cover: (IMG:http://www.914world.com/bbs2/uploads_offsite/i.imgur.com-23209-1590010246.7.jpg) Other notes: Motor spins great. Plugs are clean. 1 impeller fin is cracked. Has been sitting with oil in the pan and nothing leaks. What am I looking at here? Is it that gnarly? I have the original motor but, it doesn't turn and has been sitting outside for 20 years with no spark plugs in. So I'm not even letting that be an option. I am partially in the club of "run it til she pops" But if that's going to be 6 miles in... (IMG:style_emoticons/default/bs.gif) Obviously I should do some form of a rebuild? Can I just pull the heads, clean them up, push rod seals and call it a day? I really don't have a budget for a nice $1700+ motor build right now. Would love to have the tires on the pavement this summer. I know fast, good and cheap cant go together here. |
|
|
|
| BeatNavy |
May 20 2020, 04:20 PM
Post
#157
|
|
Certified Professional Scapegoat Group: Members Posts: 2,965 Joined: 26-February 14 From: Easton, MD Member No.: 17,042 Region Association: MidAtlantic Region |
There are a ton of people more knowledgeable on engines / rebuilds than I am, but here are my thoughts:
1. It's not that bad on the outside. The head on the 3/4 side is a little scuzzy, but not that bad all that things considered, and could be considered typical IMO. 2. That valve/stem is what concerns me most. It's hard to tell how structurally sound that thing is. 3. The rocker assemblies move freely? At least some corrosion on those. 4. Those aren't the pushrods in that pic, unless I'm looking at something different. Those are cylinder studs. The cylinders have probably wept some, but that could also just be random oil / dirt that comes down from the top over time (e.g., spilling oil while filling, etc.). 5. Of the other notes, you're good on the impeller (one cracked fin in and of itself isn't an issue). 6. Painting the tins on the motor... (IMG:style_emoticons/default/screwy.gif) I think this thing will run for longer than you might think, assuming there aren't other major issues internally. Pulling the heads and resealing the cylinders wouldn't necessarily be bad, but you'll end up in a "while I'm in there" situation. 'As a minimum, change oil cooler seals, change pushrod tube seals, clean up the cylinder fins, and get stock valve covers. If you start pulling things apart and go down the rabbit hole maybe you can start looking for a cheap set of 96mm p&c to go the 1911 route, which I have heard is pretty fun. Otherwise, it's "split the case" time. My 1.7L hadn't run for 12 years (or more) when I got it. It had scuzz all over and around it, and once I got it running it ran pretty strong for 2 years before I swapped it for a 2056. |
|
|
|
| Cairo94507 |
May 20 2020, 04:23 PM
Post
#158
|
|
Michael Group: Members Posts: 10,675 Joined: 1-November 08 From: Auburn, CA Member No.: 9,712 Region Association: Northern California |
You are doing a great job. Looking at that motor, since it is out of the car already....I say pull it apart and rebuild it. Looking at those valves alone scares me. Sorry, but better to pull it apart before it pulls itself apart. (IMG:style_emoticons/default/beerchug.gif)
|
|
|
|
| jaredmcginness |
May 20 2020, 06:10 PM
Post
#159
|
|
... Group: Members Posts: 510 Joined: 12-June 19 From: Baltimore Member No.: 23,209 Region Association: MidAtlantic Region |
QUOTE(Cairo94507 @ May 20 2020, 06:23 PM) You are doing a great job. Looking at that motor, since it is out of the car already....I say pull it apart and rebuild it. Looking at those valves alone scares me. Sorry, but better to pull it apart before it pulls itself apart. (IMG:style_emoticons/default/beerchug.gif) Thanks so much. Good point with that. @beatnavy , thanks for that write up. Seriously. When this car is on the road I need to send you and a few others a 6 pack. (IMG:style_emoticons/default/beerchug.gif) Thinking maybe I can get away with an "outside" end rebuild or whatever you'd call it. I can salvage some other parts from the original motor I have if need be (valve covers, etc). I'll look into the 1911. A quick search shows a lot of (what I presume to be?) junk $300 slip on cylinder and piston kits. If that's a typical price... and slip ons are kosher, I'm sold. haha.. But it sounds like something in a craigslist ad for a Dune Bug that doesnt run. (IMG:style_emoticons/default/idea.gif) Down the research hole I go. Edot: read more. Those slip ons are chinese made and definitely junk! |
|
|
|
| mepstein |
May 20 2020, 06:23 PM
Post
#160
|
|
914-6 GT in waiting Group: Members Posts: 20,775 Joined: 19-September 09 From: Landenberg, PA/Wilmington, DE Member No.: 10,825 Region Association: MidAtlantic Region |
QUOTE(jaredmcginness @ May 20 2020, 05:30 PM) Hey Guys, Took a couple days off work, while we are getting some of our main machines repaired. So I might as well work on the car... Today's update is more of a question to see how F***ked I am. I bought this 1.7 off a 914 guy up in Philly last year. He said its a really nice runner, no leaks. He said he put the gummy carb on there and kept the duals it had for himself... So I finally get around to taking the tins off - I was going to clean it up. Get rid of the tacky red on the tins, new belt, plugs, wires, etc. They were sprayed while on the motor. Over spray all over the place. (IMG:style_emoticons/default/screwy.gif) (IMG:http://www.914world.com/bbs2/uploads_offsite/i.imgur.com-23209-1590010245.1.jpg) This half looks OK... besides the loose spark plug I found. Aftermarket valve cover? So someone has been in here before. Was jammed full of leaves, feathers and gunk. No way this thing cooled right. Photo of the valves: Other notes: Motor spins great. Plugs are clean. 1 impeller fin is cracked. Has been sitting with oil in the pan and nothing leaks. What am I looking at here? Is it that gnarly? I have the original motor but, it doesn't turn and has been sitting outside for 20 years with no spark plugs in. So I'm not even letting that be an option. I am partially in the club of "run it til she pops" But if that's going to be 6 miles in... (IMG:style_emoticons/default/bs.gif) Obviously I should do some form of a rebuild? Can I just pull the heads, clean them up, push rod seals and call it a day? I really don't have a budget for a nice $1700+ motor build right now. Would love to have the tires on the pavement this summer. I know fast, good and cheap cant go together here. Maybe they can. We'll talk on friday. (IMG:style_emoticons/default/beerchug.gif) |
|
|
|
|
1 User(s) are reading this topic (1 Guests and 0 Anonymous Users)
0 Members:

|
Lo-Fi Version | Time is now: 19th June 2026 - 12:36 AM |
Invision Power Board
v9.1.4 © 2026 IPS, Inc.