|
|
|
Porsche, and the Porsche crest are registered trademarks of Dr. Ing. h.c. F. Porsche AG.
This site is not affiliated with Porsche in any way. Its only purpose is to provide an online forum for car enthusiasts. All other trademarks are property of their respective owners. |
|
|

  |

| sjhenry1075 |
 May 21 2020, 12:17 AM May 21 2020, 12:17 AM
Post
#161
|
|
Member  Group: Members Posts: 270 Joined: 22-July 12 From: Stevensville, MD Member No.: 14,709 Region Association: North East States |
Awesome thread, thanks for posting! I'm not far from Baltimore, so if you ever need an extra hand (to hold a beer) I wouldn't mind helping.
|
   |

 
|
| jaredmcginness |
May 21 2020, 06:01 AM
Post
#162
|
|
... Group: Members Posts: 510 Joined: 12-June 19 From: Baltimore Member No.: 23,209 Region Association: MidAtlantic Region |
QUOTE(sjhenry1075 @ May 21 2020, 02:17 AM)  Awesome thread, thanks for posting! I'm not far from Baltimore, so if you ever need an extra hand (to hold a beer) I wouldn't mind helping. Sounds good! I used to work in Millersville so I knew right about where you are. |
|
|
|
| jaredmcginness |
May 22 2020, 07:46 PM
Post
#163
|
|
... Group: Members Posts: 510 Joined: 12-June 19 From: Baltimore Member No.: 23,209 Region Association: MidAtlantic Region |
Hey guys, couple little updates.
Drove to PA today to meet a new friend @mepstein . Totally stand up guy with some cool cars and parts. I got eyes on the beautiful new mufflers hes taking part in offering to us. Cannot wait to pick one up in a few weeks. He set me up with a few goodies today: A tail shift in much nicer shape than mine. (IMG:http://www.914world.com/bbs2/uploads_offsite/i.imgur.com-23209-1590198401.1.jpg) A 150 MPH speedo. I stripped down, cleaned and painted all of these gauges today. Primed and painted the bezel as well. (IMG:http://www.914world.com/bbs2/uploads_offsite/i.imgur.com-23209-1590198402.2.jpg) To be clear, this car will never go above 72mph. But nice to have (IMG:style_emoticons/default/confused24.gif) (IMG:http://www.914world.com/bbs2/uploads_offsite/i.imgur.com-23209-1590198402.3.jpg) This is how she used to look... (IMG:http://www.914world.com/bbs2/uploads_offsite/i.imgur.com-23209-1590198402.4.jpg) Probably need a new multi (gas, etc) gauge down the road. Not as shiny. But it looks great over all. Front bumper off. Broke 3 of 4 bolts trying to remove it. Welded some BFNs (Big Fu*kin Nuts) in place and got them all unscrewed. If you squint it looks likes a GT car with Cibies..... right? (IMG:http://www.914world.com/bbs2/uploads_offsite/i.imgur.com-23209-1590198402.5.jpg) Last thing, question.... Where the heck do these two red wired eyelets go. If I touch them to power my headlights and fogs function. (woo!) For the life of me I cannot remember where I took them off, but they are short and go must go right near the fuse block or near the ground on the wall. Help? (IMG:http://www.914world.com/bbs2/uploads_offsite/i.imgur.com-23209-1590198402.6.jpg) |
|
|
|
| jaredmcginness |
May 23 2020, 10:48 AM
Post
#164
|
|
... Group: Members Posts: 510 Joined: 12-June 19 From: Baltimore Member No.: 23,209 Region Association: MidAtlantic Region |
Just a little thought about the motor situation I have....
- I have the original motor 1.7 numbers matching. Doesn’t turn, yet. - I have this Red 1.7 (Pictured above) with the crud on the valves I’ve been reading into a 1911, it seems pretty straight forward. It looks like you can go mild or big with a build like that. I’d go mild. This is still a budget build. It would be nice get have a peppier, reliable with decent MPGs Simple being: -Open up heads to 1.8 size, 105mm -open up jugs and use 94 or 96mm pistons, maybe the KB P&C kits if I want to be cheap - -42x36 valves -I think the other main components stay the same. -stock crank (66mm) is 1911, 71mm would be for 2056 And a few other bits, let me know if it’s anything major. Could probably get away with $1500 on the low end, if I shop around for parts. A plan: Do an outer end refresh of the “red” 1.7. Pull the heads, clean everything out, if the inside looks fair, slap it back together, so I have a cruiser motor for the summer. Like Rob and a few of my local friends said “These motors can sit in a lake for 3 years and still fire up in an afternoon.” (IMG:style_emoticons/default/smile.gif) In the meantime: Buy an engine stand, Strip the original, numbers matching motor Start getting a solid list, collecting parts Build original motor to a 1911 in the background This gives me a way to cruise (so as the red motor is fine) and a background project. Also let’s me suffer with a 1.7 for a bit, which will make me want a bigger motor that much more. Feels like a diary entry, thanks for reading. Any commentary is welcome. Not trying to beat a dead horse. |
|
|
|
| jaredmcginness |
May 23 2020, 10:50 AM
Post
#165
|
|
... Group: Members Posts: 510 Joined: 12-June 19 From: Baltimore Member No.: 23,209 Region Association: MidAtlantic Region |
Also, I found out those two red wires go to the brown ground block near the speaker. Thanks.
|
|
|
|
| bbrock |
May 23 2020, 12:42 PM
Post
#166
|
|
914 Guru Group: Members Posts: 5,269 Joined: 17-February 17 From: Montana Member No.: 20,845 Region Association: Rocky Mountains |
QUOTE(jaredmcginness @ May 23 2020, 10:50 AM) Also, I found out those two red wires go to the brown ground block near the speaker. Thanks. Glad you figured that out. I was scratching my head. First thought was that they looked liked ground wire connections but they should NOT be red. I don't have schematics for early models but can't imagine that would be stock. Ground wires should be brown. I like how you cleverly made sure we knew you had BFNs... like it wasn't already obvious from your build. (IMG:style_emoticons/default/shades.gif) |
|
|
|
| jaredmcginness |
May 23 2020, 01:37 PM
Post
#167
|
|
... Group: Members Posts: 510 Joined: 12-June 19 From: Baltimore Member No.: 23,209 Region Association: MidAtlantic Region |
QUOTE(bbrock @ May 23 2020, 02:42 PM) Glad you figured that out. I was scratching my head. First thought was that they looked liked ground wire connections but they should NOT be red. I don't have schematics for early models but can't imagine that would be stock. Ground wires should be brown. I like how you cleverly made sure we knew you had BFNs... like it was already obvious from your build. (IMG:style_emoticons/default/shades.gif) The ground cable goes on the opposite site of of the brown block into a post with a 10mm hex. I believe both reds are stacks on top of eachother, in that brown plastic block next to the fuse panel. if someone wants to confirm. I’ll add a photo later. And thanks (IMG:style_emoticons/default/lol-2.gif) |
|
|
|
| sixnotfour |
May 23 2020, 01:41 PM
Post
#168
|
|
914 Wizard Group: Members Posts: 11,272 Joined: 12-September 04 Member No.: 2,744 Region Association: NineFourteenerVille |
Brown Junction Block,,, not a ground...
Attached image(s) 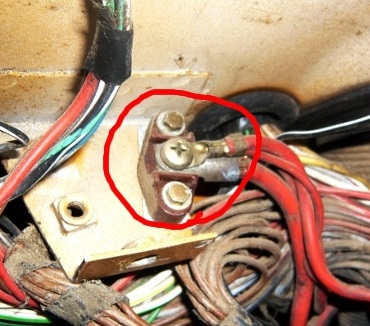
|
|
|
|
| jaredmcginness |
May 23 2020, 02:38 PM
Post
#169
|
|
... Group: Members Posts: 510 Joined: 12-June 19 From: Baltimore Member No.: 23,209 Region Association: MidAtlantic Region |
QUOTE(sixnotfour @ May 23 2020, 03:41 PM) Brown Junction Block,,, not a ground... That’s the one! Thank you for adding the photo. For the life of me I couldn’t find any info. I got it sorted now, both red eyelets are double stacked on top, and the ground goes on the reverse side. The brown plastic confused me. I guess it’s a bit different on early cars. |
|
|
|
| bbrock |
May 23 2020, 03:11 PM
Post
#170
|
|
914 Guru Group: Members Posts: 5,269 Joined: 17-February 17 From: Montana Member No.: 20,845 Region Association: Rocky Mountains |
QUOTE(jaredmcginness @ May 23 2020, 02:38 PM) I guess it’s a bit different on early cars. Roger that! Nothing I've every seen. |
|
|
|
| Bulldog9 |
May 24 2020, 07:05 AM
Post
#171
|
|
Senior Member Group: Members Posts: 706 Joined: 21-August 13 From: United States Member No.: 16,283 Region Association: MidAtlantic Region |
Great work, and project. KUDOS to you on the metal/fab work. I'm in ALexandria VA if you need a hand.
|
|
|
|
| anderssj |
May 24 2020, 12:49 PM
Post
#172
|
|
Dog is my copilot... Group: Members Posts: 1,793 Joined: 28-January 03 From: VA Member No.: 207 Region Association: MidAtlantic Region |
QUOTE(sixnotfour @ May 23 2020, 03:41 PM) Brown Junction Block,,, not a ground... Hi Jared, On my car (1972), that brown junction block is made out of bakelite and also serves as an insulator; it's intended to keep those big red wires away from the car body and anything else that's grounded down there near the fuse panel (like the fuse panel itself). IIRC, the other end of the biggest red wire is normally bolted to the terminal on the end of the positive battery cable. That wire is always "hot" whenever the battery is hooked up. The other red wires are stacked/connected via the Phillips-head screw in the center of the junction as shown in picture from sixnotfour. They distribute power to the fuse panel (fuse 11, with bridges to fuses 10 and 12), the ignition switch, and others users under the dash. Also, I'm pretty sure that the red wire is NOT protected with any kind of fuse between the battery and the junction--unless the PO did a retrofit (unlikely). Before hooking the battery back up you may want to check for continuity between the ends of the red wires in question and the terminal on the end of the positive battery cable to make sure which is the +12v feed, then mark it accordingly. I seem to remember somebody accidentally connecting that red +12v feed to ground and destroying their wiring harness when they reconnected the battery. Hope this helps! Steve A- |
|
|
|
| jaredmcginness |
May 24 2020, 07:30 PM
Post
#173
|
|
... Group: Members Posts: 510 Joined: 12-June 19 From: Baltimore Member No.: 23,209 Region Association: MidAtlantic Region |
Steve, thanks for the response. One thing I noted since connecting - my lights come on and flip up as normal... But can do so even with the key out of the ignition. I don't believe that is normal. So I screwed up something down the line.
I will check continuity, tomorrow. And thanks @bulldog9 ! Not far at all. Spent most of my life in Fairfax. |
|
|
|
| jaredmcginness |
May 24 2020, 07:43 PM
Post
#174
|
|
... Group: Members Posts: 510 Joined: 12-June 19 From: Baltimore Member No.: 23,209 Region Association: MidAtlantic Region |
Small update and more woes...
Got 3 of 4 packages from PMB Performance. Been waiting 5 or 6 weeks for this kit! Eager! Spent the afternoon tackling my front, replacement struts, balljoints, cleaned and painted some things. Lots of simple Green... Voila: (IMG:http://www.914world.com/bbs2/uploads_offsite/i.imgur.com-23209-1590371023.1.jpg) This is going to look really cool. Lowered it a hair. (IMG:http://www.914world.com/bbs2/uploads_offsite/i.imgur.com-23209-1590371024.2.jpg) If you squint, the end goal is taking shape... (IMG:style_emoticons/default/stirthepot.gif) (IMG:http://www.914world.com/bbs2/uploads_offsite/i.imgur.com-23209-1590371024.3.jpg) I like that low look on 14's.... I do see 15" in my future though. Unfortunately something happened that made my passenger balljoint not seat correctly and sag down. I guess during the final torque session the BJ slipped out of the half- moon slot. While trying to solve it, the 17mm BJ retaining bolt broke. 50 year old hardware..... (IMG:http://www.914world.com/bbs2/uploads_offsite/i.imgur.com-23209-1590371024.4.jpg) So now I will have to try and figure that one out. Hopefully I can weld a nut on the threaded section of the broken bolt and pull it out, adjust the joint and throw a new bolt in it. I don't want to have to buy a new spindle. Hope you folks have a nice Memorial day! |
|
|
|
| sixnotfour |
May 25 2020, 04:48 AM
Post
#175
|
|
914 Wizard Group: Members Posts: 11,272 Joined: 12-September 04 Member No.: 2,744 Region Association: NineFourteenerVille |
The ball joint should be a C shape, V shape is for late style wedge bolt
|
|
|
|
| dereknlee |
May 26 2020, 07:18 AM
Post
#176
|
|
Member Group: Members Posts: 73 Joined: 16-March 12 From: Shoreline, WA Member No.: 14,259 Region Association: Pacific Northwest |
Jared - great build you have here! The car is turning out really nice. And those Fuchs: (IMG:style_emoticons/default/drooley.gif) - good job. Looking forward to following this one.
-Derek PS - love the wall art in the garage. |
|
|
|
| jaredmcginness |
May 30 2020, 07:33 PM
Post
#177
|
|
... Group: Members Posts: 510 Joined: 12-June 19 From: Baltimore Member No.: 23,209 Region Association: MidAtlantic Region |
Hey guys,
Cant win em all... Theme of today's post. Pulled the heads off this motor: (IMG:http://www.914world.com/bbs2/uploads_offsite/i.imgur.com-23209-1590888789.1.jpg) Yikes - lots of cylinder leakage. 3 out of 4. (IMG:http://www.914world.com/bbs2/uploads_offsite/i.imgur.com-23209-1590888789.2.jpg) I decided to leave this to the pros and dropped these off today at a local air-cooled VW shop for a rebuild and refresh. 1 week turn around and much less expensive than a shop with a Porsche marquee on the door. We planned on a valve job, bead blast, refresh, fly cut to 105mm registers and repair 3 exhaust stud receivers that are stripped. Tapping to M9. Took a peek inside the case.... looks great, but the connecting rods have a powdery rusted coat? Must have had some condensation in there... brushes right off, but I don't think I can get way without splitting this case. If I do split the case, it may be wise to have the same shop...er guy... check the case out, crank, replace bearings, etc. (IMG:http://www.914world.com/bbs2/uploads_offsite/i.imgur.com-23209-1590888789.3.jpg) Part 2: Before: (IMG:http://www.914world.com/bbs2/uploads_offsite/i.imgur.com-23209-1590888789.4.jpg) After: (IMG:http://www.914world.com/bbs2/uploads_offsite/i.imgur.com-23209-1590888789.5.jpg) I have to say getting the rear hub and bearing out was a real bitch. This was top 5 most strenuous auto jobs I've ever done. I mentally prepped myself from readign the horror stories. it was worse. haha! Still have one side to go.... (IMG:style_emoticons/default/rolleyes.gif) To TOP IT OFF I destroyed the new bearing when I was pressing the stub axle/hub in. (IMG:style_emoticons/default/headbang.gif) (IMG:style_emoticons/default/headbang.gif) (IMG:style_emoticons/default/headbang.gif) All that work and it's wobbling. I suppose I will remove both rear swing arms, take them to a shop, have someone else press out - and press in every piece. Do it right or do it twice. I must have done 30 wheel bearings in my life and this is the one that goes bad. (IMG:style_emoticons/default/bs.gif) Part 3: In other news. Started rebuilding the calipers. I had a really stuck piston, used a hydraulic grease gun (Hydro is always more powerful than air!) (and safer, in this instance) attached the zerx fitting to the brake bleeder and she cruised right out. (IMG:http://www.914world.com/bbs2/uploads_offsite/i.imgur.com-23209-1590888790.6.jpg) Welp.... Maybe at least we can take a peek at how these rears will look - even though I have to do all this crap again... This is what it's all about. (IMG:http://www.914world.com/bbs2/uploads_offsite/i.imgur.com-23209-1590888790.7.jpg) (IMG:http://www.914world.com/bbs2/uploads_offsite/i.imgur.com-23209-1590888790.8.jpg) |
|
|
|
| mepstein |
May 30 2020, 07:59 PM
Post
#178
|
|
914-6 GT in waiting Group: Members Posts: 20,775 Joined: 19-September 09 From: Landenberg, PA/Wilmington, DE Member No.: 10,825 Region Association: MidAtlantic Region |
Did you torque the rear axle nut. It will wobble until its torqued down.
|
|
|
|
| jaredmcginness |
May 30 2020, 08:39 PM
Post
#179
|
|
... Group: Members Posts: 510 Joined: 12-June 19 From: Baltimore Member No.: 23,209 Region Association: MidAtlantic Region |
QUOTE(mepstein @ May 30 2020, 09:59 PM) Did you torque the rear axle nut. It will wobble until its torqued down. I didn’t fully torque it. I still 2-3 threads of the nut exposed. I didn’t recall the hub wobbling at all while removing it, so as usual, I expected the worst. I’ll crank it down tomorrow. |
|
|
|
| bbrock |
May 30 2020, 09:12 PM
Post
#180
|
|
914 Guru Group: Members Posts: 5,269 Joined: 17-February 17 From: Montana Member No.: 20,845 Region Association: Rocky Mountains |
QUOTE(jaredmcginness @ May 30 2020, 08:39 PM) QUOTE(mepstein @ May 30 2020, 09:59 PM) Did you torque the rear axle nut. It will wobble until its torqued down. I didn’t fully torque it. I still 2-3 threads of the nut exposed. I didn’t recall the hub wobbling at all while removing it, so as usual, I expected the worst. I’ll crank it down tomorrow. And don't roll the car around until they are torqued. This next part might just make you mad. If you do ever wind up installing rear bearings again, I highly recommend buy a cheap HF front wheel bearing kit. (IMG:http://www.914world.com/bbs2/uploads/post-20845-1552439966_thumb.jpg) It makes the bearing and hub install a piece of cake. You can see my install here: http://www.914world.com/bbs2/index.php?s=&...t&p=2696416 |
|
|
|
|
1 User(s) are reading this topic (1 Guests and 0 Anonymous Users)
0 Members:

|
Lo-Fi Version | Time is now: 19th June 2026 - 12:39 AM |
Invision Power Board
v9.1.4 © 2026 IPS, Inc.