|
|
|
Porsche, and the Porsche crest are registered trademarks of Dr. Ing. h.c. F. Porsche AG.
This site is not affiliated with Porsche in any way. Its only purpose is to provide an online forum for car enthusiasts. All other trademarks are property of their respective owners. |
|
|

  |

| djway |
 Sep 14 2020, 11:48 PM Sep 14 2020, 11:48 PM
Post
#241
|
|
Senior Member  Group: Members Posts: 787 Joined: 16-October 15 From: Riverside Member No.: 19,266 Region Association: Southern California |
Have always loved that body...those hips.....
I watched the series "The Tunnel" a while back and have not been able to stop thinking about...... Great score. |
   |

 
|
| jaredmcginness |
Sep 22 2020, 06:51 PM
Post
#242
|
|
... Group: Members Posts: 510 Joined: 12-June 19 From: Baltimore Member No.: 23,209 Region Association: MidAtlantic Region |
Hey guys,
Getting a bit chilly here in the garage evenings! Had to put a flannel on... I must not be working hard enough! Small update: been awaiting a lot of parts for my valve train. Everything has finally arrived! I had a really nice weekend at the Aircooled Swap in PA. (photos at the end of the post.) Met up with a few guys, putting some faces to the names; Thanks @914forme for the much needed trunk bracket! and thanks to @nditiz1 for the loaner Adjustable Pushrods (and advice!) Great guys. With all that said - and having read Raby's Novel on Valve Geometry about 7 times - I began. (IMG:http://www.914world.com/bbs2/uploads_offsite/i.imgur.com-23209-1600822307.1.jpg) I ground the 1.7 rockers about .060. Started with ~ .504 and ended with around .437 on all of them. I counter sank them to fit the Thorsten Peiper, Made in Germany swivel feet. (I didnt go OEM, I paid $117 for these, about 1/3 the price of OE, we'll see how it goes.) (IMG:http://www.914world.com/bbs2/uploads_offsite/i.imgur.com-23209-1600822307.2.jpg) I assembled the rocker assembly, HD studs, solid spacers. One question I am looking for a few answers on: Spacers on the rocker assembly... am I shooting to line the adjusters up with the valve, (by moving spacers left or right, and stacking between - see photo) before I start the geometry? .... Line up the valve to adjuster, dead center as close as I can, then shim later at half lift if needed? Or just assemble the rocker shaft, evenly spaced washers and shim under the studs as needed later. (IMG:http://www.914world.com/bbs2/uploads_offsite/i.imgur.com-23209-1600822308.3.jpg) I don't have a washer between every piece in the assembly. I'm told and am thinking this is OK... yes? For mounting my magnetic base, I made a quickie bracket. For the hole pattern, I overlayed my intake gasket, and copied with a sharpie. I haphazardly cut it with my grinder, as I ran out of wheels... Pretty sad for a professional sheet metal mechanic. (IMG:style_emoticons/default/lol-2.gif) (IMG:http://www.914world.com/bbs2/uploads_offsite/i.imgur.com-23209-1600822308.4.jpg) (IMG:http://www.914world.com/bbs2/uploads_offsite/i.imgur.com-23209-1600822308.5.jpg) Base mounted GREAT! Super solid! (IMG:http://www.914world.com/bbs2/uploads_offsite/i.imgur.com-23209-1600822308.6.jpg) This is about as far as I got this evening... (IMG:http://www.914world.com/bbs2/uploads_offsite/i.imgur.com-23209-1600823044.1.jpg) I lined up the dial indicator. It looks pretty coliner right now. I want to get the angle dead on. Next is preload, then find full lift, and so on so forth. --------------------- Here are a few photos from the Aircooled Swap, I found a few parts and had a great morning. Totally beautiful day. Sand Beige is so great. (IMG:http://www.914world.com/bbs2/uploads_offsite/i.imgur.com-23209-1600822308.8.jpg) (IMG:http://www.914world.com/bbs2/uploads_offsite/i.imgur.com-23209-1600822308.9.jpg) (IMG:http://www.914world.com/bbs2/uploads_offsite/i.imgur.com-23209-1600822308.10.jpg) (IMG:http://www.914world.com/bbs2/uploads_offsite/i.imgur.com-23209-1600822309.11.jpg) (IMG:http://www.914world.com/bbs2/uploads_offsite/i.imgur.com-23209-1600822309.12.jpg) Thanks all! <3 |
|
|
|
| mda123 |
Oct 1 2020, 11:27 AM
Post
#243
|
|
Newbie Group: Members Posts: 15 Joined: 25-June 20 From: DC area Member No.: 24,425 Region Association: None |
Hey Jared,
New 914 owner living in NoVA here checking in to say I've read through your build thread and it's really impressive stuff. Very motivating for me to figure out my project, a '71 with no engine/trans. I don't have any welding skills (in fact, have never welded in my life) so I'm hoping the early indications of modest rust hold up so I can get things moving. Maybe we'll cross paths one of these days. |
|
|
|
| jaredmcginness |
Oct 1 2020, 06:42 PM
Post
#244
|
|
... Group: Members Posts: 510 Joined: 12-June 19 From: Baltimore Member No.: 23,209 Region Association: MidAtlantic Region |
Fellas,
How is everyone doing? If you're like me; trying to stay off social media a bit and do your own thing. Looooots of opinions flying around right now. (IMG:style_emoticons/default/smile.gif) So we are nearing completion on the 1911 (how many times have I said that?) I've seen a lot of cool ideas for peoples engine test stands. Since I've essentially built this motor on a dolly, my options are bit more limited. I definitely need to check the vitals while breaking the motor in, preferably without the gauges rolling around on the floor and a mess of wire. I drew this up in solid works and bent it this afternoon. (IMG:http://www.914world.com/bbs2/uploads_offsite/i.imgur.com-23209-1601599352.1.jpg) Room for everything I need to break the cam in. (ignore the vacuum gauge) (IMG:http://www.914world.com/bbs2/uploads_offsite/i.imgur.com-23209-1601599353.2.jpg) I am really happy with it. I might add some holes for a switch... but I've done a lot already maybe a screw driver will be fine for engaging the starter. (IMG:style_emoticons/default/smash.gif) (IMG:http://www.914world.com/bbs2/uploads_offsite/i.imgur.com-23209-1601599353.3.jpg) ------- As for the car - here are a few pictures of cutting the chromoly pushrods. I used verniers locked @ dimension to scrape a line where my pushrods should be cut. From there I used an archery cutter - $14 on amazon - to finish the job. (IMG:http://www.914world.com/bbs2/uploads_offsite/i.imgur.com-23209-1601599353.4.jpg) Squared up with a 90* block, checked with an angle finder and LIGHTLY belt sanded.... one tap at a time, shaving a few thou of until I got a nice tight fit in my caliper. (IMG:http://www.914world.com/bbs2/uploads_offsite/i.imgur.com-23209-1601599353.5.jpg) (IMG:http://www.914world.com/bbs2/uploads_offsite/i.imgur.com-23209-1601599353.6.jpg) 2 old lifters, a rub of light oil and a mallet. We are in. They are all within 10 thou (on the money) super stoked. (IMG:http://www.914world.com/bbs2/uploads_offsite/i.imgur.com-23209-1601599354.7.jpg) General cleaning up.... Engine mount from the old motor... (IMG:http://www.914world.com/bbs2/uploads_offsite/i.imgur.com-23209-1601599354.8.jpg) If it comes out, it gets cleaned! (IMG:http://www.914world.com/bbs2/uploads_offsite/i.imgur.com-23209-1601599354.9.jpg) Foolishly, I didnt think about installing this before the impeller housing and half of the tins... Go Jared (IMG:style_emoticons/default/cheer.gif) It all comes back off. Installed - VHT paint on the mount bar. (IMG:http://www.914world.com/bbs2/uploads_offsite/i.imgur.com-23209-1601599354.10.jpg) This is where I stand now. (IMG:http://www.914world.com/bbs2/uploads_offsite/i.imgur.com-23209-1601599354.11.jpg) I think it has come a long way! Hopefully it turns over. Basically left until firing: -Remaining tins -Carbs/fuel line -Load with break-in oil -Achieve oil pressure -Plugs/Wires ..... -Hook up my new test gauge panel and trans. I think that is it! Thanks for reading. |
|
|
|
| jaredmcginness |
Oct 1 2020, 06:52 PM
Post
#245
|
|
... Group: Members Posts: 510 Joined: 12-June 19 From: Baltimore Member No.: 23,209 Region Association: MidAtlantic Region |
QUOTE(mda123 @ Oct 1 2020, 01:27 PM)  Hey Jared, New 914 owner living in NoVA here checking in to say I've read through your build thread and it's really impressive stuff. Very motivating for me to figure out my project, a '71 with no engine/trans. I don't have any welding skills (in fact, have never welded in my life) so I'm hoping the early indications of modest rust hold up so I can get things moving. Maybe we'll cross paths one of these days. Hey, thanks for the kind words. Right down the road from me. You have found the best resource for these cars and the best group of guys. I wouldn't have much progress of any caliber without 914world. Some things I have learned: Be willing to do things twice! This has been a lot of frustrating work. Don't be so critical of your work, learn from the mistakes and have fun. Looking back at the early pages and seeing the progress in saving this car is a great feeling. Mig welding is simple with practice. Make a build thread with pics! I'm sure we will meet soon, come to the local events, a lot of us show up (IMG:style_emoticons/default/smile.gif) EDIT: I may be able to help you out with the long block from my '71, but every square inch needs gone through. |
|
|
|
| bkrantz |
Oct 1 2020, 07:50 PM
Post
#246
|
|
914 Guru Group: Members Posts: 8,722 Joined: 3-August 19 From: SW Colorado Member No.: 23,343 Region Association: Rocky Mountains |
More good work, Jared. Here's to a successful engine start-up.
BTW, I assume you have turned it through several revolutions by hand to check for any surprises. |
 |
|
| jaredmcginness |
Oct 1 2020, 08:03 PM
Post
#247
|
|
... Group: Members Posts: 510 Joined: 12-June 19 From: Baltimore Member No.: 23,209 Region Association: MidAtlantic Region |
QUOTE(bkrantz @ Oct 1 2020, 09:50 PM) More good work, Jared. Here's to a successful engine start-up. BTW, I assume you have turned it through several revolutions by hand to check for any surprises. Thank you! Oui, I have oiled the bits and turned it by hand, probably about 40 times since the valve adjustment. The dual springs make it a bit of a work out. |
|
|
|
| Frankvw |
Oct 2 2020, 01:13 AM
Post
#248
|
|
working on my first 914 ! Group: Members Posts: 653 Joined: 13-April 16 From: Holland, the Netherlands Member No.: 19,896 Region Association: Europe |
good luck with the rest of the build. Good to see you do such much work yourself !
|
|
|
|
| mda123 |
Oct 2 2020, 09:46 AM
Post
#249
|
|
Newbie Group: Members Posts: 15 Joined: 25-June 20 From: DC area Member No.: 24,425 Region Association: None |
QUOTE(jaredmcginness @ Oct 1 2020, 08:52 PM) QUOTE(mda123 @ Oct 1 2020, 01:27 PM) Hey Jared, New 914 owner living in NoVA here checking in to say I've read through your build thread and it's really impressive stuff. Very motivating for me to figure out my project, a '71 with no engine/trans. I don't have any welding skills (in fact, have never welded in my life) so I'm hoping the early indications of modest rust hold up so I can get things moving. Maybe we'll cross paths one of these days. Hey, thanks for the kind words. Right down the road from me. You have found the best resource for these cars and the best group of guys. I wouldn't have much progress of any caliber without 914world. Some things I have learned: Be willing to do things twice! This has been a lot of frustrating work. Don't be so critical of your work, learn from the mistakes and have fun. Looking back at the early pages and seeing the progress in saving this car is a great feeling. Mig welding is simple with practice. Make a build thread with pics! I'm sure we will meet soon, come to the local events, a lot of us show up (IMG:style_emoticons/default/smile.gif) EDIT: I may be able to help you out with the long block from my '71, but every square inch needs gone through. Appreciate the offer on the long block, but as of now I'm taking things one step at a time. First I'm working to identify and repair all rust, then I'll probably go about cleaning and painting damn near every part underneath the car. After that I'll start thinking more seriously about the right path for the engine, but at the moment I'm thinking a Subaru swap. I have friends with some excellent connections in Subaru world that can get parts very cheap, and I take it the swaps aren't monstrously difficult. Made more difficult by the fact that I've got a fourth kid on the way though lol. I've got four weekends (Sundays, really) to work before baby enters the scene, so let's just say I'm expecting the project will be measured in months, if not years. |
|
|
|
| horizontally-opposed |
Oct 2 2020, 10:02 AM
Post
#250
|
|
Advanced Member Group: Members Posts: 3,456 Joined: 12-May 04 From: San Francisco Member No.: 2,058 Region Association: None |
QUOTE(jaredmcginness @ Sep 14 2020, 05:54 AM) I gaff taped the bolsters, so there wouldn't be much exposed foam. We'll put seat covers on in for now, maybe replace the front seats. I found the fabric in Germany, but its and arm and a leg for a yard - maybe down the road. (IMG:http://www.914world.com/bbs2/uploads_offsite/i.imgur.com-23209-1600088046.5.jpg) At least there's now 1 running Porsche at the house. Congrats on a very cool find. These are still, imo, underrated—and Studio cloth is one of Porsche's all-time coolest interiors (also imo). |
|
|
|
| jaredmcginness |
Oct 5 2020, 07:18 PM
Post
#251
|
|
... Group: Members Posts: 510 Joined: 12-June 19 From: Baltimore Member No.: 23,209 Region Association: MidAtlantic Region |
Howdy,
Spent a few hours in the garage the last few days. I made a wiring harness for my engine test gauge panel and tied up some loose ends with the motor. Pretty much ready to add the last bits, check for oil pressure, and see if she cranks! If you notice anything obvious missing, reach out. But I believe its all there. Had to get the Bosch blue coil. (IMG:style_emoticons/default/first.gif) (IMG:http://www.914world.com/bbs2/uploads_offsite/i.imgur.com-23209-1601947105.1.jpg) Painted (VHT 'Cast Iron") and installed the heat exchangers... Harder than you might think to mount by yourself. (IMG:http://www.914world.com/bbs2/uploads_offsite/i.imgur.com-23209-1601947105.2.jpg) I added some single barrel Weber copies I got them for great price. These came off a 2 litre. I partially expect them to be too small and am prepared to find a set of dual barrel 40's if it will hinder the performance notably. Time will tell. (IMG:http://www.914world.com/bbs2/uploads_offsite/i.imgur.com-23209-1601947105.3.jpg) Picked up this muffler locally, while I wait on a stainless muffler to be built. This will allow me to tune the motor and such now - go for looks later. (IMG:http://www.914world.com/bbs2/uploads_offsite/i.imgur.com-23209-1601947105.4.jpg) This being me..... There has been a long running inside joke among my friends that I am bad at oil changes... something always happens. Its mostly a joke, but still. Only right that the first time I ever put oil in this motor the #^!$ing drain plug was out. I am 1000% certain I already put it in. But sure enough... Glad I bent over "just to see if there was any leaks" ... cant even be mad.... a few towels and cat litter. Try again tomorrow. (IMG:http://www.914world.com/bbs2/uploads_offsite/i.imgur.com-23209-1601947105.5.jpg) (IMG:style_emoticons/default/idea.gif) (IMG:style_emoticons/default/rolleyes.gif) I can make it 13 pages on a build thread with fabrication, engine work, upholstery and perseverance, but cannot pour oil down a hole. Besides the moist garage floor, this is where we stand. (IMG:http://www.914world.com/bbs2/uploads_offsite/i.imgur.com-23209-1601947105.6.jpg) Tomorrow, I will crank the motor and try to get oil pressure (of course after I go purchase more VR1). If so, fully attach the carbs (I am aware they are backwards in this pic). Throw on my new starter and see if I cannot get this bad mother to turn over. Cheers, Jared |
|
|
|
| jaredmcginness |
Oct 7 2020, 10:15 AM
Post
#252
|
|
... Group: Members Posts: 510 Joined: 12-June 19 From: Baltimore Member No.: 23,209 Region Association: MidAtlantic Region |
Got lots of little (and big) parts bolted up last night.
Wild to see how large the whole unit is. Here it is next to the test stand: (IMG:http://www.914world.com/bbs2/uploads_offsite/i.imgur.com-23209-1602087307.1.jpg) Very nervous to crank it over.... *wipes sweat from brow* First order of business is to see if I can get any oil pressure. Purchased a bunch of heavy duty ground cables and hooked everything up. Configuration here is: -No plugs -No dizzy -Oil filter loose (hopefully to see some pressure squirt out) -Screw driver in hand to jump the starter connections. Here is a video after the second crank. 914 CRANK (If that doesn't work, here is youtube) Dang! in 3 or 4 rotations I got oil squirting from the filter, closed that up. Cranked again and we have pressure building up to 3 bars.... Also nice to see that all the gauges work. I think this is very good news! I'm elate that the motor even turns under its own power. (IMG:style_emoticons/default/av-943.gif) Tonight, if there is time, I will fix up some kind of gravity feed gas tank (and filter) and see if I cannot get it fired up for the first time and break this cam in. *(unsure if I should attempt to get running with the dual carbs or slap on the single weber, just for the break in. Both came from running 2.0's so they should both be in the ballpark of tuning... at least the parking lot of the ball park) ah! |
|
|
|
| mda123 |
Oct 7 2020, 01:18 PM
Post
#253
|
|
Newbie Group: Members Posts: 15 Joined: 25-June 20 From: DC area Member No.: 24,425 Region Association: None |
Awesome, nice work! Seeing all of your progress makes me think I need to just take some time off of work and spend a few days wrenching. As of now, mostly confined to Sunday afternoons because of kids and such.
|
|
|
|
| nditiz1 |
Oct 7 2020, 02:24 PM
Post
#254
|
|
Senior Member Group: Members Posts: 1,272 Joined: 26-May 15 From: Mount Airy, Maryland Member No.: 18,763 Region Association: MidAtlantic Region |
Nice job! Can't see the vids - youtube says private
|
|
|
|
| Gint |
Oct 7 2020, 05:51 PM
Post
#255
|
|
Mike Ginter Group: Admin Posts: 16,108 Joined: 26-December 02 From: Denver CO. Member No.: 20 Region Association: Rocky Mountains |
QUOTE(jaredmcginness @ Mar 23 2020, 09:03 AM) Scuff, Prime 2 coats, Semi Gloss black 3 coats, Matte clear over top. (IMG:http://www.914world.com/bbs2/uploads_offsite/i.imgur.com-23209-1584979435.2.jpg) (IMG:http://www.914world.com/bbs2/uploads_offsite/i.imgur.com-23209-1584979435.3.jpg) Those look awesome! Nice work on the entire project. I wonder if that Jasco paint remover does any harm to the factoring anodizing? For my own reasons... Is it this stuff? https://www.homedepot.com/p/Jasco-16-oz-Pre...PR502/308276936 |
|
|
|
| Gint |
Oct 7 2020, 06:03 PM
Post
#256
|
|
Mike Ginter Group: Admin Posts: 16,108 Joined: 26-December 02 From: Denver CO. Member No.: 20 Region Association: Rocky Mountains |
QUOTE(BeatNavy @ Mar 20 2020, 04:53 AM) Wow, I just noticed this thread. You're doing great work, and your fabrication skills are excellent. I found that to be a HUGE asset (or in my case mostly, a liability) in terms of repair. Great welding can't makeup for crappy fab skills. The 16 ga will hold up nicely. I suppose you could body filler on the hell hole there if you want it to look nicer, or, if later, you don't want it too obvious that it was repaired. But I don't think there's any "dishonor" in that repair, and in fact it is evidence of all the good work you did/are doing. OTOH, you're most interested in driving this thing (IMG:style_emoticons/default/driving.gif) (IMG:style_emoticons/default/agree.gif) On both points. Honestly I'm excited to see young people like you appreciating our automotive history to this degree. There is nothing wrong with anything happening here. Your making me read all of this thread! |
|
|
|
| seanpaulmc |
Oct 7 2020, 06:11 PM
Post
#257
|
|
Member Group: Members Posts: 452 Joined: 6-December 16 From: Orlando, FL Member No.: 20,649 Region Association: South East States |
Jared, Compliments on an outstanding build! Your car has come such a long way. I wish you miles and miles of enjoyment. Your thread is a great inspiration.
You mentioned the Blue coil and that caught my attention from something I read in another build thread at some past point in time. (Long time lurker.) Maybe it's a question really for the brain trust. What is the thinking on mounting the coil to the tin in that location? I had read that it is prone to vibration and cracking. Questioning this myself after reading your post today, I went and looked at the engine I pulled from my own project which shows the tin cracking in that location. 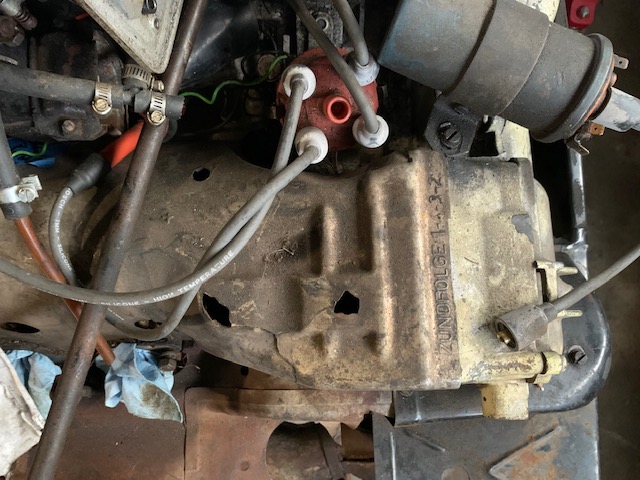 Hopefully an experienced builder can chime in with what's recommended. Again, nice job! Sean QUOTE(jaredmcginness @ Oct 5 2020, 09:18 PM) Howdy, Spent a few hours in the garage the last few days. I made a wiring harness for my engine test gauge panel and tied up some loose ends with the motor. Pretty much ready to add the last bits, check for oil pressure, and see if she cranks! If you notice anything obvious missing, reach out. But I believe its all there. Had to get the Bosch blue coil. (IMG:style_emoticons/default/first.gif) (IMG:http://www.914world.com/bbs2/uploads_offsite/i.imgur.com-23209-1601947105.1.jpg) Painted (VHT 'Cast Iron") and installed the heat exchangers... Harder than you might think to mount by yourself. (IMG:http://www.914world.com/bbs2/uploads_offsite/i.imgur.com-23209-1601947105.2.jpg) I added some single barrel Weber copies I got them for great price. These came off a 2 litre. I partially expect them to be too small and am prepared to find a set of dual barrel 40's if it will hinder the performance notably. Time will tell. (IMG:http://www.914world.com/bbs2/uploads_offsite/i.imgur.com-23209-1601947105.3.jpg) Picked up this muffler locally, while I wait on a stainless muffler to be built. This will allow me to tune the motor and such now - go for looks later. (IMG:http://www.914world.com/bbs2/uploads_offsite/i.imgur.com-23209-1601947105.4.jpg) This being me..... There has been a long running inside joke among my friends that I am bad at oil changes... something always happens. Its mostly a joke, but still. Only right that the first time I ever put oil in this motor the #^!$ing drain plug was out. I am 1000% certain I already put it in. But sure enough... Glad I bent over "just to see if there was any leaks" ... cant even be mad.... a few towels and cat litter. Try again tomorrow. (IMG:http://www.914world.com/bbs2/uploads_offsite/i.imgur.com-23209-1601947105.5.jpg) (IMG:style_emoticons/default/idea.gif) (IMG:style_emoticons/default/rolleyes.gif) I can make it 13 pages on a build thread with fabrication, engine work, upholstery and perseverance, but cannot pour oil down a hole. Besides the moist garage floor, this is where we stand. (IMG:http://www.914world.com/bbs2/uploads_offsite/i.imgur.com-23209-1601947105.6.jpg) Tomorrow, I will crank the motor and try to get oil pressure (of course after I go purchase more VR1). If so, fully attach the carbs (I am aware they are backwards in this pic). Throw on my new starter and see if I cannot get this bad mother to turn over. Cheers, Jared |
|
|
|
| Gint |
Oct 7 2020, 06:38 PM
Post
#258
|
|
Mike Ginter Group: Admin Posts: 16,108 Joined: 26-December 02 From: Denver CO. Member No.: 20 Region Association: Rocky Mountains |
QUOTE(jaredmcginness @ Oct 7 2020, 09:15 AM) *(unsure if I should attempt to get running with the dual carbs or slap on the single weber, just for the break in. Both came from running 2.0's so they should both be in the ballpark of tuning... at least the parking lot of the ball park) Run what ya brung. Those single barrels should be perfectly adequate for a cam break in. |
|
|
|
| jaredmcginness |
Oct 7 2020, 06:54 PM
Post
#259
|
|
... Group: Members Posts: 510 Joined: 12-June 19 From: Baltimore Member No.: 23,209 Region Association: MidAtlantic Region |
QUOTE(Gint @ Oct 7 2020, 08:03 PM) (IMG:style_emoticons/default/agree.gif) On both points. Honestly I'm excited to see young people like you appreciating our automotive history to this degree. There is nothing wrong with anything happening here. Your making me read all of this thread! Dang fellas lots of awesome responses! Love this community. All of ya'lls info and aid have gotten me this far. (gotta get it out of my system before its all illegal in 2035 or whatever /sarcasm) QUOTE(Gint @ Oct 7 2020, 07:51 PM) I wonder if that Jasco paint remover does any harm to the factoring anodizing? For my own reasons... Is it this stuff? https://www.homedepot.com/p/Jasco-16-oz-Pre...PR502/308276936 Thank you kindly @Gint ! Yes this is the stuff. It did not appear to damage the factory finish in any way. I was recommended that product... I think from the Samba. I am super pleased with it. QUOTE(Gint @ Oct 7 2020, 08:38 PM) Run what ya brung. Those single barrels should be perfectly adequate for a cam break in. Sounds good! Tired of unbolting things (IMG:style_emoticons/default/smile.gif) |
|
|
|
| jaredmcginness |
Oct 7 2020, 07:03 PM
Post
#260
|
|
... Group: Members Posts: 510 Joined: 12-June 19 From: Baltimore Member No.: 23,209 Region Association: MidAtlantic Region |
QUOTE(nditiz1 @ Oct 7 2020, 04:24 PM) Nice job! Can't see the vids - youtube says private un-privitized it, thanks for the heads up. Was trying to avoid the youtube trolls commentary. (IMG:style_emoticons/default/bootyshake.gif) QUOTE(seanpaulmc @ Oct 7 2020, 08:11 PM) Jared, Compliments on an outstanding build! Your car has come such a long way. I wish you miles and miles of enjoyment. Your thread is a great inspiration. You mentioned the Blue coil and that caught my attention from something I read in another build thread at some past point in time. (Long time lurker.) Maybe it's a question really for the brain trust. What is the thinking on mounting the coil to the tin in that location? Hopefully an experienced builder can chime in with what's recommended. Thank you so much @seanpaulmc , really kind. This has been massively rewarding to me. (IMG:style_emoticons/default/beerchug.gif) To me, the blue coil is just classic. It has always stood out in books since I was young, looking at 356, beetle, and buggy engine bays. All part of the whole picture/aesthetic to me. (those might be 6 volt, but still...) Silly but there it is. All I know about the location is that the coil came in that location on both of my motors and is congruent with what I see on here. Both motor's tins are crack free (surprising, coming from the state of the car, ha) (Also now that I think about it. The 2 mounting holes are tapped from the factory , with a radius that matches the coil between. I would look forward to some professional input, mine is from from it.... I am not against moving if it is recommended. But with the lack of cracking so far, It should last a few miles Cheers |
|
|
|
|
1 User(s) are reading this topic (1 Guests and 0 Anonymous Users)
0 Members:

|
Lo-Fi Version | Time is now: 18th June 2026 - 08:13 PM |
Invision Power Board
v9.1.4 © 2026 IPS, Inc.