|
|
|
Porsche, and the Porsche crest are registered trademarks of Dr. Ing. h.c. F. Porsche AG.
This site is not affiliated with Porsche in any way. Its only purpose is to provide an online forum for car enthusiasts. All other trademarks are property of their respective owners. |
|
|

  |

| ctc911ctc |
 Mar 9 2020, 08:00 PM Mar 9 2020, 08:00 PM
Post
#1
|
|
Senior Member  Group: Members Posts: 892 Joined: 9-June 18 From: boston Member No.: 22,206 Region Association: North East States |
All,
'74, 2.0, stock Read all there is on this within the board. Got the Vitrons - Check, Tubes in good shape - replaced one - Thank 914Rubber. Was obsessive in cleaning the seal guides and seats lightly oiled the seals and guides They are in, are they in far enough? Too far? What do you think? 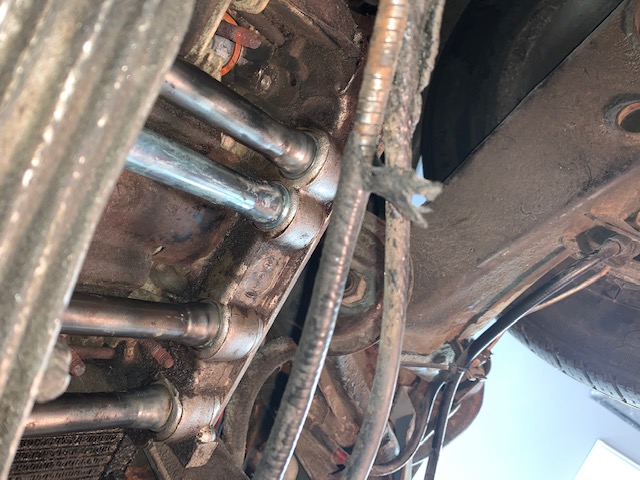 All four can be seen here (head side) 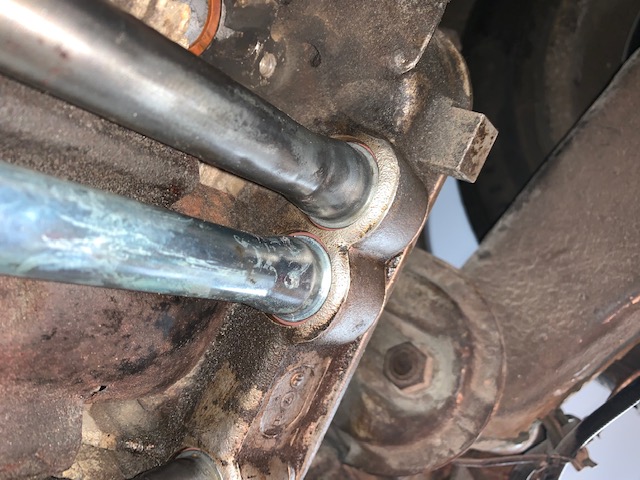 Here are the back two 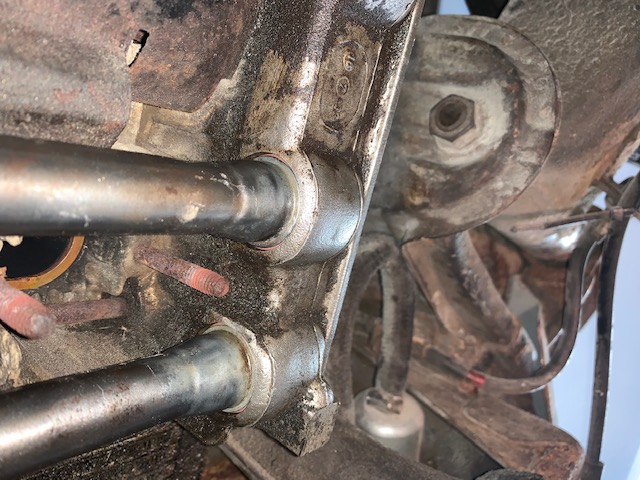 And the front two Do they look seated correctly? In all of the way? As can also be seen is the damage to the cable coating when there is an exhaust leak - which started this job! |
   |

 
|
| BeatNavy |
Mar 9 2020, 08:18 PM
Post
#2
|
|
Certified Professional Scapegoat Group: Members Posts: 2,924 Joined: 26-February 14 From: Easton, MD Member No.: 17,042 Region Association: MidAtlantic Region |
You can generally feel when it seats. It should give way as you (struggling not to use suggestive terms here) get the tube inserted into the head side. At that point it's pretty much seated where it should be. It may help to twist as you are applying inward force.
|
|
|
|
| cary |
Mar 9 2020, 08:24 PM
Post
#3
|
|
Advanced Member Group: Members Posts: 3,900 Joined: 26-January 04 From: Sherwood Oregon Member No.: 1,608 Region Association: Pacific Northwest |
Like Rob, I'd say they aren't in all the way. They need a good shove and they snapo into a seat. You'll feel it. Like Rob said, then you give them a 1/4 turn.
|
|
|
|
| bobboinski |
Mar 9 2020, 08:29 PM
Post
#4
|
|
Member Group: Members Posts: 198 Joined: 23-April 16 From: Petaluma Member No.: 19,929 Region Association: Northern California |
I recently did this for the first time. Quite a bit of force was required and they kind of popped in. You will know.
|
|
|
|
| Specracer |
Mar 10 2020, 03:38 AM
Post
#5
|
|
Member Group: Members Posts: 100 Joined: 27-March 17 From: SE Mass Member No.: 20,970 Region Association: None |
I am mid process doing this exact thing. I have the passenger side tubes out, waiting on 914 rubber to deliver new tubes. One of the installation suggestions I saw was using a socket the size of the tube to be able to tap the tube all the way, similar to driving in a seal.
|
|
|
|
| TheCabinetmaker |
Mar 10 2020, 04:21 AM
Post
#6
|
|
I drive my car everyday Group: Members Posts: 8,300 Joined: 8-May 03 From: Tulsa, Ok. Member No.: 666 |
Beat navy said it right! Use a pair of channel lock pliers to twist back and forth while also pushing. You will hear and feel it snap into place. Using something to "tap" it into place will pinch one of the seals and cause a leak.
|
|
|
|
| 914Sixer |
Mar 10 2020, 06:15 AM
Post
#7
|
|
914 Guru Group: Members Posts: 8,882 Joined: 17-January 05 From: San Angelo Texas Member No.: 3,457 Region Association: Southwest Region |
I prefer to used a deep socket (14 or 15 MM) on a extension bar and give a gentle push on the inside of the tube from head side. Your will get a pop sound when seated.
|
|
|
|
| ctc911ctc |
Mar 10 2020, 07:17 AM
Post
#8
|
|
Senior Member Group: Members Posts: 892 Joined: 9-June 18 From: boston Member No.: 22,206 Region Association: North East States |
Thank you for all of the guidance!
I pushed them in while gently rotating back and forth. There was no satisfying pop/thunk nothing. Though I do not believe they could go in any further. I used vice grips and very carefully adjusted the grip so there were not any dents or marring. Perhaps the Viton seals are tighter? Less malleable? I have never worked on my own 914 (never had the time) and I am hopeful this will be my first that does NOT leak oil! (IMG:style_emoticons/default/driving.gif) Thank you Teeners |
|
|
|
| Bleyseng |
Mar 10 2020, 07:53 AM
Post
#9
|
|
Aircooled Baby! Group: Members Posts: 13,034 Joined: 27-December 02 From: Seattle, Washington (for now) Member No.: 24 Region Association: Pacific Northwest |
Boy, I'd run a die over those rusty head studs for the heat exchangers to clean up the threads
|
|
|
|
| IronHillRestorations |
Mar 10 2020, 07:57 AM
Post
#10
|
|
I. I. R. C. Group: Members Posts: 6,717 Joined: 18-March 03 From: West TN Member No.: 439 Region Association: None |
The procedure I've used the last few times is to clean up the bores and If there's any scoring, I stuff a quality paper towel in the lifter bore and dress the bore with a scotchbrite pad, only going around the bore, never in out.
I sparingly lubricate the o-rings with Locktite 565 (one tube at a time) which is also a sealant. I have an old plastic handle screwdriver that fits the bore perfectly for pushing in the tubes, whilst giving the tube a slight turn. (I threw in the whilst, in honor of the Haynes 914 manual). The 565 lubes and aids in sealing. Jake Raby said he does this to problem leakers, I use it on all I've seen them slathered with RTV, and still leak. It's mostly about making sure the bores don't have scratches or gouges that the oil can trace, and that the O-rings don't get pinched on install. |
|
|
|
| ctc911ctc |
Mar 10 2020, 08:08 AM
Post
#11
|
|
Senior Member Group: Members Posts: 892 Joined: 9-June 18 From: boston Member No.: 22,206 Region Association: North East States |
On it, buying the die today as a matter of fact!
QUOTE(Bleyseng @ Mar 10 2020, 08:53 AM)  Boy, I'd run a die over those rusty head studs for the heat exchangers to clean up the threads |
|
|
|
| ctc911ctc |
Mar 10 2020, 08:11 AM
Post
#12
|
|
Senior Member Group: Members Posts: 892 Joined: 9-June 18 From: boston Member No.: 22,206 Region Association: North East States |
Love your stuff, been following you and your company.
The bores were very clean. One of the old (original) seals was pinched against the edge. The bores were very smooth and clean. I did this with the engine in, so did not have all of the latitude I would have liked. I Will report results! Thank you! QUOTE(IronHillRestorations @ Mar 10 2020, 08:57 AM) The procedure I've used the last few times is to clean up the bores and If there's any scoring, I stuff a quality paper towel in the lifter bore and dress the bore with a scotchbrite pad, only going around the bore, never in out. I sparingly lubricate the o-rings with Locktite 565 (one tube at a time) which is also a sealant. I have an old plastic handle screwdriver that fits the bore perfectly for pushing in the tubes, whilst giving the tube a slight turn. (I threw in the whilst, in honor of the Haynes 914 manual). The 565 lubes and aids in sealing. Jake Raby said he does this to problem leakers, I use it on all I've seen them slathered with RTV, and still leak. It's mostly about making sure the bores don't have scratches or gouges that the oil can trace, and that the O-rings don't get pinched on install. |
|
|
|
| Mark Henry |
Mar 10 2020, 06:25 PM
Post
#13
|
|
that's what I do! Group: Members Posts: 20,065 Joined: 27-December 02 From: Port Hope, Ontario Member No.: 26 Region Association: Canada |
QUOTE(IronHillRestorations @ Mar 10 2020, 08:57 AM) It's mostly about making sure the bores don't have scratches or gouges that the oil can trace, and that the O-rings don't get pinched on install. (IMG:style_emoticons/default/agree.gif) You need a smooth bore, on my rebuilds I run through the PR tube bores, case and heads with a 220 grit flap wheel. I also radius or deburr any sharp edges that could cut the seals. On top end job you don't want to do the case, but I carefully clean and will use an old flap wheel by hand to smooth out the bore. I also straighten PR tube dimples by running a socket through them. I've used oil, liquid teflon, my favorite is Dow 55 O-ring lube I use that shit on every O-ring. My tubes never "pop" in they slide in, I also use a socket to install the tube with a slight turning action. Once you're done you have to be sure the spring is seated properly. |
|
|
|
| Mikey914 |
Mar 11 2020, 01:18 AM
Post
#14
|
|
The rubber man Group: Members Posts: 12,661 Joined: 27-December 04 From: Hillsboro, OR Member No.: 3,348 Region Association: None |
The seals look too big. We didn't send you those did we. I am working on the VIton but only have the even sizes in stock. Wondering if someone got creative on our side?
The tolerance is close and we are cutting tooling for them now. Just got to get some visors shipped out 1st. |
|
|
|
| ctc911ctc |
Mar 11 2020, 06:32 AM
Post
#15
|
|
Senior Member Group: Members Posts: 892 Joined: 9-June 18 From: boston Member No.: 22,206 Region Association: North East States |
Mike,
I bought these from another vendor - i did not want to go the stock route and took to heart all of the praise of the Vitron seals. They were EXACTLY the same diameter as the ones that I removed. I am doing the other side today - will report back! CTC QUOTE(Mikey914 @ Mar 11 2020, 01:18 AM) The seals look too big. We didn't send you those did we. I am working on the VIton but only have the even sizes in stock. Wondering if someone got creative on our side? The tolerance is close and we are cutting tooling for them now. Just got to get some visors shipped out 1st. |
|
|
|
| ctc911ctc |
Mar 11 2020, 06:56 AM
Post
#16
|
|
Senior Member Group: Members Posts: 892 Joined: 9-June 18 From: boston Member No.: 22,206 Region Association: North East States |
****Update****
I removed the other side last night that found that the seal was wedged on the rim of the seat. Is this common? Also, do these look original? not too concerned just would like to know what the original seals looked like (color)? Thank you! 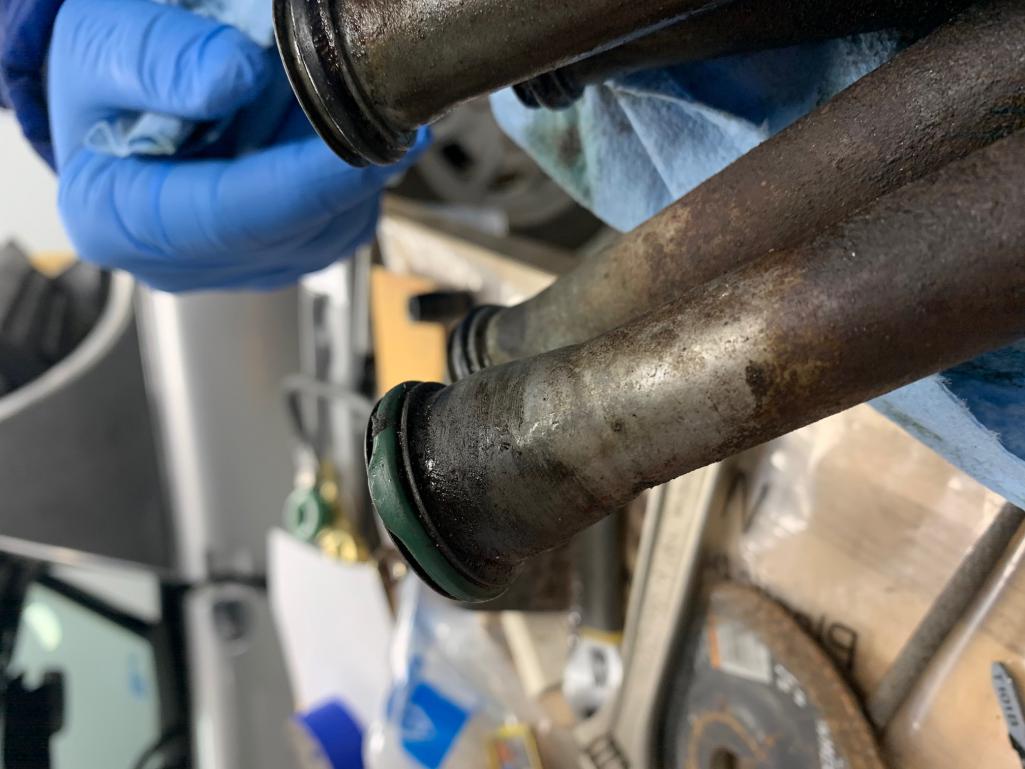 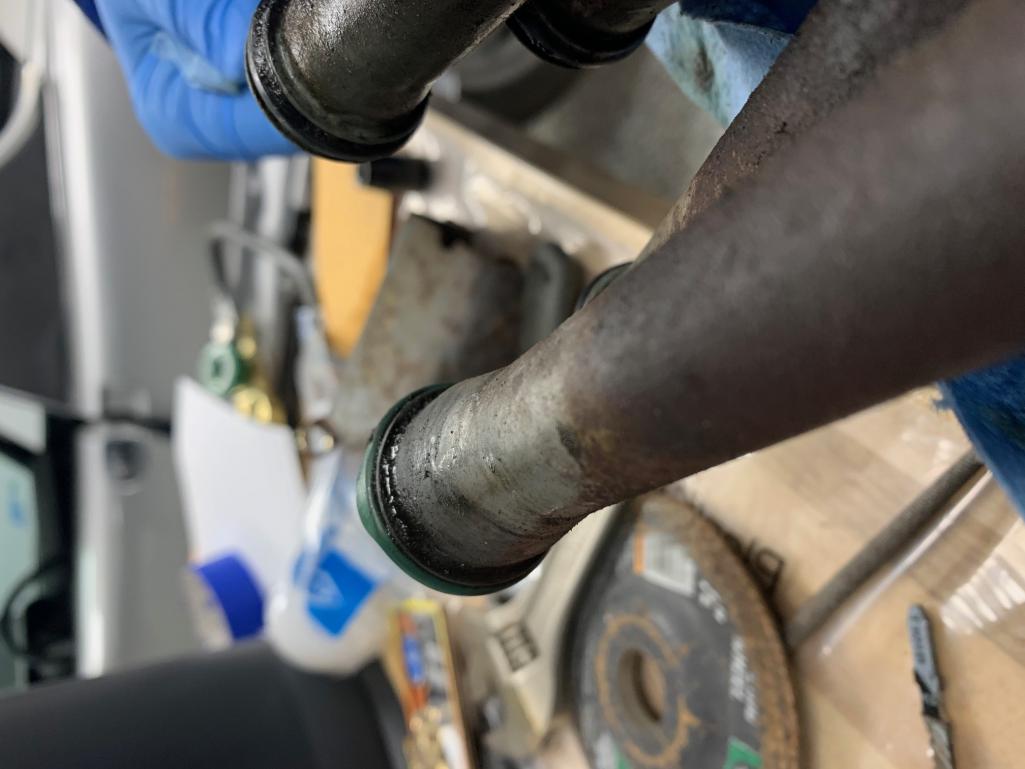 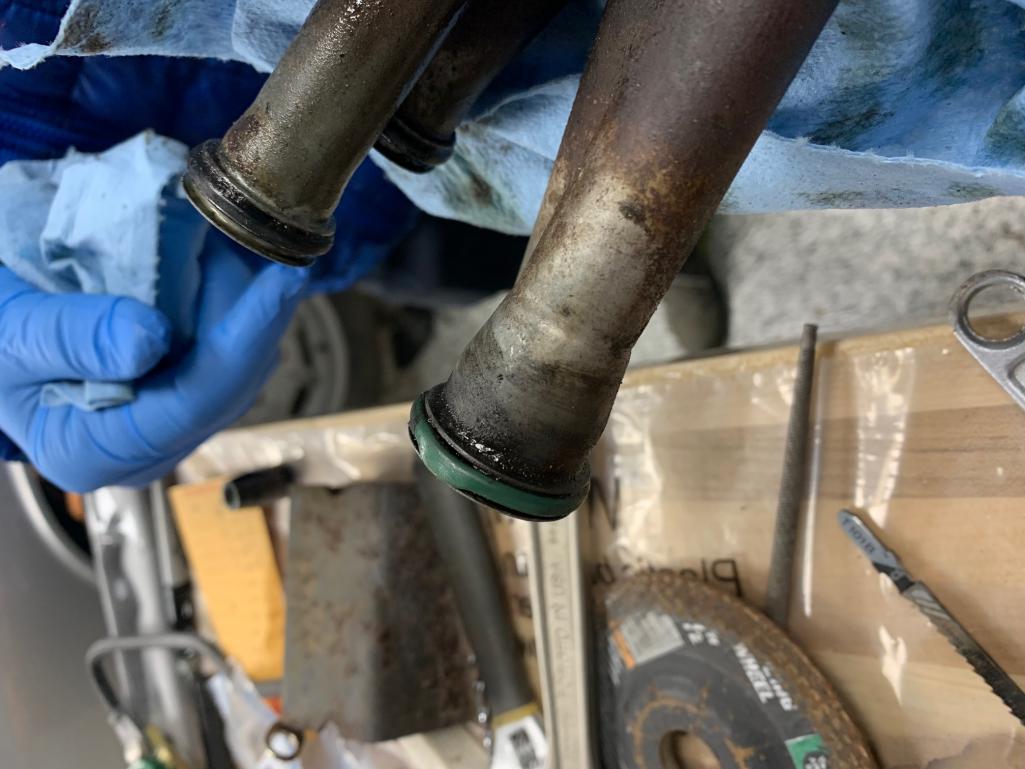 |
|
|
|
| Mikey914 |
Mar 11 2020, 09:44 AM
Post
#17
|
|
The rubber man Group: Members Posts: 12,661 Joined: 27-December 04 From: Hillsboro, OR Member No.: 3,348 Region Association: None |
I have found the difference between the off the shelf and ones that work is literally tenths of a mm. Not discernible by sight.
Just wanted to make sure we didn't make a mistake. |
|
|
|
| IronHillRestorations |
Mar 11 2020, 11:38 AM
Post
#18
|
|
I. I. R. C. Group: Members Posts: 6,717 Joined: 18-March 03 From: West TN Member No.: 439 Region Association: None |
The old PRT seals had a fluted profile, very slight, but I suspect it helped in sealing. I won't use any that have flashing, but that's just me.
|
|
|
|
|
1 User(s) are reading this topic (1 Guests and 0 Anonymous Users)
0 Members:

|
Lo-Fi Version | Time is now: 15th May 2024 - 12:14 AM |
Invision Power Board
v9.1.4 © 2024 IPS, Inc.