|
|
|
Porsche, and the Porsche crest are registered trademarks of Dr. Ing. h.c. F. Porsche AG.
This site is not affiliated with Porsche in any way. Its only purpose is to provide an online forum for car enthusiasts. All other trademarks are property of their respective owners. |
|
|

  |

| Duane921 |
 May 10 2020, 04:11 AM May 10 2020, 04:11 AM
Post
#1
|
|
Newbie  Group: Members Posts: 17 Joined: 29-August 13 From: San Antonio, Texas Member No.: 16,322 Region Association: None |
I am about to replace a floor pan in my 73 914. Can anyone recommend the best replacement parts for me? Thanks for any replies.
|
   |

 
|
| Duane921 |
May 10 2020, 04:58 AM
Post
#2
|
|
Newbie Group: Members Posts: 17 Joined: 29-August 13 From: San Antonio, Texas Member No.: 16,322 Region Association: None |
 |
|
|
|
| BeatNavy |
May 10 2020, 05:14 AM
Post
#3
|
|
Certified Professional Scapegoat Group: Members Posts: 2,962 Joined: 26-February 14 From: Easton, MD Member No.: 17,042 Region Association: MidAtlantic Region |
http://www.restoration-design.com/store/category/914
Resto Design. They have the metal you'll need. Looks like you need primarily back half section. Floor plan contributes to structural integrity of the car, so remember to brace before removing / welding. |
|
|
|
| Duane921 |
May 10 2020, 05:45 AM
Post
#4
|
|
Newbie Group: Members Posts: 17 Joined: 29-August 13 From: San Antonio, Texas Member No.: 16,322 Region Association: None |
Ive built supports for the door wells and all measurements are good. Just wanted parts on hand before i start cutting. Thanks for the advice.
|
|
|
|
| 911GT2 |
May 10 2020, 06:50 AM
Post
#5
|
|
Member Group: Members Posts: 195 Joined: 2-March 11 From: The Netherlands Member No.: 12,773 Region Association: Europe |
QUOTE(Duane921 @ May 10 2020, 03:45 AM)  Ive built supports for the door wells and all measurements are good. Just wanted parts on hand before i start cutting. Thanks for the advice. They also got a vid out on YouTube. Might be helpful https://www.youtube.com/watch?v=https://youtu.be/3kMOMNhxg-A |
|
|
|
| Superhawk996 |
May 10 2020, 09:04 AM
Post
#6
|
|
914 Guru Group: Members Posts: 7,825 Joined: 25-August 18 From: Woods of N. Idaho Member No.: 22,428 Region Association: Galt's Gulch |
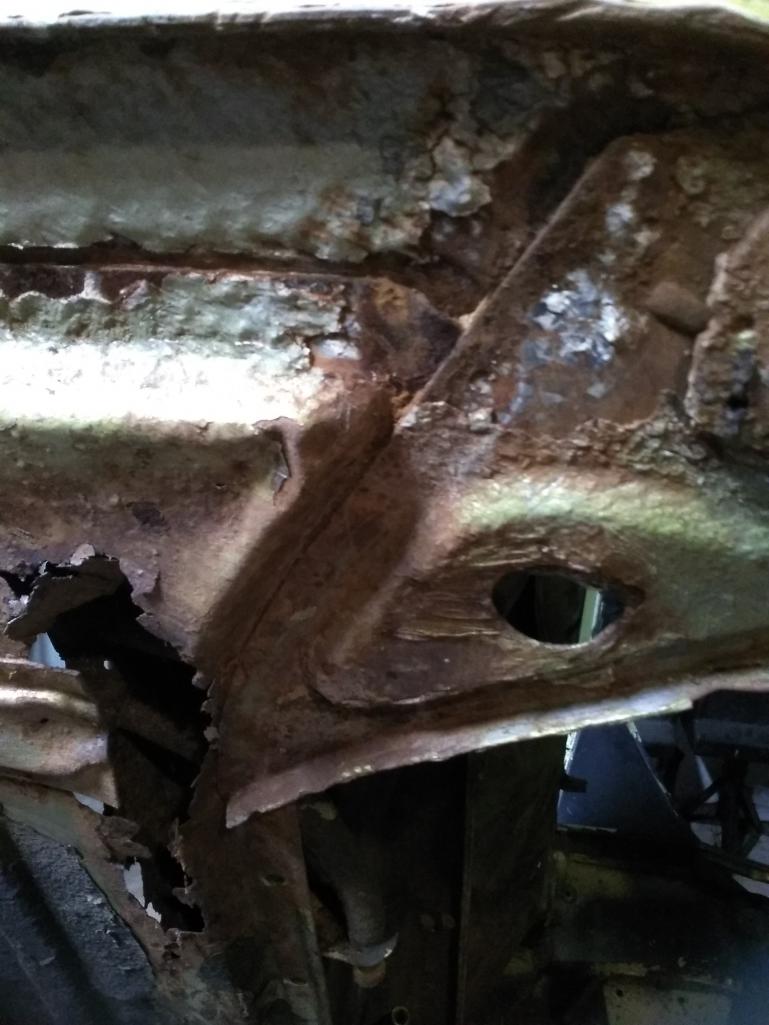
QUOTE(Duane921 @ May 10 2020, 06:11 AM) I am about to replace a floor pan in my 73 914. Can anyone recommend the best replacement parts for me? Thanks for any replies. You'll likely need much more than just a floor pan. Be sure to check the condition of the longitudinal bottoms. The floor pan welds to the bottom of the longitudinals. If they are not solid you'll be trying to weld to rust. That doesn't work so well. (IMG:style_emoticons/default/sad.gif) Also check the longitudinal where the seat belt attachment is. Many of these rusty cars are a rolling death trap since that seat belt attachment is also rusted out and will not hold the force of an impact should it be necessary. Yours appears to be pretty far gone. Don't shy away from a proper fix. Dig in and just do it! |
|
|
|
| Duane921 |
May 10 2020, 04:09 PM
Post
#7
|
|
Newbie Group: Members Posts: 17 Joined: 29-August 13 From: San Antonio, Texas Member No.: 16,322 Region Association: None |
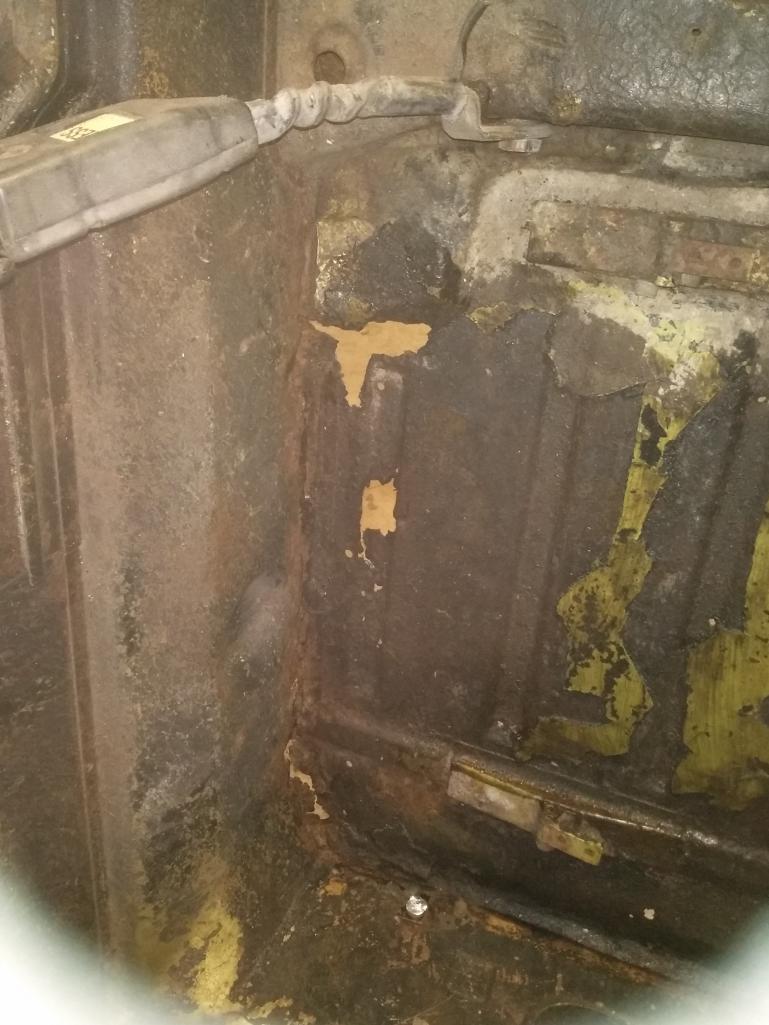
I am replacing the cross members and inner firewall longitudinal. The picture is the worst of it. Want to make sure i get the best parts i can before the work begins. The only thing i havent figured is how to get the floor pan between the support in the engine well and the outer firewall longitudinal. Any ideas there?
|
|
|
|
| Superhawk996 |
May 10 2020, 05:53 PM
Post
#8
|
|
914 Guru Group: Members Posts: 7,825 Joined: 25-August 18 From: Woods of N. Idaho Member No.: 22,428 Region Association: Galt's Gulch |
Picture?
If you talking about the portion between the inner bulkhead and the outer bulkhead, that will be part of the rear floor pan. Maybe I'm not understanding properly? |
|
|
|
| Duane921 |
May 10 2020, 06:30 PM
Post
#9
|
|
Newbie Group: Members Posts: 17 Joined: 29-August 13 From: San Antonio, Texas Member No.: 16,322 Region Association: None |
It looks like the floor pan fits above this bracket
 |
|
|
|
| Duane921 |
May 10 2020, 06:36 PM
Post
#10
|
|
Newbie Group: Members Posts: 17 Joined: 29-August 13 From: San Antonio, Texas Member No.: 16,322 Region Association: None |
I am not sure how to get the old floor pan out and the new one in here.
|
|
|
|
| bbrock |
May 10 2020, 07:56 PM
Post
#11
|
|
914 Guru Group: Members Posts: 5,269 Joined: 17-February 17 From: Montana Member No.: 20,845 Region Association: Rocky Mountains |
That bracket gets taken off as part of the floor removal and replaced after the new floor is in. You can salvage the ones you have if they are in good condition. The easier way is to order those when you order the floor. Look in the kits section of the RD web site. They have package deals for floor replacement. Can't remember if there is a package deal for just rear replacement but take a look.
Floor pan removal is easiest with the car on a lift or, better yet, a rotisserie. You cut out all the spot welds around the perimeter of the floor and along the tunnel and cross member. A Blair spot welder cutter set is great for cutting the spots. You can cut the tunnel and cross member welds from inside the car but the perimeter welds have to be done from underneath unfortunately. It will be a lot of work, but rewarding. |
|
|
|
| bkrantz |
May 10 2020, 08:36 PM
Post
#12
|
|
914 Guru Group: Members Posts: 8,675 Joined: 3-August 19 From: SW Colorado Member No.: 23,343 Region Association: Rocky Mountains |
I will second what Brent (and others) wrote. Replacing the floor pan (in sections) is pretty straight forward, and easier on a lift or some way to turn the car sideways or upside down. A good spot weld cutting bit, and lots of fun time, will detach the jack point triangles and most of the floor seams (along the longitudinals on the sides and the inner fire wall). Where the floor joins the outer firewall (in the engine compartment) and the center tunnel there are both spot welds and seam welding).
But the real problem is finding the limit of rust. In addition to the floor, you need to inspect the longs, the inner and outer firewall, and the suspension mounting (especially right side). And don't forget where the floor meets the front bulkhead. Get a good light an a sharp ice pick and stab everything hard. |
|
|
|
| Duane921 |
May 11 2020, 03:13 AM
Post
#13
|
|
Newbie Group: Members Posts: 17 Joined: 29-August 13 From: San Antonio, Texas Member No.: 16,322 Region Association: None |
Love the advice. Ill add the jack plates to my list im ordering and just replace with new. Sounds like im on the right track. I've built a rotisserie that its on now because i knew it would make things a lot easier and it has. This is my second 914 resto but the first that needs body parts replaced. Theres some work to be done in the battery hell hole that will need to be done as well. The rest of the car has a little minor surface rust on the bottom but nothing that needs more than sanding and painting. Once again, thanks for all the advice. Let the fun begin.
|
|
|
|
| jaredmcginness |
May 11 2020, 05:11 AM
Post
#14
|
|
... Group: Members Posts: 509 Joined: 12-June 19 From: Baltimore Member No.: 23,209 Region Association: MidAtlantic Region |
I had an enjoyable time doing my floors. Stock the fridge, put on some music. If you get mad, come back the next day!
It really is pretty straight forward. Welding on your back sucks a bunch. The mid part of my thread (in sig) covers my full long and floor repair, if photos will help you. Enjoy! |
|
|
|
| bbrock |
May 11 2020, 07:46 AM
Post
#15
|
|
914 Guru Group: Members Posts: 5,269 Joined: 17-February 17 From: Montana Member No.: 20,845 Region Association: Rocky Mountains |
I'll pass along another bit of great advice I got when I started my build. If you have structural repairs like hell hole and longs, get the car level and well supported and do those first before putting the car on the roisserie for the floor. The rotisserie hangs all the weight from the nose and tail so a car with weak structure will sag.
|
|
|
|
| Duane921 |
May 11 2020, 09:59 AM
Post
#16
|
|
Newbie Group: Members Posts: 17 Joined: 29-August 13 From: San Antonio, Texas Member No.: 16,322 Region Association: None |
I leveled everything and found measurements from RD. Made supports for door wells and top. Then put her on the stand. Was more afraid that it would break in half. I want this to be straight with zero issues when she is done. Thanks for the warning.
|
|
|
|
| Duane921 |
May 11 2020, 11:11 AM
Post
#17
|
|
Newbie Group: Members Posts: 17 Joined: 29-August 13 From: San Antonio, Texas Member No.: 16,322 Region Association: None |
Brent, if you have any tips or tricks to make sure it is straight, I'd love hearing them. The more I can check the better I'll feel.
|
|
|
|
| bbrock |
May 11 2020, 11:53 AM
Post
#18
|
|
914 Guru Group: Members Posts: 5,269 Joined: 17-February 17 From: Montana Member No.: 20,845 Region Association: Rocky Mountains |
I'll let others answer that since lots of people know way more than me. These might be the same as you have from RD, but if you click on the '914 Info' link in the upper right corner of the forum page, there are body dimension diagrams and other great info. I didn't get too crazy with mine. I made a cart that supported the chassis at the suspension pickups front and rear and got the car where the longs were level. Then I just checked and rechecked dimensions. Once the outer longs come off, the chassis will flex like rubber and you can dial in most of the critical dimensions with the door braces. Clamping and screwing in the long replacements seemed like a good gauge for making sure things were straight and true. Then it was just a matter of keeping the heat down while welding to minimize shrinking.
I've seen smarter people use laser levels and even jigs to lock in critical dimensions. I have driven mine yet so might have screwed it up for all I know. (IMG:style_emoticons/default/smile.gif) |
|
|
|
| Duane921 |
May 17 2020, 05:45 AM
Post
#19
|
|
Newbie Group: Members Posts: 17 Joined: 29-August 13 From: San Antonio, Texas Member No.: 16,322 Region Association: None |
Parts are due in this week. Is there a best sequence to remove and replace the rear floor pan, center cross member, and inner firewall? Each of these are single pieces. Figured it would be better and stronger than getting the half pieces.
|
|
|
|
|
1 User(s) are reading this topic (1 Guests and 0 Anonymous Users)
0 Members:

|
Lo-Fi Version | Time is now: 1st May 2026 - 02:20 AM |
Invision Power Board
v9.1.4 © 2026 IPS, Inc.