|
|
|
Porsche, and the Porsche crest are registered trademarks of Dr. Ing. h.c. F. Porsche AG.
This site is not affiliated with Porsche in any way. Its only purpose is to provide an online forum for car enthusiasts. All other trademarks are property of their respective owners. |
|
|

  |

| flat4guy |
 May 26 2020, 08:53 PM May 26 2020, 08:53 PM
Post
#21
|
|
Member  Group: Members Posts: 483 Joined: 10-October 16 From: nor cal Member No.: 20,484 Region Association: Northern California |
Owning a Willow Green 914 as well I am enjoying this thread.
|
   |

 
|
| djway |
May 26 2020, 10:28 PM
Post
#22
|
|
Senior Member Group: Members Posts: 787 Joined: 16-October 15 From: Riverside Member No.: 19,266 Region Association: Southern California |
Car is looking good.
When I was looking into cams a while back for FI I learned two things HEAT yada yada yada VACUUM yada yada yada something about the overlap in the carb cams does not sit well with the FI. I believe it was more so with D Jet than L Jet. The Web 73 was a much as anyone suggested for FI. |
|
|
|
| dereknlee |
May 26 2020, 10:42 PM
Post
#23
|
|
Member Group: Members Posts: 73 Joined: 16-March 12 From: Shoreline, WA Member No.: 14,259 Region Association: Pacific Northwest |
Thanks guys. (IMG:style_emoticons/default/beerchug.gif) When I spoke with Webcam they said the same about the 73 grind being their go to.
Most of my evening's work was cleaning up hardware and painting suspension bits. But I did want to share my attempt to phosphate etch some hardware following the steps outlined here. I began room temperature etchant, that did nothing. I don't have a hot plate but I do have an old coffee maker, so I dug that out and used the keep warm function to heat the etchant. That had a dramatic effect. Results were okay, need to keep experimenting with metal prep, time and temperature. I'm hoping thrift shops open soon so I can get a hot plate. Here's a bolt in process. 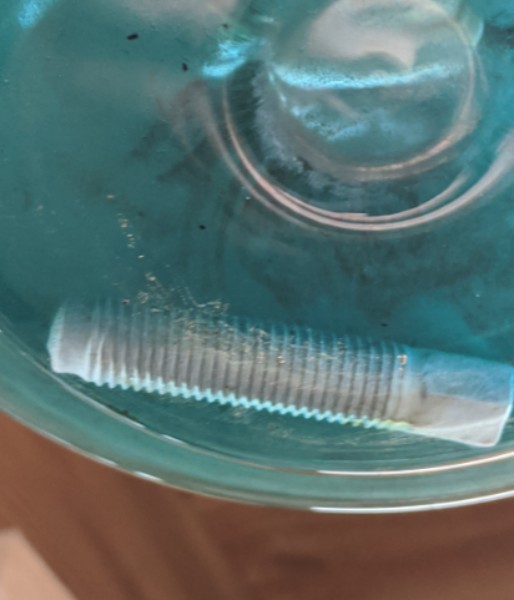 And here it is after rinsing and wiping down with oil, with a bare un-treated bolt on the right to show the color difference. 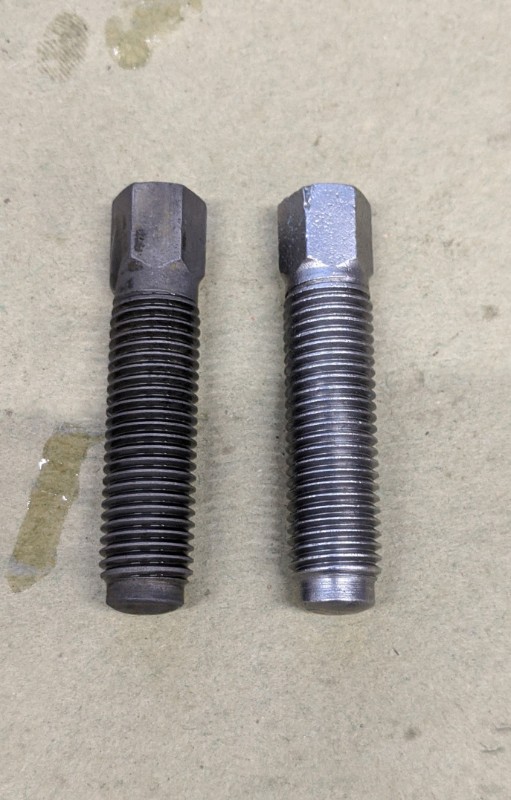 -Derek |
|
|
|
| bbrock |
May 27 2020, 08:17 AM
Post
#24
|
|
914 Guru Group: Members Posts: 5,269 Joined: 17-February 17 From: Montana Member No.: 20,845 Region Association: Rocky Mountains |
Hi Derek, I am loving your thread! Thanks for posing the link to the black phosphate etching process. I've been using CopyCad's black chromate bath with good results. It produces a black iridescent finish and works easily at room temp. Neat to see the black phosphae process in practice. Keep up the great work! (IMG:style_emoticons/default/beerchug.gif)
|
|
|
|
| dereknlee |
Jun 1 2020, 10:47 PM
Post
#25
|
|
Member Group: Members Posts: 73 Joined: 16-March 12 From: Shoreline, WA Member No.: 14,259 Region Association: Pacific Northwest |
Bit of a frustrating weekend, so I needed an easy win - which tonight was re-assembling the rear shocks.
 This weekend I built version 2.0 of my plating setup. Very happy with the zinc plating results.  The frustration came with my attempts at a yellow chromate conversion coating. I've found a couple different DIY formulations that I used as a starting point. I experimented with changing the acidity and concentration of sodium dichromate. On the second day I finally had a mix that was adhering to the parts through a light rinse, color was a bit orange:  But the color quickly turned brown during drying. Today when I lightly buffed the parts to remove brown deposits there was almost no color left (seat adjuster piece is commercially done to show the color contrast). 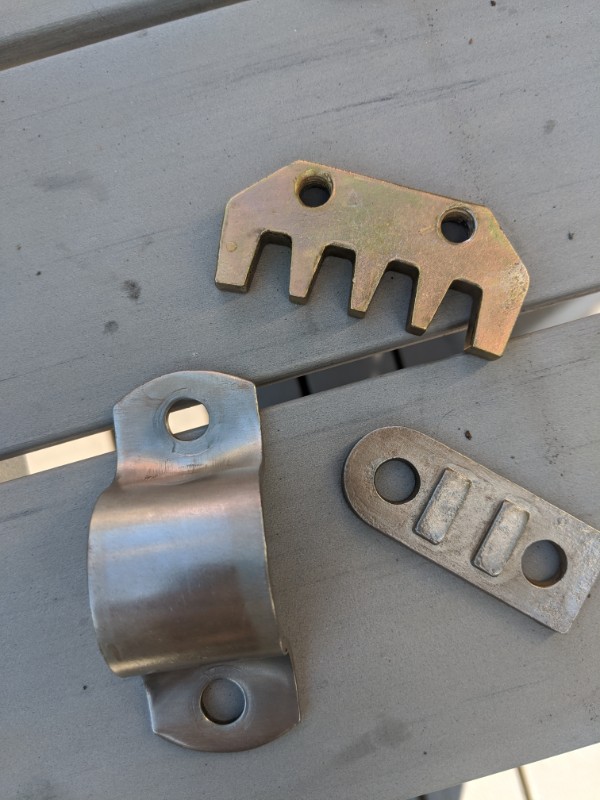 I've got a couple more things I'll try this week, but if results don't change I think I'll just call it quits for now and get these parts professionally plated. -Derek |
|
|
|
| bbrock |
Jun 2 2020, 07:59 AM
Post
#26
|
|
914 Guru Group: Members Posts: 5,269 Joined: 17-February 17 From: Montana Member No.: 20,845 Region Association: Rocky Mountains |
I wish I had space to spread my setup out a little more like you have. Very nice! Even using the CopyCad yellow chromate solution (which I highly recommend), I found it a little finicky and was definitely the trickiest part of all the plating I did. A few things I gleaned from searches that helped me were:
- heat the chromate bath with an aquarium heater. It doesn't stick well when cold. - if you use brightener in the zinc bath, try reducing it for yellow parts. I use the CopyCad brightener with I love but have a tendency to overuse because it can give a beautiful near chrome finish. It interferes with conversion coatings though. - dip the part in 10% HCl acid just until it is about to fizz, then rinse, and go immediately to the chromate. Apparently the zinc needs to be fresh and soft for the chromate to stick well. - dip the part just long enought to get a light straw color when it comes out of the bath and rinse. Too thick of a coating tended to just rub off later rather than bond to the part. -After rinse, dry the part with compressed air on very low pressure (just a couple psi). It should darken and turn iridescent right away. Parts that didn't never dried right and I learned to just clean them in HCL and try again. Quick drying also eliminated problems with the coatings splitting as they dried i my cool shop temps. Loving the progress! |
|
|
|
| Chris H. |
Jun 2 2020, 09:21 AM
Post
#27
|
|
Senior Member Group: Members Posts: 4,088 Joined: 2-January 03 From: Chicago 'burbs Member No.: 73 Region Association: Upper MidWest |
Looking great so far! Of all the great 914 colors...Willow Green is one I could stare at all day.
|
|
|
|
| dereknlee |
Jun 2 2020, 07:12 PM
Post
#28
|
|
Member Group: Members Posts: 73 Joined: 16-March 12 From: Shoreline, WA Member No.: 14,259 Region Association: Pacific Northwest |
@bbrock Thank you for the advice! That gives me hope and a few more things to try. Much appreciated!
I had a terrarium heater attached to my main chromate mix thinking that a little warmth might help - but I never measured the temperature. That heater doesn't draw much power, so it took a long time to cause the container to feel warm. I noticed that as the day went on adhesion got better and better, but I was changing too many other variables to attribute it to any one thing - maybe the mix was finally getting warm enough to work. Do you find that the process is very sensitive to residue or cleanliness of the part? I picked up that it was important for the parts going into chromate to pass a water break test. But it seemed no matter what solvent or detergent/water /rinse I could not get the water to sheet on the freshly plated parts - it always beaded up. Maybe the light etch you recommend will help (whether or not water break is necessary). I might have to break down and buy some of the Casewell supplies - they do seem highly regarded. I was looking at that Sunday night but saw shipments are on a two week delay. I would really like to get a homebrew mix to work - videos on youtube lead me to believe that it is possible and can produce good results- but I wish there was a greater body of knowledge available on the methods. -Derek |
|
|
|
| dereknlee |
Jun 2 2020, 07:12 PM
Post
#29
|
|
Member Group: Members Posts: 73 Joined: 16-March 12 From: Shoreline, WA Member No.: 14,259 Region Association: Pacific Northwest |
QUOTE(Chris H. @ Jun 2 2020, 08:21 AM)  Looking great so far! Of all the great 914 colors...Willow Green is one I could stare at all day. Me too. (IMG:style_emoticons/default/beerchug.gif) |
|
|
|
| bbrock |
Jun 2 2020, 09:52 PM
Post
#30
|
|
914 Guru Group: Members Posts: 5,269 Joined: 17-February 17 From: Montana Member No.: 20,845 Region Association: Rocky Mountains |
QUOTE(dereknlee @ Jun 2 2020, 07:12 PM) @bbrock Thank you for the advice! That gives me hope and a few more things to try. Much appreciated! I had a terrarium heater attached to my main chromate mix thinking that a little warmth might help - but I never measured the temperature. That heater doesn't draw much power, so it took a long time to cause the container to feel warm. I noticed that as the day went on adhesion got better and better, but I was changing too many other variables to attribute it to any one thing - maybe the mix was finally getting warm enough to work. Do you find that the process is very sensitive to residue or cleanliness of the part? I picked up that it was important for the parts going into chromate to pass a water break test. But it seemed no matter what solvent or detergent/water /rinse I could not get the water to sheet on the freshly plated parts - it always beaded up. Maybe the light etch you recommend will help (whether or not water break is necessary). I might have to break down and buy some of the Casewell supplies - they do seem highly regarded. I was looking at that Sunday night but saw shipments are on a two week delay. I would really like to get a homebrew mix to work - videos on youtube lead me to believe that it is possible and can produce good results- but I wish there was a greater body of knowledge available on the methods. -Derek I'm going to tag @doug_b_928 on this because he's been DIY plating too and gotten more consistently good results than me. He's also done both epsom salt and Caswell zinc baths. Also, don't get the idea I have this all figured out. I'm still learning and have failures, but did get to where I was mostly succeeding with the yellow chromate. On the chromate temp, I shot for around 90F. I think I read that on the Caswell forum. My understanding was that the water break test was for the zinc plating. I know if the parts weren't perfectly clean and grease free, the zinc plating would fail. After the zinc I would immediately rinse the part in distilled water, then a brief dip in 5% HCl, then into a separate bucket of distilled, then finally to the chromate. My thinkining was if the part was clean enough to get a good zinc plate, it should still be clean for the chromate. I'm with you on wanting the home brew but in the end, I couldn't resist the simplicity of just diluting the Caswell products per instructions. There is still a learning curve and art to it. Right now I have a contaminated zinc bath I think from plating cast iron. I need to figure out the best way to filter it if possible. |
|
|
|
| doug_b_928 |
Jun 3 2020, 05:02 PM
Post
#31
|
|
Senior Member Group: Members Posts: 730 Joined: 17-January 13 From: Winnipeg Member No.: 15,382 Region Association: Canada |
As Brent said I've used both epsom salt/vinegar and Caswell baths. The epsom salt/vinegar bath takes the yellow chromate very well but it's a bit more work and the result is not nearly as bright/shiny as the Caswell. The former looks good until you see the latter (which comes out like jewellery). I don't follow all of rules (I don't heat and I just clean with a degreaser by hand after blasting), but have had mostly good results so far (with the exception of some of the stubborn seatbelt parts--I think the problem may have been that the parts were too cold). I started plating with the epsom salt/vinegar bath and then moved up to the Caswell system. I'm keeping the epsom salt/vinegar bath for any parts that I'm concerned might contaminate the Caswell bath. Also, if I need to plate anything that's too big for the container I use for my Caswell bath I can always make a large batch of the epsom salt. In short, it's good to have/use both. But I do recommend getting the Caswell materials. It's money well spent IMHO.
|
|
|
|
| dereknlee |
Jun 3 2020, 10:43 PM
Post
#32
|
|
Member Group: Members Posts: 73 Joined: 16-March 12 From: Shoreline, WA Member No.: 14,259 Region Association: Pacific Northwest |
I may have to give caswell a try. I am happy with my epsom salt/vinegar/zinc sulfate results, but if I had a better setup I bet my standards would be raised.
This evening I tried heating a chromate mix that had previously not worked at all for me (ran off parts without any color change). I heated it to 90 degrees and what do you know - it took to the parts! It worked so much better that I could reduce the dunk time to 10-20 seconds and the color was improved. Still not vibrant and no iridescence, but a step in the right direction. I then made up a new small chromate batch using distilled water (had been using tap until that point). I iterated about 10 times, gradually working up the acidity and sodium dichromate levels. The compressed air suggestion really helped the cycle time. Can't say I found the right ratio yet, but I learned some things and have some ideas for things to try. Keeping track of everything in a google doc so I can re-trace my steps when (if) I do find something that works. Thanks for the suggestions - helped a bunch! -Derek |
|
|
|
| dereknlee |
Jun 4 2020, 10:37 PM
Post
#33
|
|
Member Group: Members Posts: 73 Joined: 16-March 12 From: Shoreline, WA Member No.: 14,259 Region Association: Pacific Northwest |
Continued with the chromate bath development this evening. Acidity seems to be the key. Finally getting better color with a hint of iridescence. Still a bit too brown though. I'm going to keep increasing acidity and see what changes.
Bottom results are some parts from last Sunday that left me super disappointed, numbers should be taken with a grain of salt. The precision improves in the more recent results, top two being from this evening. 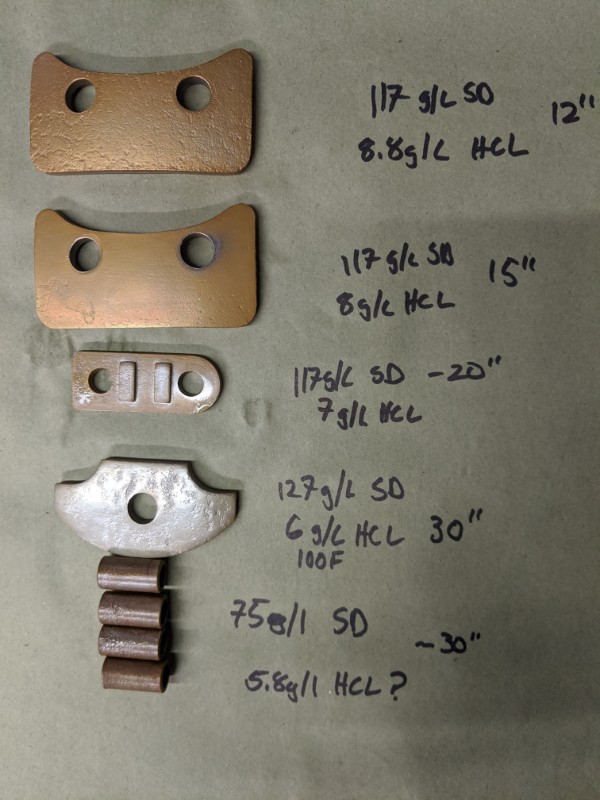 -Derek |
|
|
|
| Spoke |
Jun 4 2020, 10:47 PM
Post
#34
|
|
Jerry Group: Members Posts: 7,398 Joined: 29-October 04 From: Allentown, PA Member No.: 3,031 Region Association: None |
Car looks great. Nice chemistry set too.
|
|
|
|
| dereknlee |
Jun 7 2020, 08:56 PM
Post
#35
|
|
Member Group: Members Posts: 73 Joined: 16-March 12 From: Shoreline, WA Member No.: 14,259 Region Association: Pacific Northwest |
Plating update, and some actual car progress later on below.
I have settled on a chromate formula that I like, the measurement precision isn't super tight - but it doesn't seem to matter that much if concentrations are up or down from these values by a bit (like 5 ml/L on the acid, 50+ g/L for the sodium): Sodium Dichromate Dihydrate - 210 g/L Hydrochloric (muriatic) Acid - 24 ml/L Temperature - 70F Exposure - 4-6 seconds I plated a batch of parts on Saturday afternoon, let them bake for 3-4 hours. Had a few minor issues with adhesion (too much current I think). And also had a lot of trouble getting the plating in to tight corners (creases in spring clips, corner of bearing plates). 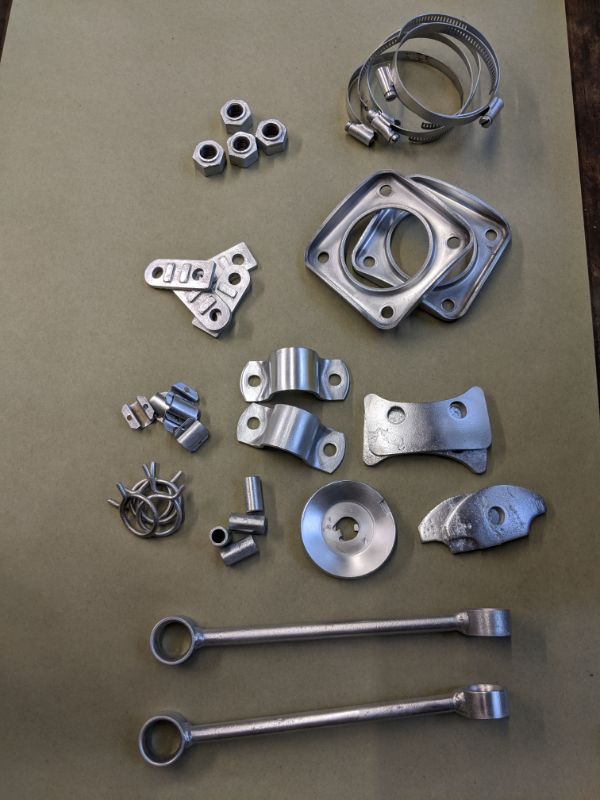 Sunday morning I ran the dichromate treatment. Backing off on the temperature from 90F to 70F helped keep the color from developing to as orange/brown (like the front sway bar bracket backing plates). My takeaway from today is that I need to work on surface finish and brightness of the basic zinc plate. The parts with the worst plate quality (bearing retainers and sway bar links) had the worst color after chromate. I dipped some new CV joint boots that were commercially done, bright zinc to begin with, and they turned out the best of any parts I did - with minimal prep too. So I plan to get some brightener and dial in my process for larger parts. Still far from perfect, if I see better results with brightener/practice I may strip some down and try again. But for now: good enough for the girls I go out with. These parts of course would have turned out better had I taken them to the pros, but being able to plate parts in small batches as the need arises - or turn bright/blue bolts yellow has me pretty stoked. 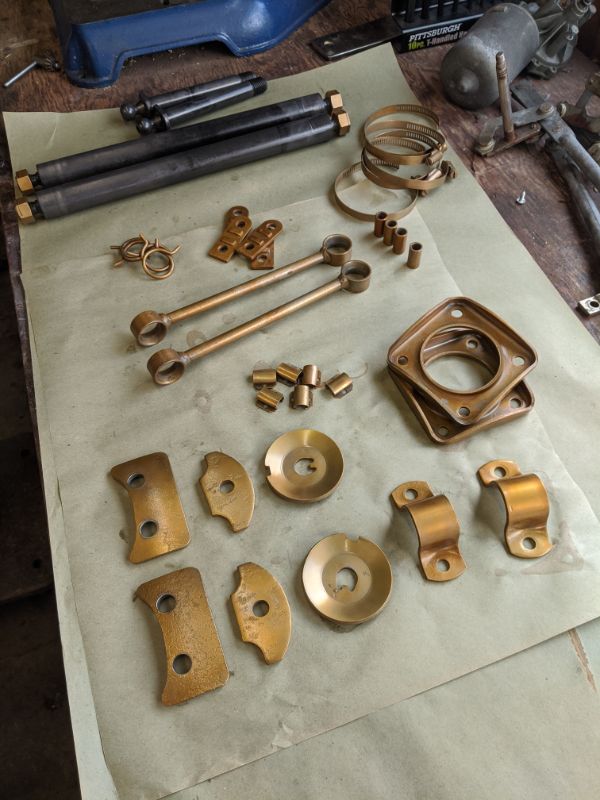 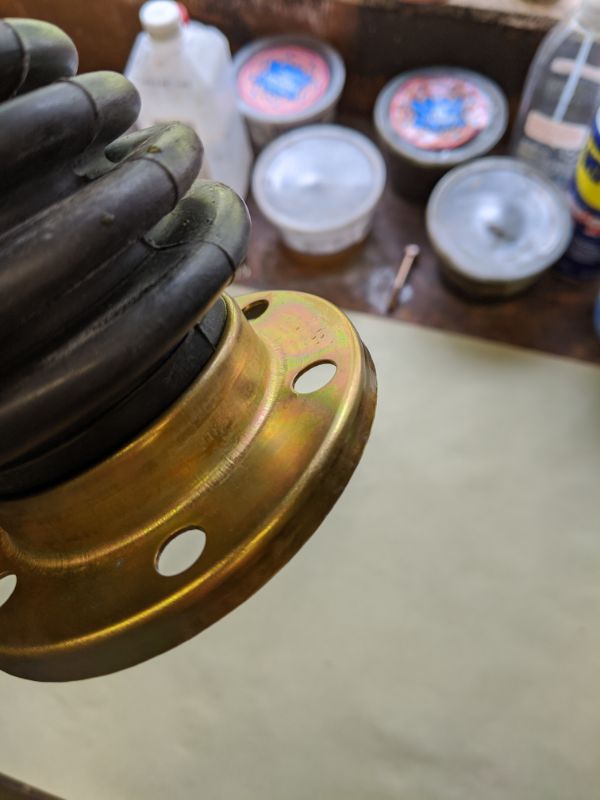 On to what feels more like actual car progress: Thanks to @mepstein I have a replacement driverside strut housing. As to why I needed one, long story short is some PO decided to take an 15/32 drill to the pinch bolt cross hole to make a wedge bolt ball joint "work". And the ball joint bore was ovalized. Contemplated a oversize helicoil, but thanks to Mark - that wasn't necessary (and wouldn't have fixed the wallerd bore anyway). However, the brake hose bracket didn't match what was on my struts and having the driverside not match the passenger side just won't do, so: As received:  Trashed housing meet Mr. Grinder: 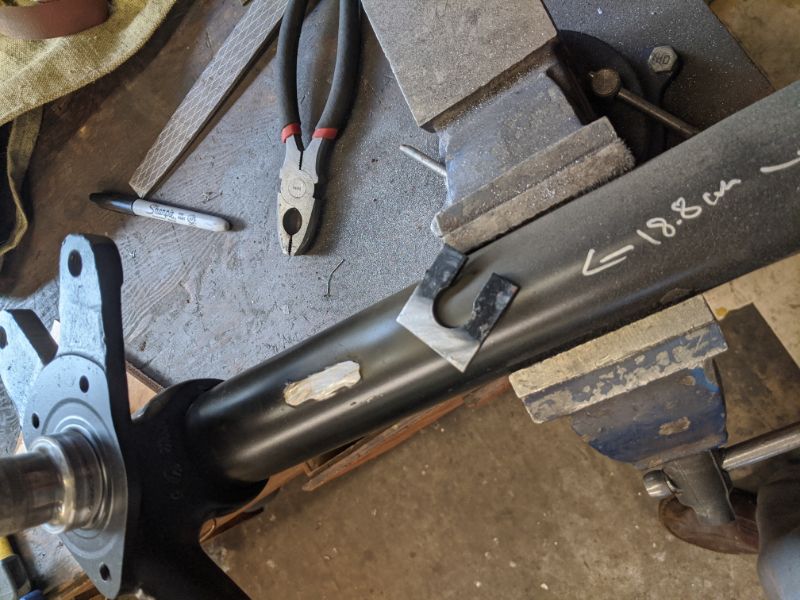 Weld into place (adjusting for skewed cut): 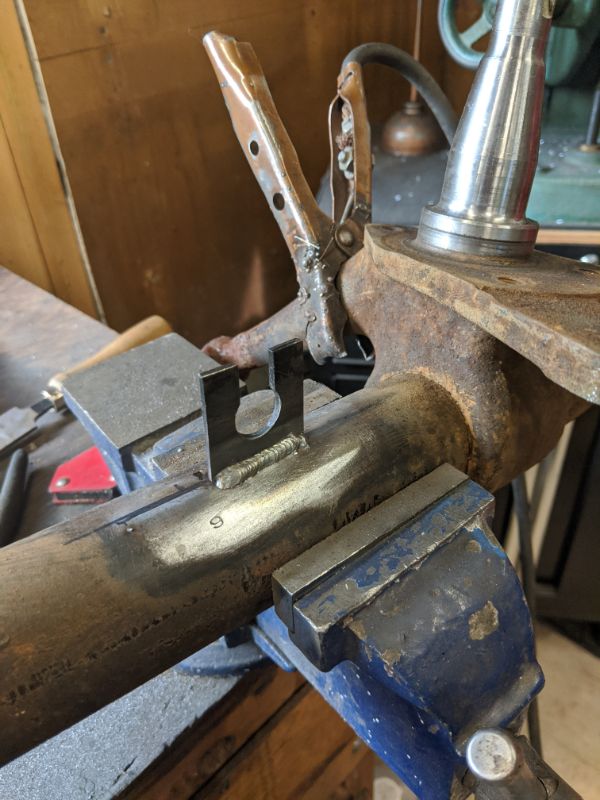 So now it is ready for bead blast and paint to match the other side. Thanks again Mark! Also got the cleaned up trailing arm pivots installed with new 914rubber bushings. That went a lot better than expected. -Derek |
|
|
|
| ben*james |
Jun 7 2020, 09:17 PM
Post
#36
|
|
LIFER Group: Members Posts: 525 Joined: 16-February 09 From: Portland Oregon Member No.: 10,062 Region Association: Pacific Northwest |
Derek -
Great thread. Nice to see all the work and the solid outcomes. Keep it up. Inspirational! |
|
|
|
| bbrock |
Jun 7 2020, 09:46 PM
Post
#37
|
|
914 Guru Group: Members Posts: 5,269 Joined: 17-February 17 From: Montana Member No.: 20,845 Region Association: Rocky Mountains |
Nice work overall and great progress on the plating! If you haven't seen this, it's worth watching this guy's vid on epsom salt plating method. Even for those of you not interested in plating, there is a priceless bit about 12:55 or so in. Anyway, he talks about polishing after the zinc to shine the parts up before chromate. The Caswell bath with brightener comes out almost like chrome so no need to polish. Of course, you pay for it.
And on the baking, this is worth a read but the important stuff is on page 20: http://www.boltcouncil.org/files/HydrogenE...ers-Brahimi.pdf Upshot is that you only need to worry about embrittlement or baking for hardware higher than grade 10. I was never able to figure out how to get plating into some of those interior corners. Rotating and repositioning the piece during plating helped, but some pieces are just stubborn. I think that's where the real art comes in. Keep up the great work! https://www.youtube.com/watch?v=UF-lhfpwlMs |
|
|
|
| dereknlee |
Jun 7 2020, 10:09 PM
Post
#38
|
|
Member Group: Members Posts: 73 Joined: 16-March 12 From: Shoreline, WA Member No.: 14,259 Region Association: Pacific Northwest |
Thanks Ben! Your car is (IMG:style_emoticons/default/drooley.gif)
Brent, Thanks for the link re not needing to baking mild steel parts. Good to know. That was one of the videos I watched in the lead up to this. I found the youtube videos both inspiring and frustrating - they get great results but I can't figure out how. They either don't say what they are using for the chromate mix, or the formulas they throw out didn't work for me. One of the videos that comes up as a top result claims to get good results with 1/6th the acid content that I'm using (but they said they add acid when it stops working - so who really knows what they have). I adopted the rinsing technique from the video you linked to, but after doing a bunch of parts I was diluting my mix so much as to have a non-trivial effect on concentration, so now I have a separate bucket for rinsing. Caswell brightener is on order. -Derek |
|
|
|
| PanelBilly |
Jun 7 2020, 10:11 PM
Post
#39
|
|
914 Guru Group: Members Posts: 5,969 Joined: 23-July 06 From: Kent, Wa Member No.: 6,488 Region Association: Pacific Northwest |
Everything looks so good. Don't worry if the colors aren't perfect. I wish this home bound event would end soon, so I could help
|
|
|
|
| dereknlee |
Jun 7 2020, 10:46 PM
Post
#40
|
|
Member Group: Members Posts: 73 Joined: 16-March 12 From: Shoreline, WA Member No.: 14,259 Region Association: Pacific Northwest |
QUOTE(PanelBilly @ Jun 7 2020, 09:11 PM) Everything looks so good. Don't worry if the colors aren't perfect. I wish this home bound event would end soon, so I could help Thanks Billy! I'd love to host a meeting of the PNW braintrust - bbq season will start July 5 and I am happy to provide all the Ranier and Fremont beers necessary to fuel thoughtful discussion! |
|
|
|
|
1 User(s) are reading this topic (1 Guests and 0 Anonymous Users)
0 Members:

|
Lo-Fi Version | Time is now: 16th June 2026 - 07:11 AM |
Invision Power Board
v9.1.4 © 2026 IPS, Inc.