|
|
|
Porsche, and the Porsche crest are registered trademarks of Dr. Ing. h.c. F. Porsche AG.
This site is not affiliated with Porsche in any way. Its only purpose is to provide an online forum for car enthusiasts. All other trademarks are property of their respective owners. |
|
|

  |

| Montreal914 |
 Jun 7 2020, 10:19 PM Jun 7 2020, 10:19 PM
Post
#1
|
|
Senior Member  Group: Members Posts: 1,544 Joined: 8-August 10 From: Claremont, CA Member No.: 12,023 Region Association: Southern California |
I am in the process of replacing the trunk floor with the RD repair panel. I have read the ~8 threads I could find on this subject but unfortunately didn't find all my answers.
My cross member supporting the gearbox is in good shape and I don't intend to remove any metal there as I really don't see any reasons why. From what I can see, the trunk floor is one piece and is embossed across to create the top half of the cross member as shown in my crappy sketch... (IMG:style_emoticons/default/rolleyes.gif) 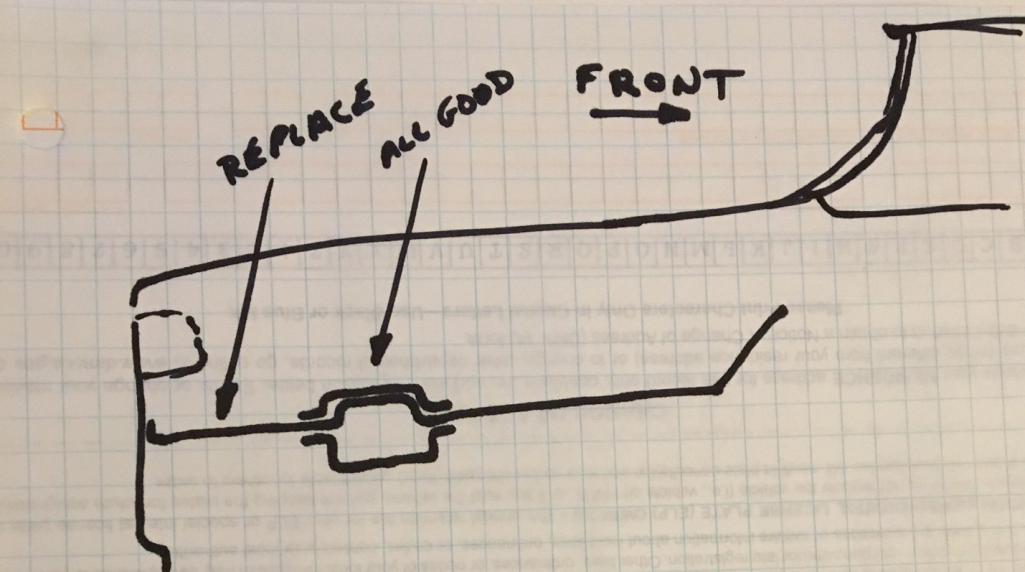 The bottom of the cross member shaped in a flanged "U" is spot welded to the floor creating the boxed beam. A reinforcement is added to the middle section (partial width) to increase strength. I fully understand how to deal with the sides and back. Straight forward rosette welds after prepping the new panel, just like RD design video. But what is the preferred way to attach the cut down repair panel to the back edge of the cross beam? 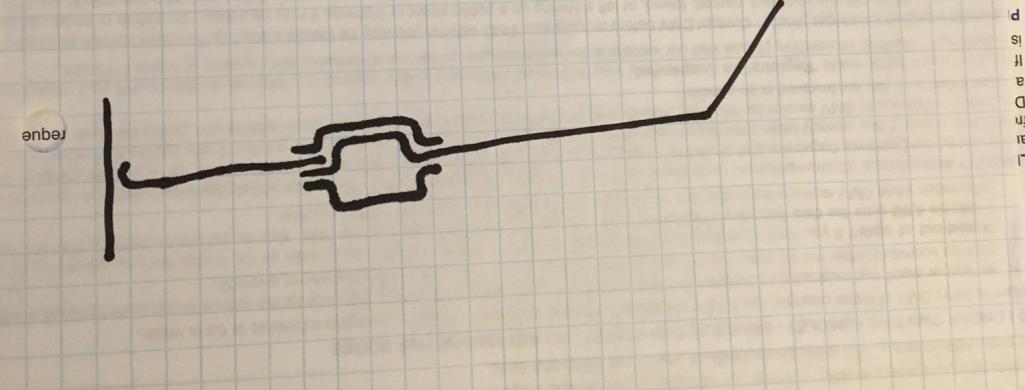 The second sketch is one thought I had where I would cut the floor at the rear edge of cross member and I would drill the spot welds of the partial width reinforcement to slide the repair panel in between. Rosette weld everything back. Any comments of suggestions to share would be greatly appreciated. (IMG:style_emoticons/default/beerchug.gif) |
   |

 
|
| SirAndy |
Jun 7 2020, 10:51 PM
Post
#2
|
|
Resident German Group: Admin Posts: 41,612 Joined: 21-January 03 From: Oakland, Kalifornia Member No.: 179 Region Association: Northern California |
When i replaced mine many years ago i had the same dilemma. I ended up leaving about 1/2 of the still good floor on the cross member side and cut the replacement panel to size and butt/spot welded the new part to the old floor.
I think that was the least destructive way since the cross member is made of several layers and trying to peel any of it, especially when it is still in good shape, did not seem like a good idea. (IMG:style_emoticons/default/welder.gif) |
 |
|
| mmichalik |
Jun 7 2020, 11:23 PM
Post
#3
|
|
MikeM Group: Members Posts: 691 Joined: 27-January 16 From: Valley Center, CA Member No.: 19,600 Region Association: Southern California |
We had the same dilemma when we replaced ours.
I've documented the process and I might have additional pictures that I could look for. Hopefully these will help you out some: https://www.2002and914.com/home/the-914/bod...nk-rust-repair/ |
|
|
|
| Montreal914 |
Jun 8 2020, 12:02 AM
Post
#4
|
|
Senior Member Group: Members Posts: 1,544 Joined: 8-August 10 From: Claremont, CA Member No.: 12,023 Region Association: Southern California |
Thank you @SirAndy . I know you originally posted many pictures in one of the trunk floor thread, but unfortunately they don't seem to show up anymore... (IMG:style_emoticons/default/sad.gif) I would prefer avoiding butt welds, but I hear what you say about messing in the layers. They are very healthy as they are, it would be a shame to go in there.
@mmichalik ; Thank you for your project link and pictures. I am trying to figure out if you installed the floor repair panel above the cross beam reinforcement lip or you sandwiched it like my second sketch. In your scenario, I see you did replace the reinforcement too. Is the reinforcement part spot welded at the same time with the lower cross beam piece. Meaning, are the three layers of metal (reinforcement, trunk floor, and underside "U" box) spot welded all at once, or is the reinforcement spot welded with another set of spots, after the "U" has been spot welded? My thought is that if the reinforcement is done in a second step, then drilling its welds would not modify the integrity of the actual cross beam. Still not ideal though... (IMG:style_emoticons/default/dry.gif) I appreciate the help! (IMG:style_emoticons/default/smilie_pokal.gif) |
|
|
|
| mmichalik |
Jun 8 2020, 12:21 AM
Post
#5
|
|
MikeM Group: Members Posts: 691 Joined: 27-January 16 From: Valley Center, CA Member No.: 19,600 Region Association: Southern California |
We actuall ended up following the same pattern as @SirAndy and did not remove the cross member. We left about a 1/2 inch of good metal all the way around on the tub, cleaned it up very well, fit the new panel in there as tight as we could get it and then punched an excessive amount of holes around the edge of the new panel for the spot welds.
Once we welded it all in, we used Aveco to seal the seams up and then sprayed the wurth /sem seam sealer around the edges to match the factory look. There was no butt welding involved. |
|
|
|
| kroelofsen |
Jun 8 2020, 02:22 AM
Post
#6
|
|
Member Group: Members Posts: 100 Joined: 27-June 19 From: The Netherlands Member No.: 23,255 Region Association: Europe |
Hi, I replaced the rear panel and rear part of the floor. I cut the floor at the support brace exactly in the middle, so half through the spot welds. The floor part I made to fit very precise and welded it along the whole seam (stich welds!). after grinding and primer it looks like original. On the picture I just welded the supports for the heat shield back in...
 |
|
|
|
| aharder |
Jun 8 2020, 08:36 AM
Post
#7
|
|
Advanced Member Group: Members Posts: 4,379 Joined: 6-September 11 From: Dallas Texas Member No.: 13,524 Region Association: Southwest Region |
Nice thread !!
I'm about to do the same thing in the very near future. |
|
|
|
| bkrantz |
Jun 8 2020, 09:31 PM
Post
#8
|
|
914 Guru Group: Members Posts: 7,742 Joined: 3-August 19 From: SW Colorado Member No.: 23,343 Region Association: Rocky Mountains |
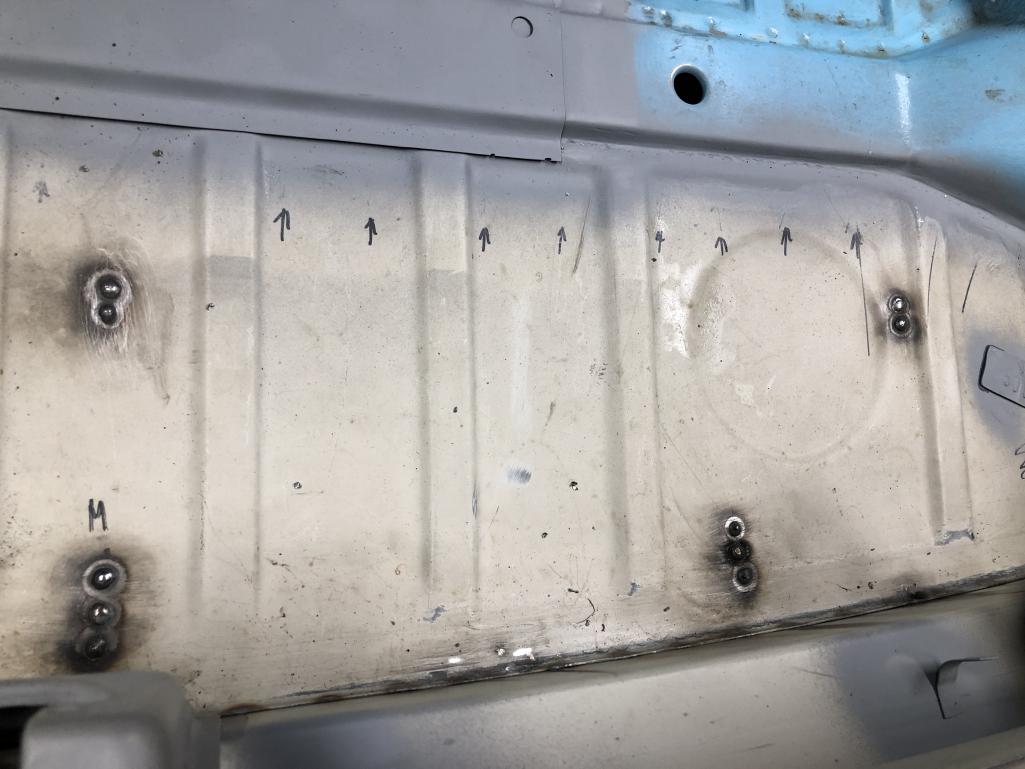
I did as your second sketch shows. Note that this makes the floor a bit higher behind the pressed raised channel, so I also changed the profile a bit on the overlying reinforcement piece.
|
|
|
|
| Mueller |
Jun 9 2020, 06:45 AM
Post
#9
|
|
914 Freak! Group: Members Posts: 17,146 Joined: 4-January 03 From: Antioch, CA Member No.: 87 Region Association: None |
Restoration Design has a short video with some good detail on this repair. It is on my list of things to fix one of these days.
|
|
|
|
| Montreal914 |
Jun 9 2020, 09:17 AM
Post
#10
|
|
Senior Member Group: Members Posts: 1,544 Joined: 8-August 10 From: Claremont, CA Member No.: 12,023 Region Association: Southern California |
QUOTE(bkrantz @ Jun 8 2020, 08:31 PM)  I did as your second sketch shows. Note that this makes the floor a bit higher behind the pressed raised channel, so I also changed the profile a bit on the overlying reinforcement piece. Right! I was also thinking about that. I originally didn't plan on completely removing the reinforcement plate, just drill the rear spot welds and slide in the floor panel but with more investigation, I saw hints of rust at its front junction to the cross member, so I will remove it and inspect. If still in good shape, I will reuse, otherwise I will get the RD part too. But definitely no plan to touch the cross beam itself. First though, the old rusty floor needs to come out... (IMG:style_emoticons/default/sawzall-smiley.gif) (IMG:style_emoticons/default/smash.gif) I will post pictures of the progress. (IMG:style_emoticons/default/beerchug.gif) |
|
|
|
| bkrantz |
Jun 9 2020, 08:00 PM
Post
#11
|
|
914 Guru Group: Members Posts: 7,742 Joined: 3-August 19 From: SW Colorado Member No.: 23,343 Region Association: Rocky Mountains |
Cutting out rust feels sooo good. Enjoy!
|
|
|
|
|
1 User(s) are reading this topic (1 Guests and 0 Anonymous Users)
0 Members:

|
Lo-Fi Version | Time is now: 2nd May 2024 - 11:40 PM |
Invision Power Board
v9.1.4 © 2024 IPS, Inc.