|
|
|
Porsche, and the Porsche crest are registered trademarks of Dr. Ing. h.c. F. Porsche AG.
This site is not affiliated with Porsche in any way. Its only purpose is to provide an online forum for car enthusiasts. All other trademarks are property of their respective owners. |
|
|

  |

| 76-914 |
 Jun 25 2020, 11:53 AM Jun 25 2020, 11:53 AM
Post
#21
|
|
Repeat Offender & Resident Subaru Antagonist  Group: Members Posts: 13,875 Joined: 23-January 09 From: Temecula, CA Member No.: 9,964 Region Association: Southern California |
QUOTE(tygaboy @ Jun 24 2020, 04:41 PM)  A bit of stretching to get things to sit nicely against the dash frame. One item I still have to work up is a stamp/punch to set the recesses in the mounting holes so those stock tapered back screws sit nicely. Though I could opt to use a nicer looking fastener and change out the stock screw plates for something else... (IMG:style_emoticons/default/idea.gif) https://www.aircraftspruce.com/search/searc...e%20dies%203/16 |
   |

 
|
| tygaboy |
Jun 25 2020, 12:19 PM
Post
#22
|
|
914 Guru Group: Members Posts: 5,802 Joined: 6-October 15 From: Petaluma, CA Member No.: 19,241 Region Association: Northern California |
QUOTE(76-914 @ Jun 25 2020, 10:53 AM) QUOTE(tygaboy @ Jun 24 2020, 04:41 PM) A bit of stretching to get things to sit nicely against the dash frame. One item I still have to work up is a stamp/punch to set the recesses in the mounting holes so those stock tapered back screws sit nicely. Though I could opt to use a nicer looking fastener and change out the stock screw plates for something else... (IMG:style_emoticons/default/idea.gif) https://www.aircraftspruce.com/search/searc...e%20dies%203/16 @76-914 OK, that's what I'm talking about! Thanks for the lead! |
|
|
|
| tygaboy |
Jun 25 2020, 12:21 PM
Post
#23
|
|
914 Guru Group: Members Posts: 5,802 Joined: 6-October 15 From: Petaluma, CA Member No.: 19,241 Region Association: Northern California |
Something I want to be sure and point out is that while the tach is essentially centered in the same place as the stock tach, I moved the outer gauges down and in a bit. This make it easier to see more of the gauges, especially for those of us with aftermarket steering wheels that have thicker rims and smaller diameters.
Here's a comparison with the stock panel set on top of mine. Attached thumbnail(s) 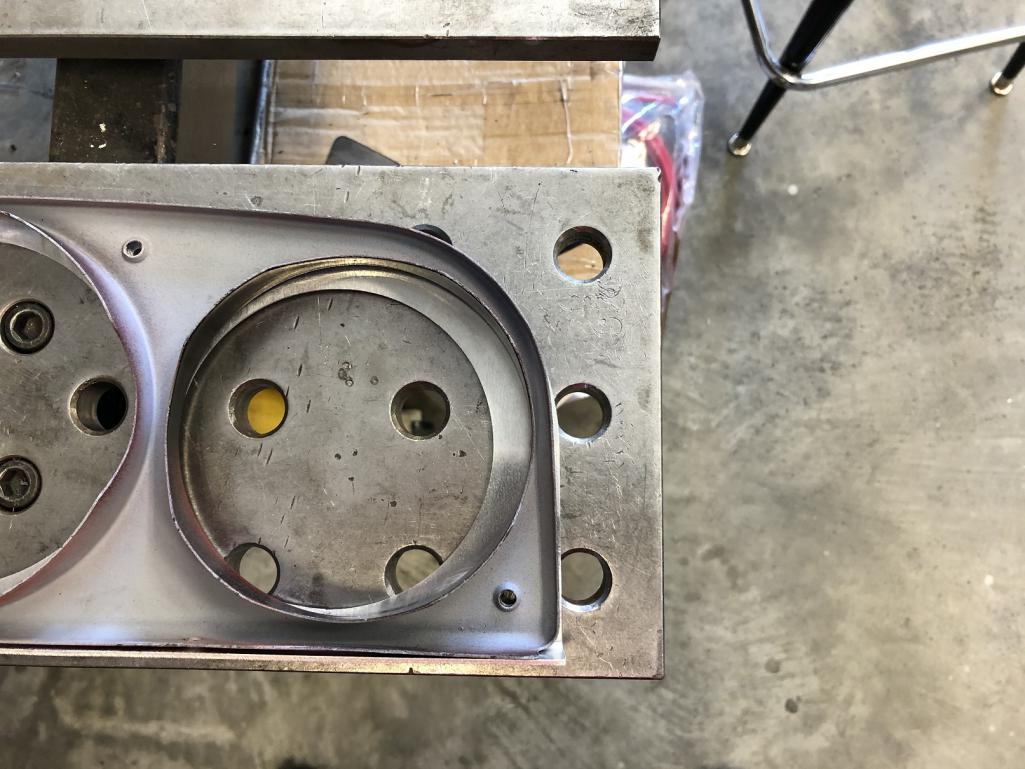
|
|
|
|
| tygaboy |
Jun 25 2020, 12:24 PM
Post
#24
|
|
914 Guru Group: Members Posts: 5,802 Joined: 6-October 15 From: Petaluma, CA Member No.: 19,241 Region Association: Northern California |
Why, oh why do I seem unable to keep things simple? (IMG:style_emoticons/default/blink.gif)
I figured I'd go for a few more style points and rather than raise a circle around the dimmer knob, I went with this. Attached thumbnail(s) 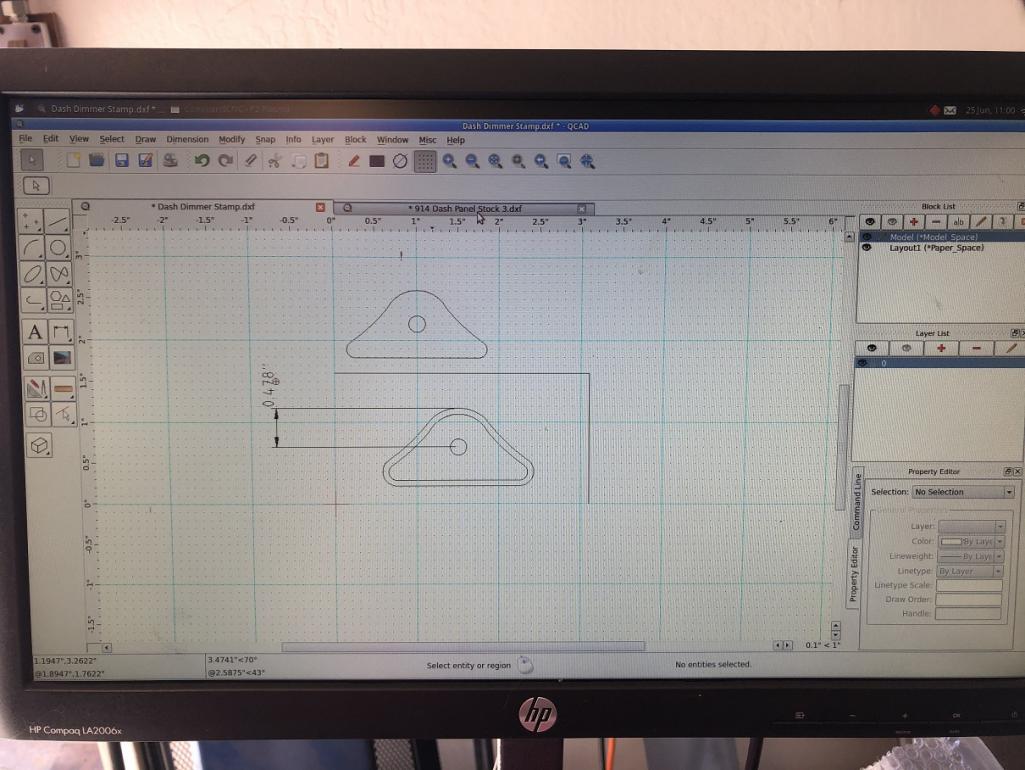
|
|
|
|
| tygaboy |
Jun 25 2020, 12:27 PM
Post
#25
|
|
914 Guru Group: Members Posts: 5,802 Joined: 6-October 15 From: Petaluma, CA Member No.: 19,241 Region Association: Northern California |
I ended up with a small flaw in one of the dies so there's a hiccup at the 1:00-ish position of the stamped area. It's more visible in the next pic.
I may be able to address it with a bit of careful filing. But I think I'll end up redoing the die set and making a whole new panel because: Tygaboy... The panel is totally serviceable so I'm happy to offer it to someone willing to live with this horror! (IMG:style_emoticons/default/laugh.gif) Attached thumbnail(s) 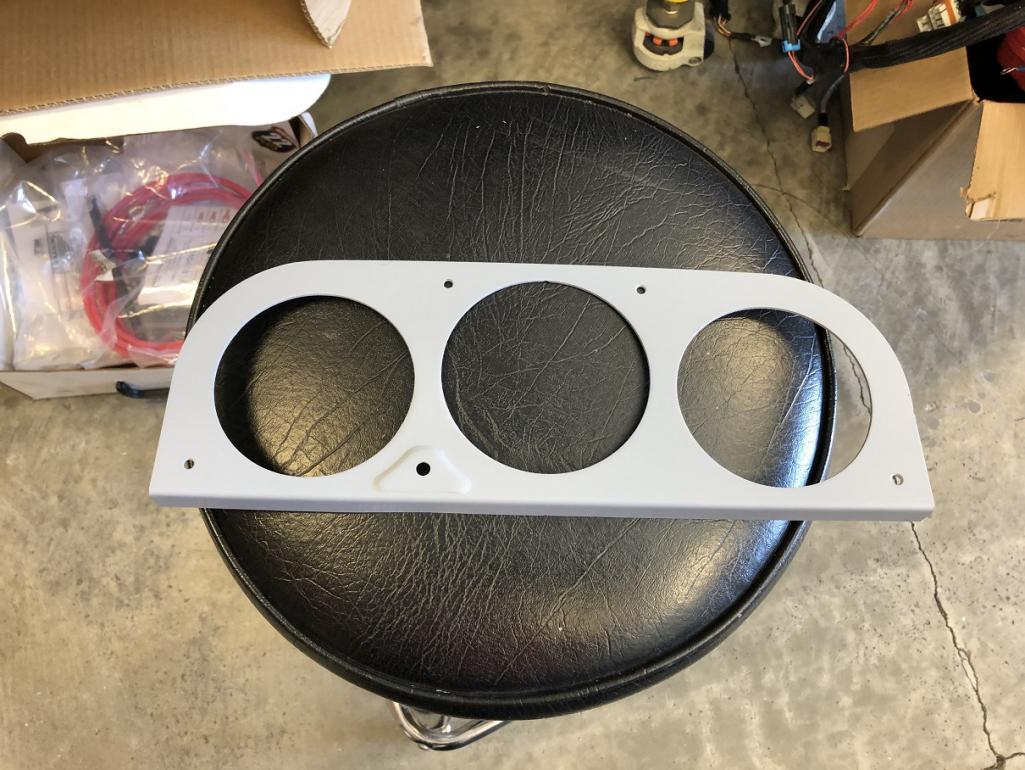
|
|
|
|
| tygaboy |
Jun 25 2020, 12:29 PM
Post
#26
|
|
914 Guru Group: Members Posts: 5,802 Joined: 6-October 15 From: Petaluma, CA Member No.: 19,241 Region Association: Northern California |
Then I gave it a squirt of SEM trim black and assembled everything.
I will say, I think it looks pretty good, that one flaw aside. That raised area is the sort of thing that most folks won't even notice and is the very reason I think it's such a neat little detail. Note: Stamping the raised area for the dimmer is a real fiddly process. So unless the solution I use to make my personal panel turns out to be reliable and repeatable, it likely won't be practical for me to offer this feature. Fingers crossed I can pull it off. Attached thumbnail(s) 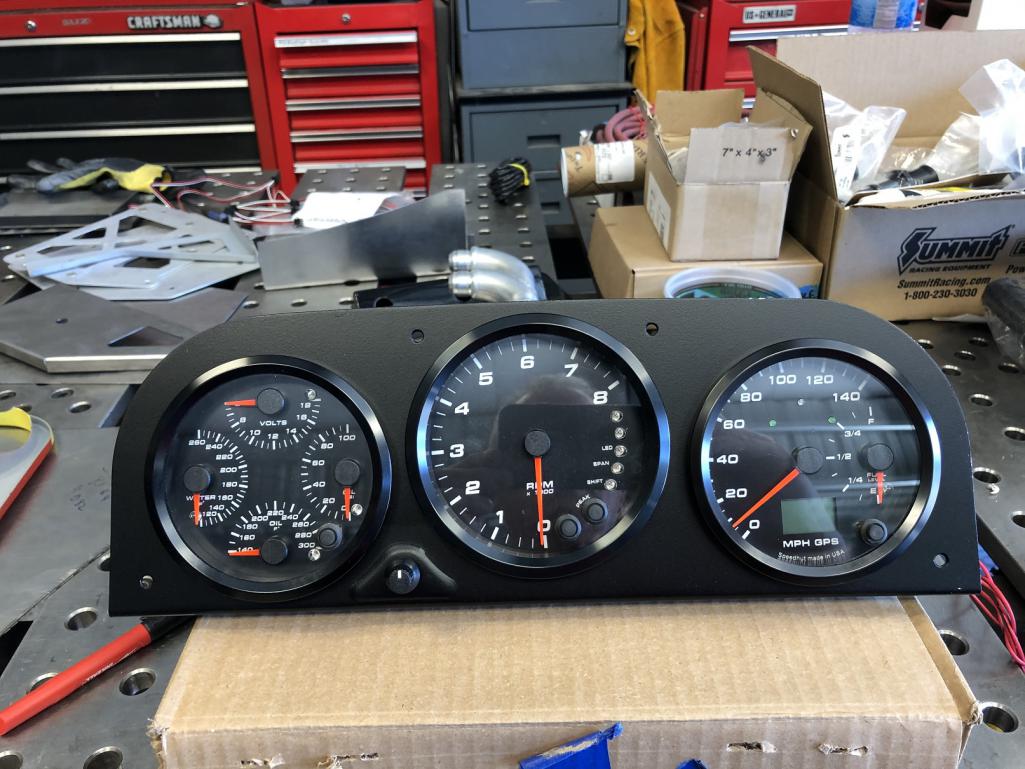
|
|
|
|
| dakotaewing |
Jun 26 2020, 09:24 PM
Post
#27
|
|
Senior Member Group: Members Posts: 1,167 Joined: 8-July 03 From: DeSoto, Tx Member No.: 897 Region Association: Southwest Region |
QUOTE(tygaboy @ Jun 25 2020, 01:29 PM) Then I gave it a squirt of SEM trim black and assembled everything. I will say, I think it looks pretty good, that one flaw aside. That raised area is the sort of thing that most folks won't even notice and is the very reason I think it's such a neat little detail. Note: Stamping the raised area for the dimmer is a real fiddly process. So unless the solution I use to make my personal panel turns out to be reliable and repeatable, it likely won't be practical for me to offer this feature. Fingers crossed I can pull it off. DAMN! I'm in - Tell me where to send my money! |
|
|
|
| pdlightning |
Jun 26 2020, 09:34 PM
Post
#28
|
|
Pdlightning Group: Members Posts: 211 Joined: 4-February 11 From: Santa Clarita Member No.: 12,660 Region Association: Southern California |
QUOTE(tygaboy @ Jun 25 2020, 11:29 AM) Then I gave it a squirt of SEM trim black and assembled everything. I will say, I think it looks pretty good, that one flaw aside. That raised area is the sort of thing that most folks won't even notice and is the very reason I think it's such a neat little detail. Note: Stamping the raised area for the dimmer is a real fiddly process. So unless the solution I use to make my personal panel turns out to be reliable and repeatable, it likely won't be practical for me to offer this feature. Fingers crossed I can pull it off. That looks great, those Are the same gauges I purchased and we appreciate you doing this! Thanks |
|
|
|
| no1uno |
Jun 27 2020, 06:54 AM
Post
#29
|
|
Member Group: Members Posts: 206 Joined: 2-December 10 From: Melbourne, FL Member No.: 12,448 Region Association: South East States |
Please add me to the list.
|
|
|
|
| Cairo94507 |
Jun 27 2020, 04:31 PM
Post
#30
|
|
Michael Group: Members Posts: 10,605 Joined: 1-November 08 From: Auburn, CA Member No.: 9,712 Region Association: Northern California |
That gauge set and bezel look so good I want to get one and cut it into the top of my desk....and it ain't a cheap desk. (IMG:style_emoticons/default/beerchug.gif)
|
 |
|
| kid914 |
Jun 27 2020, 04:43 PM
Post
#31
|
|
ALWAYS lead...NEVER follow!!!! Group: Members Posts: 2,539 Joined: 9-March 11 From: Canada Member No.: 12,811 Region Association: Canada |
QUOTE(tygaboy @ Jun 24 2020, 07:35 PM) I've updated the outer panel shape and it now fits and looks better. I also moved the tach hole down a bit - I think it looks better with less space at the bottom. I also remembered that the SpeedHut gauges offer a gauge lighting dimmer so I opted to add the dimmer knob to the front of the panel. Others may want to mount it elsewhere so I can offer the panel with or without this hole. Next, I'm going to stamp a small raised circular area around that knob, just to break up all the flatness of the panel. We'll see how I like that... Anyway, here's a front and back shot as things stand now. Where are those gauges from? |
|
|
|
| Gearup |
Jun 27 2020, 08:55 PM
Post
#32
|
|
Member Group: Members Posts: 165 Joined: 21-April 15 From: Denver Member No.: 18,660 Region Association: None |
I’m in. I have 2 speedhut 4 inch gauge and the center tach is 4.5 speedhut. If that’s your dimensions I definately want one. Brett
|
|
|
|
| tygaboy |
Jun 28 2020, 09:56 AM
Post
#33
|
|
914 Guru Group: Members Posts: 5,802 Joined: 6-October 15 From: Petaluma, CA Member No.: 19,241 Region Association: Northern California |
QUOTE(kid914 @ Jun 27 2020, 03:43 PM) QUOTE(tygaboy @ Jun 24 2020, 07:35 PM) I've updated the outer panel shape and it now fits and looks better. I also moved the tach hole down a bit - I think it looks better with less space at the bottom. I also remembered that the SpeedHut gauges offer a gauge lighting dimmer so I opted to add the dimmer knob to the front of the panel. Others may want to mount it elsewhere so I can offer the panel with or without this hole. Next, I'm going to stamp a small raised circular area around that knob, just to break up all the flatness of the panel. We'll see how I like that... Anyway, here's a front and back shot as things stand now. Where are those gauges from? @kid914 @Gearup They are from SpeedHut. 4.5" tach, 4" speedo and quad. Check out their site - they offer a lot of great options. |
|
|
|
| Chris H. |
Jun 29 2020, 06:31 AM
Post
#34
|
|
Senior Member Group: Members Posts: 4,079 Joined: 2-January 03 From: Chicago 'burbs Member No.: 73 Region Association: Upper MidWest |
QUOTE(dakotaewing @ Jun 26 2020, 10:24 PM) DAMN! I'm in - Tell me where to send my money! Yeah that looks GREAT! Excellent idea adding the dimmer. Just tell us when/where to send money! |
|
|
|
| tygaboy |
Jul 5 2020, 07:05 PM
Post
#35
|
|
914 Guru Group: Members Posts: 5,802 Joined: 6-October 15 From: Petaluma, CA Member No.: 19,241 Region Association: Northern California |
So I went all in and made a stamping die set so I can reliably create the dimmer knob element. What can I say? I love you guys and want to provide a nice piece so what the heck...
Here's the die set and an earlier version panel I "repaired" with it. It's not perfect but you get the idea. Attached thumbnail(s) 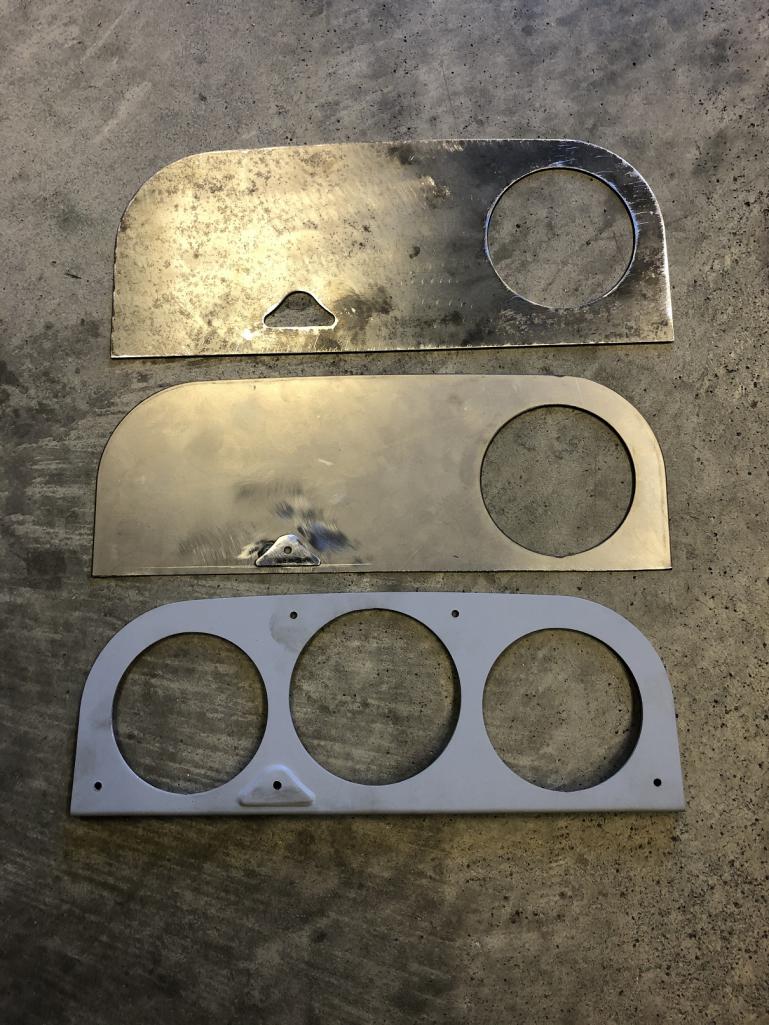
|
|
|
|
| tygaboy |
Jul 5 2020, 07:13 PM
Post
#36
|
|
914 Guru Group: Members Posts: 5,802 Joined: 6-October 15 From: Petaluma, CA Member No.: 19,241 Region Association: Northern California |
Each of these three panels have some sort of flaw so I'm willing to part with them for cost of shipping.
You can have one of these OR wait a bit and for $20 plus shipping, you can have a "good" one. PM me and it'll be first come, first served for this lot. #1, the black one with no gauges in it: the dimmer knob stamp isn't even around it's perimeter. #2, the grey one with no gauges: you can see it's got a small crease above the dimmer area and the stamping itself isn't great. What do you expect for free? (IMG:style_emoticons/default/happy11.gif) #3, the black one with gauges (no, they aren't included) has a hiccup at the 1:30-ish position of the dimmer knob area, called out by the red arrow. Attached thumbnail(s) 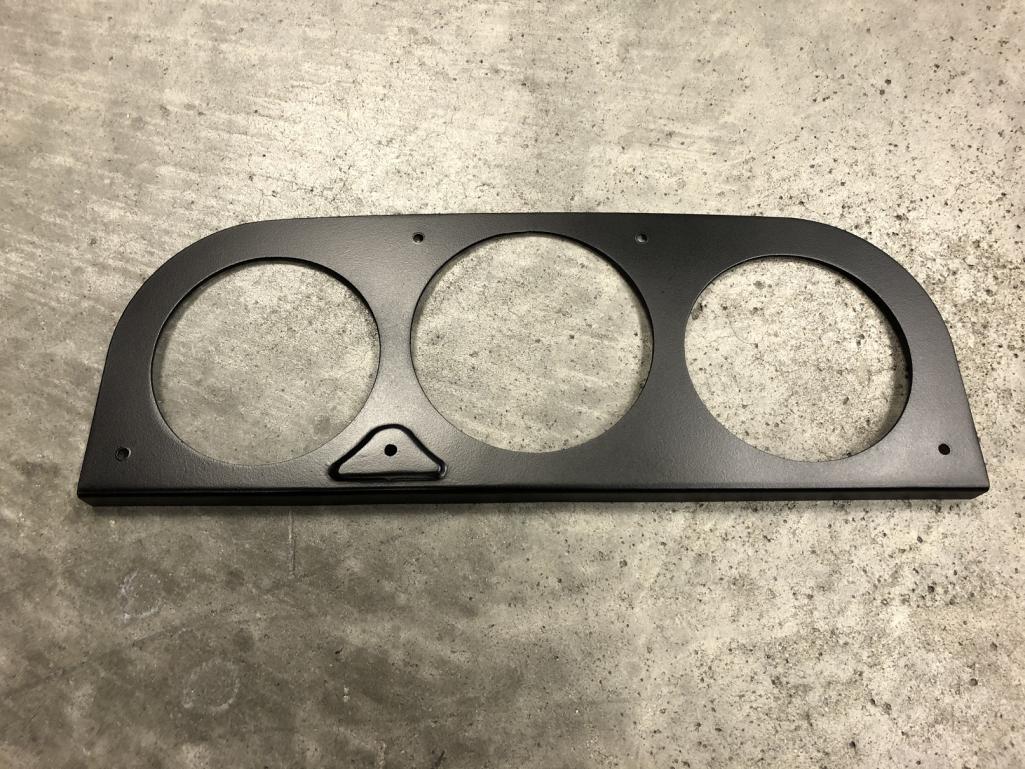 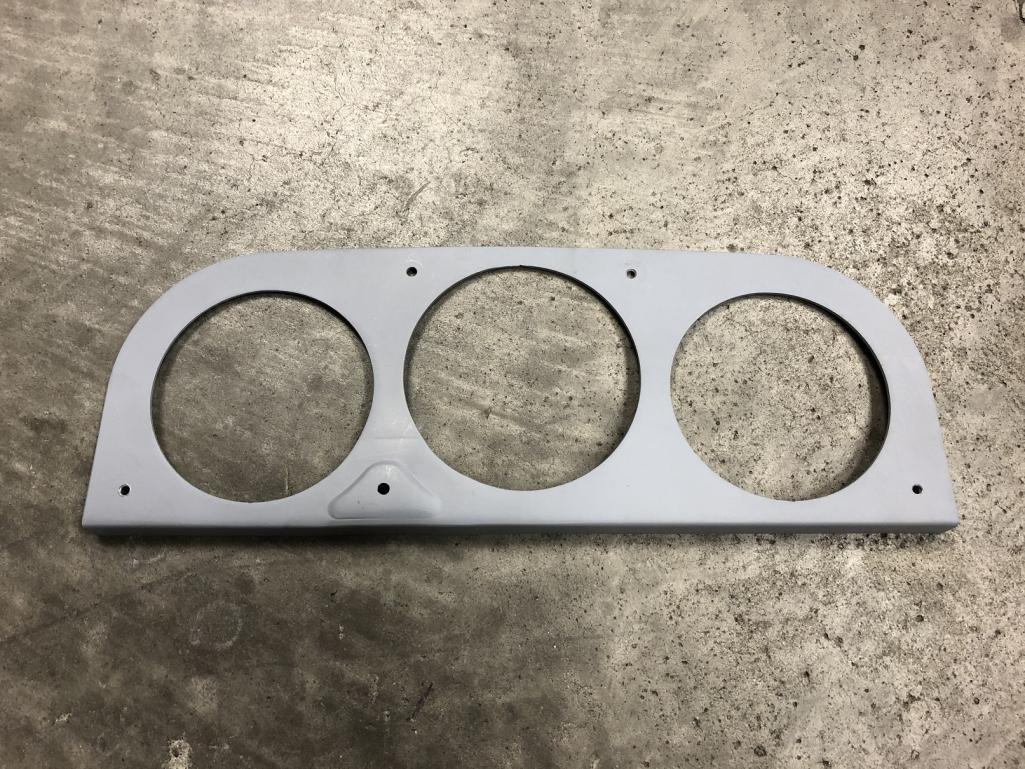 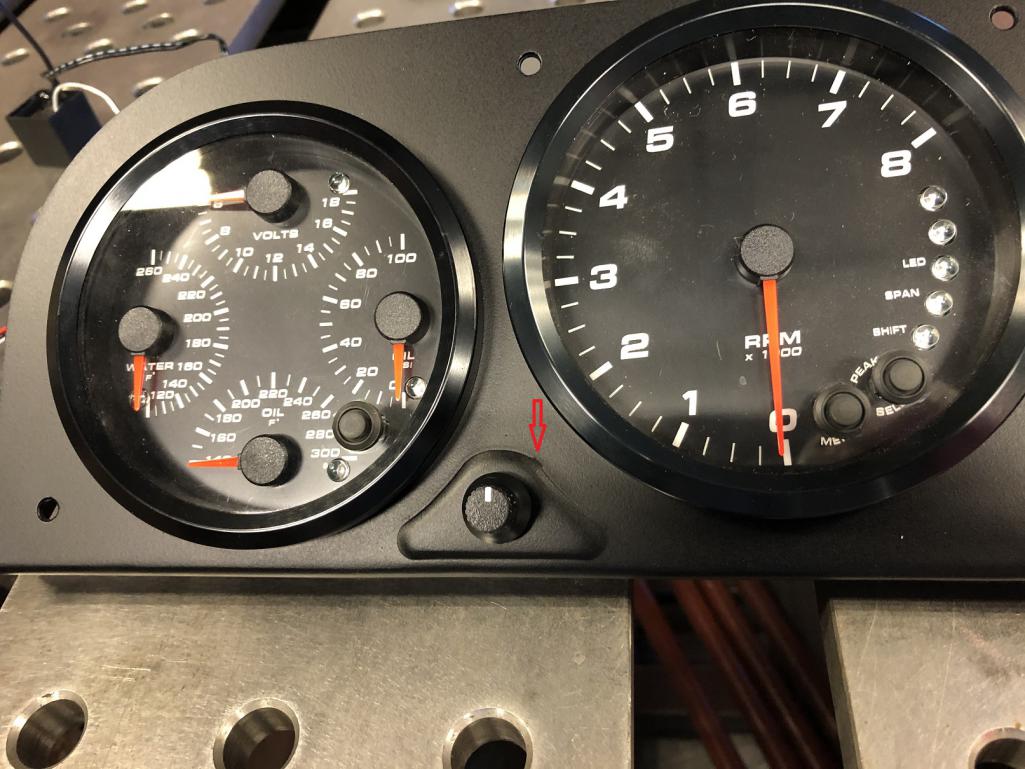
|
|
|
|
| 76-914 |
Jul 5 2020, 07:21 PM
Post
#37
|
|
Repeat Offender & Resident Subaru Antagonist Group: Members Posts: 13,875 Joined: 23-January 09 From: Temecula, CA Member No.: 9,964 Region Association: Southern California |
Just curious. What stumbling blocks, if any, were incurred during the development phase Chris? e.g warpage, distortion, etc. What is used for pressing the dies together? Vise, hammer, press? Something tells me a few hours went into making the dies. Nice job. (IMG:style_emoticons/default/beerchug.gif)
|
|
|
|
| ValcoOscar |
Jul 5 2020, 08:13 PM
Post
#38
|
|
Garage Life Group: Members Posts: 2,602 Joined: 19-November 13 From: SoCal Member No.: 16,669 Region Association: Southern California |
@tygaboy
Sweet Chris (IMG:style_emoticons/default/beer3.gif) D'MAN OF THE DAY (IMG:style_emoticons/default/aktion035.gif) Oscar |
|
|
|
| tygaboy |
Jul 5 2020, 09:25 PM
Post
#39
|
|
914 Guru Group: Members Posts: 5,802 Joined: 6-October 15 From: Petaluma, CA Member No.: 19,241 Region Association: Northern California |
QUOTE(76-914 @ Jul 5 2020, 06:21 PM) Just curious. What stumbling blocks, if any, were incurred during the development phase Chris? e.g warpage, distortion, etc. What is used for pressing the dies together? Vise, hammer, press? Something tells me a few hours went into making the dies. Nice job. (IMG:style_emoticons/default/beerchug.gif) @76-914 Kent - All three panels pictured were done with the "quick & dirty" die set pictured below. It's too small (which allowed its edges to damage the panel, as in #2, above). It required manual positioning of both pieces on either side of the panel so it was a total crap shoot that things would turn out well... hence the freebie panels with the various issues. I should know better by now that, getting lucky aside, if I want a quality result, I need to do what I know works: build a die set that is the same size as the panel. Note that on the male side of this "full size" die set, I welded the dimmer area stamp to its panel. With the die set and the panel all cut to the exact same shape, it's easy to be sure everything is aligned and I get the best result. As to warpage or distortion, I get none! Why? I use a powered H press and a sizable set of aluminum plates on both sides of the dies. It stamps the shape and flattens any distortion as it completes it's cycle. When I make the next panel, I'll video the whole process and post it so you can see how it all works. Attached thumbnail(s) 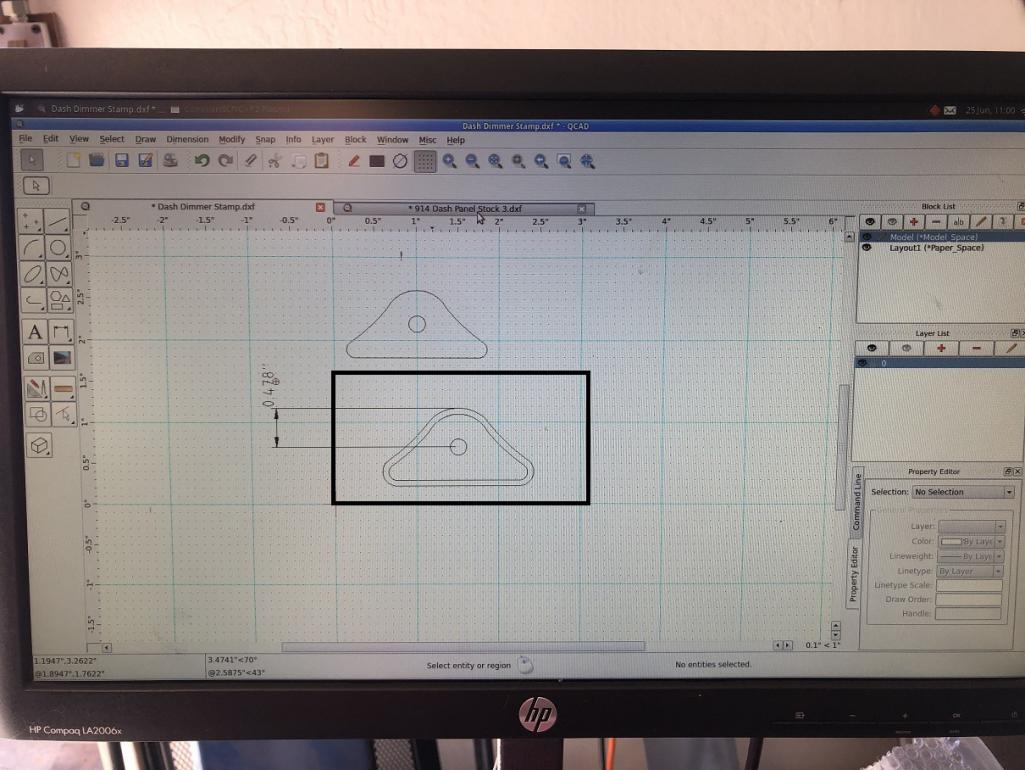
|
|
|
|
| 76-914 |
Jul 5 2020, 09:41 PM
Post
#40
|
|
Repeat Offender & Resident Subaru Antagonist Group: Members Posts: 13,875 Joined: 23-January 09 From: Temecula, CA Member No.: 9,964 Region Association: Southern California |
QUOTE(tygaboy @ Jul 5 2020, 08:25 PM) QUOTE(76-914 @ Jul 5 2020, 06:21 PM) Just curious. What stumbling blocks, if any, were incurred during the development phase Chris? e.g warpage, distortion, etc. What is used for pressing the dies together? Vise, hammer, press? Something tells me a few hours went into making the dies. Nice job. (IMG:style_emoticons/default/beerchug.gif) @76-914 Kent - All three panels pictured were done with the "quick & dirty" die set pictured below. It's too small (which allowed its edges to damage the panel, as in #2, above). It required manual positioning of both pieces on either side of the panel so it was a total crap shoot that things would turn out well... hence the freebie panels with the various issues. I should know better by now that, getting lucky aside, if I want a quality result, I need to do what I know works: build a die set that is the same size as the panel. Note that on the male side of this "full size" die set, I welded the dimmer area stamp to its panel. With the die set and the panel all cut to the exact same shape, it's easy to be sure everything is aligned and I get the best result. As to warpage or distortion, I get none! Why? I use a powered H press and a sizable set of aluminum plates on both sides of the dies. It stamps the shape and flattens any distortion as it completes it's cycle. When I make the next panel, I'll video the whole process and post it so you can see how it all works. (IMG:style_emoticons/default/popcorn[1].gif) Interested in seeing that. Thx (IMG:style_emoticons/default/beerchug.gif) |
|
|
|
|
1 User(s) are reading this topic (1 Guests and 0 Anonymous Users)
0 Members:

|
Lo-Fi Version | Time is now: 27th March 2026 - 09:35 AM |
Invision Power Board
v9.1.4 © 2026 IPS, Inc.