|
|
|
Porsche, and the Porsche crest are registered trademarks of Dr. Ing. h.c. F. Porsche AG.
This site is not affiliated with Porsche in any way. Its only purpose is to provide an online forum for car enthusiasts. All other trademarks are property of their respective owners. |
|
|

  |

| pencap914 |
 Jan 5 2021, 01:37 PM Jan 5 2021, 01:37 PM
Post
#21
|
|
Member  Group: Members Posts: 81 Joined: 16-April 06 Member No.: 5,872 Region Association: Northern California |
Almost finished with the flat plate that I'll weld in between the two suspension pivot points to mount the oil cooler and perhaps add some rigidity.
Found someone in town that has a dimple die set. Wish I squeezed a few more holes to keep things light as possible... 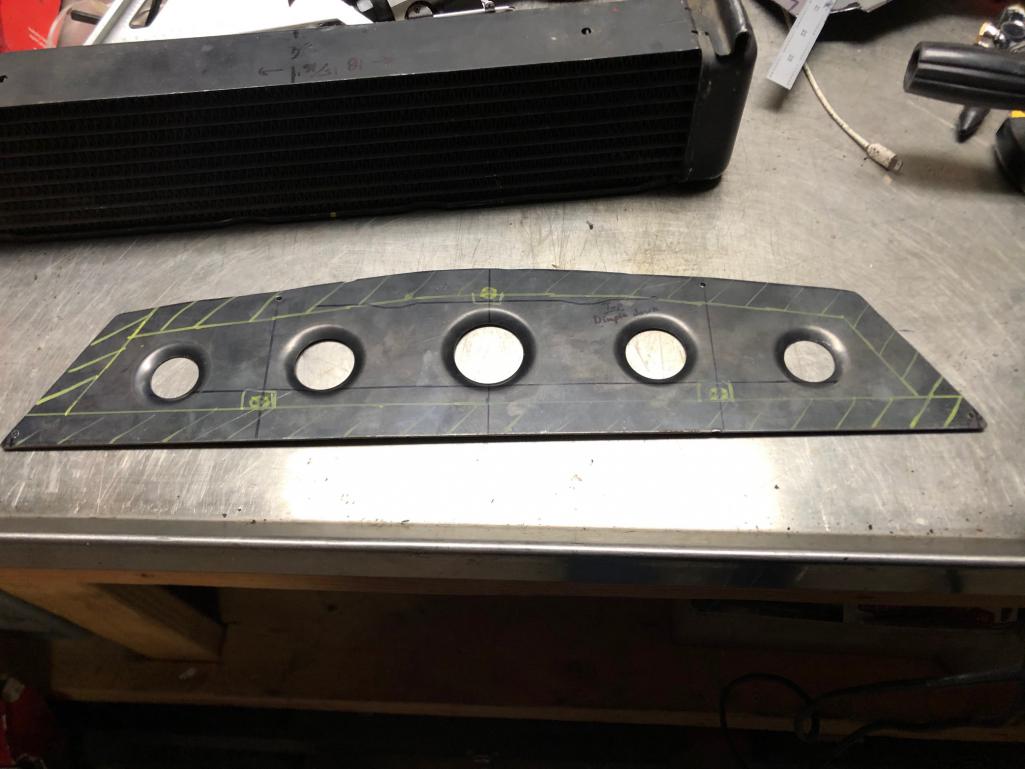 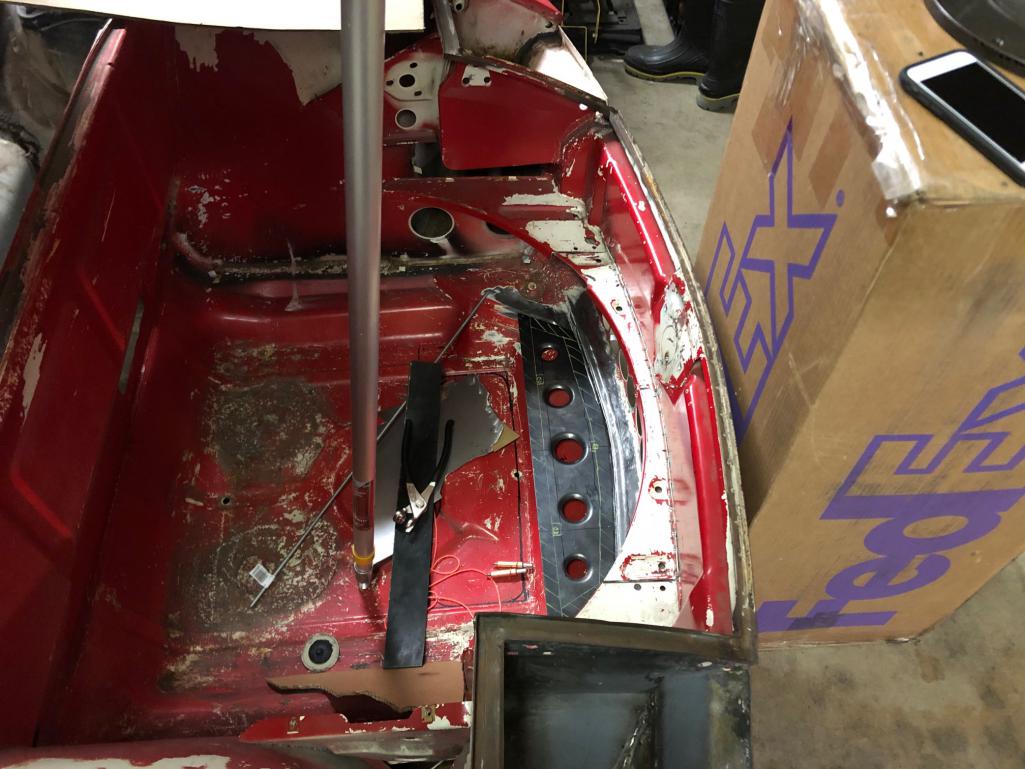 |
   |

 
|
| 930cabman |
Jan 5 2021, 06:11 PM
Post
#22
|
|
Advanced Member Group: Members Posts: 4,664 Joined: 12-November 20 From: Buffalo Member No.: 24,877 Region Association: North East States |
Great looking work so far, I missed your favorite beer?
Keep it going and keep us in the loop with your progress |
|
|
|
| Montreal914 |
Jan 6 2021, 09:59 AM
Post
#23
|
|
Advanced Member Group: Members Posts: 2,106 Joined: 8-August 10 From: Claremont, CA Member No.: 12,023 Region Association: Southern California |
I am seeing this for the first time and am very happy to look at the progress! Very nice Glenn! (IMG:style_emoticons/default/smilie_pokal.gif)
As for the condition of the longs before the installation of the RD outer clamshell, below are a few pictures from the work done. Here the original long was stripped from the original paint to see what was underneath (IMG:style_emoticons/default/drooley.gif) 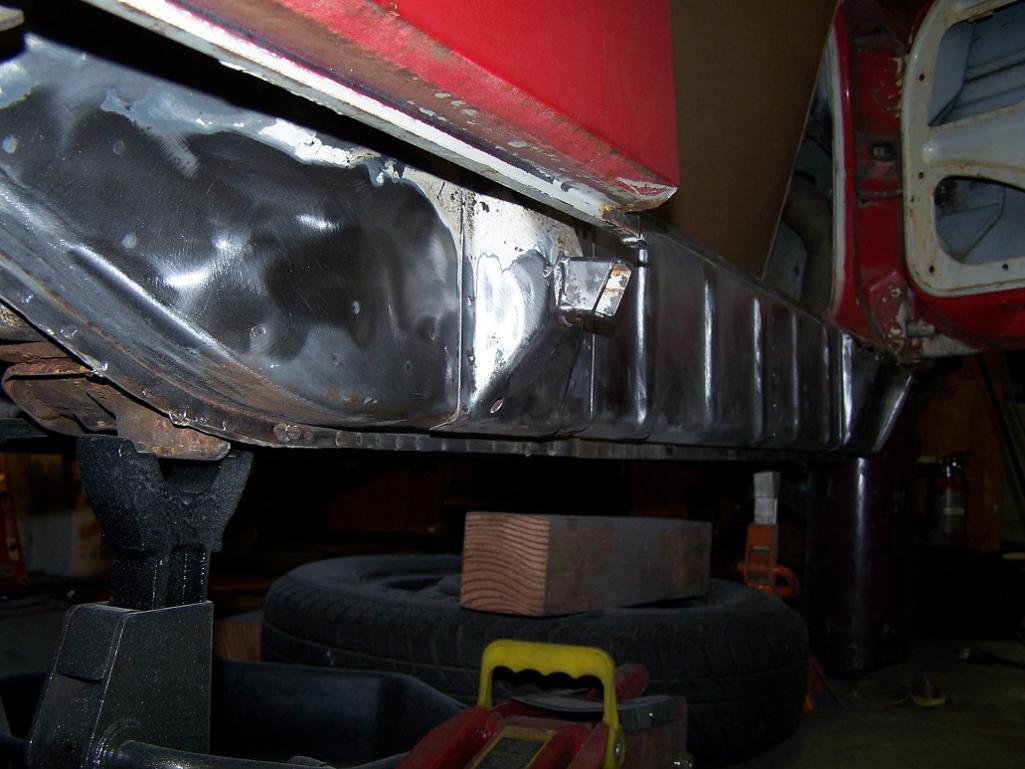 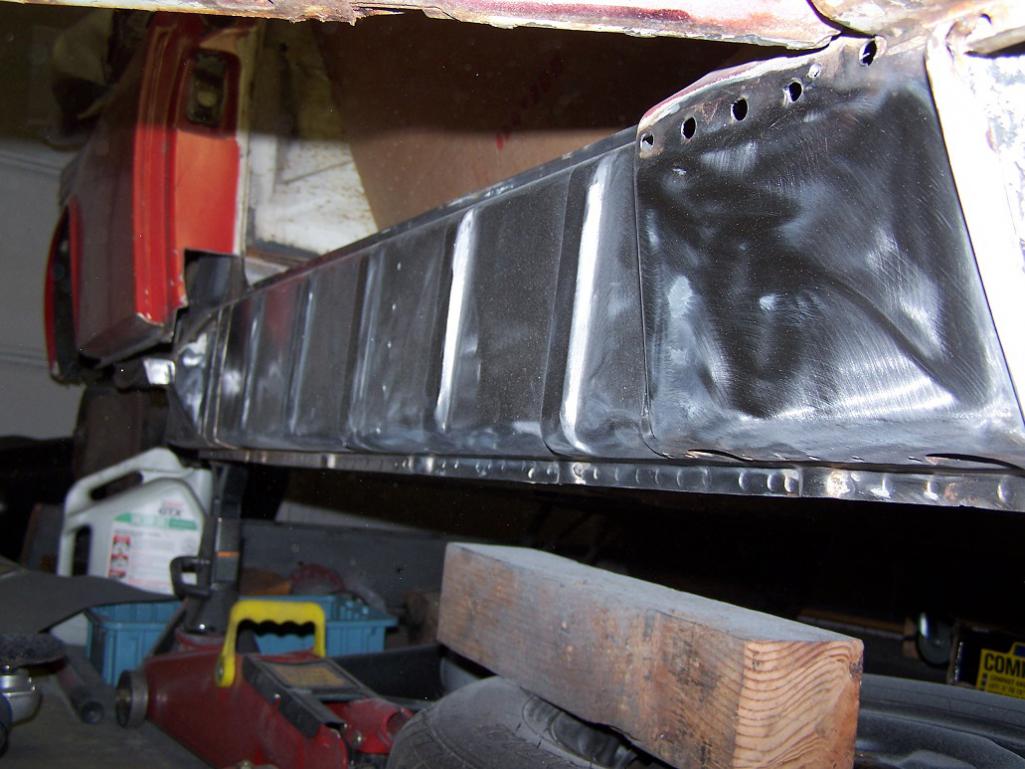 Then the metal was painted with PPG 2 component epoxy primer. Round stickers were applied where the welds would be to mask the metal in these spots. Weld through primer was then sprayed in these spots. 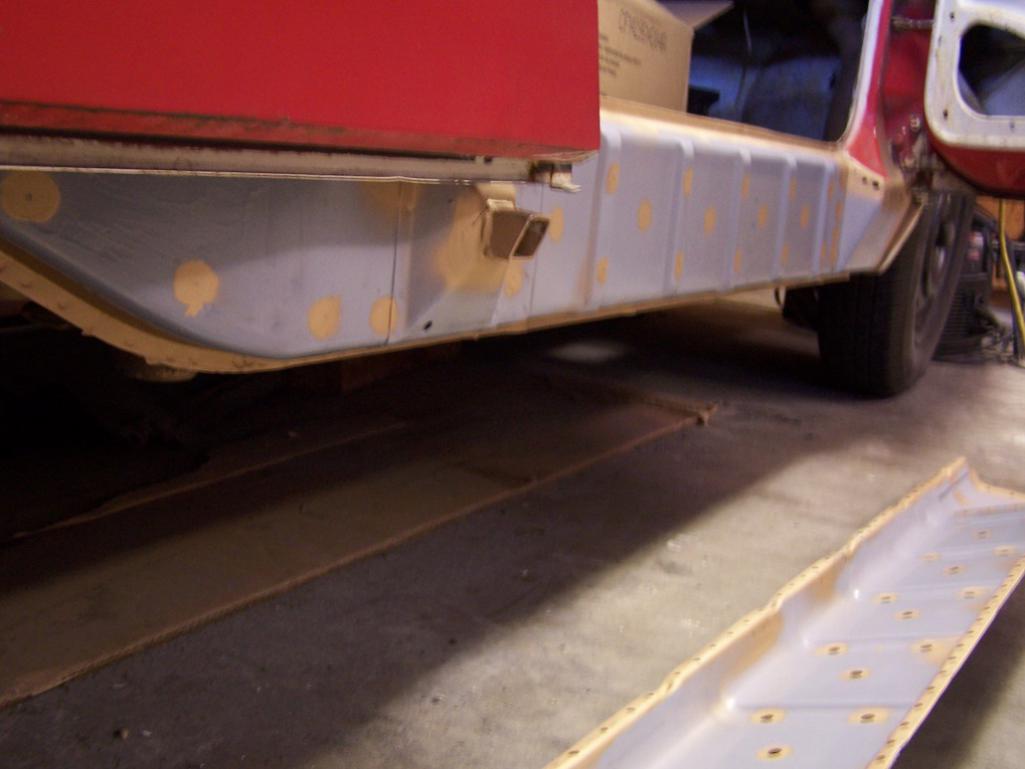 Then the RD panels were also given the same preparation treatment on their inside. 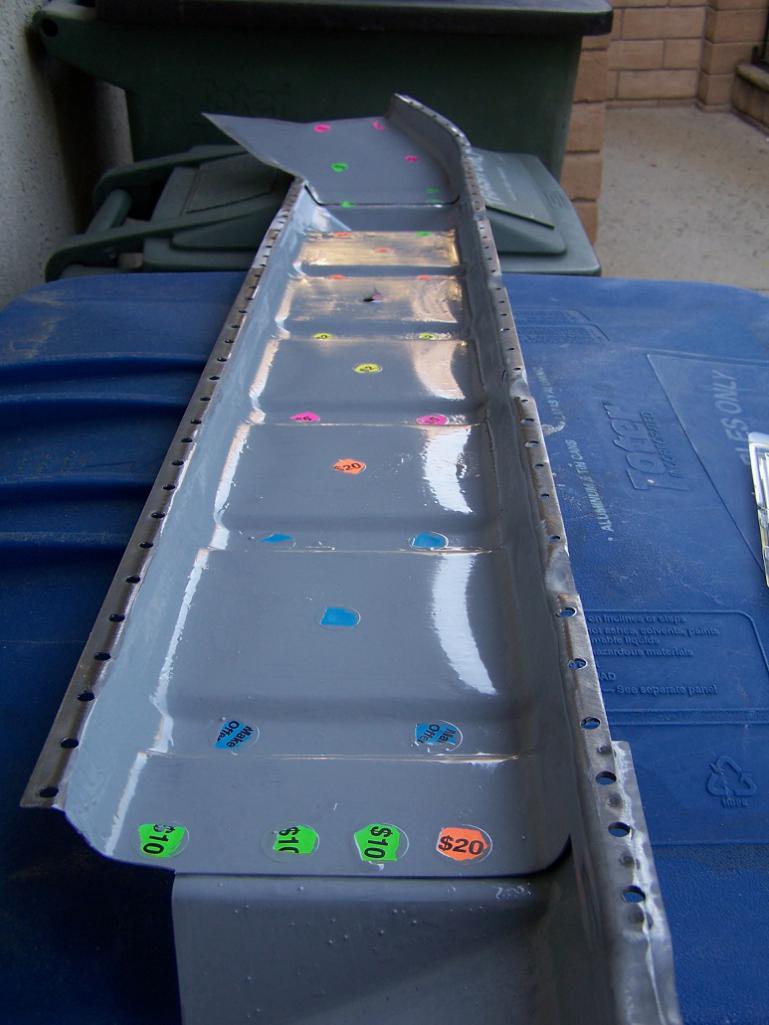 And the clam shells were installed on the car. Good luck with your project. I will follow this thread with great intererest (IMG:style_emoticons/default/popcorn[1].gif) BTW, I think I might recognize that tall FedEx box near the car @pencap914 (IMG:style_emoticons/default/idea.gif) |
|
|
|
| pencap914 |
Jan 6 2021, 10:19 AM
Post
#24
|
|
Member Group: Members Posts: 81 Joined: 16-April 06 Member No.: 5,872 Region Association: Northern California |
QUOTE(Montreal914 @ Jan 6 2021, 07:59 AM)  BTW, I think I might recognize that tall FedEx box near the car @pencap914 (IMG:style_emoticons/default/idea.gif) Just sent the gas tank yesterday! Should arrive by Thursday. |
|
|
|
| pencap914 |
Mar 14 2021, 10:29 PM
Post
#25
|
|
Member Group: Members Posts: 81 Joined: 16-April 06 Member No.: 5,872 Region Association: Northern California |
Update:
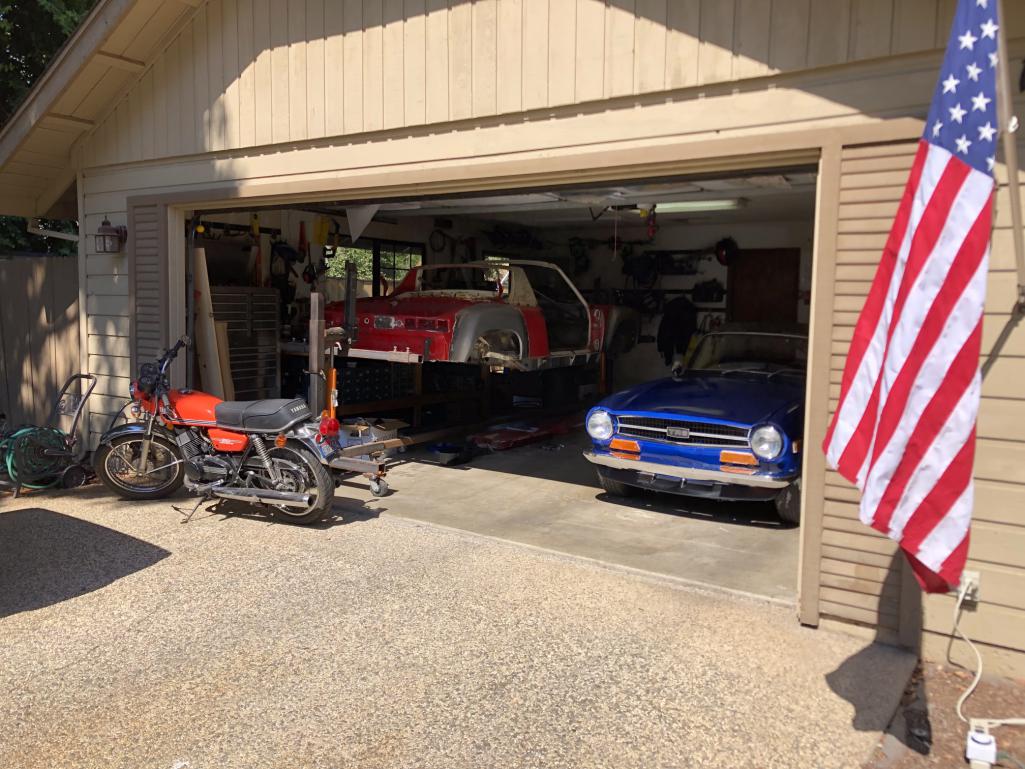
So I bought this car knowing the tub was slightly curled inwards due to the installation of the inner/outer longitudinal strengthening kit. The door gaps to the rear were a little tight, and the measurement between the Targa bar and the windshield frame was measured to be 25" even, about 1/8" closer than it should be. I tried a few different things to straighten the chassis after an installation of the inner longitudinal kit curled the tub a bit. I followed a few threads on this forum for a "how-to" first using a lengthened turnbuckle purchased from tractor supply. I attached the turnbuckle from the upper seatbelt bolt to a piece of angle iron tacked in place just inside of the door, then actually welded a tab just in front of where the heater pipe exits the longitudinal, because I found I needed to apply force lower down in front. I cut the inner long in 3 places and reefed the turnbuckles until I stretched the tub to 25-5/16" between the targa bar and windshield frame. (I only chose this to stop because I felt I was really wrenching on those turnbuckles... Then tacked the inner longs. 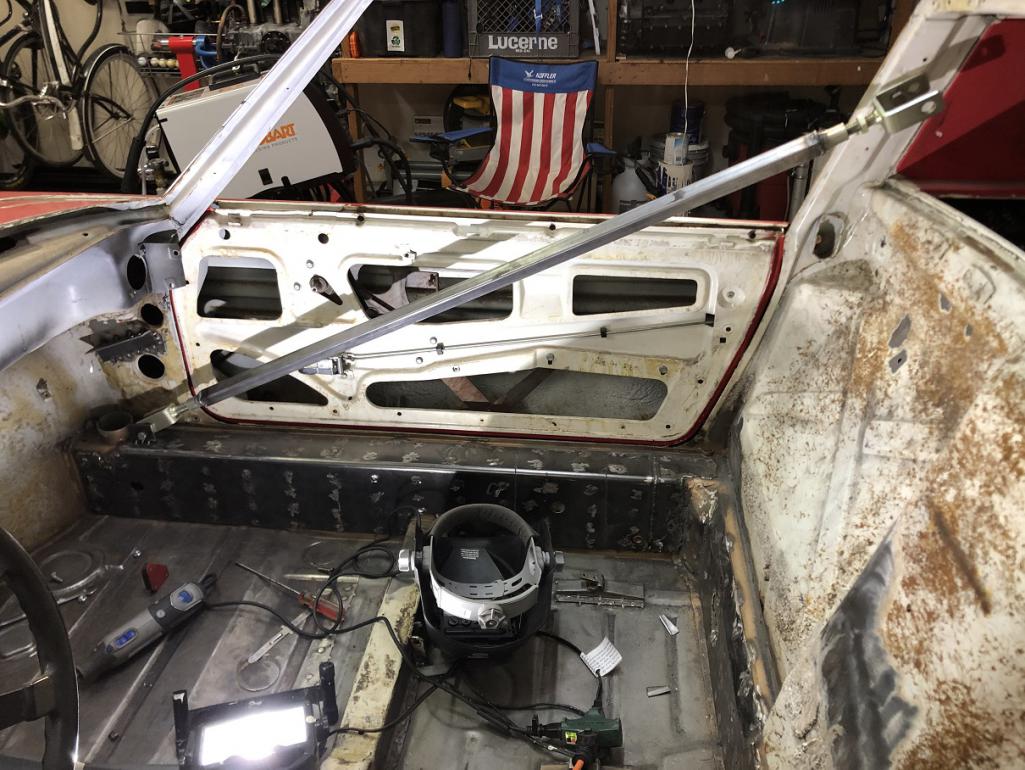 Long story short, I think I got the tub to only go about 1/16" back... about halfway there. I don't know if anyone tried to re-straighten the tub after installing both the inner and outer long kit, but I just cant apply any more force to using the turnbuckles, since I found that I had actually bent the seatbelt bolt: 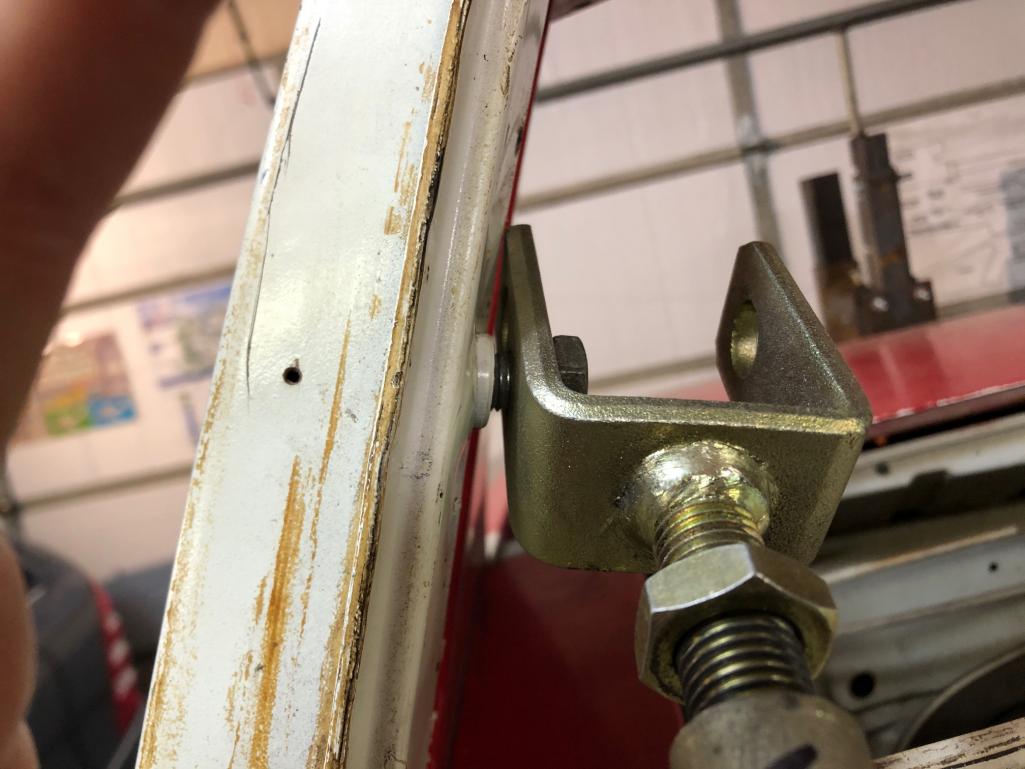 After finding the bent seatbelt bolt, I brought out the big guns: The hydraulic ram. 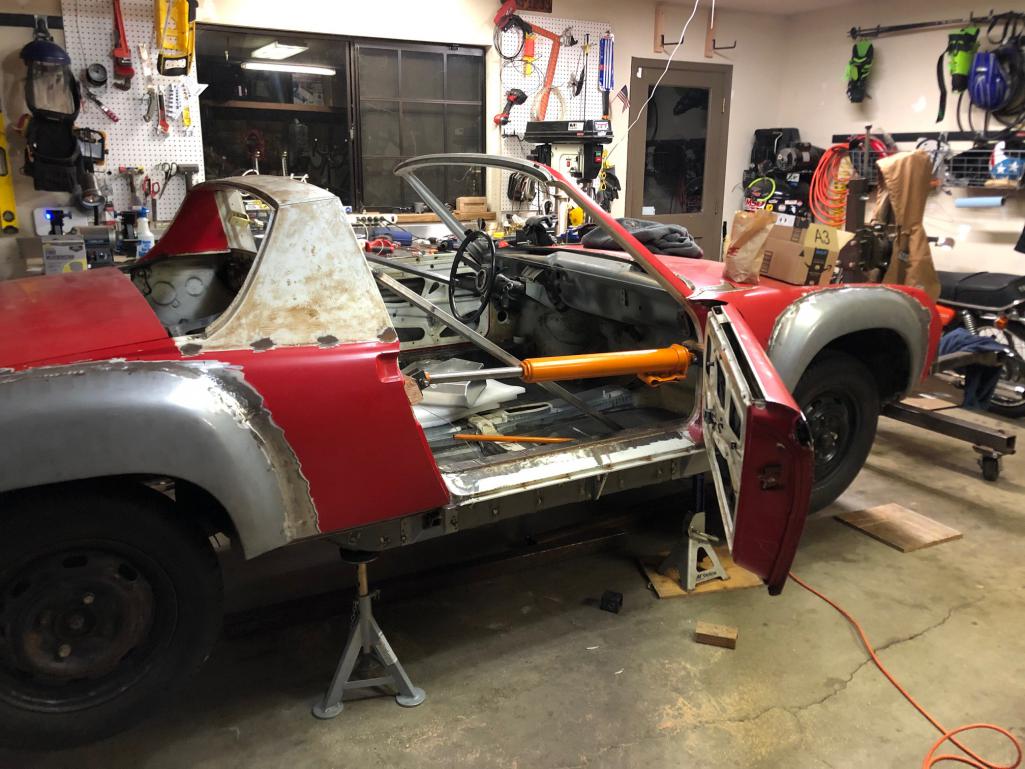 I tried pushing the tub apart using the ram, but had the same results. The tub sprung right back to the 25-1/16" measurement. Albeit, the attempt with the hydraulic ram was with the inner longs tacked from the previous attempt with the turnbuckle. I kinda feel like I had one shot and blew it with welding the inner longs back before attempting with the hydrauilc ram. I could grind out the welds and try again, but I have little confidence that the juice is worth the squeeze. Perhaps I can live with slightly tight door gaps and let this be a cautionary tale about why you need to be careful when welding stiffening kits. To maintain forward progress with this project, I decided to just mount the car on the rotisserie to make a few minor repairs to the underside of the car, and get it ready for media blasting. So here's how she sits today: 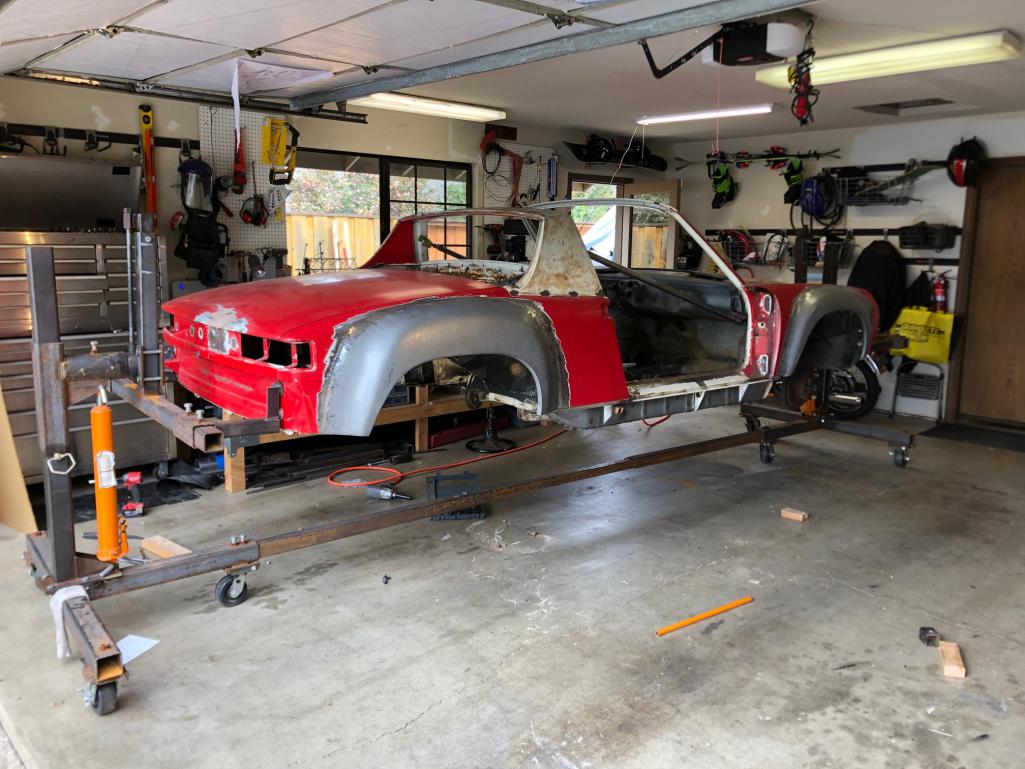 |
|
|
|
| mate914 |
Mar 15 2021, 07:27 AM
Post
#26
|
|
Matt Group: Members Posts: 941 Joined: 27-February 09 From: Eagles mere, PA Member No.: 10,102 Region Association: North East States |
Most all of the rear pillar strength comes from behind, where battery tray is.
I'm not sure how much time I would invest in this 1/16'' space. If your going to fix this, I would make a few cuts inside and out side. I'm not even sure they came perfect from factory..... Matt |
 |
|
| pencap914 |
Mar 15 2021, 10:15 AM
Post
#27
|
|
Member Group: Members Posts: 81 Joined: 16-April 06 Member No.: 5,872 Region Association: Northern California |
QUOTE(mate914 @ Mar 15 2021, 06:27 AM) Most all of the rear pillar strength comes from behind, where battery tray is. I'm not sure how much time I would invest in this 1/16'' space. If your going to fix this, I would make a few cuts inside and out side. I'm not even sure they came perfect from factory..... Matt Thanks Matt, That's what I was thinking. If I really needed to stretch the car back I would probably have to cut the outside longitudinal stiffener too. I just don't see it being worth it. I feel as if any sort of chassis straightening attempt without a Cellete bench is guesswork anyhow. Its possible I could invest another weekend in trying to get it absolutely perfect, but end up worse off than it is now. I care less about the door gaps being perfect and more about how the suspension pickup points line up. I wonder if I could borrow those Brunson precision optical levels from work to perform a suspension survey.... Meh I don't want this to be a science project. I need to maintain forward progression. Next on the list: Finish fender flare installation (need to weld undersides) Repair clutch tube Install 6cyl engine mounts Install rear sway bar mounts |
|
|
|
| pencap914 |
Mar 23 2021, 11:04 PM
Post
#28
|
|
Member Group: Members Posts: 81 Joined: 16-April 06 Member No.: 5,872 Region Association: Northern California |
Well, finding more issues with some of the previous to the previous owners repairs...
The rear floor pan and bottom half of the rear firewall had been replaced with panels from restoration design, and the shop that did the work didnt bother to use a straight-edge to line things up. So now, upon receiving the Maddogs Motorsports OEM style mount I see about a 3/8" gap at the bottom: 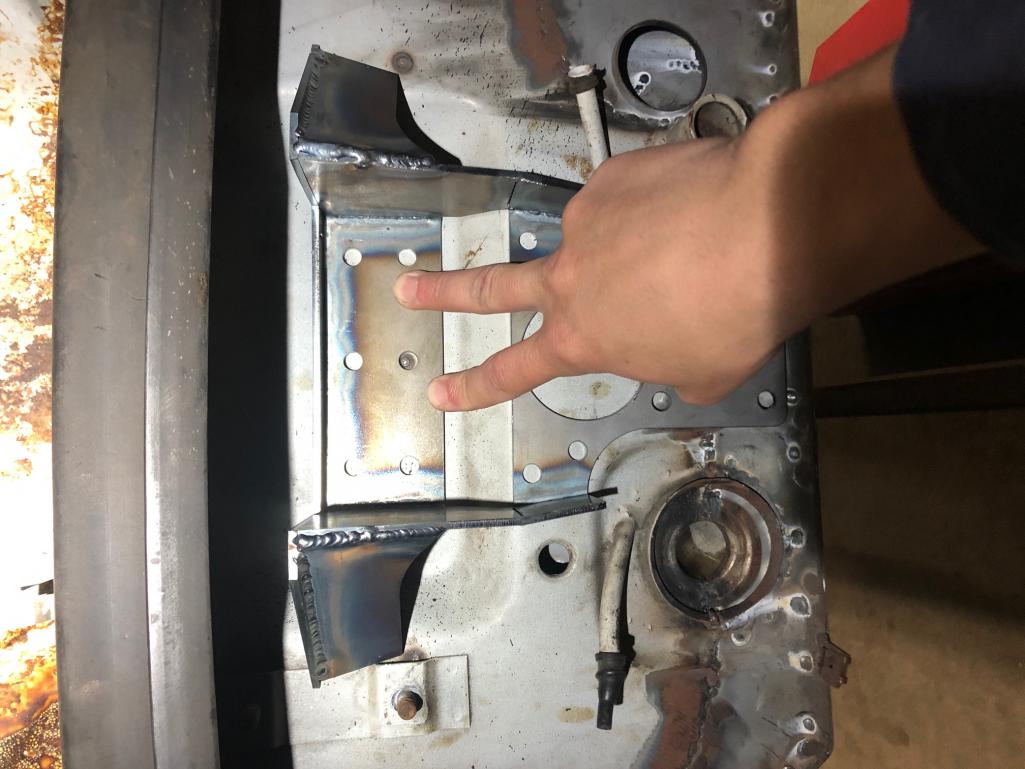 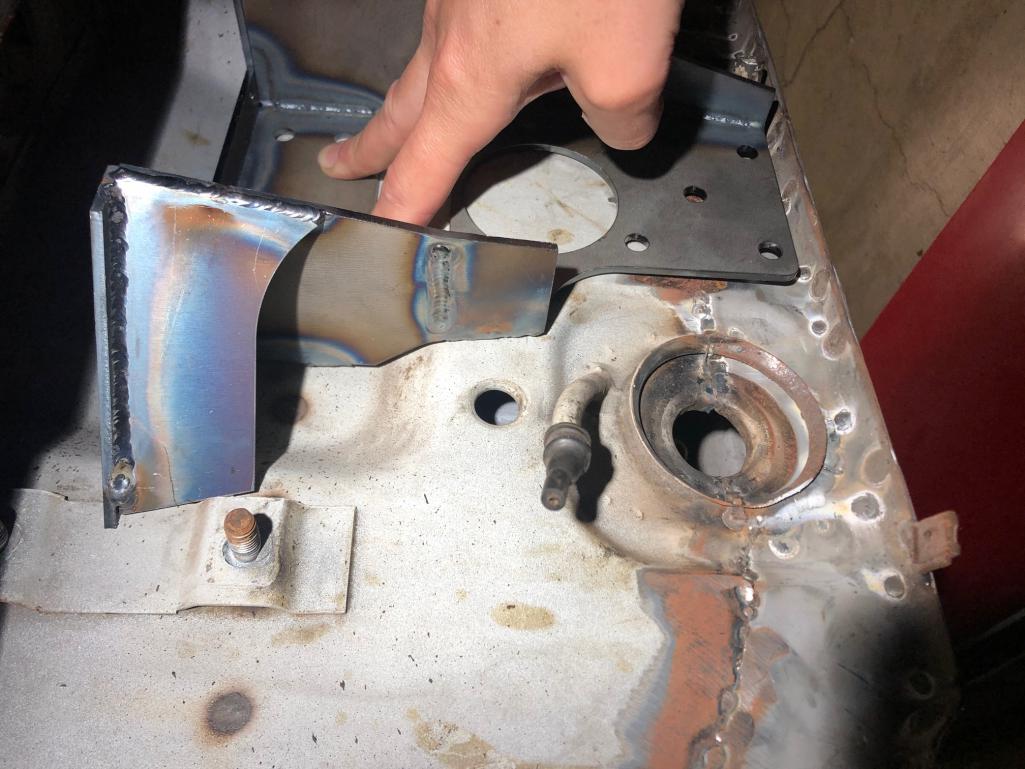 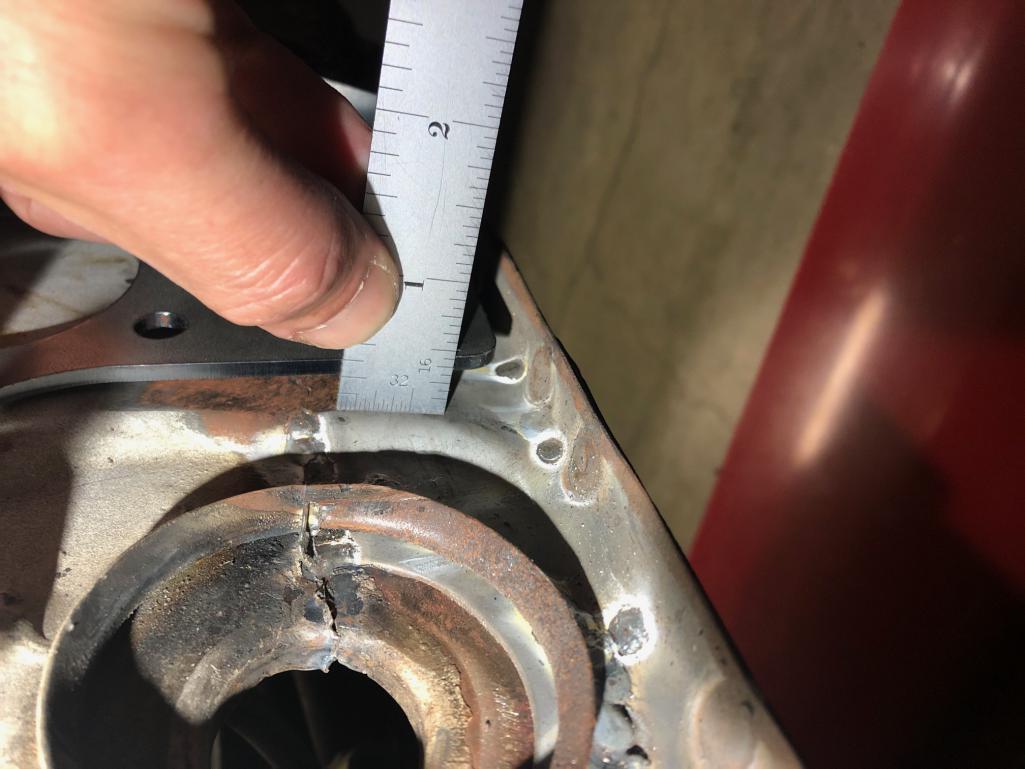 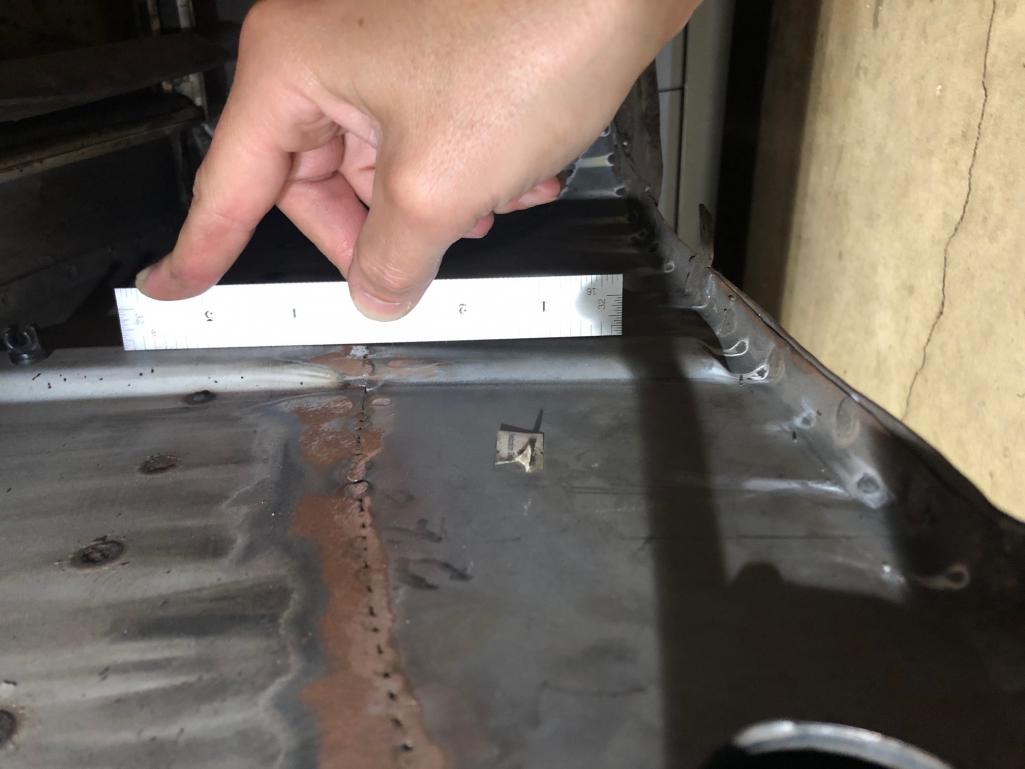 So I think I'll have to make a cut in the Maddog motor mount to get the bottom portion to line up correctly with the inward caved in bottom portion of the firewall... (IMG:style_emoticons/default/dry.gif) Its going to be painful to have to butcher up such a nice piece of fabrication from Maddogs motorsports. Oh well, it looks like I'll need to trim off a bit to make clearance for the brake pressure equalizer valve too. |
|
|
|
| Luke M |
Mar 24 2021, 07:17 AM
Post
#29
|
|
Senior Member Group: Members Posts: 1,513 Joined: 8-February 05 From: WNY Member No.: 3,574 Region Association: North East States |
QUOTE(pencap914 @ Jan 5 2021, 12:37 PM) Almost finished with the flat plate that I'll weld in between the two suspension pivot points to mount the oil cooler and perhaps add some rigidity. Found someone in town that has a dimple die set. Wish I squeezed a few more holes to keep things light as possible... I like this approach to the front cooler mount/reinforcement. Anymore pics you could add/share? What was the steel thickness used for this? Keep up the the great work. |
|
|
|
| mate914 |
Mar 24 2021, 09:02 AM
Post
#30
|
|
Matt Group: Members Posts: 941 Joined: 27-February 09 From: Eagles mere, PA Member No.: 10,102 Region Association: North East States |
QUOTE(pencap914 @ Mar 24 2021, 01:04 AM) Well, finding more issues with some of the previous to the previous owners repairs... The rear floor pan and bottom half of the rear firewall had been replaced with panels from restoration design, and the shop that did the work didnt bother to use a straight-edge to line things up. So now, upon receiving the Maddogs Motorsports OEM style mount I see about a 3/8" gap at the bottom: So I think I'll have to make a cut in the Maddog motor mount to get the bottom portion to line up correctly with the inward caved in bottom portion of the firewall... (IMG:style_emoticons/default/dry.gif) Its going to be painful to have to butcher up such a nice piece of fabrication from Maddogs motorsports. Oh well, it looks like I'll need to trim off a bit to make clearance for the brake pressure equalizer valve too. Just leave the bottom hang out. Start your welding on the top, by the time you get to the bottom its going to be hot enough and will bend with a blow of 5lb hammer. Matt |
|
|
|
| pencap914 |
May 23 2021, 03:18 PM
Post
#31
|
|
Member Group: Members Posts: 81 Joined: 16-April 06 Member No.: 5,872 Region Association: Northern California |
[/quote]
I like this approach to the front cooler mount/reinforcement. Anymore pics you could add/share? What was the steel thickness used for this? Keep up the the great work. [/quote] The main plate with the dimples is 14 gauge steel, which I'll admit seems overkill for this application, but the price was right (free scrap!). I welded a few M6 nuts on the bottom of the plate for retaining clips for the oil cooler. Then welded a 3/4" -1/16" wall square tube between the two suspension plates set this 14 gauge steel plate on top. Hopefully, will add some rigidity to the front suspension pickup points, but probably nothing really noticeable. It took me a while to get the shape correct for the side walls of the duct, as you can see its a pretty complicated shape. A pin contour gage and using CAD (Cardboard Aided Design...) came in handy for this. I removed the upper portion of the steel that was spot welded to the front of the car, just under where the hood latch mechanism lives, welded a few M6 nuts to the bottom of it to secure the top of the duct, which I plan on fabricating out of aluminum. Seen here is the extra holes punched in the front for air intake: 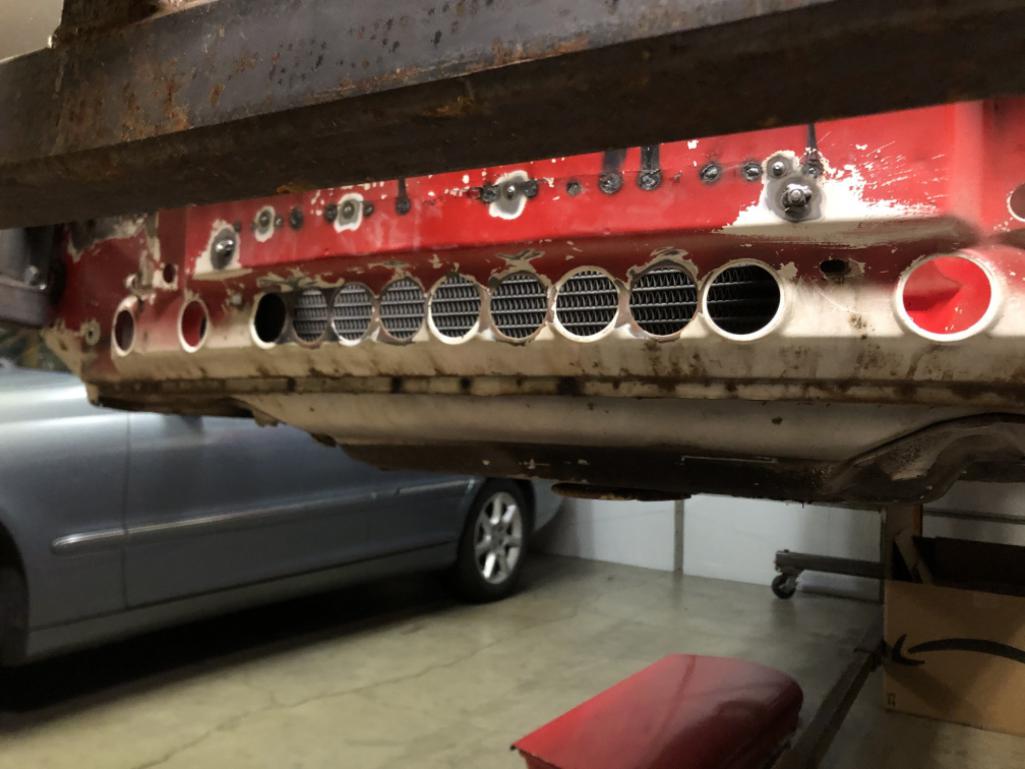 Oil cooler, rubber 1/8" rubber pad and sidewalls to direct airflow: 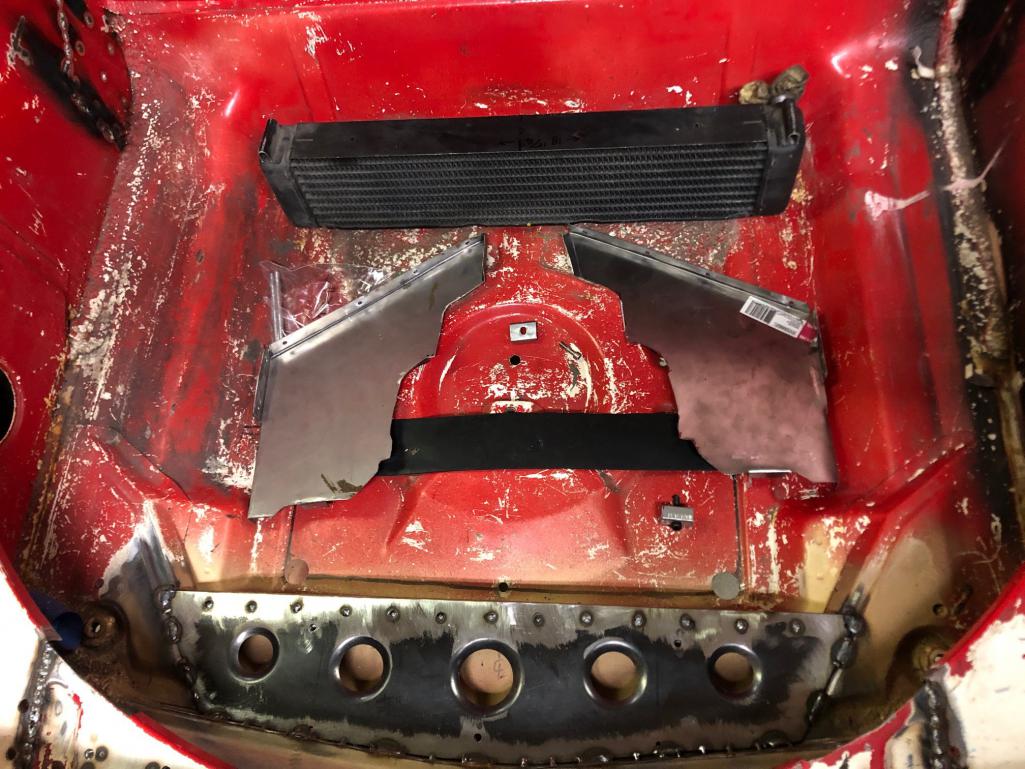 And how it sits in the car:  Top left you can see a M6 all-thread to secure the top, and bottom center of the photo one of my clips to secure the bottom of the oil cooler. 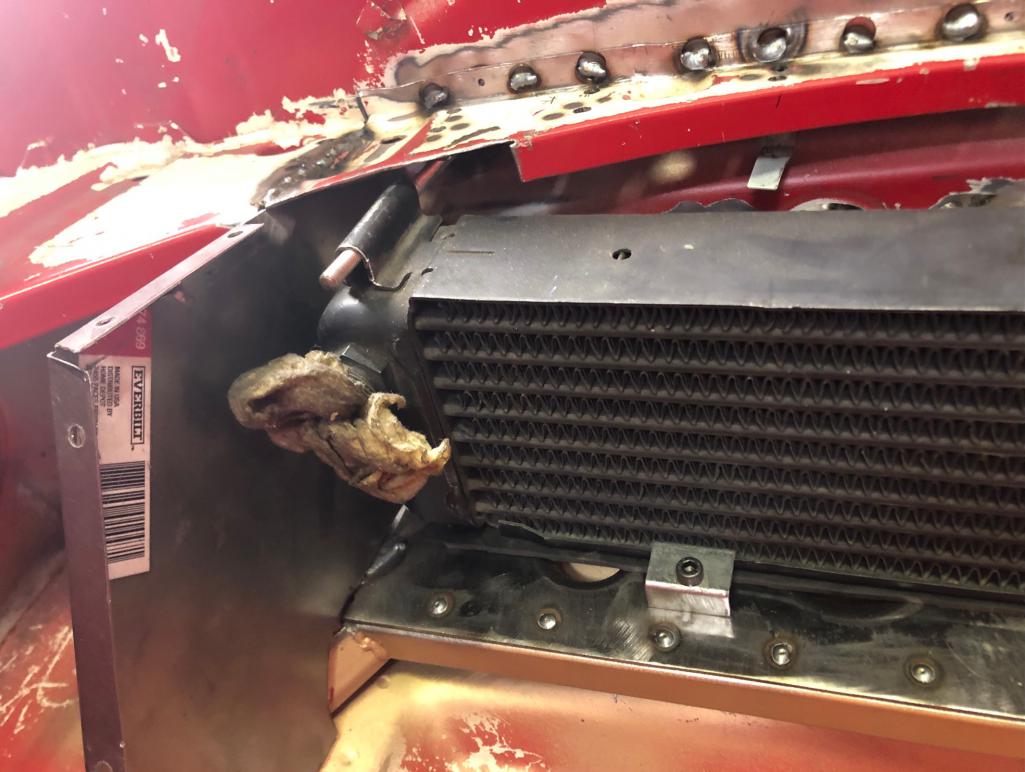 |
|
|
|
| pencap914 |
May 23 2021, 03:35 PM
Post
#32
|
|
Member Group: Members Posts: 81 Joined: 16-April 06 Member No.: 5,872 Region Association: Northern California |
Well before I weld on the motor mount for the 911 engine, I should address the broken clutch tube inside the tunnel. I'm debating how to approach this.
I purchased a replacement section of steel tube, just need to pull the trigger on cutting an access hole in the bottom of the tunnel to make the fix then weld the bottom pan back. 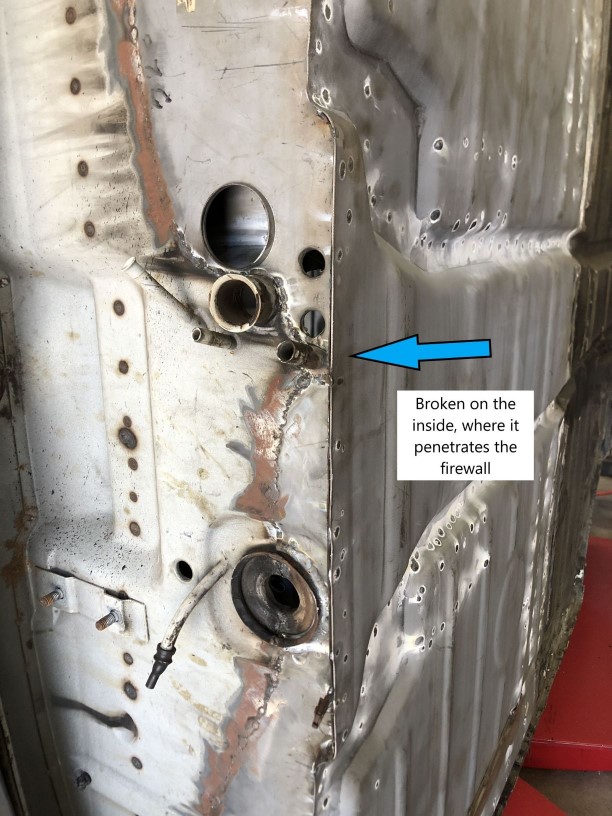 Also, debating what to do about the replaced floor board.... The shop that did this work did a simple lap joint, then tacked it in. this obviously creates a path for moisture, so should I just fully weld this joint to seal it up? 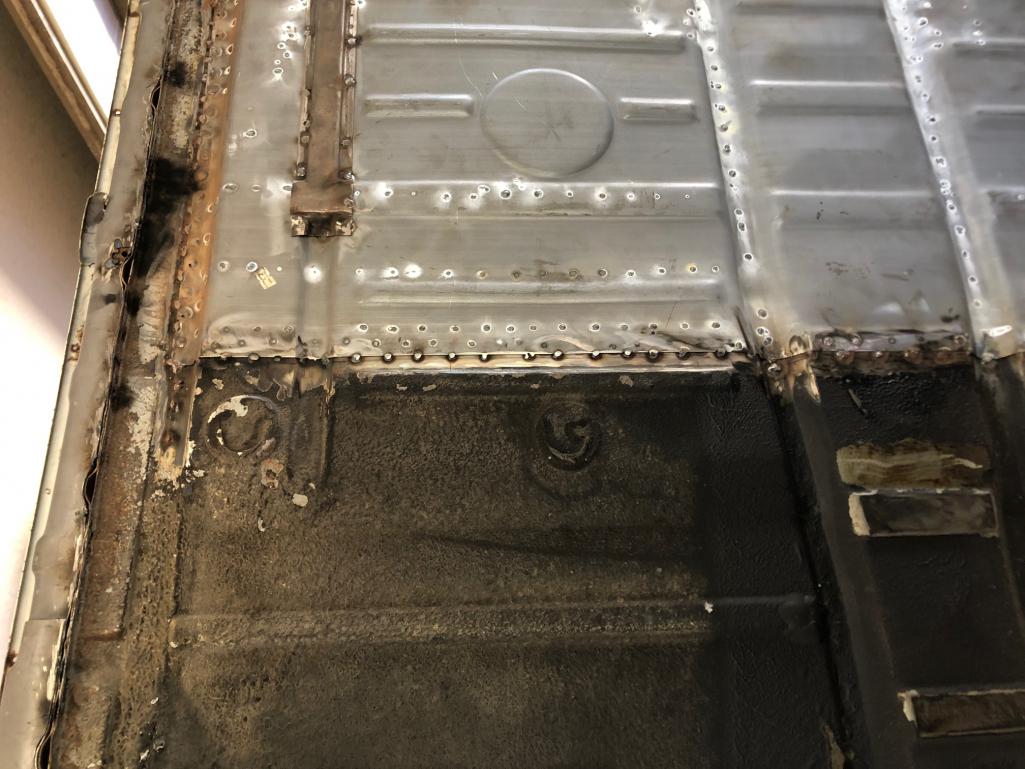 |
|
|
|
| bkrantz |
May 23 2021, 08:36 PM
Post
#33
|
|
914 Guru Group: Members Posts: 8,697 Joined: 3-August 19 From: SW Colorado Member No.: 23,343 Region Association: Rocky Mountains |
I fixed some lap joints the PO left on my car, including the outer right rear fender. Maybe I am aiming too high, but I prefer to have butt joints wherever possible.
|
|
|
|
| gereed75 |
May 24 2021, 06:06 AM
Post
#34
|
|
Senior Member Group: Members Posts: 1,427 Joined: 19-March 13 From: Pittsburgh PA Member No.: 15,674 Region Association: North East States |
Where possible, you might consider the “cut and butt” technique promoted in the Fitzzee Fabrication videos on YouTube. Looks like it might work on many of the panels shown in your pictures.
|
|
|
|
| pencap914 |
May 24 2021, 07:01 PM
Post
#35
|
|
Member Group: Members Posts: 81 Joined: 16-April 06 Member No.: 5,872 Region Association: Northern California |
QUOTE(bkrantz @ May 23 2021, 07:36 PM) I fixed some lap joints the PO left on my car, including the outer right rear fender. Maybe I am aiming too high, but I prefer to have butt joints wherever possible. Yeah I've skimmed through your build thread. Quite impressive! I can understand the fenders wanting to upgrade this splice to a butt joint, but underneath the car I'm wondering if its worth the effort. I would just be doing it for longevity. |
|
|
|
| pencap914 |
May 24 2021, 07:11 PM
Post
#36
|
|
Member Group: Members Posts: 81 Joined: 16-April 06 Member No.: 5,872 Region Association: Northern California |
QUOTE(gereed75 @ May 24 2021, 05:06 AM) Where possible, you might consider the “cut and butt” technique promoted in the Fitzzee Fabrication videos on YouTube. Looks like it might work on many of the panels shown in your pictures. Yeah I've seen that video where he takes a thin blade and makes a 45 degree cut... that's what I'm debating on doing. on the transition between the front floor pan and rear. |
|
|
|
| nditiz1 |
May 24 2021, 07:31 PM
Post
#37
|
|
Senior Member Group: Members Posts: 1,272 Joined: 26-May 15 From: Mount Airy, Maryland Member No.: 18,763 Region Association: MidAtlantic Region |
I too have the same 3/8 gap at the bottom of my maddog mount.
Also my clutch was previously repaired with a hack job. I did my best to correct it. Lastly, the rear pans on mine were also replaced with restoration design ones and the job was sub par. I know I'm on the east coast, but I'm wondering if these two "welders" purchased their welding degrees from the same dollar store academy. |
|
|
|
| pencap914 |
Sep 2 2021, 10:34 PM
Post
#38
|
|
Member Group: Members Posts: 81 Joined: 16-April 06 Member No.: 5,872 Region Association: Northern California |
Made some progress this summer:
Clutch tube repair: 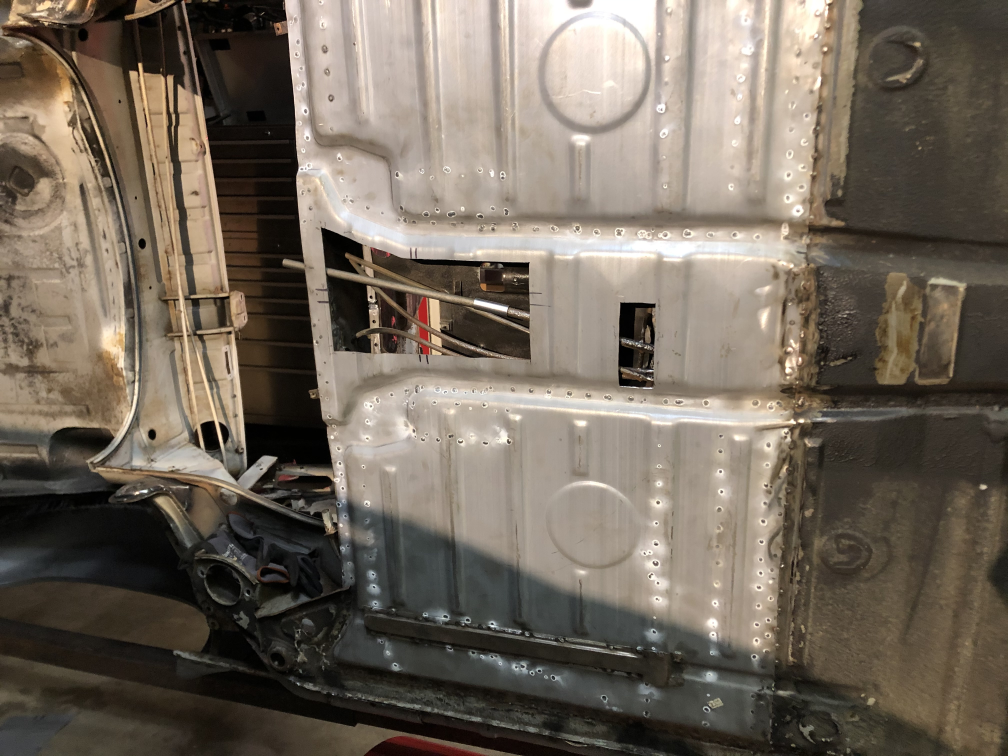 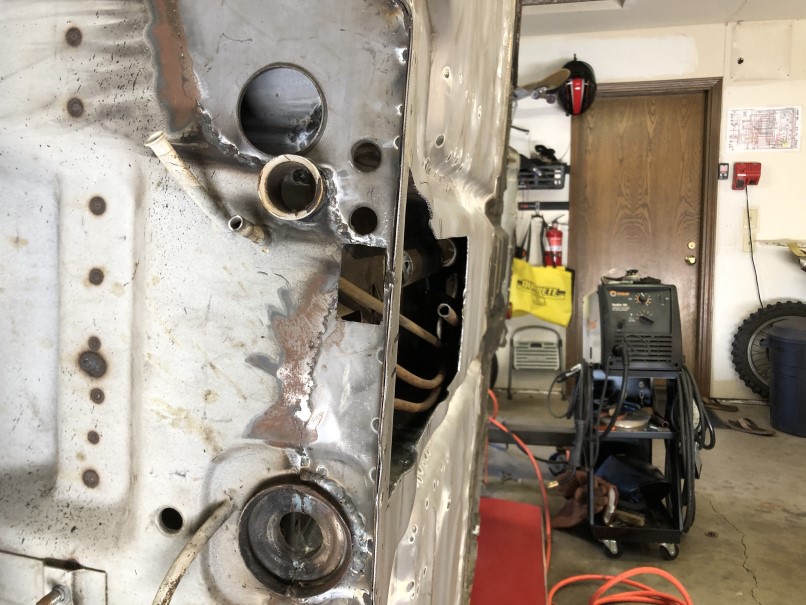 Found the oval bracket inside the tunnel was broken, leaving the throttle and clutch tubes pretty floppy: 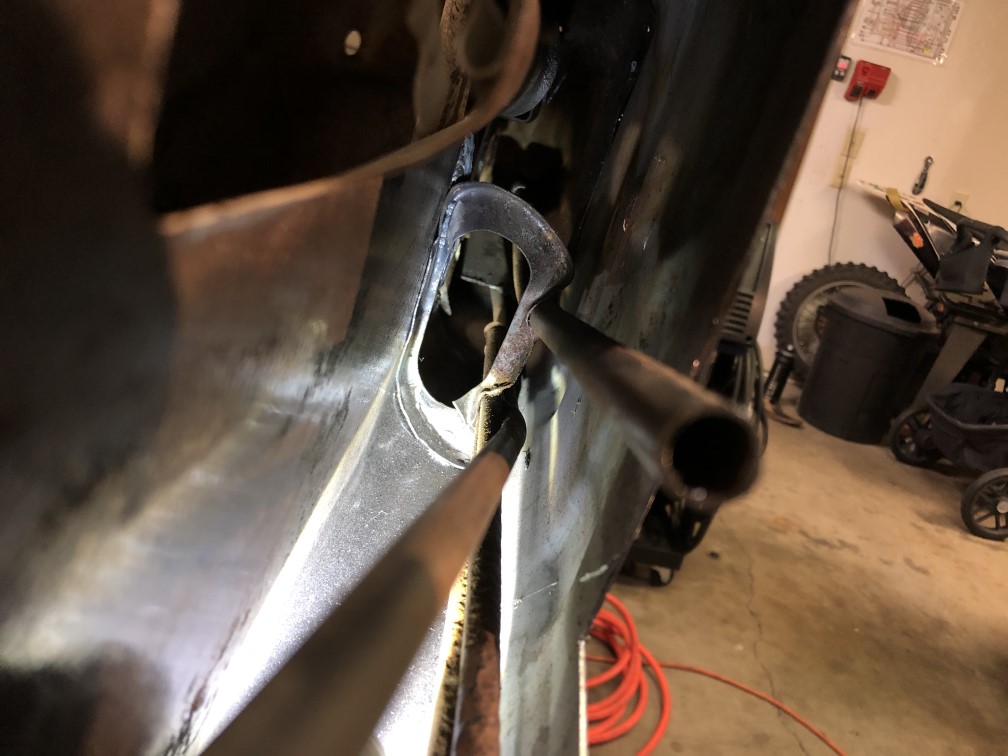 Couldn't reach the inside exactly where it was broken, so I just made a little bracket and closed the oval. Tubes are rock solid now. 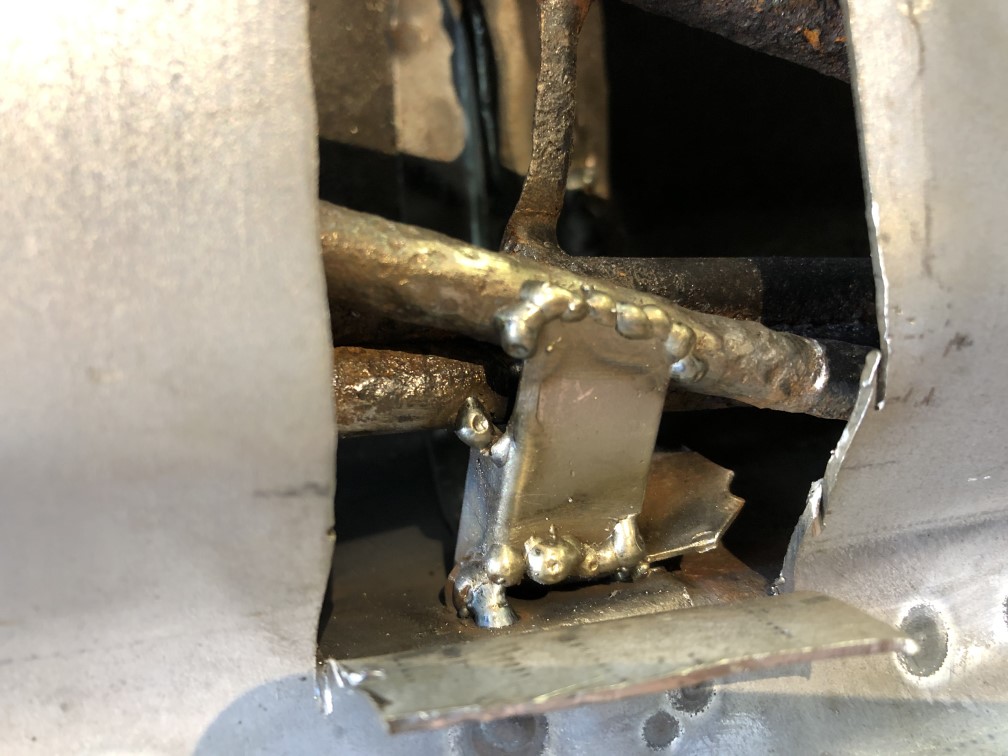 New clutch tube at the back end, with a sleeve around butt joint. 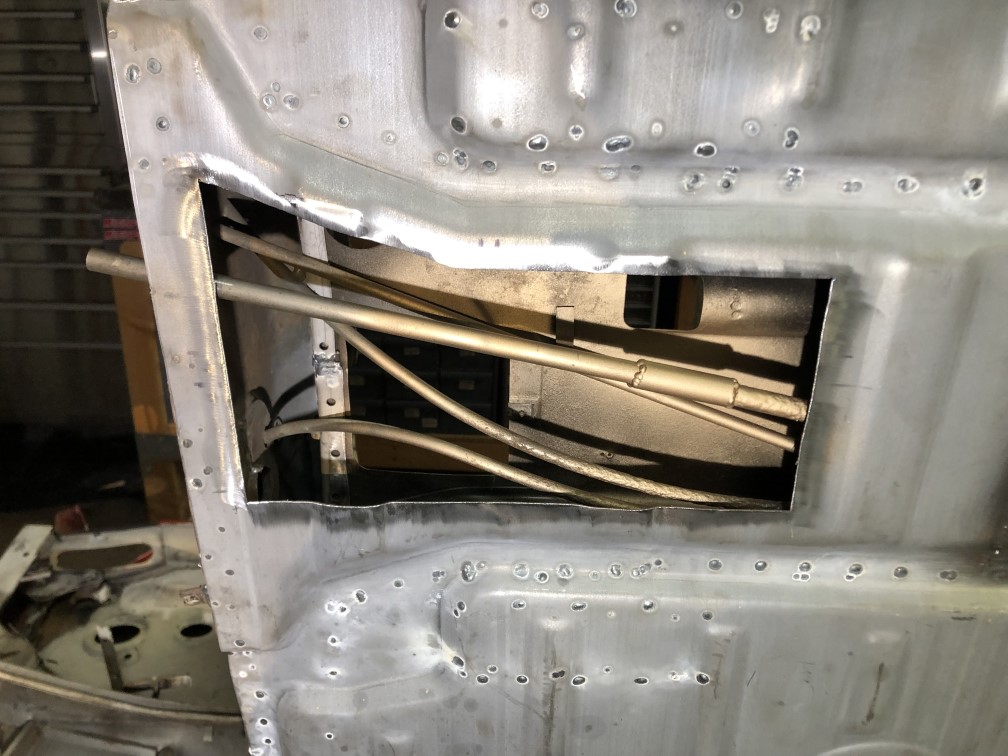 Floor pans welded back up. Surgery scars still visible before ground smooth with flap disc. 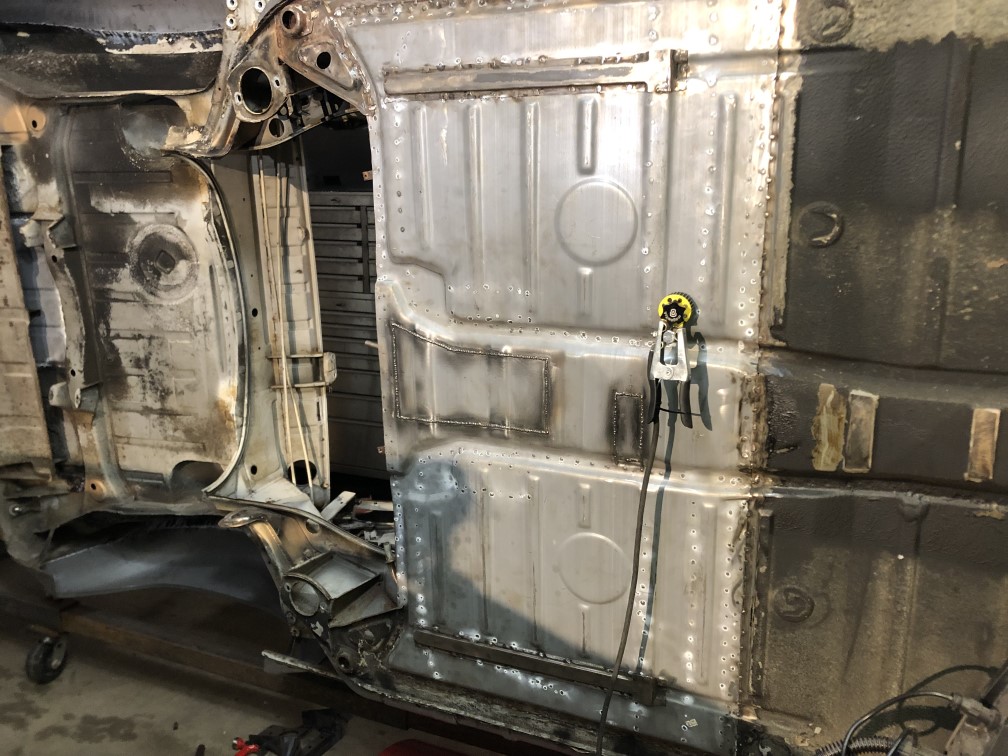 |
|
|
|
| pencap914 |
Sep 2 2021, 10:51 PM
Post
#39
|
|
Member Group: Members Posts: 81 Joined: 16-April 06 Member No.: 5,872 Region Association: Northern California |
I had a few distractions this summer... Not to mention its construction/vacation season. So time is in short supply.
 |
|
|
|
| pencap914 |
Sep 2 2021, 11:13 PM
Post
#40
|
|
Member Group: Members Posts: 81 Joined: 16-April 06 Member No.: 5,872 Region Association: Northern California |
Installed the rear suspension stiffening kit: Was in between doing this or the Heim joint stiffening kit. This will probably suffice for 8" wide DOT legal tires on curvy mountain roads.
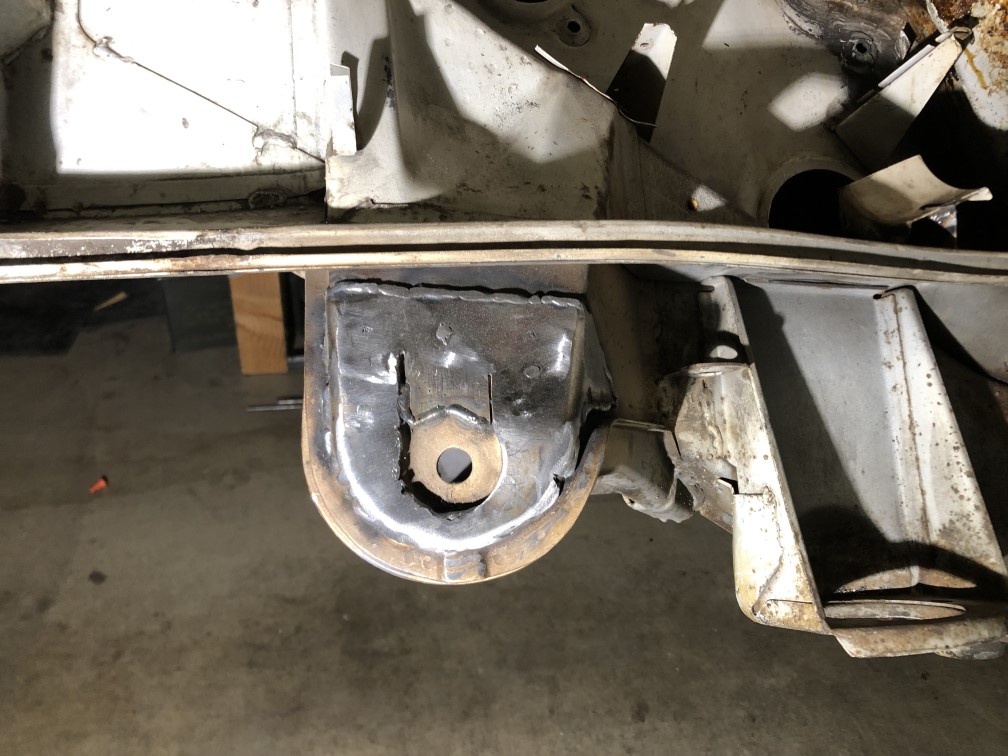 Also added the front sway bar stiffening kit. Probably overkill for my application, but its an excuse to drink beer in the garage while listening to 70's British Metal. 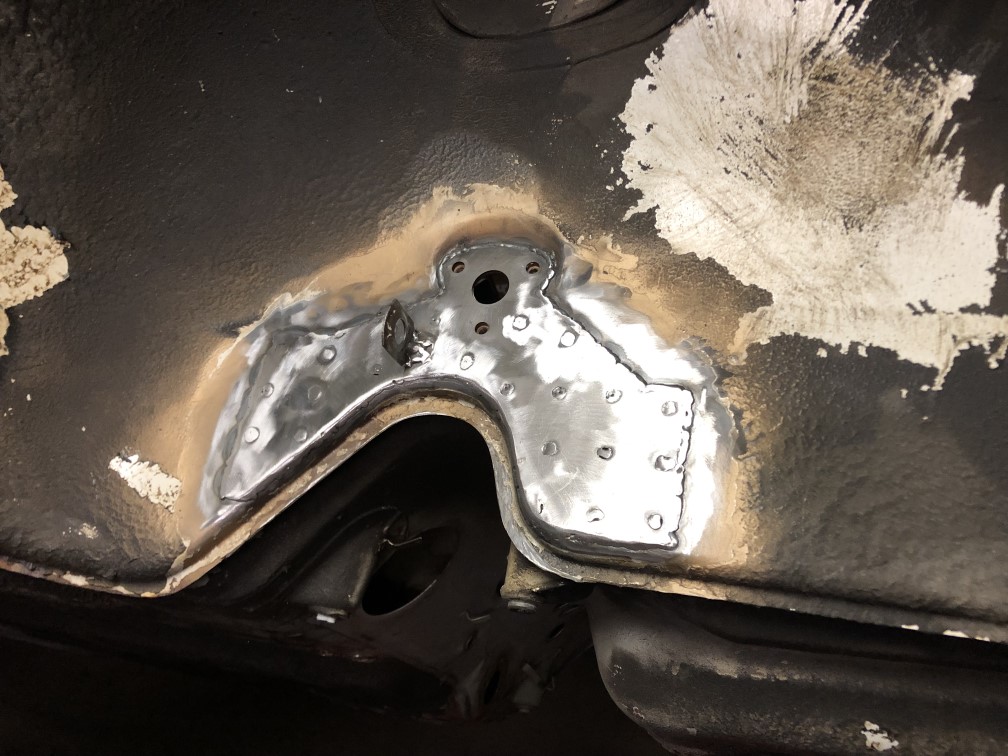 Also cut the holes for the oil tank: 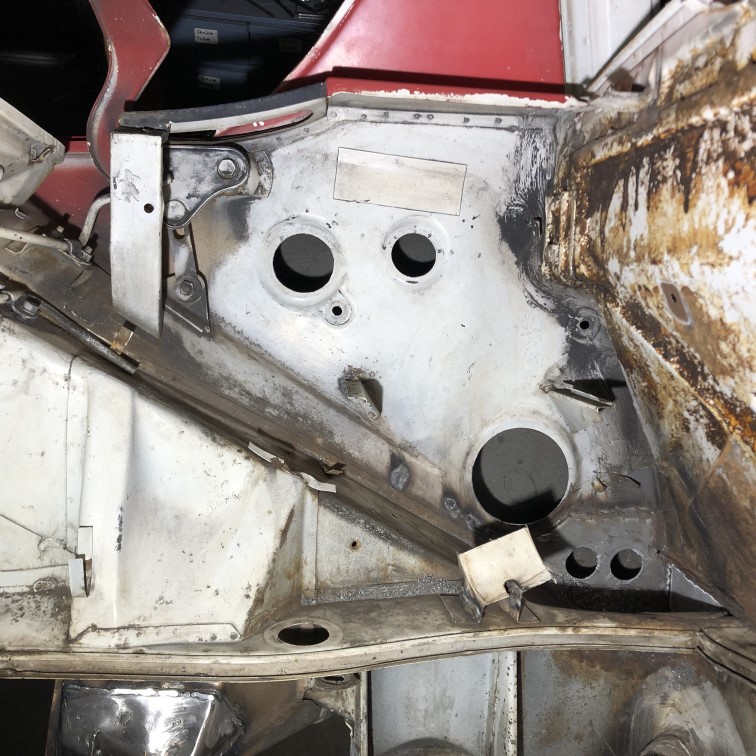 And mounted the Mad dog OEM 6cyl motor mount: 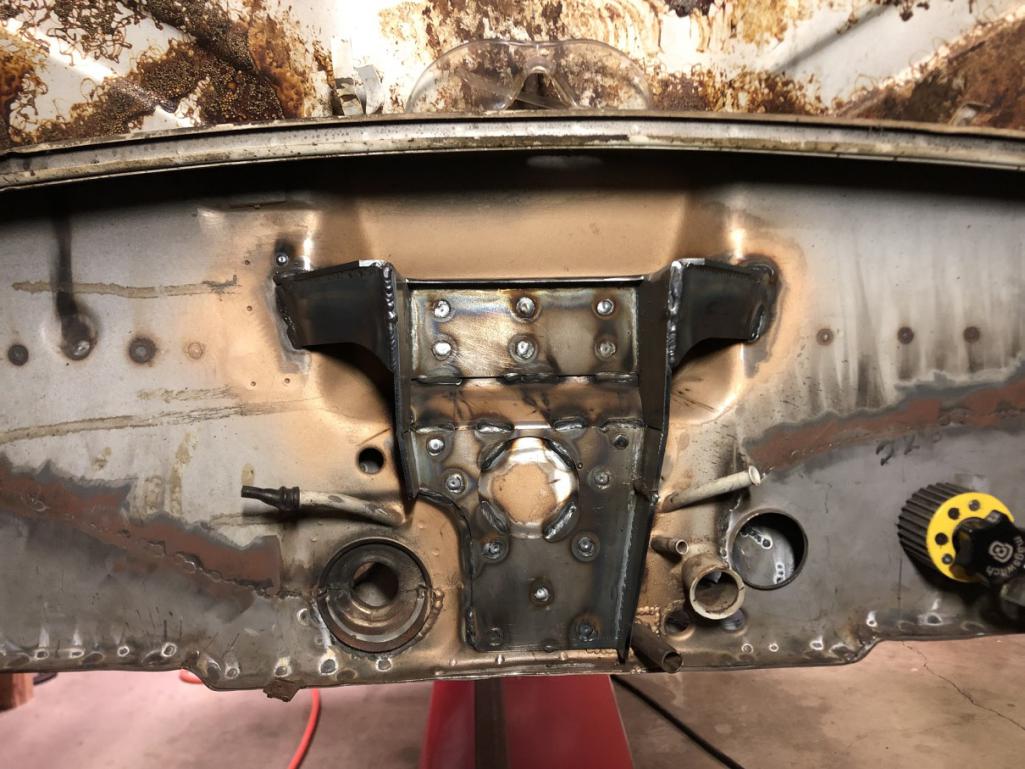 |
|
|
|
|
1 User(s) are reading this topic (1 Guests and 0 Anonymous Users)
0 Members:

|
Lo-Fi Version | Time is now: 18th May 2026 - 05:46 AM |
Invision Power Board
v9.1.4 © 2026 IPS, Inc.