|
|
|
Porsche, and the Porsche crest are registered trademarks of Dr. Ing. h.c. F. Porsche AG.
This site is not affiliated with Porsche in any way. Its only purpose is to provide an online forum for car enthusiasts. All other trademarks are property of their respective owners. |
|
|

  |

| pencap914 |
 Sep 2 2021, 11:29 PM Sep 2 2021, 11:29 PM
Post
#41
|
|
Member  Group: Members Posts: 81 Joined: 16-April 06 Member No.: 5,872 Region Association: Northern California |
So now I have a problem to solve: What to do about the brake proportioning (err.. pressure equalizer?) valve. My car is a late 74 build so its the later style more commonly found on 75-76 cars, so I had to remove the valve and bracket to make way for the /6 engine mount. I may see if PMB would be willing to take this one as a core for a rebuilt early valve, then find some hard lines from an early car, or bend my own.
Next big project: Take on this ugly mess found on both sides of the car: 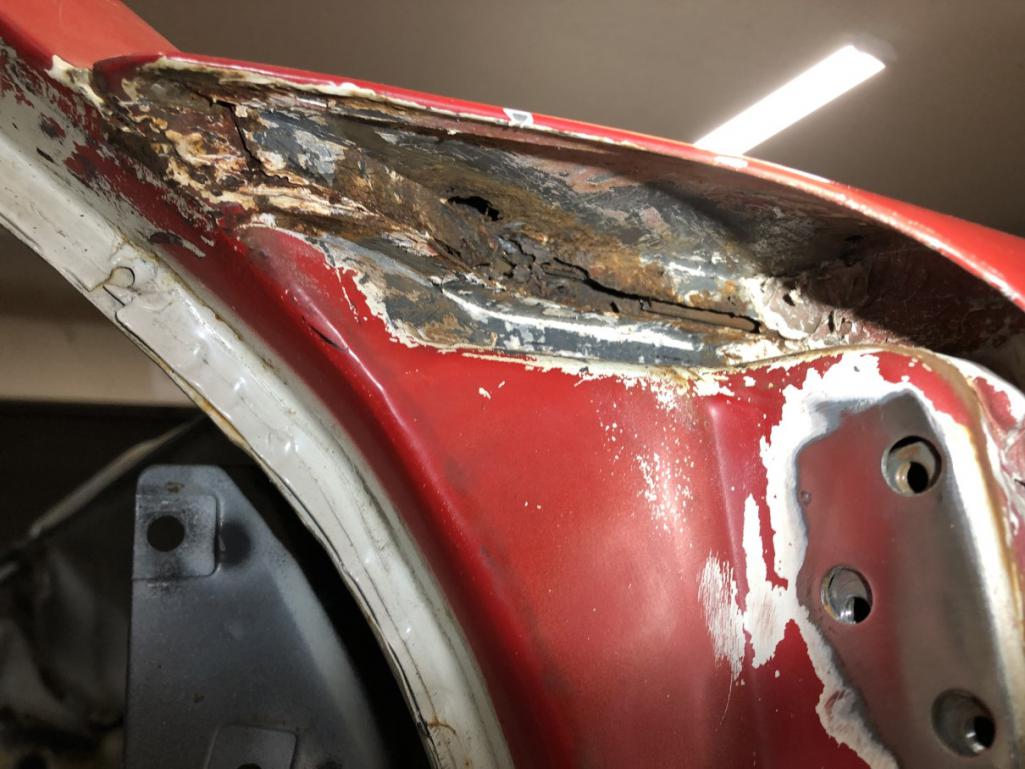 A previous repair attempt was made, but unfortunately its just insufficient. I purchased the cowl repair panels from AA. Not really looking forward to this repair, but it has to be done. This certainly will push my skills to the max. Lets hope I don't c**k it up too bad! 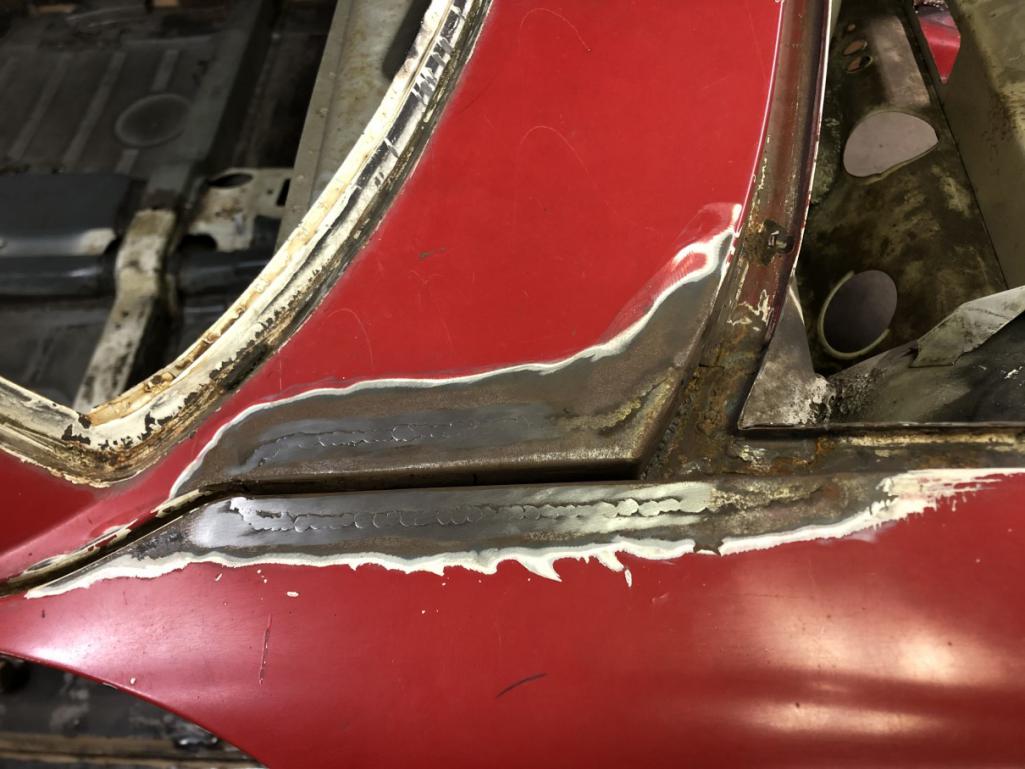 |
   |

 
|
| Cairo94507 |
Sep 3 2021, 06:30 AM
Post
#42
|
|
Michael Group: Members Posts: 10,634 Joined: 1-November 08 From: Auburn, CA Member No.: 9,712 Region Association: Northern California |
|
|
|
|
| Montreal914 |
Sep 3 2021, 12:14 PM
Post
#43
|
|
Advanced Member Group: Members Posts: 2,106 Joined: 8-August 10 From: Claremont, CA Member No.: 12,023 Region Association: Southern California |
Glad to see all of this progress being done on the car! (IMG:style_emoticons/default/smilie_pokal.gif)
I originally purchased this car in hopes of making it my dream 914 while still driving my DD 73. I felt the condition of the white 74 was a better base than my 73. After doing some of the work (inner and outer kit) the project car sat in the garage for a couple of years. It also made me realize that my dream 914 was my 73 DD because of its sentimental value, even though I didn’t think it was as good of a foundation as thé 74, now yours. I am sad to see all of the issues you are having with the repairs that were done before my ownership. One thing I never understood was why they cut the lower firewall through the shifter port... (IMG:style_emoticons/default/sad.gif) For the front fender, you saw and commented on the work I recently did on mine. I wasn’t impressed by AA’s repair piece and that is why I got an original fender part from Vince (Hesperia area) but I took my sweet time to find the right one in his yard. I will send you AA’s part if you want it. This repair definitely pushed my level of craftsmanship and I am happy with my modest work. Go very slowly and analyze. I did get excellent inputs from Cary. (IMG:style_emoticons/default/pray.gif) This will be a very nice car when completed, keep up the good work! (IMG:style_emoticons/default/smash.gif) |
|
|
|
| pencap914 |
Sep 3 2021, 09:41 PM
Post
#44
|
|
Member Group: Members Posts: 81 Joined: 16-April 06 Member No.: 5,872 Region Association: Northern California |
Thanks Eric! Yeah its been a great project for me.
QUOTE(Montreal914 @ Sep 3 2021, 11:14 AM)  I am sad to see all of the issues you are having with the repairs that were done before my ownership. One thing I never understood was why they cut the lower firewall through the shifter port... (IMG:style_emoticons/default/sad.gif) I know right?!? And why would someone replace the entire rear part of the floor without repairing the blatantly obviously busted clutch tube? I saved the invoice you gave me for the shop that did all that work, if I remember correctly, it was over $3000. Someone paid a lot of money for some sloppy work. (IMG:style_emoticons/default/huh.gif) QUOTE(Montreal914 @ Sep 3 2021, 11:14 AM) I will send you AA’s part if you want it. Ah shoot I should have reached out to you earlier, but I bought it months ago, I doubt AA would take it back. I think I can make use of them rather than chopping up a good original fender. I think I have a plan... (IMG:style_emoticons/default/idea.gif) I'll get started on that later in fall. I'm thinking the car will have to come down off the rotisserie and onto a frame dolly before I start on the cowl repair. I'd imagine the rotisserie puts a lot of stress on this area of the car. Anyone have a frame dolly they want to sell? (IMG:style_emoticons/default/biggrin.gif) |
|
|
|
| pencap914 |
Nov 7 2021, 10:22 AM
Post
#45
|
|
Member Group: Members Posts: 81 Joined: 16-April 06 Member No.: 5,872 Region Association: Northern California |
Figuring out the oil system for the 2.7. Was on the fence about using Ben's SS oil lines since I didn't realize the 4-cyl engine mounts are going to have to be cut off for these to work. I've read from others here that its not an easy task getting those off. However, after closer at the mounts, and figuring out a "demolition plan" I think I know how to take them off without much issue.
   |
|
|
|
| pencap914 |
Nov 7 2021, 10:26 AM
Post
#46
|
|
Member Group: Members Posts: 81 Joined: 16-April 06 Member No.: 5,872 Region Association: Northern California |
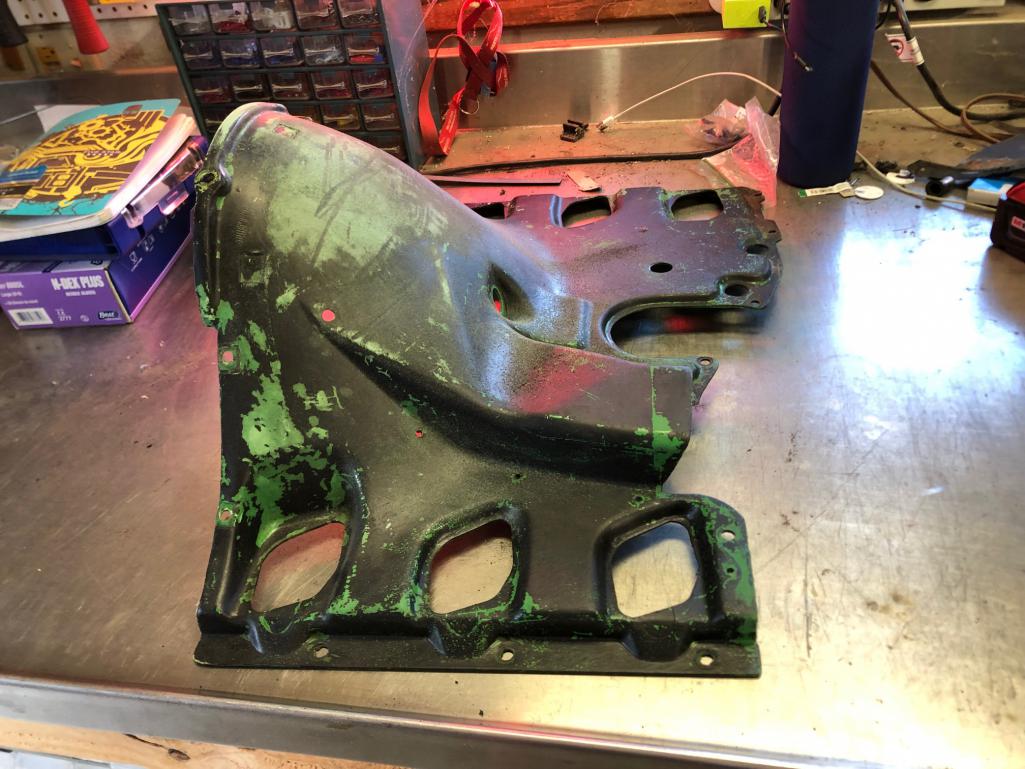
Also working on restoring the fiberglass engine shroud for the 2.7. Few cracks in the fiberglass will have to be addressed, then sanded and painted. This week I'll stop buy the automotive paint shop to talk about what would the best paint options would be for this. A fiberglass engine shroud is a challenging place for automotive paint....
 |
|
|
|
| tscrihfield |
Nov 7 2021, 08:18 PM
Post
#47
|
|
Drive Fast and Take Chances Group: Members Posts: 643 Joined: 8-September 10 From: Amelia Ohio Member No.: 12,156 Region Association: None |
Really like where this thread is headed! (IMG:style_emoticons/default/popcorn[1].gif)
Fantastic work thus far! |
|
|
|
| pencap914 |
Nov 12 2021, 02:16 PM
Post
#48
|
|
Member Group: Members Posts: 81 Joined: 16-April 06 Member No.: 5,872 Region Association: Northern California |
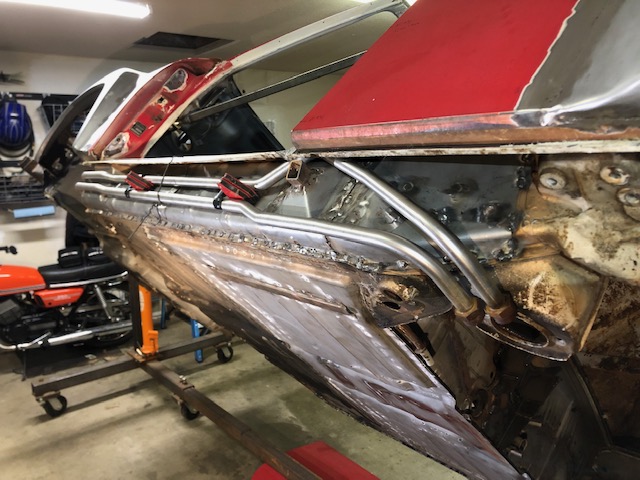
Got the 4cyl motor mount removed yesterday! Wasn't too bad to remove, a spot weld cutter and a 90 degree die grinder with a 3" cutoff wheel did most of the heavy lifting. Clean-up took a variety of tools to polish off the old welds. (Forgot to snap a pic of the finished product before leaving the house this morning...)
Now on to final fitup for the SS hard oil lines, and more weld cleanup on the outer longitudinal stiffening kits. 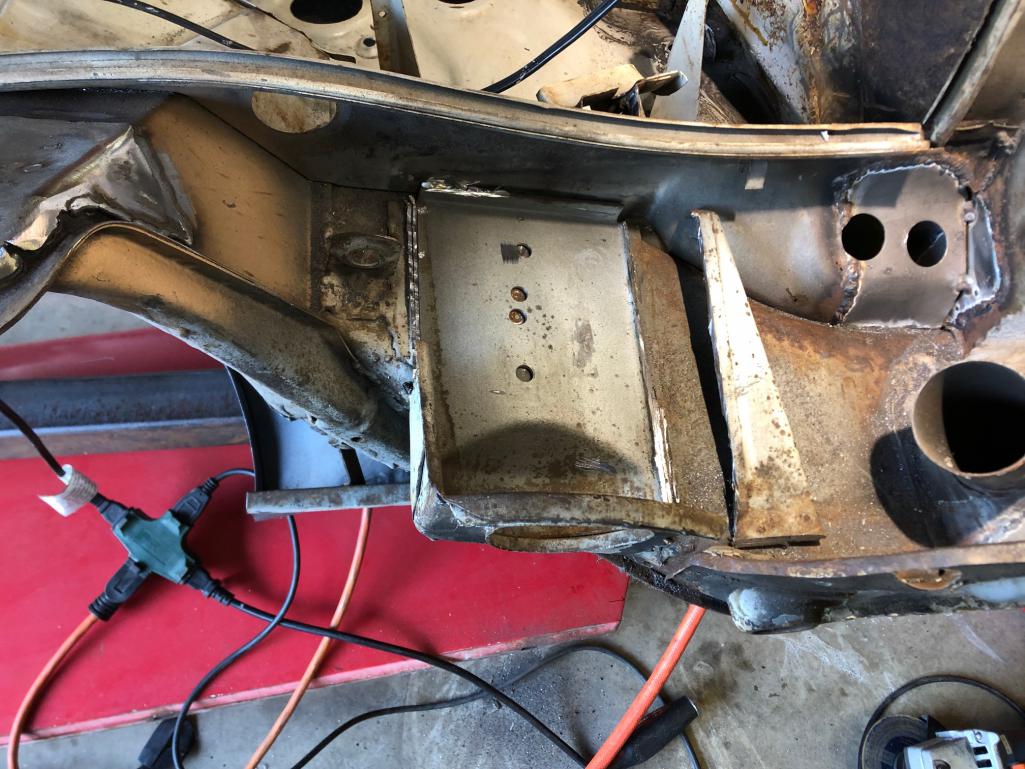 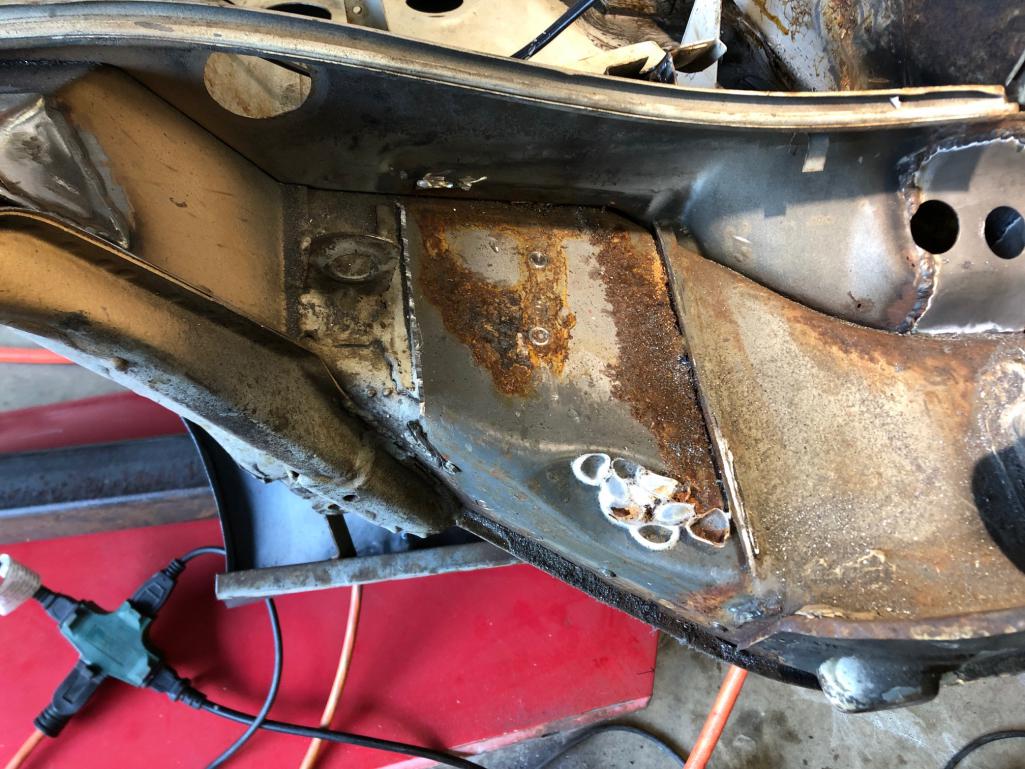 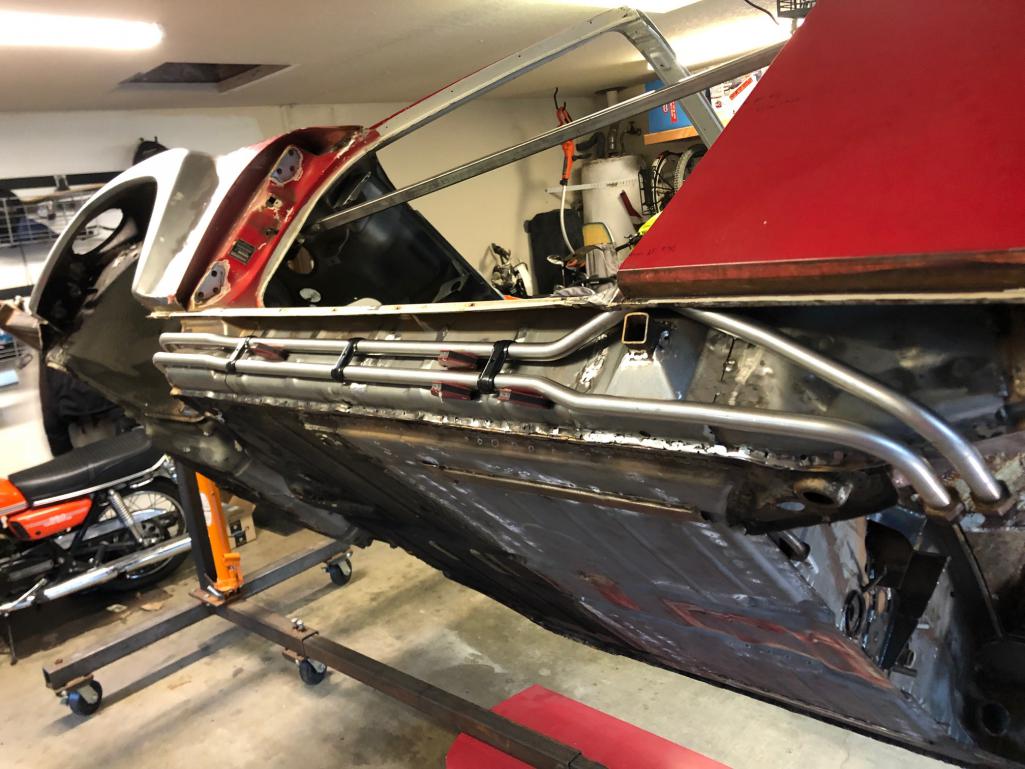 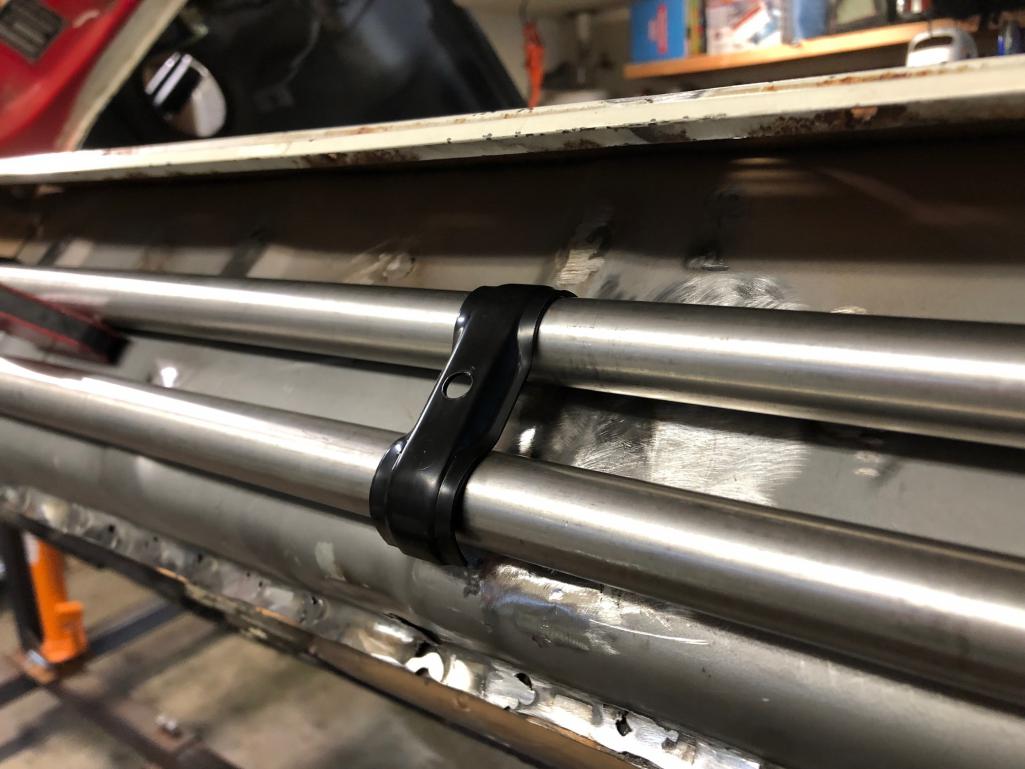 |
|
|
|
| Retroracer |
Nov 13 2021, 04:00 AM
Post
#49
|
|
Senior Member Group: Members Posts: 656 Joined: 7-July 13 From: Bend OR Member No.: 16,100 Region Association: Pacific Northwest |
Thx for posting progress on this build!
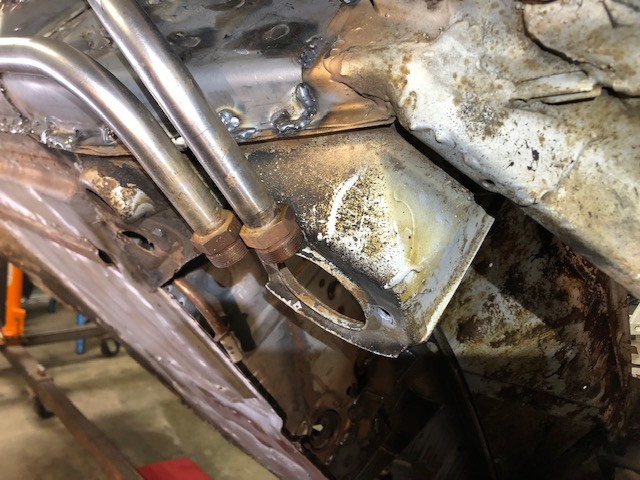
Lots of parallels to my GT build (not well documented here), some very similar issues with rust repairs; good to see you getting the stiffening panels in and removing the -4 mounts. On a real -6 there is a small bracket which holds up the oil feed pipe - which you might want to add "while the welder is out". I had a car I could measure dimensions off of, and cut it out of flat plate. I have pics somewhere if you're interested.... Also: oil cooler looks like the Behr Mercedes one? - Tony |
|
|
|
| Luke M |
Nov 13 2021, 08:57 AM
Post
#50
|
|
Senior Member Group: Members Posts: 1,513 Joined: 8-February 05 From: WNY Member No.: 3,574 Region Association: North East States |
Your car is coming along well. I'm at the point of plumbing a 3.0 to the front oil cooler. I'm looking at Ben's SS GT oil lines as well. What's your plan on a T-stat location and hose layout ?
Post pics please. (IMG:style_emoticons/default/beerchug.gif) |
|
|
|
| Montreal914 |
Nov 13 2021, 12:22 PM
Post
#51
|
|
Advanced Member Group: Members Posts: 2,106 Joined: 8-August 10 From: Claremont, CA Member No.: 12,023 Region Association: Southern California |
Great progress Glenn!
I really like the craftsmanship! Those oil lines look really nice! Have you started looking at paint shop? I am slooowly making progress on the preparation of my roller for paint. I will be interested in hearing about your findings. (IMG:style_emoticons/default/beerchug.gif) |
|
|
|
| pencap914 |
Nov 15 2021, 10:38 AM
Post
#52
|
|
Member Group: Members Posts: 81 Joined: 16-April 06 Member No.: 5,872 Region Association: Northern California |
Tony-
Just found your handle on IG. Holy cow that's a nice build you have there. Hoping my build will turn out similar! Luke- I'm noodling through the T-stat location now, still might go with a Mocal t-stat since they're about half the price of a Porsche unit off an SC or something. I Like what Ben (mb911) has done with his t-stat setup. (See the "914-6 GT oil cooler set up install and prototyping thread") I think my T-stat will go somewhere in a similar location, about where the old left side 4cyl engine mount went. I'll certainly post more pictures as I make progress! Eric- Thanks! I've only been casually asking around for a paint shop, no solid leads yet. A friend of mine recommended a place in Reno where he's had a few classic cars painted. His logic is outside of California, shops can use better paints since California is restrictive on the chemicals used.... not sure if this is true or not. There are a few shops outside of Sacramento that I may call to get quotes from as well. 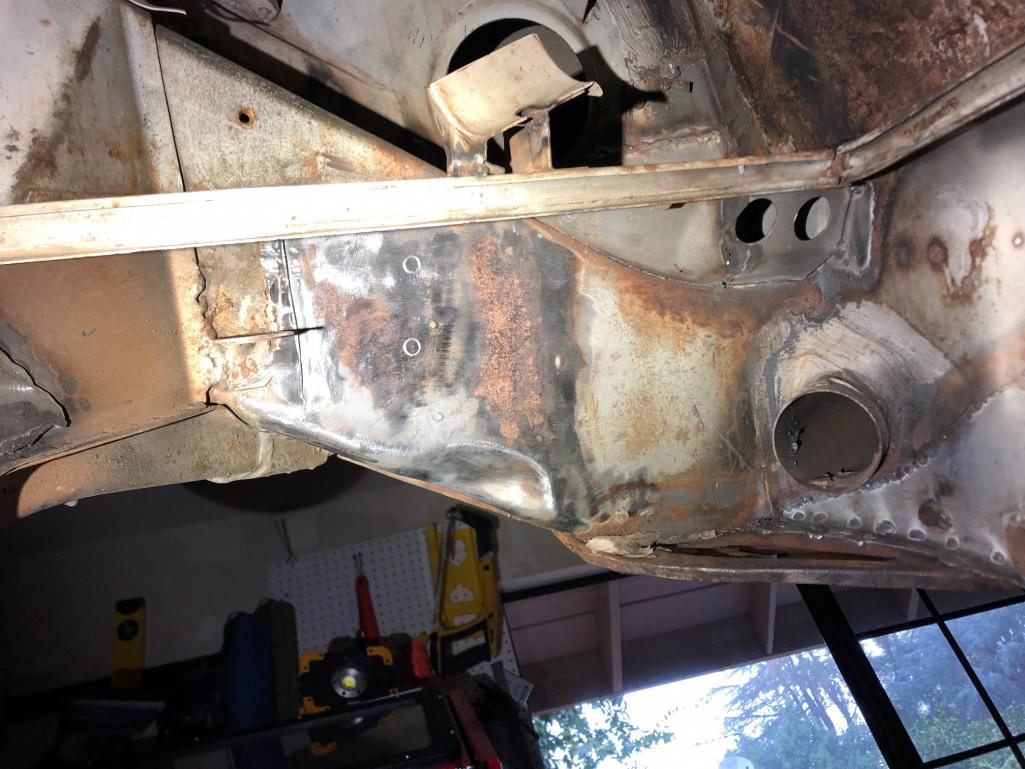 |
|
|
|
| Luke M |
Nov 15 2021, 12:05 PM
Post
#53
|
|
Senior Member Group: Members Posts: 1,513 Joined: 8-February 05 From: WNY Member No.: 3,574 Region Association: North East States |
I've been following Ben's thread on the oil lines stuff. Just wanted to see what others where doing and compare. If you plan on running a 6 oil tank in the factory location you may want to remove that fan mount. We left my brothers in place and couldn't get the oil filter on with it there.
|
|
|
|
| pencap914 |
Nov 15 2021, 12:24 PM
Post
#54
|
|
Member Group: Members Posts: 81 Joined: 16-April 06 Member No.: 5,872 Region Association: Northern California |
QUOTE(Luke M @ Nov 15 2021, 10:05 AM) I've been following Ben's thread on the oil lines stuff. Just wanted to see what others where doing and compare. If you plan on running a 6 oil tank in the factory location you may want to remove that fan mount. We left my brothers in place and couldn't get the oil filter on with it there. Good to know. I'm using one of Ben's oil tanks, so that fan mount is not long for this world. (IMG:style_emoticons/default/sawzall-smiley.gif) |
|
|
|
| Retroracer |
Nov 15 2021, 04:16 PM
Post
#55
|
|
Senior Member Group: Members Posts: 656 Joined: 7-July 13 From: Bend OR Member No.: 16,100 Region Association: Pacific Northwest |
re: Just found your handle on IG. Holy cow that's a nice build you have there. Hoping my build will turn out similar!
- Thx so much In the near future I'll need to weld on that oil feed pipe bracket. I saw someone made these and had them for sale (Perhaps tangerine racing?) I thought about making one too, looks pretty simple. Nothing a body saw and a die grinder couldn't handle. If you have pix and dimensions handy that would be much appreciated if you sent that over! - These pics were what I based mine on: 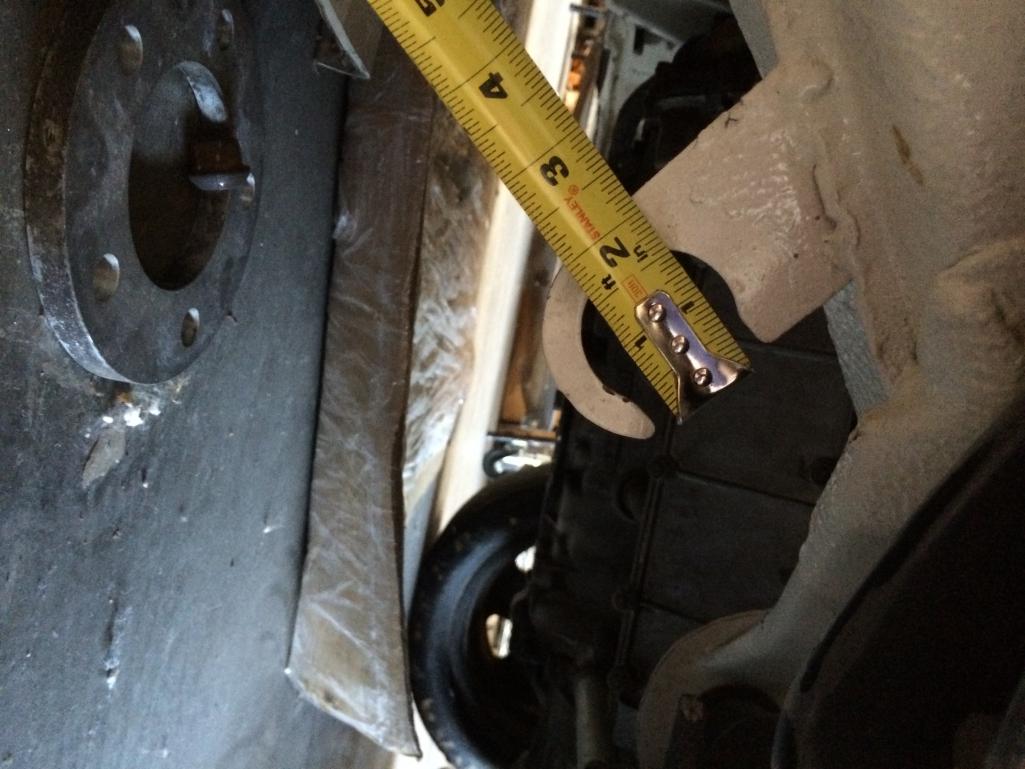 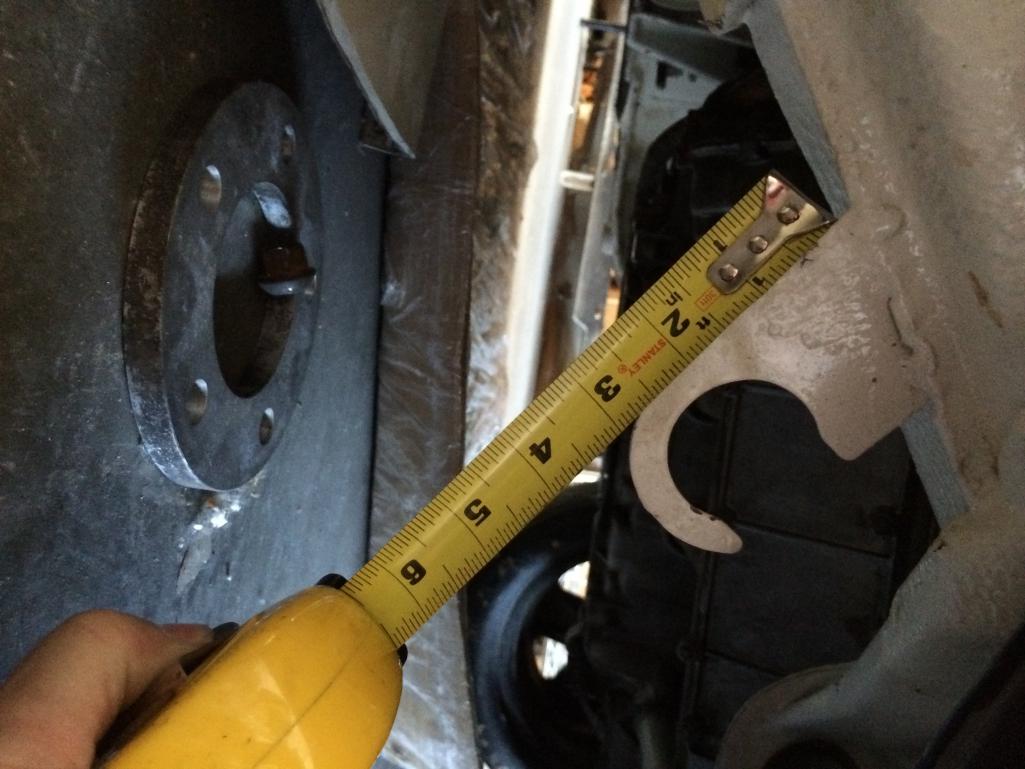 These pics are from a real -6 chassis NOTE the bad welding (factory!), and the thickness is the same as the metal on the engine lid. I made mine out of the leftover metal remaining when I cut out my GT engine lid. Hope this helps! - Tony |
|
|
|
| pencap914 |
Nov 16 2021, 02:48 PM
Post
#56
|
|
Member Group: Members Posts: 81 Joined: 16-April 06 Member No.: 5,872 Region Association: Northern California |
Thanks Tony! I should be able to work from that.
|
|
|
|
| Luke M |
Nov 18 2021, 10:24 AM
Post
#57
|
|
Senior Member Group: Members Posts: 1,513 Joined: 8-February 05 From: WNY Member No.: 3,574 Region Association: North East States |
Question on the SS oil lines going down the drivers side. Did you have to make any adjustments to the jack post or did the lines fit perfect like in your pic above?
|
|
|
|
| pencap914 |
Nov 30 2021, 05:30 PM
Post
#58
|
|
Member Group: Members Posts: 81 Joined: 16-April 06 Member No.: 5,872 Region Association: Northern California |
QUOTE(Luke M @ Nov 18 2021, 08:24 AM) Question on the SS oil lines going down the drivers side. Did you have to make any adjustments to the jack post or did the lines fit perfect like in your pic above? Sorry just saw this Luke, The jack post never moved. It may look a bit different because of the outer stiffening kit over the top of the longitudinal. Its a bit of a maneuver to fish the upper SS line in between the jack post and the body skin, but I'm impressed how well the SS lines fit and line up. I'm glad they do, because they would be a bear to bend. Hoping to get the final fit-up in the next week or so and start welding in the mounting studs. |
|
|
|
| Luke M |
Dec 1 2021, 05:49 PM
Post
#59
|
|
Senior Member Group: Members Posts: 1,513 Joined: 8-February 05 From: WNY Member No.: 3,574 Region Association: North East States |
QUOTE(pencap914 @ Nov 30 2021, 04:30 PM) QUOTE(Luke M @ Nov 18 2021, 08:24 AM) Question on the SS oil lines going down the drivers side. Did you have to make any adjustments to the jack post or did the lines fit perfect like in your pic above? Sorry just saw this Luke, The jack post never moved. It may look a bit different because of the outer stiffening kit over the top of the longitudinal. Its a bit of a maneuver to fish the upper SS line in between the jack post and the body skin, but I'm impressed how well the SS lines fit and line up. I'm glad they do, because they would be a bear to bend. Hoping to get the final fit-up in the next week or so and start welding in the mounting studs. Thanks for the reply. That's what I needed to know.. Now to hit up Ben for a set. |
|
|
|
| pencap914 |
Apr 7 2022, 01:38 PM
Post
#60
|
|
Member Group: Members Posts: 81 Joined: 16-April 06 Member No.: 5,872 Region Association: Northern California |
Slowly pecking away at the tub, getting distracted playing with the engine now.
The 1975 2.7 911 engine I purchased last year included an alternator that looks and feels a little rough. Diode readings were also indicating the need for a refresh, so being uneducated on the subject of 911 alternators, I ordered one from Autohausaz, and it turns out its the later style alternator that will need to have the housing hogged out for it to fit. (See 2nd photo, bolts are too short) Now the question is, do I send my original Motorolla unit out for a rebuild (~$250) or do I keep this $330 Valeo unit, and pay to have my fan housing cut out (~$100+) I believe my original SEV/Motorolla unit is 50(?) amps with an external voltage regulator (VR), and the Valeo unit is 75 amps with an internal VR. I've heard folks complaining about having the VR integrated to the alternator, since it sits on top of the engine getting baked by engine heat all the time. So my question is it really worth the upgrade for more output? I plan on running a set of vintage 55A Marchal auxiliary driving lights on the 914, so I'm wondering if my current Motorolla unit would be beefy enough to handle my demand. Any thoughts on this subject? 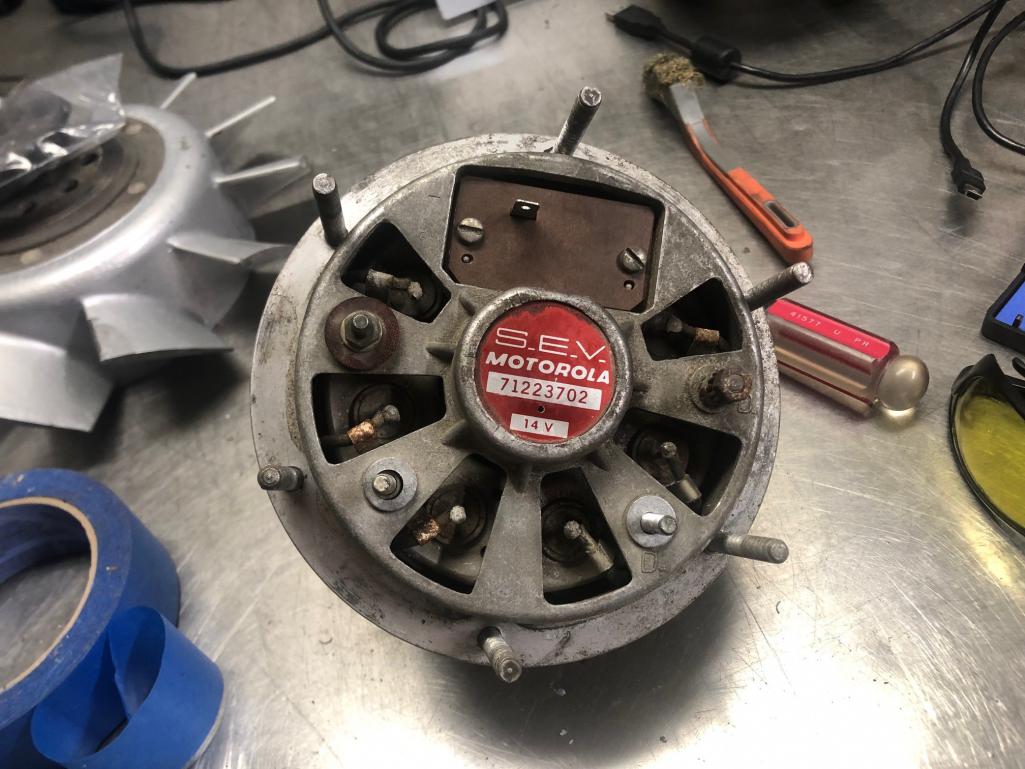 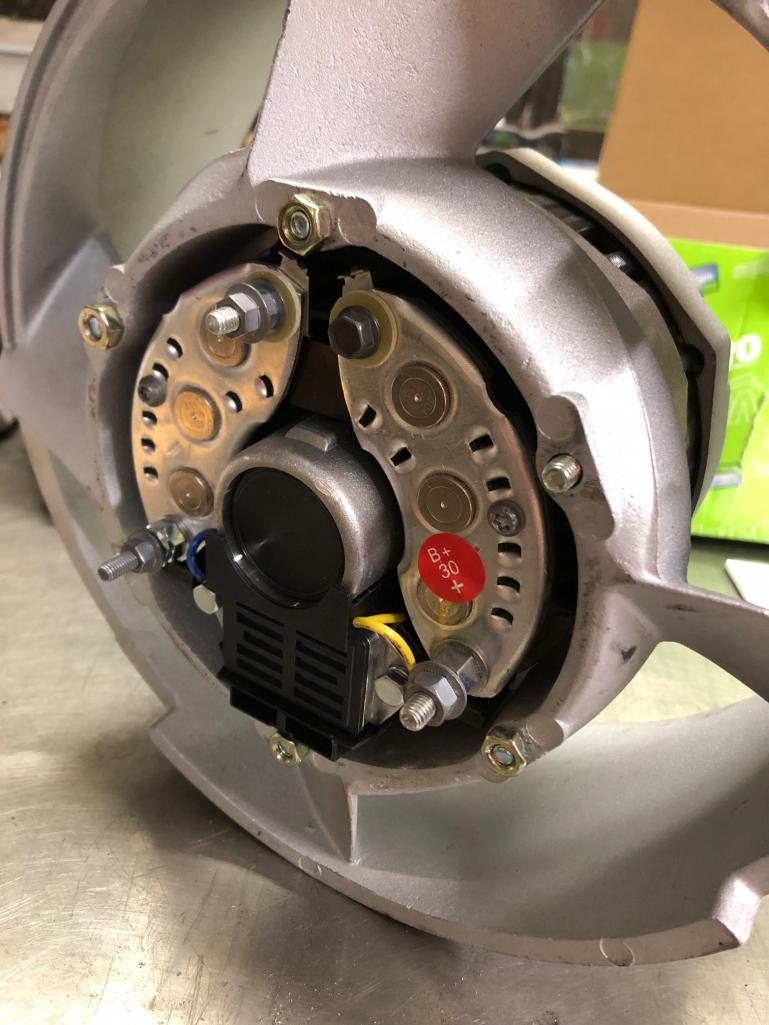 |
|
|
|
|
1 User(s) are reading this topic (1 Guests and 0 Anonymous Users)
0 Members:

|
Lo-Fi Version | Time is now: 18th May 2026 - 05:45 AM |
Invision Power Board
v9.1.4 © 2026 IPS, Inc.