|
|
|
Porsche, and the Porsche crest are registered trademarks of Dr. Ing. h.c. F. Porsche AG.
This site is not affiliated with Porsche in any way. Its only purpose is to provide an online forum for car enthusiasts. All other trademarks are property of their respective owners. |
|
|

  |

| BillC |
 Jul 11 2020, 04:19 PM Jul 11 2020, 04:19 PM
Post
#41
|
|
Senior Member  Group: Members Posts: 732 Joined: 24-April 15 From: Silver Spring, MD Member No.: 18,667 Region Association: MidAtlantic Region |
Today I worked on reinstalling the fresh air box. With a new top gasket and intake screen (came on '74 and later 914s), it was every bit the royal pain that they said it was. But, here is the box installed:
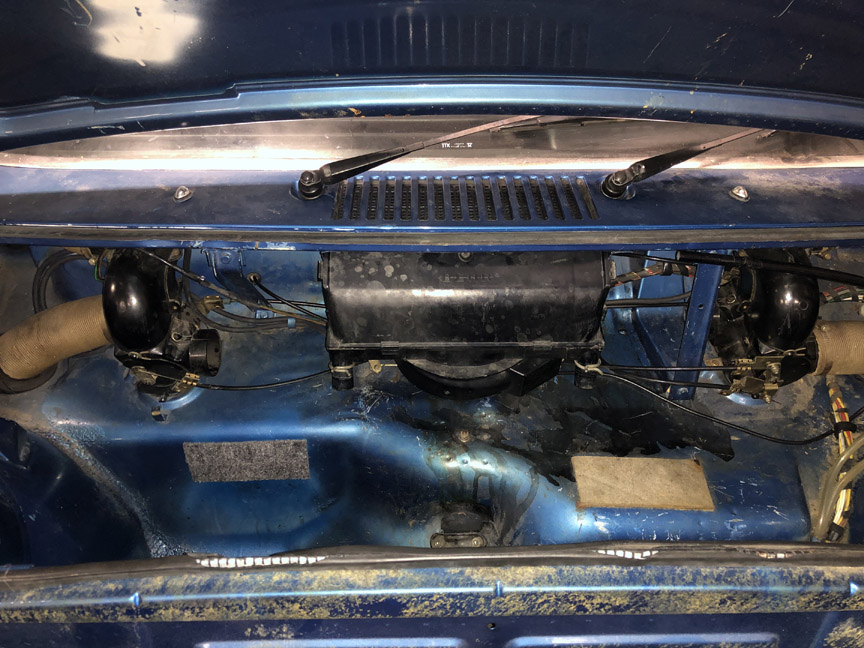 Because it was such a pain to get the two bolts installed, I had to get creative. I got the driver-side bolt in okay, but couldn't get the box high enough to get the passenger-side bolt in. So, I decided to make a "mini jack" with a tall socket and a brake pad spreader. 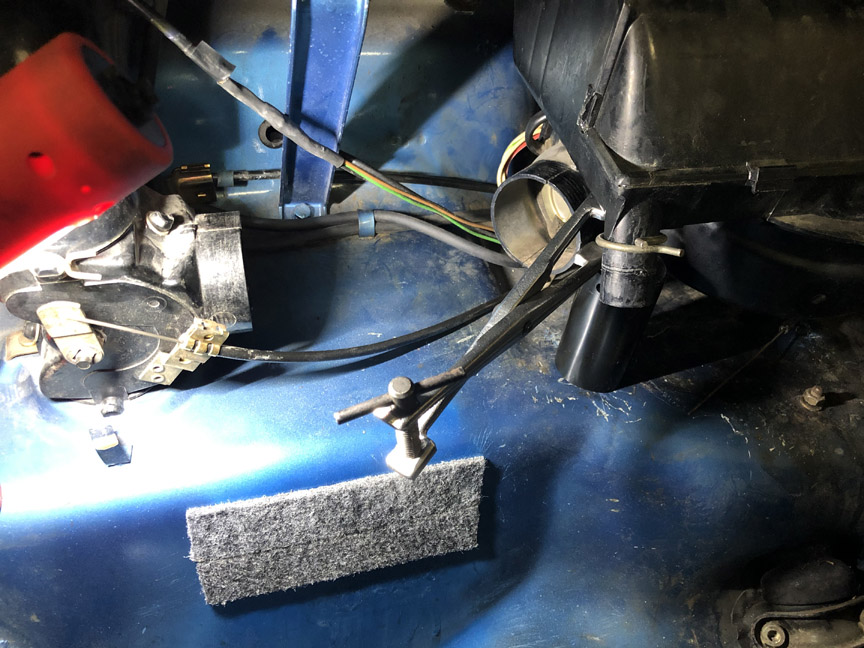 This got it up high enough to get the last bolt in. Then, I connected the cable to the fan box. This was almost as big a pain as installing the box itself. No pics, since I had to do the job basically by feel. Then, the hoses were reinstalled. First the paper hoses to the ventilation system and then the drain hoses. One of the old hoses broke, so I had to get new hoses (from AA). Unfortunately, they don't quite match the old ones, so I'll order some from 914Rubber, next time I place an order. 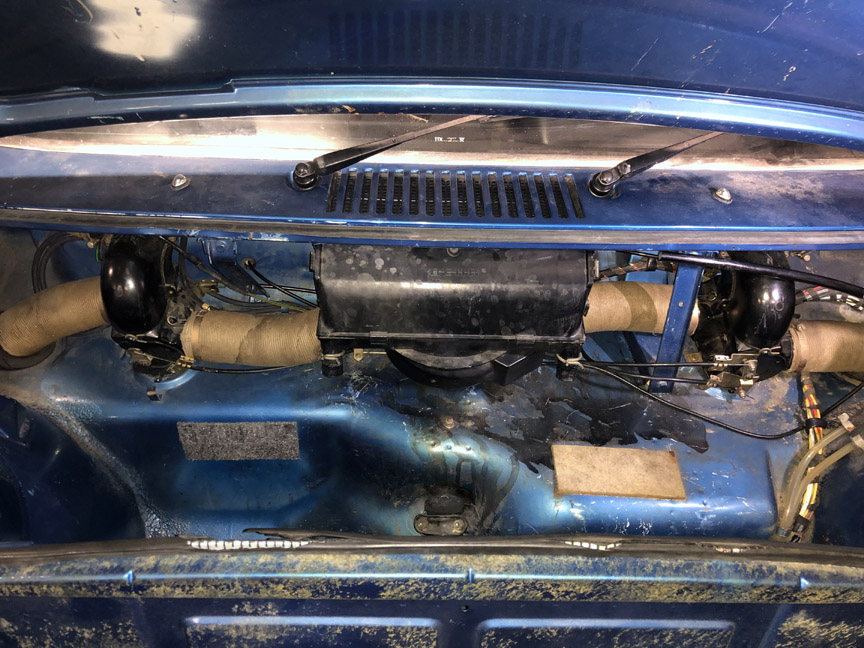 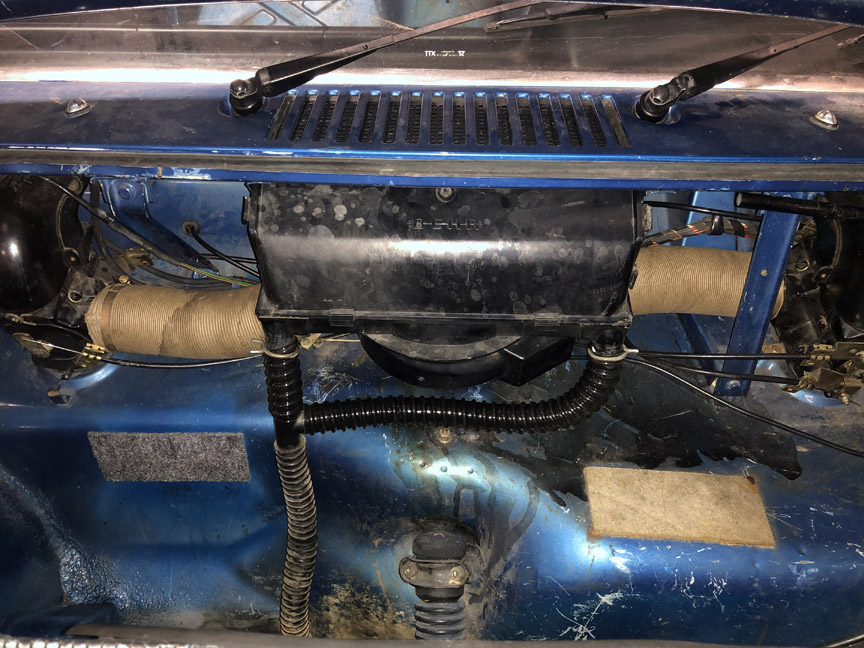 |
   |

 
|
| BillC |
Jul 12 2020, 02:39 PM
Post
#42
|
|
Senior Member Group: Members Posts: 732 Joined: 24-April 15 From: Silver Spring, MD Member No.: 18,667 Region Association: MidAtlantic Region |
Time to tackle the hacked-in hole by the foot pedals. Here's what it looked like before I started:
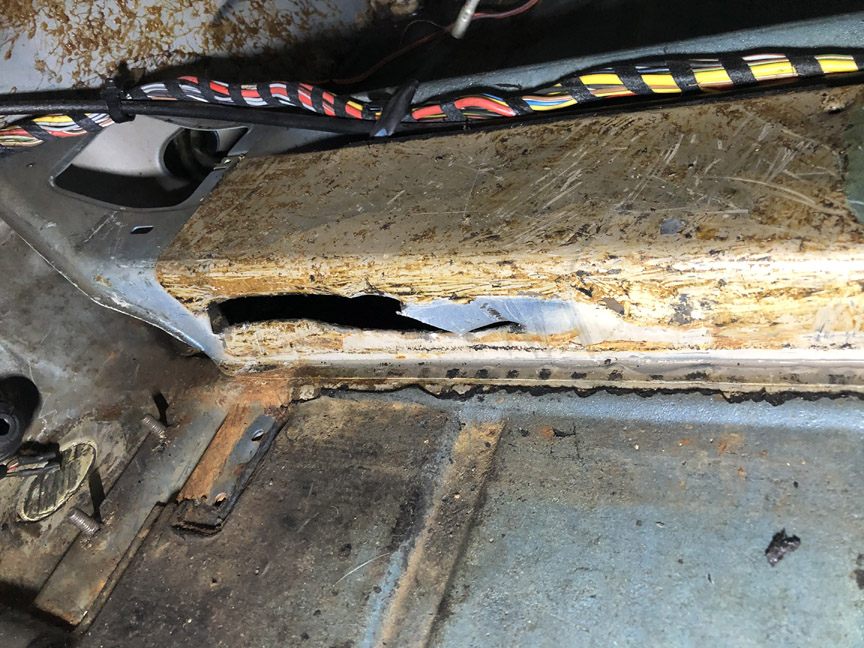 I didn't really want to cut another hole in the car, but there was no way I was going to be able to reform the hacked metal without an access hole on top of the center column. The bit in the top of the hole is the old accelerator cable -- the liner was stuck in the tube and I needed the access hole to get the liner out through the front end of the tube. Once I'm all done with the welding and painting, I'll make a panel to cover the hole, which will be attached with butyl rubber so it can be accessed in the future.  Here's the hole and the patch (what was originally cut loose) after reshaping. 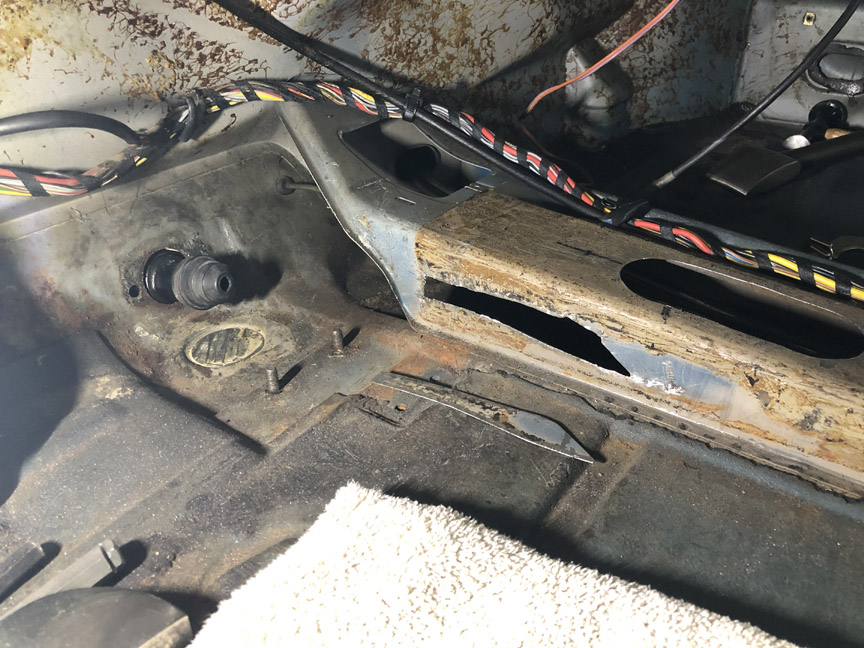 And the patch fitted in place. There's a copper bar behind the patch, to act as a temporary backing plate for the welding.  Patch welded and then ground. 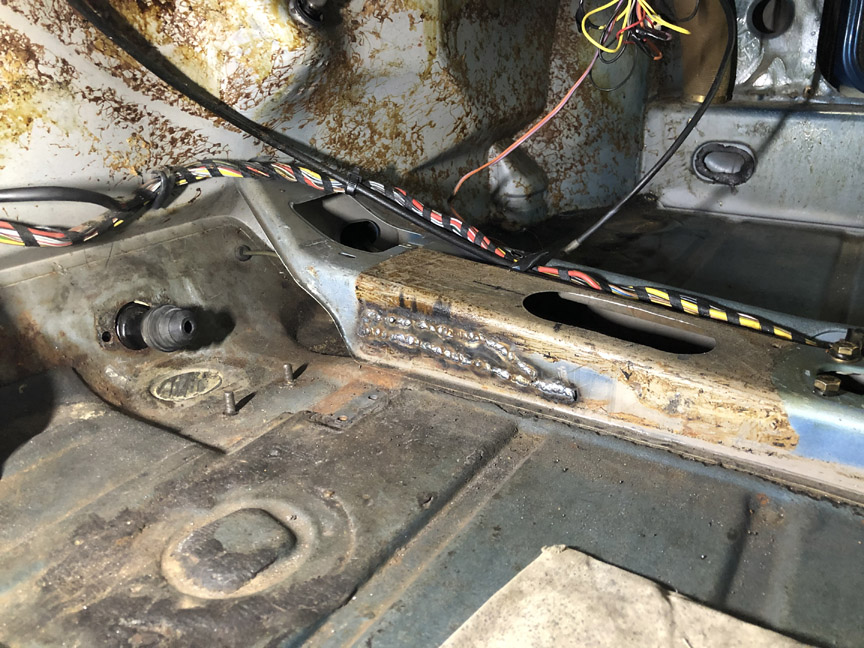 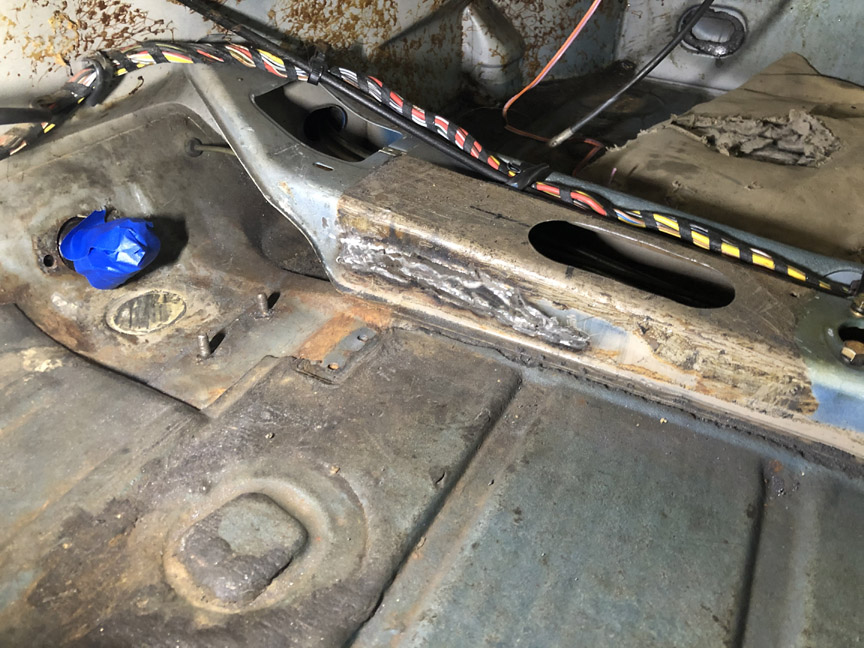 Here's what the clutch tube looked like: 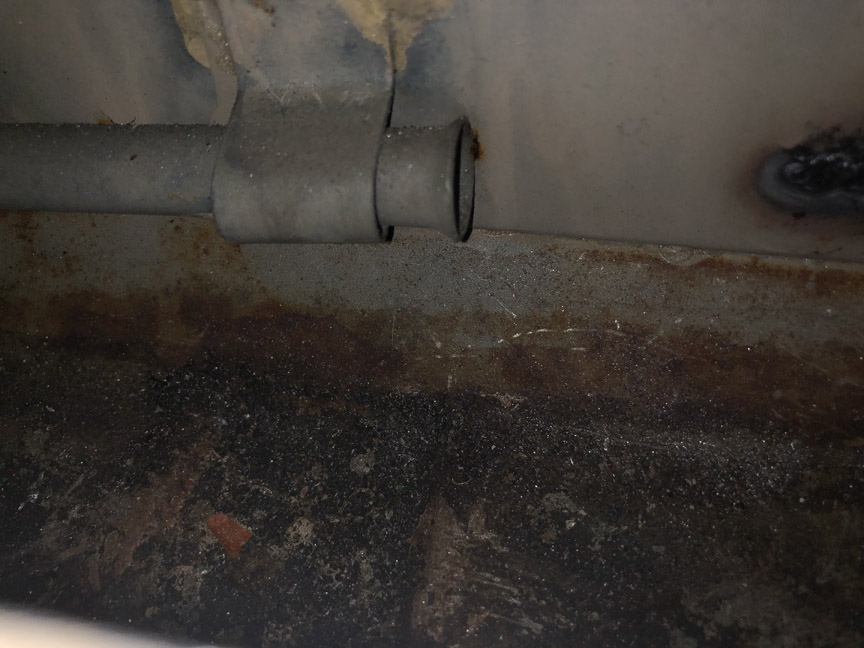 Even though the clutch tube still looks well-attached, I decided I might as weld in a support strap while I had easy access to it. I bent a piece of 3/16" wire into a loop about 5/8" inside diameter. Then, I drilled two holes, above and below the clutch tube, and placed the strap. 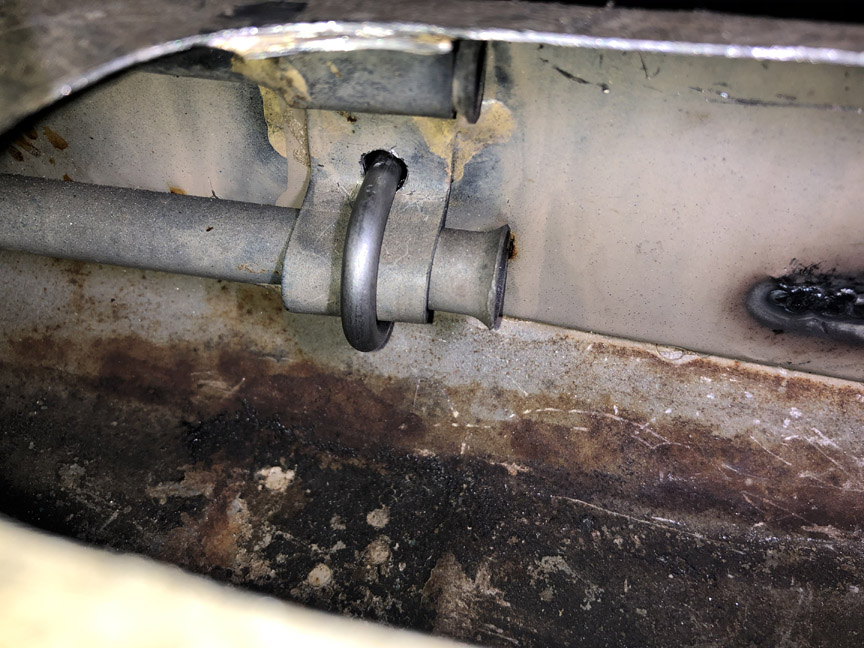 Here's the strap welded to the tube support. Not the greatest welding job (access wasn't good, even with the access hole), but it should hold. 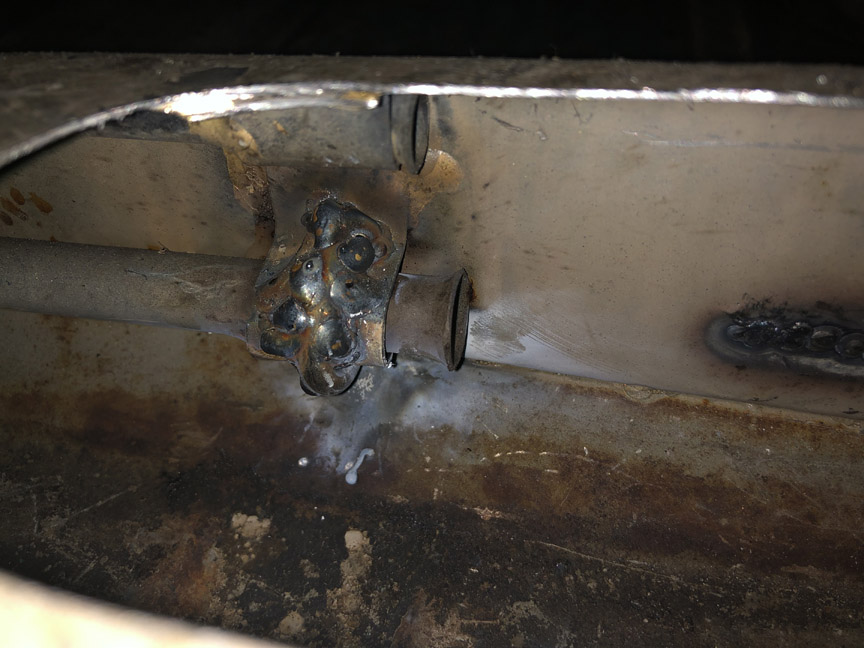 On the outside of the center column, you can see where the strap protruded. 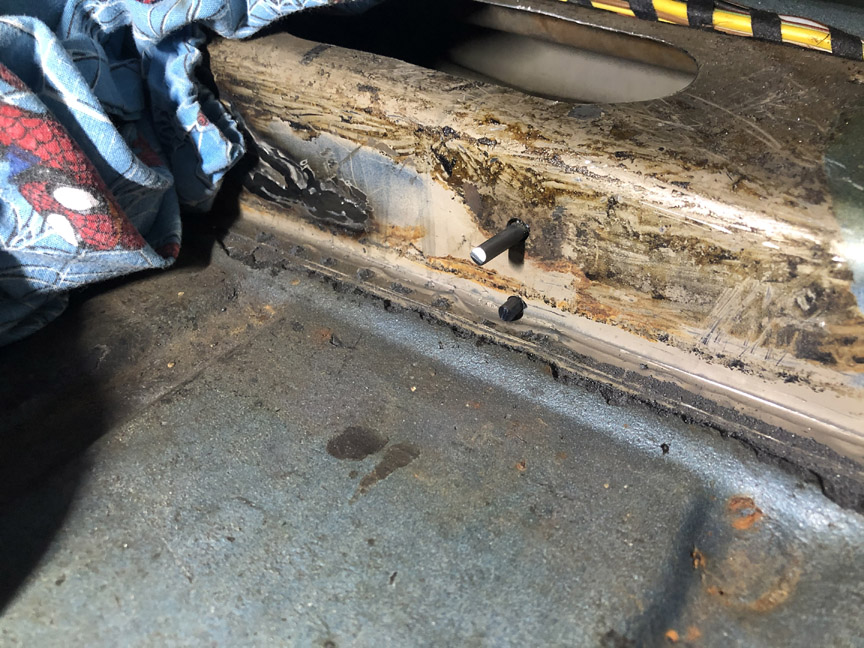 So I trimmed the ends of the strap in preparation for welding: 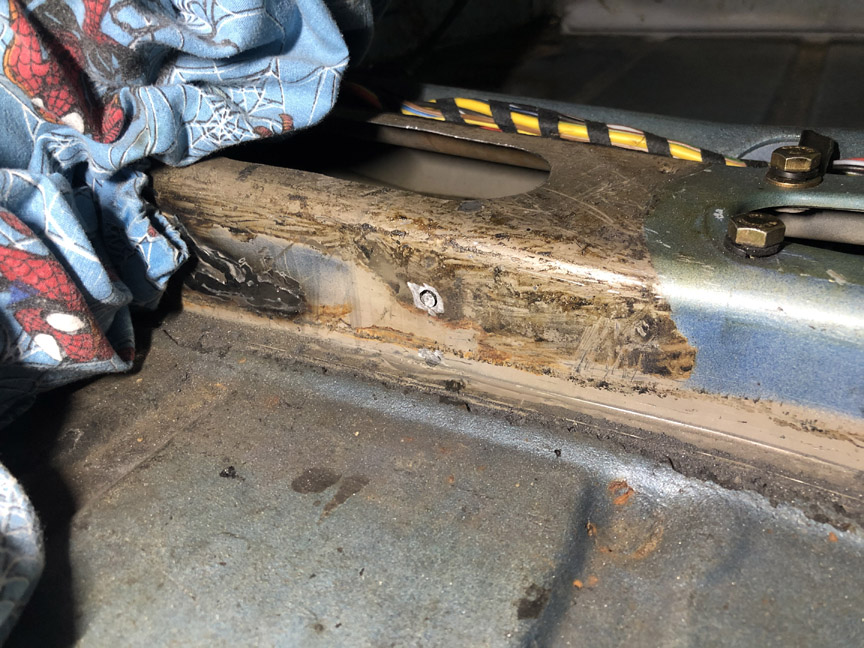 Here's the final result, after welding and grinding: 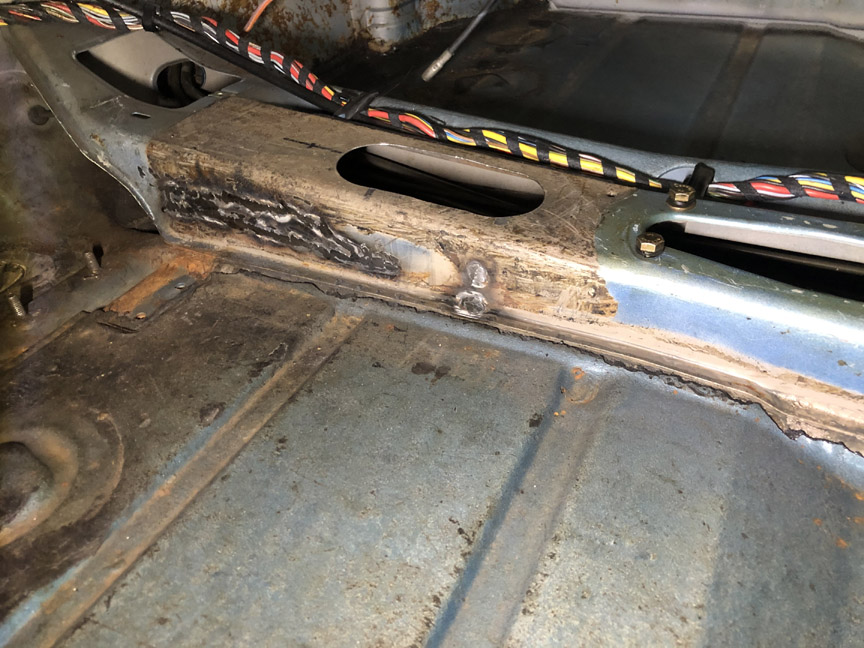 |
|
|
|
| 914werke |
Jul 12 2020, 03:00 PM
Post
#43
|
|
"I got blisters on me fingers" Group: Members Posts: 11,680 Joined: 22-March 03 From: USofA Member No.: 453 Region Association: Pacific Northwest |
Good idea on the Wire support.
|
|
|
|
| Superhawk996 |
Jul 12 2020, 03:58 PM
Post
#44
|
|
914 Guru Group: Members Posts: 7,886 Joined: 25-August 18 From: Woods of N. Idaho Member No.: 22,428 Region Association: Galt's Gulch |
Like the wire support execution.
My donor tunnel came with two threaded rod hooks made and had nuts external to the tunnel to pull them tight. Rather unelegant but functional. I like your solution since it won't be visible of leave a wart on the side of the tunnel. Nice Job. (IMG:style_emoticons/default/aktion035.gif) Out of caution you might want to make sure that the weld penetration hasn't entered the clutch tube which would cause the cable to hang up later on when trying to feed it though. Check now if you're not sure. Better to find out now rather than later when access is limited again. |
|
|
|
| BillC |
Jul 12 2020, 07:17 PM
Post
#45
|
|
Senior Member Group: Members Posts: 732 Joined: 24-April 15 From: Silver Spring, MD Member No.: 18,667 Region Association: MidAtlantic Region |
QUOTE(Superhawk996 @ Jul 12 2020, 05:58 PM)  Like the wire support execution. Thanks, but it's basically the same idea as the cable clamp Clay Perrine suggested way-back-when, just without the nuts. QUOTE(Superhawk996 @ Jul 12 2020, 05:58 PM) Out of caution you might want to make sure that the weld penetration hasn't entered the clutch tube which would cause the cable to hang up later on when trying to feed it though. Excellent suggestion -- already tested it and no impingement inside the tube. |
|
|
|
| ClayPerrine |
Jul 12 2020, 09:50 PM
Post
#46
|
|
Life's been good to me so far..... Group: Admin Posts: 16,545 Joined: 11-September 03 From: Hurst, TX. Member No.: 1,143 Region Association: NineFourteenerVille |
QUOTE(BillC @ Jul 12 2020, 08:17 PM) QUOTE(Superhawk996 @ Jul 12 2020, 05:58 PM) Like the wire support execution. Thanks, but it's basically the same idea as the cable clamp Clay Perrine suggested way-back-when, just without the nuts. QUOTE(Superhawk996 @ Jul 12 2020, 05:58 PM) Out of caution you might want to make sure that the weld penetration hasn't entered the clutch tube which would cause the cable to hang up later on when trying to feed it though. Excellent suggestion -- already tested it and no impingement inside the tube. Betty and I installed the cable clamp in her car back when we were first married, over 30 years ago. We didn't have the money, time or location to tear the tunnel apart and fix it right. It is still on the car, but the car is in the body shop now so I am going to have them fix it right when the rest of the body work is done. |
|
|
|
| BillC |
Jul 13 2020, 07:17 PM
Post
#47
|
|
Senior Member Group: Members Posts: 732 Joined: 24-April 15 From: Silver Spring, MD Member No.: 18,667 Region Association: MidAtlantic Region |
And now, let's go after this lovely bunch of holes:
 First step is to cut access holes in the outer three layers: 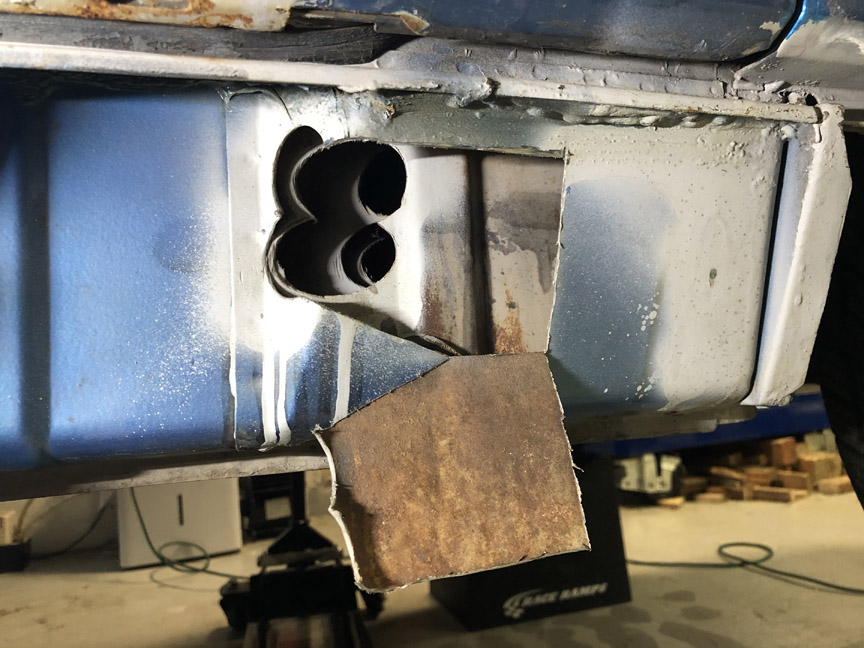 I found this little surprise inside the first layer. You can just see it in the bottom of the hole in the above picture. It's one of the bits that was hole cut -- it fell inside and was left there. Unfortunately, it's useless as a patch, so it goes in the scrap bin. 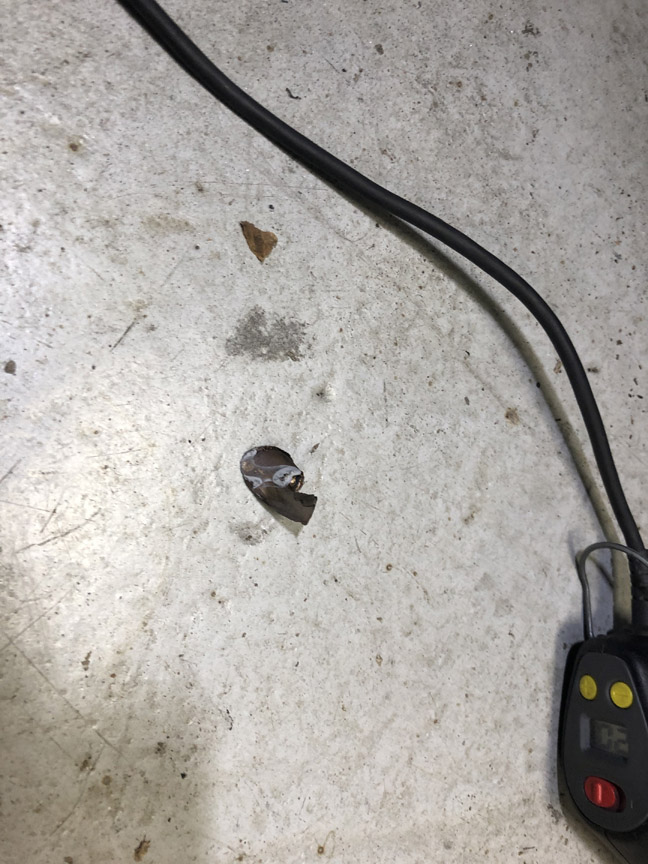 Second layer access: 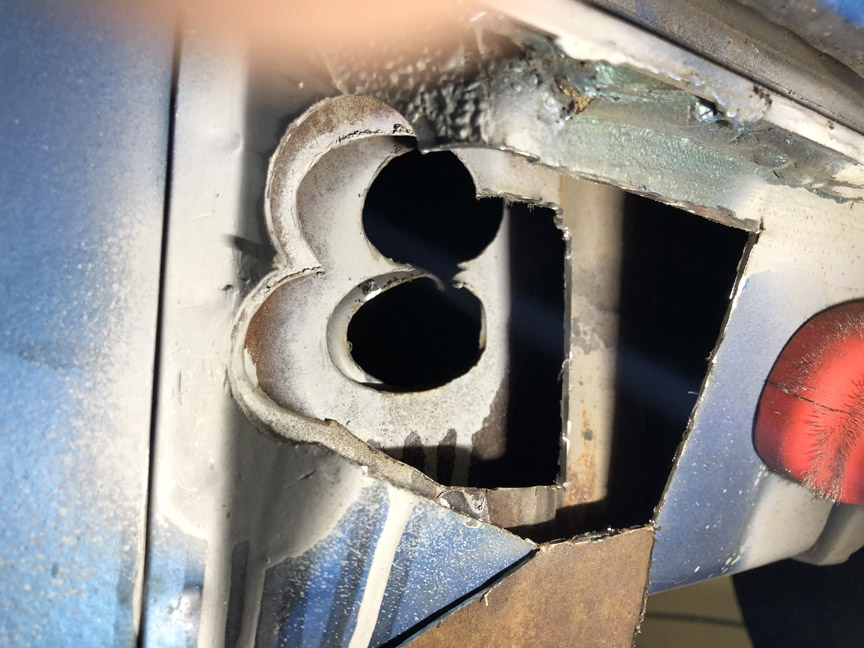 The cut pieces for the first two layers will be saved and welded back in later. Then, the third layer. 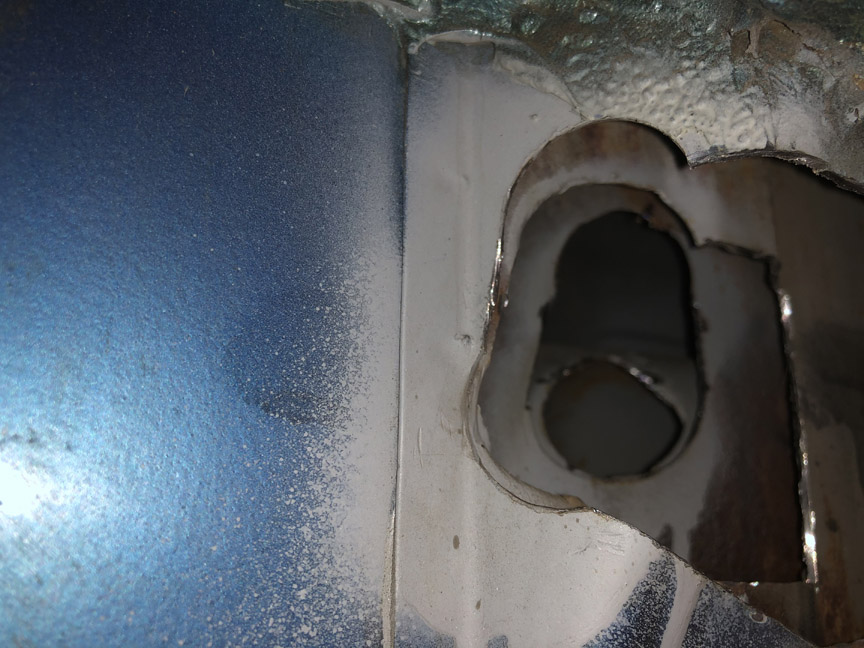 Once I got a little further into making the patch for the innermost hole, I realized I needed to make the third layer hole a little larger. I'll just make a larger patch later. Now it's time to make a patch for the innermost layer, the heat duct tube. This is the masking tape method. First, put masking tape over the hole: 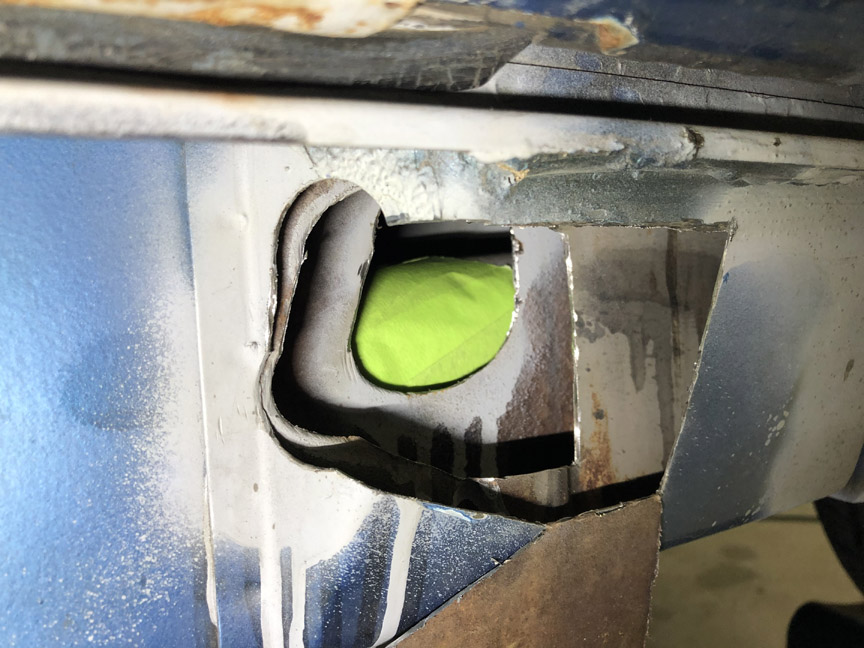 Then, use an x-acto knife and cut out the tape over the hole: 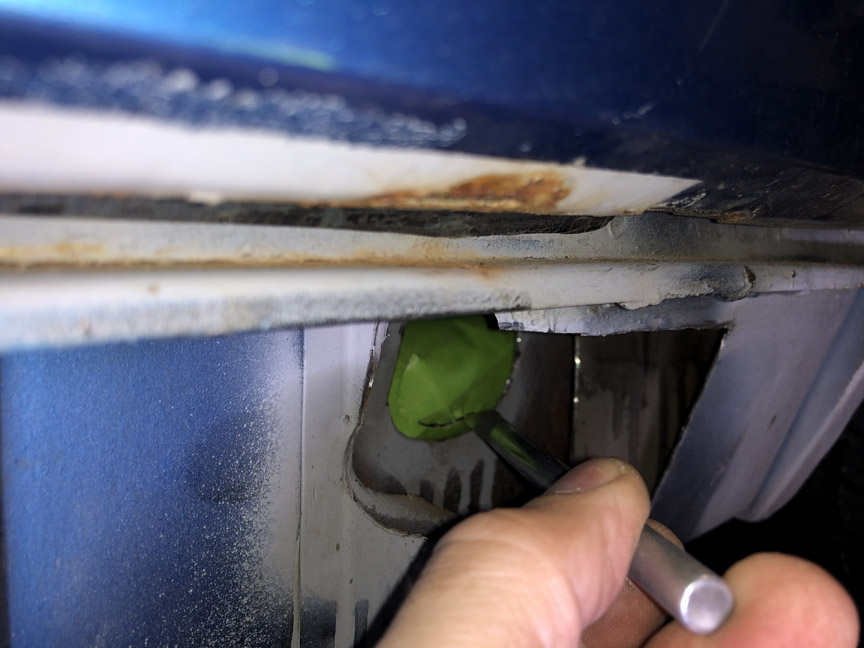 Remove the cut piece and place it on a piece of sheet metal: 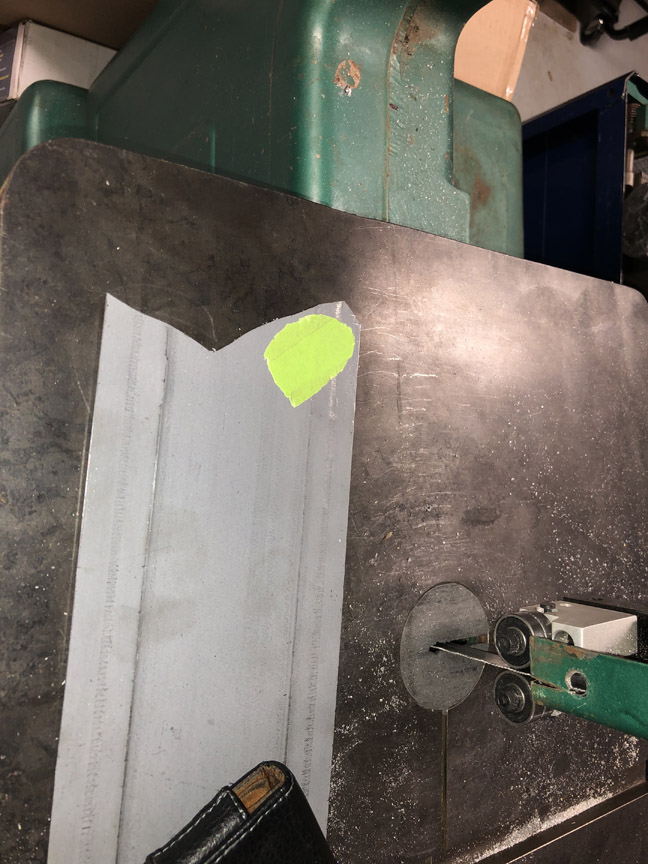 Then, cut out the piece of sheet metal, and you have your patch: 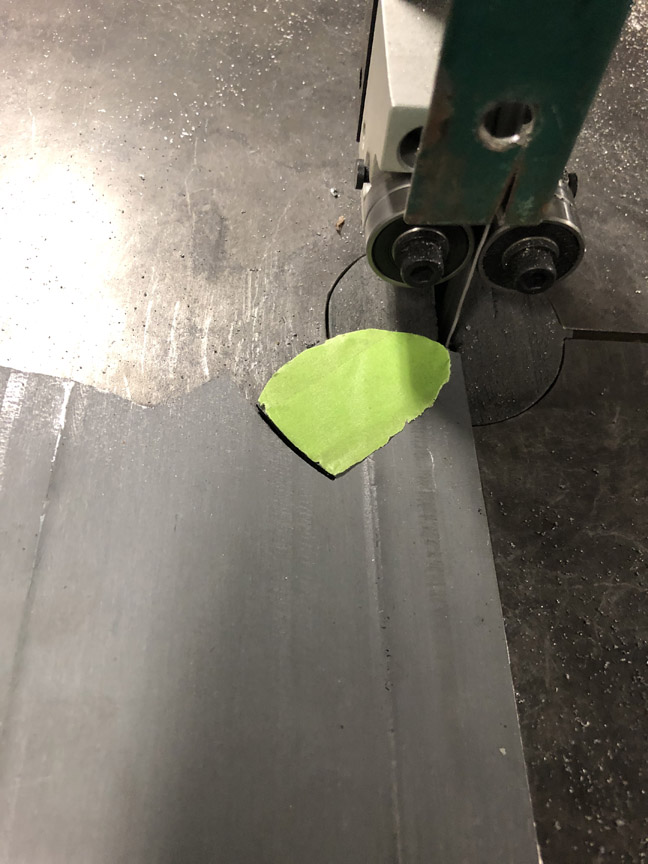 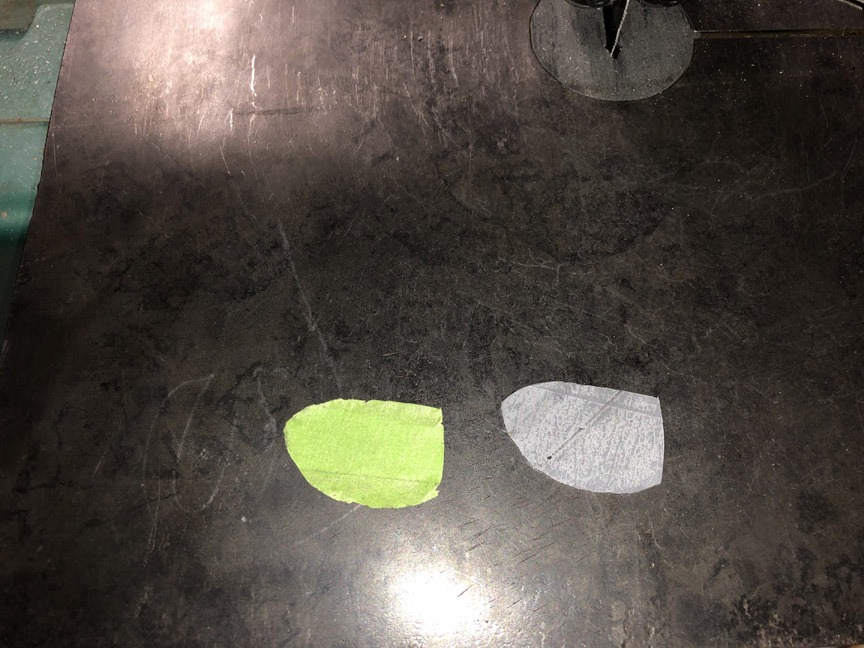 Since this patch goes on a tube, I found a socket that's about the same diameter as the tube and shaped the patch over the socket. 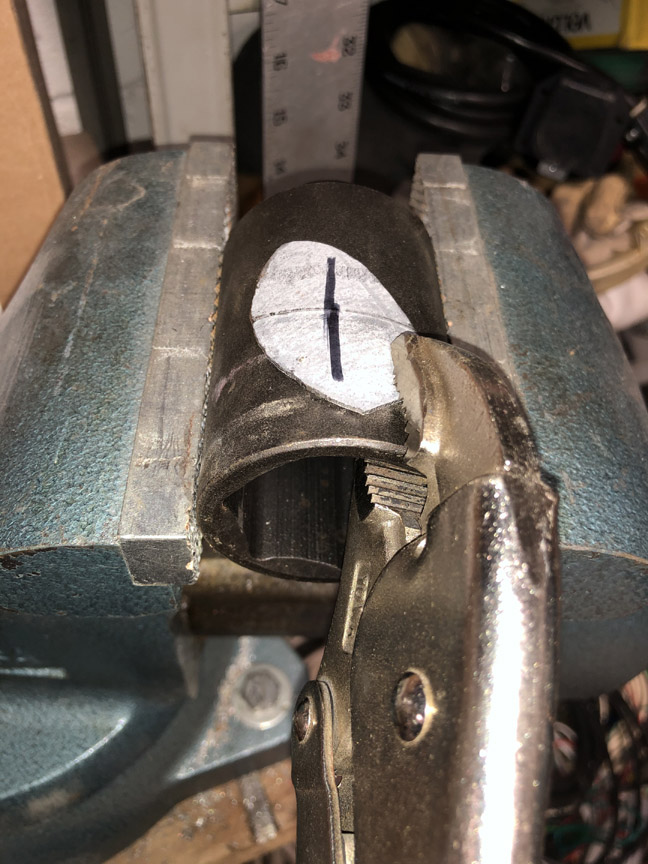 |
|
|
|
| BillC |
Jul 13 2020, 07:29 PM
Post
#48
|
|
Senior Member Group: Members Posts: 732 Joined: 24-April 15 From: Silver Spring, MD Member No.: 18,667 Region Association: MidAtlantic Region |
The lovely bunch of holes, continued:
Here's the first patch in place. The screw is used as a handle to place the patch. After the patch is tacked in place, the screw will be removed and the hole welded over. 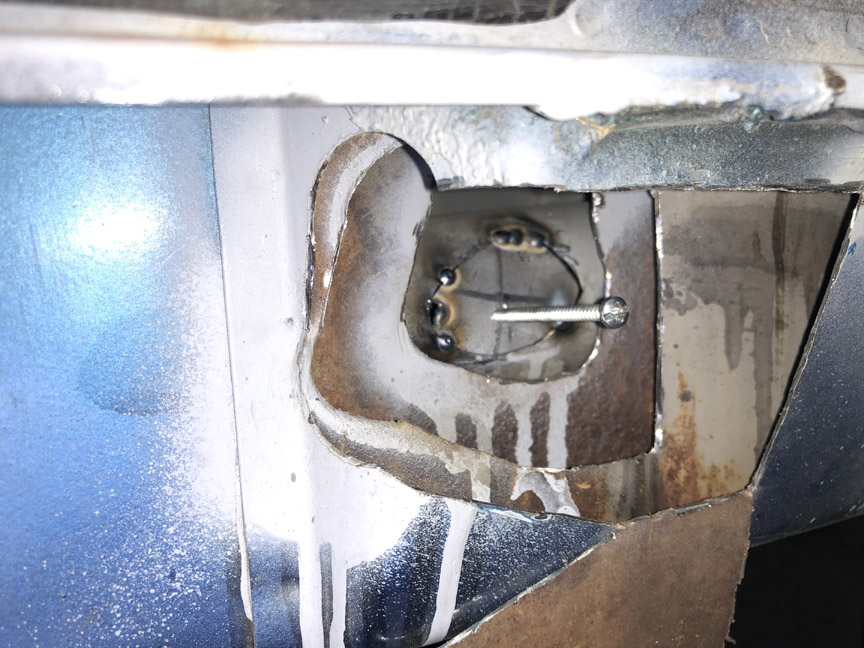 And all welded up: 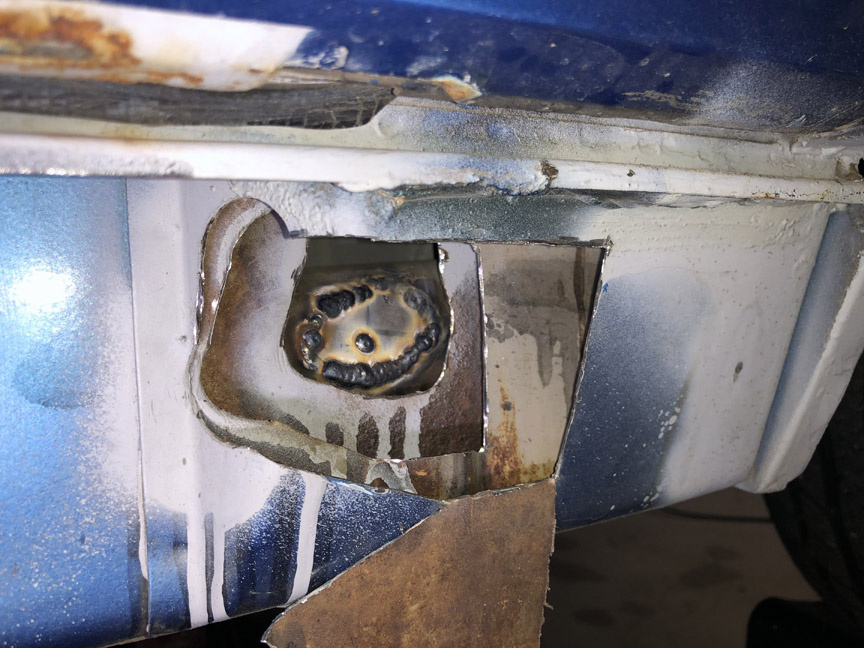 I'm not going to bother grinding down the welds inside the hole. No one will see them once this is all done, and they will add a little strength. I use the masking tape method to make all of the patches to replace missing metal. I'll spare you the repeated steps and just show each major step completed. Here's the third layer patch completed: 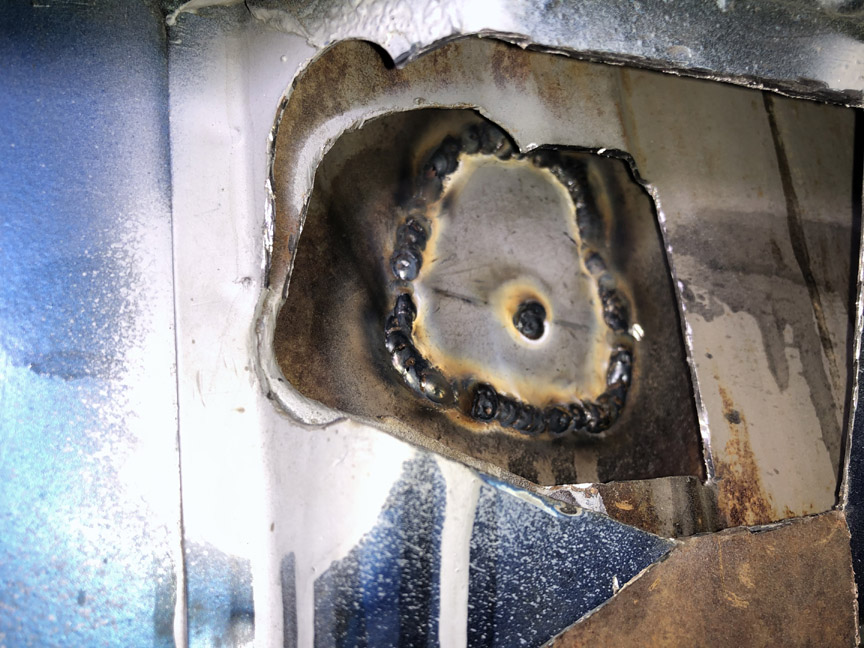 The first part of the second layer patch -- re-attaching the piece that was cut out for access: 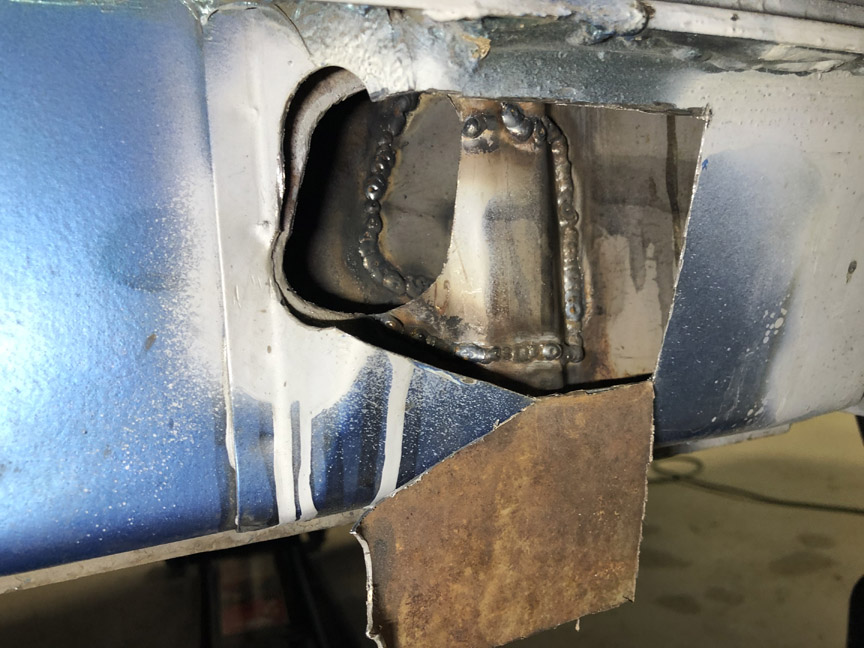 And the finish of the second layer patch: 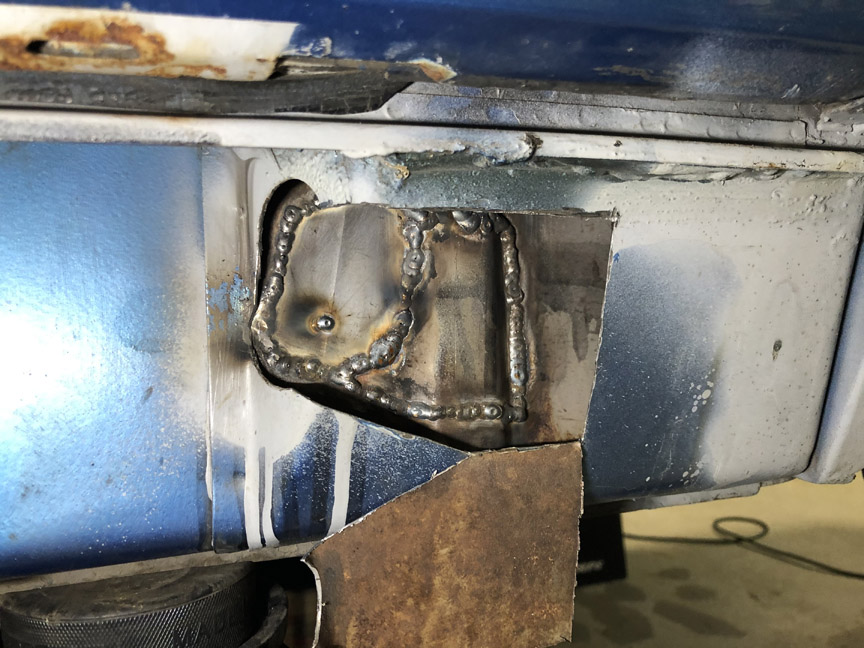 That's enough for tonight. I'll tackle the outer layer patches tomorrow. |
|
|
|
| Superhawk996 |
Jul 14 2020, 07:50 AM
Post
#49
|
|
914 Guru Group: Members Posts: 7,886 Joined: 25-August 18 From: Woods of N. Idaho Member No.: 22,428 Region Association: Galt's Gulch |
(IMG:style_emoticons/default/smilie_pokal.gif)
Like the screw as a handle. Still had to have been fun trying to place tacks in that tight space! Maybe shoot some Eastwood Internal frame coating or something similar into that outer reinfocement to lock down the rust progression while access is easy? Photo's like this always make me laugh. No such thing as rust free 914's. You just can't see it . . . . yet. It's always lurking inside these sorts of cavities. |
|
|
|
| kroelofsen |
Jul 14 2020, 11:53 AM
Post
#50
|
|
Member Group: Members Posts: 102 Joined: 27-June 19 From: The Netherlands Member No.: 23,255 Region Association: Europe |
(IMG:style_emoticons/default/piratenanner.gif) Nice work...!
|
|
|
|
| BillC |
Jul 14 2020, 12:35 PM
Post
#51
|
|
Senior Member Group: Members Posts: 732 Joined: 24-April 15 From: Silver Spring, MD Member No.: 18,667 Region Association: MidAtlantic Region |
QUOTE(Superhawk996 @ Jul 14 2020, 09:50 AM) Like the screw as a handle. Still had to have been fun trying to place tacks in that tight space! Nope, not much fun at all. My legs and neck were very sore and stiff after that was all done, just from the contortions needed to make the welds. But, I was trying hard to keep the holes as small as possible. QUOTE(Superhawk996 @ Jul 14 2020, 09:50 AM) Maybe shoot some Eastwood Internal frame coating or something similar into that outer reinfocement to lock down the rust progression while access is easy? It wasn't shown, but I've been spraying rust-converter paint inside each layer right before I seal them up. I do have the Eastwood Internal Frame coating, which will be applied inside the heat tube and inside the longitudinal through the factory access holes inside the passenger compartment. QUOTE(Superhawk996 @ Jul 14 2020, 09:50 AM) Photo's like this always make me laugh. No such thing as rust free 914's. You just can't see it . . . . yet. It's always lurking inside these sorts of cavities. Someone here quipped a while ago that "rust free 914" just means the seller isn't charging for the rust. (IMG:style_emoticons/default/lol-2.gif) ( (IMG:style_emoticons/default/headbang.gif) ) |
|
|
|
| bkrantz |
Jul 14 2020, 08:29 PM
Post
#52
|
|
914 Guru Group: Members Posts: 8,716 Joined: 3-August 19 From: SW Colorado Member No.: 23,343 Region Association: Rocky Mountains |
Be fair! I am sure most 914s were free of rust for at least a few weeks after leaving the assembly line.
|
|
|
|
| BillC |
Jul 15 2020, 04:34 PM
Post
#53
|
|
Senior Member Group: Members Posts: 732 Joined: 24-April 15 From: Silver Spring, MD Member No.: 18,667 Region Association: MidAtlantic Region |
QUOTE(bkrantz @ Jul 14 2020, 10:29 PM) Be fair! I am sure most 914s were free of rust for at least a few weeks after leaving the assembly line. There's an old story out there on the internet, from a Porsche factory manager, where he said that at the end of the day, after all the lights, fans and other noises were turned off, he could actually hear the cars rusting on the production line. Since I know everyone is just dying with anticipation to see the end of the "lovely holes" fix, here it is: Yesterday, I welded in the outer layer patches. Didn't get anything else done since CINC-House had other plans. 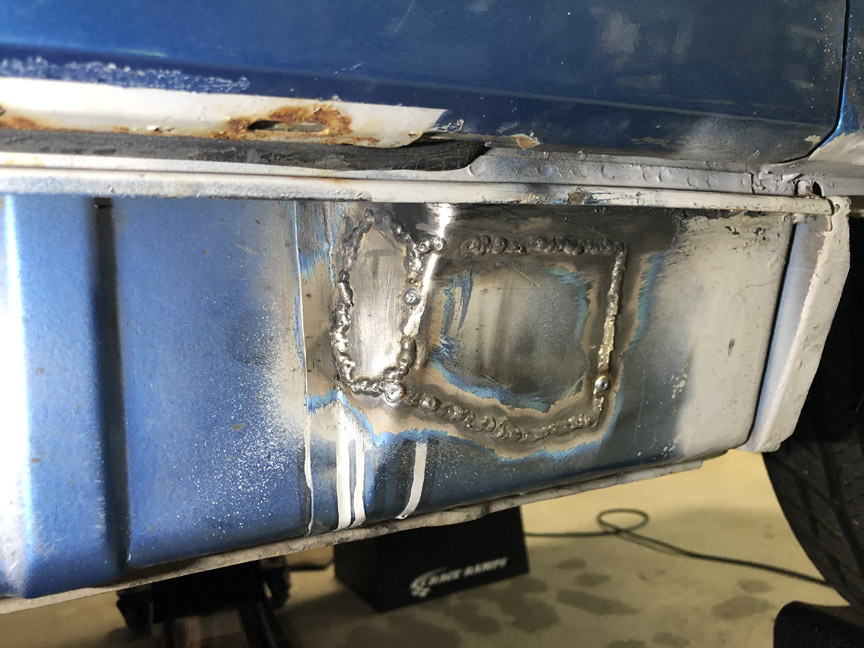 Today, I ground the welds down and then primed the patch. 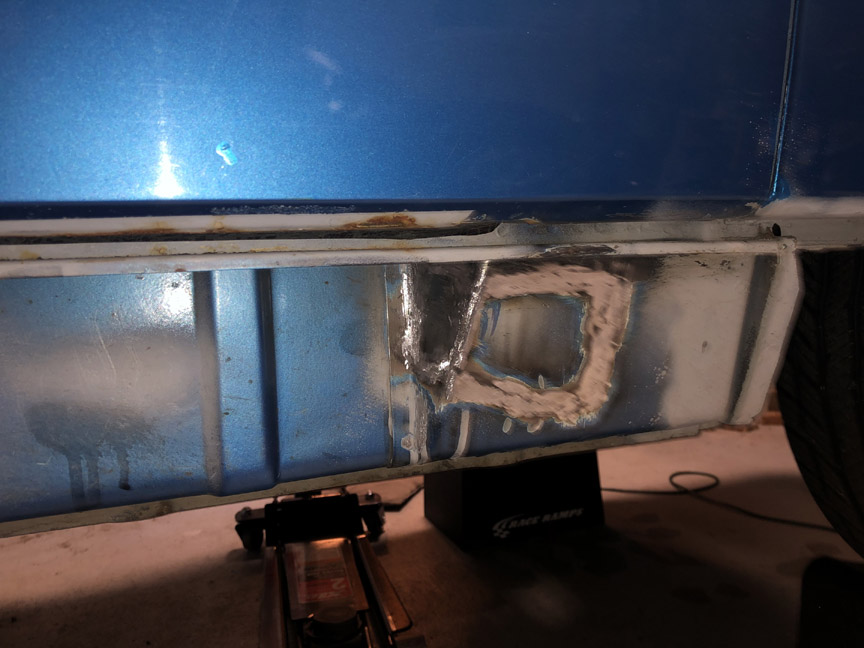 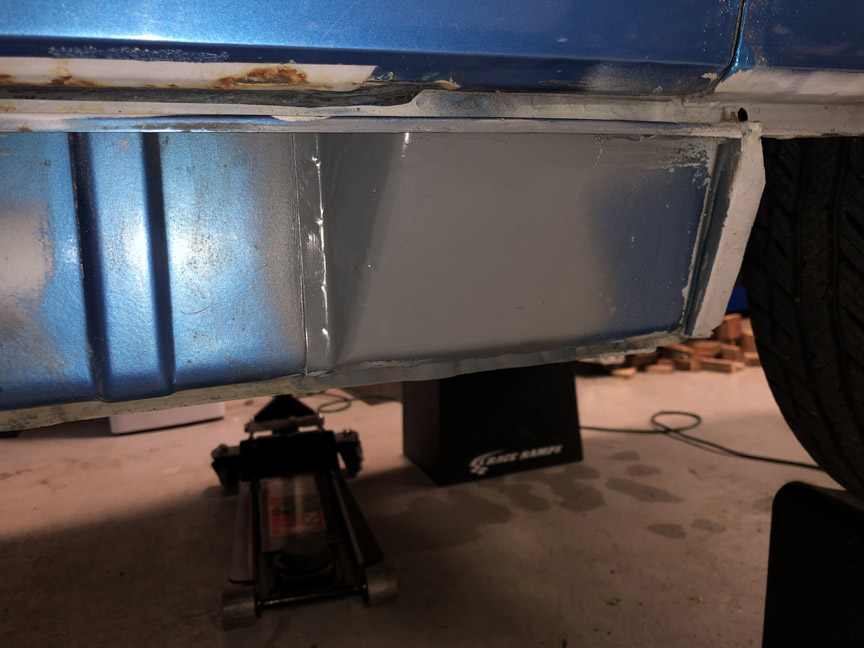 Once the epoxy primer dries, I'll hit it with some high-build primer, sand it smooth and the holes will be gone. I also installed the new Tangerine Racing stainless steel fuel lines. While I was in the engine compartment, I found this stunning example of prime DAPO-ism: 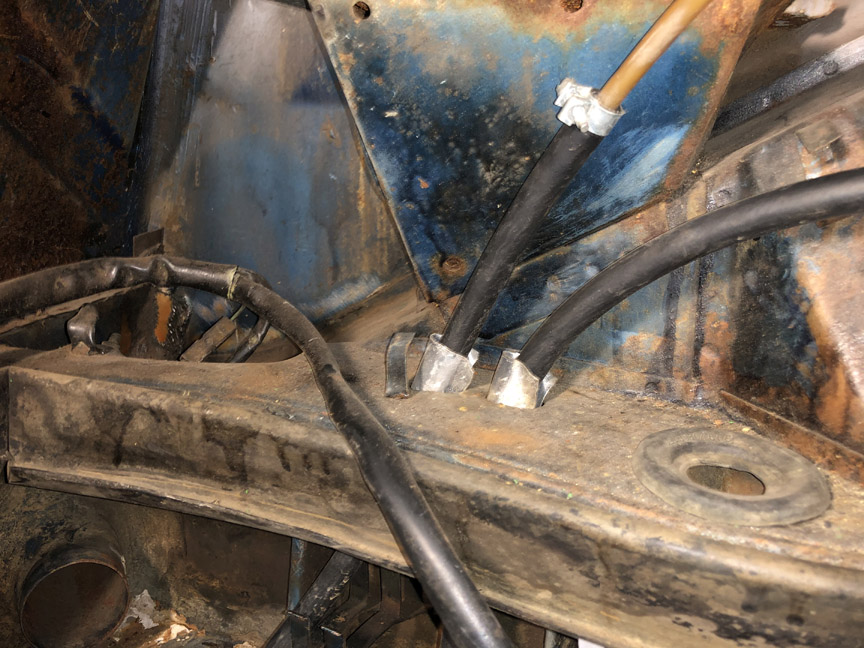 Instead of proper rubber grommets, they sleeved the holes with aluminum flashing. They did put some thought and effort into this, shaping the aluminum to hold the hoses centered and also not fall out. Just too bad they didn't think to do it properly. SMH |
|
|
|
| BillC |
Jul 17 2020, 04:52 PM
Post
#54
|
|
Senior Member Group: Members Posts: 732 Joined: 24-April 15 From: Silver Spring, MD Member No.: 18,667 Region Association: MidAtlantic Region |
Time to do more work on the fuel system.
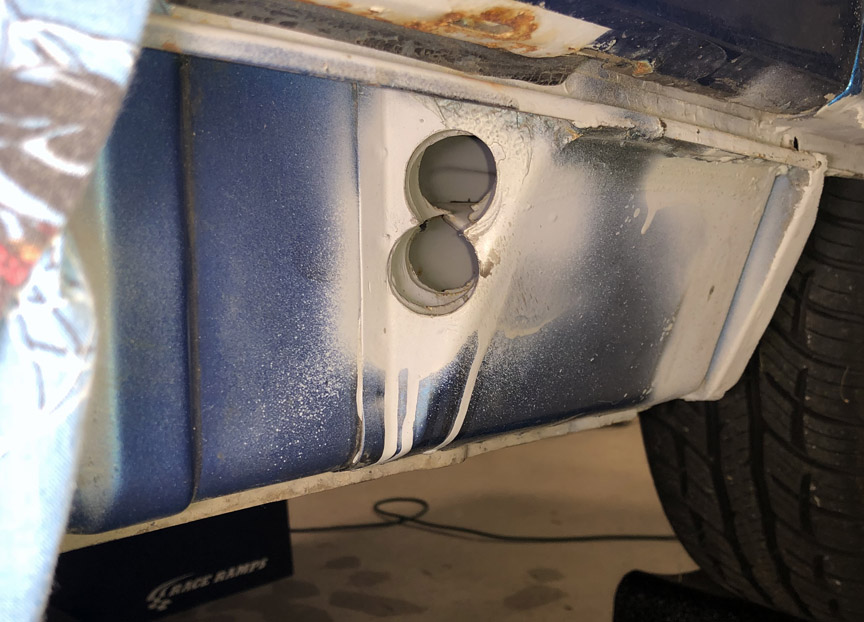
First, need to fit a new vinyl overflow tube to the gas tank (the old one was broken off too short). This was kind of a pain, since the tube has to stretch quite a bit to fit over the nipple. But, here's the result: 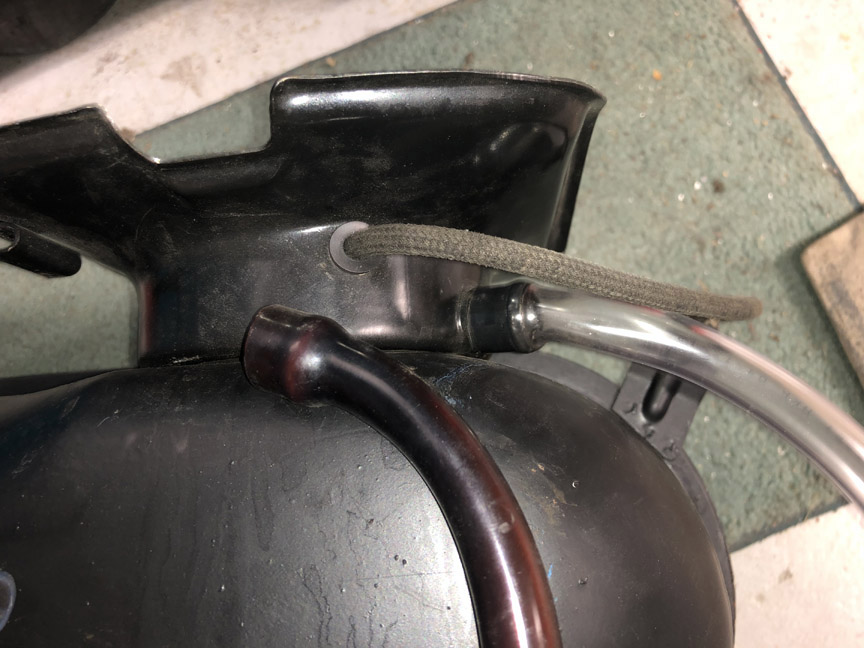 Next, is to mount the fuel pump and fuel filter. I'm mounting them up front, and need to make sure everything will fit and clear. I'm using a Tangerine Racing fuel pump mount. I decided to also make a mount for the metal fuel filter. Here's how I did it. First, start with a strip of aluminum, 1" wide by 2.5" long and fold a "Z" bend in the middle: 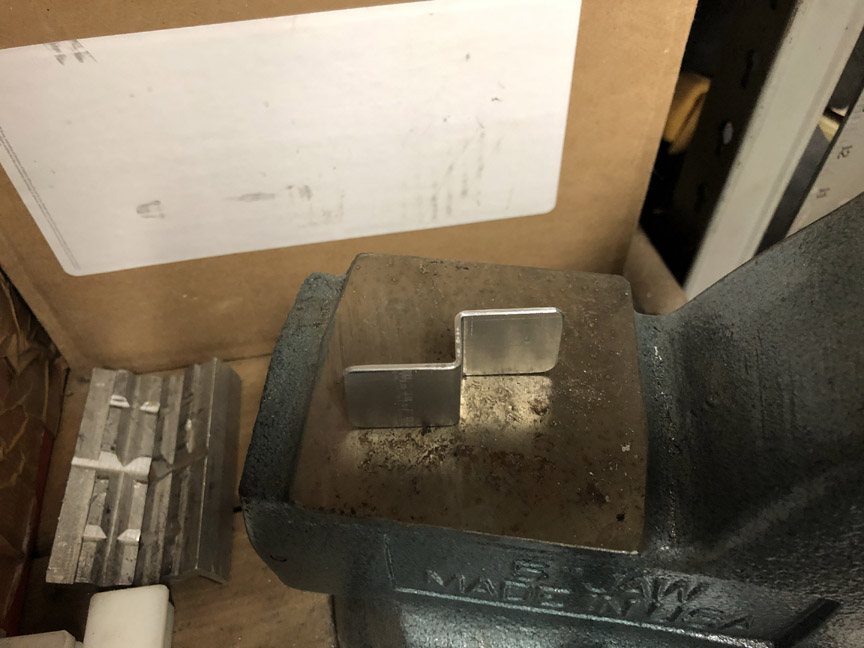 Then, shape one end over a socket: 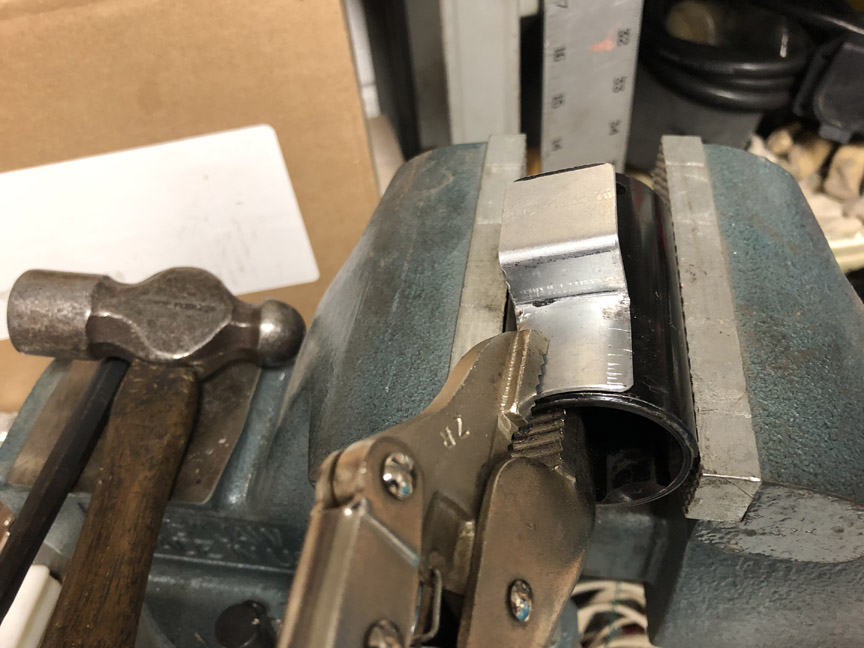 Here's the finished bracket: 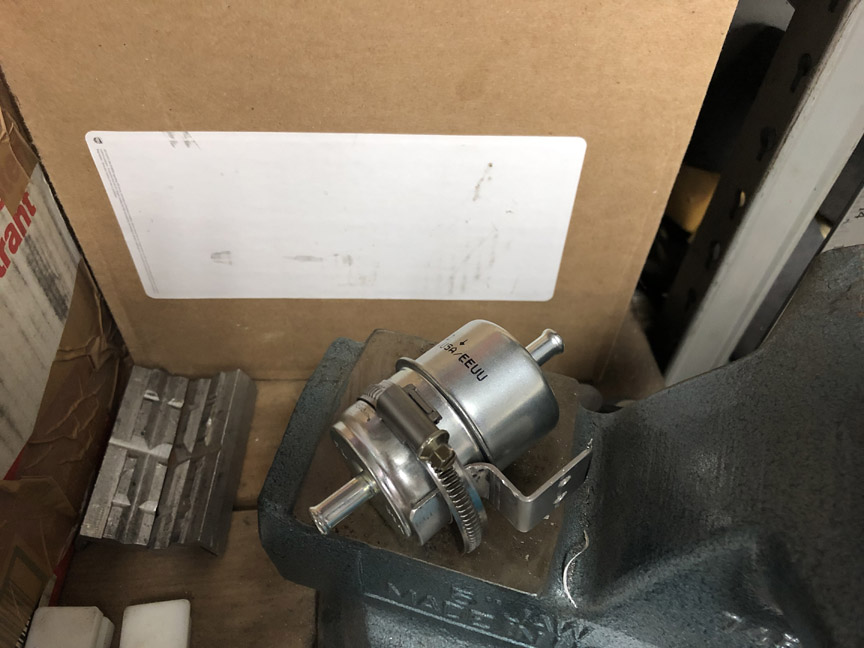 And, all the brackets mounted: 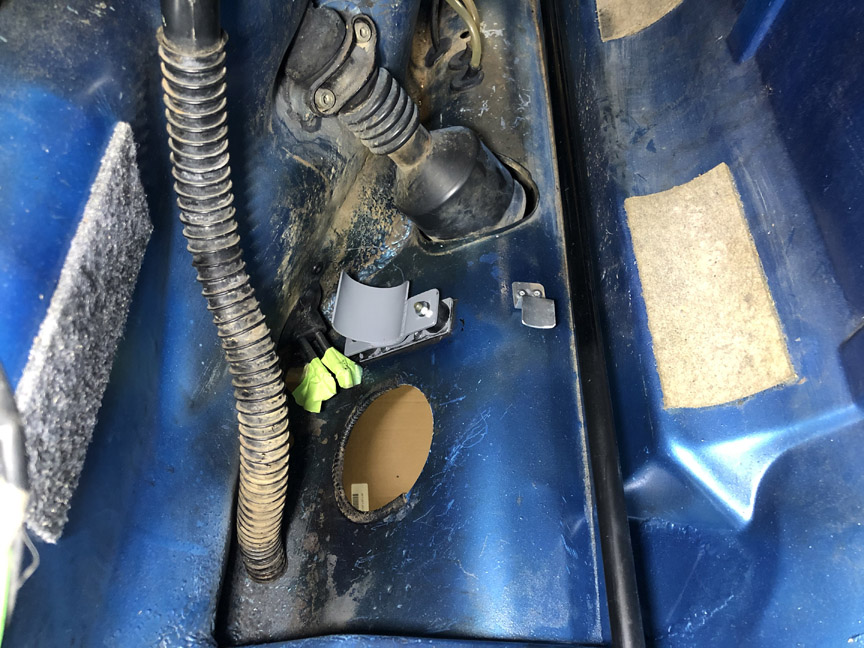 I'll install fuel lines and run wires tomorrow. |
|
|
|
| Superhawk996 |
Jul 18 2020, 08:43 AM
Post
#55
|
|
914 Guru Group: Members Posts: 7,886 Joined: 25-August 18 From: Woods of N. Idaho Member No.: 22,428 Region Association: Galt's Gulch |
|
|
|
|
| Cupomeat |
Jul 18 2020, 09:05 AM
Post
#56
|
|
missing my NY 914 in VA Group: Members Posts: 1,349 Joined: 26-November 07 From: Oakton VA Member No.: 8,376 Region Association: MidAtlantic Region |
Love this thread! Thankfully I've had my 914 for 33 yrs, but I have to admit that somedays i am fixing things that I did wrong when I was 17yrs old...
That makes me the DACO! (IMG:style_emoticons/default/happy11.gif) |
|
|
|
| barefoot |
Jul 18 2020, 02:13 PM
Post
#57
|
|
Senior Member Group: Members Posts: 1,517 Joined: 19-March 13 From: Charleston SC Member No.: 15,673 Region Association: South East States |
Next, is to mount the fuel pump and fuel filter. I'm mounting them up front, and need to make sure everything will fit and clear. I'm using a Tangerine Racing fuel pump mount. I decided to also make a mount for the metal fuel filter. Here's how I did it.
And, all the brackets mounted [/quote] I hope you won't have to remove the fuel tank next time a new filter is needed ?? Mine are just behind the opening in the front firewall where there's access (late years fuel pump mounting area) |
|
|
|
| BillC |
Jul 18 2020, 06:27 PM
Post
#58
|
|
Senior Member Group: Members Posts: 732 Joined: 24-April 15 From: Silver Spring, MD Member No.: 18,667 Region Association: MidAtlantic Region |
QUOTE(Cupomeat @ Jul 18 2020, 11:05 AM) Love this thread! Thanks! Sometimes I wonder if anyone's reading this or if I'm just wasting electrons. QUOTE(barefoot @ Jul 18 2020, 04:13 PM) I hope you won't have to remove the fuel tank next time a new filter is needed ?? Mine are just behind the opening in the front firewall where there's access (late years fuel pump mounting area) Yes, the tank will need to come out for a filter or pump replacement. However, it does mean that there's no need to cut a big hole in the firewall. And, given the car's current "toy" status, the fresh new screen inside the tank and how long modern fuel filters tend to last, that will probably be the next owner's problem.... (IMG:style_emoticons/default/happy11.gif) |
|
|
|
| BillC |
Jul 18 2020, 06:27 PM
Post
#59
|
|
Senior Member Group: Members Posts: 732 Joined: 24-April 15 From: Silver Spring, MD Member No.: 18,667 Region Association: MidAtlantic Region |
Anyway, finally got the pump, filter and hoses installed. Also ran a pair of wires from the rear to the front to power the pump. Here's what it looks like, before the tank goes in:
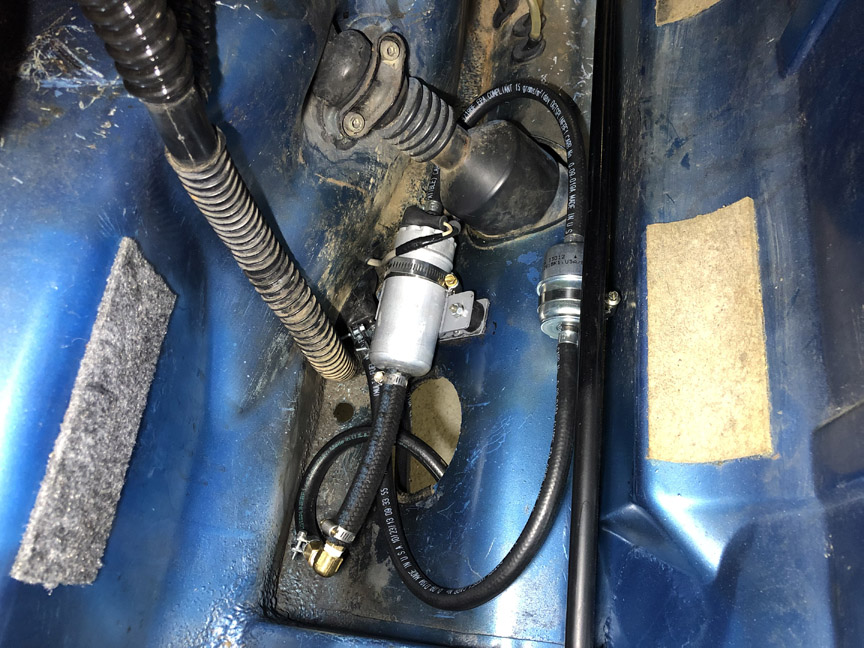 I ran the wires through the center tunnel, and drilled a hole in the bulkhead to connect to the pump. I fitted a grommet to protect the wires (can be seen in the above pic). Since the snorkel tube was cracked open, I took advantage of the break to run the wires through it and up into the engine compartment. 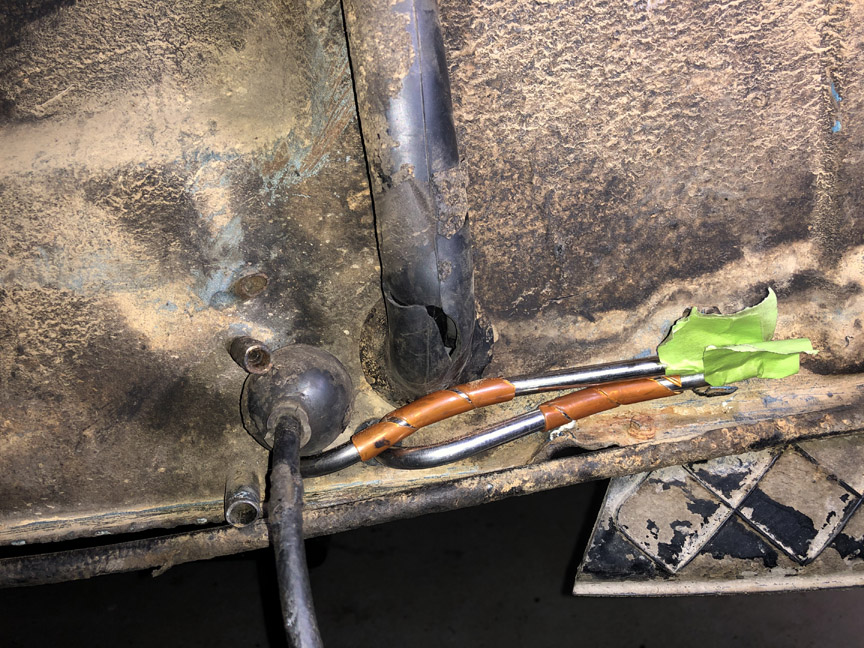 Once the pump wires were run, I decided to fix the snorkel. If you are very careful with CA glue, the factory rubber bits glue together nicely. A tip for accurately placing the glue is to put a drop on the tip of a small screwdriver and then use the screwdriver to spread the glue. And, work in small sections, starting at the ends of the crack and work towards the center. 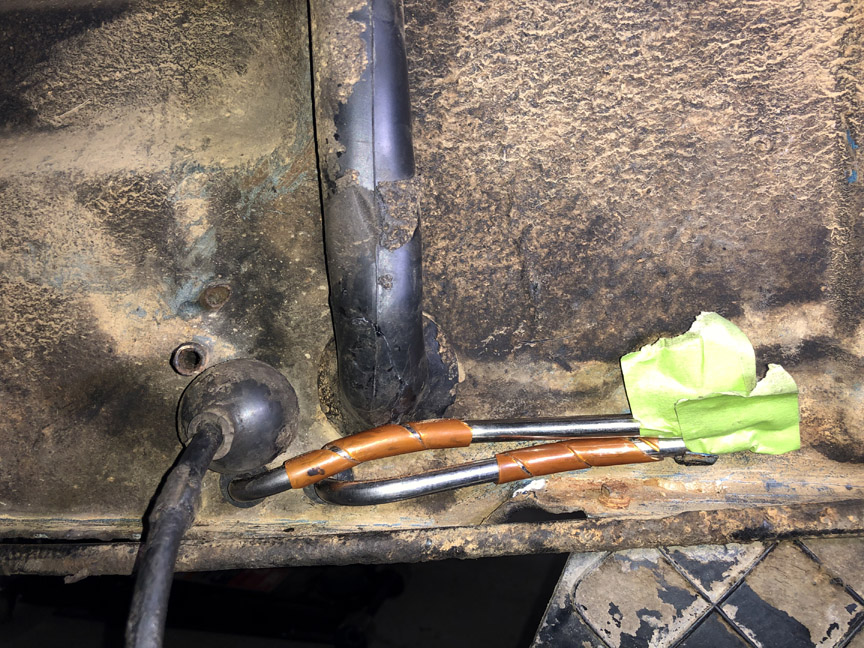 Almost as good as new. |
|
|
|
| bkrantz |
Jul 18 2020, 08:33 PM
Post
#60
|
|
914 Guru Group: Members Posts: 8,716 Joined: 3-August 19 From: SW Colorado Member No.: 23,343 Region Association: Rocky Mountains |
QUOTE(BillC @ Jul 18 2020, 06:27 PM) QUOTE(Cupomeat @ Jul 18 2020, 11:05 AM) Love this thread! Thanks! Sometimes I wonder if anyone's reading this or if I'm just wasting electrons. QUOTE(barefoot @ Jul 18 2020, 04:13 PM) I hope you won't have to remove the fuel tank next time a new filter is needed ?? Mine are just behind the opening in the front firewall where there's access (late years fuel pump mounting area) Yes, the tank will need to come out for a filter or pump replacement. However, it does mean that there's no need to cut a big hole in the firewall. And, given the car's current "toy" status, the fresh new screen inside the tank and how long modern fuel filters tend to last, that will probably be the next owner's problem.... (IMG:style_emoticons/default/happy11.gif) Don't worry--we are definitely reading. Did you consider mounting the pump on the underside of the floor panel (above the steering rack)? |
|
|
|
|
2 User(s) are reading this topic (2 Guests and 0 Anonymous Users)
0 Members:

|
Lo-Fi Version | Time is now: 14th June 2026 - 04:43 PM |
Invision Power Board
v9.1.4 © 2026 IPS, Inc.