|
|
|
Porsche, and the Porsche crest are registered trademarks of Dr. Ing. h.c. F. Porsche AG.
This site is not affiliated with Porsche in any way. Its only purpose is to provide an online forum for car enthusiasts. All other trademarks are property of their respective owners. |
|
|

  |

| AndrewBlyholder |
 Aug 15 2020, 12:36 PM Aug 15 2020, 12:36 PM
Post
#1
|
|
Member  Group: Members Posts: 109 Joined: 20-September 04 From: Richmond, CA Member No.: 2,791 |
Launching in my hell hole rust repair. Need some advice on the usual welding technique for patching.
Many of the patch parts have flanges that match the factory stampings. I assume the factory spot welded these things together. Is that correct? Don't have a spot welder, and probably couldn't reach most of these locations if I did. What's the usual technique then? Drill holes in the flanges and fill with rosette welds? Or just weld the edges of the flanges? I'm replacing some sections of the main longitudinal tubes under the battery. That tube was a double walled on both the inside and outside faces. The replacement panel I have from AA has the double wall spot welded onto it. But how do I go about getting both panels weld together at the butt joint where the patch meets the original? Grind/cut the outer face back a little bit more than the inner panel, weld the inner first, and then weld up the outer? Battery tray replacement questions: - The lower support has three flanges on it. The front and side flange are easily accessible for welding, but the rear flange is turned inward. Do you weld that one too or leave it unwelded? What did the factory do there? - The easy way to attach the battery tray to the support would be to weld them together first. Is that recommended? But if you do that, then there would be no way to weld the inward turned rear flange of the support. Thanks for any and all suggestions. Andrew Blyholder |
   |

 
|
| Superhawk996 |
Aug 15 2020, 01:00 PM
Post
#2
|
|
914 Guru Group: Members Posts: 5,723 Joined: 25-August 18 From: Woods of N. Idaho Member No.: 22,428 Region Association: Galt's Gulch |
Andrew - no easy answers to all of your questions.
Yes - flanges were spot welded at factory. Yes - you can rosette weld the new panels. No - don't weld just the edges of the flanges. Without the rosette welds along the flange you'll lose stiffness. Yes -- you can add some intermittent stich welds at the edges but don't rely on that exclusively. The rest of the questions basically come down to your skills, your equipment on hand, and the quality of the end result you desire. Bottom line, there is no "right" way. It sort of comes down to experience on a case by case basis. As you noted, it also comes down to the order of assembly. In my case I've done a lot of things differently since I'm trying to preserve the paint on my quarter panels rather than undertake a full exterior paint job at the end. Would strongly recommend checking out other legendary build threads here by Jeff Hail and Brent Brock. Lots of pictures, lots of step by step. Lots of sharing what tools and techniques were used. http://www.914world.com/bbs2/index.php?showtopic=307290 http://www.914world.com/bbs2/index.php?showtopic=76791 Pictures of your specific concerns will garner a better, more educated response. Many here will chime in and be happy to help. I'd suggest posting pictures of your situation as you encounter them rather than in lump sum. Sounds like you've got a project on your hands (IMG:style_emoticons/default/happy11.gif) |
 |
|
| bkrantz |
Aug 15 2020, 09:09 PM
Post
#3
|
|
914 Guru Group: Members Posts: 7,723 Joined: 3-August 19 From: SW Colorado Member No.: 23,343 Region Association: Rocky Mountains |
One more thing to watch for: Even the relatively intact sheet metal around the below the battery have probably been etched by corrosion, and may also have surface contamination. Trying to weld onto that provides additional challenge, so get to clean metal as much as possible.
|
|
|
|
| SirAndy |
Aug 15 2020, 09:59 PM
Post
#4
|
|
Resident German Group: Admin Posts: 41,601 Joined: 21-January 03 From: Oakland, Kalifornia Member No.: 179 Region Association: Northern California |
QUOTE(Superhawk996 @ Aug 15 2020, 12:00 PM)  Yes - flanges were spot welded at factory. Yes - you can rosette weld the new panels. No - don't weld just the edges of the flanges. Without the rosette welds along the flange you'll lose stiffness. Yes -- you can add some intermittent stich welds at the edges but don't rely on that exclusively. (IMG:style_emoticons/default/agree.gif) As for the battery tray, i did mine in two parts, support first (including the rear part) with drilled holes emulating spot welds. Then added the tray part on top since it's the least structural as long as you have a solid base. (IMG:style_emoticons/default/welder.gif) |
|
|
|
| mtndawg |
Aug 15 2020, 11:29 PM
Post
#5
|
|
Member Group: Members Posts: 413 Joined: 26-January 09 From: Granite Bay, Ca Member No.: 9,985 Region Association: None |
I’ve welded the stand in, then bolted the tray so it’s removable.
Attached thumbnail(s) 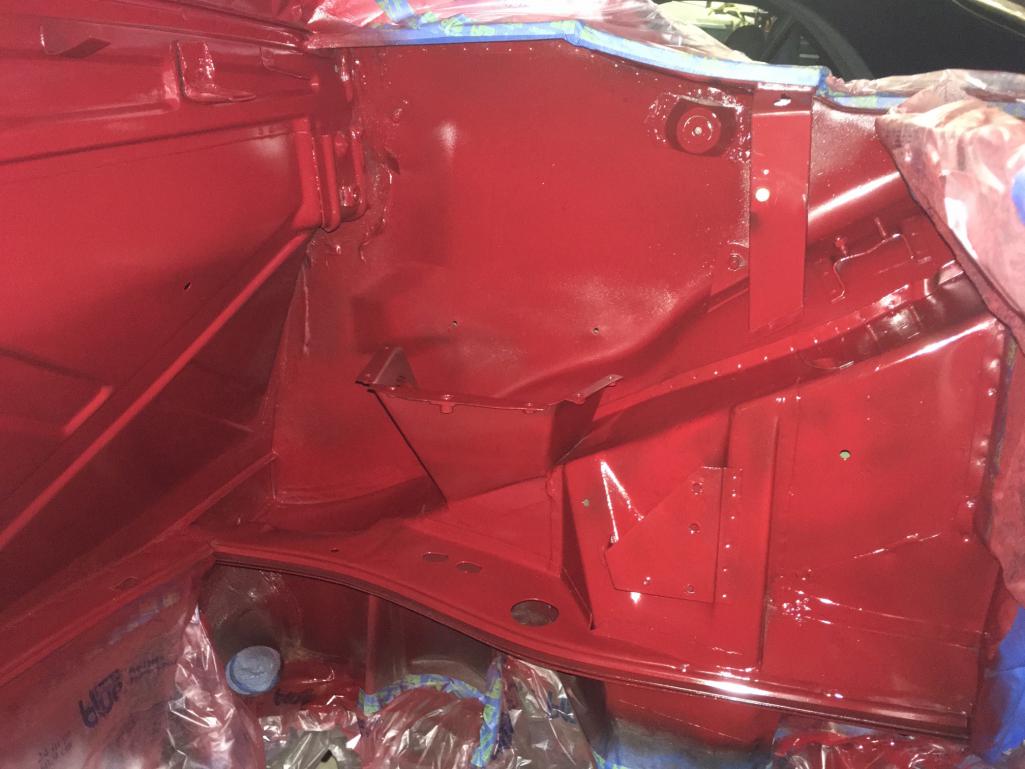 Attached image(s) 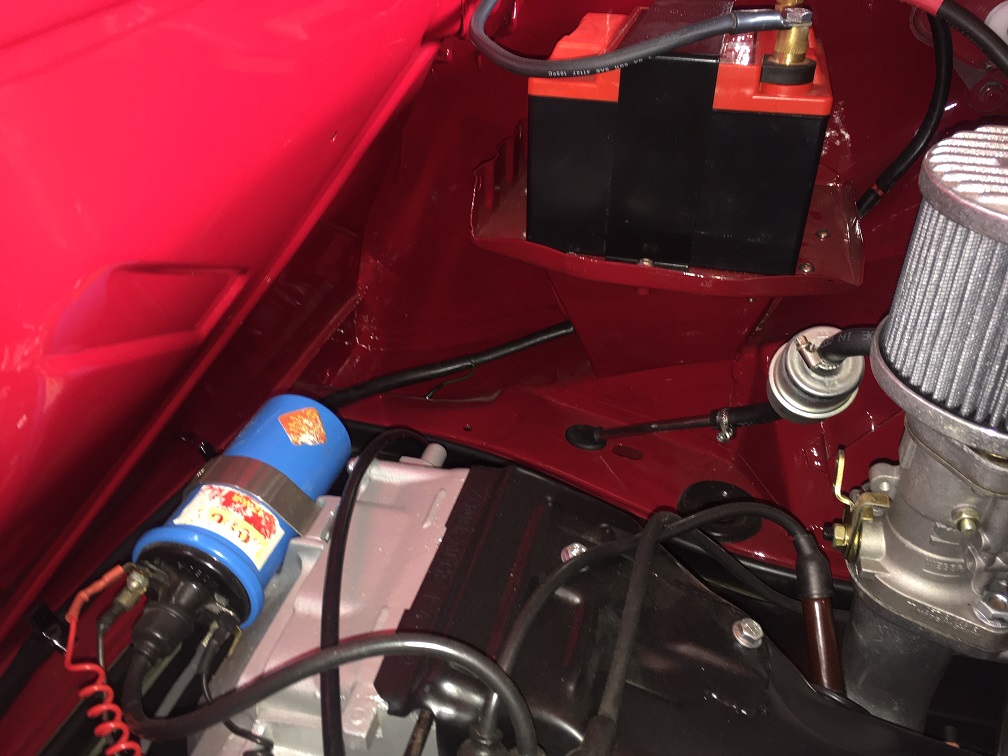
|
|
|
|
| BillC |
Aug 16 2020, 02:27 PM
Post
#6
|
|
Senior Member Group: Members Posts: 533 Joined: 24-April 15 From: Silver Spring, MD Member No.: 18,667 Region Association: MidAtlantic Region |
QUOTE(mtndawg @ Aug 16 2020, 01:29 AM) I’ve welded the stand in, then bolted the tray so it’s removable. That is a fantastic idea! I will take a long, hard look at doing that when I install my new battery tray. Although, I may weld studs to the tray and hold it down with the nuts underneath and inside the fender well. The thought of being able to easily remove the tray for maintenance and/or future restoration is very appealing. |
|
|
|
| AndrewBlyholder |
Aug 16 2020, 02:30 PM
Post
#7
|
|
Member Group: Members Posts: 109 Joined: 20-September 04 From: Richmond, CA Member No.: 2,791 |
Thanks for the advice.
I'll check out the specific threads. Good to have particular favorites because I'm sure there are many, many similar, as this is right of passage we almost all go through. My specific situation is complicated by the factor that I'm the second person to work on this car. This project was already done once by a previous owner, and unfortunately, done not so well. So I'm also trying to fix some sloppy previous work too. I'll try to post more specific photos and questions as they come up. Andrew |
|
|
|
| bkrantz |
Aug 16 2020, 08:18 PM
Post
#8
|
|
914 Guru Group: Members Posts: 7,723 Joined: 3-August 19 From: SW Colorado Member No.: 23,343 Region Association: Rocky Mountains |
QUOTE(AndrewBlyholder @ Aug 16 2020, 02:30 PM) Thanks for the advice. I'll check out the specific threads. Good to have particular favorites because I'm sure there are many, many similar, as this is right of passage we almost all go through. My specific situation is complicated by the factor that I'm the second person to work on this car. This project was already done once by a previous owner, and unfortunately, done not so well. So I'm also trying to fix some sloppy previous work too. I'll try to post more specific photos and questions as they come up. Andrew The famous 914 PO lament. |
|
|
|
| bbrock |
Aug 16 2020, 09:37 PM
Post
#9
|
|
914 Guru Group: Members Posts: 5,269 Joined: 17-February 17 From: Montana Member No.: 20,845 Region Association: Rocky Mountains |
QUOTE(AndrewBlyholder @ Aug 16 2020, 02:30 PM) Thanks for the advice. I'll check out the specific threads. Good to have particular favorites because I'm sure there are many, many similar, as this is right of passage we almost all go through. My specific situation is complicated by the factor that I'm the second person to work on this car. This project was already done once by a previous owner, and unfortunately, done not so well. So I'm also trying to fix some sloppy previous work too. I'll try to post more specific photos and questions as they come up. Andrew Ha! At least you get to blame the PO. A lot of the dumbass (IMG:style_emoticons/default/stromberg.gif) I had to fix was done by me 35 years ago - including letting the car darn near rot into the ground in the first place. |
|
|
|
| AndrewBlyholder |
Aug 17 2020, 10:32 AM
Post
#10
|
|
Member Group: Members Posts: 109 Joined: 20-September 04 From: Richmond, CA Member No.: 2,791 |
Ok, backing up a bit to give the background on my rustoration project. Here's what I started with:
 And here is it after cutting out all the rusty and essentially non-functional metal: 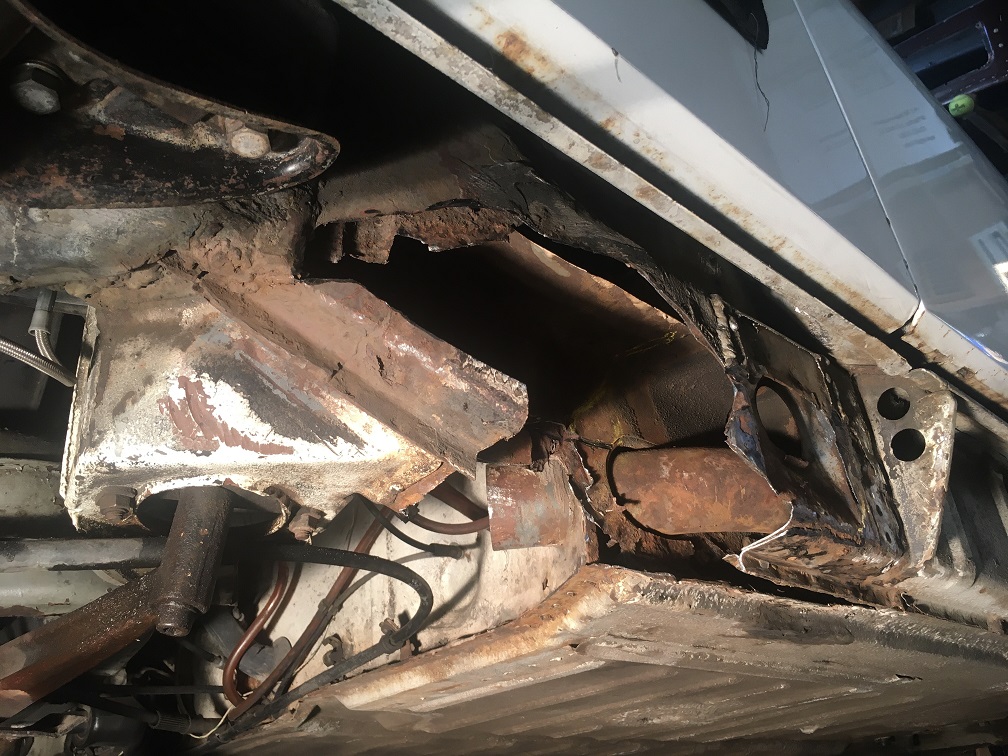 Mind you, I got into all this just after running an autocross with this car. I've heard many complaints that the 914 chassis is pretty flexy over the years, but I'm pretty impressed myself that I was cornering this car at 1.2 gees in this condition with no noticeable body flex issues. The passenger door shows no sagging in the door gaps and continues to open/close normally. Forgot to take any pictures of my battery tray, but suffice to say, after removing the collection of hardware angles and self-tapping screws I'd been patching it up with over the years, I was able to remove both the trey and support by just yanking on it by hand! Andrew |
|
|
|
| AndrewBlyholder |
Aug 17 2020, 10:53 AM
Post
#11
|
|
Member Group: Members Posts: 109 Joined: 20-September 04 From: Richmond, CA Member No.: 2,791 |
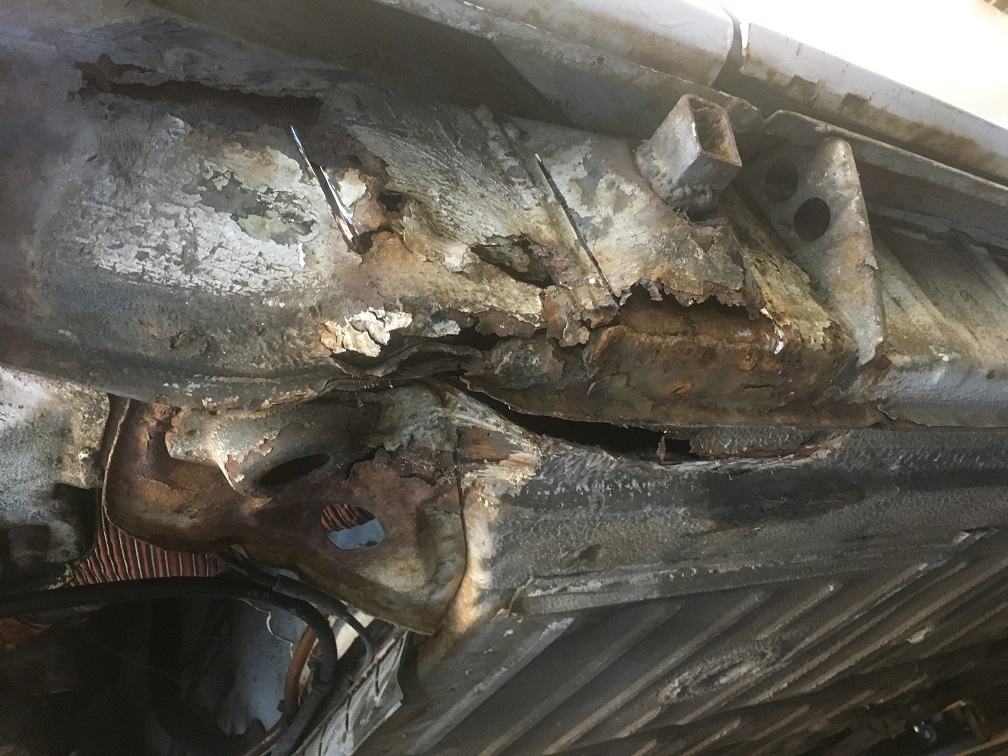
Also found that the inner trailing arm ear was badly cracked on both sides:
Outer face: 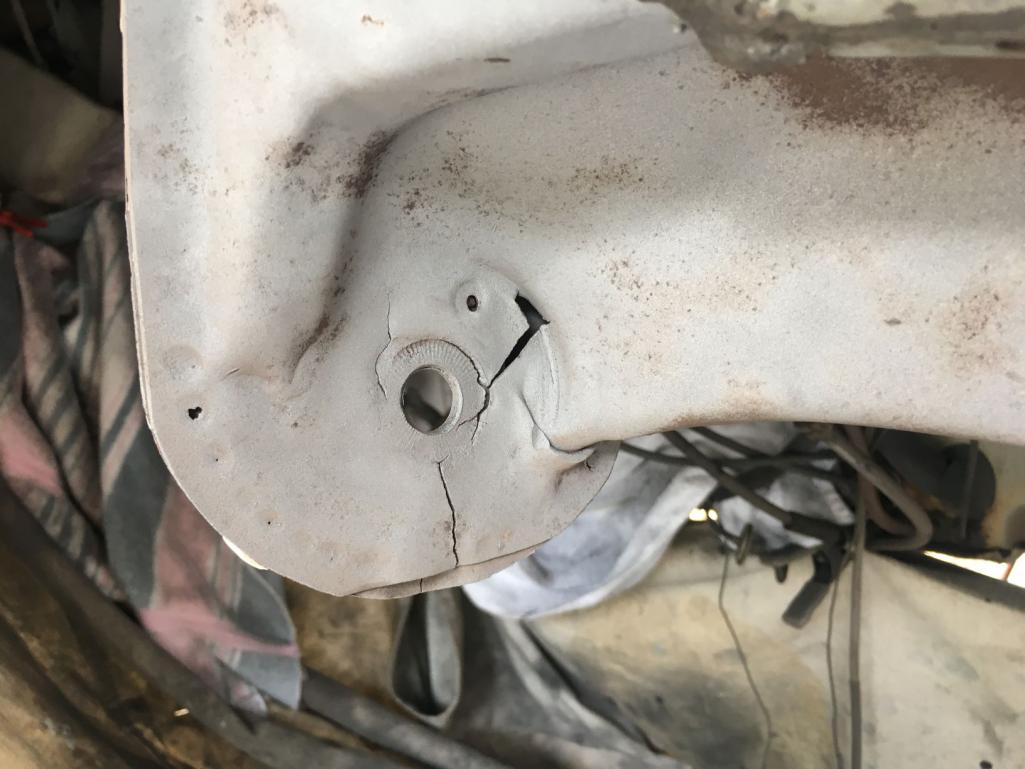 Inner face: (haven't figured out how to rotate protrait photos yet, so please excuse the sideways rotation) 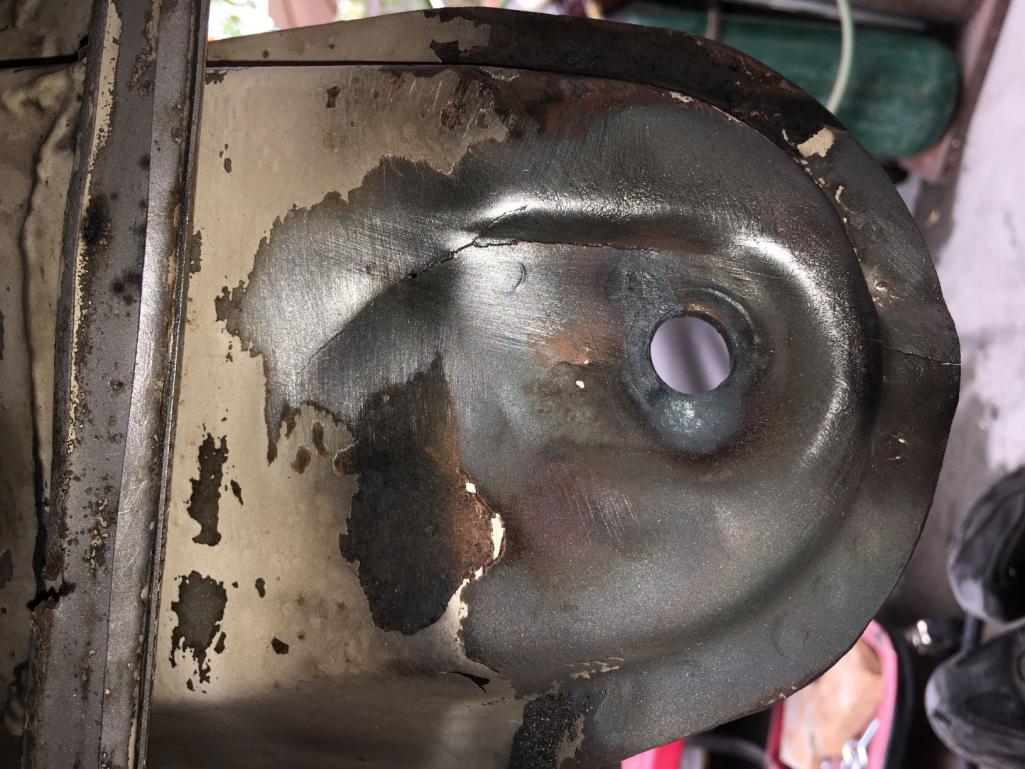 I cleaned these up with a Habor Freight 20# media blaster. Worked pretty well on things that are just painted, but doesn't do much against the thick undercoating and seam sealer. For removing that, I found a wire wheel to be much faster. Here's the ears after welding up the cracks: 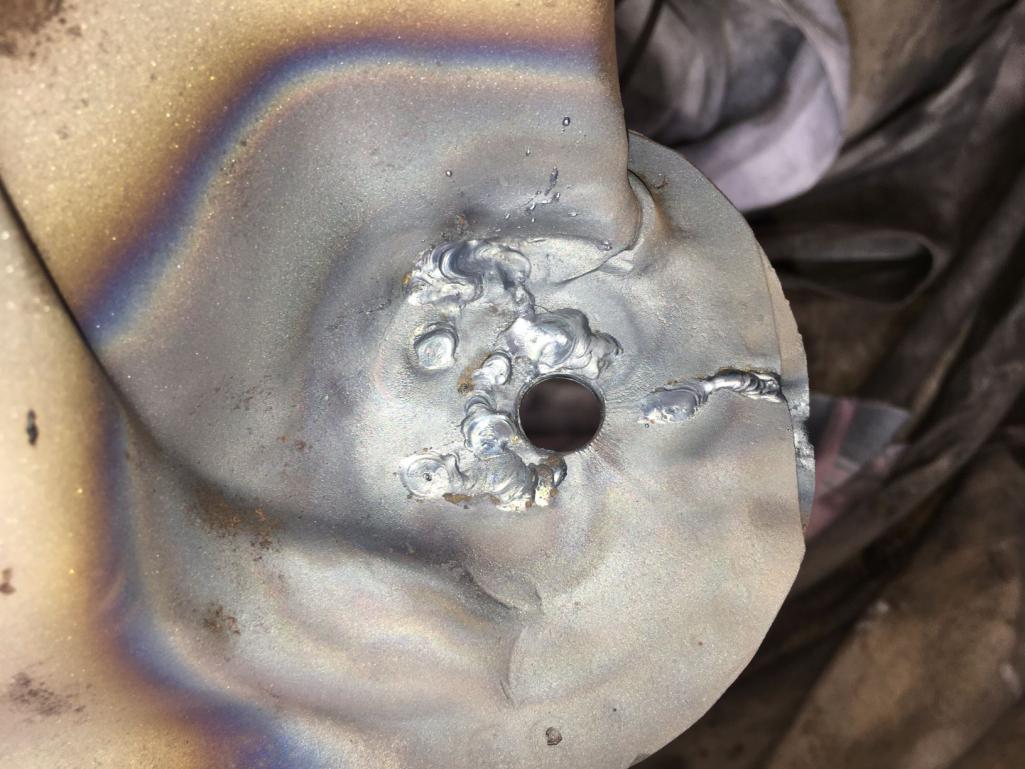  I consider myself just an ok welder, and my overhead and vertical skills are still pretty weak. So no haters on the weld beads. Hopefully I'll get better as this project goes along. The welders I have available to me are gas and TIG. A friend who is a master welder with many, many years of old car restoration experience recommended I use gas for this as it's much more tolerant of rusty metal. I'm trying to clean/grind everything I weld completely, but it will be impossible to get perfect prep on this type of project. Andrew Attached thumbnail(s) 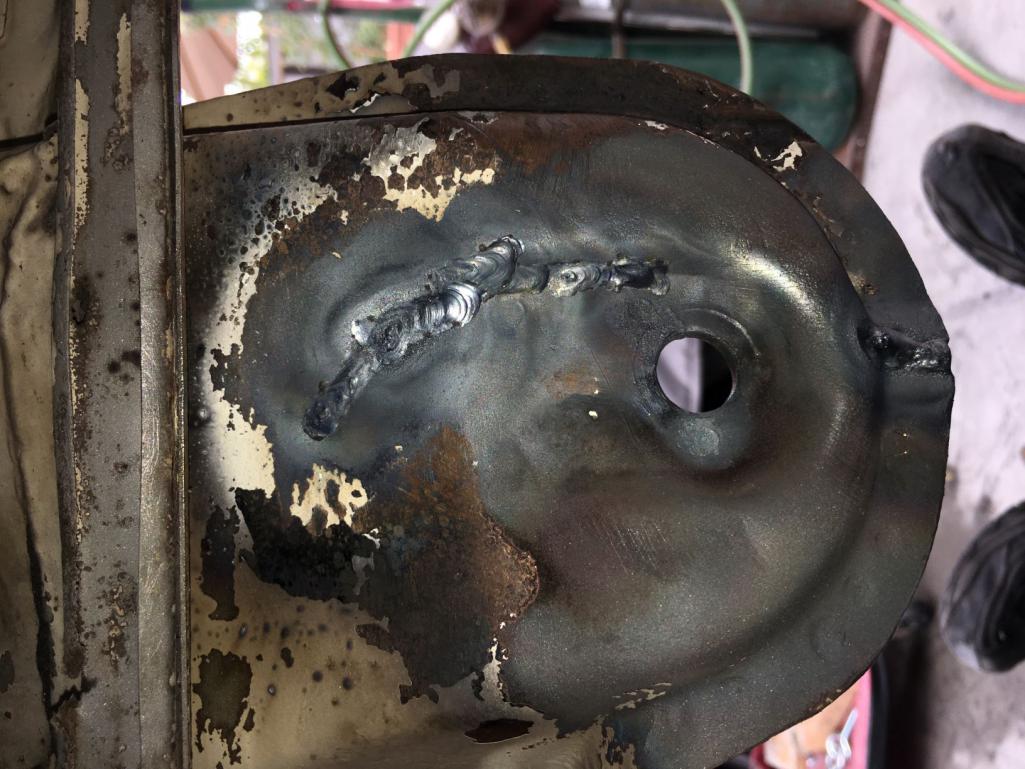
|
|
|
|
| AndrewBlyholder |
Aug 17 2020, 11:02 AM
Post
#12
|
|
Member Group: Members Posts: 109 Joined: 20-September 04 From: Richmond, CA Member No.: 2,791 |
In my enthusiasm of cutting out the rust, I cut off a bit of the flange for the floor panel. I figured I'd need that flange back when I splice in my patch for the inner longitudinal. Again, forgot to take a proper "before" picture, but here it is with a small patch panel welded in. I've outlined the patch in red:
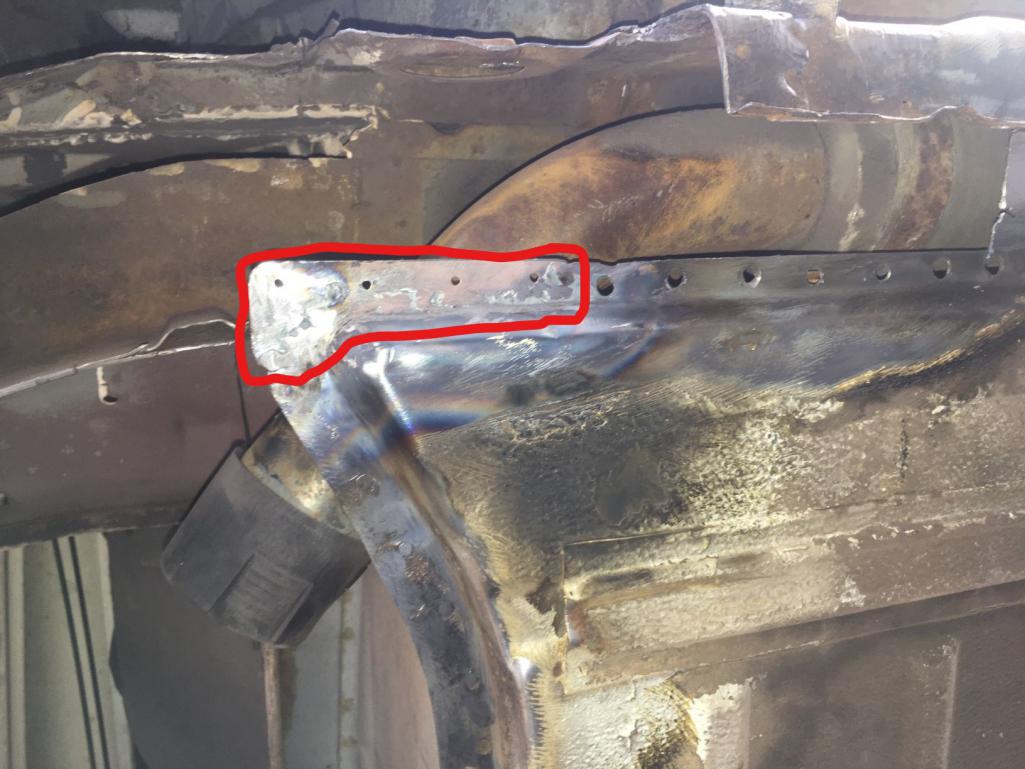 That's it for yesterday's work. Today I'll start working on fabricating the patch for the inner longitudinal. My plan of attack is to put pieces back in from inside to outside: - outer layer of the inner longitudinal - inner layer of the inner longitudinal - outer longitudinal (I have an AA stamping for this part, which already has the inner layer attached.) - new jack pad - battery support - battery tray Andrew |
|
|
|
| Superhawk996 |
Aug 17 2020, 11:19 AM
Post
#13
|
|
914 Guru Group: Members Posts: 5,723 Joined: 25-August 18 From: Woods of N. Idaho Member No.: 22,428 Region Association: Galt's Gulch |
Yup . . . you've got a project on your hands. Looks suspisciouly like what I started with.
You're off to a great start. (IMG:style_emoticons/default/biggrin.gif) Depending on your goals, you may want to consider replacing that supension console. By the time you get to that level of cracking you already have a lot of work hardening and metal fatigue. You can weld one area but new cracks will form pretty quickly especially if you intend to autocross it again in the future. At a bare minimum check out Tangerine Racing. They make a doubler for the inboard ear of the console which is cheap and a quick weld-on affair. |
|
|
|
| bbrock |
Aug 17 2020, 12:26 PM
Post
#14
|
|
914 Guru Group: Members Posts: 5,269 Joined: 17-February 17 From: Montana Member No.: 20,845 Region Association: Rocky Mountains |
QUOTE(Superhawk996 @ Aug 17 2020, 11:19 AM) Depending on your goals, you may want to consider replacing that supension console. By the time you get to that level of cracking you already have a lot of work hardening and metal fatigue. You can weld one area but new cracks will form pretty quickly especially if you intend to autocross it again in the future. (IMG:style_emoticons/default/agree.gif) I would be strongly inclined to replace those consoles, especially if you see 1.2 G in its future. It looks like one of them is even wrinkled which makes me wonder if the geometry is still in spec. |
|
|
|
| brant |
Aug 17 2020, 01:02 PM
Post
#15
|
|
914 Wizard Group: Members Posts: 11,603 Joined: 30-December 02 From: Colorado Member No.: 47 Region Association: Rocky Mountains |
QUOTE(bbrock @ Aug 17 2020, 12:26 PM) QUOTE(Superhawk996 @ Aug 17 2020, 11:19 AM) Depending on your goals, you may want to consider replacing that supension console. By the time you get to that level of cracking you already have a lot of work hardening and metal fatigue. You can weld one area but new cracks will form pretty quickly especially if you intend to autocross it again in the future. (IMG:style_emoticons/default/agree.gif) I would be strongly inclined to replace those consoles, especially if you see 1.2 G in its future. It looks like one of them is even wrinkled which makes me wonder if the geometry is still in spec. the crack repair introduced a lot of heat into the console. the metal will be more brittle now and I'd be worried about that console also brant |
|
|
|
| SirAndy |
Aug 17 2020, 02:27 PM
Post
#16
|
|
Resident German Group: Admin Posts: 41,601 Joined: 21-January 03 From: Oakland, Kalifornia Member No.: 179 Region Association: Northern California |
QUOTE(AndrewBlyholder @ Aug 17 2020, 09:53 AM) Also found that the inner trailing arm ear was badly cracked on both sides: @AndrewBlyholder Racer Chris at Tangerine Racing makes an excellent reinforcement piece for this: http://www.tangerineracing.com/chassis.htm (IMG:style_emoticons/default/bye1.gif) |
|
|
|
| Krieger |
Aug 17 2020, 11:54 PM
Post
#17
|
|
Advanced Member Group: Members Posts: 4,693 Joined: 24-May 04 From: Santa Rosa CA Member No.: 2,104 Region Association: None |
If you had smaller, harder tires you wouldn't have this problem and you'd save a bunch of money! (IMG:style_emoticons/default/poke.gif) You might want to run a brace from that area of the trailing arm forward to the firewall. I did a set and made them removable.
|
|
|
|
| Krieger |
Aug 18 2020, 12:01 AM
Post
#18
|
|
Advanced Member Group: Members Posts: 4,693 Joined: 24-May 04 From: Santa Rosa CA Member No.: 2,104 Region Association: None |
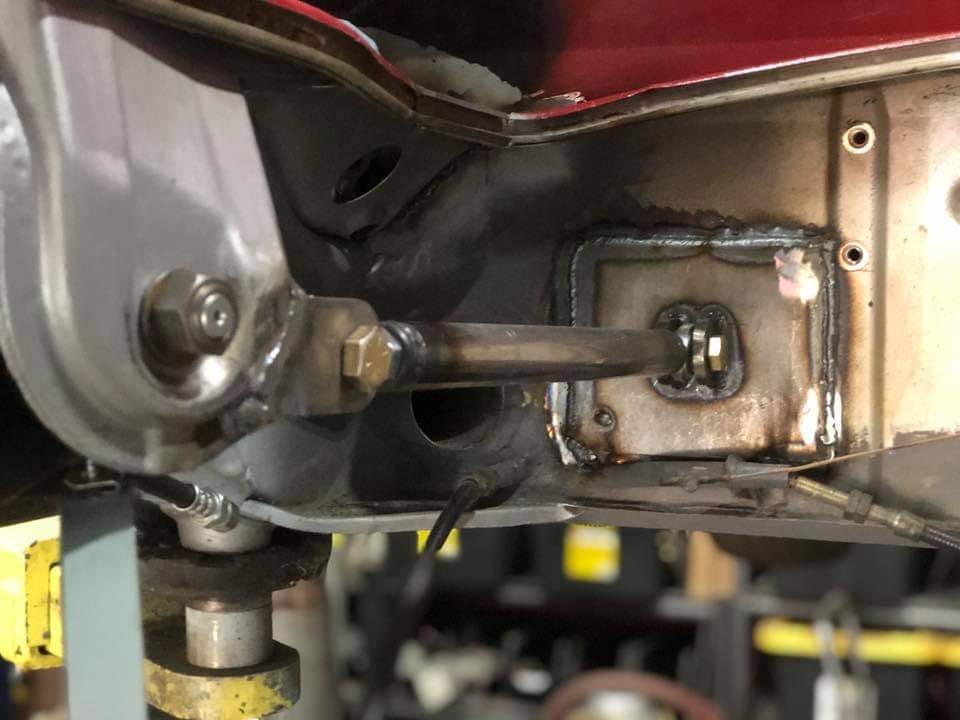
This is how PMB did it. I copied this from a very recent post they had on their Facebook page. There are a few more pics there if you want more details.
 |
|
|
|
| DRPHIL914 |
Aug 18 2020, 06:24 AM
Post
#19
|
|
Dr. Phil Group: Members Posts: 5,756 Joined: 9-December 09 From: Bluffton, SC Member No.: 11,106 Region Association: South East States |
QUOTE(mtndawg @ Aug 16 2020, 01:29 AM) I’ve welded the stand in, then bolted the tray so it’s removable. sorry to OP not ment to high jack the thread but just had to say "wow" that just looks so super!!! great job! maybe its that red too but wow! |
|
|
|
| AndrewBlyholder |
Aug 18 2020, 10:36 PM
Post
#20
|
|
Member Group: Members Posts: 109 Joined: 20-September 04 From: Richmond, CA Member No.: 2,791 |
All good advice on the trailing arm ear.
This car won't be an autocross car for very long. It only got pressed into service because Carrillo is being so damned slow making the pistons for my race car. So this one I want to keep stock. It's also a Limited Edition creamsicle. It had lost it's decals and Pheonix Red bumpers before I got it. Eventually, I want to fully restore it back to it's original creamsicle glory. For that project, I think the advice to replace the entire console is the right path. What's there now is obviously a replacement because it was welded in so poorly. But that can be later project. Andrew |
|
|
|
|
1 User(s) are reading this topic (1 Guests and 0 Anonymous Users)
0 Members:

|
Lo-Fi Version | Time is now: 17th April 2024 - 10:22 PM |
Invision Power Board
v9.1.4 © 2024 IPS, Inc.