|
|
|
Porsche, and the Porsche crest are registered trademarks of Dr. Ing. h.c. F. Porsche AG.
This site is not affiliated with Porsche in any way. Its only purpose is to provide an online forum for car enthusiasts. All other trademarks are property of their respective owners. |
|
|

  |

| jaredmcginness |
 Oct 10 2020, 04:47 PM Oct 10 2020, 04:47 PM
Post
#1
|
|
...  Group: Members Posts: 509 Joined: 12-June 19 From: Baltimore Member No.: 23,209 Region Association: MidAtlantic Region |
Hey guys,
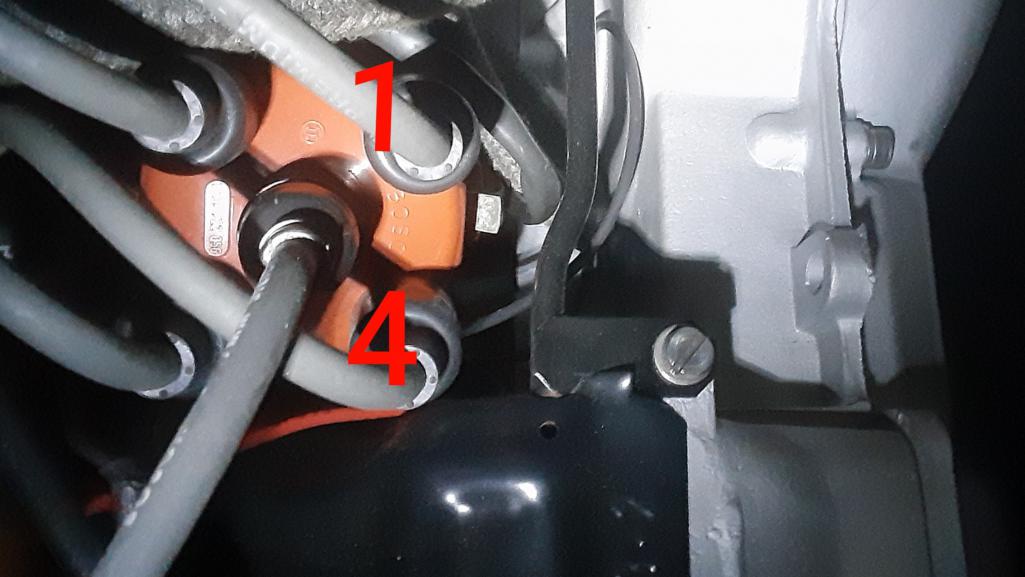
This is endlessly frustrating. I waited to post until i needed to. I will try to give as much info and be as clear as possible, so bear with me. This SHOULD be simple. Air, Fuel, and Spark. Completed my engine build. Ready to fire and break in the cam. I got good oil pressure while cranking. All is well there. (IMG:http://www.914world.com/bbs2/uploads_offsite/i.imgur.com-23209-1601947105.6.jpg) I am breaking the motor in on the ground. Do I have everything necessary? Going off the old beetle bench run list. -Positive battery to Starter + -Negative battery grounded to starter base and trans body -Direct 12v to Terminal 15 on the coil I believe - beside fuel and air, thats all I need hooked up for a carbed motor. Coils typically do NOT need a ground, right? (IMG:http://www.914world.com/bbs2/uploads_offsite/i.imgur.com-23209-1602370043.1.jpg) Last night I tried this and only got spark from cylinder 3. No luck on anything else. I met up with my buddy @nditiz1 today and he mentioned maybe I had the wrong vaccuum advance/FI distributor.... ding ding ding. (Pn# 172-001) Gracisouly, he lent me three 009 Distributors to test. One being a pertronix. These are known good out of a running car(s). My two hunks o junk on the right... (IMG:http://www.914world.com/bbs2/uploads_offsite/i.imgur.com-23209-1602370043.2.jpg) I have: -Bosch Blue Coil tested @: -3.9 resistance -8600 ohms Stocker coil tested @: -4.2 resistance -7600 ohms. 12 volt and test light check out @ term 15 and term 1 I believe these are good numbers all around. I ditched the FI dizzys, tried the pertronix - no dice. I tried a points 009, no dice. At this point, I have swapped: 4 Dizzy 5 caps 5 rotors 2 coils 3 starters set of plug wires Other notes: New battery. Rotor lined up with the notch, at TDC #1, pointed at one. Plug wires, clockwise, 1, 4, 3, 2 (they are a bit wonky lay out, seemed wrong, but match the firing order This is the plug layout... seem right? (IMG:http://www.914world.com/bbs2/uploads_offsite/i.imgur.com-23209-1602370043.3.jpg) -Plugs are NGK and gapped -I cannot seem to get the coil post to spark. I got it last night, but it is fighting me now. (unplugged from dizzy, held about 1/4" off a ground, and cranked the motor) No spark. But coil numbers are good. Could be benching it wrong. (IMG:style_emoticons/default/confused24.gif) -Tried grounding plugs 3 and 1 on the body, no spark. Everything seems good until it comes out of the coil? (IMG:style_emoticons/default/smash.gif) |
   |

 
|
| Mikey914 |
Oct 10 2020, 05:08 PM
Post
#2
|
|
The rubber man Group: Members Posts: 12,772 Joined: 27-December 04 From: Hillsboro, OR Member No.: 3,348 Region Association: None |
Did you by chance get fake NGK's Regardless of TDC and firing order check each least to plug, not at the spark plug. but off the case. You should be able to get spark on all 4
If no spark it could be coil, condenser or points It sounds like you did at least did get a spark, so my guess is it's downstream. Fuel you can tell if you pull a plug, as it should be evident in the chamber if it's been turning over. Test the plug to the case and see if it's a plug issue. It's more than likely on the electrical side is my best guess. Let us know how this progresses |
|
|
|
| ndfrigi |
Oct 10 2020, 05:35 PM
Post
#3
|
|
Advanced Member Group: Members Posts: 2,970 Joined: 21-August 11 From: Orange County Member No.: 13,474 Region Association: Southern California |
QUOTE(jaredmcginness @ Oct 10 2020, 03:47 PM)  Hey guys, This is endlessly frustrating. I waited to post until i needed to. I will try to give as much info and be as clear as possible, so bear with me. This SHOULD be simple. Air, Fuel, and Spark. Completed my engine build. Ready to fire and break in the cam. I got good oil pressure while cranking. All is well there. (IMG:http://www.914world.com/bbs2/uploads_offsite/i.imgur.com-23209-1601947105.6.jpg) I am breaking the motor in on the ground. Do I have everything necessary? Going off the old beetle bench run list. -Positive battery to Starter + -Negative battery grounded to starter base and trans body -Direct 12v to Terminal 15 on the coil I believe - beside fuel and air, thats all I need hooked up for a carbed motor. Coils typically do NOT need a ground, right? (IMG:http://www.914world.com/bbs2/uploads_offsite/i.imgur.com-23209-1602370043.1.jpg) Last night I tried this and only got spark from cylinder 3. No luck on anything else. I met up with my buddy @nditiz1 today and he mentioned maybe I had the wrong vaccuum advance/FI distributor.... ding ding ding. (Pn# 172-001) Gracisouly, he lent me three 009 Distributors to test. One being a pertronix. These are known good out of a running car(s). My two hunks o junk on the right... (IMG:http://www.914world.com/bbs2/uploads_offsite/i.imgur.com-23209-1602370043.2.jpg) I have: -Bosch Blue Coil tested @: -3.9 resistance -8600 ohms Stocker coil tested @: -4.2 resistance -7600 ohms. 12 volt and test light check out @ term 15 and term 1 I believe these are good numbers all around. I ditched the FI dizzys, tried the pertronix - no dice. I tried a points 009, no dice. At this point, I have swapped: 4 Dizzy 5 caps 5 rotors 2 coils 3 starters set of plug wires Other notes: New battery. Rotor lined up with the notch, at TDC #1, pointed at one. Plug wires, clockwise, 1, 4, 3, 2 (they are a bit wonky lay out, seemed wrong, but match the firing order This is the plug layout... seem right? (IMG:http://www.914world.com/bbs2/uploads_offsite/i.imgur.com-23209-1602370043.3.jpg) -Plugs are NGK and gapped -I cannot seem to get the coil post to spark. I got it last night, but it is fighting me now. (unplugged from dizzy, held about 1/4" off a ground, and cranked the motor) No spark. But coil numbers are good. Could be benching it wrong. (IMG:style_emoticons/default/confused24.gif) -Tried grounding plugs 3 and 1 on the body, no spark. Everything seems good until it comes out of the coil? (IMG:style_emoticons/default/smash.gif) looks like the dizzy is not in the right/proper installation. |
|
|
|
| Retroracer |
Oct 10 2020, 05:46 PM
Post
#4
|
|
Senior Member Group: Members Posts: 647 Joined: 7-July 13 From: Bend OR Member No.: 16,100 Region Association: Pacific Northwest |
May be misinterpreting this - but I think you are lacking the points connection to the coil? Yes, the coil needs +12V, no ground - but it does also need the connection to the points on the distributor - which I don't see on the photos....?
- Tony |
|
|
|
| jaredmcginness |
Oct 10 2020, 05:46 PM
Post
#5
|
|
... Group: Members Posts: 509 Joined: 12-June 19 From: Baltimore Member No.: 23,209 Region Association: MidAtlantic Region |
QUOTE(ndfrigi @ Oct 10 2020, 07:35 PM) looks like the dizzy is not in the right/proper installation. I noticed it was cocked CC, after I took the photo. Loosened the clamp and fixed it. The dizzy sits in the key way flush and the rotor turns properly when cranked. |
|
|
|
| sholman5 |
Oct 10 2020, 05:49 PM
Post
#6
|
|
Kraut burner Group: Members Posts: 191 Joined: 11-September 16 From: Ormond beach, Fl. Member No.: 20,391 Region Association: South East States |
 Either the wires are not in the correct order, cap is not on correct or the distributor is turned to far counterclockwise. I could be wrong. |
|
|
|
| jaredmcginness |
Oct 10 2020, 05:50 PM
Post
#7
|
|
... Group: Members Posts: 509 Joined: 12-June 19 From: Baltimore Member No.: 23,209 Region Association: MidAtlantic Region |
QUOTE(Retroracer @ Oct 10 2020, 07:46 PM) May be misinterpreting this - but I think you are lacking the points connection to the coil? Yes, the coil needs +12V, no ground - but it does also need the connection to the points on the distributor - which I don't see on the photos....? - Tony Condenser Green wire to negative/Term 1 maybe? Makes sense that I dont yet fully under stand the wiring for the pertronix. But it would be silly if the condesner wire is all that was the issue here. I have not tried attaching this yet since I have had the 009s here. I was scared - I know its bad news if you put that wire on term 15. |
|
|
|
| jaredmcginness |
Oct 10 2020, 06:00 PM
Post
#8
|
|
... Group: Members Posts: 509 Joined: 12-June 19 From: Baltimore Member No.: 23,209 Region Association: MidAtlantic Region |
Here is a picture with the cap off.
I installed per one of my books (How to Keep your VW Alive) I felt like this was backwards when I put this new dizzy in (from the FI dizzy last time) But it said to make sure the filed notch is pointed towards cyl #1 Photo pointing at the notch. (IMG:http://www.914world.com/bbs2/uploads_offsite/i.imgur.com-23209-1602374401.1.jpg) |
|
|
|
| rhodyguy |
Oct 10 2020, 06:13 PM
Post
#9
|
|
Chimp Sanctuary NW. Check it out. Group: Members Posts: 22,252 Joined: 2-March 03 From: Orion's Bell. The BELL! Member No.: 378 Region Association: Galt's Gulch |
Try one terminal clockwise.
Attached thumbnail(s) 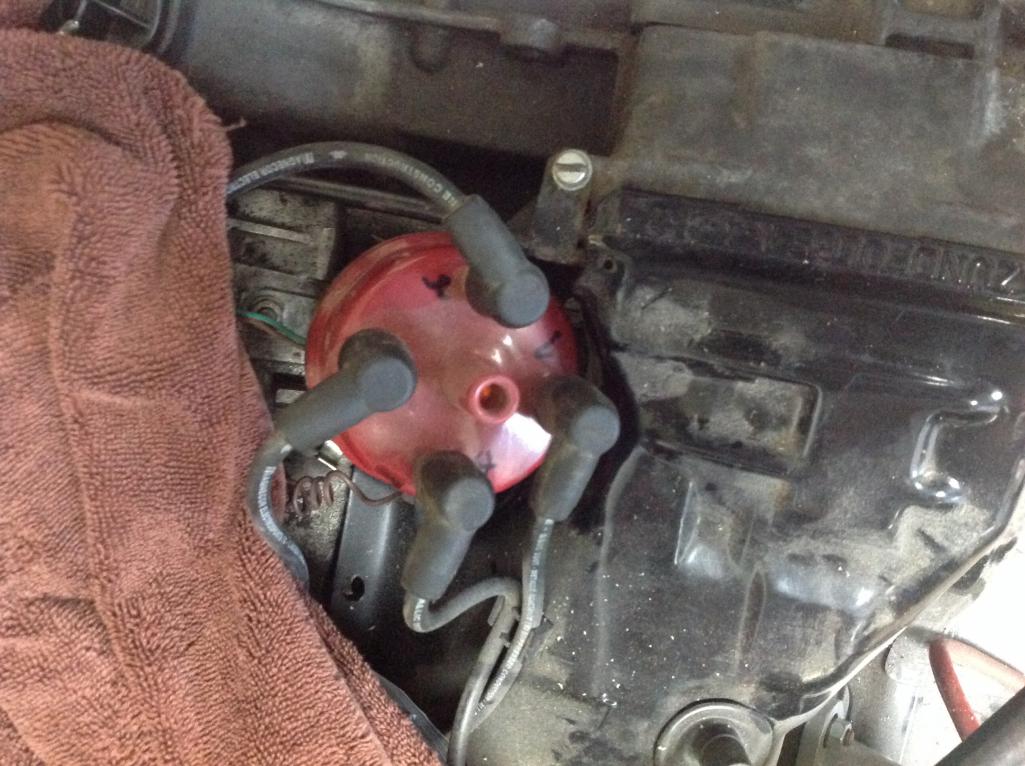
|
|
|
|
| type2man |
Oct 10 2020, 06:30 PM
Post
#10
|
|
Member Group: Members Posts: 355 Joined: 3-March 09 From: Miami, Fl Member No.: 10,127 Region Association: South East States |
Remove the passenger valve cover (the one opposite side of the distributor) and spin the engine until the front three valves (closest to the flywheel) have lash. Now look at where the distributor rotor is pointing and align it with the notch. This will be number one cylinder. Then install the wires clockwise 1-4-3-2. It should start.
|
|
|
|
| ndfrigi |
Oct 10 2020, 07:19 PM
Post
#11
|
|
Advanced Member Group: Members Posts: 2,970 Joined: 21-August 11 From: Orange County Member No.: 13,474 Region Association: Southern California |
|
|
|
|
| jaredmcginness |
Oct 10 2020, 07:46 PM
Post
#12
|
|
... Group: Members Posts: 509 Joined: 12-June 19 From: Baltimore Member No.: 23,209 Region Association: MidAtlantic Region |
QUOTE(type2man @ Oct 10 2020, 08:30 PM) Remove the passenger valve cover (the one opposite side of the distributor) Quick clarification needed here @type2man Passenger valve cover is on the SAME side as the distributor.... correct? Unless my motor installs backwards, the passenger side is the dizzy side. With the drivers side valve cover off, my drive gear keyway marks are 180* off. I don’t want to get confused and pull my drive gear out, if it was right to begin with. Thanks! |
|
|
|
| nditiz1 |
Oct 10 2020, 10:14 PM
Post
#13
|
|
Senior Member Group: Members Posts: 1,262 Joined: 26-May 15 From: Mount Airy, Maryland Member No.: 18,763 Region Association: MidAtlantic Region |
Even if the distributor gear is out of factory spec, the engine will still run correctly as long as the timing is correct and the plug wires are in the correct locations.
|
 |
|
| Tbrown4x4 |
Oct 10 2020, 11:57 PM
Post
#14
|
|
Senior Member Group: Members Posts: 708 Joined: 13-May 14 From: Port Orchard, WA Member No.: 17,338 Region Association: None |
I should stay the hell out of this, but I have to ask. Who told you the coil doesn't need a ground?
Tony tried to steer you right, but the hammer was too small. An ignition coil has three terminals: positive, negative and the high voltage terminal. Positive is battery voltage with the key in the run position. The negative terminal is a ground circuit THROUGH the ignition points. The coil wire plugs into the high voltage terminal and the center terminal of the distributor. The condenser is wired to the points to keep the points from burning. When the distributor points are closed, current flows from the positive terminal through the primary coil windings to ground, creating a magnetic field. When the points open, the ground circuit is lost. The magnetic field collapses, and induces a current in the secondary coil windings which produce the beautiful spark the engine requires to run. Your Pertronix distributor should have a red wire to the coil positive, and a black wire to the coil negative. Condenser not needed. |
|
|
|
| Superhawk996 |
Oct 11 2020, 07:33 AM
Post
#15
|
|
914 Guru Group: Members Posts: 7,573 Joined: 25-August 18 From: Woods of N. Idaho Member No.: 22,428 Region Association: Galt's Gulch |
QUOTE(Tbrown4x4 @ Oct 11 2020, 01:57 AM) I should stay the hell out of this, but I have to ask. Who told you the coil doesn't need a ground? Tony tried to steer you right, but the hammer was too small. An ignition coil has three terminals: positive, negative and the high voltage terminal. Positive is battery voltage with the key in the run position. The negative terminal is a ground circuit THROUGH the ignition points. The coil wire plugs into the high voltage terminal and the center terminal of the distributor. The condenser is wired to the points to keep the points from burning. When the distributor points are closed, current flows from the positive terminal through the primary coil windings to ground, creating a magnetic field. When the points open, the ground circuit is lost. The magnetic field collapses, and induces a current in the secondary coil windings which produce the beautiful spark the engine requires to run. Your Pertronix distributor should have a red wire to the coil positive, and a black wire to the coil negative. Condenser not needed. (IMG:style_emoticons/default/agree.gif) I may be lost by all the churn in this thread. I see a whole lot of parts swapping going on without a logical apprach. If the issue was no spark why all the dizzy swapping and disucssion about valves, distributor poistions, etc. PM me if you want detailed help. I will provide my phone number and will walk with you though this to trouble shoot in a methodical way to get your off center if you haven't already figured this out. |
|
|
|
| jaredmcginness |
Oct 11 2020, 09:57 AM
Post
#16
|
|
... Group: Members Posts: 509 Joined: 12-June 19 From: Baltimore Member No.: 23,209 Region Association: MidAtlantic Region |
Thanks for the offer Superhawk. Before I saw that post, I made some progress.
I stripped all the wiring off the test stand, re did all of my grounds, unhooked my test gauges (Incase something was funny wiring-wise) Layed everything out. I put the motor to TDC, piston #1 fully out. Straw method. (I did notice that my drive gear was offset... large side on the right, maybe I installed at the top of #3... it was a few months ago) Regardless of this the rotor points towards one. I installed the Bosch Blue coil with Pertronix. Aligned the notch with the rotor. Plugs 1, 4, 3, 2. Got spark on every plug. Hooked up my 3psi mechanical fuel pump, with a filter inline. Cranked the motor it immediately fired up. Runs for about 30 seconds before cutting out. I am going out to check timing and make sure my carb is clean. (IMG:style_emoticons/default/beerchug.gif) |
|
|
|
| Superhawk996 |
Oct 11 2020, 10:47 AM
Post
#17
|
|
914 Guru Group: Members Posts: 7,573 Joined: 25-August 18 From: Woods of N. Idaho Member No.: 22,428 Region Association: Galt's Gulch |
(IMG:style_emoticons/default/biggrin.gif)
Sweet it sounds like you’ve got it under control and you’re making progress! |
|
|
|
| ndfrigi |
Oct 11 2020, 11:49 AM
Post
#18
|
|
Advanced Member Group: Members Posts: 2,970 Joined: 21-August 11 From: Orange County Member No.: 13,474 Region Association: Southern California |
nice! keep it going and continue sharing also or update your original build thread. Congratulations!
|
|
|
|
| type2man |
Oct 12 2020, 09:11 PM
Post
#19
|
|
Member Group: Members Posts: 355 Joined: 3-March 09 From: Miami, Fl Member No.: 10,127 Region Association: South East States |
QUOTE(jaredmcginness @ Oct 10 2020, 09:46 PM) QUOTE(type2man @ Oct 10 2020, 08:30 PM) Remove the passenger valve cover (the one opposite side of the distributor) Quick clarification needed here @type2man Passenger valve cover is on the SAME side as the distributor.... correct? Unless my motor installs backwards, the passenger side is the dizzy side. With the drivers side valve cover off, my drive gear keyway marks are 180* off. I don’t want to get confused and pull my drive gear out, if it was right to begin with. Thanks! I meant the drivers side valve cover. My bad. At least you got it running. When it cuts out, look down the throat of the carb and press the throttle. The squirters should work about 5 times then run dry. This would mean, you're running out of fuel. If you are running those ICT's in the first pic, they are too small for a type4. |
|
|
|
| jaredmcginness |
Oct 13 2020, 09:59 AM
Post
#20
|
|
... Group: Members Posts: 509 Joined: 12-June 19 From: Baltimore Member No.: 23,209 Region Association: MidAtlantic Region |
QUOTE(type2man @ Oct 12 2020, 11:11 PM) I meant the drivers side valve cover. My bad. At least you got it running. When it cuts out, look down the throat of the carb and press the throttle. The squirters should work about 5 times then run dry. This would mean, you're running out of fuel. If you are running those ICT's in the first pic, they are too small for a type4. Cheers, thank you. I'm getting set up with a pair of Dellorto 40's. Much better matched carb. I appreciate the help. |
|
|
|
|
1 User(s) are reading this topic (1 Guests and 0 Anonymous Users)
0 Members:

|
Lo-Fi Version | Time is now: 7th December 2025 - 06:45 PM |
Invision Power Board
v9.1.4 © 2025 IPS, Inc.