|
|
|
Porsche, and the Porsche crest are registered trademarks of Dr. Ing. h.c. F. Porsche AG.
This site is not affiliated with Porsche in any way. Its only purpose is to provide an online forum for car enthusiasts. All other trademarks are property of their respective owners. |
|
|

  |

| betz |
 Oct 22 2020, 10:14 AM Oct 22 2020, 10:14 AM
Post
#1
|
|
Member  Group: Members Posts: 76 Joined: 22-October 18 From: San Leandro, CA Member No.: 22,593 Region Association: Northern California |
I did a lot of searching but none really have quite the same issue I'm having.
So I installed a new master cylinder a while back, wrestled around with the reservoir flared fittings into the grommets, etc etc, finally got it in somehow. FYI- this is a URO parts master cylinder. I am wary of URO parts not always being the best quality but the @UROpartsman seems to stand behind their products and makes revisions based on feedback so I trust it well enough. So anyways, got it installed, but it was leaking just small little drops from the reservoir fitting towards the front of the car. Enough to drain the reservoir overnight. Did some searching and saw that many people forget the washers. But also see the Uro master cylinder has them pre-installed as of a recent revision. I take the safe road and buy a couple of washers, right part number genuine porsche. Pull out my master cyl again, pull out the grommets, of course it already had washers in there. Since I got this far I replaced the washers anyways, and reinstall everything. NOW, it doesn't drip drop. It's a constant stream, leaking like a sieve. Front fitting again, the back one if it leaks, doesn't leak nearly as much. I wrestle with the fittings even more and may have gotten it down to a profuse drop. But the fittings were pushed all the way into the cylinder as far as I could tell! No amount of wrestling got them any further. And I was pushing into it pretty hard. Seems like maybe the angle had an effect on how much it was leaking. But is it really to the point that you need to just get them in just perfect or else it will leak? Seems like normal driving could move it around. I would think it's just, if it's in it's in. My solution for now is I guess I'll buy new grommets? I'm just wondering if there's any case that that the flare fitting is only partially seated, or did I just wrestle with it too much and somehow damage the grommets? How can I tell it's seated? Anyways I got some Ate brand grommets on the way since that's the only thing I could think of causing the leak. Would appreciate any insight, thanks. |
   |

 
|
| UROpartsman |
Oct 22 2020, 11:04 AM
Post
#2
|
|
Member Group: Members Posts: 291 Joined: 22-October 15 From: Simi Valley, CA Member No.: 19,288 Region Association: None |
QUOTE(betz @ Oct 22 2020, 09:14 AM)  But is it really to the point that you need to just get them in just perfect or else it will leak? Hi Betz, unfortunately that's the case; for a good seal against the neck of the flare and around the tubing, the line must be completely seated with the flare between the stand-off washer and the bottom of the grommet. It is very difficult to do given the tight quarters. If the flare isn't pushed all the way through the grommet, the flare will spread the ID of the grommet and create a leak path. Hopefully starting fresh with new grommets and a bit of practice under your belt will mean success on your next attempt. Please PM us if you have any questions. |
|
|
|
| betz |
Oct 22 2020, 11:54 AM
Post
#3
|
|
Member Group: Members Posts: 76 Joined: 22-October 18 From: San Leandro, CA Member No.: 22,593 Region Association: Northern California |
QUOTE(UROpartsman @ Oct 22 2020, 10:04 AM) Hi Betz, unfortunately that's the case; for a good seal against the neck of the flare and around the tubing, the line must be completely seated with the flare between the stand-off washer and the bottom of the grommet. It is very difficult to do given the tight quarters. If the flare isn't pushed all the way through the grommet, the flare will spread the ID of the grommet and create a leak path. So basically, the flare needs to be right up against the washer, with the rubber right above / around it? Should I try working the grommet around the flare to help it seat? So, normally when this is installed. Is the hard part getting the flare into the grommet, or getting the flare all the way into the grommet? |
|
|
|
| UROpartsman |
Oct 22 2020, 12:11 PM
Post
#4
|
|
Member Group: Members Posts: 291 Joined: 22-October 15 From: Simi Valley, CA Member No.: 19,288 Region Association: None |
QUOTE(betz @ Oct 22 2020, 10:54 AM) So basically, the flare needs to be right up against the washer, with the rubber right above / around it? Exactly, see attached image. The flare needs to be squeezed between the washer and the bottom of the grommet. We've actually heard of guys with welders making a custom Channel-Lock style tool to help pull the lines down through the grommets without damaging the tubing, it takes quite a bit of force. QUOTE(betz @ Oct 22 2020, 10:54 AM) So, normally when this is installed. Is the hard part getting the flare into the grommet, or getting the flare all the way into the grommet? Getting it through the grommet is the hard part. While pulling down the tubing, you might feel a final "give" when the flare escapes the ID of the grommet. Attached image(s) 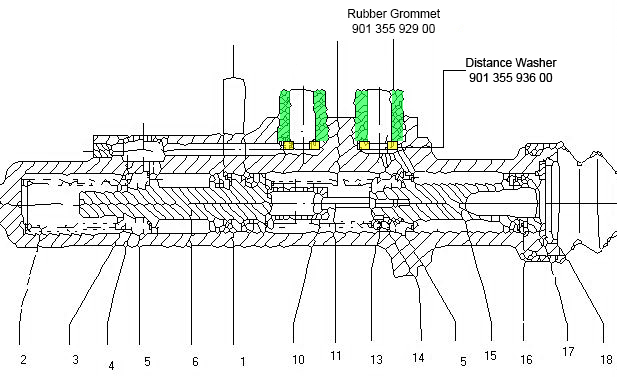
|
|
|
|
| betz |
Oct 22 2020, 12:32 PM
Post
#5
|
|
Member Group: Members Posts: 76 Joined: 22-October 18 From: San Leandro, CA Member No.: 22,593 Region Association: Northern California |
Thank you, I really appreciate the info. Do you know the approximate depth so maybe I could mark it on the tubing? from bottom of flare / top of washer to top of grommet. If you don't that's ok. Again, thanks for the info!!
|
|
|
|
| Craigers17 |
Oct 22 2020, 04:38 PM
Post
#6
|
|
Senior Member Group: Members Posts: 728 Joined: 5-August 17 From: Rome, GA Member No.: 21,317 Region Association: South East States |
.....this is only my 2 cents.....and this was my first rodeo on the whole m/c thing, so take it with a grain of salt. I couldn't get it seated from underneath....and I tore a grommet trying to do so.
I actually drained most of the gas tank, and, after removing the expansion part of the tank, I tilted it so that I could access the area underneath. Then I disconnected the plastic tubes where they meet the blue reservoir hoses and pulled them up through the top. This also makes it easier to install new grommets where the 2 lines go through the firewall. Anyhow, at that point, I installed the plastic lines and grommets into the m/c on the workbench(or, in my case, the top of a large recycle bin w/ plywood on top). If this is your first time, this method is not only easier, but it allows you to visually see what is going on as well, which usually helps me out. Then I fed the tubes back up through the bottom of the firewall and reconnected to the cluster and reservoir. Since I'm kinda clueless on this stuff, I can only describe the installation as slowly "tucking the grommet in" around the flare while applying pressure so that is seats. Although others have obviously pulled this off, after seeing the process from above so to speak, the only way I could see of doing it from below is if you put a 90 degree bend on a very small screwdriver so that you can tuck that grommet in. IIRC, there is an article on Pelican Parts which mentions this. Good luck! I'm sure someone will chime in and tell you why my post is nuts! |
|
|
|
| Mikey914 |
Oct 22 2020, 04:51 PM
Post
#7
|
|
The rubber man Group: Members Posts: 12,638 Joined: 27-December 04 From: Hillsboro, OR Member No.: 3,348 Region Association: None |
Not seeing it on your drawings but to work properly it should have an undercut
Attached thumbnail(s) 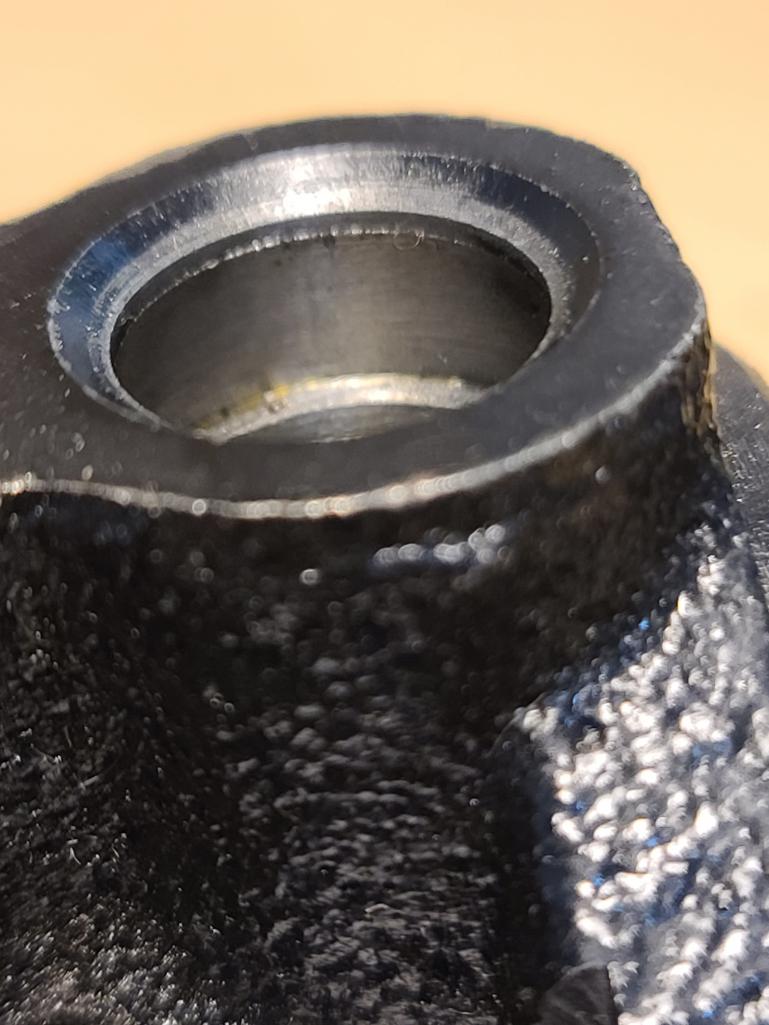
|
|
|
|
| Mikey914 |
Oct 22 2020, 04:55 PM
Post
#8
|
|
The rubber man Group: Members Posts: 12,638 Joined: 27-December 04 From: Hillsboro, OR Member No.: 3,348 Region Association: None |
Looks like your grommets are not quite the same method of engagement either
Attached thumbnail(s) 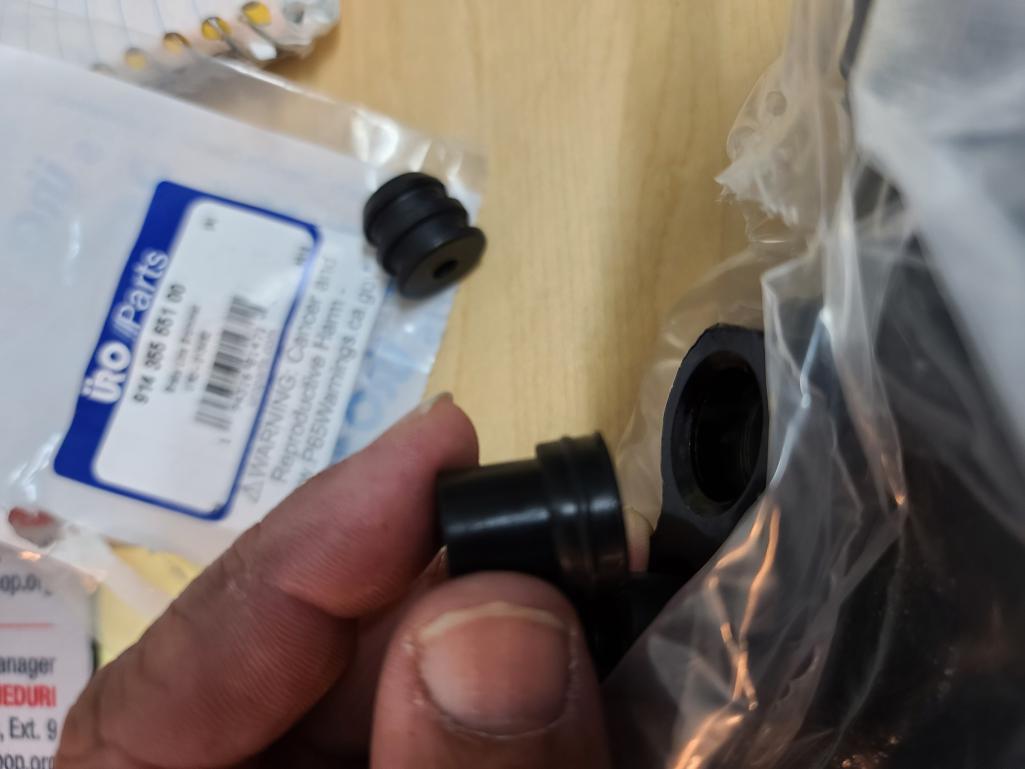
|
|
|
|
| betz |
Oct 22 2020, 05:14 PM
Post
#9
|
|
Member Group: Members Posts: 76 Joined: 22-October 18 From: San Leandro, CA Member No.: 22,593 Region Association: Northern California |
QUOTE(Craigers17 @ Oct 22 2020, 03:38 PM) .....this is only my 2 cents.....and this was my first rodeo on the whole m/c thing, so take it with a grain of salt. I couldn't get it seated from underneath....and I tore a grommet trying to do so. I actually drained most of the gas tank, and, after removing the expansion part of the tank, I tilted it so that I could access the area underneath. Then I disconnected the plastic tubes where they meet the blue reservoir hoses and pulled them up through the top. This also makes it easier to install new grommets where the 2 lines go through the firewall. Anyhow, at that point, I installed the plastic lines and grommets into the m/c on the workbench(or, in my case, the top of a large recycle bin w/ plywood on top). If this is your first time, this method is not only easier, but it allows you to visually see what is going on as well, which usually helps me out. Then I fed the tubes back up through the bottom of the firewall and reconnected to the cluster and reservoir. Since I'm kinda clueless on this stuff, I can only describe the installation as slowly "tucking the grommet in" around the flare while applying pressure so that is seats. Although others have obviously pulled this off, after seeing the process from above so to speak, the only way I could see of doing it from below is if you put a 90 degree bend on a very small screwdriver so that you can tuck that grommet in. IIRC, there is an article on Pelican Parts which mentions this. Good luck! I'm sure someone will chime in and tell you why my post is nuts! Interesting, might have to do that as a back up plan. Doesn't sound too difficult. I just read through the Pelican parts article and they seem to encourage taking off the grommet and slipping it over the lines and inserting both into the MC. It doesn't seem to be any easier, but at least it seems easier to tell that it has fully seated. Anyone try it this way? |
|
|
|
| UROpartsman |
Oct 22 2020, 05:29 PM
Post
#10
|
|
Member Group: Members Posts: 291 Joined: 22-October 15 From: Simi Valley, CA Member No.: 19,288 Region Association: None |
QUOTE(Mikey914 @ Oct 22 2020, 03:51 PM) Not seeing it on your drawings but to work properly it should have an undercut It's actually the drawing from the original Porsche PET system, which is probably why you didn't recognize the artwork. Our unit does indeed have the proper undercut, how else would the base of the grommet be retained inside the bore? QUOTE(Mikey914 @ Oct 22 2020, 03:55 PM) (IMG:http://www.914world.com/bbs2/uploads/post-3348-1603407312_thumb.jpg) Looks like your grommets are not quite the same method of engagement either Are you talking about the little bead toward the bottom? That bead isn't for engagement, it's to improve sealing. Our Master Cylinder Reservoir Grommet 901 355 929 00 is a terrific reproduction of the original ATE piece, but you're certainly free to make your grommets as different as you like. Thanks for sharing a photo of our Brake Line Grommet 914 355 651 00 (located at front and rear center tunnel bulkheads) which is available from Auto Atlanta, we appreciate it. |
|
|
|
| Craigers17 |
Oct 22 2020, 06:14 PM
Post
#11
|
|
Senior Member Group: Members Posts: 728 Joined: 5-August 17 From: Rome, GA Member No.: 21,317 Region Association: South East States |
"I just read through the Pelican parts article and they seem to encourage taking off the grommet and slipping it over the lines and inserting both into the MC. It doesn't seem to be any easier, but at least it seems easier to tell that it has fully seated. Anyone try it this way?"
....I probably wasn't clear on that point, but, Yes, ....I took the grommets out of the m/c first, fed them onto the steel flare until the end of the flare was flush with the end of the grommet. Then inserted both flare & grommet while applying pressure and working the grommet in simultaneously with a dull screwdriver to push it into the m/c. |
|
|
|
| betz |
Oct 22 2020, 06:53 PM
Post
#12
|
|
Member Group: Members Posts: 76 Joined: 22-October 18 From: San Leandro, CA Member No.: 22,593 Region Association: Northern California |
Hopefully this helps someone out, but I measured the length of the grommet to be 0.664" on my calipers.
Took out my master again, I don't know per se if this is the issue, but it looks like my (front) grommet has some damage - maybe from putting it in and out? I didn't use any tools on it and wasn't really overly aggressive taking it out but this is how it looks. Thinking I'm best off replacing it either way: (IMG:http://www.914world.com/bbs2/uploads_offsite/i.imgur.com-22593-1603414415.1.jpg) And not entirely sure what the discussion above is about but this is what the top of my master looks like... (IMG:http://www.914world.com/bbs2/uploads_offsite/i.imgur.com-22593-1603414416.2.jpg) |
|
|
|
| Mikey914 |
Oct 22 2020, 09:32 PM
Post
#13
|
|
The rubber man Group: Members Posts: 12,638 Joined: 27-December 04 From: Hillsboro, OR Member No.: 3,348 Region Association: None |
The correct Rubber is tough, It shouldn't dissolve. I'm thinking you reused the old one???
lf it's new. That could be a sign of an incorrect material being used. |
|
|
|
| betz |
Oct 22 2020, 11:01 PM
Post
#14
|
|
Member Group: Members Posts: 76 Joined: 22-October 18 From: San Leandro, CA Member No.: 22,593 Region Association: Northern California |
QUOTE(Mikey914 @ Oct 22 2020, 08:32 PM) The correct Rubber is tough, It shouldn't dissolve. I'm thinking you reused the old one??? lf it's new. That could be a sign of an incorrect material being used. It's from the new master. It was sort of flaking/ scraping off rather than dissolving. My old master was one big rust stick.. wouldn't ever think of re-useing those seals. |
|
|
|
| Tbrown4x4 |
Oct 23 2020, 12:09 AM
Post
#15
|
|
Senior Member Group: Members Posts: 702 Joined: 13-May 14 From: Port Orchard, WA Member No.: 17,338 Region Association: None |
I have Mark's 19mm master cylinder. Used the original style, not the "easy" style.
I unstrapped the brake fluid reservoir and pulled the hoses down to give me some working room. I lubed the grommets and pipe flares with Permatex 24125 Ceramic Extreme Brake Parts Lubricant. This is the purple grease that Eric Shea uses in his caliper rebuild video. It was a tight fit, but went in without issue. I even used a pressure bleeder to bleed the brakes after with no leaks. |
|
|
|
| 76-914 |
Oct 23 2020, 05:38 AM
Post
#16
|
|
Repeat Offender & Resident Subaru Antagonist Group: Members Posts: 13,490 Joined: 23-January 09 From: Temecula, CA Member No.: 9,964 Region Association: Southern California |
A flaring block clamped on the tube allows you to pull the tube in square and snug. It was a few months back but if IRRC, 5/16” size for OEM tube and 3/8” size for the tube supplied with 914rubber’s tube. I tried to pass this info on to 914rubber but they never bothered calling me back. (IMG:style_emoticons/default/confused24.gif)
|
|
|
|
| Mikey914 |
Oct 23 2020, 08:31 AM
Post
#17
|
|
The rubber man Group: Members Posts: 12,638 Joined: 27-December 04 From: Hillsboro, OR Member No.: 3,348 Region Association: None |
1st I’ve head about it. PM me the specifics. I did the initial testing and spec on materials so if there is an issue do let me know. Also let me know how you tried to reach me so I can see why we have a black hole in our system.
|
|
|
|
| UROpartsman |
Oct 23 2020, 09:12 AM
Post
#18
|
|
Member Group: Members Posts: 291 Joined: 22-October 15 From: Simi Valley, CA Member No.: 19,288 Region Association: None |
QUOTE(betz @ Oct 22 2020, 05:53 PM) Took out my master again, I don't know per se if this is the issue, but it looks like my (front) grommet has some damage - maybe from putting it in and out? The lip in the bore is beveled on top to make it easier to insert the grommets, but it's quite sharp on the bottom edge (since the grommets are consumables and aren't meant to be removed and reinstalled), so removing the grommets could scrape them like that. We do sell Master Cylinder Reservoir Grommet 901 355 929 00 separately, and would be happy to send you a pair so you can start fresh. We'll send you a PM. |
|
|
|
| betz |
Oct 23 2020, 09:41 AM
Post
#19
|
|
Member Group: Members Posts: 76 Joined: 22-October 18 From: San Leandro, CA Member No.: 22,593 Region Association: Northern California |
QUOTE(Tbrown4x4 @ Oct 22 2020, 11:09 PM) I have Mark's 19mm master cylinder. Used the original style, not the "easy" style. I unstrapped the brake fluid reservoir and pulled the hoses down to give me some working room. I lubed the grommets and pipe flares with Permatex 24125 Ceramic Extreme Brake Parts Lubricant. This is the purple grease that Eric Shea uses in his caliper rebuild video. It was a tight fit, but went in without issue. I even used a pressure bleeder to bleed the brakes after with no leaks. Just picked up some of this. Needed some of this stuff anyways for my brake pads! Lube the pole and the hole as they say... |
|
|
|
| betz |
Oct 25 2020, 10:15 AM
Post
#20
|
|
Member Group: Members Posts: 76 Joined: 22-October 18 From: San Leandro, CA Member No.: 22,593 Region Association: Northern California |
Just received the new Ate grommets I ordered before I even started this thread. The height of them is 0.695" so a little longer than the Uro ones. The rubber seems to be a little stiffer also.
|
|
|
|
|
1 User(s) are reading this topic (1 Guests and 0 Anonymous Users)
0 Members:

|
Lo-Fi Version | Time is now: 25th April 2024 - 06:50 AM |
Invision Power Board
v9.1.4 © 2024 IPS, Inc.