|
|
|
Porsche, and the Porsche crest are registered trademarks of Dr. Ing. h.c. F. Porsche AG.
This site is not affiliated with Porsche in any way. Its only purpose is to provide an online forum for car enthusiasts. All other trademarks are property of their respective owners. |
|
|

  |

| iankarr |
 Nov 29 2020, 02:49 PM Nov 29 2020, 02:49 PM
Post
#1
|
|
The wrencher formerly known as Cuddy_K  Group: Members Posts: 2,567 Joined: 22-May 15 From: Heber City, UT Member No.: 18,749 Region Association: Intermountain Region |
Hey Guys,
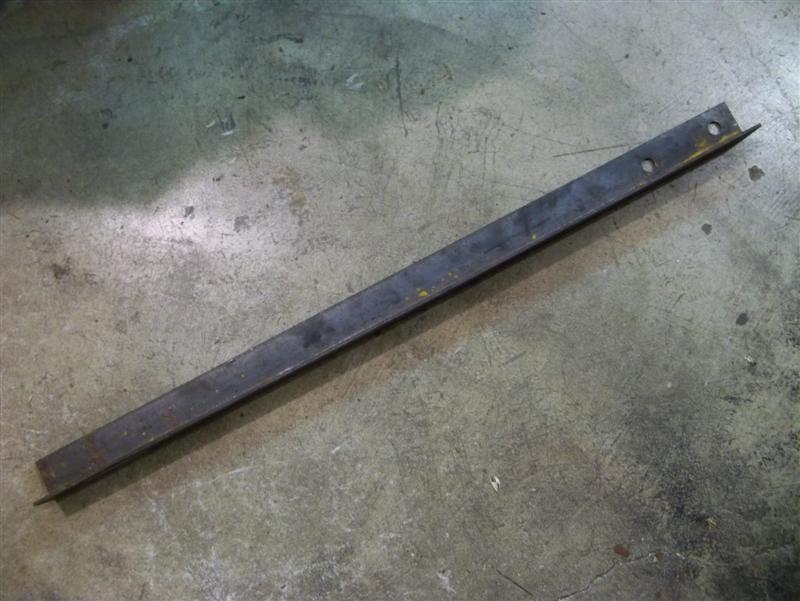
It's new video Sunday and the the battle of the bolts has begun! In this episode I remove the brakes and prep them for @eric_shea . also pull the axles, press out the hubs and bearings and get the trailing arms ready for powder coating. Whew! https://www.youtube.com/watch?v=VFLyAjA_XYM |
   |

 
|
| MM1 |
Nov 29 2020, 03:07 PM
Post
#2
|
|
914 obsession continues Group: Members Posts: 619 Joined: 9-May 18 From: Thousand Oaks, CA Member No.: 22,105 Region Association: Southern California |
Thanks, Ian! Perfect timing for me.
|
|
|
|
| 914werke |
Nov 29 2020, 06:07 PM
Post
#3
|
|
"I got blisters on me fingers" Group: Members Posts: 11,314 Joined: 22-March 03 From: USofA Member No.: 453 Region Association: Pacific Northwest |
|
|
|
|
| iankarr |
Nov 29 2020, 07:36 PM
Post
#4
|
|
The wrencher formerly known as Cuddy_K Group: Members Posts: 2,567 Joined: 22-May 15 From: Heber City, UT Member No.: 18,749 Region Association: Intermountain Region |
Very cool tool / setup, Rich. Wish I had that rig a few days ago. More proof that the knowledgebase here is amazing.
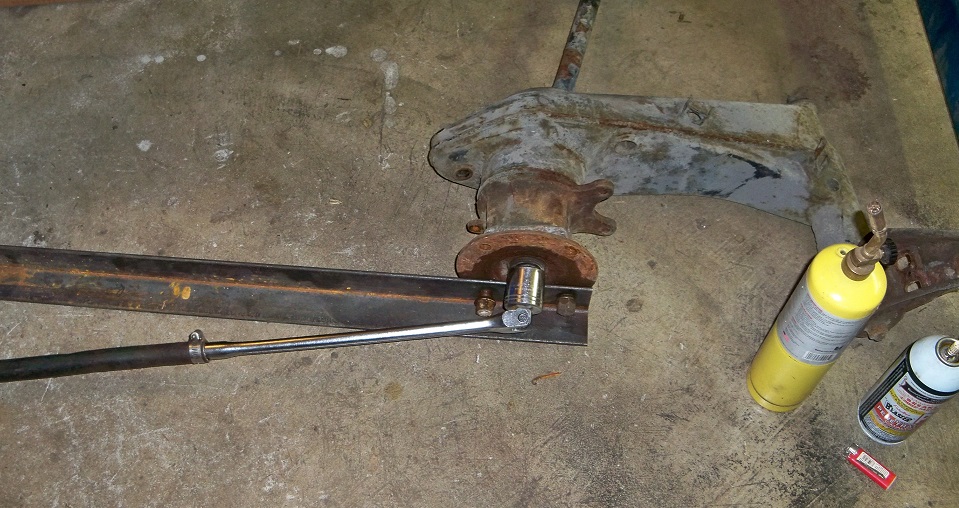
I think part of the reason why I had to cut the nut is because the car is just a roller. I put all my weight on a breaker bar and also tried a pipe extension. Two things happened...1) the breaker bar bent to the point that I was sure it would snap. And 2) the car actually jumped on the lift. Unfortunately the camera wasn't rolling for that, but it was pretty scary. If the car had an engine and was fully weighted, I'm pretty sure a beefier breaker bar would've done the trick. But as a roller, the forces applied were enough to move the car before the bolt. Setting the entire trailing arm on the ground and immobilizing the hub with angle is a genius idea. |
|
|
|
| FlacaProductions |
Nov 29 2020, 08:03 PM
Post
#5
|
|
Senior Member Group: Members Posts: 1,976 Joined: 24-November 17 From: LA Member No.: 21,628 Region Association: Southern California |
Great stuff, Ian - again.
One question - is your right rear bumper "tit" on correctly? Looks like it's bowing out to the right? Can't see the left on - maybe they're swapped? |
|
|
|
| VegasRacer |
Nov 29 2020, 09:12 PM
Post
#6
|
|
ELVIRA Group: Benefactors Posts: 8,902 Joined: 27-March 03 From: Between Scylla and Charybdis Member No.: 481 Region Association: None |
Thanks for another great video Ian. (IMG:style_emoticons/default/smilie_pokal.gif)
I really enjoyed all of the destruction in this episode. (IMG:style_emoticons/default/happy11.gif) (IMG:style_emoticons/default/smash.gif) (IMG:style_emoticons/default/sawzall-smiley.gif) (IMG:style_emoticons/default/smash.gif) |
|
|
|
| iankarr |
Nov 29 2020, 09:31 PM
Post
#7
|
|
The wrencher formerly known as Cuddy_K Group: Members Posts: 2,567 Joined: 22-May 15 From: Heber City, UT Member No.: 18,749 Region Association: Intermountain Region |
QUOTE(FlacaProductions @ Nov 29 2020, 09:03 PM)  Great stuff, Ian - again. One question - is your right rear bumper "tit" on correctly? Looks like it's bowing out to the right? Can't see the left on - maybe they're swapped? What? You don’t like tits that point sideways? Great eye. The body shop mixed em up when they put the bumper on and I told them to just leave it. I’m gonna make swapping them the very last thing I do. |
|
|
|
| mepstein |
Nov 29 2020, 09:54 PM
Post
#8
|
|
914-6 GT in waiting Group: Members Posts: 19,990 Joined: 19-September 09 From: Landenberg, PA/Wilmington, DE Member No.: 10,825 Region Association: MidAtlantic Region |
Next time- More heat, paraffin on the threads while they are hot and alternate directions on the impact. I promise doing these three things will get the fastener loose.
I don't use breaker bars when the car is on a lift or jackstands. |
|
|
|
| iankarr |
Nov 29 2020, 10:37 PM
Post
#9
|
|
The wrencher formerly known as Cuddy_K Group: Members Posts: 2,567 Joined: 22-May 15 From: Heber City, UT Member No.: 18,749 Region Association: Intermountain Region |
Thanks, Mark. I learned my lesson about breaker bars on the lift with this one for sure. I did try both directions on the impact. I guess maybe even more heat. Paraffin sounds interesting.
In hindsight, I should've asked you guys before I took to the dremel (IMG:style_emoticons/default/wink.gif) |
|
|
|
| JOEPROPER |
Nov 30 2020, 09:57 AM
Post
#10
|
|
The answer is "no" unless you ask... Group: Members Posts: 1,208 Joined: 21-November 15 From: White Plains New York Member No.: 19,387 Region Association: North East States |
Another great video! I'm impressed with the fact that you have press in your home shop. Very useful tool. Also, if you need a little more umph from your impact gun, you cold put a few drops of air tool oil on the air inlet and give it another shot. Good stuff Ian. Looking forward to the next one. Thanks
|
|
|
|
| Cairo94507 |
Nov 30 2020, 10:49 AM
Post
#11
|
|
Michael Group: Members Posts: 10,399 Joined: 1-November 08 From: Auburn, CA Member No.: 9,712 Region Association: Northern California |
Hello Ian,
I love your video series. You are an excellent tutor and your videos make it look so simple I want to do another 914! Great work and thank you. Cheers, Michael (IMG:style_emoticons/default/beerchug.gif) |
|
|
|
| bdstone914 |
Nov 30 2020, 10:55 AM
Post
#12
|
|
bdstone914 Group: Members Posts: 5,060 Joined: 8-November 03 From: Riverside CA Member No.: 1,319 |
@iankarr
Good video. My technique for getting the big nut loose is to use a piece of chain to restrain the rotation of the hub. Use a lug bolt thru a link to attach the chain to the hub. Wrap the chain around the trailing arm and bolt the chain to itself. Rotate the hub to tighten the chain. It makes the impact much more effective by making it a true impact rather than a cushioned blow. Works on or off of the car. To hold the hub for reinstallation on a painted T arm I cover the chain in an old bike inner tube. I leave the shock connected until the nut is removed to control any movement of the arm. You can use chain as small as 9/16 if you elongate the end links to accept a 14mm bolt. If the caliper is off you can use a shorter chain and attach one end to a caliper mounting hole and one end to a hub hole. Some can be totally stuck. I got a 3/4 air impact to remove them and have still had ones I cant remove. I use a 4 inc angle grinder with a thin blade to cut straight into the stud axle and nut. If I get the nut of without damage I remove the washer and start the nut on backwards with the castle part inward. spin on the nut until it is flush with the end of the stub axle. Hold one hammer against the stud and strike that hammer with another hammer. I minimizes damage to the nut and stud axle threads. If you are going to use your press to remove the pivot shaft here is how i do it. Screw on a 14mm nut onto the threads on the shaft. place a deep well socket on nut. Place the setup in the press. Heat both ends of the trailing arm around the bushing until it smokes. Then press it far enough the clear the first bushing. reverse the arm and press it back the other way. It can also be done with a gear puller to push the shaft for those that do not have a press. If you do not have good ventilation heat the metal to at least 160 F ( check with IR heat gun ). Rubber smoke is not pleasant to breath. Be careful to not let the busing get pressed inside of the arm. Done that too and they are nut fun to fish out. |
 |
|
| bbrock |
Nov 30 2020, 11:36 AM
Post
#13
|
|
914 Guru Group: Members Posts: 5,269 Joined: 17-February 17 From: Montana Member No.: 20,845 Region Association: Rocky Mountains |
Anyone who can say, "I find when I run out of patience..." with that kind of smile on their face has mechanical skills that I sorely lack. Thanks for another great vid! (IMG:style_emoticons/default/beerchug.gif)
|
|
|
|
| pete000 |
Nov 30 2020, 12:21 PM
Post
#14
|
|
Senior Member Group: Members Posts: 1,887 Joined: 23-August 10 From: Bradenton Florida Member No.: 12,094 Region Association: South East States |
Real heat and leverage are your friends...
|
|
|
|
| PanelBilly |
Nov 30 2020, 01:33 PM
Post
#15
|
|
914 Guru Group: Members Posts: 5,907 Joined: 23-July 06 From: Kent, Wa Member No.: 6,488 Region Association: Pacific Northwest |
You need to pick up a dead blow hammer. HF has them for around $10. Its an plastic hammer filled with sand and it lets you bang on wrenches without the bounce back that the rubber hammers have. Much easier on the hands and very effective. The HF ones look like junk, but I've had mine for many years and its seen lots of use.
|
|
|
|
| iankarr |
Nov 30 2020, 08:53 PM
Post
#16
|
|
The wrencher formerly known as Cuddy_K Group: Members Posts: 2,567 Joined: 22-May 15 From: Heber City, UT Member No.: 18,749 Region Association: Intermountain Region |
Thanks for all the great tips, guys. These threads live forever and will serve to help others in the future. I'm changing the sub-title to "stuck stub axle nut" to make it more searchable. Glad you're enjoying the series. I really appreciate the feedback.
@Joeproper - Good to know. I did put some oil in the air inlet but had no idea that it made an...ahem...impact. I just did it cause I was beating the snot out of the tool (IMG:style_emoticons/default/wink.gif) @bdstone914 - The chain idea sounds great. Will definitely try that when the time comes to put these back on. @bbrock - That smile is medicated. You should've seen my face during the bolt battle. @panelbilly - Thanks...Now I can officially tell my wife that I DON'T have every tool known to mankind. And I have another reason to kill an hour or two at HF. |
|
|
|
| BillC |
Dec 3 2020, 04:44 PM
Post
#17
|
|
Senior Member Group: Members Posts: 678 Joined: 24-April 15 From: Silver Spring, MD Member No.: 18,667 Region Association: MidAtlantic Region |
QUOTE(iankarr @ Nov 29 2020, 03:49 PM) Hey Guys, It's new video Sunday and the the battle of the bolts has begun! In this episode I remove the brakes and prep them for @eric_shea . also pull the axles, press out the hubs and bearings and get the trailing arms ready for powder coating. Whew! https://www.youtube.com/watch?v=VFLyAjA_XYM Very nice video. One comment, though, on your technique: You should always use the box end of the wrench whenever possible, especially when trying to break loose stuck bolts and nuts. The difference is that the open end of the wrench only makes contact on two points of the hex, whereas the box end makes contact at 6 points -- gives you three times the ability to apply torque before you round-off the corners. It's especially important with bleeder nipples, since they are small diameter and rather soft, very easy to round off or even completely strip the hex. Also, the axle nuts are torqued to a ridiculously high value. Very few people have an impact gun with enough ooomph to get those nuts loose. You may want to consider getting a 6-foot breaker bar and a 3/4" drive socket for the next time -- I have actually broken 1/2" drive breaker bars at the square drive because it's just not quite big enough to handle the load. |
|
|
|
| 914Sixer |
Dec 3 2020, 05:12 PM
Post
#18
|
|
914 Guru Group: Members Posts: 9,204 Joined: 17-January 05 From: San Angelo Texas Member No.: 3,457 Region Association: Southwest Region |
I always start work on loosening the nut with the whole car on the ground. That will indicate to me where I am going to need to go.
|
|
|
|
| iankarr |
Dec 3 2020, 07:12 PM
Post
#19
|
|
The wrencher formerly known as Cuddy_K Group: Members Posts: 2,567 Joined: 22-May 15 From: Heber City, UT Member No.: 18,749 Region Association: Intermountain Region |
QUOTE(BillC @ Dec 3 2020, 05:44 PM) QUOTE(iankarr @ Nov 29 2020, 03:49 PM) Hey Guys, It's new video Sunday and the the battle of the bolts has begun! In this episode I remove the brakes and prep them for @eric_shea . also pull the axles, press out the hubs and bearings and get the trailing arms ready for powder coating. Whew! https://www.youtube.com/watch?v=VFLyAjA_XYM Very nice video. One comment, though, on your technique: You should always use the box end of the wrench whenever possible, especially when trying to break loose stuck bolts and nuts. The difference is that the open end of the wrench only makes contact on two points of the hex, whereas the box end makes contact at 6 points -- gives you three times the ability to apply torque before you round-off the corners. It's especially important with bleeder nipples, since they are small diameter and rather soft, very easy to round off or even completely strip the hex. Also, the axle nuts are torqued to a ridiculously high value. Very few people have an impact gun with enough ooomph to get those nuts loose. You may want to consider getting a 6-foot breaker bar and a 3/4" drive socket for the next time -- I have actually broken 1/2" drive breaker bars at the square drive because it's just not quite big enough to handle the load. Thanks for watching. I’m always open to suggestions. I do usually try to use the box end where possible but the area around rear caliper bolts didn’t have enough clearance. And my 7mm wrench doesn’t have a box end (the other side is 8mm). My impact has taken axle nuts off in the past (and the left side on this car), but this one was too tough. I recently got a 20V impact and I’m pretty sure it would’ve handled that. The instant torque of electric has me converted. Highly recommend. As usual, I fix the barn door after the horse has left. |
|
|
|
| mepstein |
Dec 3 2020, 07:54 PM
Post
#20
|
|
914-6 GT in waiting Group: Members Posts: 19,990 Joined: 19-September 09 From: Landenberg, PA/Wilmington, DE Member No.: 10,825 Region Association: MidAtlantic Region |
Ian - I have some restored plated axle nuts. If you'd like them, just PM me your address. No payment accepted. Unfortunately, I don't have the plated washers to go with them.
They are yellow zinc. I don't know if the color is correct but I won't tell. |
|
|
|
|
1 User(s) are reading this topic (1 Guests and 0 Anonymous Users)
0 Members:

|
Lo-Fi Version | Time is now: 30th July 2025 - 05:01 AM |
Invision Power Board
v9.1.4 © 2025 IPS, Inc.