|
|
|
Porsche, and the Porsche crest are registered trademarks of Dr. Ing. h.c. F. Porsche AG.
This site is not affiliated with Porsche in any way. Its only purpose is to provide an online forum for car enthusiasts. All other trademarks are property of their respective owners. |
|
|

 Model Specific Information
914/4: 70 71 72 73 74 75 76 914/6: 70 71 72
  |

| wonkipop |
 Feb 19 2021, 06:44 PM Feb 19 2021, 06:44 PM
Post
#21
|
|
914 Guru  Group: Members Posts: 5,550 Joined: 6-May 20 From: north antarctica Member No.: 24,231 Region Association: NineFourteenerVille |
FUEL FILTER AFTER PUMP.
having taken apart original style 3 port fuel pump, i think running a high pressure fuel filter after the pump is prudent. i currently have one installed after fitting 2 port inline pump to get the car running again. you should always have one in a 2 port install. its possible for small metal parts to make their way out of a failed or failing 3 port pump. i can see that now. the injectors could get jammed by metal fragments. managed to get a full set of NOS bosch injectors for the recommission so i want to look after them. i have a full flow filter fixed to the bracket that held the decal valve. don't have a decal valve, thats another story. the car has not had a decal valve in it since i have owned it - for 31 years. i think it was an emissions cheat installed during time of first owner. does not cause any problems. a fuel pressure regulator had been subbed in place of decal valve. never had backfire problems - it comes off throttle nicely. pressure regulator sub is zip-tied in position off a vacuum hose to the vapor can. i will make a little bracket to mount if off the fuel filter location with the fuel filter. fuel filter addition and replacement of plastic fuel lines is only non stock mod i have done to the engine bay. i will be keeping it even if i put the 3 port pump back in. 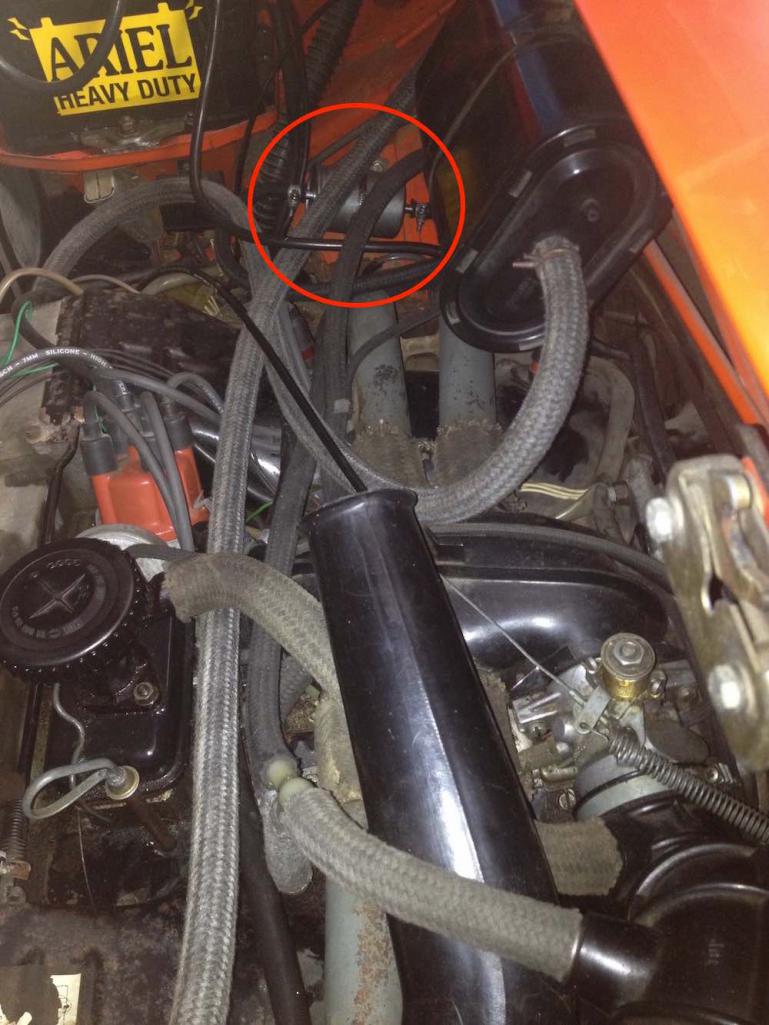 |
   |

 
|
| wonkipop |
Feb 21 2021, 05:31 PM
Post
#22
|
|
914 Guru Group: Members Posts: 5,550 Joined: 6-May 20 From: north antarctica Member No.: 24,231 Region Association: NineFourteenerVille |
just noticed that auto atlanta has rebuilt 009 type fuel pumps listed.
price with a core is very fair in the USA. having taken one apart and put it back together, if i added up hours. not to mention ever present f%^k up factor risk. different story for aus. cost to ship a core to usa, convert pesos to real dollars, potential customs/gst tax hit on import, general decline in covid world shipping times/increased shipping costs probably means rebuilt pump could be a 1K peso hit here landed. and they might still be pesos but thats a lot. no one down here will rebuild them. given hours/effort, the AA deal is a good deal for usa owners if you have to have an original pump. |
|
|
|
| wonkipop |
Feb 25 2021, 10:50 PM
Post
#23
|
|
914 Guru Group: Members Posts: 5,550 Joined: 6-May 20 From: north antarctica Member No.: 24,231 Region Association: NineFourteenerVille |
test results.
under load. 009 (ex 914). achieving 34-35 PSI. flows 500ml - 27/28seconds. 005 (ex SAAB) achieving 38 psi. flows 500ml - 25 seconds. 005 has a slightly bigger intake port i have noticed than the two output ports, 009 has three ports same diam. might explain higher pressures/not sure? whatever was wrong with SAAB pump is fixed now, its almost an overachiever. specs from factory manual. operating pressure 32-38 psi. min flow 500ml in 30 seconds. been successful to this point. no leaks from joints/o-rings under test. its not impossible to re build one of these pumps. certainly no problem to tear one down and see if the brushes/commutator are still ok. if so, o-ring replacement will fix any leaks and its good to go again. medium worn commutator usually reconditionable with a simple machining down on a lathe. not hard to do if you have to. in the case of these two pumps commutator had only light wear. re-assembly of SAAB unit took less than a morning. once you have done one/ironed out glitches/technique takes no time to pull apart and put back together. will just research best way to long term store. flush out kerosine? etc. |
|
|
|
| JeffBowlsby |
Mar 3 2021, 10:58 AM
Post
#24
|
|
914 Wiring Harnesses & Beekeeper Group: Members Posts: 9,269 Joined: 7-January 03 From: San Ramon CA Member No.: 104 Region Association: None |
Nice work!
|
|
|
|
| wonkipop |
Mar 4 2021, 02:33 AM
Post
#25
|
|
914 Guru Group: Members Posts: 5,550 Joined: 6-May 20 From: north antarctica Member No.: 24,231 Region Association: NineFourteenerVille |
i have worked out how the pressure relief valve and check valve work.
all in one in these pumps. one little seat valve that is slotted does both functions.. the first section of the tubular valve is circular with a small rubber teat that sits into a valve seat. then there is a groove and a second groove. after the first groove the tube has a flat section that will allow fuel through. the two springs are progressive and fit inside each other. first small spring is for the normal operation of the pump and the check valve function. approx 35 psi or whatever is required for particular pump variant fully opens the check valve function by pushing the valve open against the first spring and opens up the port to the outlet or discharge port. the outlet is through the valve seat. if pressure builds past 35 ibs it floods the tube with the valve in it and pushes it further until it engages with the second larger spring. at 70lbs it pushes it far enough for fuel to flood past the front circular section and into the section with the flat part and then fuel escapes into the relief port. saab pump was good in that respect. the 009 out of the 914 took a fair bit of cleaning and even some honing by hand with 2000 grit sand paper wrapped around a drill bit to make the valve slide easily again in its cylindrical chamber. there was stubborn residual gum that even ultrasonic cleaning could not seem to dislodge. both pumps have been tested to pressure relief - 70lbs. both opened fully at that pressure and released through the relief port. these pumps are precision mechanisms and have 0 tolerance anywhere. i discovered reassembling 009 914 pump that the port body had lifted very slightly by less than 1mm against the outer motor casing on one side when i had reassembled and crimped. this was enough to bind the pump axle very slightly with the roller cell vane and cause the pump to not reach spec pressure the first time it was run. i realligned them and got it absolutely even all round - gave the crimps a bit more of a tap. was enough to lift the pump performance from marginal to upper end of spec. interesting stuff germans made. no slop anywhere. there is a bit of long axis play in the electric motor axle up and down, thats all and its designed to have it. the rest has to be exact. i found a cross section cut pump on the mercedes benz heritage website. shows pressure relief / check valve though does not necessarily make any clearer how it works. fuel moves through the tiniest of holes. the cross section pump has the valve located in the fully open fuel delivery position and on its way to the 70lb pressure relief position. a mercedes tech manual for late 60s models also contains tech information and specs on the three port pumps. this cutaway pump and the tech merc tech were the only source i was able to find. everything else deals with later in-line variant of the pumps. never had problems with vapor lock with this car before recent rebuilding of the fuel system and replacement of plastic tunnel/engine bay lines with mild steel. now i do. not major but car will on occasion require more than normal cranking to restart hot. i believe its not the pump doing this but the lines themselves. original plastic lines did not absorb/conduct heat like the metal ones do? i think fuel vaporizes in the section of line from the tunnel to the pump. a minor issue and i can live with it as the car does not refuse to restart. also figure if i change to front pump location this problem would still be there in that section of fuel line. will put the original pump back in the car and bag the spare saab pump with desiccant after pickling it. should easy last me to the end. best information i can find says to pickle them with shellite (or i think its called mineral spirits in the usa) - then cap them. still can't find anyone to rebuild the merc pump commutator. its a lost industry. even ten years ago there were shops around that rebuild starter motors, esp, for trucks. they have all disappeared - retired. either australia really has become a nation of soft handed screen punchers or cheap chinese parts ruined viability. electric cars are going to be interesting. rebuilding / reconditioning electric motors might become a sought after skill again? 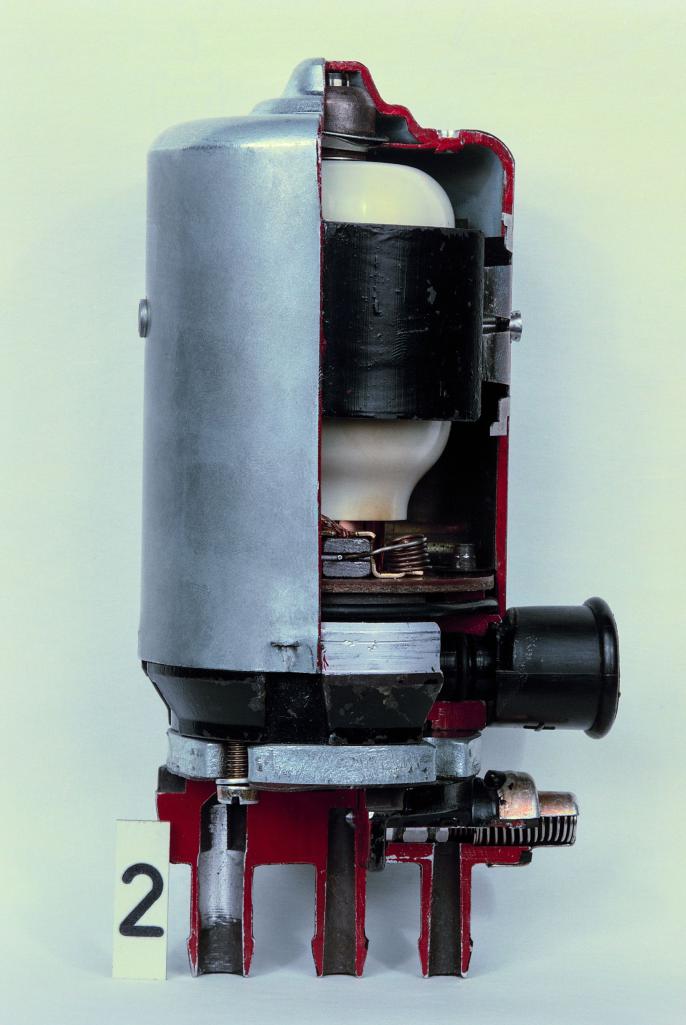 |
|
|
|
| wonkipop |
May 11 2021, 03:24 AM
Post
#26
|
|
914 Guru Group: Members Posts: 5,550 Joined: 6-May 20 From: north antarctica Member No.: 24,231 Region Association: NineFourteenerVille |
epilogue -
i was given a bosch 0580 960 004 fuel pump predating the 005 unit i had from a 74 SAAB and my own 009 unit from the 74 1.8. this pump originally came out of a VW type 3 FI fastback. D jet. it had 72 written on it in paint. so i assume that was the model year. slightly different set of serial numbers - 960 instead of 463, but specs for flow/pressure must be similar as its for VW D Jet. it had been left in a shed for at least 30 years and not stored properly. i opened it up to see what state it was in - assuming it was kaput big time. its of the type i have seen before in images. full shrouds around the electric motor armature. which i think of as turbulence shrouds. (but could also be around ideas of spark arresting? - i don't really know, but these shrouds are dropped by the time of the 005 and later units. the pump itself was stuffed with corrosion jambing up the roller cell vane. digging in deeper most of the electric motor portion was still in reasonable condition with some surface corrosion. not that much wear on the commutator and brushes, so good for parts or if i feel like it building up into yet another spare if i could find a good port section. (for free of course because none of these pumps are worth buying). interestingly i found another difference in the earlier to later pumps. in the pressure relief valve section of the pump port assembly they arrangement of the springs is altered. the earlier version has the small check valve spring separated from the pressure relief spring by a little washer or spring seat. so the normal pressure, check valve spring fully compresses (theorectically) before it pushes the main pressure relief spring. in the later pumps the two springs simply sit inside each other and both compress against the aluminium end cap. in the later pumps when the check valve spring is half compressed the little sliding valve then engages with the pressure relief spring and then it is compressed to relieve fuel into the return port. interesting how they continue to improve and modify this pump design and its mostly by leaving things out as they go and making it simpler. i can see why they might have started to delete the little seat between the two springs as it would cause the springs to act in unison which might be unpredictable compared to one spring acting on its own as a first stage and then there is a clear moment where the pressure relief spring is engaged and it compresses. more anachronistic and useless information, maybe helpful to anyone silly enough to be interested in restoring technology along with interior and exterior decor and finishes.  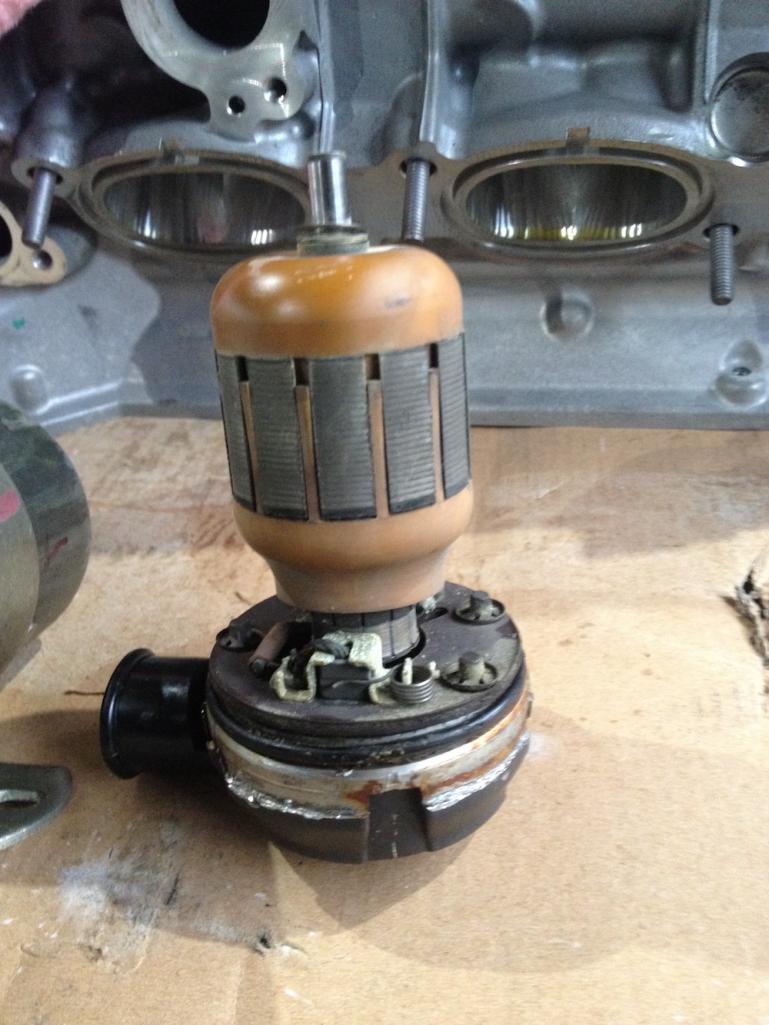 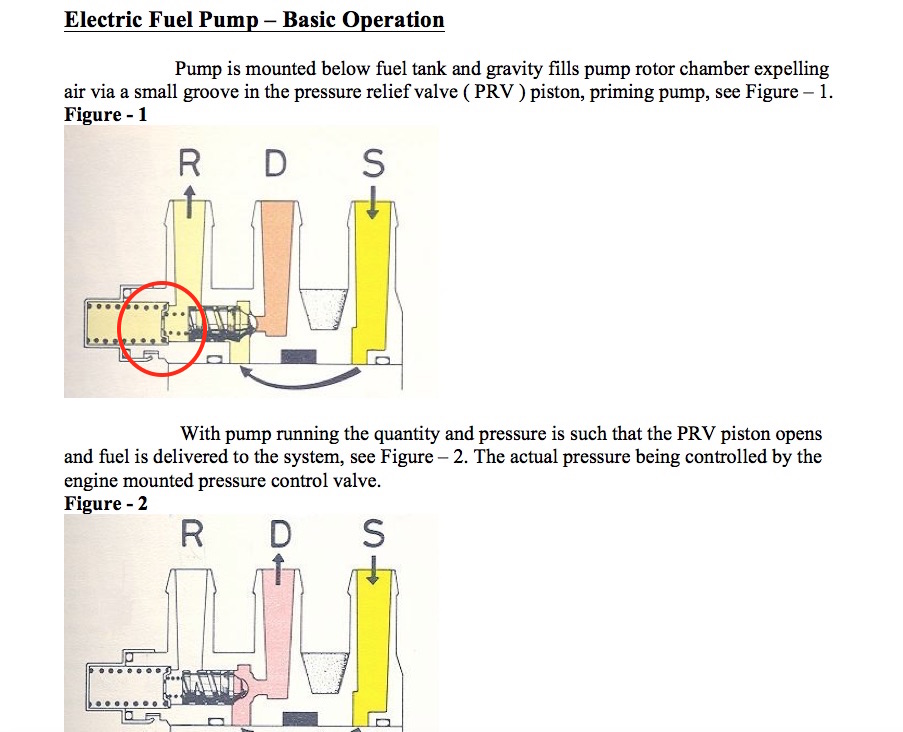 |
|
|
|
| Yellowbeard |
Feb 16 2025, 01:46 PM
Post
#27
|
|
Member Group: Members Posts: 53 Joined: 8-June 05 From: Northwest Arkansas Member No.: 4,229 |
I'm working on a similar problem in the US. I've been looking for the O-rings for the face plates (the easiest to get to ones as those seem to fail the most for me).
My part Number is VW 0 580 463 007 FWIW. Looks like it was used in D and L Jetronic fuel systems so that jives. Worth noting that my fuel pump is also licensed to kill. Well, I guess they all are but mine is ACTUALLY James Bond so.... (IMG:style_emoticons/default/wink.gif) Here are some sizes that might be helpful: The SAE size appears to be: 1-1/4"x1-3/8" The diameter of the ring cross section looks like .070. The standard name for this part seems to be AS568-026 The metric standard size appears to be 2-026 Here's a handy size chart: https://www.rocketseals.com/o-ring-size-chart/ Here's a version of this part at Napa: https://www.napaonline.com/en/p/BK_7272026 If you're in a pinch, Danco (faucet parts) makes an O-ring in this size called the #82. They can sometimes be found at plumbing supply places. In all my research I also found that you can just buy an O-ring splicing kit (something I'd never heard of) and make your own. Here is an example of that at Amazon: https://a.co/d/b7cTwcq Just FYI, I haven't actually tried any of these yet because it's Sunday and I can't get any of them. They don't appear to be available locally for me in any event but at least it gives folks something to search for. I will update once I actually get something from somewhere and try it. ***EDIT*** Here's what I actually ended up ordering from Grainger: https://www.grainger.com/product/O-Ring-Bun...41UJ75?opr=ILOF |
|
|
|
|
1 User(s) are reading this topic (1 Guests and 0 Anonymous Users)
0 Members:

|
Lo-Fi Version | Time is now: 13th June 2026 - 07:56 PM |
Invision Power Board
v9.1.4 © 2026 IPS, Inc.