|
|
|
Porsche, and the Porsche crest are registered trademarks of Dr. Ing. h.c. F. Porsche AG.
This site is not affiliated with Porsche in any way. Its only purpose is to provide an online forum for car enthusiasts. All other trademarks are property of their respective owners. |
|
|

  |

| Wew |
 Jan 31 2021, 07:21 PM Jan 31 2021, 07:21 PM
Post
#1
|
|
Member  Group: Members Posts: 227 Joined: 17-January 15 From: Novato, ca Member No.: 18,335 Region Association: None |
I have given it the college try and then some.
Setting my pushrod lengths is just not working. Too many setbacks and challenges to list. Can anyone on this forum recommend someone in the Bay Area ca, that is experienced at working on 2056 motors. Much appreciated. Gary |
   |

 
|
| windforfun |
Jan 31 2021, 07:33 PM
Post
#2
|
|
Senior Member Group: Members Posts: 1,791 Joined: 17-December 07 From: Blackhawk, CA Member No.: 8,476 Region Association: None |
QUOTE(Wew @ Jan 31 2021, 05:21 PM)  I have given it the college try and then some. Setting my pushrod lengths is just not working. Too many setbacks and challenges to list. Can anyone on this forum recommend someone in the Bay Area ca, that is experienced at working on 2056 motors. Much appreciated. Gary Daniel or Tony at EuroQuatro in Mtn. View. George at Adolph's Auto in San Ramon. These guys are from Europe & have been working on 914s since they were teenagers. |
|
|
|
| Wew |
Jan 31 2021, 10:28 PM
Post
#3
|
|
Member Group: Members Posts: 227 Joined: 17-January 15 From: Novato, ca Member No.: 18,335 Region Association: None |
Thank you for the info.
(IMG:style_emoticons/default/headbang.gif) |
|
|
|
| Jake Raby |
Jan 31 2021, 11:50 PM
Post
#4
|
|
Engine Surgeon Group: Members Posts: 9,394 Joined: 31-August 03 From: Lost Member No.: 1,095 Region Association: South East States |
What is the issue? You are setting the valve train geometry, correct?
|
|
|
|
| VaccaRabite |
Feb 1 2021, 10:44 AM
Post
#5
|
|
En Garde! Group: Admin Posts: 13,444 Joined: 15-December 03 From: Dallastown, PA Member No.: 1,435 Region Association: MidAtlantic Region |
Echo Jake.
Tell us what you were doing. Once you get the first one right, the rest pretty much are easy. Sometimes just stepping away from a problem for a day is all it takes to solve it. You come back fresh and everything clicks. Zach |
|
|
|
| Wew |
Feb 1 2021, 12:15 PM
Post
#6
|
|
Member Group: Members Posts: 227 Joined: 17-January 15 From: Novato, ca Member No.: 18,335 Region Association: None |
Hi all,
Thanks for the encouragement. I had a hard time setting the rockers on the studs and sliding down into the head. I started with cylinder 1 intake, but when I set the rockers to the actual head it pushed down the intake, maybe all the way. When I tried to rotate the motor, with the dial in place on the valve, no dice, wouldn't budge. I removed the rockers and it moves nicely with some light resistance. After standing back and looking at this, I was like, F it, nothing is working. I have spent a couple of days reading through Jake's write up. Watching a few videos and reading some more. Thinking about it now, maybe the elephant feet were adjusted all the way down so as soon as I tried to set the rockers in the lifter (installed) and the push rod moved the valve all the way down. What I didn't do was loosen the adjustment on the elephant foot. I hope what I am saying is clear. I am still perplexed on why I couldn't turn the motor over, and where I am going wrong other than adjusting the valve and moving the elephant foot snug with the rocker arm. I did have the 1.7 rocker arms machined so I did have the .060 removed. Thanks for the encouragement. Gary |
|
|
|
| VaccaRabite |
Feb 1 2021, 01:07 PM
Post
#7
|
|
En Garde! Group: Admin Posts: 13,444 Joined: 15-December 03 From: Dallastown, PA Member No.: 1,435 Region Association: MidAtlantic Region |
When you slide the rockers on they should be loose. You should be able to have the rocker fully bolted down but still loose enough to get the adjustable pushrod in and out. The elephant feet need to be within a thread of all the way screwed in, with the top of the "foot" near the rocker. You should have to turn the adjuster stem slightly to reach "zero gap" and snug everything up.
This is one of those situations where a picture might say a 1000 words. If your adjusters are screwed out a good bit, you will be very very tight for sure. Zach |
|
|
|
| Wew |
Feb 1 2021, 07:08 PM
Post
#8
|
|
Member Group: Members Posts: 227 Joined: 17-January 15 From: Novato, ca Member No.: 18,335 Region Association: None |
I will start with the cam shaft and it’s grind. This is what is installed.
Web Cam Type 4 Camshaft, 73/86 Split Duration Grind, (In/Ex) 262/270 Duration, .426/.423" Lift), Solid Lifters [Cam Clearancing:No Cam Clearancing] [Lobe Center:108 Degree Lobe Center(Standard)] I do not have a caliper large enough to measure the pushrod in Centimeters. I tried a loose translation with my tape measure from inches to cm. 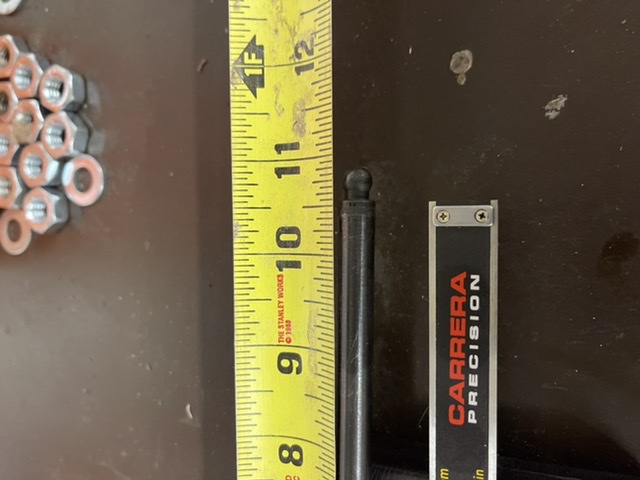 The adjustable rod was too long even screwed all the way down it seemed to create too much friction. See pic of elephant foot with gouge after two 360 degree turns. 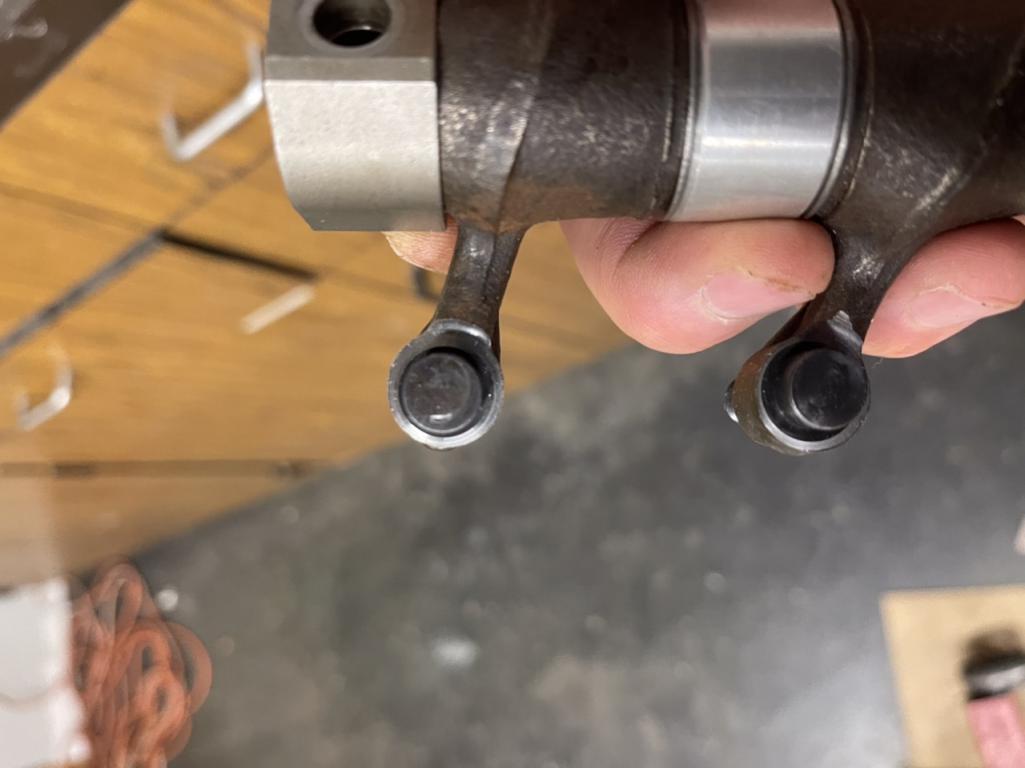 I removed one of the nuts on the adjustable rod to shorten it, so I could complete a rotation without marring the foot. I have the adjustable feet turned all the way in. I.e. provide as much of a gap as possible. At what I believe is top dead center the intake valve spring for cylinder one is all the way up. 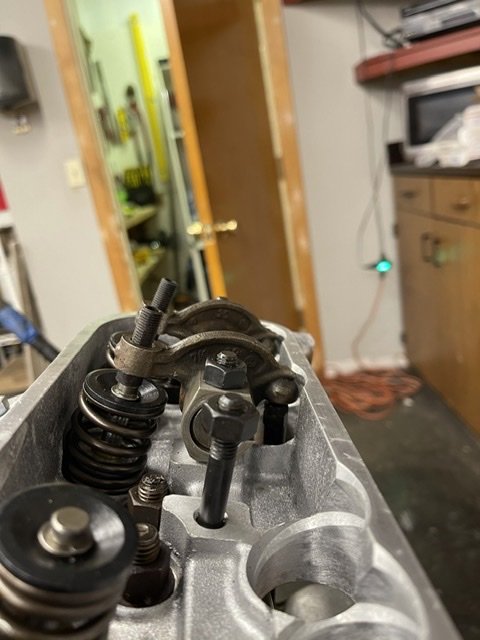 I have not set up the dial yet as I seem to be so far away from actually doing this properly. You may also notice in the pictures that the rockers are not tightened down all the way. Note, still a very slight off the gap off the head which once tightened all the way will squeeze things even more. I have attached some images and hopefully give you all a better idea of what I am wrestling with and the next best steps to complete or throw in the towel. Let me know if there are any other photos you would like to see that could be helpful. Thanks again for all the help and input. Gary |
|
|
|
| Wew |
Feb 2 2021, 09:44 AM
Post
#9
|
|
Member Group: Members Posts: 227 Joined: 17-January 15 From: Novato, ca Member No.: 18,335 Region Association: None |
So, after more reading and more videos, I am going to give it another go.
My understanding is that I am timed properly as my distributor rotor is on the notch on the the housing and both number 1 intake and exhaust are all the way open. I.E. both valve springs are up. I will hook up the dial to it and do the full rotation and read that distance and compare to what is stated on the camshaft specs. If all works out, my next step is to get the intake valve at the halfway point, with the front and the rear of the rocker on the same plane, with zero lash and the pushrod snug with no up and down play, but it should be able to spin. That would be the correct length for the pushrod...I think.. Does this sound like I am on the right track? Thanks for the input. |
|
|
|
| Wew |
Feb 2 2021, 12:01 PM
Post
#10
|
|
Member Group: Members Posts: 227 Joined: 17-January 15 From: Novato, ca Member No.: 18,335 Region Association: None |
QUOTE(Jake Raby @ Jan 31 2021, 09:50 PM) What is the issue? You are setting the valve train geometry, correct? Yes Jake, I am setting the valve train geometry. I have been following your type 4 engine rebuild DVD. Would never have made it this far without your instructional DVD. I have also read through your write up and have read it many times in order to wrap my head around the process. This is the first time for me doing something like this and I am not naturally mechanical. I have read through different explanations and watched some videos, and that has certainly helped. Since I have nothing to compare what I am doing I have no clue on if I am doing something so wrong as I am going to grenade my rebuild engine. Definitely want to avoid that. I had some nice heads built and have done the entire bottom end of the motor. The rocker arm shaft with the bolt down attachments on each end are still a little tough to wiggle on and off. I have the 1.7 rockers that were ground down. Are all of these rockers the same or is there a specific intake and exhaust rocker arm? If so, how do you identify? Thanks for all your information. Appreciate it. Gary |
|
|
|
| iankarr |
Feb 2 2021, 05:55 PM
Post
#11
|
|
The wrencher formerly known as Cuddy_K Group: Members Posts: 2,473 Joined: 22-May 15 From: Heber City, UT Member No.: 18,749 Region Association: Intermountain Region |
Were you able to set the adjustable pushrod to 27.1cm as a starting point, as Jake described in his writeup? and are you following this one...(post 8)?
http://www.914world.com/bbs2/index.php?showtopic=229571 |
 |
|
| Wew |
Feb 4 2021, 11:49 PM
Post
#12
|
|
Member Group: Members Posts: 227 Joined: 17-January 15 From: Novato, ca Member No.: 18,335 Region Association: None |
Hi Ian,
I am following the write up. Getting closer. I am enjoying your engine rebuild posts, as I had the same problem you have with crankshaft resistance after I assembled the case. My problem was the oils pump contacting the cover making the extra friction. After rocker balancing is complete I will move onto transmission. This has been a 5 year project and needs to get done for a spring reveal. Thanks for everyone’s time and input. All the knowledge sharing is amazing on this forum. Gary |
|
|
|
|
1 User(s) are reading this topic (1 Guests and 0 Anonymous Users)
0 Members:

|
Lo-Fi Version | Time is now: 19th May 2024 - 02:51 PM |
Invision Power Board
v9.1.4 © 2024 IPS, Inc.