|
|
|
Porsche, and the Porsche crest are registered trademarks of Dr. Ing. h.c. F. Porsche AG.
This site is not affiliated with Porsche in any way. Its only purpose is to provide an online forum for car enthusiasts. All other trademarks are property of their respective owners. |
|
|


| worn |
 Feb 24 2021, 10:40 AM Feb 24 2021, 10:40 AM
Post
#1
|
|
can't remember  Group: Members Posts: 3,153 Joined: 3-June 11 From: Madison, WI Member No.: 13,152 Region Association: Upper MidWest |
See last post. Welding and rubber sealant removal coming to the end. Thanks.
Haven't been very active for a couple of years. Partly because the 911 has taken up my time. So I am finally getting around to rust repair on my '76. The floors have rusted through so I have been working on the layer cake that makes up the right side longitudinal, focused on the hell region. The rust has affected both the inner pieces as well as the outer ones, and it is concentrated where all of the pieces come together. 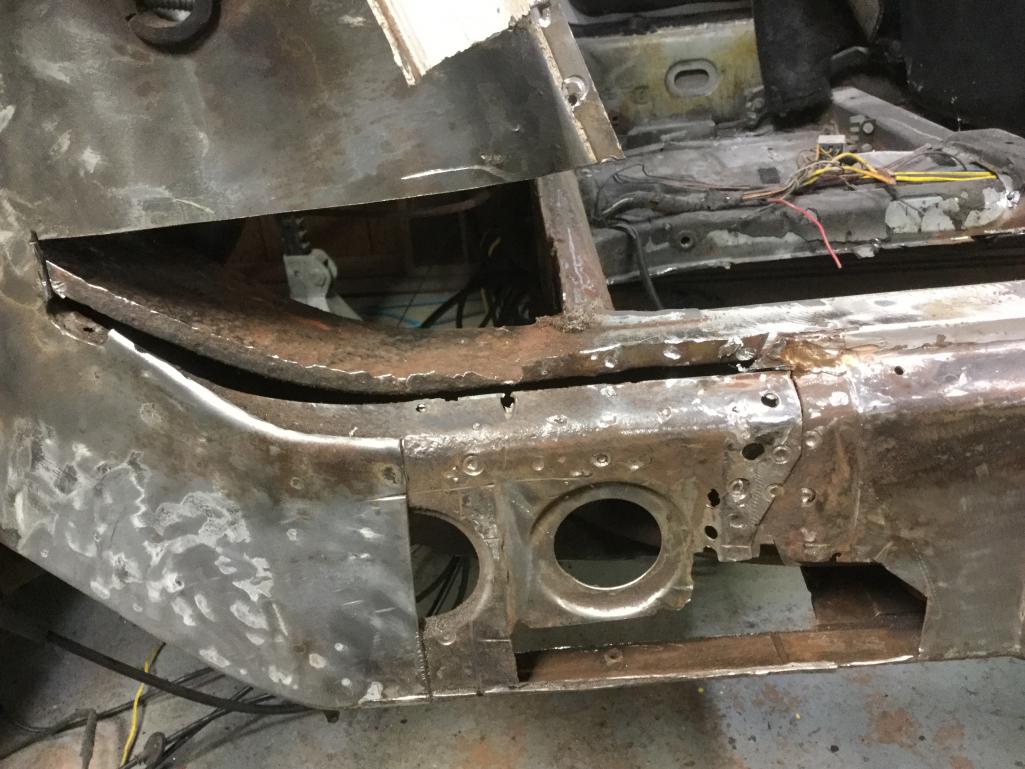 I have cut away the pitted and perforated metal. My question is as follows. I am addressing the problem by restoring each piece to produce a longitudinal as it came from the factory. For example.  In this case I made a piece to restore the tab of the forward inner layer of the outside long. Then I added a piece to restore the rear inner layer piece the overlaps: 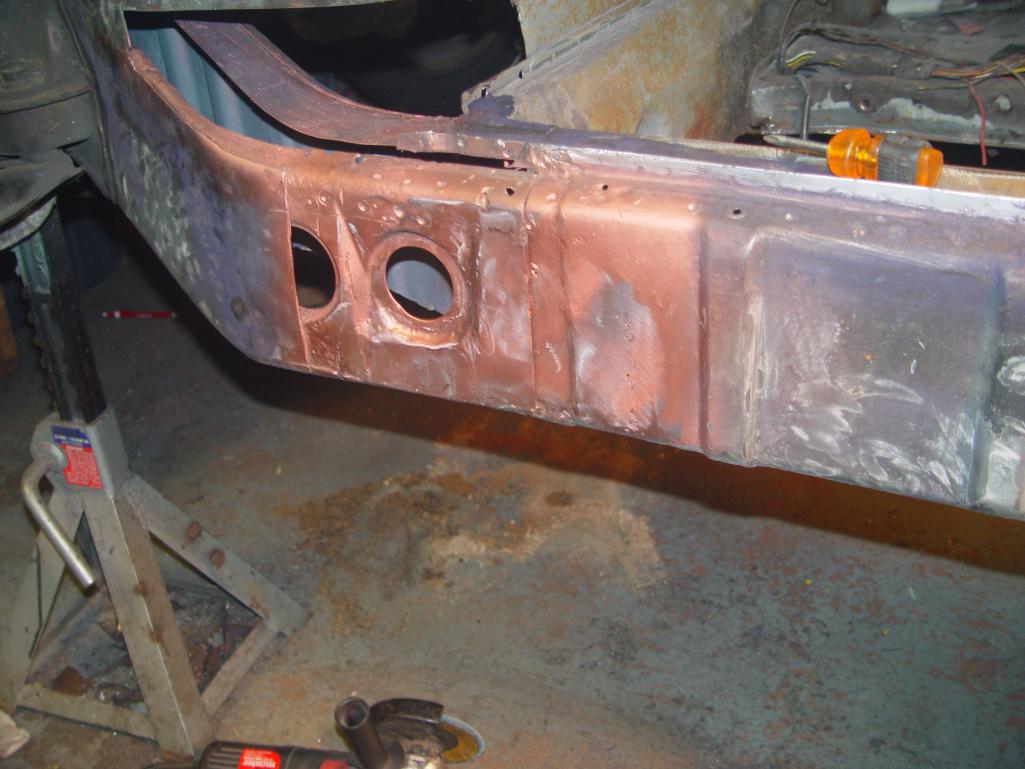 Then I have made a patch for the outer wheel house piece to produce the outer layer. The patches are butt welded to good metal on the original pieces and shaped to reproduce the originals. Here is the question. Is this really best practice? For example, instead of making a bunch of pieces that join together to match the original I could use a single sheet that replaces them all at once. With fewer butt welds and seams. My method so far has been heavily influenced by threads from people I admire here on the world. You folks make nice welds. |
   |

 
|
  |
Replies
| mbseto |
Feb 26 2021, 01:58 PM
Post
#2
|
|
Senior Member Group: Members Posts: 1,253 Joined: 6-August 14 From: Cincy Member No.: 17,743 Region Association: North East States |
In my experience, fitting a patch takes about the same amount of time regardless of the size of the patch. So three small patches might take three times as long as one big patch that covers the whole area.
I also like the idea of minimizing welds, which is what you get from a larger patch. And in these layered areas, avoiding having a weld in one layer lined up with a weld in another layer. Of course I picked up all this from the more experienced guys on this forum. |
|
|
|
| Root_Werks |
Feb 26 2021, 05:15 PM
Post
#3
|
|
Village Idiot Group: Members Posts: 8,315 Joined: 25-May 04 From: About 5NM from Canada Member No.: 2,105 Region Association: Pacific Northwest |
QUOTE(mbseto @ Feb 26 2021, 11:58 AM)  In my experience, fitting a patch takes about the same amount of time regardless of the size of the patch. So three small patches might take three times as long as one big patch that covers the whole area. I also like the idea of minimizing welds, which is what you get from a larger patch. And in these layered areas, avoiding having a weld in one layer lined up with a weld in another layer. Of course I picked up all this from the more experienced guys on this forum. (IMG:style_emoticons/default/agree.gif) I've learned from others over the years replacing larger pre-made sections can be less work than patching a number of smaller areas. Plus, it just looks cleaner in the end. Grinding.....grinding, ugh. |
|
|
|
| worn |
Feb 26 2021, 08:51 PM
Post
#4
|
|
can't remember Group: Members Posts: 3,153 Joined: 3-June 11 From: Madison, WI Member No.: 13,152 Region Association: Upper MidWest |
QUOTE(Root_Werks @ Feb 26 2021, 03:15 PM) QUOTE(mbseto @ Feb 26 2021, 11:58 AM) In my experience, fitting a patch takes about the same amount of time regardless of the size of the patch. So three small patches might take three times as long as one big patch that covers the whole area. I also like the idea of minimizing welds, which is what you get from a larger patch. And in these layered areas, avoiding having a weld in one layer lined up with a weld in another layer. Of course I picked up all this from the more experienced guys on this forum. (IMG:style_emoticons/default/agree.gif) I've learned from others over the years replacing larger pre-made sections can be less work than patching a number of smaller areas. Plus, it just looks cleaner in the end. Grinding.....grinding, ugh. Thanks to all who replied. The way the rust worm turns it seems that all of the rust ends up at the overlap pieces that made up the original. Both inside and outside longitudinal pieces were in turn made up of inner and outer sections. The spot welds produce a wonderfully strong unit. In my case each and every piece has the last couple of inches rusted off. That is why I have started down the road of restoring each end one at a time. Just spent a day in a frozen garage trying to avoid setting my car harts on fire. Making progress. My big problem now is dealing with the moat of metal on either side of the weld beam. Pictures tomorrow but the basic problem comes when trying to grind the welds flat. Bright middle, with dark edges, and then bright surroundings. The area around the weld has shrunk. Any solutions? Thanks folks! |
|
|
|
Posts in this topic
 worn "elluva a hole. Still welding after all these years... Feb 24 2021, 10:40 AM
 Root_Werks That is no light project! I have digging into... Feb 25 2021, 10:51 AM SirAndy Here is the question. Is this really best practic... Feb 25 2021, 10:57 AM
 Superhawk996
Personally, i like to weld as little as possible... Feb 26 2021, 06:00 PM worn
[quote name='SirAndy' post='2894532' date='Feb 25... Feb 27 2021, 01:04 PM worn
FWIW -- RD panels are Galvaneal. The Zinc that... Feb 27 2021, 01:25 PM worn Typically the right side of the car has less rust ... Mar 19 2021, 05:52 AM worn The inner strengthening piece holds the seat belt ... Mar 26 2021, 09:32 AM worn The outer shell of the inner long is thinner: 18 g... Mar 26 2021, 09:45 AM ssuperflyoldguy Use Cold Galvi weld thru primer instead of red - r... Feb 26 2021, 03:41 PM jaredmcginness Your repair is great! Nice work so far. Keep u... Feb 28 2021, 07:45 AM worn Made some progress this week. Got the wheel house... Mar 4 2021, 11:29 AM worn The floor carries many items for use on the new fl... Mar 4 2021, 11:50 AM worn After spending a few hours on my back on the froze... Mar 4 2021, 12:05 PM worn I have been measuring the door gap after every pat... Mar 10 2021, 11:27 AM 930cabman Nice looking work and it appears your project was ... Mar 26 2021, 12:15 PM worn
Nice looking work and it appears your project was... Mar 26 2021, 07:54 PM Shivers Nice work. Mar 27 2021, 08:29 AM FourBlades Great repair job! :beer2:
You are on a roll... Mar 27 2021, 08:56 AM worn
Great repair job! :beer2:
You are on a rol... Mar 31 2021, 08:47 AM worn Been awhile but in the mean time I have been remod... Jan 11 2022, 01:27 PM worn The jack point has to be located such that it line... Jan 11 2022, 01:32 PM worn Back to the right side. Spent some time fiddling ... Jan 11 2022, 01:36 PM worn Speaking of RD wonders, here is the rear part of t... Jan 11 2022, 01:44 PM mb911
Speaking of RD wonders, here is the rear part of ... Jan 11 2022, 01:55 PM worn
That was a killer on mine. Bled through in a few... Jan 11 2022, 07:14 PM JeffBowlsby
The jack point has to be located such that it lin... Jan 11 2022, 02:13 PM worn
I just found this thread. Is this Creamsicle on... Jan 11 2022, 07:08 PM 930cabman Why do we punish ourselves with this crap??
Great... Jan 12 2022, 09:01 AM worn As the Brits would say, I offered up the floor to ... Jan 12 2022, 09:49 AM worn
I know that I usually have to do some work on the... Mar 13 2022, 10:55 AM worn I have some advice to those who try this sort of t... Apr 6 2022, 02:53 PM bkrantz You're not the only one who got started, found... Apr 6 2022, 08:21 PM worn The trunk floor supplied by RD is made for the ear... May 23 2022, 09:58 AM worn This is the trunk floor after some welding.
I mad... May 23 2022, 10:05 AM worn I found that rust often lurks behind the rubber se... May 23 2022, 10:07 AM 914werke :welder: :headbanger: Dedication May 23 2022, 10:23 AM flyer86d Wow! Nice work.
Charlie May 23 2022, 02:20 PM brant Great job!! May 23 2022, 06:06 PM worn
Great job!!
Thanks folks! The piece... May 23 2022, 06:18 PM Dion Wow, way to go Warren. That was a task. Well done. May 24 2022, 07:39 AM worn Kept hitting my head while backing out of the engi... May 25 2022, 10:58 AM worn Another hole found. I had to buy the B-pillar pre... May 25 2022, 11:04 AM worn You can buy the B-pillar, but not the piece of the... May 25 2022, 11:17 AM worn Into the big hole.
Not shown is the weldi... May 25 2022, 11:26 AM worn Why should the driver's side be any different?... May 25 2022, 11:34 AM worn The sail rusted where failed sealer met overlappin... May 26 2022, 09:47 AM worn Got most of the grime out of the front wheel wells... May 26 2022, 09:52 AM worn I still have some welding to do up in the bow, but... Jun 2 2022, 06:45 PM 76-914
I still have some welding to do up in the bow, bu... Jun 2 2022, 08:53 PM worn
I still have some welding to do up in the bow, b... Jun 3 2022, 08:16 AM 76-914
[quote name='76-914' post='3006103' date='Ju... Jun 4 2022, 08:01 PM worn Throughout this project I have found two tools rea... Jun 25 2022, 10:09 AM worn A curious thing about the car is the absence of fr... Jun 25 2022, 10:21 AM worn Here is another shot...ad nauseum I suppose. It s... Jun 25 2022, 11:01 AM worn Waited to replace the frunk floor so I could crawl... Jun 25 2022, 11:08 AM SirAndy A curious thing about the car is the absence of fr... Jun 25 2022, 11:51 AM worn That sounds pretty much like I thought but used th... Jun 25 2022, 03:20 PM worn .
:popcorn:
Those guys new style when they s... Jun 26 2022, 08:41 AM worn
.
:popcorn:
Those guys new style when they ... Jun 26 2022, 08:44 AM 930cabman
A curious thing about the car is the absence of f... Jun 26 2022, 07:26 AM 930cabman
Throughout this project I have found two tools re... Jun 27 2022, 06:07 PM 914fahrer Did you really look at the correct place ?Here is ... Jun 26 2022, 09:28 AM worn
Did you really look at the correct place ?Here is... Jun 27 2022, 08:35 AM
Superhawk996
Personally, i like to weld as little as possible... Feb 26 2021, 06:00 PM worn
[quote name='SirAndy' post='2894532' date='Feb 25... Feb 27 2021, 01:04 PM worn
FWIW -- RD panels are Galvaneal. The Zinc that... Feb 27 2021, 01:25 PM worn Typically the right side of the car has less rust ... Mar 19 2021, 05:52 AM worn The inner strengthening piece holds the seat belt ... Mar 26 2021, 09:32 AM worn The outer shell of the inner long is thinner: 18 g... Mar 26 2021, 09:45 AM ssuperflyoldguy Use Cold Galvi weld thru primer instead of red - r... Feb 26 2021, 03:41 PM jaredmcginness Your repair is great! Nice work so far. Keep u... Feb 28 2021, 07:45 AM worn Made some progress this week. Got the wheel house... Mar 4 2021, 11:29 AM worn The floor carries many items for use on the new fl... Mar 4 2021, 11:50 AM worn After spending a few hours on my back on the froze... Mar 4 2021, 12:05 PM worn I have been measuring the door gap after every pat... Mar 10 2021, 11:27 AM 930cabman Nice looking work and it appears your project was ... Mar 26 2021, 12:15 PM worn
Nice looking work and it appears your project was... Mar 26 2021, 07:54 PM Shivers Nice work. Mar 27 2021, 08:29 AM FourBlades Great repair job! :beer2:
You are on a roll... Mar 27 2021, 08:56 AM worn
Great repair job! :beer2:
You are on a rol... Mar 31 2021, 08:47 AM worn Been awhile but in the mean time I have been remod... Jan 11 2022, 01:27 PM worn The jack point has to be located such that it line... Jan 11 2022, 01:32 PM worn Back to the right side. Spent some time fiddling ... Jan 11 2022, 01:36 PM worn Speaking of RD wonders, here is the rear part of t... Jan 11 2022, 01:44 PM mb911
Speaking of RD wonders, here is the rear part of ... Jan 11 2022, 01:55 PM worn
That was a killer on mine. Bled through in a few... Jan 11 2022, 07:14 PM JeffBowlsby
The jack point has to be located such that it lin... Jan 11 2022, 02:13 PM worn
I just found this thread. Is this Creamsicle on... Jan 11 2022, 07:08 PM 930cabman Why do we punish ourselves with this crap??
Great... Jan 12 2022, 09:01 AM worn As the Brits would say, I offered up the floor to ... Jan 12 2022, 09:49 AM worn
I know that I usually have to do some work on the... Mar 13 2022, 10:55 AM worn I have some advice to those who try this sort of t... Apr 6 2022, 02:53 PM bkrantz You're not the only one who got started, found... Apr 6 2022, 08:21 PM worn The trunk floor supplied by RD is made for the ear... May 23 2022, 09:58 AM worn This is the trunk floor after some welding.
I mad... May 23 2022, 10:05 AM worn I found that rust often lurks behind the rubber se... May 23 2022, 10:07 AM 914werke :welder: :headbanger: Dedication May 23 2022, 10:23 AM flyer86d Wow! Nice work.
Charlie May 23 2022, 02:20 PM brant Great job!! May 23 2022, 06:06 PM worn
Great job!!
Thanks folks! The piece... May 23 2022, 06:18 PM Dion Wow, way to go Warren. That was a task. Well done. May 24 2022, 07:39 AM worn Kept hitting my head while backing out of the engi... May 25 2022, 10:58 AM worn Another hole found. I had to buy the B-pillar pre... May 25 2022, 11:04 AM worn You can buy the B-pillar, but not the piece of the... May 25 2022, 11:17 AM worn Into the big hole.
Not shown is the weldi... May 25 2022, 11:26 AM worn Why should the driver's side be any different?... May 25 2022, 11:34 AM worn The sail rusted where failed sealer met overlappin... May 26 2022, 09:47 AM worn Got most of the grime out of the front wheel wells... May 26 2022, 09:52 AM worn I still have some welding to do up in the bow, but... Jun 2 2022, 06:45 PM 76-914
I still have some welding to do up in the bow, bu... Jun 2 2022, 08:53 PM worn
I still have some welding to do up in the bow, b... Jun 3 2022, 08:16 AM 76-914
[quote name='76-914' post='3006103' date='Ju... Jun 4 2022, 08:01 PM worn Throughout this project I have found two tools rea... Jun 25 2022, 10:09 AM worn A curious thing about the car is the absence of fr... Jun 25 2022, 10:21 AM worn Here is another shot...ad nauseum I suppose. It s... Jun 25 2022, 11:01 AM worn Waited to replace the frunk floor so I could crawl... Jun 25 2022, 11:08 AM SirAndy A curious thing about the car is the absence of fr... Jun 25 2022, 11:51 AM worn That sounds pretty much like I thought but used th... Jun 25 2022, 03:20 PM worn .
:popcorn:
Those guys new style when they s... Jun 26 2022, 08:41 AM worn
.
:popcorn:
Those guys new style when they ... Jun 26 2022, 08:44 AM 930cabman
A curious thing about the car is the absence of f... Jun 26 2022, 07:26 AM 930cabman
Throughout this project I have found two tools re... Jun 27 2022, 06:07 PM 914fahrer Did you really look at the correct place ?Here is ... Jun 26 2022, 09:28 AM worn
Did you really look at the correct place ?Here is... Jun 27 2022, 08:35 AM |
1 User(s) are reading this topic (1 Guests and 0 Anonymous Users)
0 Members:

|
Lo-Fi Version | Time is now: 7th May 2024 - 05:10 AM |
Invision Power Board
v9.1.4 © 2024 IPS, Inc.