|
|
|
Porsche, and the Porsche crest are registered trademarks of Dr. Ing. h.c. F. Porsche AG.
This site is not affiliated with Porsche in any way. Its only purpose is to provide an online forum for car enthusiasts. All other trademarks are property of their respective owners. |
|
|


| GeorgeKopf |
 Mar 14 2021, 05:50 PM Mar 14 2021, 05:50 PM
Post
#41
|
|
Member  Group: Members Posts: 260 Joined: 9-February 21 From: Princeton, NJ Member No.: 25,186 Region Association: MidAtlantic Region |
Today marks the official beginning of my 1974 Porsche 914-4 restoration project.
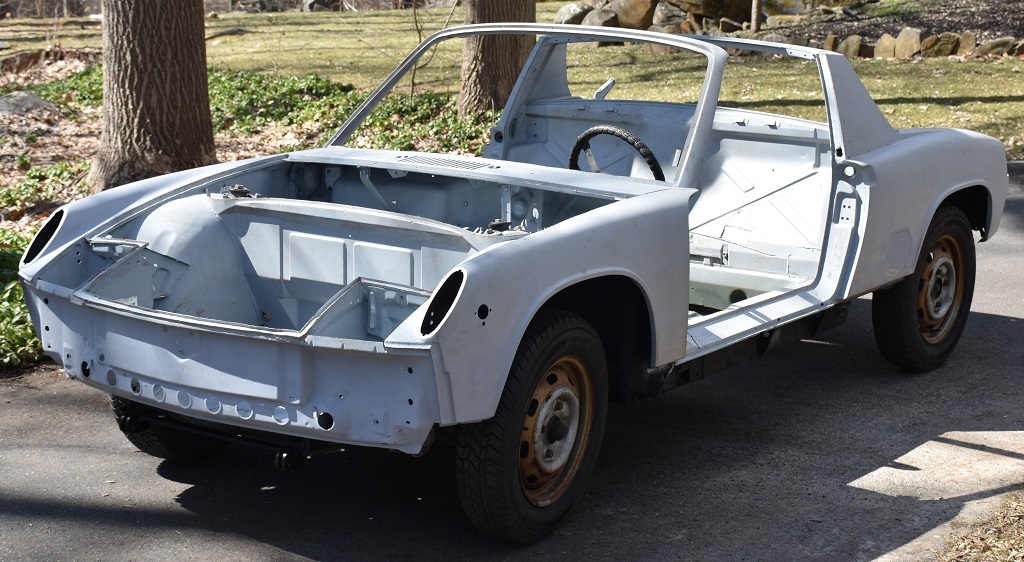 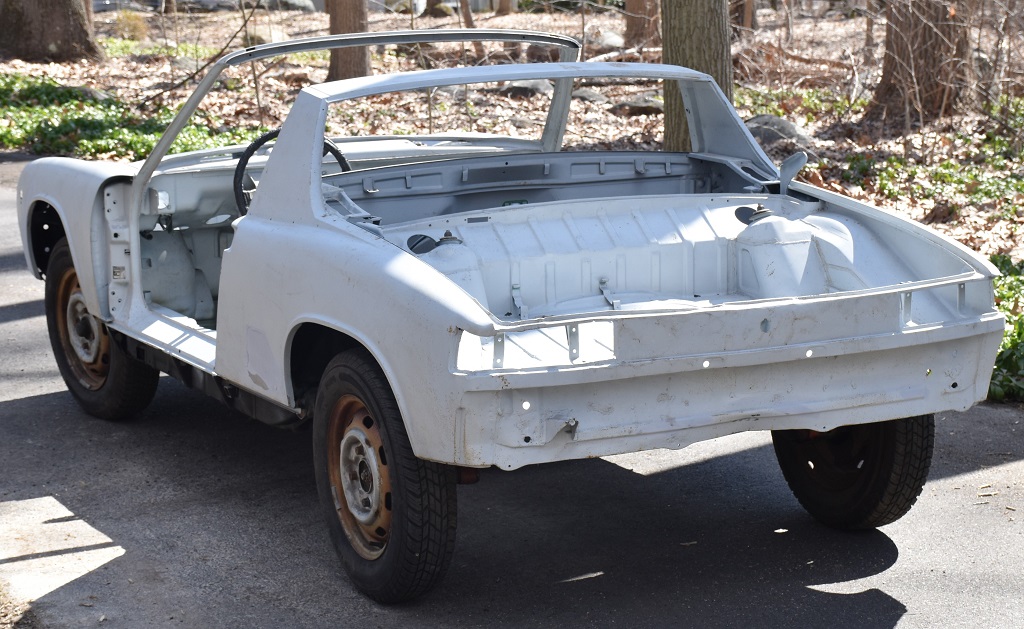 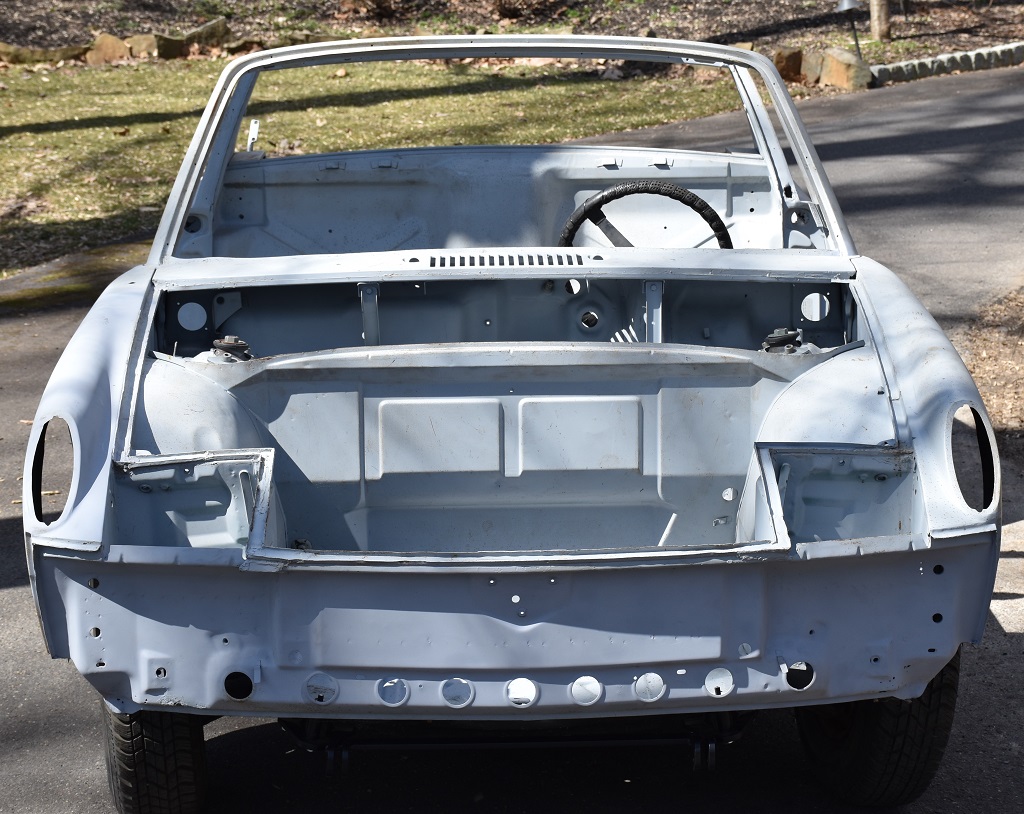 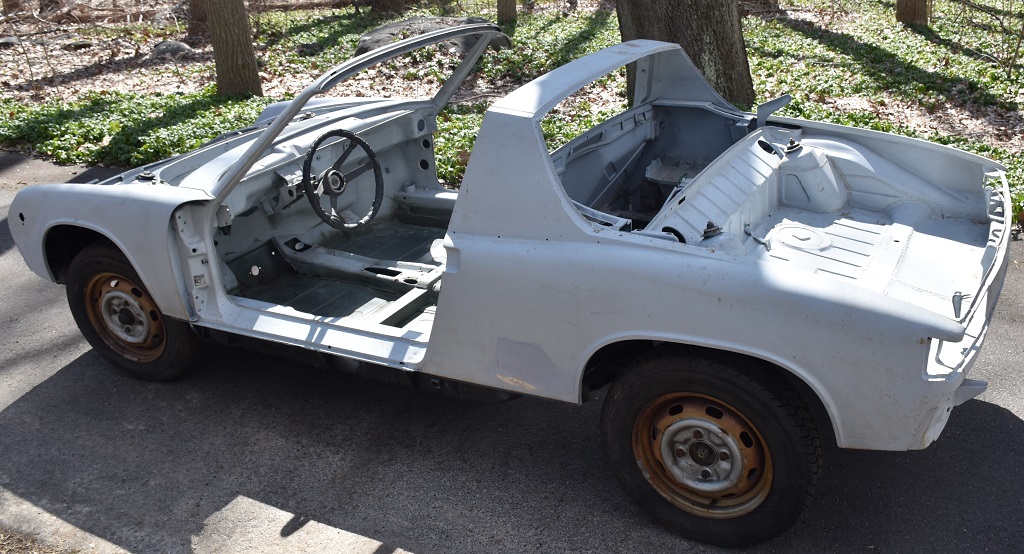 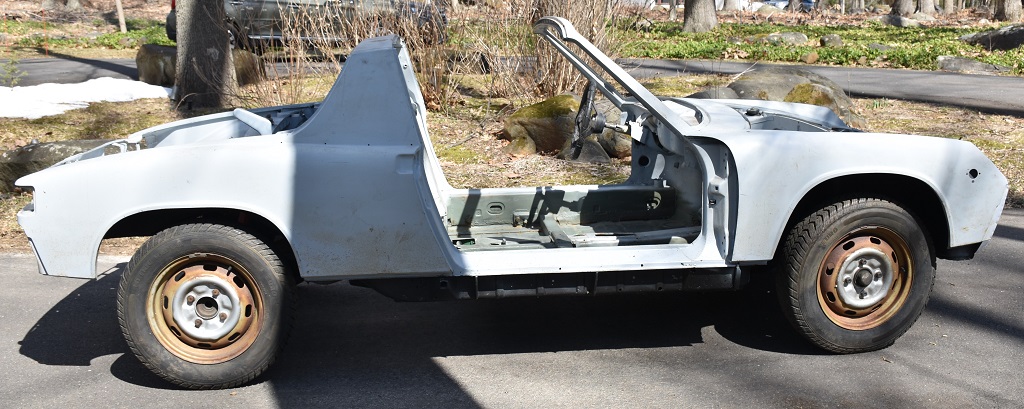 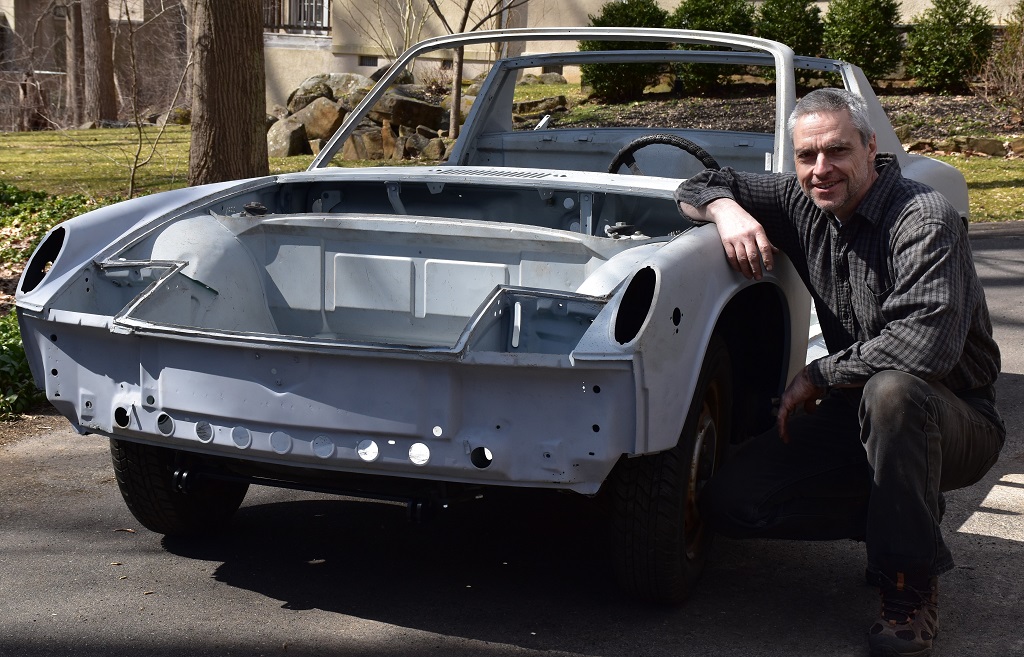 I'm hoping to have the car on the road before its 50 anniversary. |
   |

 
|
Posts in this topic
GeorgeKopf 1974 Porsche 914-4 Restoration Mar 14 2021, 05:50 PM bkrantz Enjoy the "ride". Mar 14 2021, 07:28 PM Jamie
Today marks the official beginning of my 1974 Por... Mar 14 2021, 08:03 PM
bkrantz Enjoy the "ride". Mar 14 2021, 07:28 PM Jamie
Today marks the official beginning of my 1974 Por... Mar 14 2021, 08:03 PM
 GeorgeKopf
Today marks the official beginning of my 1974 Po... Mar 14 2021, 10:15 PM Root_Werks That looks like a good starting 914 to me! Yo... Mar 15 2021, 05:24 PM GeorgeKopf Prepping the car for the body shop. Added the hoo... Mar 22 2021, 09:02 AM Shivers Looks like a real good start. I'm back to this... Mar 22 2021, 09:21 AM GeorgeKopf I dropped the car off at TranslogGT (http://transl... Jul 11 2021, 12:34 AM GeorgeKopf I finished refurbishing my wiring harness. I repa... Oct 2 2021, 08:26 PM bkrantz Nice work! All the hours spent on the wiring ... Oct 2 2021, 08:53 PM Cairo94507 Really nice work that is going to pay huge dividen... Oct 3 2021, 06:34 AM Mikey914 Nice work. Hopefully most of the work done is good... Oct 3 2021, 12:24 PM GeorgeKopf Just finished refurbishing my front turn signal ho... Oct 16 2021, 09:35 PM mlindner That looks great George, keep posting. Mark Nov 6 2021, 02:56 PM TRS63 Great work making progress on all the parts during... Nov 7 2021, 03:39 AM StarBear Ah, just found this. Yeah, probably not ready in t... Jan 11 2022, 02:30 PM StarBear @GeorgeKopf Presuming (?) you had metalwork don... Jan 15 2022, 08:12 AM GeorgeKopf
@[url=http://www.914world.com/bbs2/index.php?show... Jan 17 2022, 09:48 PM StarBear
[quote name='StarBear' post='2974729' date='Jan 1... Jan 18 2022, 08:13 AM GeorgeKopf Bare naked 914!
The chassis just came back ... Feb 26 2022, 07:41 PM barnfind9141972
Bare naked 914!
There is a bit of work to... Feb 26 2022, 10:24 PM GeorgeKopf
Bare naked 914!
There is a bit of work t... Feb 27 2022, 12:47 AM Archie Bare naked 914!
Does that look great or wha... Jul 11 2022, 08:44 PM sixaddict Ever come up with solution
Bare naked 914... Aug 30 2022, 09:15 PM GeorgeKopf Going to refurbish my suspension while Translog GT... Feb 28 2022, 12:23 AM Dion Wow, what a great candidate to begin a restoration... Feb 28 2022, 05:26 AM Superhawk996 Given that you've done a full tub acid dip, ar... Feb 28 2022, 07:36 AM GeorgeKopf @Superhawk996
Wow. That looks great. I'm je... Feb 28 2022, 12:48 PM Superhawk996
[b]@[url=http://www.914world.com/bbs2/index.php?s... Feb 28 2022, 12:59 PM GeorgeKopf I hear you about having somebody else do the plati... Feb 28 2022, 02:23 PM GeorgeKopf Turns out my powder coating oven is not big enough... Mar 24 2022, 08:06 PM Superhawk996
Also, I've had good success with Zinc platin... Mar 25 2022, 06:07 AM friethmiller
I've had good success with Zinc plating but c... Mar 25 2022, 12:38 PM GeorgeKopf I can't believe how long it has been since I l... Jun 10 2023, 07:25 PM GeorgeKopf I just visited my chassis at Translog (York, PA).
... Sep 17 2023, 06:37 PM windforfun Did you attend Princeton University?
:) :) :) Sep 17 2023, 06:47 PM GeorgeKopf
Did you attend Princeton University?
:) :) :)... Sep 17 2023, 08:00 PM GeorgeKopf Brought home the finished chassis this past weeken... Jul 21 2024, 08:46 PM StarBear Wow! :Qarl: Super lovely! A passion, for ... Jul 22 2024, 04:52 AM 930cabman Lookin great, keep us updated as you complete this... Jul 22 2024, 05:01 AM GeorgeKopf The wiring harness is in. I connected the battery... May 5 2025, 07:11 PM Geezer914 Very nice!!! May 5 2025, 07:23 PM GeorgeKopf I have made a ton of progress these last few weeks... Jun 8 2025, 08:15 PM dtmehall :beer2: Jun 8 2025, 08:40 PM GeorgeKopf So much progress!!!!
1. Wiper mo... Jun 22 2025, 01:17 PM slowrodent You are really doing some fine work there George..... Jun 22 2025, 02:02 PM friethmiller Looking good! :popcorn: Jun 22 2025, 05:54 PM GeorgeKopf More progress.
I cleaned up my brake calipers and... Aug 11 2025, 06:19 PM Aayala This is amazing progress and documentation! I ... Aug 19 2025, 02:07 PM friethmiller Been watching this one for a while. :popcorn: ... Aug 19 2025, 02:23 PM Artfrombama The car is gonna be awesome!!
Been a foll... Aug 19 2025, 07:10 PM Root_Werks Haven't looked at this thread in a while, wow... Aug 21 2025, 04:15 PM 930cabman lookin good, great progress
engine/transmission? Aug 21 2025, 06:14 PM iankarr Looking good! Aug 24 2025, 07:31 AM GeorgeKopf Working on populating the center tunnel. Just ord... Sep 12 2025, 07:11 AM GeorgeKopf I've been working on "stuff that goes in ... Sep 30 2025, 02:01 PM GeorgeKopf Spent a week de-rusting the inside of the tank. S... Nov 6 2025, 03:02 PM Cairo94507 Great work and progress. :beer2: Nov 6 2025, 04:02 PM
GeorgeKopf
Today marks the official beginning of my 1974 Po... Mar 14 2021, 10:15 PM Root_Werks That looks like a good starting 914 to me! Yo... Mar 15 2021, 05:24 PM GeorgeKopf Prepping the car for the body shop. Added the hoo... Mar 22 2021, 09:02 AM Shivers Looks like a real good start. I'm back to this... Mar 22 2021, 09:21 AM GeorgeKopf I dropped the car off at TranslogGT (http://transl... Jul 11 2021, 12:34 AM GeorgeKopf I finished refurbishing my wiring harness. I repa... Oct 2 2021, 08:26 PM bkrantz Nice work! All the hours spent on the wiring ... Oct 2 2021, 08:53 PM Cairo94507 Really nice work that is going to pay huge dividen... Oct 3 2021, 06:34 AM Mikey914 Nice work. Hopefully most of the work done is good... Oct 3 2021, 12:24 PM GeorgeKopf Just finished refurbishing my front turn signal ho... Oct 16 2021, 09:35 PM mlindner That looks great George, keep posting. Mark Nov 6 2021, 02:56 PM TRS63 Great work making progress on all the parts during... Nov 7 2021, 03:39 AM StarBear Ah, just found this. Yeah, probably not ready in t... Jan 11 2022, 02:30 PM StarBear @GeorgeKopf Presuming (?) you had metalwork don... Jan 15 2022, 08:12 AM GeorgeKopf
@[url=http://www.914world.com/bbs2/index.php?show... Jan 17 2022, 09:48 PM StarBear
[quote name='StarBear' post='2974729' date='Jan 1... Jan 18 2022, 08:13 AM GeorgeKopf Bare naked 914!
The chassis just came back ... Feb 26 2022, 07:41 PM barnfind9141972
Bare naked 914!
There is a bit of work to... Feb 26 2022, 10:24 PM GeorgeKopf
Bare naked 914!
There is a bit of work t... Feb 27 2022, 12:47 AM Archie Bare naked 914!
Does that look great or wha... Jul 11 2022, 08:44 PM sixaddict Ever come up with solution
Bare naked 914... Aug 30 2022, 09:15 PM GeorgeKopf Going to refurbish my suspension while Translog GT... Feb 28 2022, 12:23 AM Dion Wow, what a great candidate to begin a restoration... Feb 28 2022, 05:26 AM Superhawk996 Given that you've done a full tub acid dip, ar... Feb 28 2022, 07:36 AM GeorgeKopf @Superhawk996
Wow. That looks great. I'm je... Feb 28 2022, 12:48 PM Superhawk996
[b]@[url=http://www.914world.com/bbs2/index.php?s... Feb 28 2022, 12:59 PM GeorgeKopf I hear you about having somebody else do the plati... Feb 28 2022, 02:23 PM GeorgeKopf Turns out my powder coating oven is not big enough... Mar 24 2022, 08:06 PM Superhawk996
Also, I've had good success with Zinc platin... Mar 25 2022, 06:07 AM friethmiller
I've had good success with Zinc plating but c... Mar 25 2022, 12:38 PM GeorgeKopf I can't believe how long it has been since I l... Jun 10 2023, 07:25 PM GeorgeKopf I just visited my chassis at Translog (York, PA).
... Sep 17 2023, 06:37 PM windforfun Did you attend Princeton University?
:) :) :) Sep 17 2023, 06:47 PM GeorgeKopf
Did you attend Princeton University?
:) :) :)... Sep 17 2023, 08:00 PM GeorgeKopf Brought home the finished chassis this past weeken... Jul 21 2024, 08:46 PM StarBear Wow! :Qarl: Super lovely! A passion, for ... Jul 22 2024, 04:52 AM 930cabman Lookin great, keep us updated as you complete this... Jul 22 2024, 05:01 AM GeorgeKopf The wiring harness is in. I connected the battery... May 5 2025, 07:11 PM Geezer914 Very nice!!! May 5 2025, 07:23 PM GeorgeKopf I have made a ton of progress these last few weeks... Jun 8 2025, 08:15 PM dtmehall :beer2: Jun 8 2025, 08:40 PM GeorgeKopf So much progress!!!!
1. Wiper mo... Jun 22 2025, 01:17 PM slowrodent You are really doing some fine work there George..... Jun 22 2025, 02:02 PM friethmiller Looking good! :popcorn: Jun 22 2025, 05:54 PM GeorgeKopf More progress.
I cleaned up my brake calipers and... Aug 11 2025, 06:19 PM Aayala This is amazing progress and documentation! I ... Aug 19 2025, 02:07 PM friethmiller Been watching this one for a while. :popcorn: ... Aug 19 2025, 02:23 PM Artfrombama The car is gonna be awesome!!
Been a foll... Aug 19 2025, 07:10 PM Root_Werks Haven't looked at this thread in a while, wow... Aug 21 2025, 04:15 PM 930cabman lookin good, great progress
engine/transmission? Aug 21 2025, 06:14 PM iankarr Looking good! Aug 24 2025, 07:31 AM GeorgeKopf Working on populating the center tunnel. Just ord... Sep 12 2025, 07:11 AM GeorgeKopf I've been working on "stuff that goes in ... Sep 30 2025, 02:01 PM GeorgeKopf Spent a week de-rusting the inside of the tank. S... Nov 6 2025, 03:02 PM Cairo94507 Great work and progress. :beer2: Nov 6 2025, 04:02 PM  |
5 User(s) are reading this topic (5 Guests and 0 Anonymous Users)
0 Members:

|
Lo-Fi Version | Time is now: 24th June 2026 - 04:08 PM |
Invision Power Board
v9.1.4 © 2026 IPS, Inc.