|
|
|
Porsche, and the Porsche crest are registered trademarks of Dr. Ing. h.c. F. Porsche AG.
This site is not affiliated with Porsche in any way. Its only purpose is to provide an online forum for car enthusiasts. All other trademarks are property of their respective owners. |
|
|

  |

| markhoward |
 Apr 29 2021, 05:49 PM Apr 29 2021, 05:49 PM
Post
#21
|
|
Member  Group: Members Posts: 375 Joined: 5-March 17 From: Lafayette, CA Member No.: 20,897 Region Association: Northern California |
Sometimes the best intentions get diffused by procrastination. I needed an intervention and before you know it, up the block I hear the baritone rumble of @tygaboy and his amazing 914.
  Out Chris came bearing tools and an arsenal of skill. Smoggy must be stoked! After a short discussion, we started prepping the car to accept the new Restoration Design rear floor. There was some trimming involved which Chris took the helm on. That got me to acceptance that the fresh and not cheap panel need the knife. We then located the floor going through iterations of interpreting fit, checking, refitting, rechecking. Once satisfied, a line was scribed across the original pan where it will meet its Canadian mate and the death wheel was broken out. First Chris took his pass on one side and handed the tool to me. I started going on the other side and guess what, its not as easy to stay on the line as Chris made it seem. After some constructive feedback and several iterations, I got my side fitted. 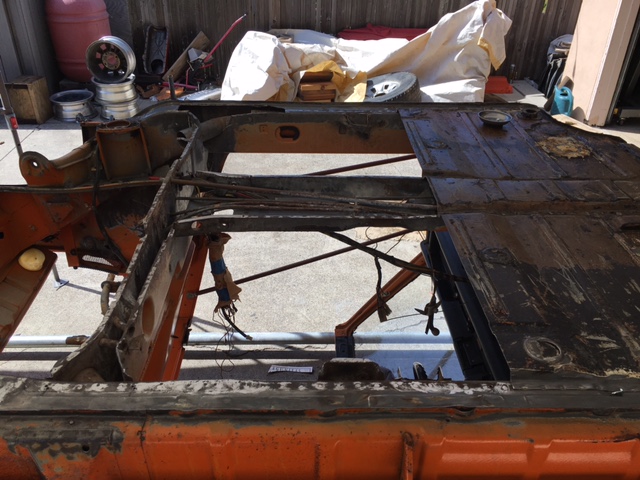 A few tek screws later and wouldn't you know it, Smoggy is looking mighty fine! 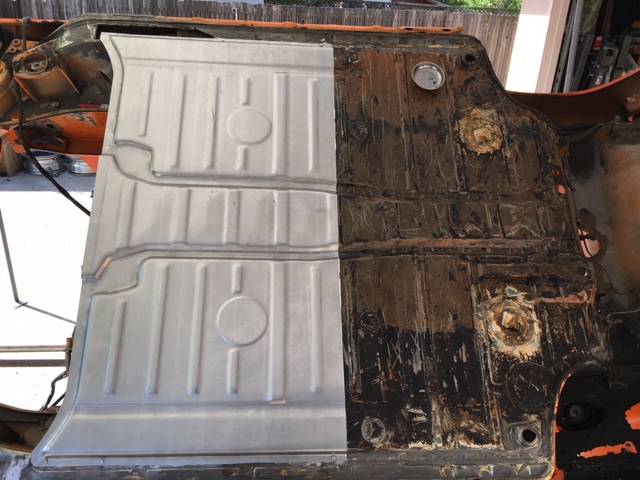 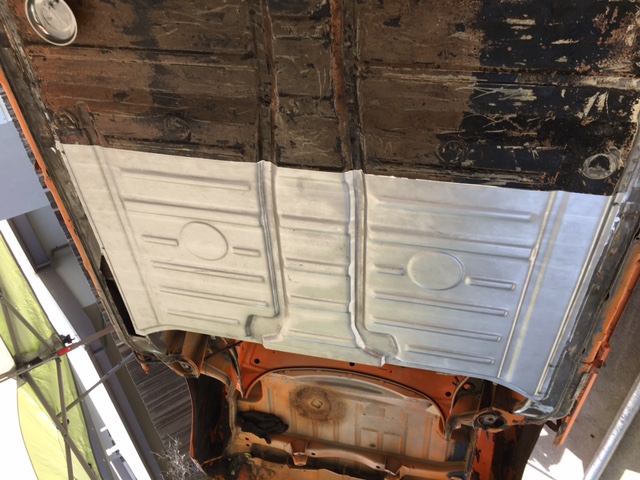 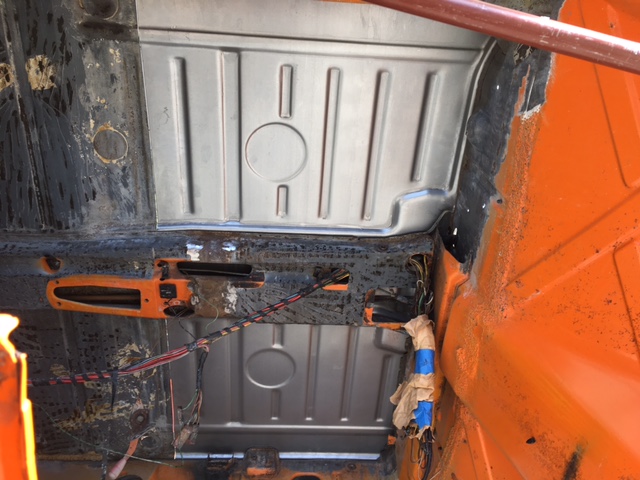 Next up was making a lower patch panel for the driver's side inner firewall. Chris graciously lent his shrinker/stretcher. We made a template to create the curve. Some shrink, some stretch, repeat.. Notch out other areas and here is a very close fitting section of metal that will replace the scongy part. Final fitting to take place later. 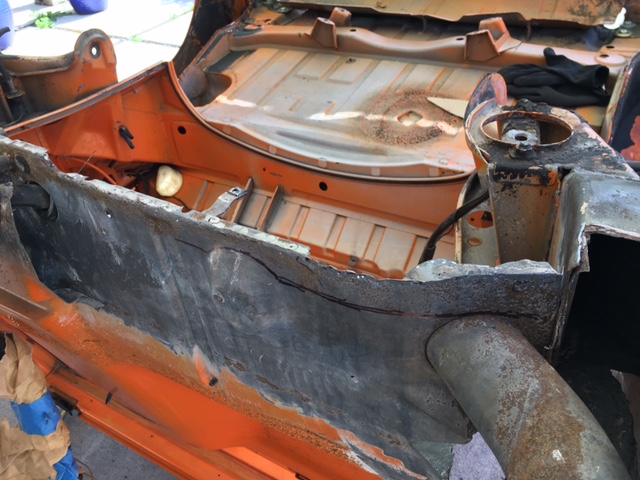 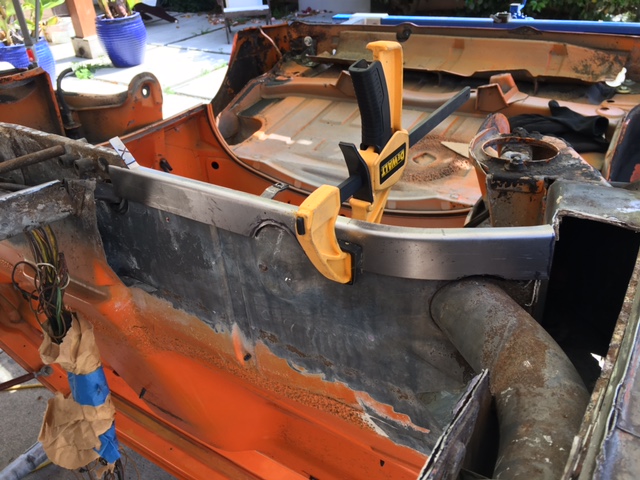 All good things must come to an end so with progress in motion, its time to roll on. Thank you Chris for today!  |
   |

 
|
| Dion |
Apr 29 2021, 06:10 PM
Post
#22
|
|
RN Group: Members Posts: 2,764 Joined: 16-September 04 From: Audubon,PA Member No.: 2,766 Region Association: MidAtlantic Region |
Awesome stuff!
|
|
|
|
| Root_Werks |
Apr 29 2021, 08:31 PM
Post
#23
|
|
Village Idiot Group: Members Posts: 8,315 Joined: 25-May 04 From: About 5NM from Canada Member No.: 2,105 Region Association: Pacific Northwest |
Nothing like someone showing up to help motivate! Good progress!
|
|
|
|
| markhoward |
May 7 2021, 07:48 PM
Post
#24
|
|
Member Group: Members Posts: 375 Joined: 5-March 17 From: Lafayette, CA Member No.: 20,897 Region Association: Northern California |
Its another day with @tygaboy and smoggy. Today, we (meaning Chris) formed out the internal lower long panel that reinforces the area around the seat belt mount. This is a piece you will never see once closed up but that does not matter to the metal master. Hand formed and without the usual shop at his disposal, we got the panel fitting pretty nice. We also decided to replace the driver's side inner firewall instead of patching pinholes along the bottom. So that meant another RD order. Wait, you can't just order one thing given shipping so the only rational thing to do is to pull the trigger on a set of steel GT flares! Yes, it has been decided (IMG:style_emoticons/default/stirthepot.gif)
      |
|
|
|
| rmarx |
May 12 2021, 09:23 PM
Post
#25
|
|
Member Group: Members Posts: 95 Joined: 5-June 07 From: Pleasant Hill, CA Member No.: 7,784 |
Looking good Mark! Looking at your project makes me want to jump the gun and order my GT flares also.
|
|
|
|
| euro911 |
May 12 2021, 10:53 PM
Post
#26
|
|
Retired & living the dream. God help me if I wake up! Group: Members Posts: 8,848 Joined: 2-December 06 From: So.Cal. & No.AZ (USA) Member No.: 7,300 Region Association: Southern California |
Looks like the major surgery is going well (IMG:style_emoticons/default/smile.gif)
|
|
|
|
| AZBanks |
May 13 2021, 01:02 AM
Post
#27
|
|
Senior Member Group: Members Posts: 1,060 Joined: 7-December 05 From: New River, AZ Member No.: 5,245 Region Association: Southwest Region |
I was missing my regular fix of tygaboy's metal mastery. Thanks for returning him to our regularly scheduled programming.
|
|
|
|
| tygaboy |
May 13 2021, 08:42 AM
Post
#28
|
|
914 Guru Group: Members Posts: 5,285 Joined: 6-October 15 From: Petaluma, CA Member No.: 19,241 Region Association: Northern California |
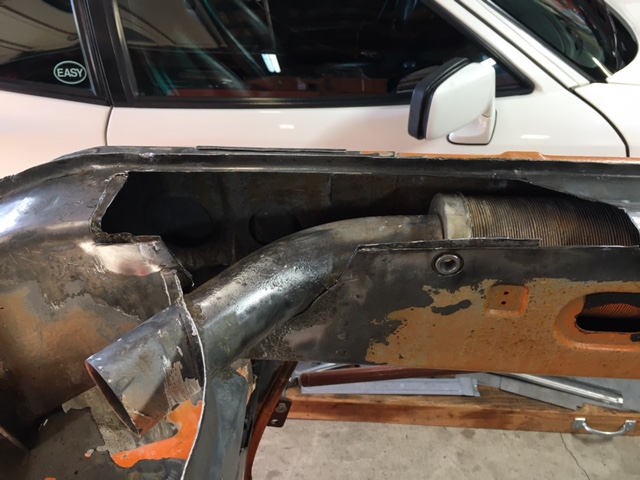
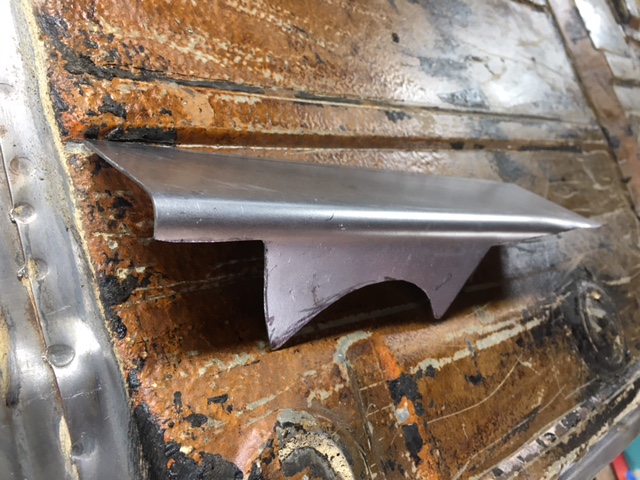
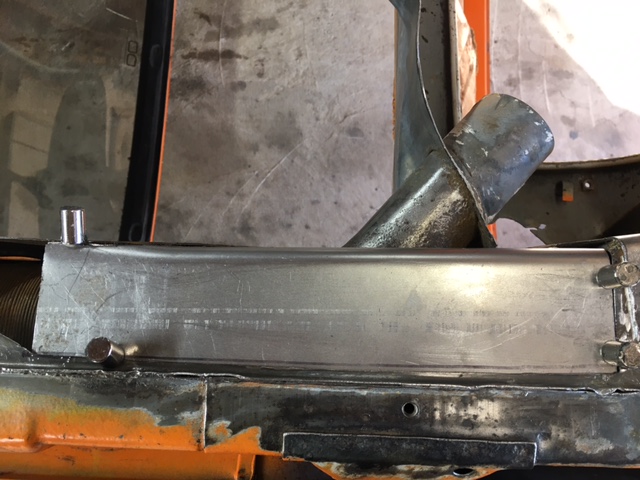
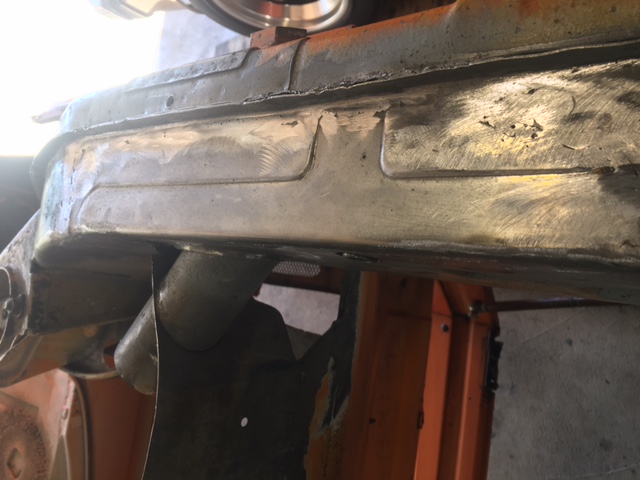
Smoggy needs a patch for the outer layer of the long, right at the back where the floor panel attaches. I was able to bend up a suitable radius then use the bead roller to duplicate the recess where that floor panel sits.
The fun part was using one hand to gradually release the roller pressure while at the same time guiding the panel with the other hand to create the fade in the depth of that recess as it turns 90 degrees and moves outward to the edge of the panel. I wanted it like the factory shaped it. And hooray, it only took me two versions to get it. Will anyone ever see it? Nope. But hey, it's for @Markhoward and Smoggy! Attached thumbnail(s) 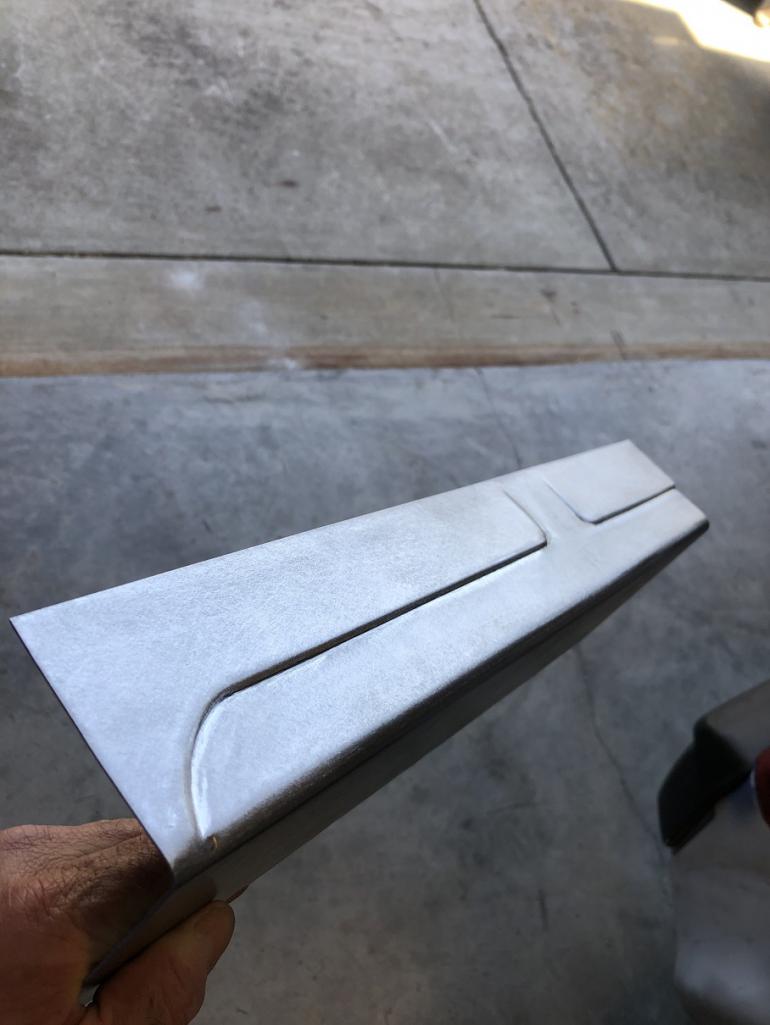
|
|
|
|
| euro911 |
May 13 2021, 10:57 AM
Post
#29
|
|
Retired & living the dream. God help me if I wake up! Group: Members Posts: 8,848 Joined: 2-December 06 From: So.Cal. & No.AZ (USA) Member No.: 7,300 Region Association: Southern California |
Metal mastery (IMG:style_emoticons/default/first.gif)
|
|
|
|
| markhoward |
May 13 2021, 05:36 PM
Post
#30
|
|
Member Group: Members Posts: 375 Joined: 5-March 17 From: Lafayette, CA Member No.: 20,897 Region Association: Northern California |
QUOTE(tygaboy @ May 13 2021, 07:42 AM)  Smoggy needs a patch for the outer layer of the long, right at the back where the floor panel attaches. I was able to bend up a suitable radius then use the bead roller to duplicate the recess where that floor panel sits. The fun part was using one hand to gradually release the roller pressure while at the same time guiding the panel with the other hand to create the fade in the depth of that recess as it turns 90 degrees and moves outward to the edge of the panel. I wanted it like the factory shaped it. And hooray, it only took me two versions to get it. Will anyone ever see it? Nope. But hey, it's for @Markhoward and Smoggy! The pieces Chris has shown up with is raising the bar on smoggy in a huge way. This car is going to turn out nice! If it was not for @tygaboy , then it would be so-so. Such an inspiration and I am so lucky to have his hand in this project! (IMG:style_emoticons/default/beerchug.gif) |
|
|
|
| tygaboy |
May 18 2021, 05:09 PM
Post
#31
|
|
914 Guru Group: Members Posts: 5,285 Joined: 6-October 15 From: Petaluma, CA Member No.: 19,241 Region Association: Northern California |
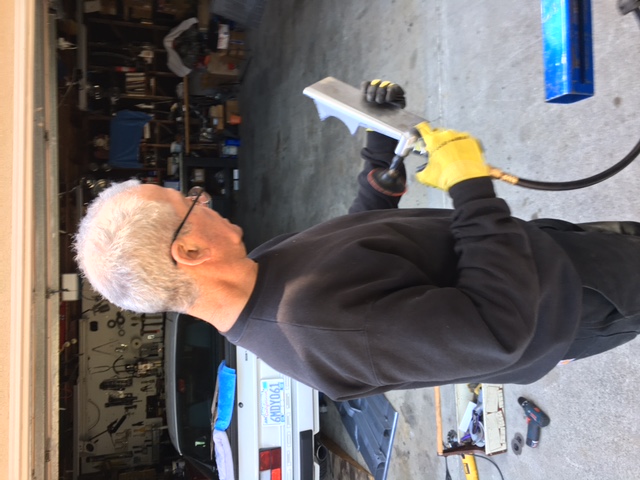
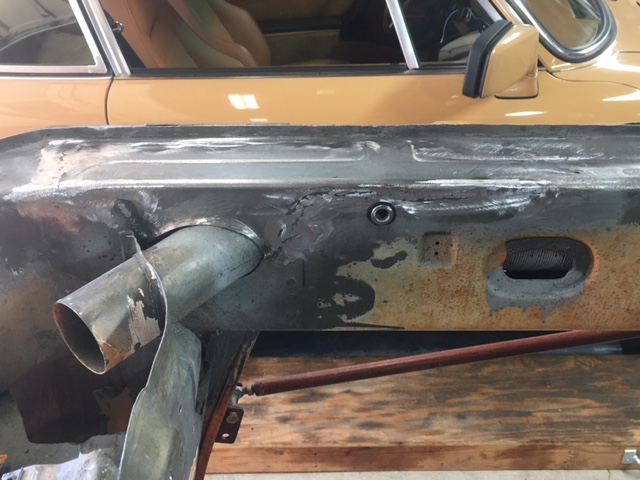
@markhoward hard at work with his killer new Miller 211 mig welder
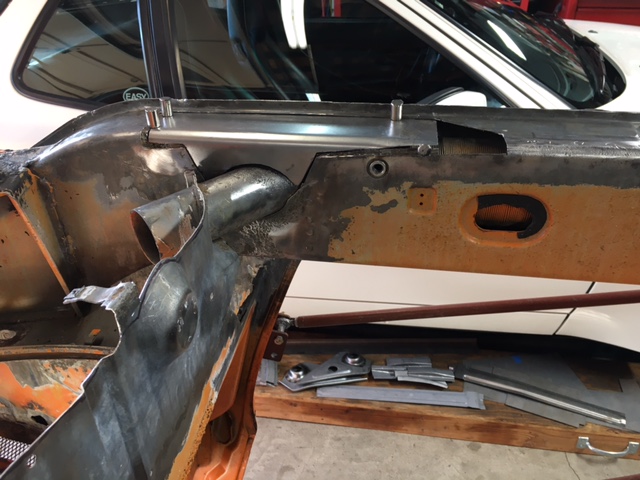
I have the previous generation of this same machine and can say this new version is REALLY nice. Highly recommended! Also gotta say, Mark has jumped in with both feet and is doing a great job welding this tedious and critical area. He is careful and has, IMO, the right attitude about level of quality: Always strive for awesome - but don't let "perfect" get in the way of "really good". The best news of the day was after completing ~75% of the welding on this final, outer patch piece on the long, we flipped the car over, removed all tension/pressure from the door braces and checked the windshield-to-targa bar corners distance. I always get a bit nervous when checking chassis measurements after welding on the longs... 25 1/8"! Right on the money! (IMG:style_emoticons/default/smilie_pokal.gif) (IMG:style_emoticons/default/piratenanner.gif) (IMG:style_emoticons/default/shades.gif) Smoggy is coming along nicely. Attached thumbnail(s) 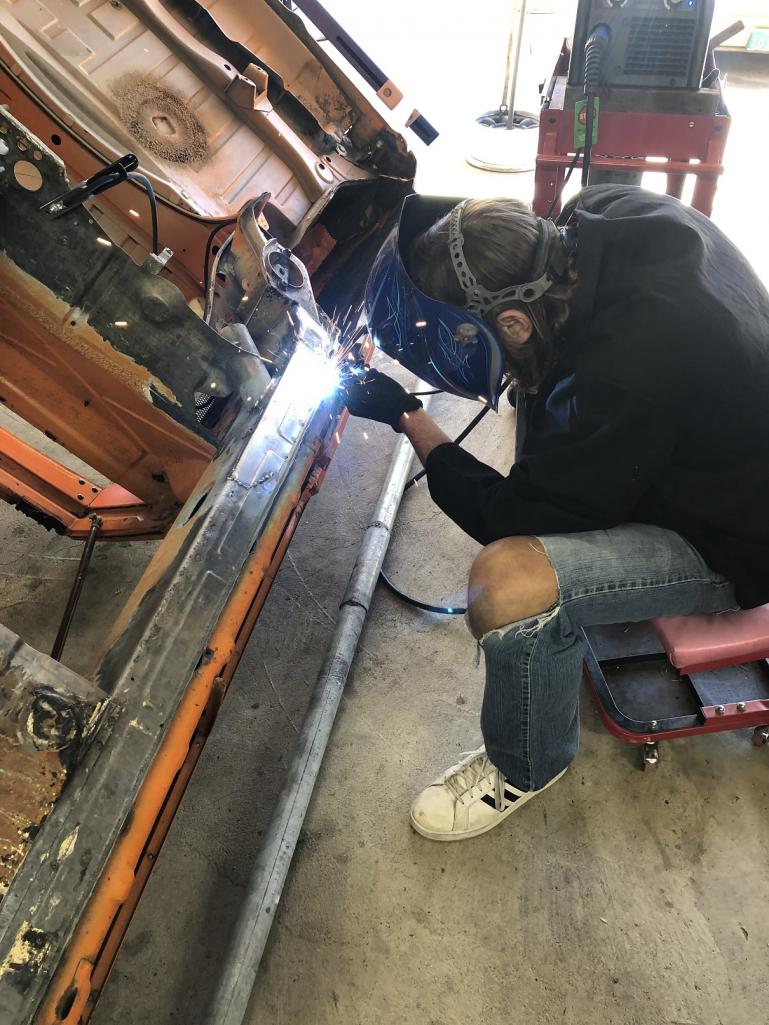
|
|
|
|
| MM1 |
May 18 2021, 10:46 PM
Post
#32
|
|
914 obsession continues Group: Members Posts: 608 Joined: 9-May 18 From: Thousand Oaks, CA Member No.: 22,105 Region Association: Southern California |
|
|
|
|
| markhoward |
May 19 2021, 10:47 AM
Post
#33
|
|
Member Group: Members Posts: 375 Joined: 5-March 17 From: Lafayette, CA Member No.: 20,897 Region Association: Northern California |
@tygaboy had a plan to take the 'little guy' to s-car-go on Tuesday for an alignment and corner balance and with me local to them, what better excuse is there to spend the day working on smoggy for free while running a tab over there! The task at hand has to fit Chris' killer hand made lower long patch complete with factory style bead rolled embossing. Nothing like having proper detailing on things that wont be seen on the finished product but hey, we know its there! First off was to start trimming the patch down to fit the car and form a nice flare around where there heater tube comes out. All of this totally freestyle using a sharpie, hand sheers, hammer, and a vice.
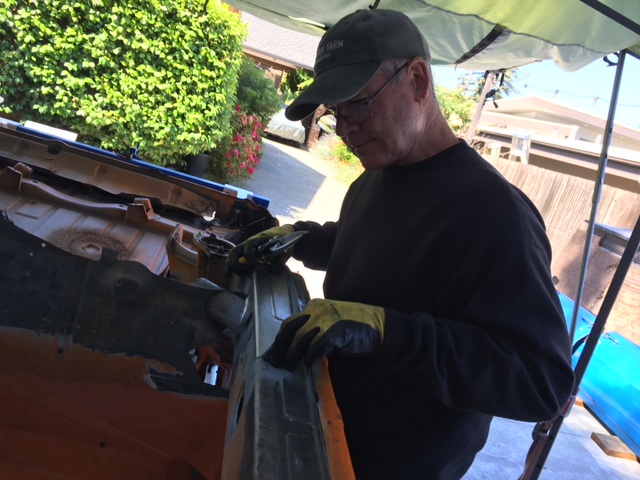 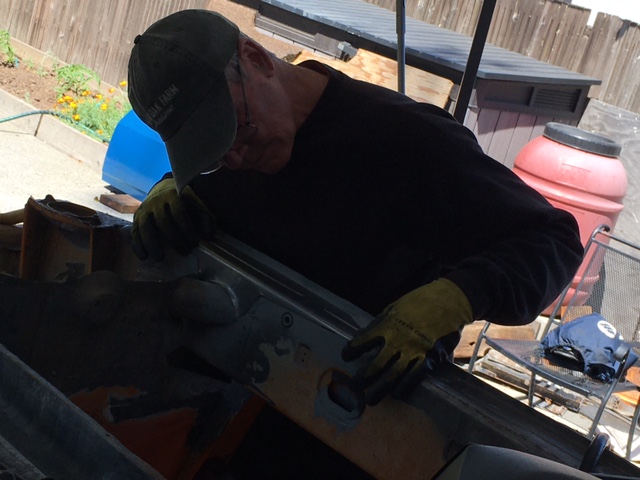 Last go around, Chris made a quick template out of cardboard and returned with that beautiful bead rolled piece. Basically created from memory and no car in sight to reference during the process. When time came to fit it, well.. 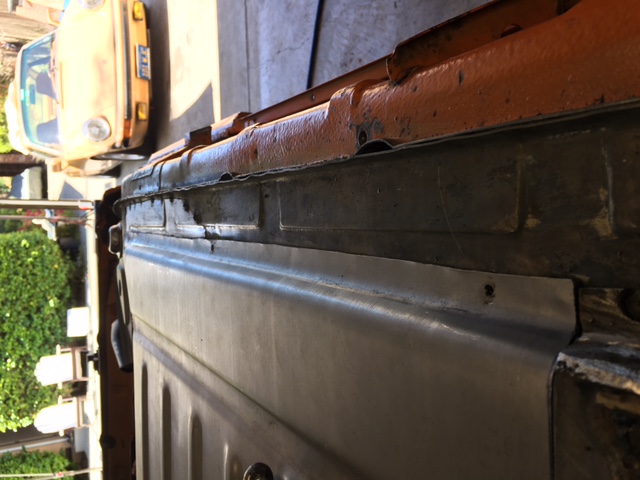 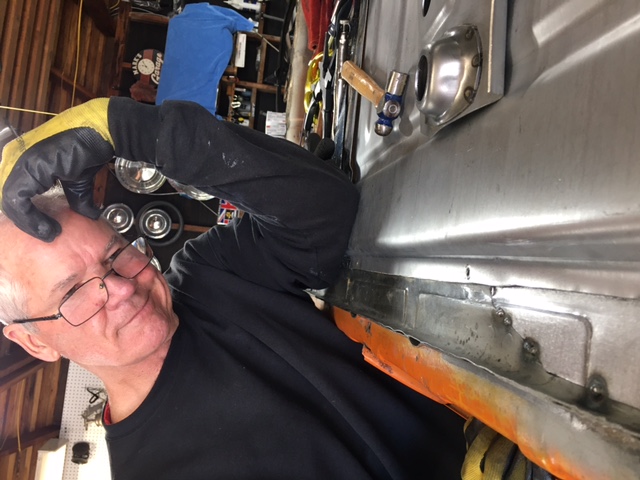 the channel where the floor plan sits was slightly off and I mean slightly. Disappointment had set in on Chris. I could tell he had a hard time not heading back home for another cut. It was definitely hard for him to move forward but let me tell you, it was much harder for me given that this is my car and after all, he is getting paid handsomely by means of a sandwich and some water! Taking the high road on this one and am not letting on how I feel.. Back to the program.. lets burn in some metal (IMG:style_emoticons/default/welder.gif) 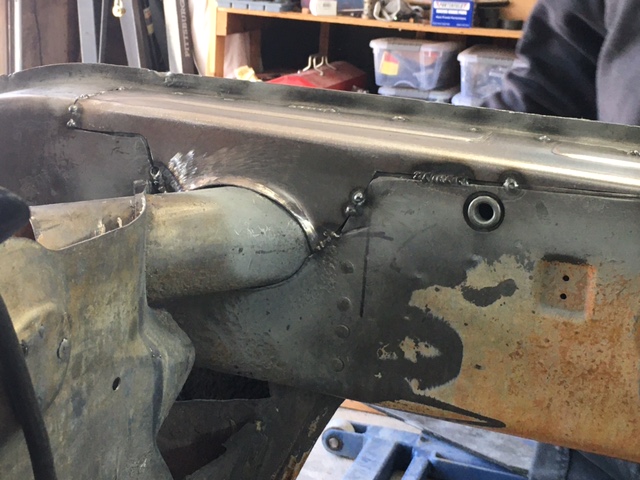  We got most of the welding done but ran out of time. Its so cool when you dress those welds and the old blends with the new. I will be attempting to finish her off without Chris' guidance. Wish me luck.. 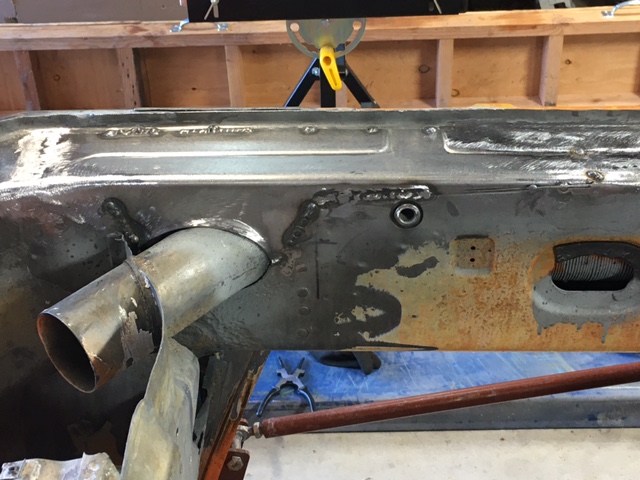 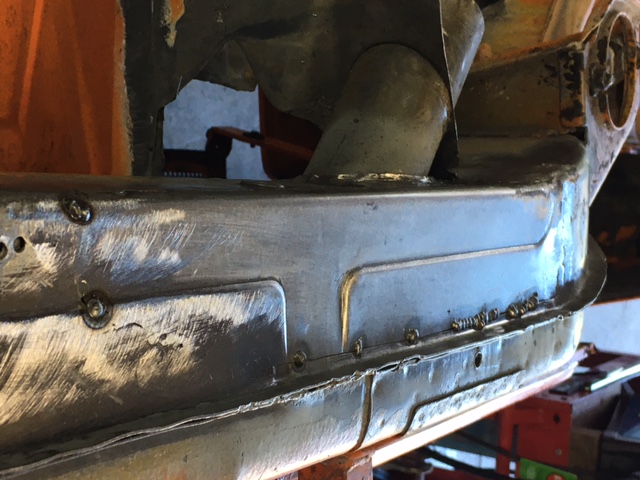 A great day in in the garage and what better way to top it off that to find a large box on your porch. (IMG:style_emoticons/default/beerchug.gif) 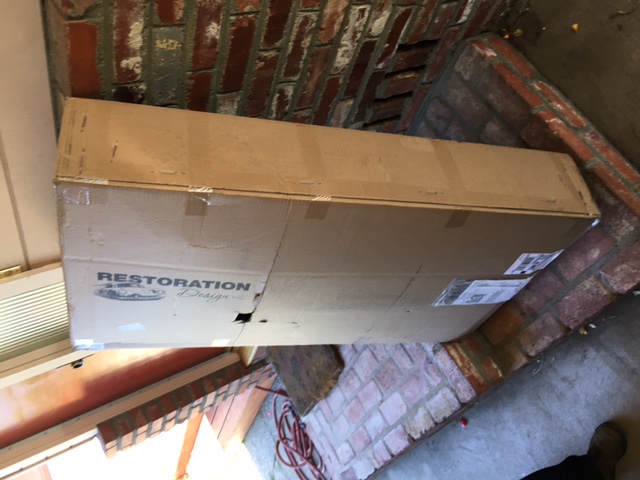 What could it be?? 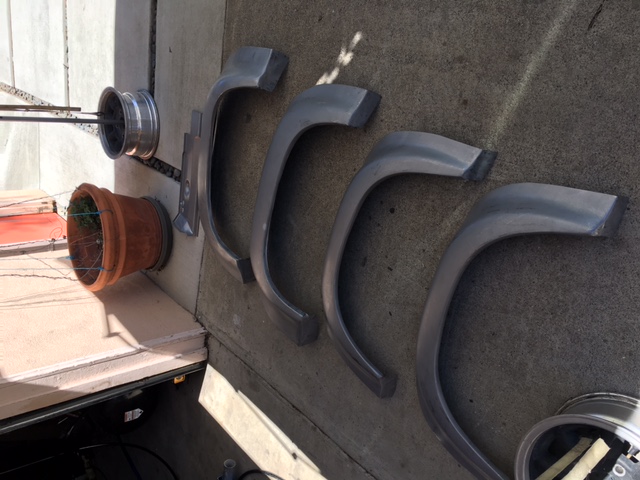 |
|
|
|
| rmarx |
May 19 2021, 10:56 AM
Post
#34
|
|
Member Group: Members Posts: 95 Joined: 5-June 07 From: Pleasant Hill, CA Member No.: 7,784 |
QUOTE(markhoward @ May 19 2021, 09:47 AM) @tygaboy had a plan to take the 'little guy' to s-car-go on Tuesday for an alignment and corner balance and with me local to them, what better excuse is there to spend the day working on smoggy for free while running a tab over there! The task at hand has to fit Chris' killer hand made lower long patch complete with factory style bead rolled embossing. Nothing like having proper detailing on things that wont be seen on the finished product but hey, we know its there! First off was to start trimming the patch down to fit the car and form a nice flare around where there heater tube comes out. All of this totally freestyle using a sharpie, hand sheers, hammer, and a vice. Last go around, Chris made a quick template out of cardboard and returned with that beautiful bead rolled piece. Basically created from memory and no car in sight to reference during the process. When time came to fit it, well.. the channel where the floor plan sits was slightly off and I mean slightly. Disappointment had set in on Chris. I could tell he had a hard time not heading back home for another cut. It was definitely hard for him to move forward but let me tell you, it was much harder for me given that this is my car and after all, he is getting paid handsomely by means of a sandwich and some water! Taking the high road on this one and am not letting on how I feel.. Back to the program.. lets burn in some metal (IMG:style_emoticons/default/welder.gif) We got most of the welding done but ran out of time. Its so cool when you dress those welds and the old blends with the new. I will be attempting to finish her off without Chris' guidance. Wish me luck.. A great day in in the garage and what better way to top it off that to find a large box on your porch. (IMG:style_emoticons/default/beerchug.gif) What could it be?? Me likee those flares! |
|
|
|
| markhoward |
May 19 2021, 04:15 PM
Post
#35
|
|
Member Group: Members Posts: 375 Joined: 5-March 17 From: Lafayette, CA Member No.: 20,897 Region Association: Northern California |
Finished welding the outer patch without @tygaboy watching over me. Think its alright. Did not want to dress the vertical stiches with the grinder in fear of taking off too much parent metal. May hit it later with Chris around to guide me (IMG:style_emoticons/default/spank.gif)
   |
|
|
|
| tygaboy |
May 19 2021, 06:46 PM
Post
#36
|
|
914 Guru Group: Members Posts: 5,285 Joined: 6-October 15 From: Petaluma, CA Member No.: 19,241 Region Association: Northern California |
Wow, that looks great! Really nice work, Mark.
And see? I told you. Not too big a deal, once you've had a bit of practice. Hit that with some acetone and get a squirt of primer on it: weld-through where the floor and firewall pieces will get spot welded, regular everywhere else. Again, nice, nice work. You should be proud of that repair. |
|
|
|
| Krieger |
May 20 2021, 08:33 AM
Post
#37
|
|
Advanced Member Group: Members Posts: 4,705 Joined: 24-May 04 From: Santa Rosa CA Member No.: 2,104 Region Association: None |
Looking really good guys!
|
|
|
|
| Shivers |
May 20 2021, 08:45 AM
Post
#38
|
|
Senior Member Group: Members Posts: 2,368 Joined: 19-October 20 From: La Quinta, CA Member No.: 24,781 Region Association: Southern California |
Great job
|
|
|
|
| Andyrew |
May 20 2021, 11:38 AM
Post
#39
|
|
Spooling.... Please wait Group: Members Posts: 13,376 Joined: 20-January 03 From: Riverbank, Ca Member No.: 172 Region Association: Northern California |
|
|
|
|
| markhoward |
Aug 10 2021, 06:13 PM
Post
#40
|
|
Member Group: Members Posts: 375 Joined: 5-March 17 From: Lafayette, CA Member No.: 20,897 Region Association: Northern California |
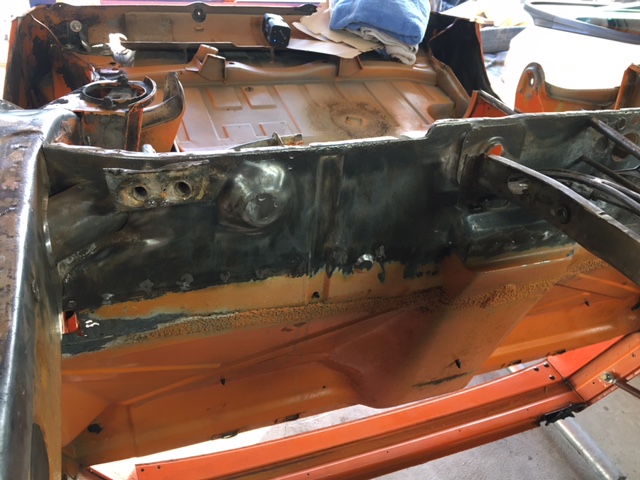
It seems like I let other things get in the way of smoggy but we are back. Since the last update, the outer lower firewall has been removed. Next up is replacing sconged out metal on the top of the longs and doing some minor patching in the vicinity. Chris ( @tygaboy ) whipped up these nifty patches which should be installed in the coming days. Vacation and two other projects got in the way (toyota pickup engine rebuild and 68 camaro front clip assembly). The pickup is back on the road and I stuck the Camaro in storage to help keep focus on smoggy. Feel free to hassle me if I slack (IMG:style_emoticons/default/welder.gif)
Attached image(s) 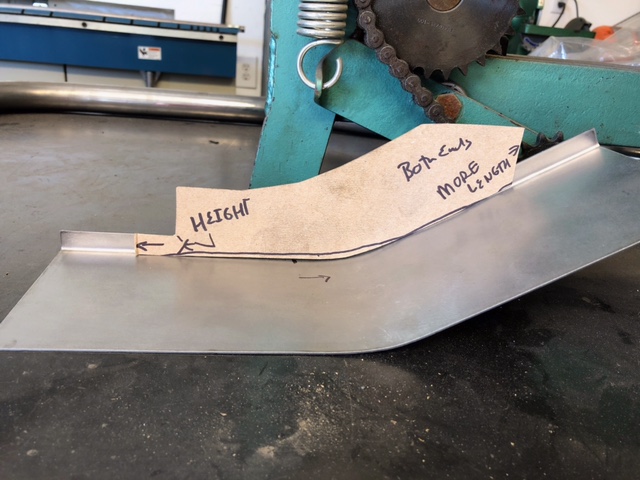 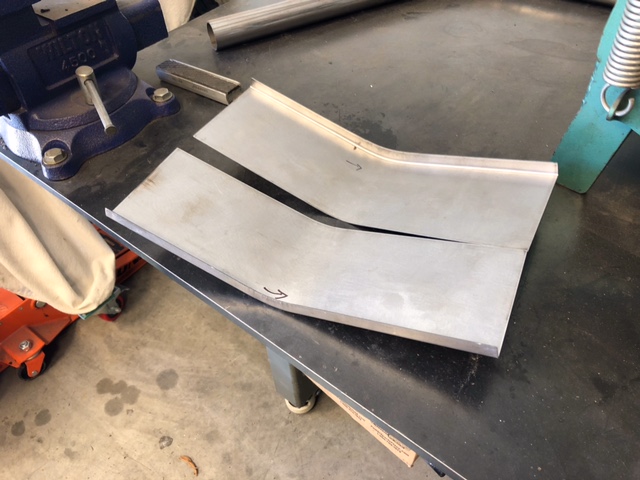 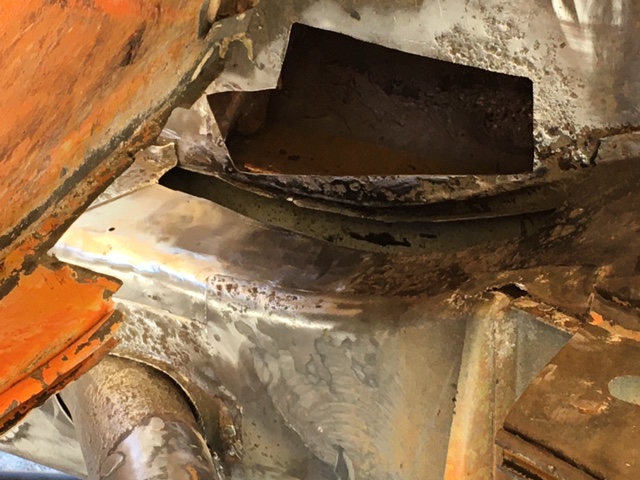 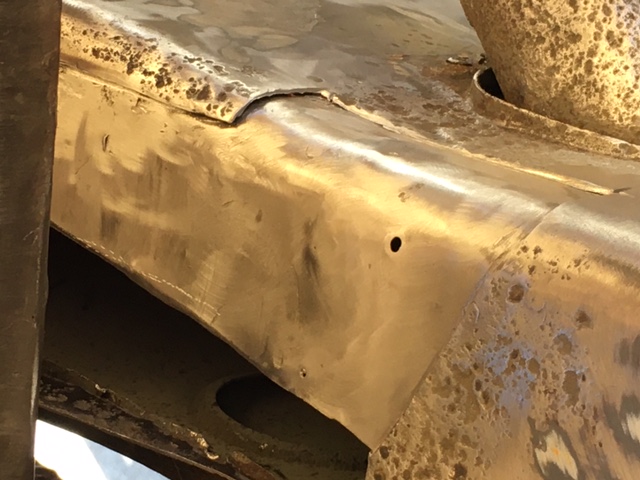 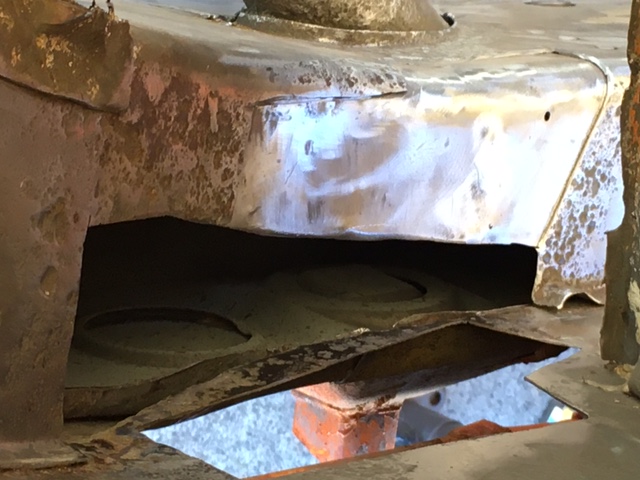 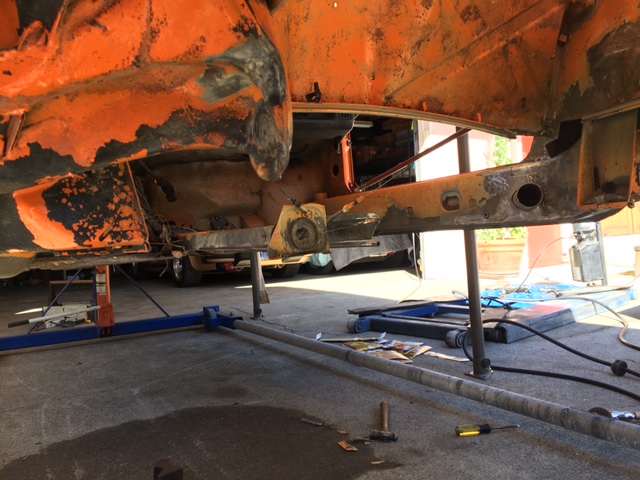
|
|
|
|
|
1 User(s) are reading this topic (1 Guests and 0 Anonymous Users)
0 Members:

|
Lo-Fi Version | Time is now: 6th May 2024 - 06:48 AM |
Invision Power Board
v9.1.4 © 2024 IPS, Inc.