|
|
|
Porsche, and the Porsche crest are registered trademarks of Dr. Ing. h.c. F. Porsche AG.
This site is not affiliated with Porsche in any way. Its only purpose is to provide an online forum for car enthusiasts. All other trademarks are property of their respective owners. |
|
|

  |

| Rob-O |
 May 15 2021, 10:50 PM May 15 2021, 10:50 PM
Post
#1
|
|
Senior Member  Group: Members Posts: 1,252 Joined: 5-December 03 From: Mansfield, TX Member No.: 1,419 Region Association: Southwest Region |
Found a vacuum leak on the air elbow from the AFM to the TB. The large vacuum line that goes from the air elbow to the oil fill tower has a metal piece that fits into the air elbow on one end and the vacuum line on the other end. The air elbow is a few years old from 914Rubber. If I remember correctly I think that metal piece actually came with the air elbow. In any event, I noticed that the fit was very loose today. I could easily pull the metal piece from the air elbow. When I did I noticed the metal piece had some black goo that was holding it in place but had let go. Of course L-Jet doesn’t like vacuum leaks. I’m wondering what I can use to ‘glue’ that piece back into the air elbow. It would need to be able to handle having some oil on it (remember the vacuum line that attaches to this metal piece runs to the oil fill tower.
Pics attached. Any suggestions? Attached thumbnail(s) 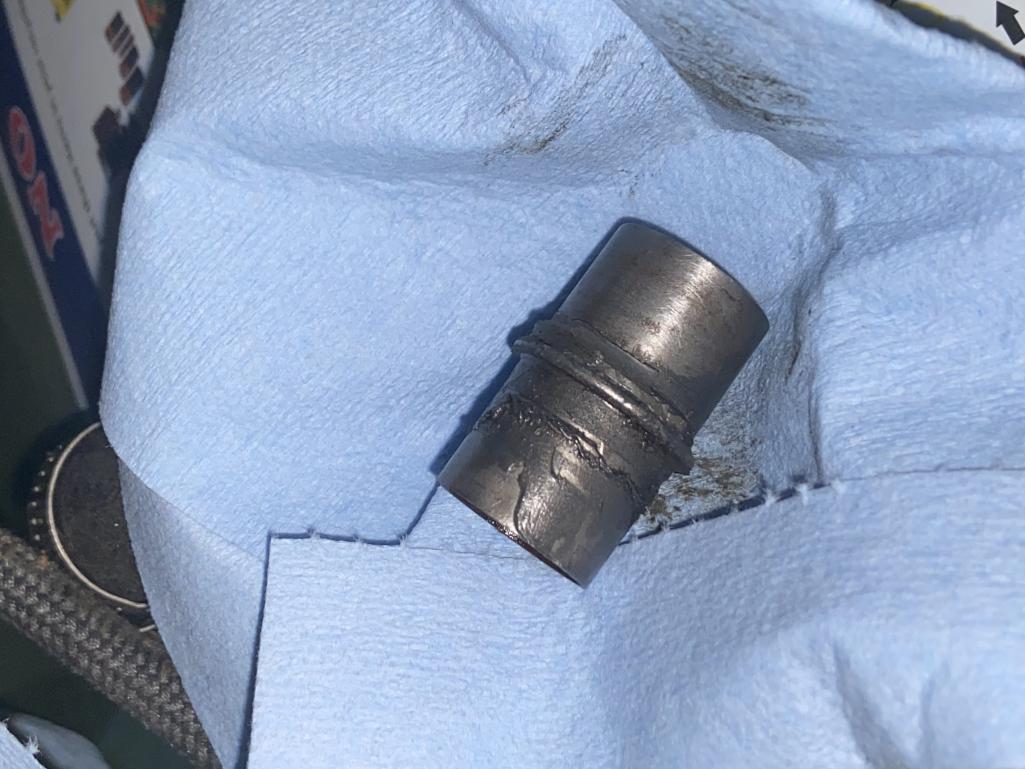
|
   |

 
|
| Rob-O |
May 15 2021, 10:51 PM
Post
#2
|
|
Senior Member Group: Members Posts: 1,252 Joined: 5-December 03 From: Mansfield, TX Member No.: 1,419 Region Association: Southwest Region |
Air elbow
Attached thumbnail(s) 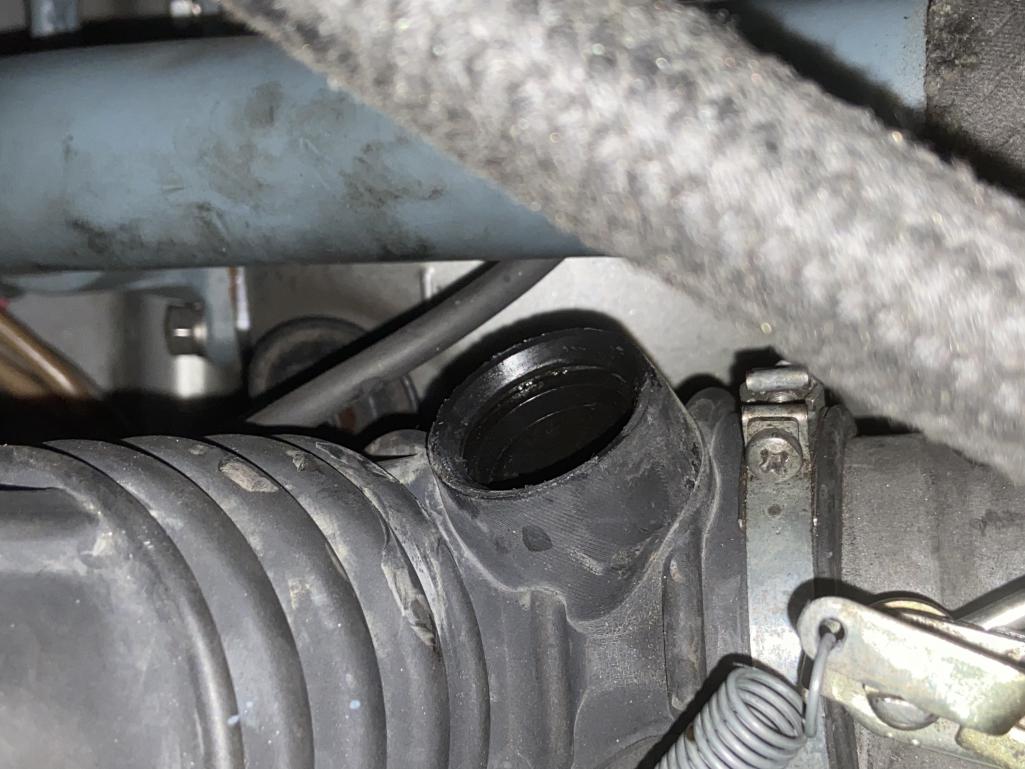
|
|
|
|
| JeffBowlsby |
May 15 2021, 11:14 PM
Post
#3
|
|
914 Wiring Harnesses Group: Members Posts: 8,510 Joined: 7-January 03 From: San Ramon CA Member No.: 104 Region Association: None |
Clean it up really well use acetone for the final clean to both mating surfaces. Try silicone. Or methyl methacrylate.
|
|
|
|
| wonkipop |
May 16 2021, 01:49 AM
Post
#4
|
|
Advanced Member Group: Members Posts: 4,318 Joined: 6-May 20 From: north antarctica Member No.: 24,231 Region Association: NineFourteenerVille |
i have a factory original boot. and that metal joiner tube is a tight fit, but i can pull it out if i try hard, real hard. it was never glued in i believe in the factory parts. it should be just a push in tight fit. its the same with the one further up that plugs into the aux air vac line.
something that might also work if mr. b's suggestion fails, and he points out importantly, its going to have to be clean like an operating table to get a glue/selant bond, is you could consider an o-ring. a correct sized o-ring might have just enough pressure to seal it. you want to be careful not to overpressure and split the boot. o-rings manufactured in viton or nitrile will resist the hydrocarbon fumes from the crankcase vent. viton is the best at that, but it is also the hardest and least flexible and will place the most pressure on the boot, so be careful if you decide to do that. i'm unsure as to what kind of conventional sealant can resist hydrocarbon fumes, esp heated crankcase gases. definitely not common or garden variant silicone as in silicone roof/plumbing sealants. something that will likely work might be the wet sealant used on some sump pans. there is a Japanese brand that is very good, honda use it at their factory to seal the sump pans on. the brand name is 3 bond. it is silicone, but its not the silicone sealant we normally think of. has a kind of brown orange color. you can also get a super duper version of it that is black in color. it will be up to the job but its expensive. it works for sump pans so it ought to work for the plug. i can recommend it because i had some real trouble with the sump pan on a citroen xm v6 i had apart. i tried to seal the sump pan on three times, each time it failed - using a variety of supposedly correct for application wet gasket sealant. until i used the 3 bond. |
|
|
|
| StarBear |
May 16 2021, 07:30 AM
Post
#5
|
|
Senior Member Group: Members Posts: 1,887 Joined: 2-September 09 From: NJ Member No.: 10,753 Region Association: North East States |
(IMG:style_emoticons/default/agree.gif) with Jeff and wonkipop. My fit is neither tight nor loose. I think I put a very thin coat of black rtv silicone on the exteriors of the metal barrels - just to provide a tad of thightness.
|
|
|
|
| Mikey914 |
May 16 2021, 09:30 AM
Post
#6
|
|
The rubber man Group: Members Posts: 12,670 Joined: 27-December 04 From: Hillsboro, OR Member No.: 3,348 Region Association: None |
The way we made it allows the tube to use an o-ring to help hold it in place. It should push into the body of the intake and firmly hold the tube. Make sure the o ring is seated inside the rubber. I think you should be able to resolve this without needing to use a sealant. I can see how it could become dislocated if the tube was removed.
Mark |
|
|
|
| pilothyer |
May 16 2021, 10:04 AM
Post
#7
|
|
Member Group: Members Posts: 838 Joined: 21-May 08 From: N. Alabama Member No.: 9,080 Region Association: South East States |
If you don't want to use the goo or glue method and maybe the O-Ring is lost, you could use one or more (as needed) layers of shrink tubing to get the right fit. That way you can add thickness to the metal at both ends as needed and still be able to remove it as needed.
|
|
|
|
| Rob-O |
May 19 2021, 07:56 PM
Post
#8
|
|
Senior Member Group: Members Posts: 1,252 Joined: 5-December 03 From: Mansfield, TX Member No.: 1,419 Region Association: Southwest Region |
So just to circle back to this. I cleaned the rubber elbow and the metal piece thoroughly. Then I used a mastic type tape and wrapped it around the ridge of the metal piece. That effectively made the ridge larger. Then when I pushed it into the rubber elbow it pressed into place and the lip on the elbow keep the ridge on the metal piece in place. I’m not sure the mastic tape is the right choice in the long term since this area sees some oil fumes (that’s a whole other post when it comes to 1.8L cars). But for now it is working.
I appreciate all the input, guys. Funny how something like this will leave one stumped for a minute until you see some other experienced guys (and not just in 914’s) put a set of fresh eyes on an issue. |
|
|
|
| StarBear |
May 20 2021, 08:24 AM
Post
#9
|
|
Senior Member Group: Members Posts: 1,887 Joined: 2-September 09 From: NJ Member No.: 10,753 Region Association: North East States |
Indeed! Always amazed at the group institutional knowledge here. Still learning......
|
|
|
|
|
1 User(s) are reading this topic (1 Guests and 0 Anonymous Users)
0 Members:

|
Lo-Fi Version | Time is now: 21st May 2024 - 06:55 AM |
Invision Power Board
v9.1.4 © 2024 IPS, Inc.