

 First of the Texas Twins, First Build |
|
|

|
Porsche, and the Porsche crest are registered trademarks of Dr. Ing. h.c. F. Porsche AG.
This site is not affiliated with Porsche in any way. Its only purpose is to provide an online forum for car enthusiasts. All other trademarks are property of their respective owners. |
|
|
  |
| Puebloswatcop |
 Aug 22 2026, 05:05 PM
Post
#1261
|
|
Senior Member  Group: Members Posts: 1,779 Joined: 27-December 14 From: Mineola, Texas Member No.: 18,258 Region Association: Southwest Region  |
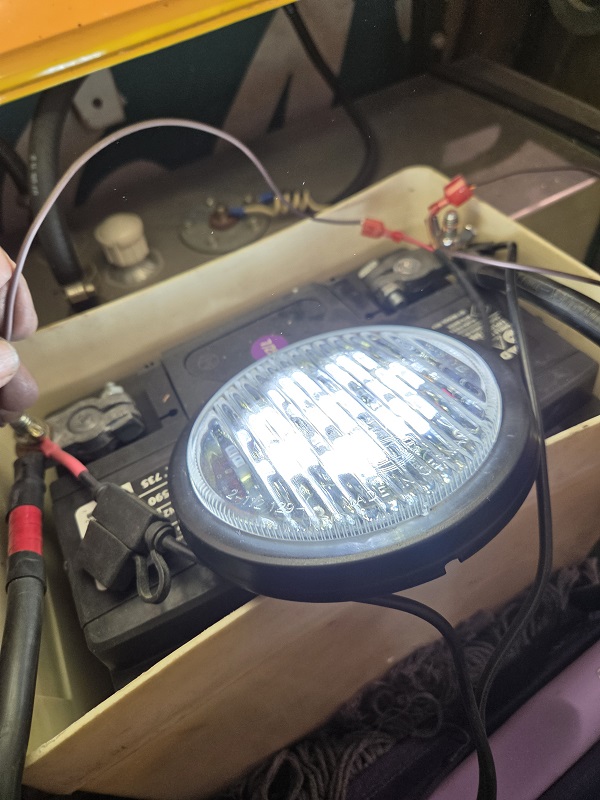
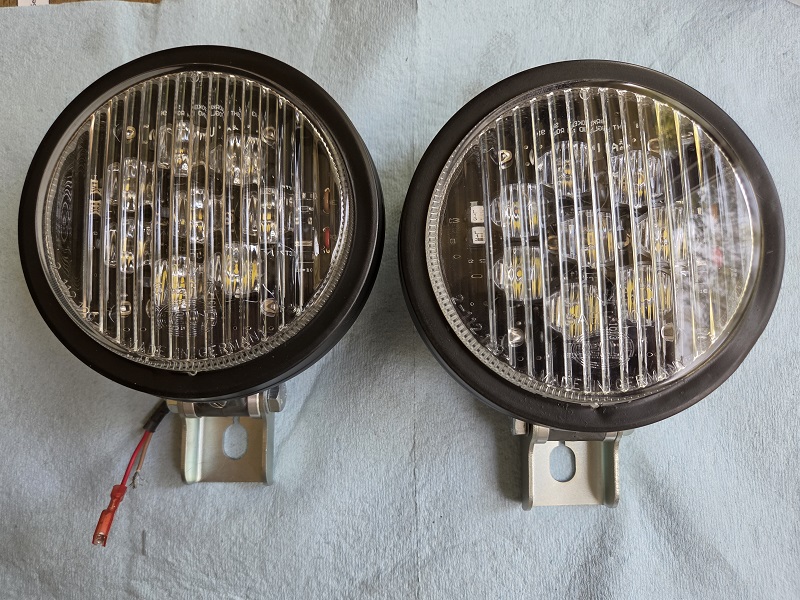
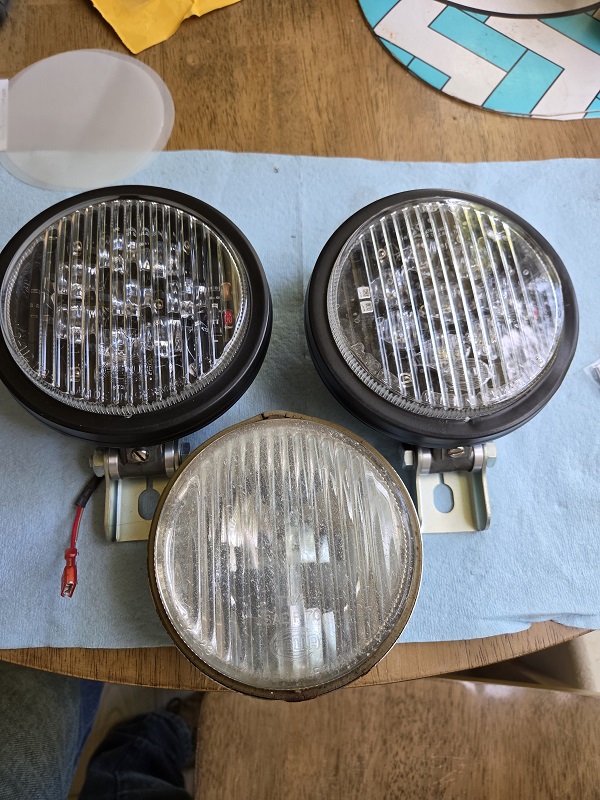
After assembly, I went out and hooked each light up to the battery in my wife's hot rod. Believe me when I say I am very pleased with the quality of spoke works LED lights and their great customer service. Same goes for 914 Rubber who put the re-build kit together. Here are a few pics to see everything completed and one thrown in to show you how beat up the fog lights are on the second twin.
   |
   |

 
|
| bkrantz |
Aug 23 2026, 07:58 PM
Post
#1262
|
|
914 Guru Group: Members Posts: 8,811 Joined: 3-August 19 From: SW Colorado Member No.: 23,343 Region Association: Rocky Mountains 
|
Those should be bright enough! I swapped a single LED bulb into mine and wish they made more light.
|
|
|
|
| Puebloswatcop |
Aug 24 2026, 06:55 PM
Post
#1263
|
|
Senior Member Group: Members Posts: 1,779 Joined: 27-December 14 From: Mineola, Texas Member No.: 18,258 Region Association: Southwest Region |
Well today was kind of a short day for working on the 914.
Since I didn't have a ton of time, I worked on repairing one of the front bumpers, that I plan on using, I have a few to choose from, but this is the best of the three. The only problem is one of the bumper braces was missing. So I mounted it back onto a car and used the marks on the car as a reference point. Luckily the bumper had one of the mounting holes for the bumper top that goes through the brace as well. So that made lining up the top of the bumper pretty easy. 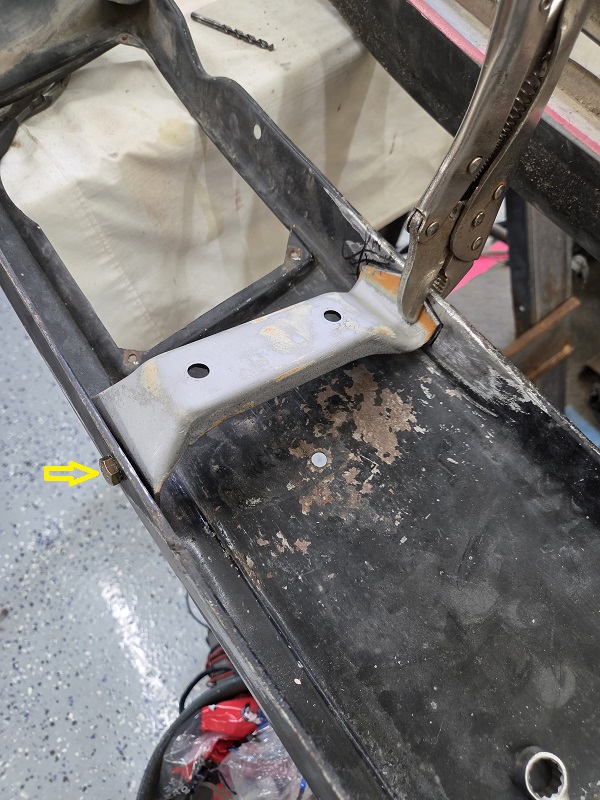 With the bumper on the car I lined it up on the landmarks on the car. 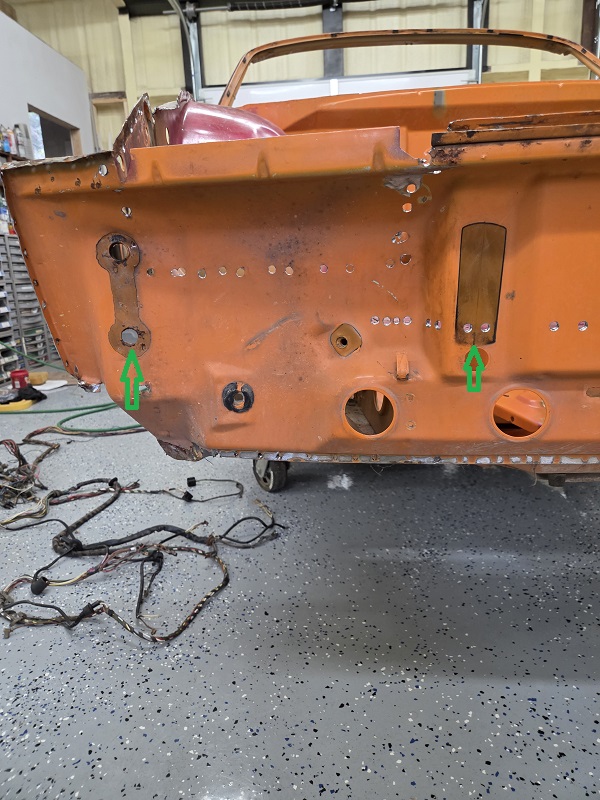 then marked its location with a black marker. It was tough trying to access it, so as you can see, there are several extra marks that went un-needed. Then drilled holes so I could weld the brace back into the bumper. 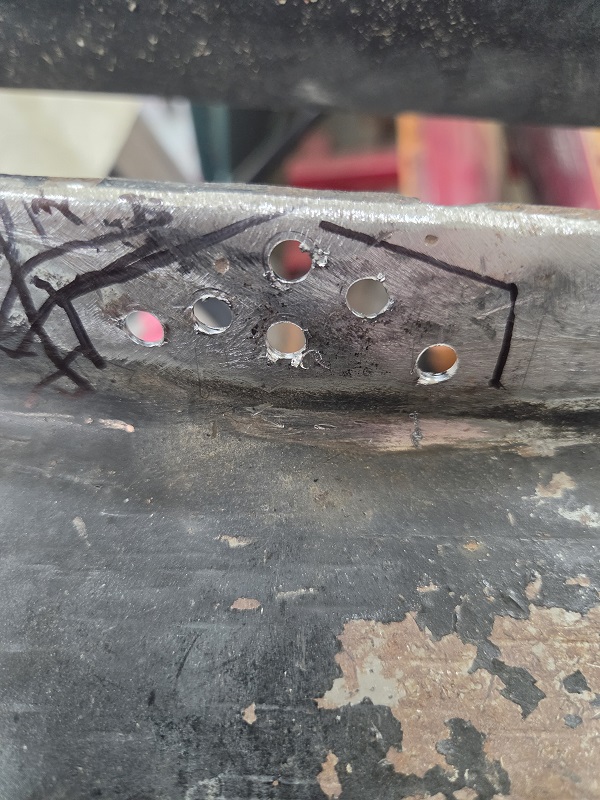 Once I had the location correct, I had to be sure it was square so it would sit flat on the front of the car. I used the other brace as the starting point then used a steel ruler to make sure it sat flat on the second brace. 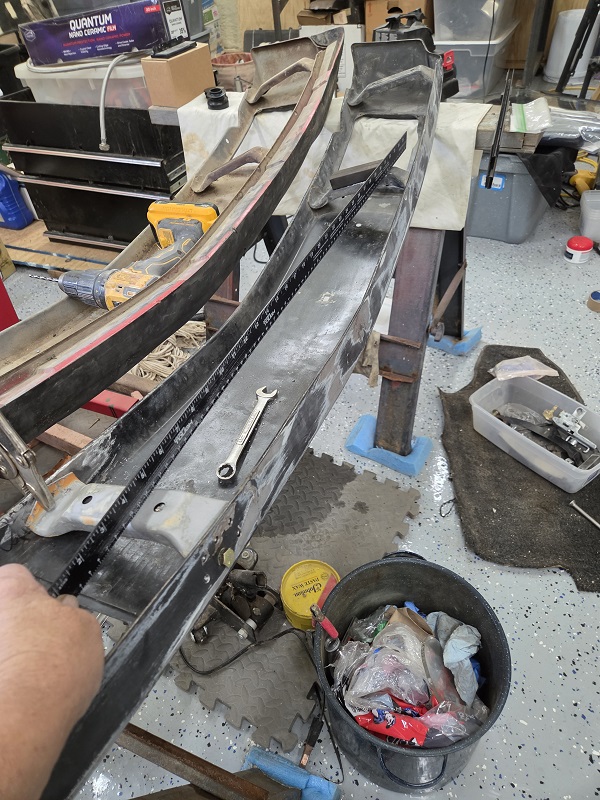 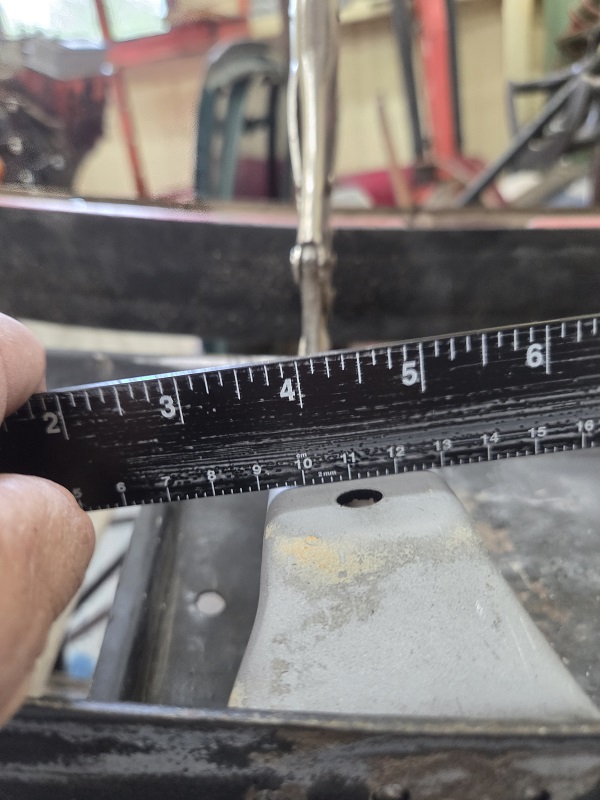 Then I drilled the holes for the top of the bumper, Note the larger hole is where the bumper top bolts in. 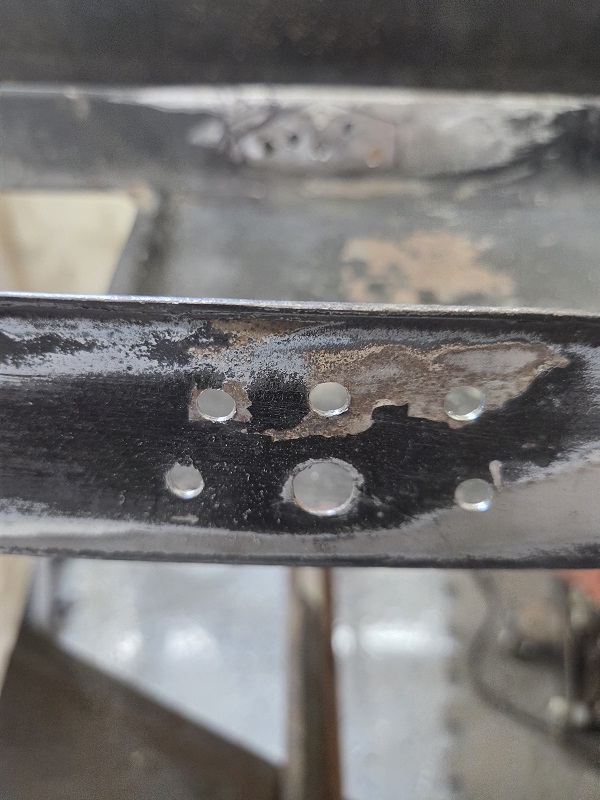 After puting the brace back into the bumper and lining everything back up, I welded the brace in using plug welds. then put a light coat of paint on it to prevent rust. 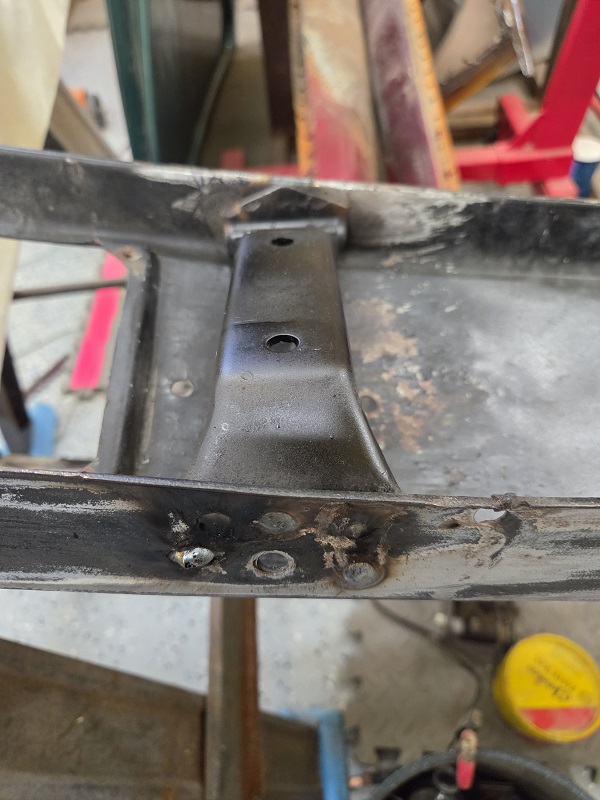 |
|
|
|
| Puebloswatcop |
Aug 28 2026, 05:26 PM
Post
#1264
|
|
Senior Member Group: Members Posts: 1,779 Joined: 27-December 14 From: Mineola, Texas Member No.: 18,258 Region Association: Southwest Region |
Next on the agenda is to weld in the bumper tit mounting holes. The entire face of the bumper was rough sanded, especially around the the holes.
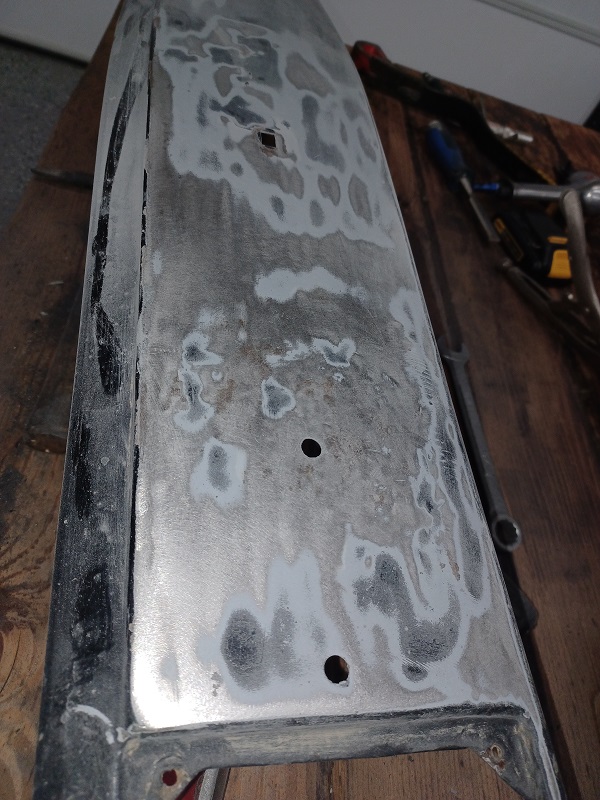 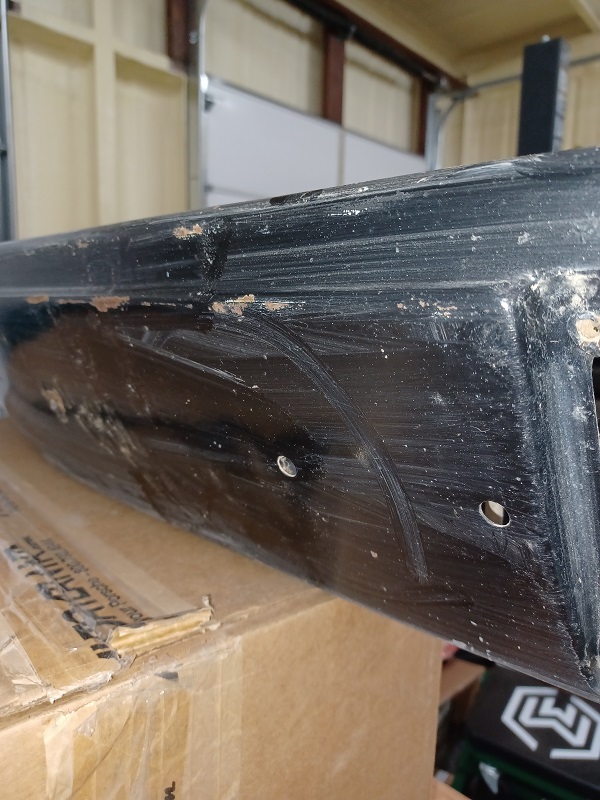 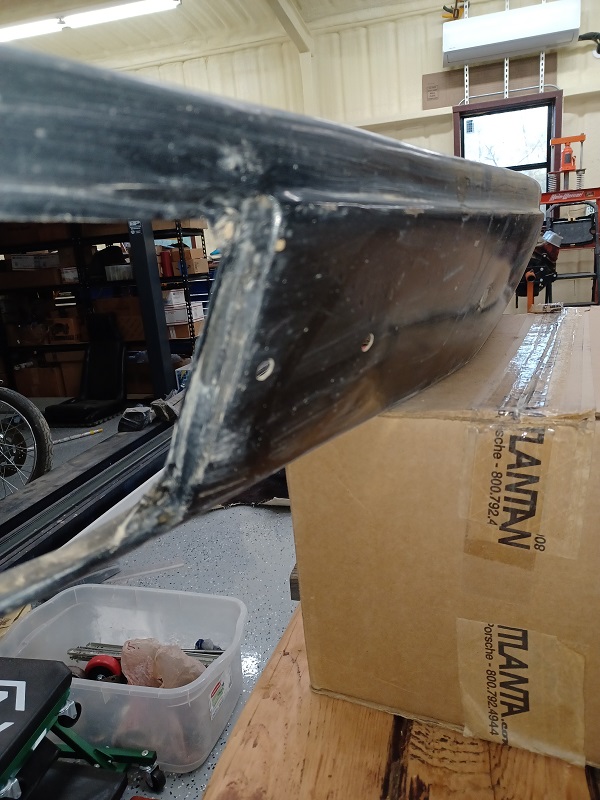 Then the holes were welded closed. I used a copper welding tool on the back side to make welding the hole a lot easier. 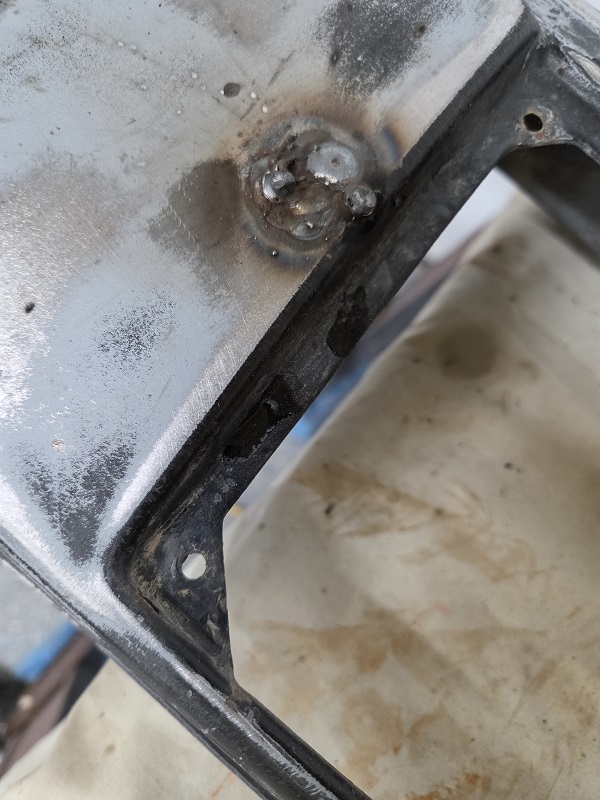 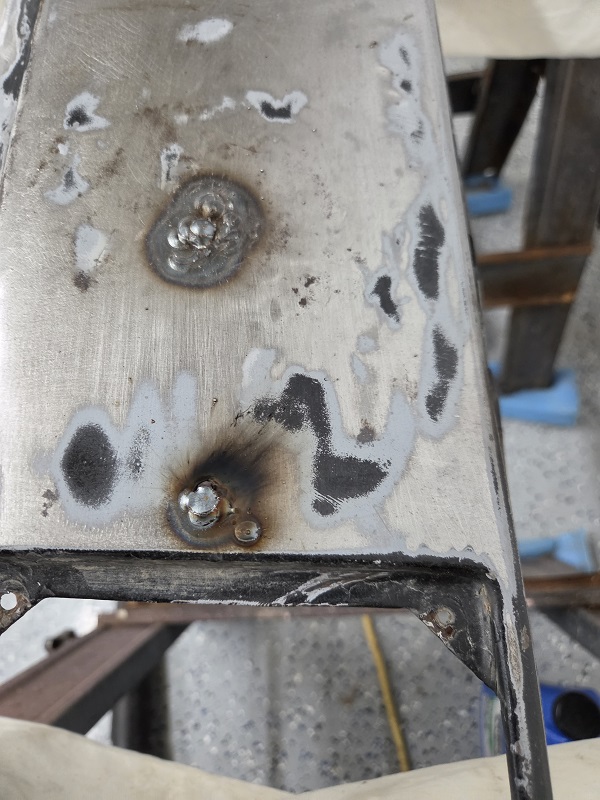 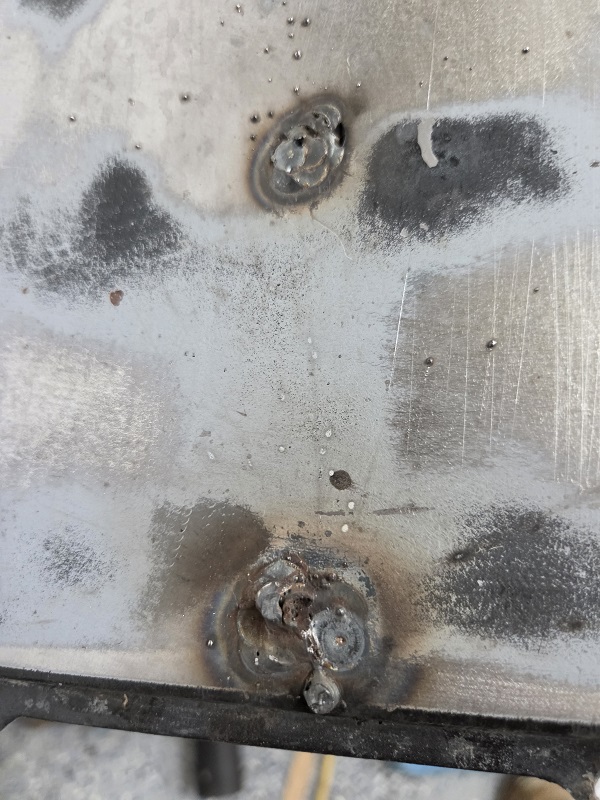 Then the welds were ground flush, both front and back sides 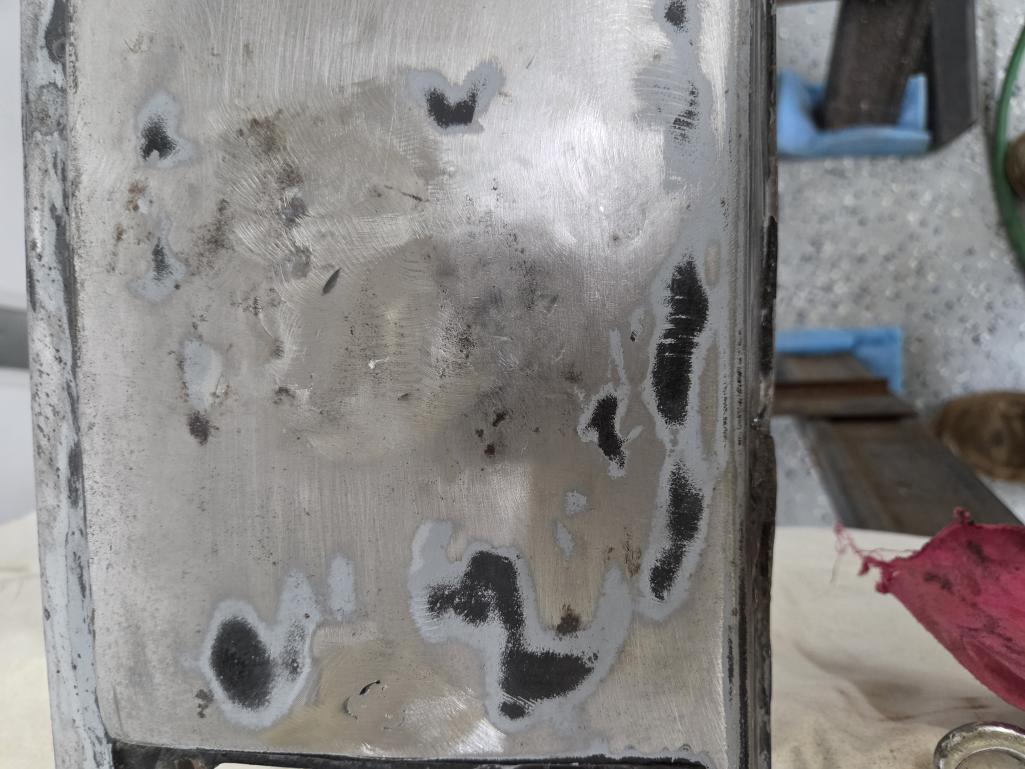 |
|
|
|
| Puebloswatcop |
Aug 28 2026, 05:51 PM
Post
#1265
|
|
Senior Member Group: Members Posts: 1,779 Joined: 27-December 14 From: Mineola, Texas Member No.: 18,258 Region Association: Southwest Region |
Then some other minor touch up things. The hole was finished where the supprt bracket was welded in, and a crack and hole in the bottom of the bumper was repaired.
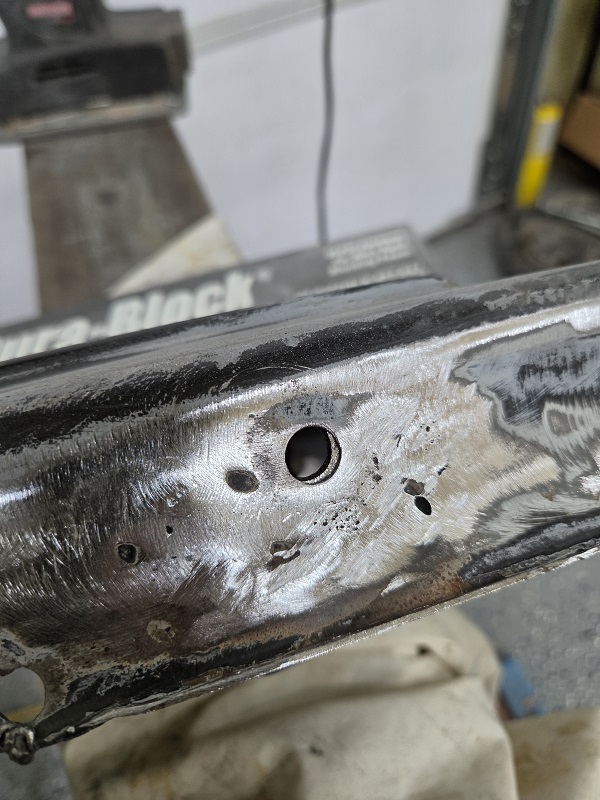 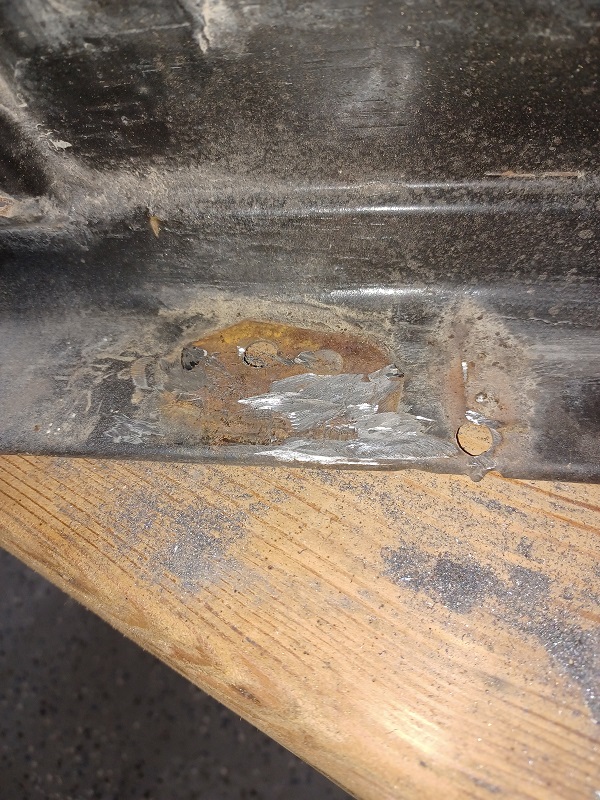 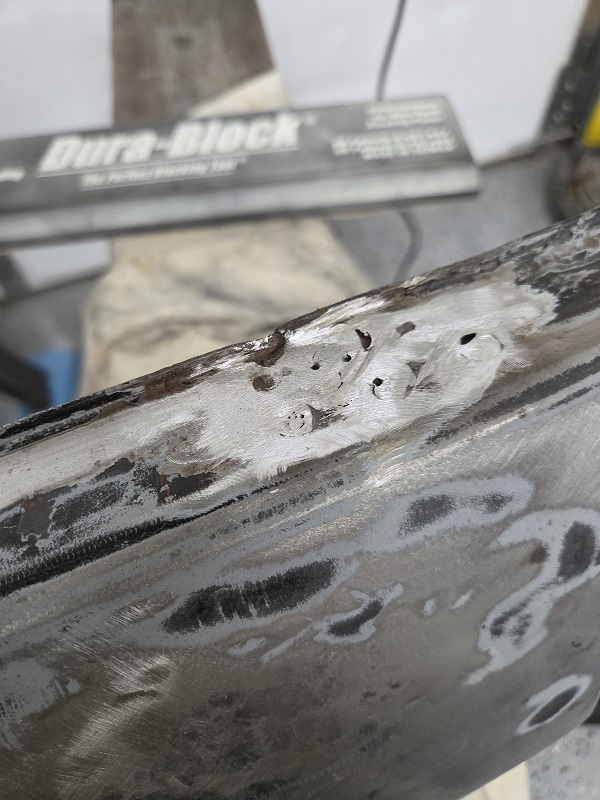 |
|
|
|
| Puebloswatcop |
Aug 28 2026, 06:04 PM
Post
#1266
|
|
Senior Member Group: Members Posts: 1,779 Joined: 27-December 14 From: Mineola, Texas Member No.: 18,258 Region Association: Southwest Region |
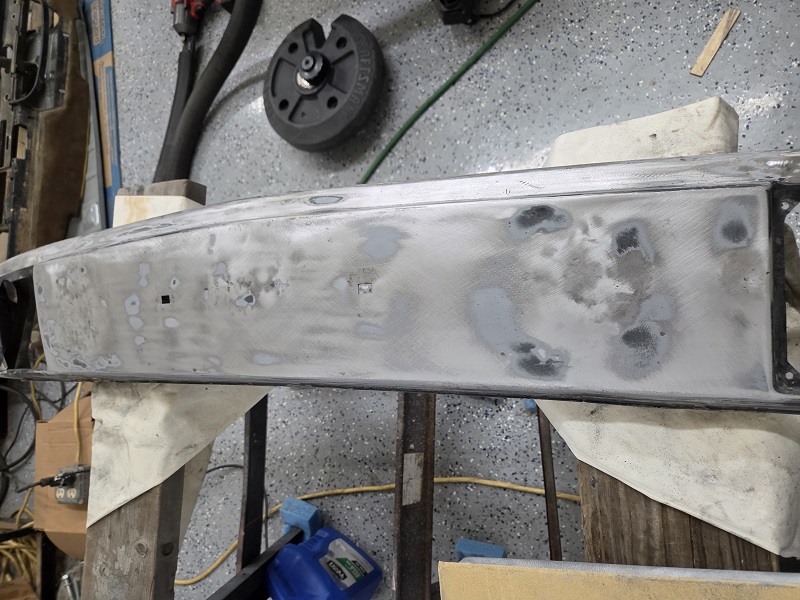
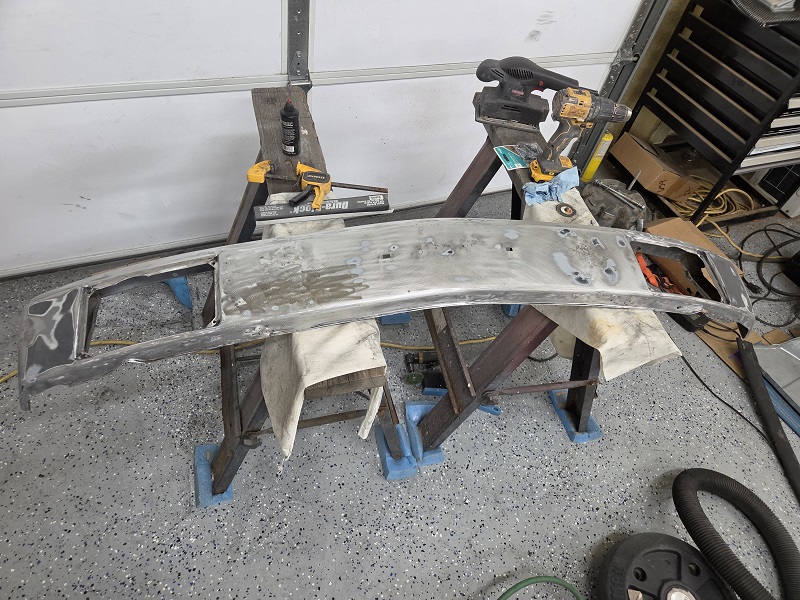
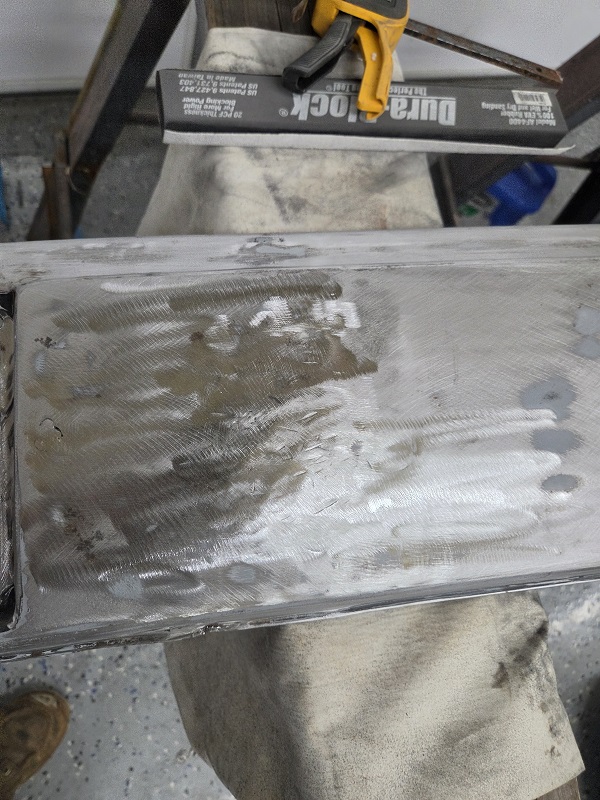
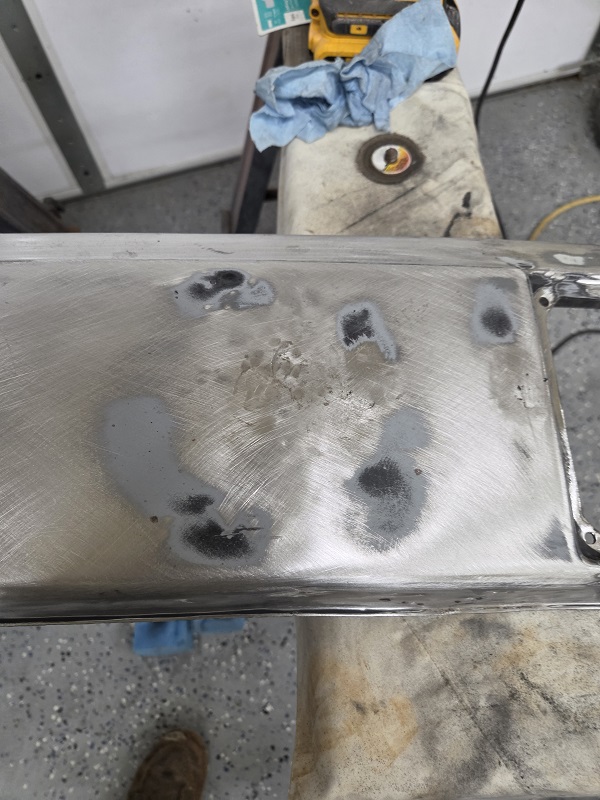
After a few hours of hammer and dolly work, most everything was shaped to what I thought was going to be good, I am still a bit concerned that the high spot on the drivers side, where the tit was mounted, still may be a little high. Problem is, when I hammer the hump in one spot, it changes the profile in another. I tried shrinking it, but it didn't do a whole lot.
    |
|
|
|
| Puebloswatcop |
Aug 28 2026, 06:24 PM
Post
#1267
|
|
Senior Member Group: Members Posts: 1,779 Joined: 27-December 14 From: Mineola, Texas Member No.: 18,258 Region Association: Southwest Region |
After the hammer and dolly session, I started spot filling the smaller imperfections
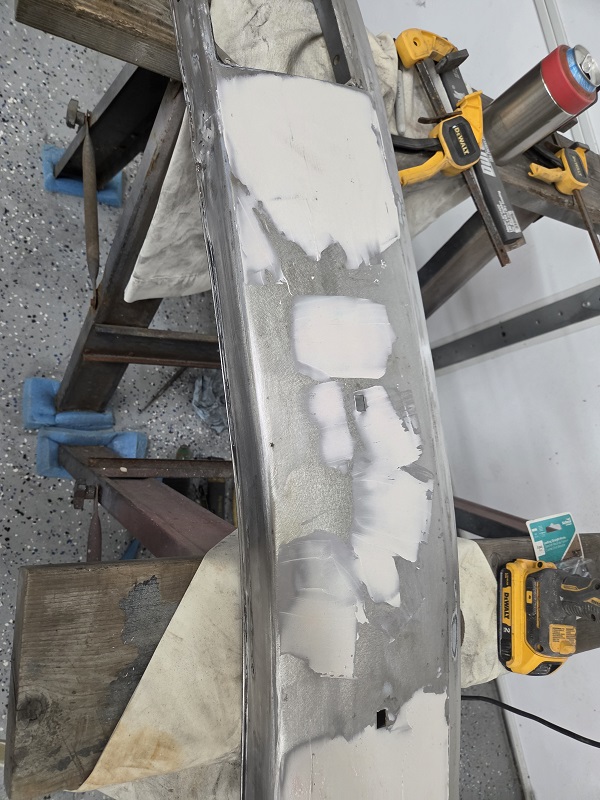 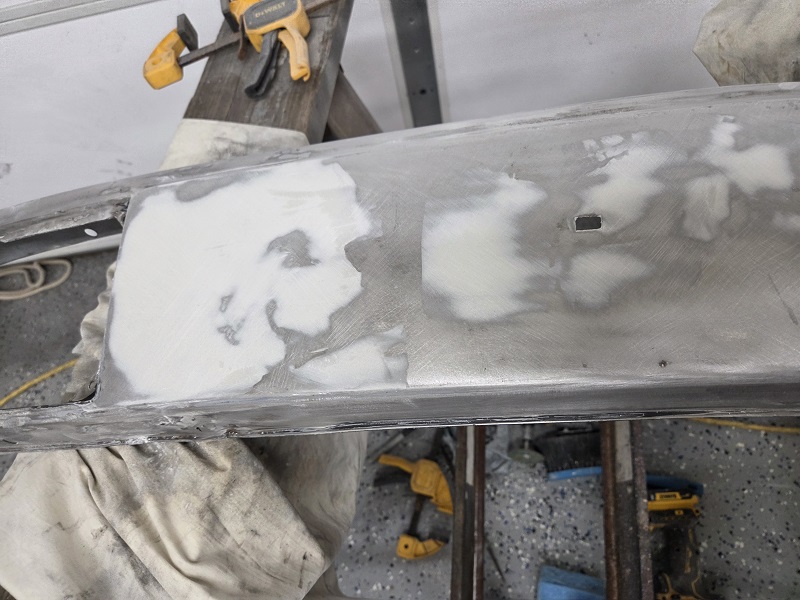 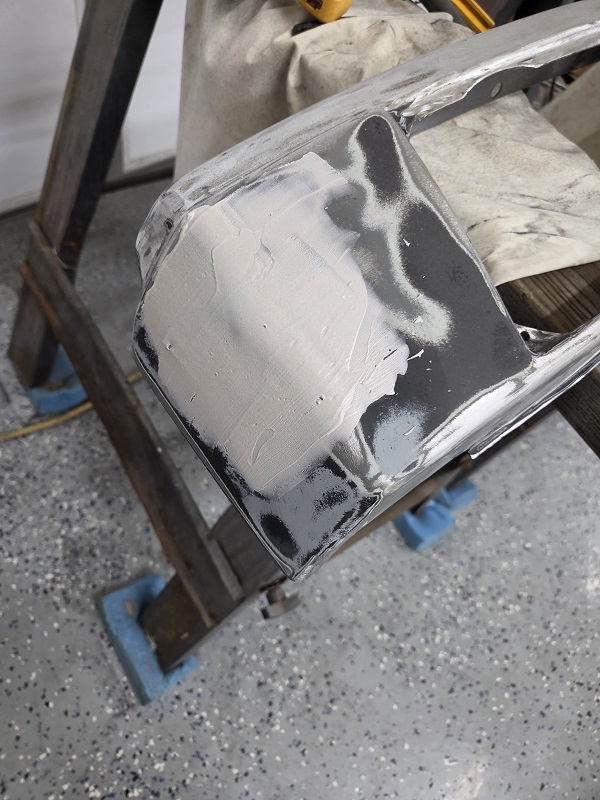 Then I put on a coat of filler on the areas where the Tit holes were welded closed. As youcan see, as the drivers side has a high spot, that came through after some sanding. I may have to take the filler out around it and do more hammer an dolly work then re-coat it 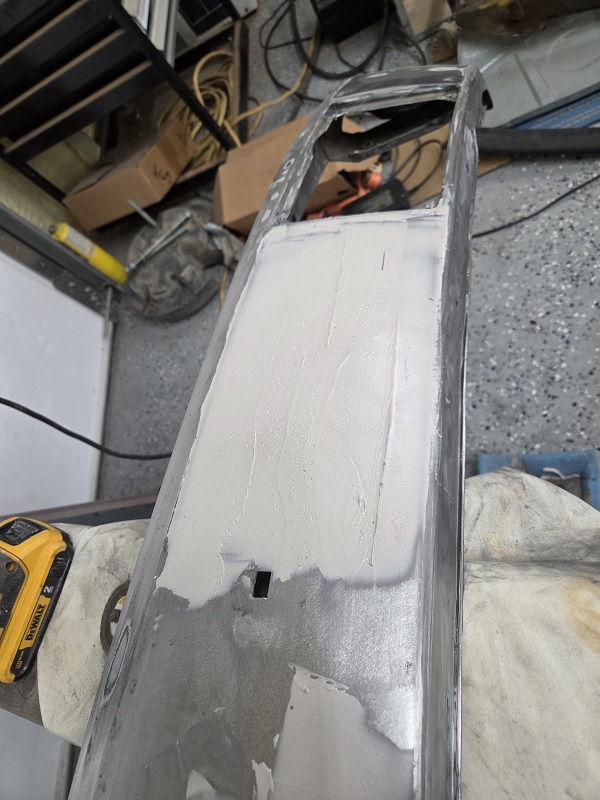 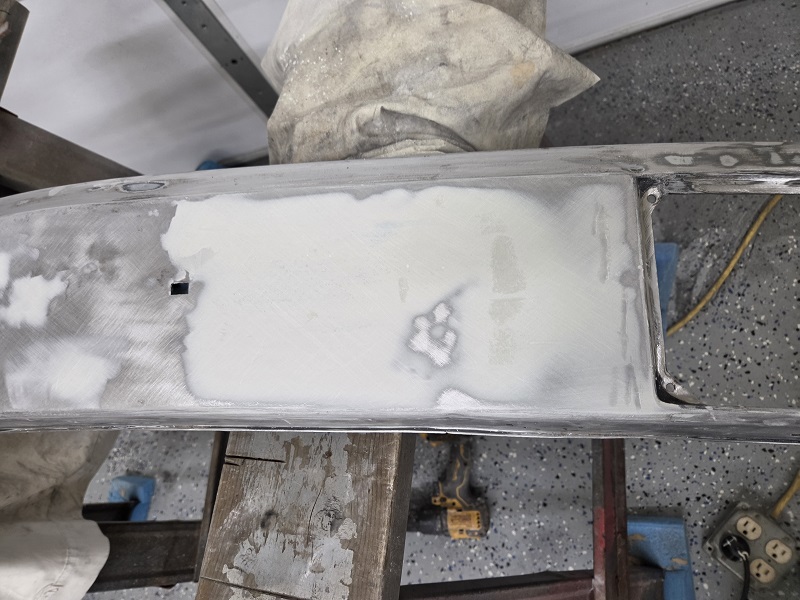 After re-coating the bumper, so far, the high spot on the drivers side is coming out nicely, but now the passenger side doesn't want to play nice.....Damn 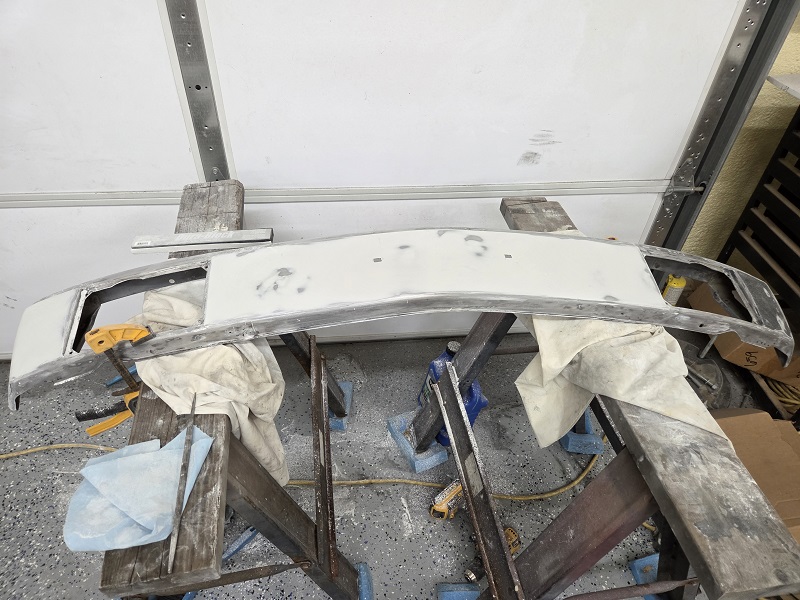 Well to tired to try and tackle the issue for now, will try again tomorrow. |
|
|
|
| Puebloswatcop |
Sep 9 2026, 07:00 PM
Post
#1268
|
|
Senior Member Group: Members Posts: 1,779 Joined: 27-December 14 From: Mineola, Texas Member No.: 18,258 Region Association: Southwest Region |
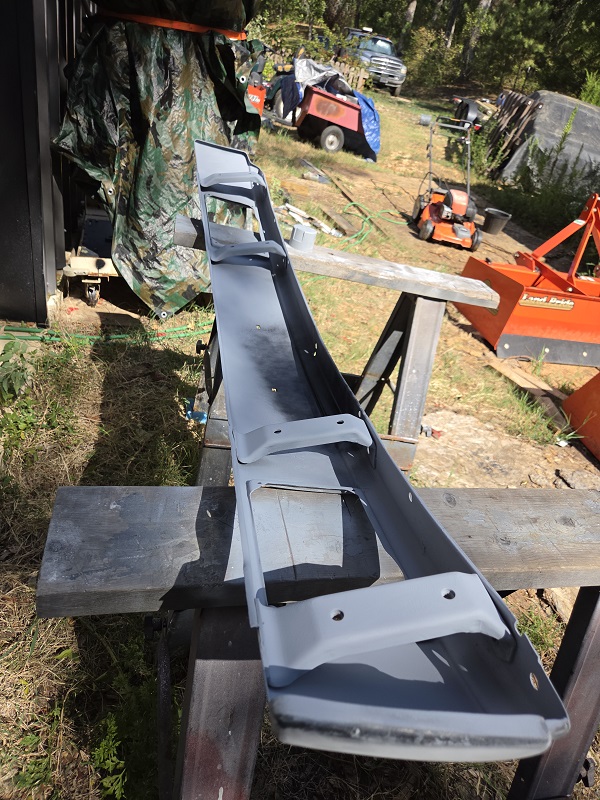
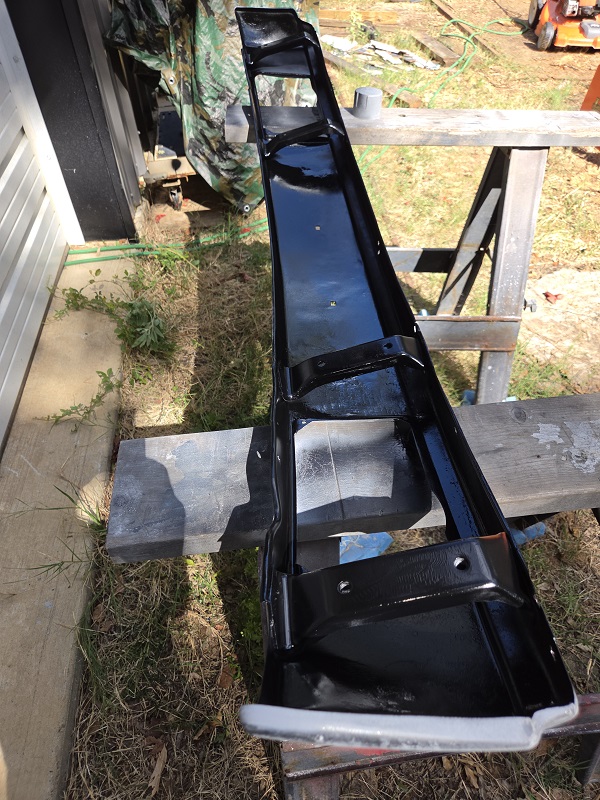
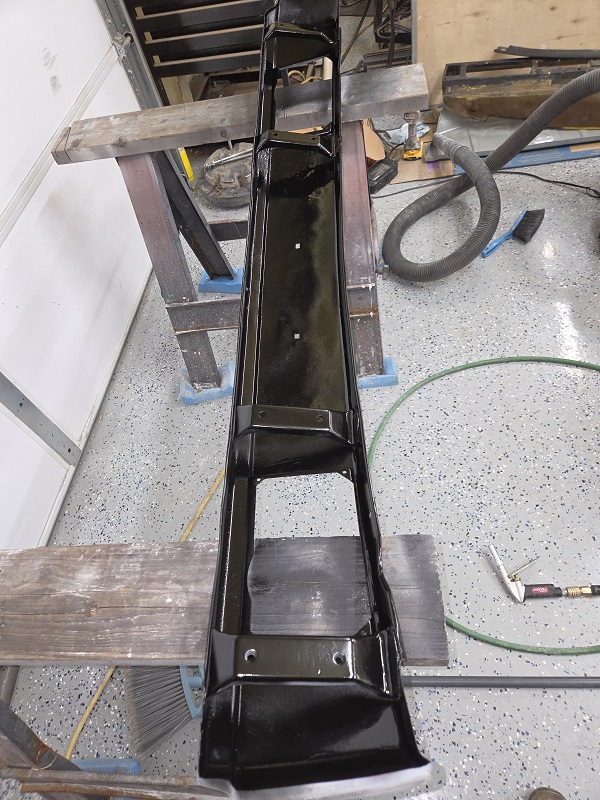
Back to work on the front bumper. Since I am ready to do finish work on the front side of the bumper, I decided I would go ahead and paint the back side so I wouldn't be spraying primer when the front was finished. I shot 2 coats of primer, then 2 coats of a satin black. The satin black offered me the opportunity to see what it looked like before I finish the front side of the bumper.
   |
|
|
|
| Puebloswatcop |
Sep 9 2026, 07:09 PM
Post
#1269
|
|
Senior Member Group: Members Posts: 1,779 Joined: 27-December 14 From: Mineola, Texas Member No.: 18,258 Region Association: Southwest Region |
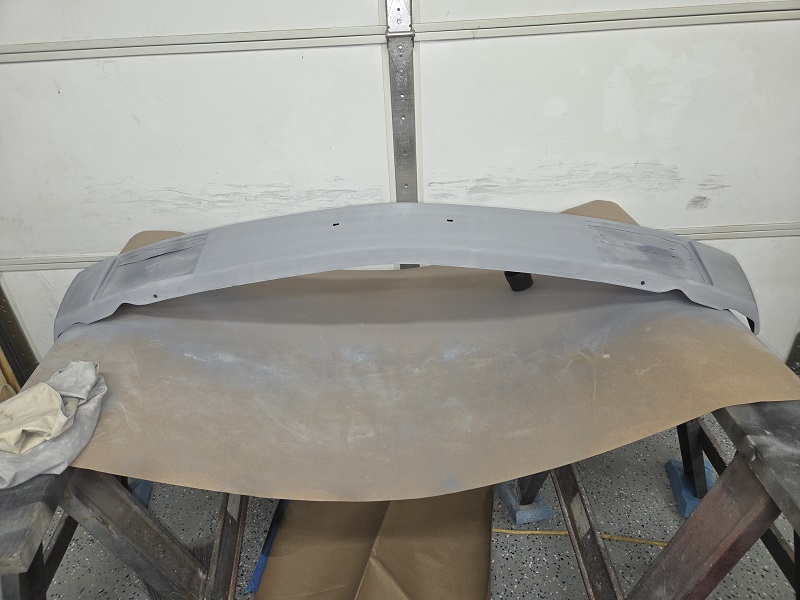
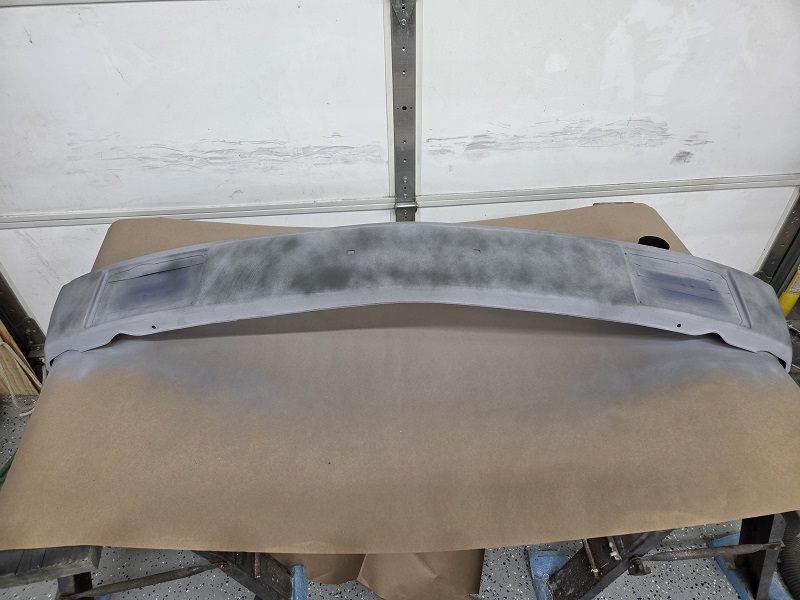
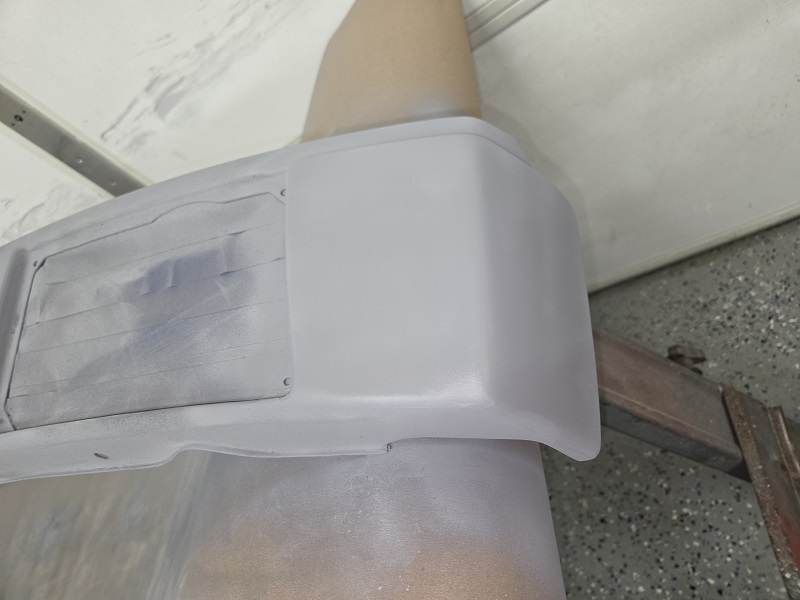
After shooting the back side, it was time to finish the front. It felt nice and smooth, but now was going to be the moment of truth. The first coat of primer I shot it with a high build primer, let that flash and then hit it with a second coat. As you could see in the prior pics, I was painting outside, but the heat and humidity made that unworkable, so I moved back inside the shop. I hit it with a guide coat of black primer, and then it was time to see if it was truely as flat as I felt....
  |
|
|
|
| Puebloswatcop |
Sep 9 2026, 07:18 PM
Post
#1270
|
|
Senior Member Group: Members Posts: 1,779 Joined: 27-December 14 From: Mineola, Texas Member No.: 18,258 Region Association: Southwest Region |
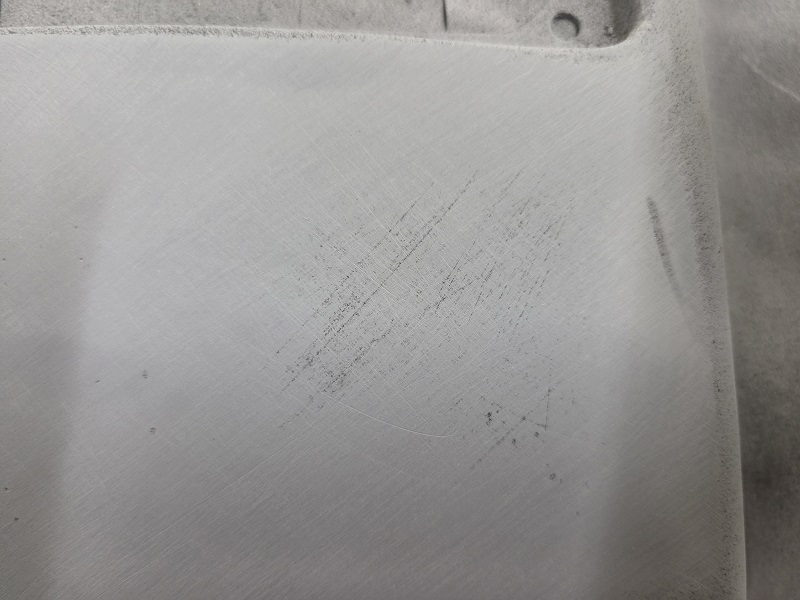
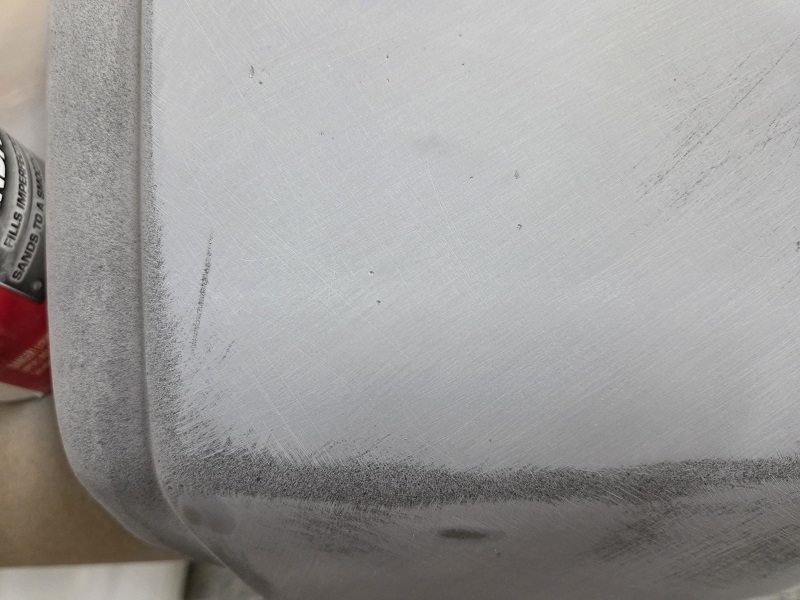
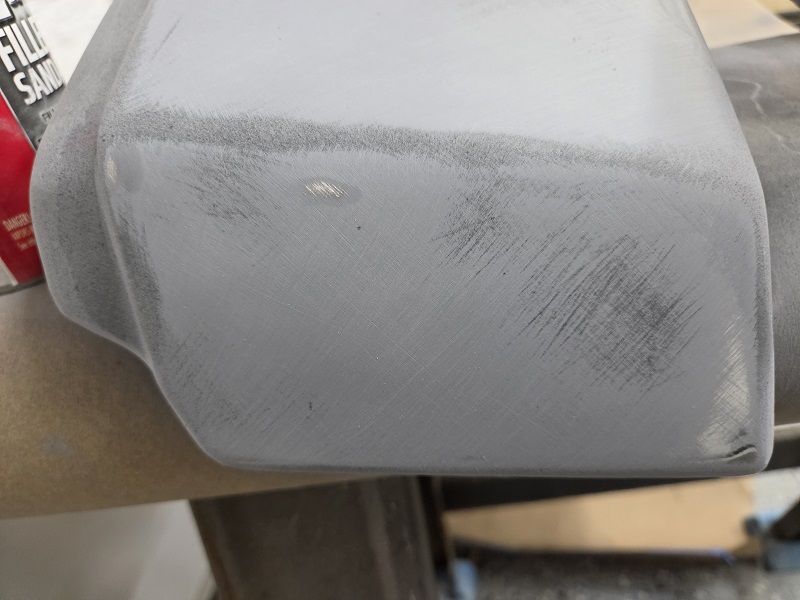
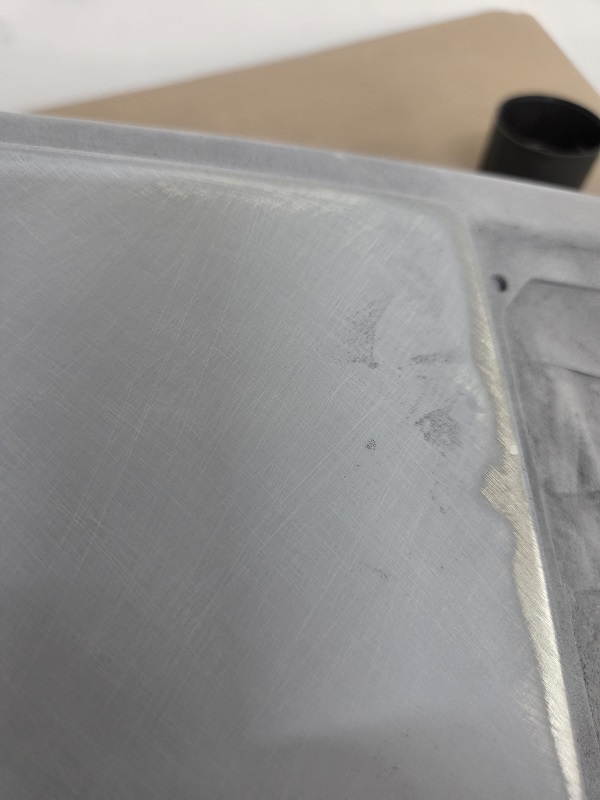
I sanded it with a 120 grit and for the most part everything was looking goodI had a few small low spots, but these could be easily fixed with another coat or two of the high build primer. I would have to shoot at least one more anyway and then sand it with 180, so I wasn't to worried about the sanding scratches that appeared or the small spots.
     |
|
|
|
| Puebloswatcop |
Sep 9 2026, 07:30 PM
Post
#1271
|
|
Senior Member Group: Members Posts: 1,779 Joined: 27-December 14 From: Mineola, Texas Member No.: 18,258 Region Association: Southwest Region |
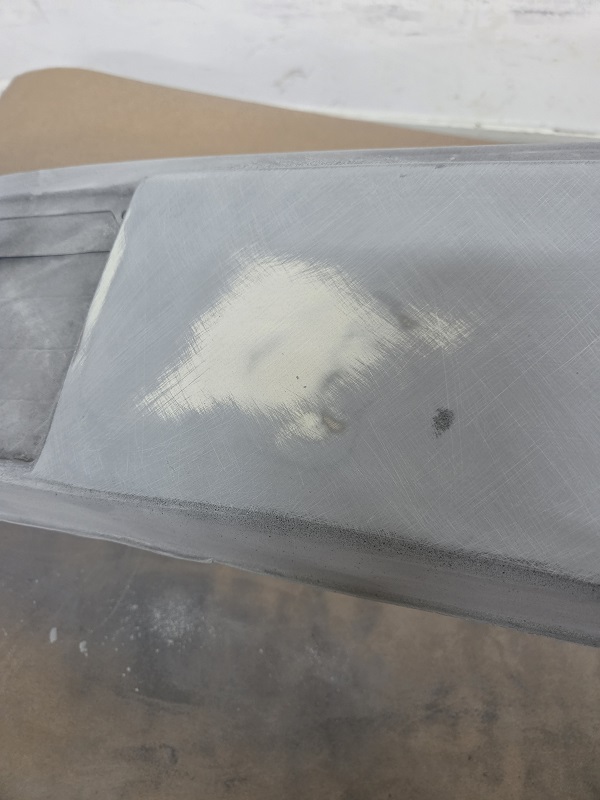
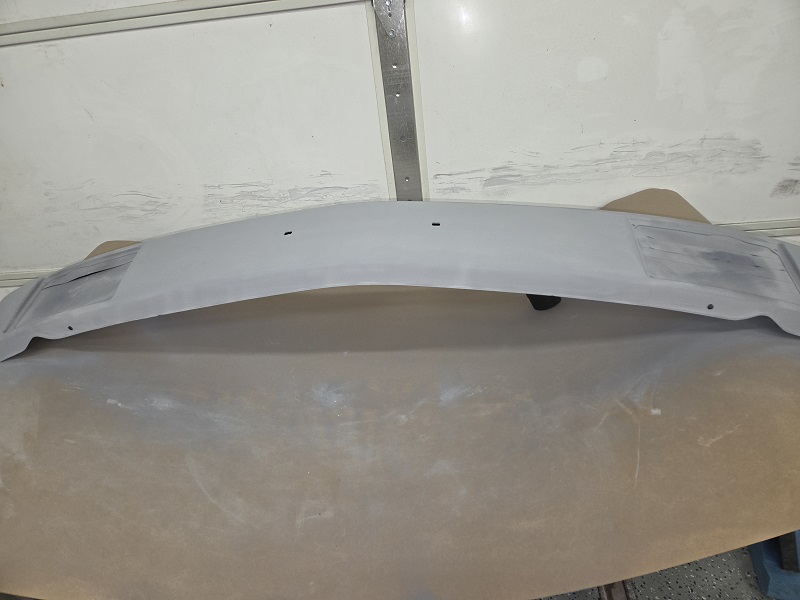
There was however one real problem spot, it was a high area where the worst of the damage had been. A little disapointing, but fixable. I kept sanding lightly until I could just see the high point of the metal showing through the filler and blended it out to the surface area around it. then after vacuuming away all of the sanding dust, wiped it down with wax and greese remover, then shot it with another 2 coats of high build primer. I'll give that a couple of days and then sand it with 180 grit and see where I'm at.
  |
|
|
|
| Puebloswatcop |
Sep 9 2026, 07:40 PM
Post
#1272
|
|
Senior Member Group: Members Posts: 1,779 Joined: 27-December 14 From: Mineola, Texas Member No.: 18,258 Region Association: Southwest Region |
QUOTE(bkrantz @ Aug 23 2026, 08:58 PM)  Those should be bright enough! I swapped a single LED bulb into mine and wish they made more light. That was my first thought, but I really wanted to try Spokes conversion. Its never too late, and the swap was very simple. I highly recommend it Bob. |
|
|
|
| friethmiller |
Sep 10 2026, 07:23 AM
Post
#1273
|
|
Senior Member Group: Members Posts: 1,579 Joined: 10-February 19 From: Austin, TX Member No.: 22,863 Region Association: Southwest Region
|
QUOTE(Puebloswatcop @ Sep 9 2026, 08:30 PM) There was however one real problem spot, it was a high area where the worst of the damage had been. A little disapointing, but fixable. I kept sanding lightly until I could just see the high point of the metal showing through the filler and blended it out to the surface area around it. then after vacuuming away all of the sanding dust, wiped it down with wax and greese remover, then shot it with another 2 coats of high build primer. I'll give that a couple of days and then sand it with 180 grit and see where I'm at. Good work here Kevin! Honestly, at this point you may just need another skim coat of filler to get the entire area up high enough to sand everything flat. If it were me, I'd tape the edges and skim at least half (if not all) of that center section of that bumper. But I'm not there looking at it so I'm sure you've got a better idea of things. Body work on bumpers isn't always pretty but, after 50 years, very necessary. (IMG:style_emoticons/default/popcorn[1].gif) |
|
|
|
| Puebloswatcop |
Sep 10 2026, 07:33 AM
Post
#1274
|
|
Senior Member Group: Members Posts: 1,779 Joined: 27-December 14 From: Mineola, Texas Member No.: 18,258 Region Association: Southwest Region |
QUOTE(friethmiller @ Sep 10 2026, 08:23 AM) QUOTE(Puebloswatcop @ Sep 9 2026, 08:30 PM) There was however one real problem spot, it was a high area where the worst of the damage had been. A little disapointing, but fixable. I kept sanding lightly until I could just see the high point of the metal showing through the filler and blended it out to the surface area around it. then after vacuuming away all of the sanding dust, wiped it down with wax and greese remover, then shot it with another 2 coats of high build primer. I'll give that a couple of days and then sand it with 180 grit and see where I'm at. Good work here Kevin! Honestly, at this point you may just need another skim coat of filler to get the entire area up high enough to sand everything flat. If it were me, I'd tape the edges and skim at least half (if not all) of that center section of that bumper. But I'm not there looking at it so I'm sure you've got a better idea of things. Body work on bumpers isn't always pretty but, after 50 years, very necessary. (IMG:style_emoticons/default/popcorn[1].gif) Thanks for the tip Fred. You have a good point. I'm going to see how this sands out after the 2 coats of high build, and if I still have that high spot, I will do exactly that. Question, Can I just rough up the paint with 60 or 80 paper and skim over the top of the primer, or is it better to take it all off? |
|
|
|
| friethmiller |
Sep 10 2026, 09:19 AM
Post
#1275
|
|
Senior Member Group: Members Posts: 1,579 Joined: 10-February 19 From: Austin, TX Member No.: 22,863 Region Association: Southwest Region
|
QUOTE(Puebloswatcop @ Sep 10 2026, 08:33 AM) Thanks for the tip Fred. You have a good point. I'm going to see how this sands out after the 2 coats of high build, and if I still have that high spot, I will do exactly that. Question, Can I just rough up the paint with 60 or 80 paper and skim over the top of the primer, or is it better to take it all off? I'd be hitting it with something in the range of 120 - 180 grit on a semi-flexible board. 60-80 is too much grit and it will come off too fast for you not to mention the scratches. Yes, you can absolutely use polyester filler over your high-build - assuming it's a polyester-based primer. Use guide coat here. If you get it to level out, clean it thoroughly and re-primer it with 2 coats, hit with 220-grit and move up from there. With painted bumpers, I wouldn't go past 400-grit unless you've got some special high-gloss stuff planned. Good luck. |
|
|
|
| friethmiller |
Sep 10 2026, 09:27 AM
Post
#1276
|
|
Senior Member Group: Members Posts: 1,579 Joined: 10-February 19 From: Austin, TX Member No.: 22,863 Region Association: Southwest Region
|
QUOTE(Puebloswatcop @ Sep 9 2026, 08:30 PM) One other note: If you leave the above -as is, it will show in the final paint and it will bother you every time you see it. So keep going for your own peace of mind. Also, once you get it leveled out flat without any low spots, take the time to finish your edges. I've found the front bumpers are especially tricky to get the edges correct. Obviously a lot it is covered up by the bumper-tops but verify things. The edges around the fog light grills are not and you'll want to make sure things look good. |
|
|
|
| Puebloswatcop |
Sep 10 2026, 12:01 PM
Post
#1277
|
|
Senior Member Group: Members Posts: 1,779 Joined: 27-December 14 From: Mineola, Texas Member No.: 18,258 Region Association: Southwest Region |
QUOTE(friethmiller @ Sep 10 2026, 10:27 AM) QUOTE(Puebloswatcop @ Sep 9 2026, 08:30 PM) One other note: If you leave the above -as is, it will show in the final paint and it will bother you every time you see it. So keep going for your own peace of mind. Also, once you get it leveled out flat without any low spots, take the time to finish your edges. I've found the front bumpers are especially tricky to get the edges correct. Obviously a lot it is covered up by the bumper-tops but verify things. The edges around the fog light grills are not and you'll want to make sure things look good. Thanks Fred I appreciate your input on this. Your work absolutely gives me the trust and confidence to make this come out the best it can. And on the super gloss black, NOPE. it will most likely be the same satin black that I did the back of the bumper with. |
|
|
|
| friethmiller |
Sep 10 2026, 01:11 PM
Post
#1278
|
|
Senior Member Group: Members Posts: 1,579 Joined: 10-February 19 From: Austin, TX Member No.: 22,863 Region Association: Southwest Region
|
QUOTE(Puebloswatcop @ Sep 10 2026, 01:01 PM) Thanks Fred I appreciate your input on this. Sure, no problem. Just to be clear, you can certainly use a lower grit prior to filling on top of the high build. The difference b/w 80 and 120 grit isn't what is important here. My concern would be sanding the primer and specifically getting your lows prep'd. Sand the surface with a block, use a pencil to circle your lows, and then hand-sand these low spots to make sure every inch is rough'd up ready to go. Then do your cleaning to make sure it's ready for filler or paint, which ever. The pencil marks will help you later when you start sanding. They'll start to show and you'll know to stop. This "stopping" thing is the hardest part. Ask me how I know (IMG:style_emoticons/default/rolleyes.gif) |
|
|
|
| Puebloswatcop |
Sep 10 2026, 06:05 PM
Post
#1279
|
|
Senior Member Group: Members Posts: 1,779 Joined: 27-December 14 From: Mineola, Texas Member No.: 18,258 Region Association: Southwest Region |
QUOTE(friethmiller @ Sep 10 2026, 02:11 PM) QUOTE(Puebloswatcop @ Sep 10 2026, 01:01 PM) Thanks Fred I appreciate your input on this. Sure, no problem. Just to be clear, you can certainly use a lower grit prior to filling on top of the high build. The difference b/w 80 and 120 grit isn't what is important here. My concern would be sanding the primer and specifically getting your lows prep'd. Sand the surface with a block, use a pencil to circle your lows, and then hand-sand these low spots to make sure every inch is rough'd up ready to go. Then do your cleaning to make sure it's ready for filler or paint, which ever. The pencil marks will help you later when you start sanding. They'll start to show and you'll know to stop. This "stopping" thing is the hardest part. Ask me how I know (IMG:style_emoticons/default/rolleyes.gif) Let me guess Fred, experience....it can be good or bad. When i was talking about using the courser paper, thats what I was talking about, I wanted to be sure it had something for the filler to bite into. I like the idea of using the pencile as a tattle tale to know when to stop. |
|
|
|
| friethmiller |
Sep 11 2026, 02:45 AM
Post
#1280
|
|
Senior Member Group: Members Posts: 1,579 Joined: 10-February 19 From: Austin, TX Member No.: 22,863 Region Association: Southwest Region
|
QUOTE(Puebloswatcop @ Sep 10 2026, 07:05 PM) Let me guess Fred, experience....it can be good or bad. When i was talking about using the courser paper, thats what I was talking about, I wanted to be sure it had something for the filler to bite into. I like the idea of using the pencile as a tattle tale to know when to stop. Right. But of course the main goal of circling the low is to know where the hell to put the filler since sanding it removes all visible trace. (IMG:style_emoticons/default/smile.gif) |
|
|
|
|
20 User(s) are reading this topic (20 Guests and 0 Anonymous Users)
0 Members:

|
Lo-Fi Version | Time is now: 20th October 2026 - 06:15 AM |
Invision Power Board
v9.1.4 © 2026 IPS, Inc.