|
|
|
Porsche, and the Porsche crest are registered trademarks of Dr. Ing. h.c. F. Porsche AG.
This site is not affiliated with Porsche in any way. Its only purpose is to provide an online forum for car enthusiasts. All other trademarks are property of their respective owners. |
|
|

  |

| Puebloswatcop |
 Dec 31 2021, 06:01 PM Dec 31 2021, 06:01 PM
Post
#281
|
|
Senior Member  Group: Members Posts: 1,690 Joined: 27-December 14 From: Mineola, Texas Member No.: 18,258 Region Association: Southwest Region |
I used carburetor cleaner and was able to remove allot of the adhesive. But had to quit because I couldn't open the garage door.
So I guess we will call it a year and go drink beer. (IMG:style_emoticons/default/beer.gif) (IMG:style_emoticons/default/beer3.gif) Hope everyone has a great and safe new years eve, and a happy new year. 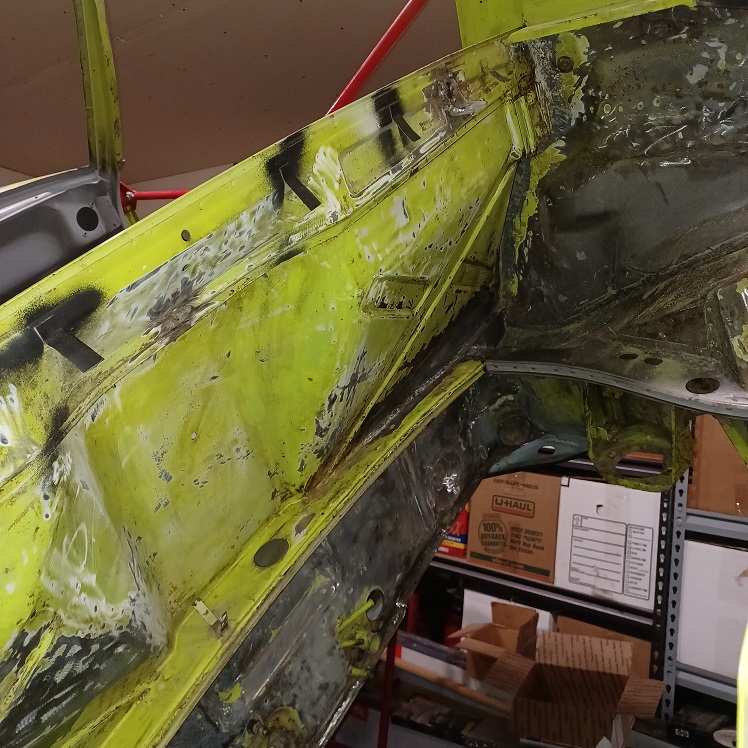 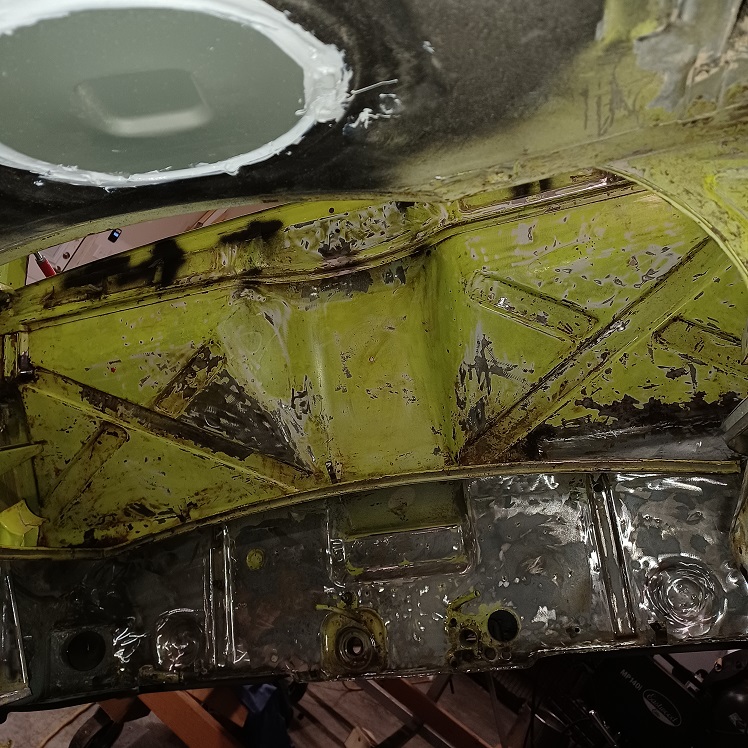 |
   |

 
|
| Luke M |
Dec 31 2021, 06:13 PM
Post
#282
|
|
Senior Member Group: Members Posts: 1,447 Joined: 8-February 05 From: WNY Member No.: 3,574 Region Association: North East States |
I can tell you that after having my brothers 914 blasted it did not remove the seam sealer. My brother removed some from the front trunk but left the area under the cowl alone. The blasting didn't touch the seam sealer at all. The blasting sorta cleaned the areas where he used the heat gun and scraper. He had to go back and hit the areas with a wire wheel to remove it all. As for seam sealer we used a product called Sure Seal. It comes in a calk gun tube then we spread it with a hard bristle brush. We also used epoxy primer in the areas prior to adding the seam sealer.
Car looks great. I know installing flares can be a pain to get just right. |
|
|
|
| Puebloswatcop |
Dec 31 2021, 06:38 PM
Post
#283
|
|
Senior Member Group: Members Posts: 1,690 Joined: 27-December 14 From: Mineola, Texas Member No.: 18,258 Region Association: Southwest Region |
QUOTE(Luke M @ Dec 31 2021, 06:13 PM)  I can tell you that after having my brothers 914 blasted it did not remove the seam sealer. My brother removed some from the front trunk but left the area under the cowl alone. The blasting didn't touch the seam sealer at all. The blasting sorta cleaned the areas where he used the heat gun and scraper. He had to go back and hit the areas with a wire wheel to remove it all. As for seam sealer we used a product called Sure Seal. It comes in a calk gun tube then we spread it with a hard bristle brush. We also used epoxy primer in the areas prior to adding the seam sealer. Car looks great. I know installing flares can be a pain to get just right. Thanks Luke. I noticed in all the posts that the seam sealer stays intact, but I really hope the tar coating will come off. I started sealing the floor plugs etc., with Tiger seal from Upol, but the tubes I got were old so it was very difficult to use, so I returned them. How did you like the sure seal, and do you know who makes it? I am planning on doing the 2 part Epoxy primer as well. |
|
|
|
| Luke M |
Jan 1 2022, 09:56 AM
Post
#284
|
|
Senior Member Group: Members Posts: 1,447 Joined: 8-February 05 From: WNY Member No.: 3,574 Region Association: North East States |
QUOTE(Puebloswatcop @ Dec 31 2021, 05:38 PM) QUOTE(Luke M @ Dec 31 2021, 06:13 PM) I can tell you that after having my brothers 914 blasted it did not remove the seam sealer. My brother removed some from the front trunk but left the area under the cowl alone. The blasting didn't touch the seam sealer at all. The blasting sorta cleaned the areas where he used the heat gun and scraper. He had to go back and hit the areas with a wire wheel to remove it all. As for seam sealer we used a product called Sure Seal. It comes in a calk gun tube then we spread it with a hard bristle brush. We also used epoxy primer in the areas prior to adding the seam sealer. Car looks great. I know installing flares can be a pain to get just right. Thanks Luke. I noticed in all the posts that the seam sealer stays intact, but I really hope the tar coating will come off. I started sealing the floor plugs etc., with Tiger seal from Upol, but the tubes I got were old so it was very difficult to use, so I returned them. How did you like the sure seal, and do you know who makes it? I am planning on doing the 2 part Epoxy primer as well. It's called Dominion Sure Seal LTD. Made in Canada Code : 9002 , Stock : CSW I picked up the tubes at a local auto paint supply store. Spread pretty well. I used the calk gun to apply and my brother behind me spreading it around. Dipped brush in mineral spirits to keep the sealer from sticking to the brush. After a while went to the finger spreading method.. (IMG:style_emoticons/default/lol-2.gif) Dries fairly quick too but we let it cure 24 hrs before painting over it. Attached image(s) 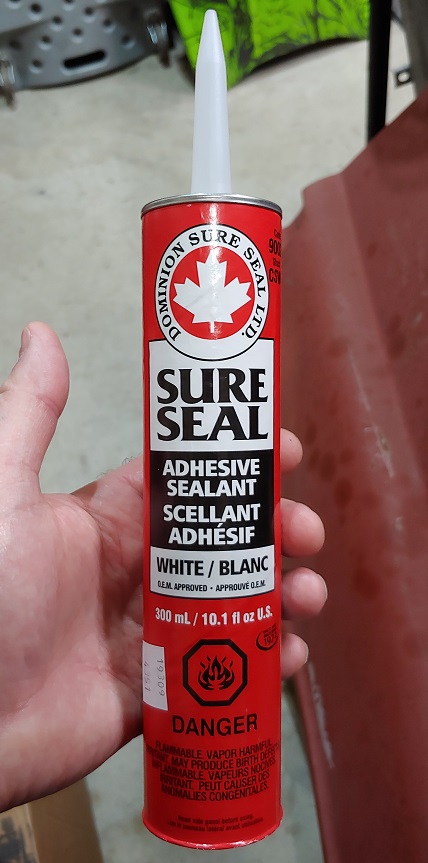
|
|
|
|
| Puebloswatcop |
Jan 1 2022, 10:09 AM
Post
#285
|
|
Senior Member Group: Members Posts: 1,690 Joined: 27-December 14 From: Mineola, Texas Member No.: 18,258 Region Association: Southwest Region |
QUOTE(Luke M @ Jan 1 2022, 09:56 AM) QUOTE(Puebloswatcop @ Dec 31 2021, 05:38 PM) QUOTE(Luke M @ Dec 31 2021, 06:13 PM) I can tell you that after having my brothers 914 blasted it did not remove the seam sealer. My brother removed some from the front trunk but left the area under the cowl alone. The blasting didn't touch the seam sealer at all. The blasting sorta cleaned the areas where he used the heat gun and scraper. He had to go back and hit the areas with a wire wheel to remove it all. As for seam sealer we used a product called Sure Seal. It comes in a calk gun tube then we spread it with a hard bristle brush. We also used epoxy primer in the areas prior to adding the seam sealer. Car looks great. I know installing flares can be a pain to get just right. Thanks Luke. I noticed in all the posts that the seam sealer stays intact, but I really hope the tar coating will come off. I started sealing the floor plugs etc., with Tiger seal from Upol, but the tubes I got were old so it was very difficult to use, so I returned them. How did you like the sure seal, and do you know who makes it? I am planning on doing the 2 part Epoxy primer as well. It's called Dominion Sure Seal LTD. Made in Canada Code : 9002 , Stock : CSW I picked up the tubes at a local auto paint supply store. Spread pretty well. I used the calk gun to apply and my brother behind me spreading it around. Dipped brush in mineral spirits to keep the sealer from sticking to the brush. After a while went to the finger spreading method.. (IMG:style_emoticons/default/lol-2.gif) Dries fairly quick too but we let it cure 24 hrs before painting over it. Thanks Luke. I will check at my local paint supply. Thanks for the input. Happy new Year. |
|
|
|
| Puebloswatcop |
Jan 5 2022, 03:20 PM
Post
#286
|
|
Senior Member Group: Members Posts: 1,690 Joined: 27-December 14 From: Mineola, Texas Member No.: 18,258 Region Association: Southwest Region |
Finally got a day where I could move the hot rod outside, so back to work on the 914.
Finished installing the rear frame stiffeners, then coated it with some primer to fend off the rust. 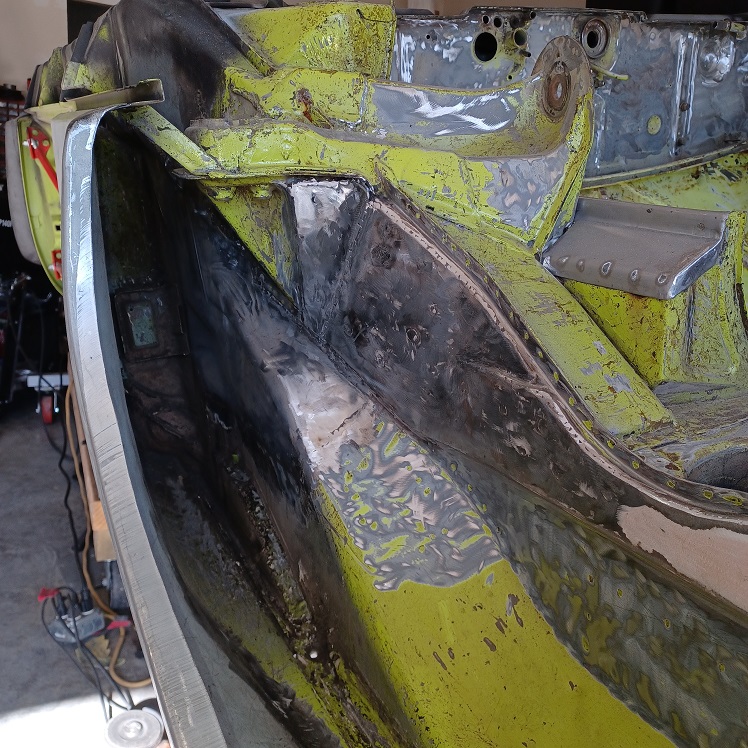 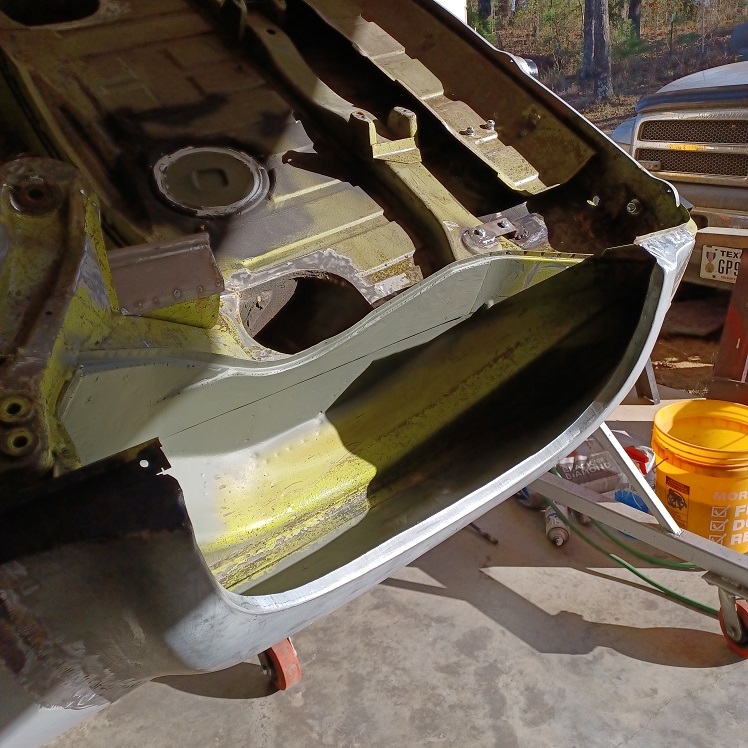 |
|
|
|
| Puebloswatcop |
Jan 5 2022, 03:24 PM
Post
#287
|
|
Senior Member Group: Members Posts: 1,690 Joined: 27-December 14 From: Mineola, Texas Member No.: 18,258 Region Association: Southwest Region |
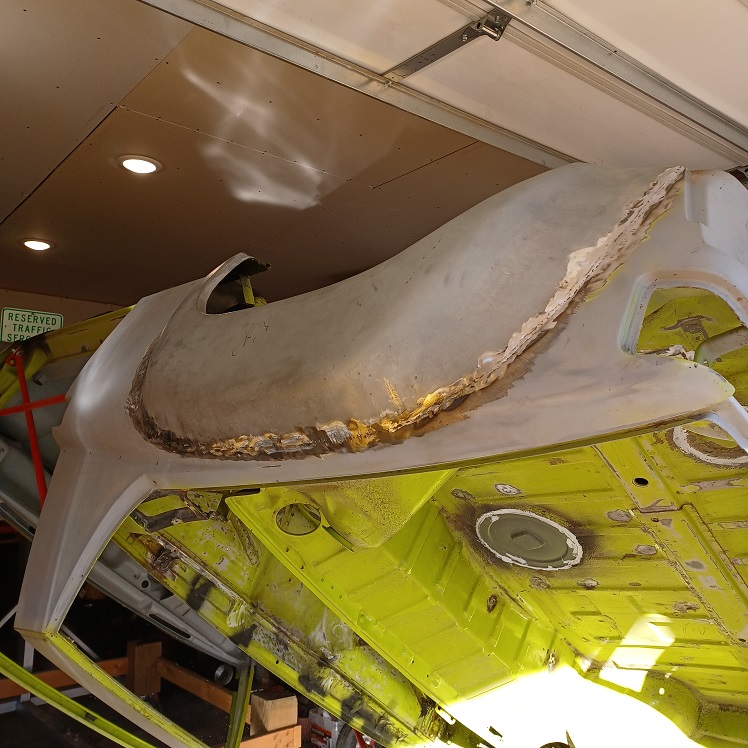
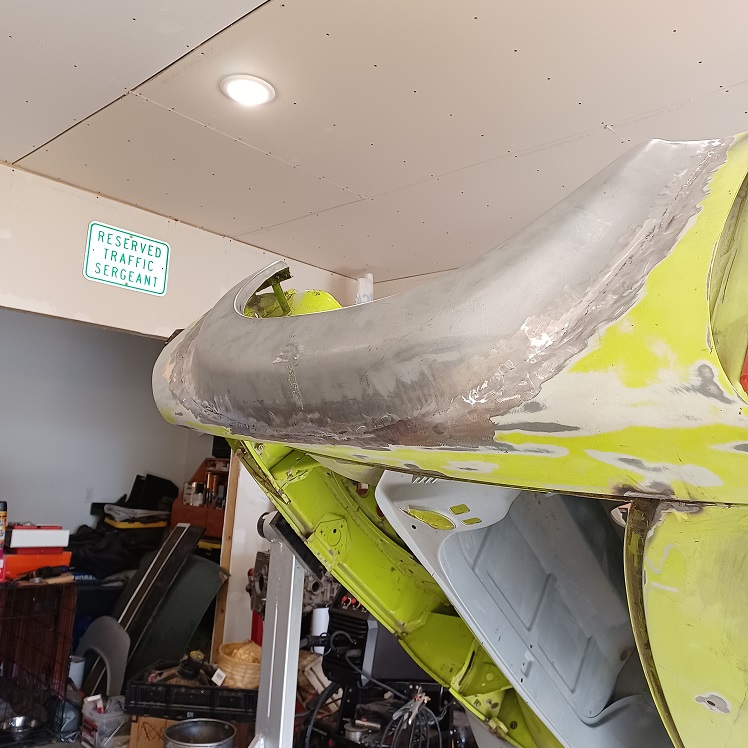
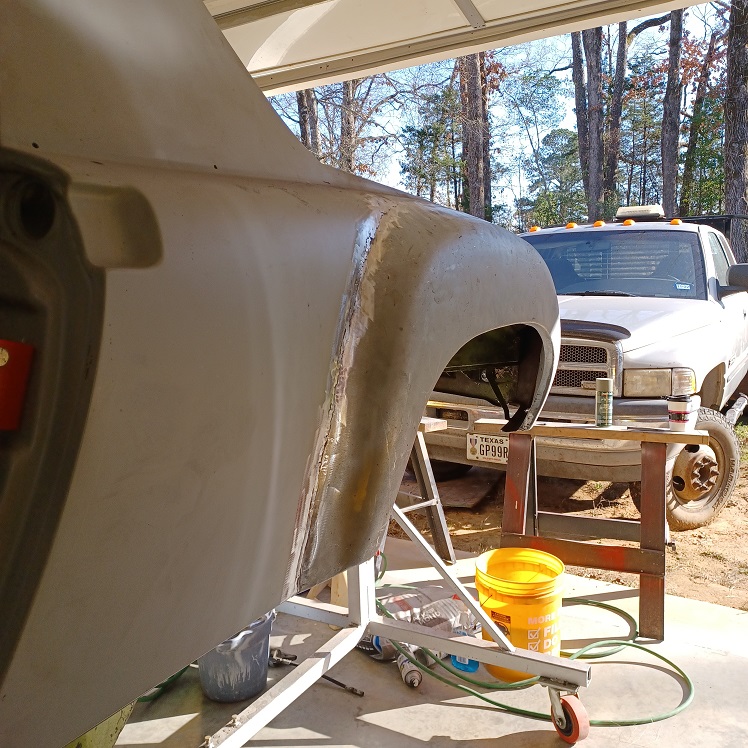
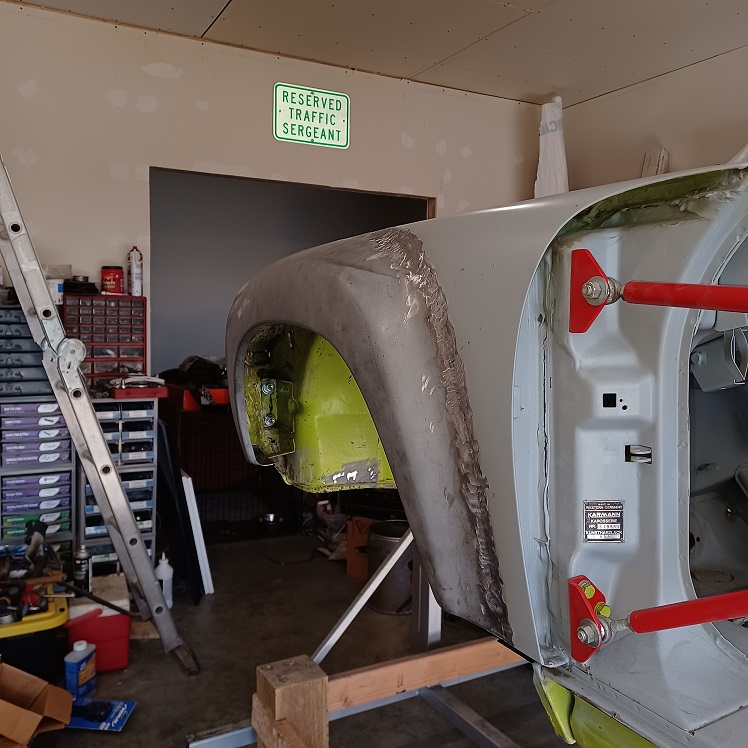
Then spent the rest of the day grinding and sanding the welds on all 4 fender flares. They are all installed and ready for body work.
    |
|
|
|
| Puebloswatcop |
Jan 5 2022, 03:25 PM
Post
#288
|
|
Senior Member Group: Members Posts: 1,690 Joined: 27-December 14 From: Mineola, Texas Member No.: 18,258 Region Association: Southwest Region |
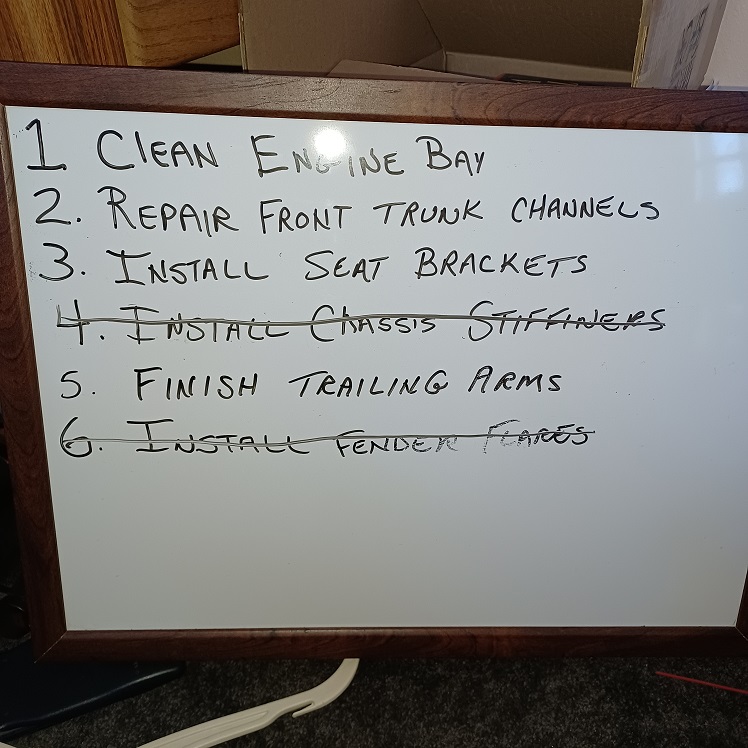
Cross 2 more items off of the white board
 |
|
|
|
| Puebloswatcop |
Jan 6 2022, 06:02 PM
Post
#289
|
|
Senior Member Group: Members Posts: 1,690 Joined: 27-December 14 From: Mineola, Texas Member No.: 18,258 Region Association: Southwest Region |
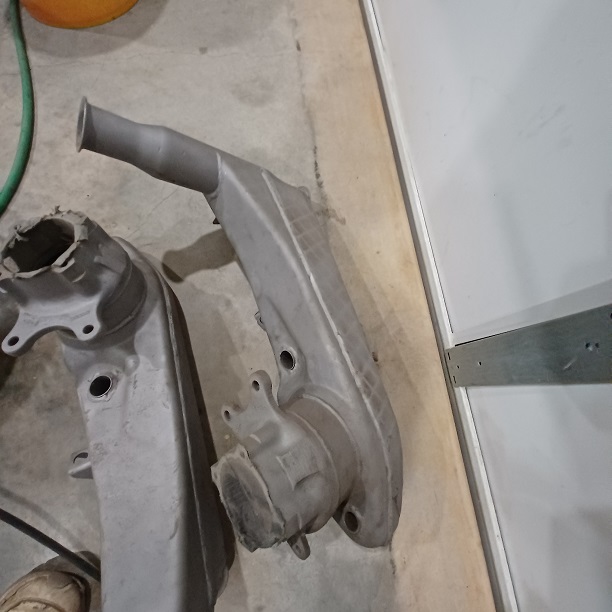
So, since I am waiting on my seat hinge brackets fron RD, I decided to finish up my trailing arms. I had already started boxing them before leaving Colorado, so it was pretty much a matter of cleaning up the welds and cleaning them up... I do have to press the shaft and bushings out of one of them before sending them to powder coater.
I am amazed how quickly things rust here. These sat in the garage in Colorado for a couple of years with no paint on them... and no rust. A few months in Texas and they need blasting. 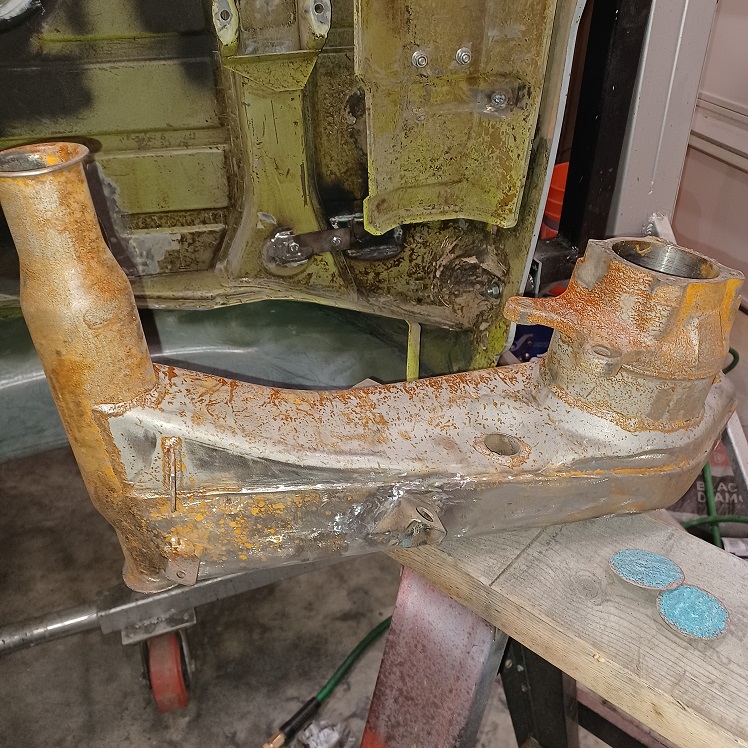 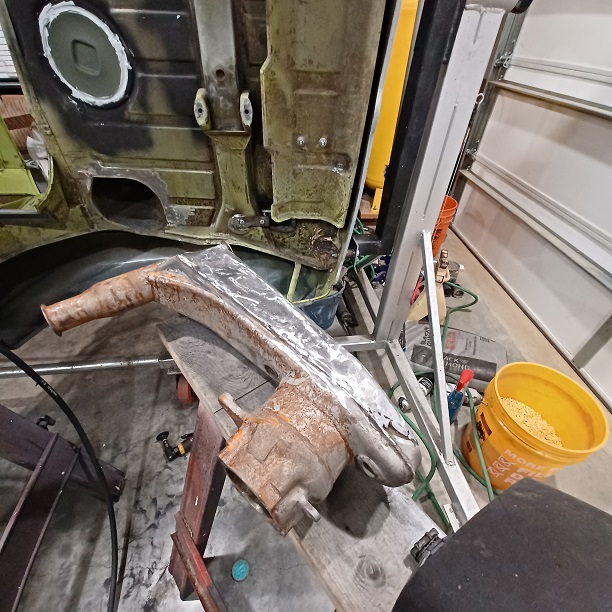 |
|
|
|
| Puebloswatcop |
Jan 6 2022, 06:04 PM
Post
#290
|
|
Senior Member Group: Members Posts: 1,690 Joined: 27-December 14 From: Mineola, Texas Member No.: 18,258 Region Association: Southwest Region |
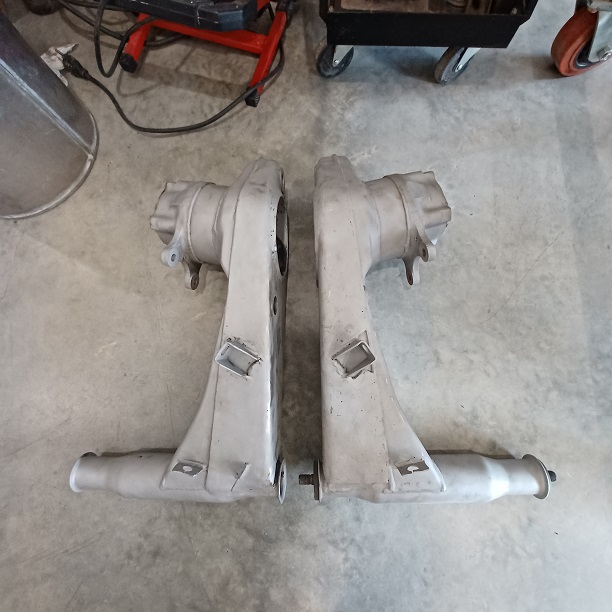
So spent a couple of hours finishing up the welds and then grinding everything smooth.
 |
|
|
|
| Puebloswatcop |
Jan 6 2022, 06:06 PM
Post
#291
|
|
Senior Member Group: Members Posts: 1,690 Joined: 27-December 14 From: Mineola, Texas Member No.: 18,258 Region Association: Southwest Region |
Then re-blasted everything in prep for the powder coating.
  |
|
|
|
| Puebloswatcop |
Jan 6 2022, 06:09 PM
Post
#292
|
|
Senior Member Group: Members Posts: 1,690 Joined: 27-December 14 From: Mineola, Texas Member No.: 18,258 Region Association: Southwest Region |
Then I spent the rest of the day doing the thankless chore of cleaning my blast cabinet. (IMG:style_emoticons/default/dry.gif) (IMG:style_emoticons/default/barf.gif) Most of the media was gone and replaced with tons of rust and paint dust. So cleaned it out and replaced with new blast media....ready to clean more Porsche 914 parts......
|
|
|
|
| bkrantz |
Jan 6 2022, 09:53 PM
Post
#293
|
|
914 Guru Group: Members Posts: 8,554 Joined: 3-August 19 From: SW Colorado Member No.: 23,343 Region Association: Rocky Mountains |
QUOTE(Puebloswatcop @ Jan 6 2022, 05:02 PM) So, since I am waiting on my seat hinge brackets fron RD, I decided to finish up my trailing arms. I had already started boxing them before leaving Colorado, so it was pretty much a matter of cleaning up the welds and cleaning them up... I do have to press the shaft and bushings out of one of them before sending them to powder coater. I am amazed how quickly things rust here. These sat in the garage in Colorado for a couple of years with no paint on them... and no rust. A few months in Texas and they need blasting. Give them a few more months and they will grow mold. (IMG:style_emoticons/default/icon8.gif) I do not miss the climate of Texas. |
|
|
|
| Puebloswatcop |
Jan 7 2022, 06:48 PM
Post
#294
|
|
Senior Member Group: Members Posts: 1,690 Joined: 27-December 14 From: Mineola, Texas Member No.: 18,258 Region Association: Southwest Region |
QUOTE(bkrantz @ Jan 6 2022, 09:53 PM) QUOTE(Puebloswatcop @ Jan 6 2022, 05:02 PM) So, since I am waiting on my seat hinge brackets fron RD, I decided to finish up my trailing arms. I had already started boxing them before leaving Colorado, so it was pretty much a matter of cleaning up the welds and cleaning them up... I do have to press the shaft and bushings out of one of them before sending them to powder coater. I am amazed how quickly things rust here. These sat in the garage in Colorado for a couple of years with no paint on them... and no rust. A few months in Texas and they need blasting. Give them a few more months and they will grow mold. (IMG:style_emoticons/default/icon8.gif) I do not miss the climate of Texas. No doubt Bob. The one thing I do miss about Colorado is you could take a step forward (metal work wise) and it stayed there, even if you had to take a months long break....Here you don't dare leave it for anu more than a few days or you've gone two steps backward.... |
|
|
|
| Puebloswatcop |
Jan 8 2022, 03:45 PM
Post
#295
|
|
Senior Member Group: Members Posts: 1,690 Joined: 27-December 14 From: Mineola, Texas Member No.: 18,258 Region Association: Southwest Region |
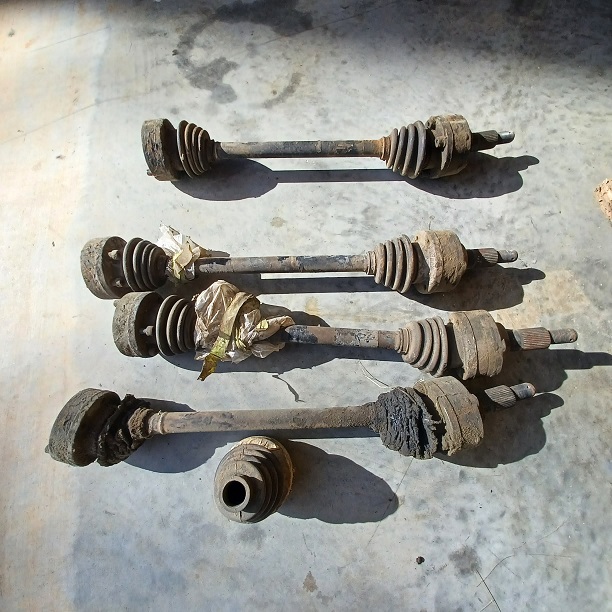
If there is one nasty, dirty job that you would like to do to your 914 on a rainy (or snowy) day when you can't be outside, this is the job. Stripping, cleaning and repacking your rear axle CV Joints. I have 2 sets here, plus one extra that I don't have a clue where it came from.
 |
|
|
|
| Puebloswatcop |
Jan 8 2022, 03:47 PM
Post
#296
|
|
Senior Member Group: Members Posts: 1,690 Joined: 27-December 14 From: Mineola, Texas Member No.: 18,258 Region Association: Southwest Region |
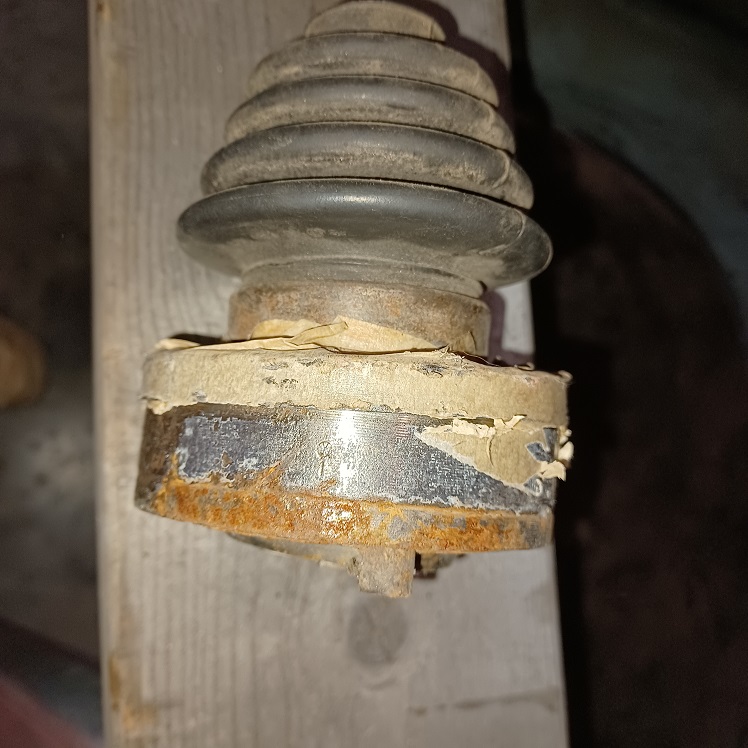
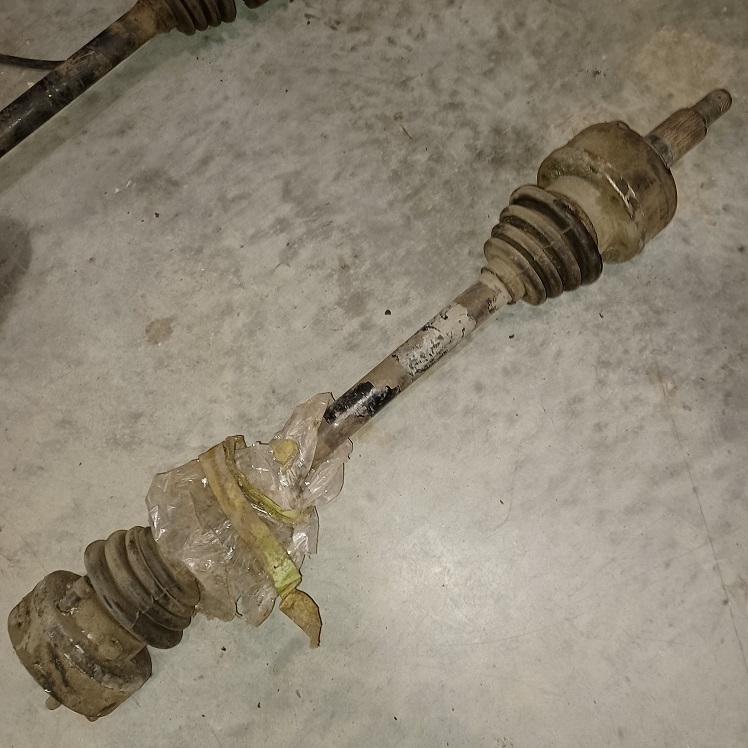
So we can start with the extra. Someone took the time to tape it up with several layers of masking tape to hold all the pieces in. If you have ever tried to remove ancient masking tape, you know what I mean when I say it sucks... (IMG:style_emoticons/default/headbang.gif) But at least this one is a throw away....
  |
|
|
|
| Puebloswatcop |
Jan 8 2022, 03:59 PM
Post
#297
|
|
Senior Member Group: Members Posts: 1,690 Joined: 27-December 14 From: Mineola, Texas Member No.: 18,258 Region Association: Southwest Region |
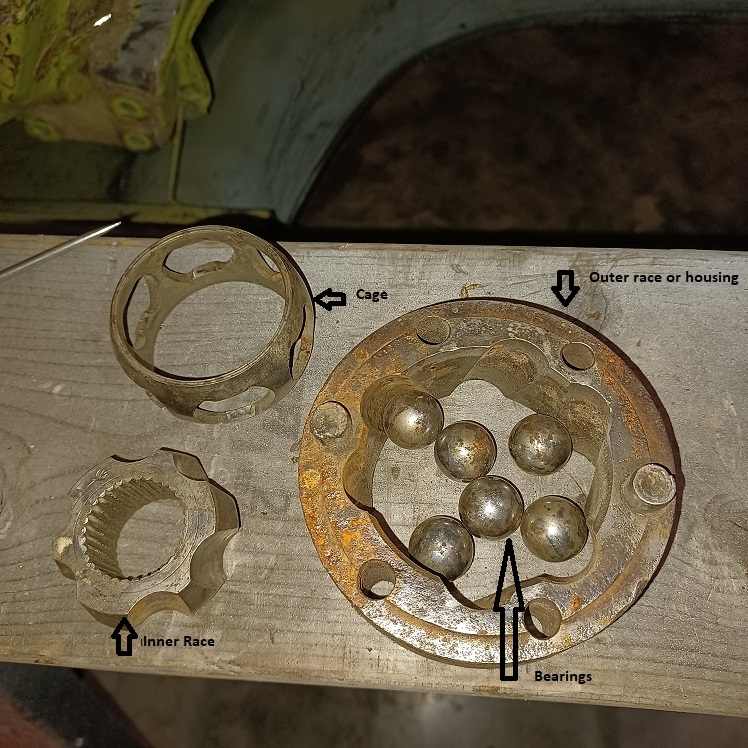
I will go into detail tomorrow as to tear down and cleaning and re-assembly, but this is a good representation of the parts in each of the CV joints, for any of you who have never had the desire to do this nasty job. Of course this one is garbage. Parts are very badly worn and rust has taken its toll, but I didn't have to clean off a quarter pound of grease to show the parts.
 |
|
|
|
| Puebloswatcop |
Jan 8 2022, 04:11 PM
Post
#298
|
|
Senior Member Group: Members Posts: 1,690 Joined: 27-December 14 From: Mineola, Texas Member No.: 18,258 Region Association: Southwest Region |
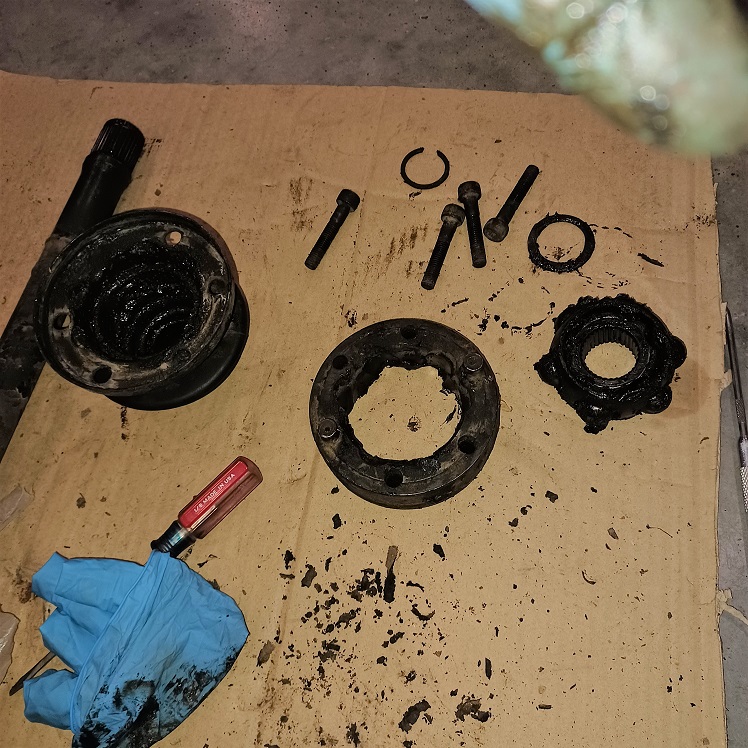
Now I'll show you what is inside a used (or new) CV joint. Be prepared for a royal mess. Have tons of rags, parts cleaner and lots of gloves or be prepared to wash your hands every 5 minutes, and take my word for it, don't let your wife catch you washing your hands in any sink in her house.
 |
|
|
|
| Puebloswatcop |
Jan 8 2022, 04:14 PM
Post
#299
|
|
Senior Member Group: Members Posts: 1,690 Joined: 27-December 14 From: Mineola, Texas Member No.: 18,258 Region Association: Southwest Region |
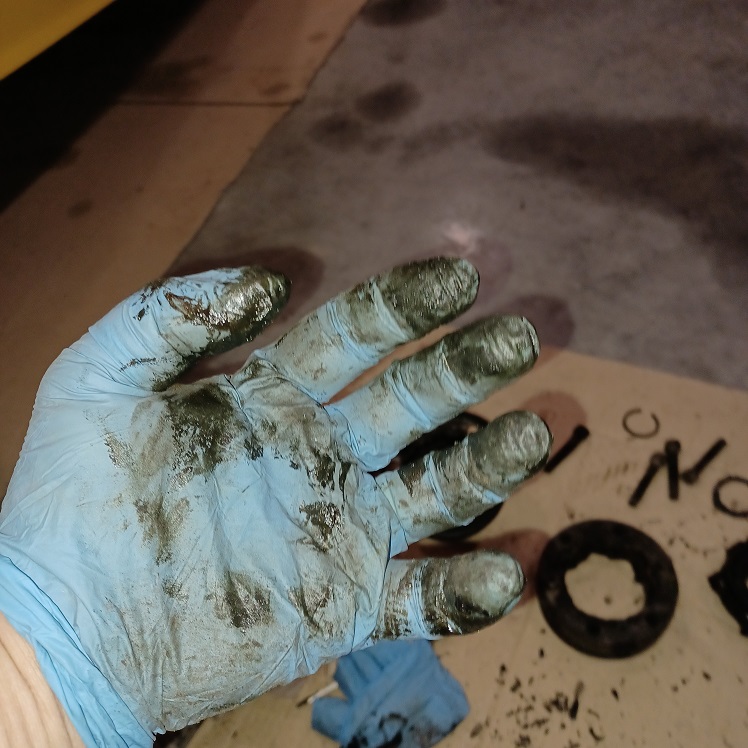
I dis-assembled the transmission end first. As you can see, the grease in here is thick and is as black as charcoal...
 |
|
|
|
| Puebloswatcop |
Jan 8 2022, 04:16 PM
Post
#300
|
|
Senior Member Group: Members Posts: 1,690 Joined: 27-December 14 From: Mineola, Texas Member No.: 18,258 Region Association: Southwest Region |
And it sticks to everything.....I guarantee, you want to be wearing gloves.
 |
|
|
|
|
1 User(s) are reading this topic (1 Guests and 0 Anonymous Users)
0 Members:

|
Lo-Fi Version | Time is now: 16th December 2025 - 06:56 AM |
Invision Power Board
v9.1.4 © 2025 IPS, Inc.