|
|
|
Porsche, and the Porsche crest are registered trademarks of Dr. Ing. h.c. F. Porsche AG.
This site is not affiliated with Porsche in any way. Its only purpose is to provide an online forum for car enthusiasts. All other trademarks are property of their respective owners. |
|
|


| Van B |
 Apr 1 2022, 08:57 PM Apr 1 2022, 08:57 PM
Post
#1
|
|
Senior Member  Group: Members Posts: 1,589 Joined: 20-October 21 From: Maryland Member No.: 26,011 Region Association: None |
Evening all,
I just got done with my first time using circuit board epoxy and I’m really stoked how it all turned out. Not perfect, but damn close! For starters, I bought some flame retardant circuit board epoxy because I wanted a more modern and safer choice to the old tar from 49yrs ago. Nothing like an accelerant hanging just above your fuel rail in the event of a fire am I right?! Here’s the product I chose: https://www.amazon.com/MG-Chemicals-Black-R...d/dp/B07B3Z8CLY Regarding the removal of the tar, there’s no way around it, it is a tedious task. My method of choice was to use a box knife to slice up the tar and then used a flat screw driver to remove the bulk until I got down to the base. From there I took a full assortment of tiny screw drivers and used an appropriate size to clear the channels where the copper strips run… like a tar shovel. Then at each wedge location, I use a pick to clear out those areas. An air hose is handy to blow away the shavings as you work. Once I hit the limit of productivity there, I took some citrus based bug and tar remover as well as a wire brush to remove the stuck on bits. This step again is tedious because you have to rinse with soap and water to check your progress before reapplying more citrus remover and going again. When the tar was gone, I then took my favorite phosphoric acid based rust remover to deoxidize the copper strips. I had some corrosion even under bits that were still covered in tar. After a very thorough soap and water rinse to remove the acid gel. I went after it with an air hose to dry it off and bake it in the oven for an hour on the lowest setting (170F for mine). After it cools, it’s time to start sealing the holes. I used high temp gasket maker. With a small tip, you need to fill the holes: -where the voltage regulator connects -where the alternator connects -where the cable hold down clips (used to go) -where the two tabs are on the end -where the VR screws go… actually it’s best to install the screws so you can get molded thread holes Be sure to get that RTV all the way up in there! This was my one mistake, but it was recoverable thankfully. For the air channel under the voltage regulator, use a polymer eraser cut to fit and jam it in there till it’s flush with the top side. Attached thumbnail(s) 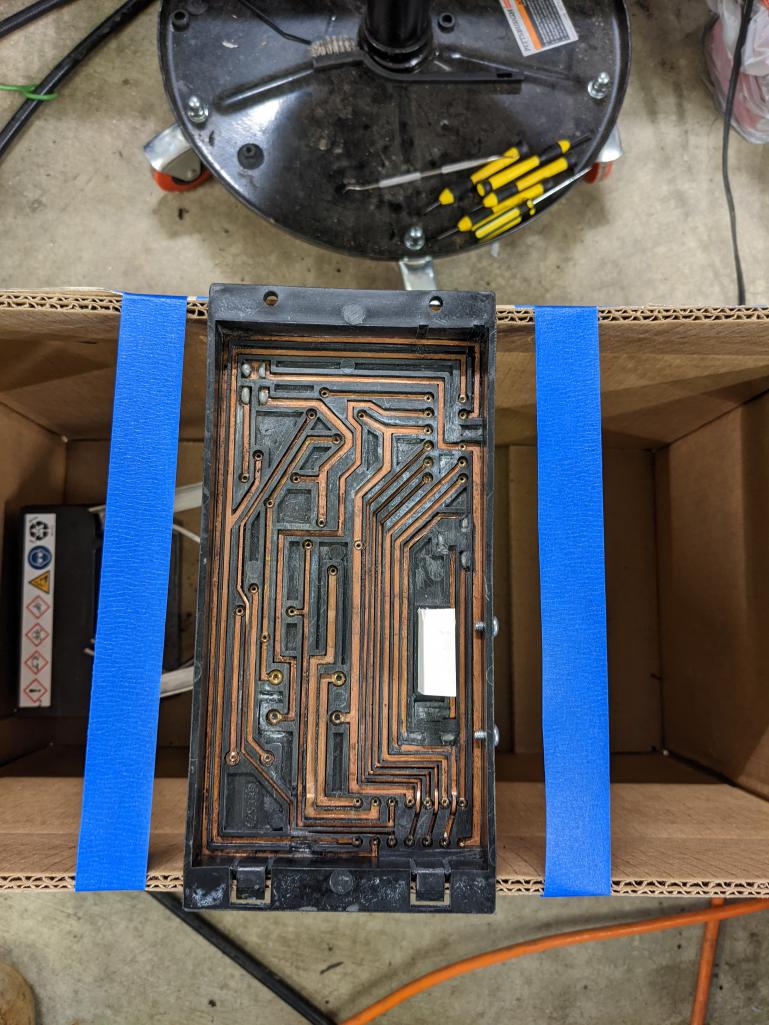
|
   |

 
|
Posts in this topic
 Van B Relay Board Redux Apr 1 2022, 08:57 PM
 Van B Now it’s time to set up for the pour.
As you ca... Apr 1 2022, 09:03 PM Van B I tried to tap on it as much as I could without di... Apr 1 2022, 09:08 PM Van B After an hour she was fully cured with only a coup... Apr 1 2022, 09:12 PM wonkipop hope you are not going to bake cakes in that oven ... Apr 2 2022, 01:40 AM Van B Lol… it will be spending the morning in self cle... Apr 2 2022, 06:32 AM StarBear Huzzah! Awesome job, pal. Apr 2 2022, 07:08 AM Superhawk996 Nice write up! :trophy: Apr 2 2022, 08:14 AM
Van B Now it’s time to set up for the pour.
As you ca... Apr 1 2022, 09:03 PM Van B I tried to tap on it as much as I could without di... Apr 1 2022, 09:08 PM Van B After an hour she was fully cured with only a coup... Apr 1 2022, 09:12 PM wonkipop hope you are not going to bake cakes in that oven ... Apr 2 2022, 01:40 AM Van B Lol… it will be spending the morning in self cle... Apr 2 2022, 06:32 AM StarBear Huzzah! Awesome job, pal. Apr 2 2022, 07:08 AM Superhawk996 Nice write up! :trophy: Apr 2 2022, 08:14 AM
 Van B
Nice write up! :trophy:
Thanks guys. Since... Apr 2 2022, 08:48 AM ndfrigi nicely done sir! Apr 2 2022, 08:52 AM brant Great.
Now I have another project
Nice job Apr 2 2022, 09:29 AM
Van B
Nice write up! :trophy:
Thanks guys. Since... Apr 2 2022, 08:48 AM ndfrigi nicely done sir! Apr 2 2022, 08:52 AM brant Great.
Now I have another project
Nice job Apr 2 2022, 09:29 AM  |
1 User(s) are reading this topic (1 Guests and 0 Anonymous Users)
0 Members:

|
Lo-Fi Version | Time is now: 20th May 2024 - 06:05 AM |
Invision Power Board
v9.1.4 © 2024 IPS, Inc.