|
|
|
Porsche, and the Porsche crest are registered trademarks of Dr. Ing. h.c. F. Porsche AG.
This site is not affiliated with Porsche in any way. Its only purpose is to provide an online forum for car enthusiasts. All other trademarks are property of their respective owners. |
|
|


| tygaboy |
 Apr 22 2022, 01:58 PM Apr 22 2022, 01:58 PM
Post
#1261
|
|
914 Guru  Group: Members Posts: 5,836 Joined: 6-October 15 From: Petaluma, CA Member No.: 19,241 Region Association: Northern California |
Hi 914 World -
A bit of an intro, if you'll indulge me. I've always been a believer in fate and karma. A believer in serendipity. A believer that the universe presents thing to us for a reason. Sometimes good, sometimes not. Fortunately, the journey of adventure I'm about to begin is one of the good ones! Maybe a year or so ago, @Krieger Andy calls and says he has a buddy looking to buy a rear valance for a 914 and do I have one I'd sell. I said that I do, give my contact info to your friend. A few days later, this guy calls and we arrange for him to come by the Red Barn and see if the valance meets his needs. He arrives and we start "the dance of the car guys"! (IMG:style_emoticons/default/laugh.gif) He talks about his car experiences, I talk about mine. We talk 356s. We talk 911s. We talk 914s. Obviously, we have a ton in common, including a love for my LS build. He pours over my car, noticing not only the big stuff, but all the little things I've done, too. On this day, he buys the valance and we agree we'll stay in touch. And we do! Over the course of the following months, he stops by pretty regularly, I visit his place and it's clear that beyond the car stuff, he's a good guy, we get along well and we're going to be friends. So, one day, we're chatting about RacerBenz. my 2001 Mercedes CL500, Corvette suspension, mid engine, center seat track car build. Yes, I know, a horrific waste of time and money. But anyway, I say "What would be cool is to build "Benzo Ferrari! Find a Ferrari engine and trans and..." He interrupts and says "I have one! From a 360 Modena. And the trans, harnesses, ECUs, etc. I'd love to see it get used for something. Why don't you come get it?" Wait, what? (IMG:style_emoticons/default/blink.gif) Fast forward to last week where I do just that. Here's what's in the Red Barn now: 3.6 liters, 400 hp and 275 lb/ft of Italian automotive porn. Attached thumbnail(s) 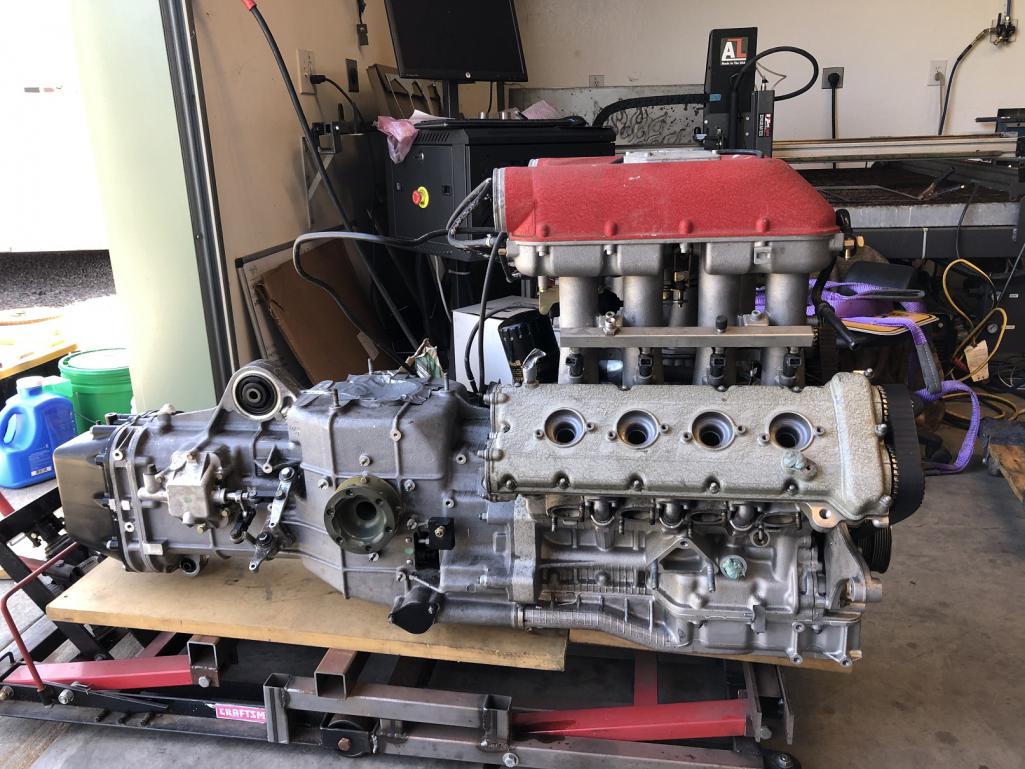 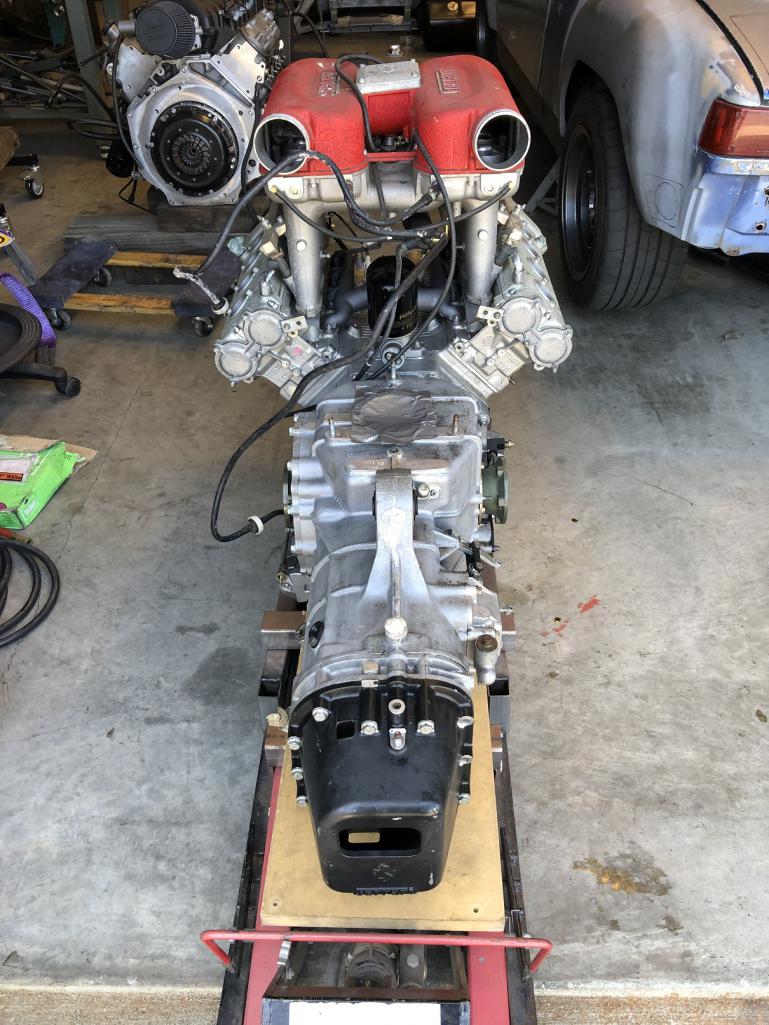 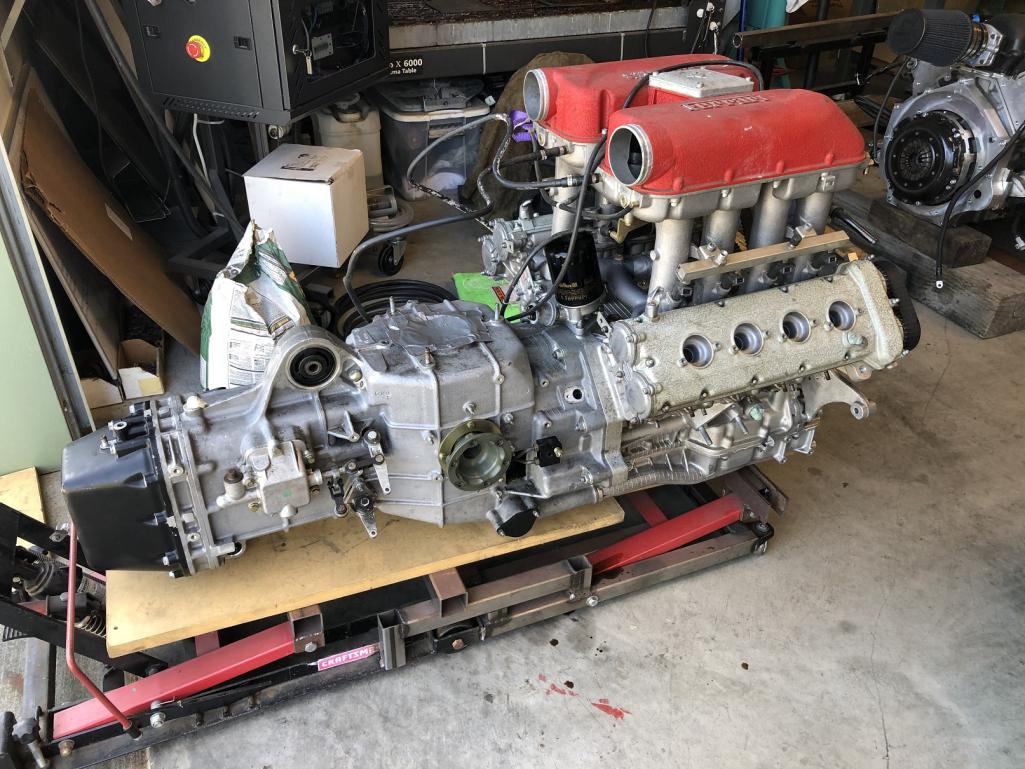
|
   |

 
|
Posts in this topic
 tygaboy 914 GT 3.6 Ferrari Build Apr 22 2022, 01:58 PM
 76-914 You need help. :evilgrin: Apr 22 2022, 01:58 PM
 Root_Werks
You need help. :evilgrin:
:agree:
:lol:
... Apr 22 2022, 02:03 PM tygaboy
You need help. :evilgrin:
:agree:
:lol:
... Apr 22 2022, 02:07 PM 76-914
[quote name='Root_Werks' post='2996971' date='Apr... Apr 22 2022, 02:24 PM tygaboy As those who've followed my LS build know, I... Apr 22 2022, 02:02 PM tygaboy Hmmm, this looks more promising than I expected. Apr 22 2022, 02:03 PM tygaboy Well, would you look at that! It fits. :headb... Apr 22 2022, 02:06 PM tygaboy More Apr 22 2022, 02:08 PM tygaboy But wait, it gets better!
I forward these pics... Apr 22 2022, 02:14 PM tygaboy more Apr 22 2022, 02:16 PM tygaboy So. There it is: the next build.
There is one majo... Apr 22 2022, 02:22 PM SirAndy :blink: Apr 22 2022, 02:38 PM napasteve
:blink:
Exactly (in a good way) Apr 22 2022, 05:02 PM markhoward This is going to be amazing! Hope it stays th... Apr 22 2022, 03:56 PM tygaboy
This is going to be amazing! Hope it stays t... Apr 22 2022, 04:31 PM SirAndy No specific color called out but the factory color... Apr 22 2022, 08:00 PM Andyrew That’s some of the best valance work I’ve seen... Apr 22 2022, 04:36 PM Chris H.
That’s some of the best valance work I’ve see... Apr 23 2022, 07:15 AM mepstein I would put a Porsche six in the flared 914 and bu... Apr 22 2022, 05:40 PM Krieger It's all my fault! Two wild and crazy guy... Apr 22 2022, 06:17 PM tygaboy
It's all my fault! Two wild and crazy gu... Apr 22 2022, 06:25 PM siverson That's awesome! Do it!
-Steve Apr 22 2022, 06:34 PM Chris914n6 I'd totally paint it Rosso Red.
To match t... Apr 22 2022, 06:54 PM rgalla9146 Are the output flanges in line with the hubs ? th... Apr 22 2022, 07:53 PM tygaboy
Are the output flanges in line with the hubs ? t... Apr 23 2022, 09:43 AM KELTY360 Beware of Ferrari fanatics named Guido. :shoot2ki... Apr 22 2022, 08:04 PM Cairo94507 @tygaboy - Man, that is a nice, straight, perfect... Apr 23 2022, 06:52 AM Superhawk996 Hope the engine checks out - this will be cool. Apr 23 2022, 07:34 AM tygaboy I figured some of you might like this - thanks for... Apr 23 2022, 08:40 AM Shivers Wow. I hope it is good, but the back up plan is ni... Apr 23 2022, 08:58 AM Chris H. A pink 914 with a Ferrari engine...that would be s... Apr 23 2022, 09:13 AM rgalla9146 You'll have to have some hidden GoPros when yo... Apr 23 2022, 10:54 AM Gearup If you decide against the flared body because the ... Apr 23 2022, 11:40 AM TRS63 What a cool project, looking forward to it !
... Apr 23 2022, 01:36 PM tygaboy Another typical Tygaboy post: virtually no 914 con... Apr 24 2022, 12:30 PM sixnotfour Great Video..DrySump Tank built into trans,,crazy.... Apr 24 2022, 12:42 PM Superhawk996 flat plane crank and 8500 rpm - audio porn. :lol... Apr 24 2022, 03:18 PM tygaboy Because it was such a cool picture. I end up just ... Apr 24 2022, 05:15 PM sixnotfour 100% :first: Apr 24 2022, 05:38 PM Cairo94507 That 914 could be the ultimate "sleeper... Apr 25 2022, 07:21 AM tygaboy The stars align again. I can't remember if I m... Apr 26 2022, 09:13 AM Mueller
The stars align again. I can't remember if I ... May 3 2022, 05:03 PM tygaboy
The stars align again. I can't remember if I... May 3 2022, 05:22 PM Cairo94507 That is great! I would love to be able to be ... Apr 26 2022, 01:09 PM tygaboy
That is great! I would love to be able to be... Apr 26 2022, 02:28 PM ClayPerrine And I thought my flat fan and ITB conversion was m... Apr 26 2022, 01:29 PM tygaboy
And I thought my flat fan and ITB conversion was ... Apr 26 2022, 02:48 PM infraredcalvin This is such an awesome project, I’m waiting for... Apr 26 2022, 01:35 PM ClayPerrine
This is such an awesome project, I’m waiting fo... Apr 26 2022, 01:37 PM tygaboy
This is such an awesome project, I’m waiting fo... Apr 26 2022, 02:40 PM Chris914n6 Moteena
Mule = donkey + horse Apr 26 2022, 02:56 PM tygaboy
Moteena
Mule = donkey + horse
@Chris914n6 - O... Apr 26 2022, 03:28 PM mgp4591
[quote name='Chris914n6' post='2997938' date='Apr... Apr 27 2022, 09:45 PM eric9144 914NARF :cheer:
Took me too long to dig this up... Apr 26 2022, 02:58 PM infraredcalvin I like it! Could always go with the “PORRAR... Apr 26 2022, 11:59 PM tygaboy Let's keep with the "it was meant to be... Apr 27 2022, 05:31 PM tygaboy One other major decision has been made. I asked th... Apr 27 2022, 05:37 PM Shivers
One other major decision has been made. I asked t... Apr 27 2022, 05:56 PM Dion This is fascinating. The fact the Italian & Ge... Apr 27 2022, 06:36 PM mepstein Ferrari and Porsche did share the 914-6/308 rear c... Apr 27 2022, 08:22 PM JamesJ Hey Chris,
I was thinking 94dena or 914ena.
Lookin... Apr 28 2022, 04:38 PM Andyrew Big win on the axles!!!! Apr 29 2022, 06:43 AM tygaboy Subtle badging Apr 30 2022, 01:56 PM tygaboy We found a pic of the car from when the previous o... May 2 2022, 09:29 AM Retroracer
We found a pic of the car from when the previous ... May 2 2022, 03:57 PM ClayPerrine
So seeing that pic - and being the massive Rush ... May 3 2022, 06:44 AM Chris H. Looks like they're in process of taking the ^*... May 2 2022, 10:10 AM Morph914 Chris, this is so cool! Nothing beats the musi... May 2 2022, 12:32 PM tygaboy
Chris, this is so cool! Nothing beats the mus... May 2 2022, 01:34 PM tygaboy Milestone morning:
The Ferrari SwapRod (as I'v... May 4 2022, 11:30 AM Cairo94507 :popcorn: :beer2: May 4 2022, 12:08 PM Mueller I think you need a bigger barn now. May 4 2022, 12:53 PM tygaboy And now, some pics of the chassis:
Boy, I'm r... May 4 2022, 01:28 PM tygaboy But it's up frunk where things get interesting... May 4 2022, 01:31 PM tygaboy Were to begin?
- louvered floor
- custom base plat... May 4 2022, 01:35 PM tygaboy The nose, bumper and front valance are prepped for... May 4 2022, 01:36 PM tygaboy Another view. May 4 2022, 01:39 PM tygaboy Really nice gaps. But yes, somewhere along the way... May 4 2022, 01:41 PM tygaboy So there it is. Let the debate begin about how thi... May 4 2022, 01:55 PM tygaboy The factory headers arrived today. Surprisingly li... May 4 2022, 02:37 PM tygaboy And in place, they look the business. You can see ... May 4 2022, 02:50 PM FourBlades Another amazing project!
Can't wait to wa... May 5 2022, 02:35 PM tygaboy The Milestone mornings just keep coming!
Yest... May 5 2022, 02:53 PM Cairo94507 Congratulations. That is the way to start a proje... May 5 2022, 03:09 PM Andyrew Awesome!!!! I am really glad to he... May 5 2022, 09:58 PM Shivers
@tygaboy
Was there such a wide variation b... May 5 2022, 10:45 PM jcd914
[b]@[url=http://www.914world.com/bbs2/index.ph... May 6 2022, 12:31 AM tygaboy @shivers - I'm a newbie to all things Ferrari... May 6 2022, 08:54 AM tygaboy Drive train mounting: Initial planning
I initially... May 6 2022, 09:35 AM ClayPerrine
Drive train mounting: Initial planning
I initiall... May 6 2022, 11:04 AM tygaboy
Drive train mounting: Initial planning
...
Why ... May 6 2022, 12:26 PM Chris914n6 My best guess for the 2 ECUs is 2 MAFs. Not a sign... May 6 2022, 12:30 PM racerbvd Subscribed May 6 2022, 12:45 PM targa72e Two ECU's is not just a Ferrari thing. The BMW... May 6 2022, 05:00 PM Andyrew Or you could build removable mounting points from ... May 7 2022, 06:48 PM Retroracer Chris - RE: Engine cradles and such: More food for... May 8 2022, 10:22 AM r_towle Is it running yet? May 8 2022, 09:49 PM Superhawk996
Is it running yet?
:lol4: May 9 2022, 05:29 AM Cairo94507
You would likely end up removing a lot of metal ... May 9 2022, 06:37 AM
Root_Werks
You need help. :evilgrin:
:agree:
:lol:
... Apr 22 2022, 02:03 PM tygaboy
You need help. :evilgrin:
:agree:
:lol:
... Apr 22 2022, 02:07 PM 76-914
[quote name='Root_Werks' post='2996971' date='Apr... Apr 22 2022, 02:24 PM tygaboy As those who've followed my LS build know, I... Apr 22 2022, 02:02 PM tygaboy Hmmm, this looks more promising than I expected. Apr 22 2022, 02:03 PM tygaboy Well, would you look at that! It fits. :headb... Apr 22 2022, 02:06 PM tygaboy More Apr 22 2022, 02:08 PM tygaboy But wait, it gets better!
I forward these pics... Apr 22 2022, 02:14 PM tygaboy more Apr 22 2022, 02:16 PM tygaboy So. There it is: the next build.
There is one majo... Apr 22 2022, 02:22 PM SirAndy :blink: Apr 22 2022, 02:38 PM napasteve
:blink:
Exactly (in a good way) Apr 22 2022, 05:02 PM markhoward This is going to be amazing! Hope it stays th... Apr 22 2022, 03:56 PM tygaboy
This is going to be amazing! Hope it stays t... Apr 22 2022, 04:31 PM SirAndy No specific color called out but the factory color... Apr 22 2022, 08:00 PM Andyrew That’s some of the best valance work I’ve seen... Apr 22 2022, 04:36 PM Chris H.
That’s some of the best valance work I’ve see... Apr 23 2022, 07:15 AM mepstein I would put a Porsche six in the flared 914 and bu... Apr 22 2022, 05:40 PM Krieger It's all my fault! Two wild and crazy guy... Apr 22 2022, 06:17 PM tygaboy
It's all my fault! Two wild and crazy gu... Apr 22 2022, 06:25 PM siverson That's awesome! Do it!
-Steve Apr 22 2022, 06:34 PM Chris914n6 I'd totally paint it Rosso Red.
To match t... Apr 22 2022, 06:54 PM rgalla9146 Are the output flanges in line with the hubs ? th... Apr 22 2022, 07:53 PM tygaboy
Are the output flanges in line with the hubs ? t... Apr 23 2022, 09:43 AM KELTY360 Beware of Ferrari fanatics named Guido. :shoot2ki... Apr 22 2022, 08:04 PM Cairo94507 @tygaboy - Man, that is a nice, straight, perfect... Apr 23 2022, 06:52 AM Superhawk996 Hope the engine checks out - this will be cool. Apr 23 2022, 07:34 AM tygaboy I figured some of you might like this - thanks for... Apr 23 2022, 08:40 AM Shivers Wow. I hope it is good, but the back up plan is ni... Apr 23 2022, 08:58 AM Chris H. A pink 914 with a Ferrari engine...that would be s... Apr 23 2022, 09:13 AM rgalla9146 You'll have to have some hidden GoPros when yo... Apr 23 2022, 10:54 AM Gearup If you decide against the flared body because the ... Apr 23 2022, 11:40 AM TRS63 What a cool project, looking forward to it !
... Apr 23 2022, 01:36 PM tygaboy Another typical Tygaboy post: virtually no 914 con... Apr 24 2022, 12:30 PM sixnotfour Great Video..DrySump Tank built into trans,,crazy.... Apr 24 2022, 12:42 PM Superhawk996 flat plane crank and 8500 rpm - audio porn. :lol... Apr 24 2022, 03:18 PM tygaboy Because it was such a cool picture. I end up just ... Apr 24 2022, 05:15 PM sixnotfour 100% :first: Apr 24 2022, 05:38 PM Cairo94507 That 914 could be the ultimate "sleeper... Apr 25 2022, 07:21 AM tygaboy The stars align again. I can't remember if I m... Apr 26 2022, 09:13 AM Mueller
The stars align again. I can't remember if I ... May 3 2022, 05:03 PM tygaboy
The stars align again. I can't remember if I... May 3 2022, 05:22 PM Cairo94507 That is great! I would love to be able to be ... Apr 26 2022, 01:09 PM tygaboy
That is great! I would love to be able to be... Apr 26 2022, 02:28 PM ClayPerrine And I thought my flat fan and ITB conversion was m... Apr 26 2022, 01:29 PM tygaboy
And I thought my flat fan and ITB conversion was ... Apr 26 2022, 02:48 PM infraredcalvin This is such an awesome project, I’m waiting for... Apr 26 2022, 01:35 PM ClayPerrine
This is such an awesome project, I’m waiting fo... Apr 26 2022, 01:37 PM tygaboy
This is such an awesome project, I’m waiting fo... Apr 26 2022, 02:40 PM Chris914n6 Moteena
Mule = donkey + horse Apr 26 2022, 02:56 PM tygaboy
Moteena
Mule = donkey + horse
@Chris914n6 - O... Apr 26 2022, 03:28 PM mgp4591
[quote name='Chris914n6' post='2997938' date='Apr... Apr 27 2022, 09:45 PM eric9144 914NARF :cheer:
Took me too long to dig this up... Apr 26 2022, 02:58 PM infraredcalvin I like it! Could always go with the “PORRAR... Apr 26 2022, 11:59 PM tygaboy Let's keep with the "it was meant to be... Apr 27 2022, 05:31 PM tygaboy One other major decision has been made. I asked th... Apr 27 2022, 05:37 PM Shivers
One other major decision has been made. I asked t... Apr 27 2022, 05:56 PM Dion This is fascinating. The fact the Italian & Ge... Apr 27 2022, 06:36 PM mepstein Ferrari and Porsche did share the 914-6/308 rear c... Apr 27 2022, 08:22 PM JamesJ Hey Chris,
I was thinking 94dena or 914ena.
Lookin... Apr 28 2022, 04:38 PM Andyrew Big win on the axles!!!! Apr 29 2022, 06:43 AM tygaboy Subtle badging Apr 30 2022, 01:56 PM tygaboy We found a pic of the car from when the previous o... May 2 2022, 09:29 AM Retroracer
We found a pic of the car from when the previous ... May 2 2022, 03:57 PM ClayPerrine
So seeing that pic - and being the massive Rush ... May 3 2022, 06:44 AM Chris H. Looks like they're in process of taking the ^*... May 2 2022, 10:10 AM Morph914 Chris, this is so cool! Nothing beats the musi... May 2 2022, 12:32 PM tygaboy
Chris, this is so cool! Nothing beats the mus... May 2 2022, 01:34 PM tygaboy Milestone morning:
The Ferrari SwapRod (as I'v... May 4 2022, 11:30 AM Cairo94507 :popcorn: :beer2: May 4 2022, 12:08 PM Mueller I think you need a bigger barn now. May 4 2022, 12:53 PM tygaboy And now, some pics of the chassis:
Boy, I'm r... May 4 2022, 01:28 PM tygaboy But it's up frunk where things get interesting... May 4 2022, 01:31 PM tygaboy Were to begin?
- louvered floor
- custom base plat... May 4 2022, 01:35 PM tygaboy The nose, bumper and front valance are prepped for... May 4 2022, 01:36 PM tygaboy Another view. May 4 2022, 01:39 PM tygaboy Really nice gaps. But yes, somewhere along the way... May 4 2022, 01:41 PM tygaboy So there it is. Let the debate begin about how thi... May 4 2022, 01:55 PM tygaboy The factory headers arrived today. Surprisingly li... May 4 2022, 02:37 PM tygaboy And in place, they look the business. You can see ... May 4 2022, 02:50 PM FourBlades Another amazing project!
Can't wait to wa... May 5 2022, 02:35 PM tygaboy The Milestone mornings just keep coming!
Yest... May 5 2022, 02:53 PM Cairo94507 Congratulations. That is the way to start a proje... May 5 2022, 03:09 PM Andyrew Awesome!!!! I am really glad to he... May 5 2022, 09:58 PM Shivers
@tygaboy
Was there such a wide variation b... May 5 2022, 10:45 PM jcd914
[b]@[url=http://www.914world.com/bbs2/index.ph... May 6 2022, 12:31 AM tygaboy @shivers - I'm a newbie to all things Ferrari... May 6 2022, 08:54 AM tygaboy Drive train mounting: Initial planning
I initially... May 6 2022, 09:35 AM ClayPerrine
Drive train mounting: Initial planning
I initiall... May 6 2022, 11:04 AM tygaboy
Drive train mounting: Initial planning
...
Why ... May 6 2022, 12:26 PM Chris914n6 My best guess for the 2 ECUs is 2 MAFs. Not a sign... May 6 2022, 12:30 PM racerbvd Subscribed May 6 2022, 12:45 PM targa72e Two ECU's is not just a Ferrari thing. The BMW... May 6 2022, 05:00 PM Andyrew Or you could build removable mounting points from ... May 7 2022, 06:48 PM Retroracer Chris - RE: Engine cradles and such: More food for... May 8 2022, 10:22 AM r_towle Is it running yet? May 8 2022, 09:49 PM Superhawk996
Is it running yet?
:lol4: May 9 2022, 05:29 AM Cairo94507
You would likely end up removing a lot of metal ... May 9 2022, 06:37 AM  |
5 User(s) are reading this topic (5 Guests and 0 Anonymous Users)
0 Members:

|
Lo-Fi Version | Time is now: 3rd July 2026 - 03:26 PM |
Invision Power Board
v9.1.4 © 2026 IPS, Inc.