|
|
|
Porsche, and the Porsche crest are registered trademarks of Dr. Ing. h.c. F. Porsche AG.
This site is not affiliated with Porsche in any way. Its only purpose is to provide an online forum for car enthusiasts. All other trademarks are property of their respective owners. |
|
|

  |

| Cairo94507 |
 Dec 16 2022, 05:38 PM Dec 16 2022, 05:38 PM
Post
#501
|
|
Michael  Group: Members Posts: 10,687 Joined: 1-November 08 From: Auburn, CA Member No.: 9,712 Region Association: Northern California |
Game changer for sure. (IMG:style_emoticons/default/beerchug.gif)
|
   |

 
|
| tygaboy |
Dec 17 2022, 09:09 AM
Post
#502
|
|
914 Guru Group: Members Posts: 5,838 Joined: 6-October 15 From: Petaluma, CA Member No.: 19,241 Region Association: Northern California |
QUOTE(BillC @ Dec 16 2022, 03:17 PM)  QUOTE(tygaboy @ Dec 15 2022, 03:55 PM) Noodling on ideas for boxing, with this design leading at the moment. The height of the opening allows access to the mounting fastener. Looks kinda cool, too. That looks great, but have you checked to see if you have clearance with the engine in place to put a socket on that bolt? If the engine is wider than the cradle at that point, you might not have room to get a wrench or socket in there. Not saying I've ever been bitten by sorta detail before, but.... (IMG:style_emoticons/default/headbang.gif) @BillC - As you can see from this "planning stage" pic, the engine width isn't a worry. The only thing that I expect could prevent accessing the rear cradle bolts from above would be the headers - which are yet to be developed. But you make a fair point, for sure. That said, worst case, I can make a custom tool that will allow me to get at that cradle nut. Or come up with some sort of captured nut/nut plate and eliminate the concern all together. All TBD at this point. Attached thumbnail(s) 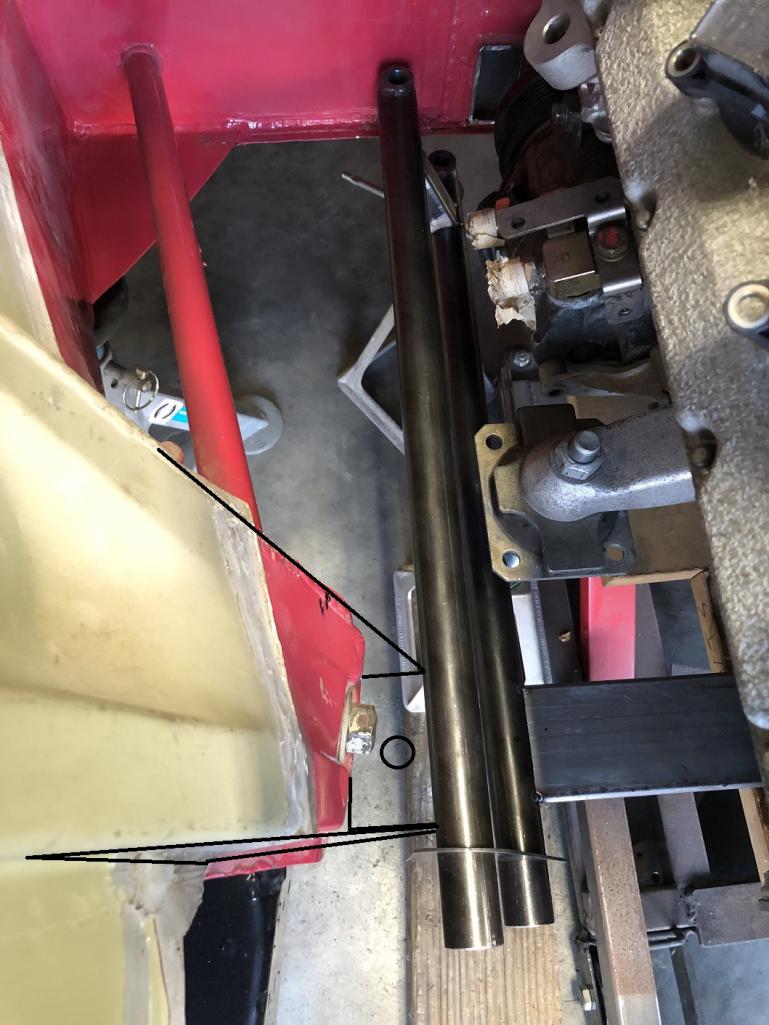
|
|
|
|
| tygaboy |
Dec 17 2022, 05:58 PM
Post
#503
|
|
914 Guru Group: Members Posts: 5,838 Joined: 6-October 15 From: Petaluma, CA Member No.: 19,241 Region Association: Northern California |
Today was getting the cradle under the engine and jacking everything into position so I can locate the engine mounting side and main plates on the cradle.
This requires fully suspending the engine in the exact location I want it. I ended up slinging the front from the the engine hoist while the rear is mounted at the trans. That right there is a Ferrari drive train held where it's gonna end up! (IMG:style_emoticons/default/aktion035.gif) And OMG, the QuickJacks are awesome. All the way up and the motor slides under. Drop it to the low position and it's a perfect height to intall the drive train. So. Much. Better! Attached thumbnail(s) 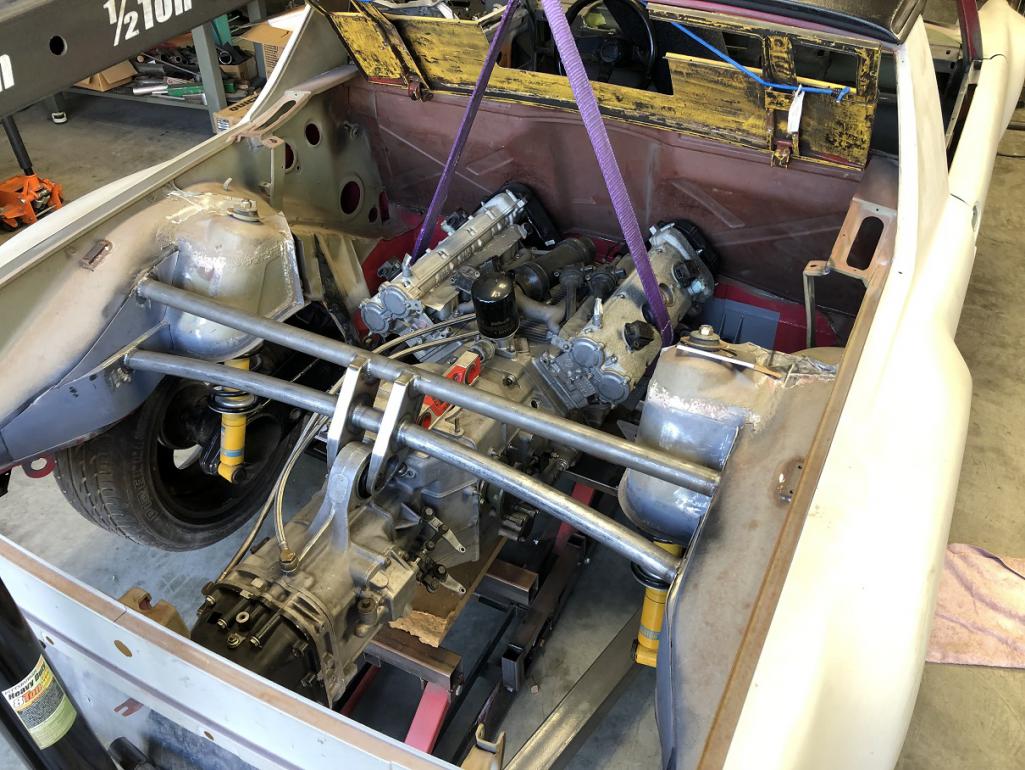
|
|
|
|
| tygaboy |
Dec 17 2022, 06:01 PM
Post
#504
|
|
914 Guru Group: Members Posts: 5,838 Joined: 6-October 15 From: Petaluma, CA Member No.: 19,241 Region Association: Northern California |
And happiest of all it that my measurements were accurate: all clearances are just what I wanted - most critically, at the alternator. (IMG:style_emoticons/default/beerchug.gif)
Attached thumbnail(s) 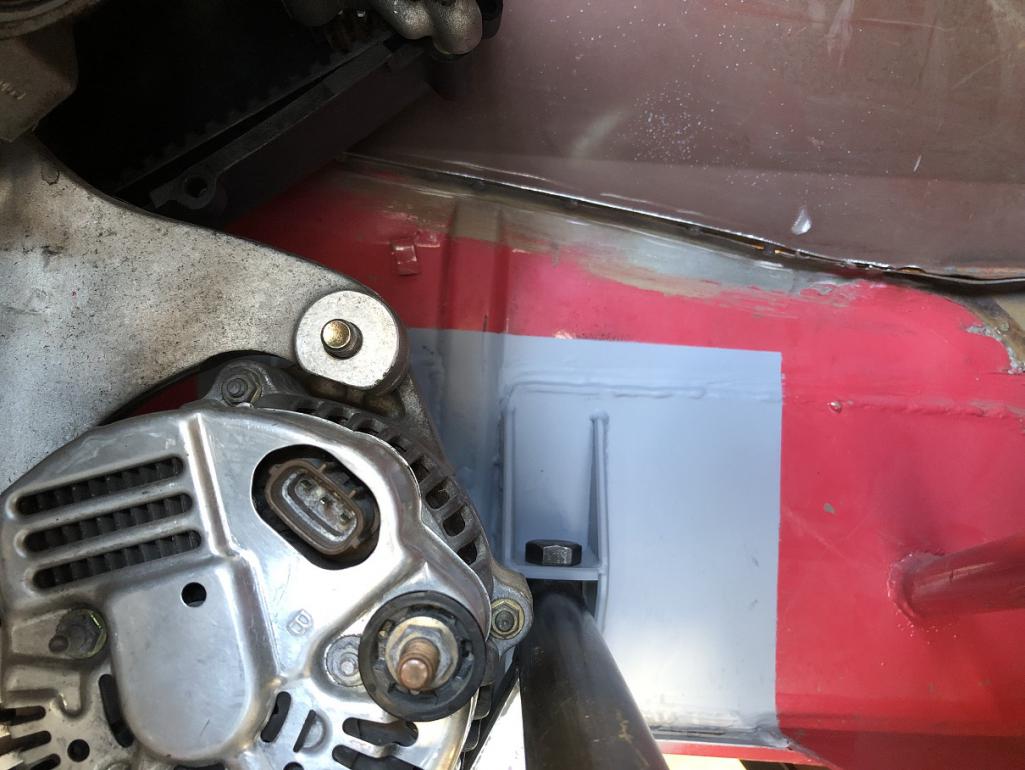
|
|
|
|
| tygaboy |
Dec 17 2022, 06:03 PM
Post
#505
|
|
914 Guru Group: Members Posts: 5,838 Joined: 6-October 15 From: Petaluma, CA Member No.: 19,241 Region Association: Northern California |
Even the motor mount height inside the mount side plates is just where it's supposed to be! Probably only one more day of work and this first phase of "mount the drive train" will be concluded. It's been a long time coming, eh?
Attached thumbnail(s) 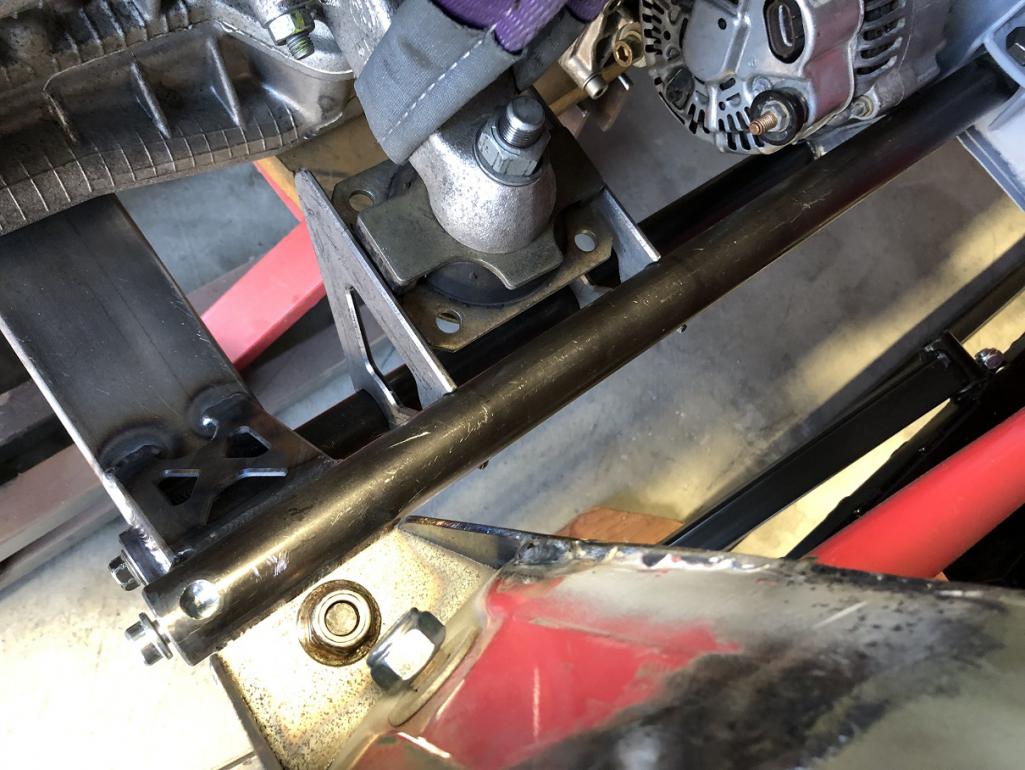
|
|
|
|
| SirAndy |
Dec 17 2022, 06:26 PM
Post
#506
|
|
Resident German Group: Admin Posts: 42,486 Joined: 21-January 03 From: Oakland, Kalifornia Member No.: 179 Region Association: Northern California |
How much clearance do you have on the firewall? Those valve covers look awfully close.
(IMG:style_emoticons/default/idea.gif) |
 |
|
| tygaboy |
Dec 17 2022, 06:56 PM
Post
#507
|
|
914 Guru Group: Members Posts: 5,838 Joined: 6-October 15 From: Petaluma, CA Member No.: 19,241 Region Association: Northern California |
QUOTE(SirAndy @ Dec 17 2022, 04:26 PM) How much clearance do you have on the firewall? Those valve covers look awfully close. (IMG:style_emoticons/default/idea.gif) @SirAndy Andy - It's a bit deceiving in the pics, there's plenty of room. I did have to "massage" the fire wall just ahead of the cover, but not too much. |
|
|
|
| tygaboy |
Dec 18 2022, 02:10 PM
Post
#508
|
|
914 Guru Group: Members Posts: 5,838 Joined: 6-October 15 From: Petaluma, CA Member No.: 19,241 Region Association: Northern California |
@SirAndy - Andy - There's a bit more room than the tape shows but, yes, there's clearance.
Attached image(s) 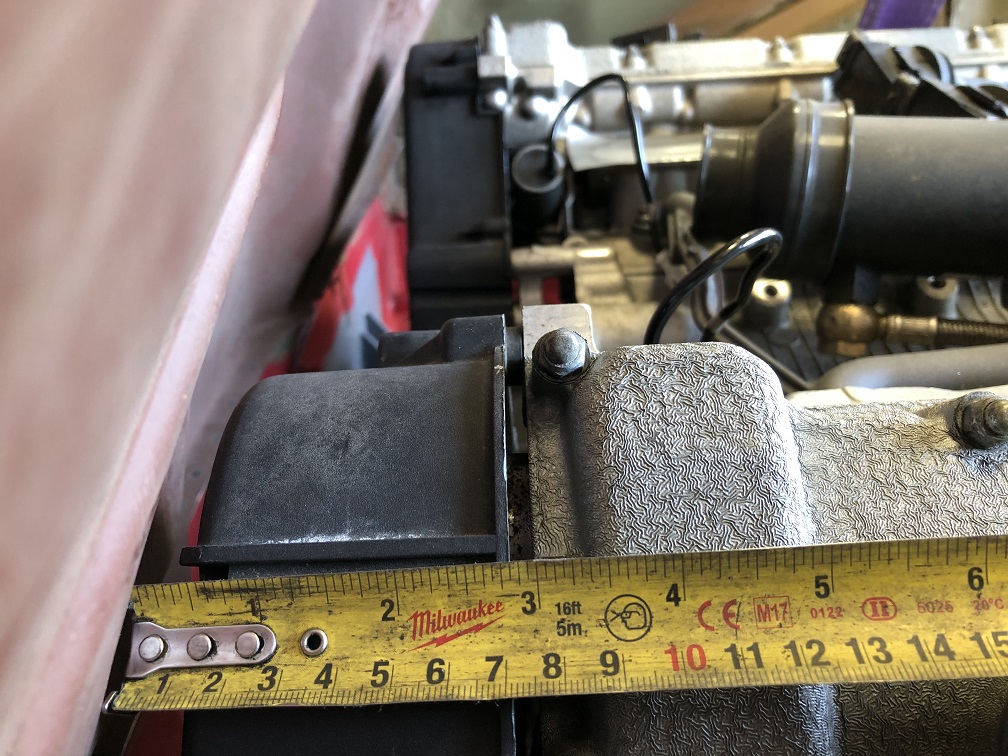
|
|
|
|
| tygaboy |
Dec 18 2022, 02:15 PM
Post
#509
|
|
914 Guru Group: Members Posts: 5,838 Joined: 6-October 15 From: Petaluma, CA Member No.: 19,241 Region Association: Northern California |
Motor mount "top plates" are trimmed to size and everything is now nicely centered. Ahead of final positioning and welding, I'm going to substitute a metal spacer for the rubber mount so as to eliminate any deflection/out of plane caused by the rubber. This'll guarantee the top plates end up parallel to the cast aluminum engine mount surface.
Attached image(s) 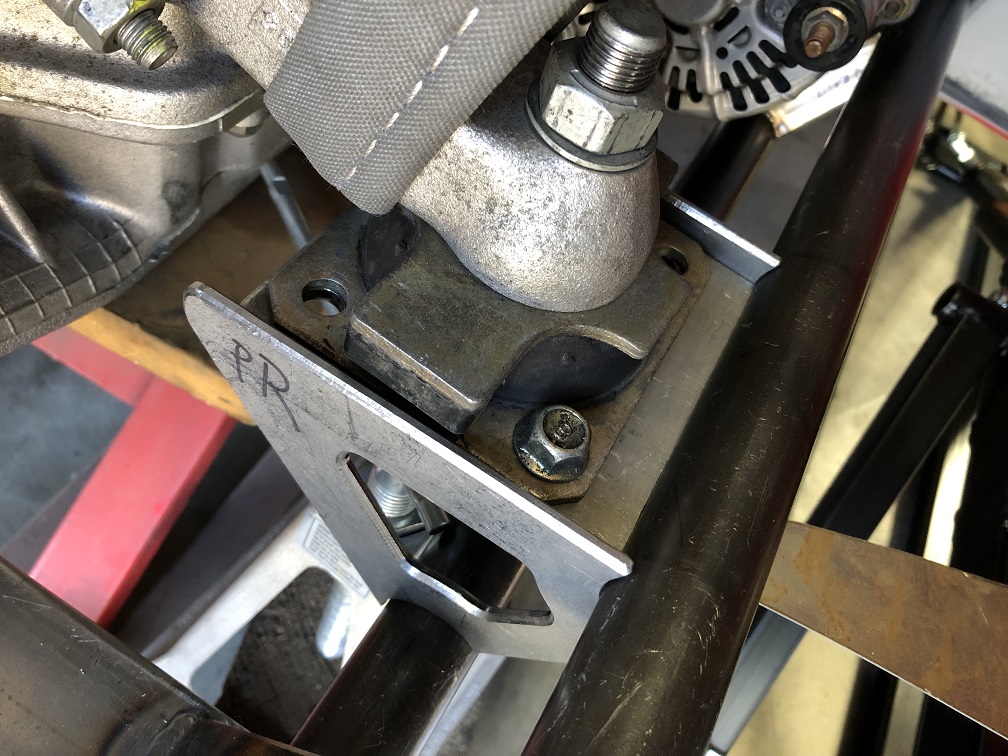 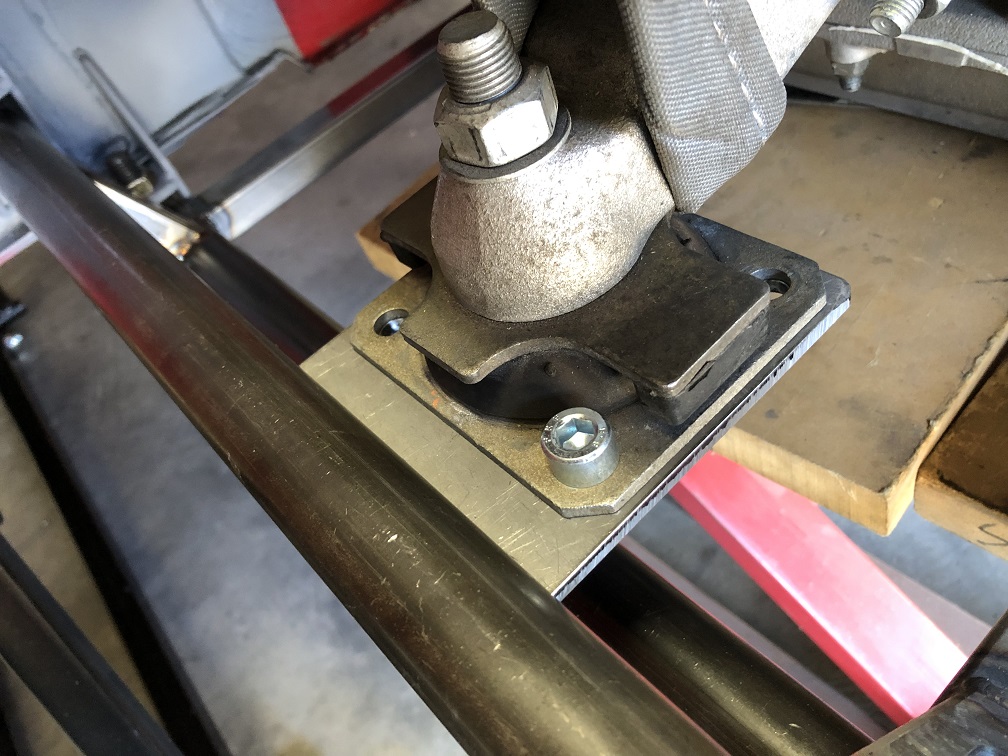
|
|
|
|
| mgp4591 |
Dec 18 2022, 03:01 PM
Post
#510
|
|
914 Guru Group: Members Posts: 5,966 Joined: 1-August 12 From: Salt Lake City Ut Member No.: 14,748 Region Association: Intermountain Region |
Chris, will substituting metal for the rubber isolator put more stress on the aluminum mounting ears and possibly cause cracks or failure in the castings?
|
|
|
|
| tygaboy |
Dec 18 2022, 04:03 PM
Post
#511
|
|
914 Guru Group: Members Posts: 5,838 Joined: 6-October 15 From: Petaluma, CA Member No.: 19,241 Region Association: Northern California |
QUOTE(mgp4591 @ Dec 18 2022, 01:01 PM) Chris, will substituting metal for the rubber isolator put more stress on the aluminum mounting ears and possibly cause cracks or failure in the castings? @mgp4591 - Sorry, I should have been more clear: I'm only substituting the metal to serve as a temporary fixture to locate and ensure the top plate is dead even with the base of the aluminum mounting ears. Once welding is complete on the cradle mounts, the spacer comes out and the factory rubber mounts go back in. |
|
|
|
| tygaboy |
Dec 19 2022, 05:56 PM
Post
#512
|
|
914 Guru Group: Members Posts: 5,838 Joined: 6-October 15 From: Petaluma, CA Member No.: 19,241 Region Association: Northern California |
Today was committing to the drive train position and getting the engine mounts welded to the cradle.
First up was making the above-mentioned spacer set up to substiture for the Ferrari engine mount and serve as the positioning fixture. I plasma cut a couple appropriate plates and, unbelieveably, found the perfect sized spacer in the scrap pile! Karma, baby! Here's the spacer set up next to the Ferrari mount. Note, both are upside down. Attached image(s) 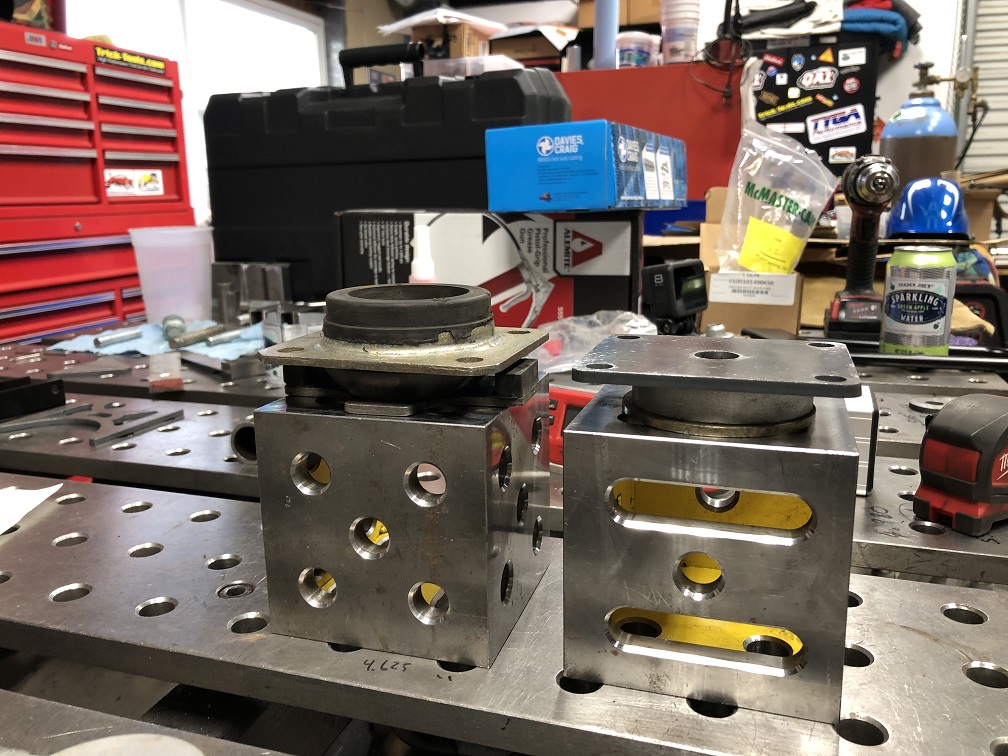
|
|
|
|
| tygaboy |
Dec 19 2022, 06:00 PM
Post
#513
|
|
914 Guru Group: Members Posts: 5,838 Joined: 6-October 15 From: Petaluma, CA Member No.: 19,241 Region Association: Northern California |
Next was to get the drive train suspended in the proper location - that was fun...
Once that was set up and all levels and angles were checked and rechecked, the engine mount top plates were tacked to the upper cradle bars. Then the cradle was removed from the car for bench welding. The first step there was to level the top plates to each other and verifiy them as level to the main cross bar. Yep, everything check out just as Then the side plates got squared and clamped and all those parts tacked in place. Attached image(s) 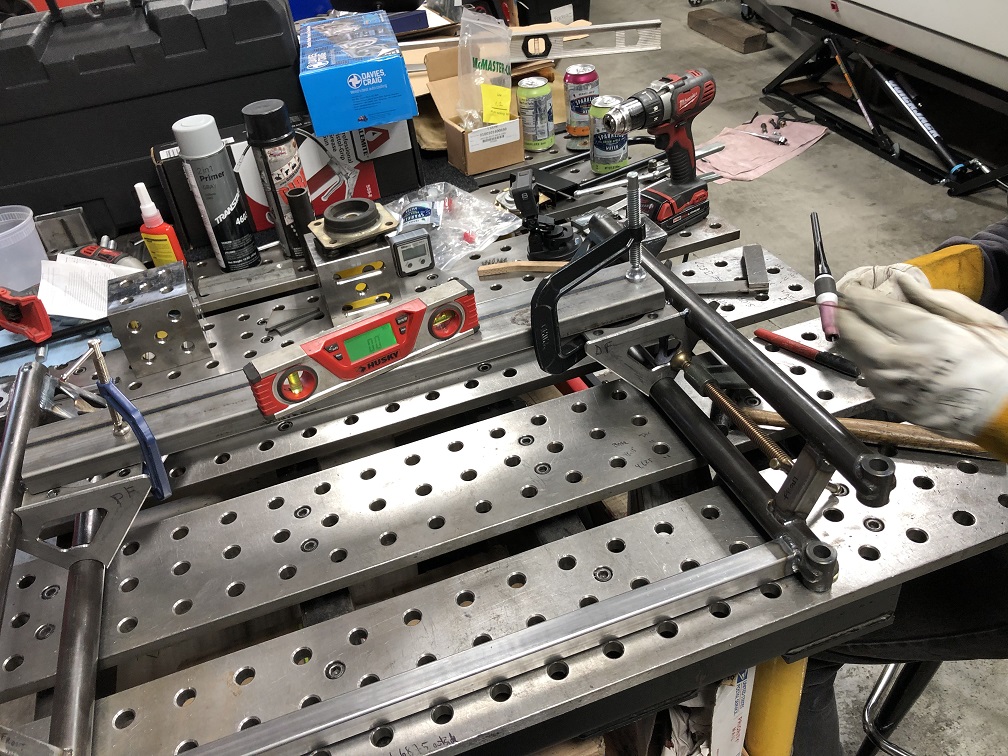 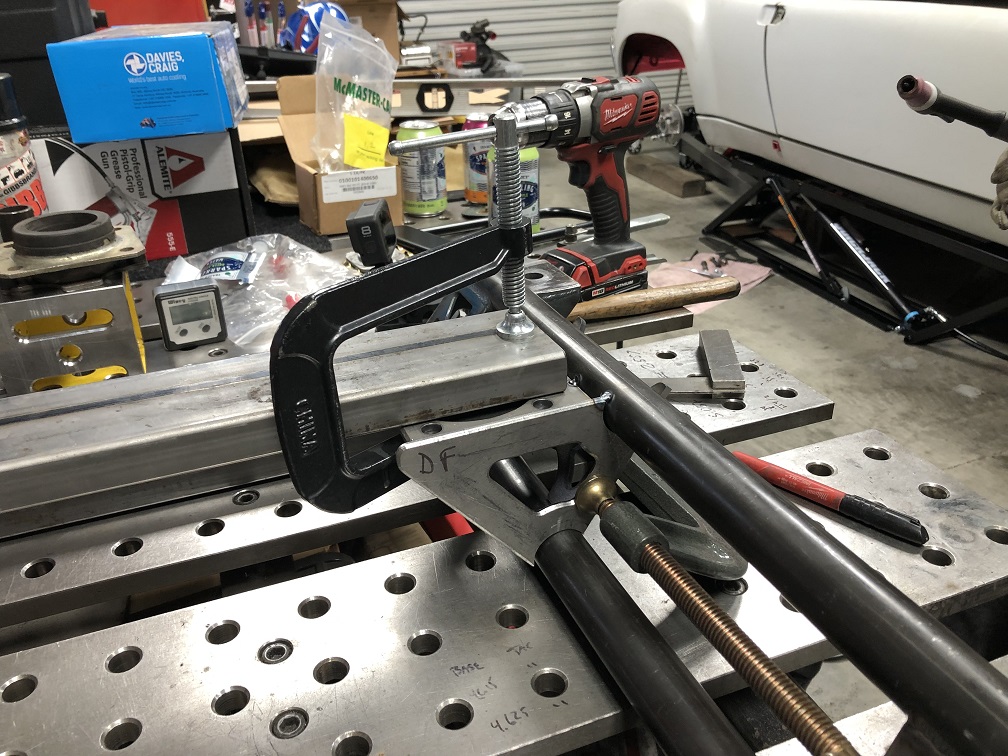
|
|
|
|
| tygaboy |
Dec 19 2022, 06:01 PM
Post
#514
|
|
914 Guru Group: Members Posts: 5,838 Joined: 6-October 15 From: Petaluma, CA Member No.: 19,241 Region Association: Northern California |
On to making up some gussets for the side plates and fixturing them for tacking.
Attached image(s) 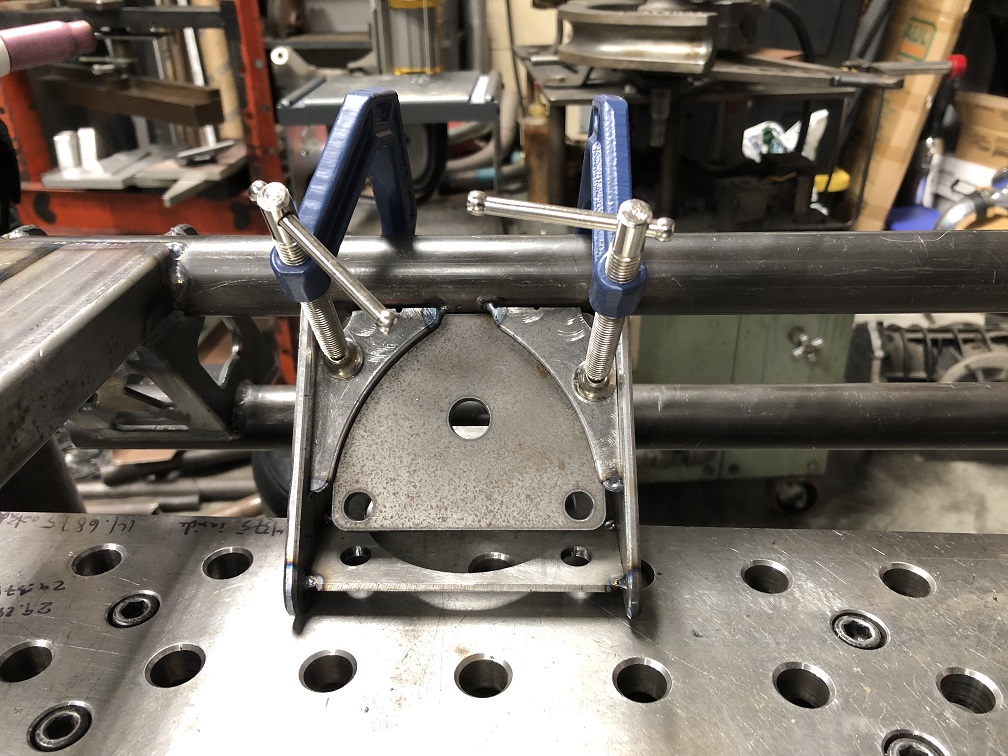
|
|
|
|
| tygaboy |
Dec 19 2022, 06:04 PM
Post
#515
|
|
914 Guru Group: Members Posts: 5,838 Joined: 6-October 15 From: Petaluma, CA Member No.: 19,241 Region Association: Northern California |
The side plate gussets got the edge router treatment, as well as some corner cut outs to help prevent trapping stuff that may find it's way in there.
Yep, style points for stuff no one will ever see. It's how we do things "At the Red Barn". (What could those quotes possibly imply...?) (IMG:style_emoticons/default/idea.gif) Attached image(s) 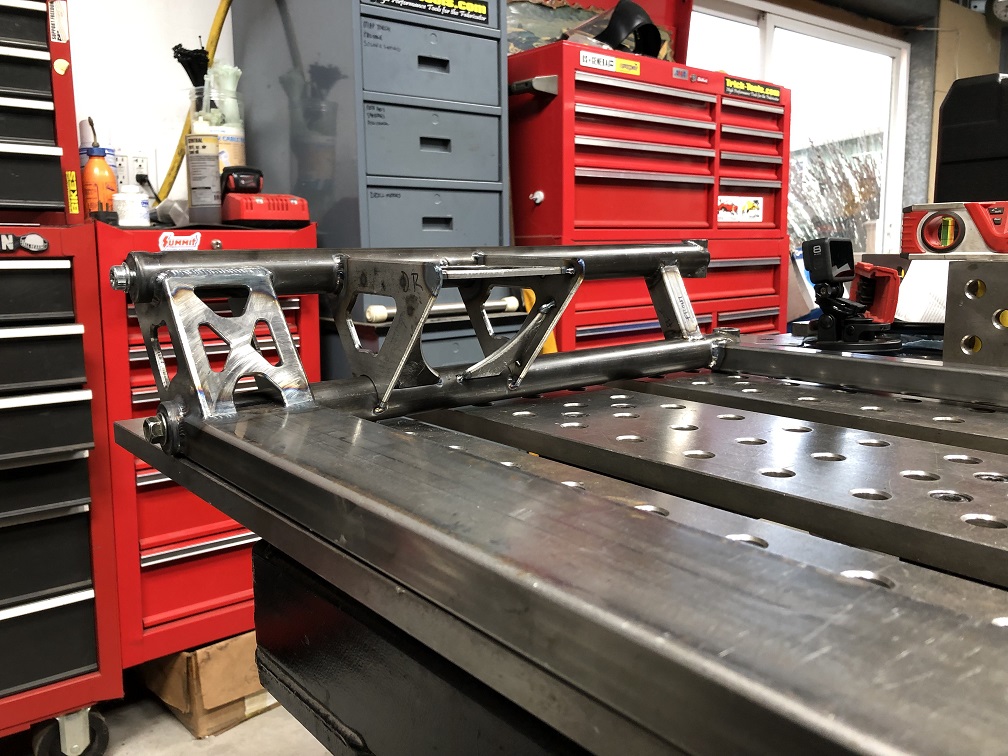 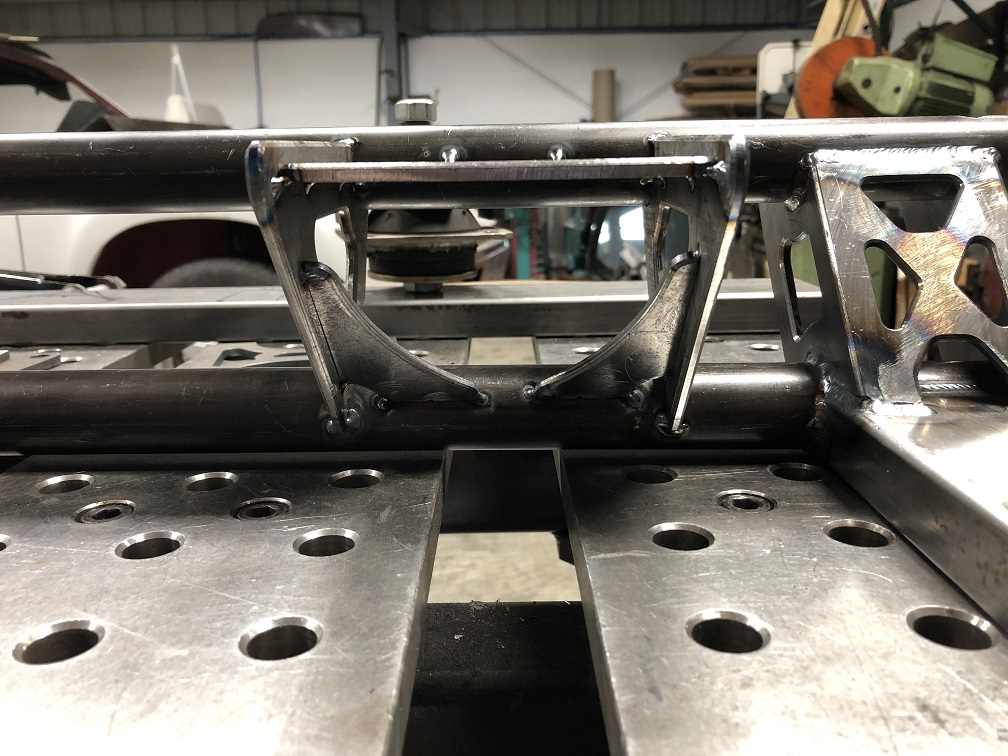
|
|
|
|
| tygaboy |
Dec 19 2022, 06:07 PM
Post
#516
|
|
914 Guru Group: Members Posts: 5,838 Joined: 6-October 15 From: Petaluma, CA Member No.: 19,241 Region Association: Northern California |
Final welding yet to go but here it is: the Ferrari engine cradle.
That was WAY more complicated and WAY more work that I'd ever imagined it would be. But the good news is this means that tomorrow, the drive train will be fully mounted in the chassis and it'll be on to the next chapter of the build! (IMG:style_emoticons/default/cheer.gif) Attached image(s) 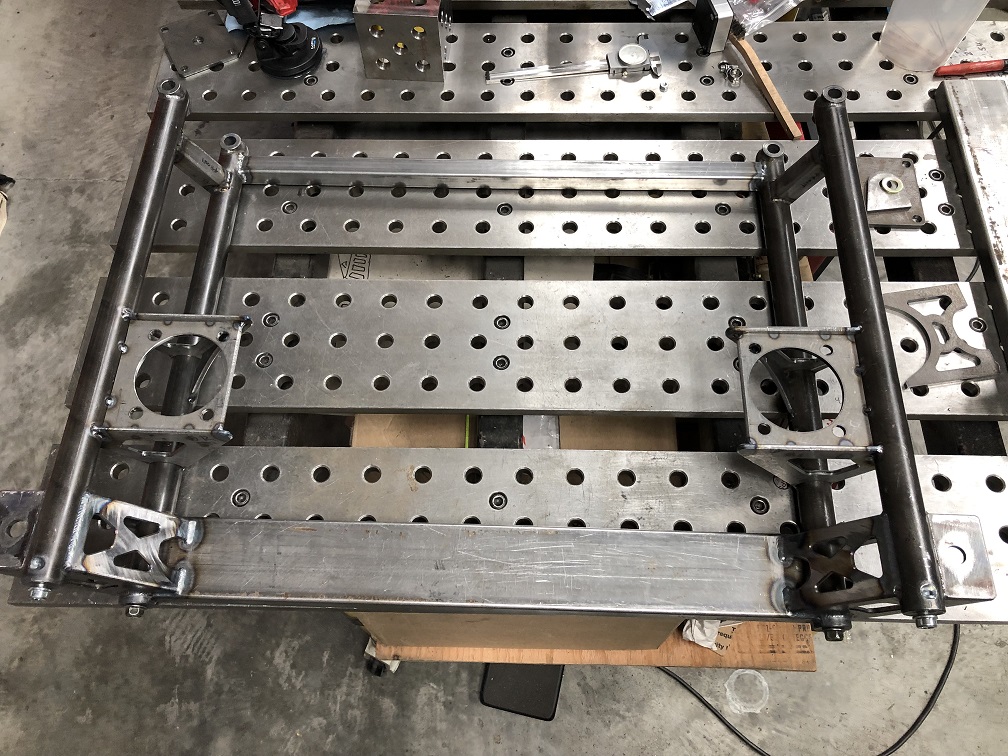
|
|
|
|
| Cairo94507 |
Dec 20 2022, 08:22 AM
Post
#517
|
|
Michael Group: Members Posts: 10,687 Joined: 1-November 08 From: Auburn, CA Member No.: 9,712 Region Association: Northern California |
|
|
|
|
| KELTY360 |
Dec 20 2022, 09:14 AM
Post
#518
|
|
914 Neferati Group: Members Posts: 5,190 Joined: 31-December 05 From: Pt. Townsend, WA Member No.: 5,344 Region Association: Pacific Northwest |
DaVinci would approve.
Maybe the car should be named Leonardo.....or at least the drive train cradle. |
|
|
|
| Tferrer |
Dec 20 2022, 10:13 AM
Post
#519
|
|
Newbie Group: Members Posts: 8 Joined: 5-October 22 From: Bay Area Member No.: 26,896 Region Association: Northern California |
Beautiful work. You better be careful, Chris- Before you know it you'll have a wait list for folks wanting one of your builds! (IMG:style_emoticons/default/chowtime.gif)
|
|
|
|
| Steve |
Dec 20 2022, 10:35 AM
Post
#520
|
|
914 Guru Group: Members Posts: 6,056 Joined: 14-June 03 From: Laguna Niguel, CA Member No.: 822 Region Association: Southern California |
QUOTE(Tferrer @ Dec 20 2022, 08:13 AM) Beautiful work. You better be careful, Chris- Before you know it you'll have a wait list for folks wanting one of your builds! (IMG:style_emoticons/default/chowtime.gif) (IMG:style_emoticons/default/agree.gif) Sad... but that drive train is cheaper than a 993 3.6 motor and 915 trans. https://www.ebay.com/itm/354286038626?hash=...%3ABFBM-O6ThqZh |
|
|
|
|
4 User(s) are reading this topic (1 Guests and 0 Anonymous Users)

|
Lo-Fi Version | Time is now: 5th July 2026 - 10:06 AM |
Invision Power Board
v9.1.4 © 2026 IPS, Inc.