|
|
|
Porsche, and the Porsche crest are registered trademarks of Dr. Ing. h.c. F. Porsche AG.
This site is not affiliated with Porsche in any way. Its only purpose is to provide an online forum for car enthusiasts. All other trademarks are property of their respective owners. |
|
|

  |

| vitamin914 |
 May 2 2022, 11:13 AM May 2 2022, 11:13 AM
Post
#1
|
|
Member  Group: Members Posts: 202 Joined: 8-September 21 From: Toronto Canada Member No.: 25,893 Region Association: Canada |
While reading the thread about 4" hole under the gas tank and the protective cover for the steering rack I decided to get under mine to see if I need the protective cover. Yes, I do, and I found something I did not expect a sheared-off bolt head. (IMG:style_emoticons/default/unsure.gif)
See photos. Right side ok, left side not so good. No clue what caused it was but it is painted over and not fresh - (IMG:style_emoticons/default/mad.gif) must have existed when I bought the car. I know this is not correct and needs to be fixed. I don't know what these supports are holding but I suspect it is the front axle. Is it dangerous? How urgent should it be? Anyone have a feel for the difficulty in removing that sheared bolt?  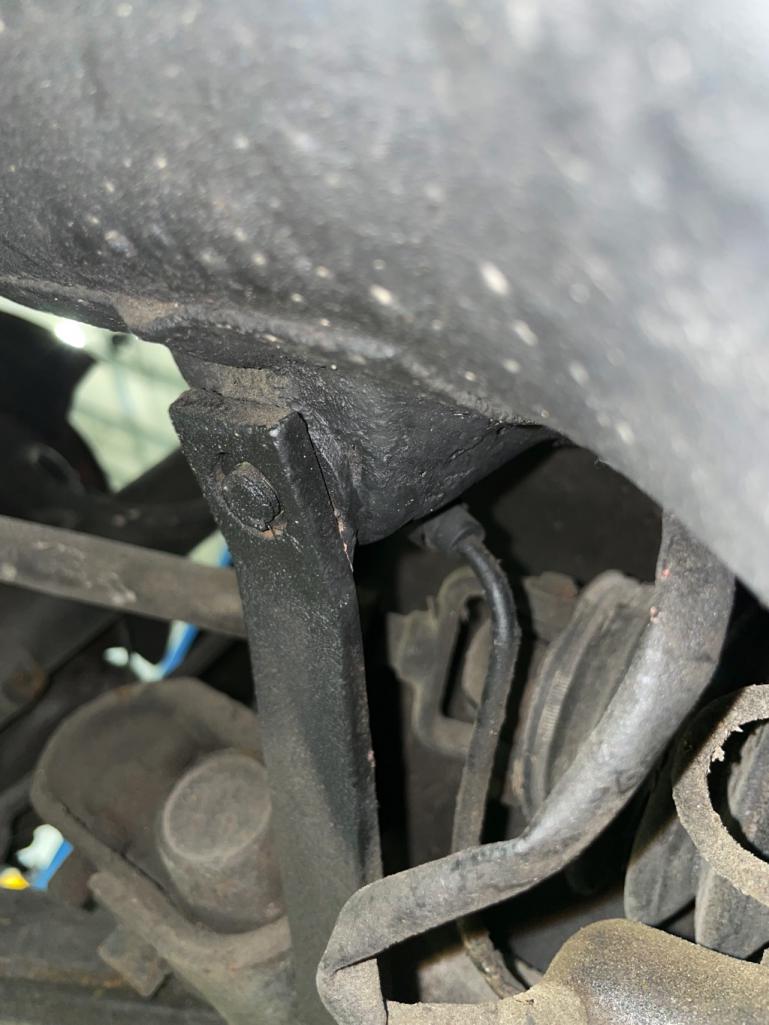 |
   |

 
|
| vitamin914 |
May 2 2022, 11:17 AM
Post
#2
|
|
Member Group: Members Posts: 202 Joined: 8-September 21 From: Toronto Canada Member No.: 25,893 Region Association: Canada |
Hmmm... I may have more problems... Just looking at my last photo...
I am going to have to crawl under again to see what that kinked tube is... Is it coming from the master brake cylinder? |
|
|
|
| euro911 |
May 2 2022, 11:18 AM
Post
#3
|
|
Retired & living the dream. God help me if I wake up! Group: Members Posts: 8,849 Joined: 2-December 06 From: So.Cal. & No.AZ (USA) Member No.: 7,300 Region Association: Southern California |
Drill a hole in the center & use an 'EASY-OUT' to get the remnant out, then replace the bolt.
|
|
|
|
| Cairo94507 |
May 2 2022, 11:23 AM
Post
#4
|
|
Michael Group: Members Posts: 9,787 Joined: 1-November 08 From: Auburn, CA Member No.: 9,712 Region Association: Northern California |
That "kinked tube" looks to me like the sheathing on the wiring going to the master cylinder. (IMG:style_emoticons/default/confused24.gif)
|
 |
|
| Superhawk996 |
May 2 2022, 11:35 AM
Post
#5
|
|
914 Guru Group: Members Posts: 5,853 Joined: 25-August 18 From: Woods of N. Idaho Member No.: 22,428 Region Association: Galt's Gulch |
QUOTE(euro911 @ May 2 2022, 01:18 PM)  Drill a hole in the center & use an 'EASY-OUT' to get the remnant out, then replace the bolt. No . . . no . . . no. That is not what Easy Outs are for. Please don't do this. Trust me I've learned this via the school of hard knocks too many times. If the fastener is corroded enough to have the head has sheared off - you will not get it out with an Easy Out. You'll probably make it worse. If you break the EZ Out off in the bolt, you're seriously limiting your options on what you can do down the road as a "next" fix after the EZ out breaks. There is not a decent hand drill in the world that will touch it once the EZ out is broken off in the bolt. Unless you have access to a Welder and a well equipped shop, I'd take it to someone that is equipped to deal with this. Better method without a welder: 1) Saturate well for days in advance with PB Blaster. 2) Square off the bolt head. Locate dead center. Center Punch it. Then drill it with a LEFT Hand Drill bit. That might very well spin it out. If it doesn't the EZ wouldn't have done it either. 3) Keep drilling with LEFT hand drill bits removing more and more material from center of the bolt. 4) Eventually you'll be able to pick / chisel any of that last bolt remnants out - assuming it hasn't backed out with the left hand drilling. 5) Clean the hole with proper tap. 5a) Even if you screw this up and didn't drill perfectly on center and/or drill too much of the original threads out, you're still in a decent position to use a Timesert or Helicoil as a backup plan. Other method I'd use 1st but requires a welder: Weld a hex nut to the stub of the bolt sticking out. Usually the heat of welding combined with a welded on Hex nut will all the bolt to come out. Even if this fails, you can still revert to the left hand drill method above. PS - When I bought my car it came to me with the very same fastener sheared off & thoroughly corroded in there. The head is sheared off for a reason. Absolute worst case: Restoration design sells this mount. Again, it will require cutting out the old one and welding in the new one. I guess this could also be the fix if you decide to go the EZ-Out method and it breaks off! Why you should HATE EZ outs: An EZ out applies OUTWARD compressive forces into the bolt shank as it tries to dig deeper into the bolt. This is exactly what you don't want. That compression is basically acting to wedge the bolt even more firmly into the tapped hole. EZ-outs are also made of very hard steel. That means brittle. They are very easy to fracture off in the bolt. Once this happens the only thing that will touch an EZ out is Electrical Discharge Machining (EDM) and that can't be done on the car. |
|
|
|
| Shivers |
May 2 2022, 11:37 AM
Post
#6
|
|
Senior Member Group: Members Posts: 2,395 Joined: 19-October 20 From: La Quinta, CA Member No.: 24,781 Region Association: Southern California |
^^^What these Guys said^^^ I'd soak the area with a liquid wrench type product first, drill and then apply heat before inserting and turning the easy out. You have lots sticking out, shouldn't be too bad. The last one subjection is probably the safest
|
|
|
|
| vitamin914 |
May 2 2022, 12:32 PM
Post
#7
|
|
Member Group: Members Posts: 202 Joined: 8-September 21 From: Toronto Canada Member No.: 25,893 Region Association: Canada |
QUOTE(Cairo94507 @ May 2 2022, 01:23 PM) That "kinked tube" looks to me like the sheathing on the wiring going to the master cylinder. (IMG:style_emoticons/default/confused24.gif) (IMG:style_emoticons/default/aktion035.gif) Crawled back under. You are 100% correct. Whew... |
|
|
|
| vitamin914 |
May 2 2022, 12:54 PM
Post
#8
|
|
Member Group: Members Posts: 202 Joined: 8-September 21 From: Toronto Canada Member No.: 25,893 Region Association: Canada |
QUOTE(Superhawk996 @ May 2 2022, 01:35 PM) QUOTE(euro911 @ May 2 2022, 01:18 PM) Drill a hole in the center & use an 'EASY-OUT' to get the remnant out, then replace the bolt. No . . . no . . . no. That is not what Easy Outs are for. Please don't do this. Trust me I've learned this via the school of hard knocks too many times. If the fastener is corroded enough to have the head has sheared off - you will not get it out with an Easy Out. You'll probably make it worse. If you break the EZ Out off in the bolt, you're seriously limiting your options on what you can do down the road as a "next" fix after the EZ out breaks. There is not a decent hand drill in the world that will touch it once the EZ out is broken off in the bolt. Unless you have access to a Welder and a well equipped shop, I'd take it to someone that is equipped to deal with this. Better method without a welder: 1) Saturate well for days in advance with PB Blaster. 2) Square off the bolt head. Locate dead center. Center Punch it. Then drill it with a LEFT Hand Drill bit. That might very well spin it out. If it doesn't the EZ wouldn't have done it either. 3) Keep drilling with LEFT hand drill bits removing more and more material from center of the bolt. 4) Eventually you'll be able to pick / chisel any of that last bolt remnants out - assuming it hasn't backed out with the left hand drilling. 5) Clean the hole with proper tap. 5a) Even if you screw this up and didn't drill perfectly on center and/or drill too much of the original threads out, you're still in a decent position to use a Timesert or Helicoil as a backup plan. Other method I'd use 1st but requires a welder: Weld a hex nut to the stub of the bolt sticking out. Usually the heat of welding combined with a welded on Hex nut will all the bolt to come out. Even if this fails, you can still revert to the left hand drill method above. PS - When I bought my car it came to me with the very same fastener sheared off & thoroughly corroded in there. The head is sheared off for a reason. Absolute worst case: Restoration design sells this mount. Again, it will require cutting out the old one and welding in the new one. I guess this could also be the fix if you decide to go the EZ-Out method and it breaks off! Why you should HATE EZ outs: An EZ out applies OUTWARD compressive forces into the bolt shank as it tries to dig deeper into the bolt. This is exactly what you don't want. That compression is basically acting to wedge the bolt even more firmly into the tapped hole. EZ-outs are also made of very hard steel. That means brittle. They are very easy to fracture off in the bolt. Once this happens the only thing that will touch an EZ out is Electrical Discharge Machining (EDM) and that can't be done on the car. @Superhawk996 I have both TIG and MIG. I also have a plasma torch - but I don't even want think of having to go there. I am trying to avoid taking off the crossmember. My plan is to get a nut and turn down one end so that it fits inside the crossmember clearance hole, then MIG weld inside the nut. Any idea what the replacement bolt size is? M10x20? And just a guess... does the rack and pinion cover that I'll get from Resoration Design mount with these same bolts? |
|
|
|
| Front yard mechanic |
May 2 2022, 12:55 PM
Post
#9
|
|
Senior Member Group: Members Posts: 1,165 Joined: 23-July 15 From: New Mexico Member No.: 18,984 Region Association: None |
Soak that with pb blaster. Pull the bar down and put a vice grip on it that will come loose easy peasy
|
|
|
|
| Bartlett 914 |
May 2 2022, 01:04 PM
Post
#10
|
|
Advanced Member Group: Members Posts: 2,216 Joined: 30-August 05 From: South Elgin IL Member No.: 4,707 Region Association: Upper MidWest |
QUOTE(Front yard mechanic @ May 2 2022, 01:55 PM) Soak that with pb blaster. Pull the bar down and put a vice grip on it that will come loose easy peasy That was my first thought. The steering rack can be lowered enough to allow vice grips. Really give the PB Blaster time to work. Heat will also help. Don't get greedy when removing. Allow a little back and forth motion when working it out |
|
|
|
| mepstein |
May 2 2022, 01:54 PM
Post
#11
|
|
914-6 GT in waiting Group: Members Posts: 19,284 Joined: 19-September 09 From: Landenberg, PA/Wilmington, DE Member No.: 10,825 Region Association: MidAtlantic Region |
Mug weld a nut on. Oftentimes, the heat from welding will loosen the corrosion and make it easy to remove. Good catch.
|
|
|
|
| brant |
May 2 2022, 02:08 PM
Post
#12
|
|
914 Wizard Group: Members Posts: 11,626 Joined: 30-December 02 From: Colorado Member No.: 47 Region Association: Rocky Mountains |
and this is a job for Kroil
100 times superior to PB blaster... |
|
|
|
| porschetub |
May 2 2022, 02:12 PM
Post
#13
|
|
Advanced Member Group: Members Posts: 4,701 Joined: 25-July 15 From: New Zealand Member No.: 18,995 Region Association: None |
Let heat be your helper,apply it several times and this will assist ,soaking in penetrant while it is still hot helps also.
(IMG:style_emoticons/default/agree.gif) with Superhawk on easyouts they are horrible things....often used incorrectly and that's why they break ,they have somewhat limited use IMO. One thing that will help is that without a head left the remains may not be that tight anymore,you could try building the remains up with your MIG to extend it then weld a nut on making sure you can put a good solid weld on. Failing that you will have to "core " it out but make sure you drill it "dead centre " and take your time,good luck. |
|
|
|
| flyer86d |
May 2 2022, 02:26 PM
Post
#14
|
|
Member Group: Members Posts: 425 Joined: 12-January 11 From: Corea, Maine Member No.: 12,585 Region Association: North East States |
I would do what Mark said. Weld a nut to the stud and back it out. If it breaks off, do it again until it comes out. I have used this method many times. It works great on broken exhaust studs also
Charlie |
|
|
|
| mepstein |
May 2 2022, 02:48 PM
Post
#15
|
|
914-6 GT in waiting Group: Members Posts: 19,284 Joined: 19-September 09 From: Landenberg, PA/Wilmington, DE Member No.: 10,825 Region Association: MidAtlantic Region |
QUOTE(flyer86d @ May 2 2022, 04:26 PM) I would do what Mark said. Weld a nut to the stud and back it out. If it breaks off, do it again until it comes out. I have used this method many times. It works great on broken exhaust studs also Charlie It’s what shops do all the time since they can’t wait days for penetrating oil. I’ve also found that impact guns work well for this. They know the corrosion free from the repeated hammering. |
|
|
|
| r_towle |
May 2 2022, 04:05 PM
Post
#16
|
|
Custom Member Group: Members Posts: 24,582 Joined: 9-January 03 From: Taxachusetts Member No.: 124 Region Association: North East States |
Weld it OR soak it….not both
Fire hazard, fuel above |
|
|
|
| Superhawk996 |
May 3 2022, 06:23 AM
Post
#17
|
|
914 Guru Group: Members Posts: 5,853 Joined: 25-August 18 From: Woods of N. Idaho Member No.: 22,428 Region Association: Galt's Gulch |
QUOTE(vitamin914 @ May 2 2022, 02:54 PM) My plan is to get a nut and turn down one end so that it fits inside the crossmember clearance hole, then MIG weld inside the nut. Good Plan! (IMG:style_emoticons/default/smilie_pokal.gif) |
|
|
|
| mate914 |
May 4 2022, 06:53 AM
Post
#18
|
|
Matt Group: Members Posts: 749 Joined: 27-February 09 From: Eagles mere, PA Member No.: 10,102 Region Association: North East States |
I would like to add.
Remove gas tank. locate mount under gas tank, drill hole in sheet metal above broken bolt. Spray PB blaster from the top for two days. Vise grip or weld nut onto protruding bolt threads and loosen and tighten until moves free enough to remove. The rust that caused the broken bolt is at the top of the threads. I wish you luck. Matt (IMG:style_emoticons/default/flag.gif) |
|
|
|
| 76-914 |
May 4 2022, 07:17 AM
Post
#19
|
|
Repeat Offender & Resident Subaru Antagonist Group: Members Posts: 13,505 Joined: 23-January 09 From: Temecula, CA Member No.: 9,964 Region Association: Southern California |
Use a pipe wrench as opposed to vice grips. Vice grips can and do slip whereas a pipe wrench will tighten more as force is applied. I've always had luck with heat. If you go with a penetrant then apply it after you've heated the part. The penetrant will flow into a heated (not red hot or it will burn off) section quickly & with ease. So many ways to do this but an easy out ain't one of them. (IMG:style_emoticons/default/beerchug.gif)
|
|
|
|
| Van B |
May 4 2022, 07:50 AM
Post
#20
|
|
Senior Member Group: Members Posts: 1,591 Joined: 20-October 21 From: Maryland Member No.: 26,011 Region Association: None |
QUOTE(flyer86d @ May 2 2022, 04:26 PM) I would do what Mark said. Weld a nut to the stud and back it out. If it breaks off, do it again until it comes out. I have used this method many times. It works great on broken exhaust studs also Charlie (IMG:style_emoticons/default/agree.gif) I'm not a big fan of the "I don't want to" logic. Do you want to get that broken bolt out or not? Welding a nut on there is a no brainer. The heat directed into the stud will help free it and a large nut welded on will give your plenty of torque to loosen it. Anything worth doing, is worth doing right. |
|
|
|
|
1 User(s) are reading this topic (1 Guests and 0 Anonymous Users)
0 Members:

|
Lo-Fi Version | Time is now: 24th May 2024 - 07:46 AM |
Invision Power Board
v9.1.4 © 2024 IPS, Inc.