

 How To: Close the Gap on Triangle Window Seal |
|
|

|
Porsche, and the Porsche crest are registered trademarks of Dr. Ing. h.c. F. Porsche AG.
This site is not affiliated with Porsche in any way. Its only purpose is to provide an online forum for car enthusiasts. All other trademarks are property of their respective owners. |
|
|
  |
| bbrock |
 Aug 7 2022, 11:39 AM
Post
#1
|
|
914 Guru  Group: Members Posts: 5,269 Joined: 17-February 17 From: Montana Member No.: 20,845 Region Association: Rocky Mountains 
 |
When I was reassembling my bare metal restoration, I probably spent close to 80 hours installing and adjusting body seals and gaskets. I wanted to get the car as air tight as possible to control cabin noise and leaks. I'm happy to say that my car seals tight enough to feel that pressure bubble when you close a door with top on and windows up like you get with a new modern car.
However, my one trouble spot was the top of the side triangle window. The 914Rubber main front targa seal is nice, but the rubber on mine was just a little too stiff to let the triangle frame to bed in for a proper seal. No amount of adjustment to move the frame forward helped. I even tried wrapping a ratchet strap around the top of the triangle window and windshield frame to pull the frame into the rubber and left it for two weeks to see if it would take a set. It didn't. There was this gap that let water trip in and created significant wind noise in an otherwise suprisingly quiet top on, windows up, cabin. 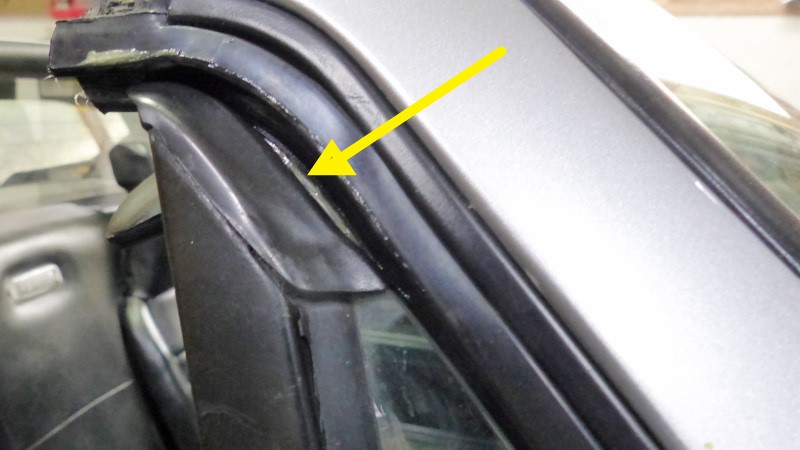 Here is how I fixed it. 1. Clean the main targa seal, triangle window end cap, and top edge of the triangle window thoroughly with isopropyl alcohol. 2. Smear the triangle window end cap and a few inches of the top edge of the window with a generous, but smooth coat of petroleum jelly. This will act as a release agent for the silicone caulk you are about to apply. 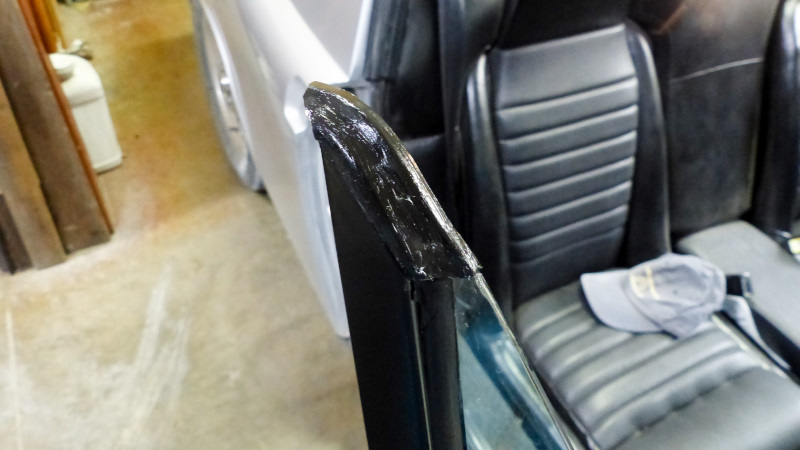 3. Apply a thick bead of black silicone on the targa seal in the area where the gap needs to be filled. Don't worry about getting it smooth at this point. Don't overdo it or you will have more mess to clean up in the next step. 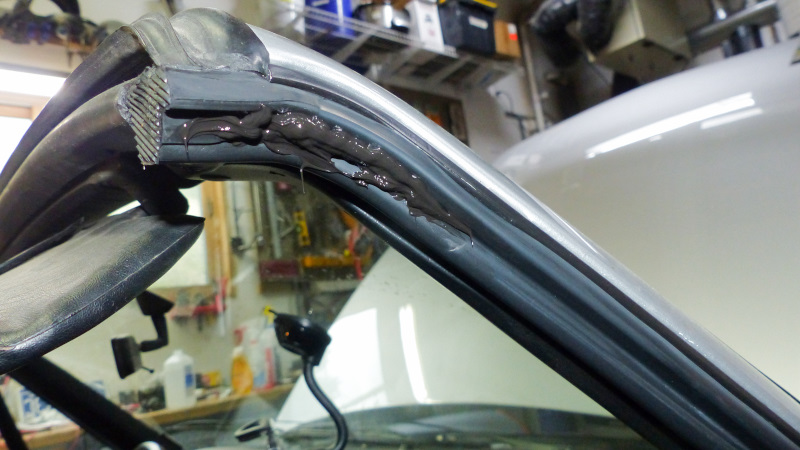 4. Close the door tight and use a lint free cloth soaked with isopropyl alcohol to clean up any silicone that oozes out on the inside. Be thorough with the clean up on this side. 5. Use your finger on the outside to force the silicone into the gap and smooth it out. I had to squirt in a bit more silicone to make sure it was completely filled. 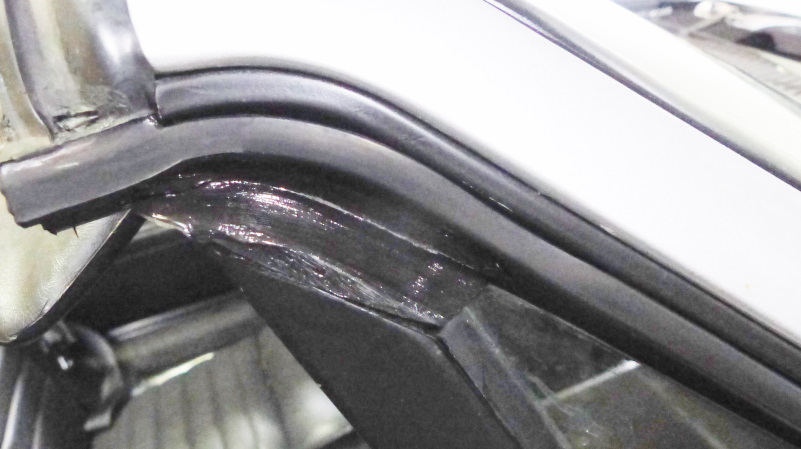 6. When you are satisfied the gap is completely filled with silicone and it looks nice and smooth, carefully go over inside and out with a clean alcohol soaked cloth to tidy up any stray silicone. Much easier at this stage than after silicone has cured. Careful not wipe the petroleum jelly off the end cap though. 7. Leave the car alone for at least 12 hours to let the silicone cure. After the silicone has cured, open the door and clean off the petroleum jelly with alcohol. 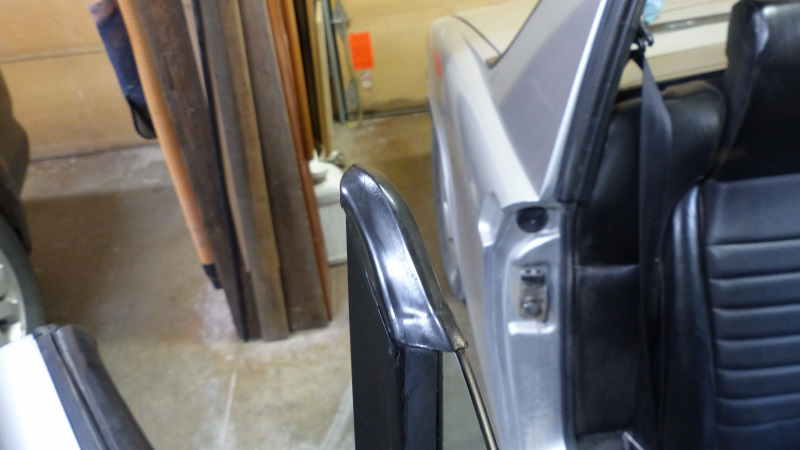 You should have a perfect seal and nearly invisible repair. This picture was taken with a flash to better show the cured silicone. 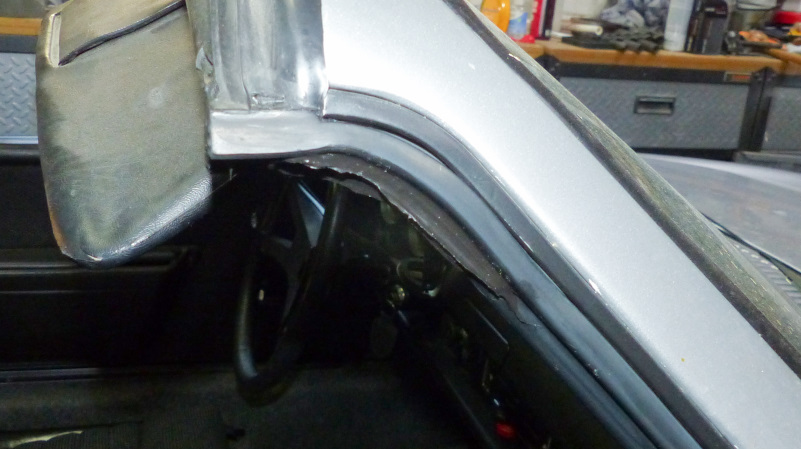 And here is without flash which is more representative of how it looks in natural light. 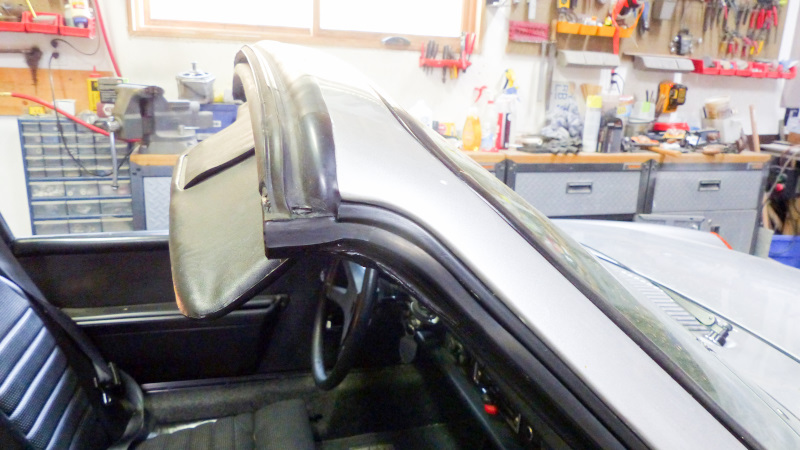 The small amount of jagged slag is only noticeable if you are looking for it, and disappears when the door is closed, but I'll let the silicone cure a few more days and try to smooth it with some fine sandpaper. 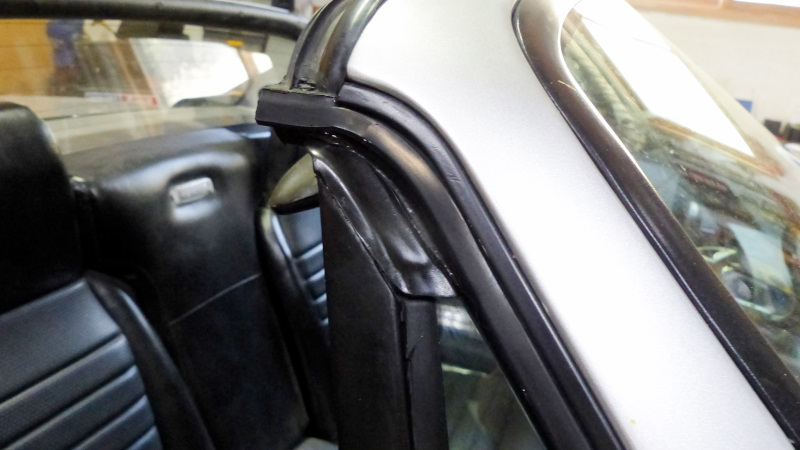 Happy drip and whistle free motoring! (IMG:style_emoticons/default/driving.gif) (IMG:style_emoticons/default/driving-girl.gif) |
   |

 
|
| FlacaProductions |
Aug 7 2022, 12:52 PM
Post
#2
|
|
Advanced Member Group: Members Posts: 2,289 Joined: 24-November 17 From: LA Member No.: 21,628 Region Association: Southern California
|
Your ingenuity never fails to impress. Practical solutions to real-world issues. Really nice work. Again.
|
|
|
|
| Dion |
Aug 7 2022, 01:37 PM
Post
#3
|
|
RN Group: Members Posts: 2,935 Joined: 16-September 04 From: Shepherdstown, WV Member No.: 2,766 Region Association: MidAtlantic Region 
|
Nice one Brent! I may need to do this. Evil genius you.
|
|
|
|
| Superhawk996 |
Aug 7 2022, 02:18 PM
Post
#4
|
|
914 Guru Group: Members Posts: 8,149 Joined: 25-August 18 From: Woods of N. Idaho Member No.: 22,428 Region Association: Galt's Gulch
|
Good job on a fix. (IMG:style_emoticons/default/smilie_pokal.gif)
Would be far nicer if the targa seal fit properly in the 1st place. The seal material is too hard (not pliable enough) and doesn't have quite the right profile to make proper contact. Like you, I spent many hours adjusting the seal, the window triangle, and even nudging the aluminum track outboard as far as I could without resorting to re-slotting the aluminum tracks. I hate to bang on 914Rubber since they do so much to support the community. I'm just thinking I need seals that fit more than I need plaid blankets from Scotland. Don't get me wrong I sincerely appreciate that there is a vendor supporting us with the rubber products that we all need. I just think that the 914 has appreciated in value to the point were I'd be willing to pay double if the seal actually replicated OEM form and function. I actually am saving my OEM seal since it fit noticeably better sealing in that critical area both for water leaks and wind noise. Currently contemplating a hybrid. My OEM seal was perfect on the top but had torn on the driver side bottom where it interfaces with the door seal which is why I replaced it. I just traded one leak path for a worse leak path. My thinking is that it may be better to use the OEM on the top and then splice in the lower straight sections where there is less going on with respect to all the interfacing surfaces. (IMG:style_emoticons/default/confused24.gif) It will be a while before I do it but seems like an experiment worth doing. Your fix looks like the much easier solution. Let us know how it holds up over time. (IMG:style_emoticons/default/aktion035.gif) |
|
|
|
| mb911 |
Aug 7 2022, 02:46 PM
Post
#5
|
|
914 Guru Group: Members Posts: 7,821 Joined: 2-January 09 From: Burlington wi Member No.: 9,892 Region Association: Upper MidWest
|
QUOTE(Superhawk996 @ Aug 7 2022, 12:18 PM)  Good job on a fix. (IMG:style_emoticons/default/smilie_pokal.gif) Would be far nicer if the targa seal fit properly in the 1st place. The seal material is too hard (not pliable enough) and doesn't have quite the right profile to make proper contact. Like you, I spent many hours adjusting the seal, the window triangle, and even nudging the aluminum track outboard as far as I could without resorting to re-slotting the aluminum tracks. I hate to bang on 914Rubber since they do so much to support the community. I'm just thinking I need seals that fit more than I need plaid blankets from Scotland. Don't get me wrong I sincerely appreciate that there is a vendor supporting us with the rubber products that we all need. I just think that the 914 has appreciated in value to the point were I'd be willing to pay double if the seal actually replicated OEM form and function. I actually am saving my OEM seal since it fit noticeably better sealing in that critical area both for water leaks and wind noise. Currently contemplating a hybrid. My OEM seal was perfect on the top but had torn on the driver side bottom where it interfaces with the door seal which is why I replaced it. I just traded one leak path for a worse leak path. My thinking is that it may be better to use the OEM on the top and then splice in the lower straight sections where there is less going on with respect to all the interfacing surfaces. (IMG:style_emoticons/default/confused24.gif) It will be a while before I do it but seems like an experiment worth doing. Your fix looks like the much easier solution. Let us know how it holds up over time. (IMG:style_emoticons/default/aktion035.gif) (IMG:style_emoticons/default/agree.gif) Mine fits the same way and just not happy with it. If I could find an oem one I would buy it. Perfect example of oem vs aftermarket I experienced this past week. Ordered some parts from. 928srus.com and In that order was a Porsche badge seal. It was 12 dollars. I have owned a dozen different porsches over the years including 944s, 911s, 964s etc. Well pull the seal out of the package and it fit the badge like none I have ever purchased before. It fit exactly Perfect. I mean Perfect Perfect.. in all my years I have never had one fit that good. I emailed Roger telling him how nice the seal fit. He responded thank you and said that is the reason why he only sells Porsche badge seals and not aftermarket. My little story just was to express how surprised I was in the difference in fitment. |
|
|
|
| Olympic 914 |
Aug 7 2022, 03:36 PM
Post
#6
|
|
Group: Members Posts: 1,795 Joined: 7-July 11 From: Pittsburgh PA Member No.: 13,287 Region Association: North East States
|
I have used a product called Shoe Goo. On things other than shoes.
I comes in black or clear. I think it would work in this application, maybe better than silicone. |
|
|
|
| Superhawk996 |
Aug 7 2022, 03:43 PM
Post
#7
|
|
914 Guru Group: Members Posts: 8,149 Joined: 25-August 18 From: Woods of N. Idaho Member No.: 22,428 Region Association: Galt's Gulch
|
QUOTE(mb911 @ Aug 7 2022, 04:46 PM) My little story just was to express how surprised I was in the difference in fitment. In full disclosure I'm biased since I used to work for an OEM. I can't tell you the number of hours of design, development and validation that go into something as seemingly simple as seals. Water test booths that simulates monsoon rain as well as high pressure wash testing. Dust intrusion testing. Door slam testing. Windnoise / Windtunnel testing. Testing in extreme hot and extreme cold. The list goes on and on. There are most certainly significant differences between OEM and the aftermarket for almost every type of part (sheetmetal, brake pads, tires, seals, etc.) There is a reason OEM service parts cost more and it's not just mark up (though there is a good bit of that too!). 914Rubber has a very hard job and does a pretty good job trying to balance that tight rope between trying to balance tooling costs vs. making a fair profit. Don't want to bash them unnecessarily. I don't envy what they do. But yet, I would glady give an arm and a leg for OEM quality seals that fit. |
|
|
|
| SirAndy |
Aug 7 2022, 03:49 PM
Post
#8
|
|
Resident German Group: Admin Posts: 42,550 Joined: 21-January 03 From: Oakland, Kalifornia Member No.: 179 Region Association: Northern California |
I'm pretty sure you can adjust the angle of the chrome channel forward to get a better initial seal. I remember doing this on mine many years ago.
(IMG:style_emoticons/default/idea.gif) |
 |
|
| bbrock |
Aug 7 2022, 03:54 PM
Post
#9
|
|
914 Guru Group: Members Posts: 5,269 Joined: 17-February 17 From: Montana Member No.: 20,845 Region Association: Rocky Mountains
|
QUOTE(SirAndy @ Aug 7 2022, 03:49 PM) I'm pretty sure you can adjust the angle of the chrome channel forward to get a better initial seal. I remember doing this on mine many years ago. (IMG:style_emoticons/default/idea.gif) You SHOULD be able to adjust the channel forward and, in fact, you can. The problem is that the rubber in the seal is stiff enough that it just pushes the channel back instead of letting it bed in for a tight seal. There's just a lot of leverage at the top of the channel for the stiff rubber seal to push against. |
|
|
|
| mb911 |
Aug 7 2022, 05:29 PM
Post
#10
|
|
914 Guru Group: Members Posts: 7,821 Joined: 2-January 09 From: Burlington wi Member No.: 9,892 Region Association: Upper MidWest
|
QUOTE(bbrock @ Aug 7 2022, 01:54 PM) QUOTE(SirAndy @ Aug 7 2022, 03:49 PM) I'm pretty sure you can adjust the angle of the chrome channel forward to get a better initial seal. I remember doing this on mine many years ago. (IMG:style_emoticons/default/idea.gif) You SHOULD be able to adjust the channel forward and, in fact, you can. The problem is that the rubber in the seal is stiff enough that it just pushes the channel back instead of letting it bed in for a tight seal. There's just a lot of leverage at the top of the channel for the stiff rubber seal to push against. (IMG:style_emoticons/default/agree.gif) |
|
|
|
| Superhawk996 |
Aug 7 2022, 05:34 PM
Post
#11
|
|
914 Guru Group: Members Posts: 8,149 Joined: 25-August 18 From: Woods of N. Idaho Member No.: 22,428 Region Association: Galt's Gulch
|
QUOTE(mb911 @ Aug 7 2022, 07:29 PM) QUOTE(bbrock @ Aug 7 2022, 01:54 PM) QUOTE(SirAndy @ Aug 7 2022, 03:49 PM) I'm pretty sure you can adjust the angle of the chrome channel forward to get a better initial seal. I remember doing this on mine many years ago. (IMG:style_emoticons/default/idea.gif) You SHOULD be able to adjust the channel forward and, in fact, you can. The problem is that the rubber in the seal is stiff enough that it just pushes the channel back instead of letting it bed in for a tight seal. There's just a lot of leverage at the top of the channel for the stiff rubber seal to push against. (IMG:style_emoticons/default/agree.gif) Yup, triangle adjusted all the way forward, and inboard as far as the bolt on the bottom down at the door will allow. Seal just pushes it all around without deforming the rubber bulb of the seal. I even considered re-slotting the door and/or extending the bolts -- but that is not acceptable. Should not be necessary and will only drive up door closing effort. |
|
|
|
| StarBear |
Aug 7 2022, 05:47 PM
Post
#12
|
|
Advanced Member Group: Members Posts: 2,382 Joined: 2-September 09 From: NJ Member No.: 10,753 Region Association: North East States
|
QUOTE(Olympic 914 @ Aug 7 2022, 05:36 PM) I have used a product called Shoe Goo. On things other than shoes. I comes in black or clear. I think it would work in this application, maybe better than silicone. Interesting. Used clear but never seen black before. |
|
|
|
| bbrock |
Aug 7 2022, 06:06 PM
Post
#13
|
|
914 Guru Group: Members Posts: 5,269 Joined: 17-February 17 From: Montana Member No.: 20,845 Region Association: Rocky Mountains
|
QUOTE(Superhawk996 @ Aug 7 2022, 05:34 PM) QUOTE(mb911 @ Aug 7 2022, 07:29 PM) QUOTE(bbrock @ Aug 7 2022, 01:54 PM) QUOTE(SirAndy @ Aug 7 2022, 03:49 PM) I'm pretty sure you can adjust the angle of the chrome channel forward to get a better initial seal. I remember doing this on mine many years ago. (IMG:style_emoticons/default/idea.gif) You SHOULD be able to adjust the channel forward and, in fact, you can. The problem is that the rubber in the seal is stiff enough that it just pushes the channel back instead of letting it bed in for a tight seal. There's just a lot of leverage at the top of the channel for the stiff rubber seal to push against. (IMG:style_emoticons/default/agree.gif) Yup, triangle adjusted all the way forward, and inboard as far as the bolt on the bottom down at the door will allow. Seal just pushes it all around without deforming the rubber bulb of the seal. I even considered re-slotting the door and/or extending the bolts -- but that is not acceptable. Should not be necessary and will only drive up door closing effort. When I was unsuccessfully trying to get mine to fit, I removed the plastic end cap on the channel and moved it around through the window frame seal to see if there was a spot where it fit the contour of the seal. There was, but a little lower. I've wondered if a little deeper channel in the bottom of the triangle seal would allow the whole triangle window assembly to sit low enough for the corner to nestle tightly into the targa seal and still have everything else line up. I wasn't about to start carving on the seal to find out though. |
|
|
|
| bbrock |
Aug 7 2022, 06:11 PM
Post
#14
|
|
914 Guru Group: Members Posts: 5,269 Joined: 17-February 17 From: Montana Member No.: 20,845 Region Association: Rocky Mountains
|
QUOTE(StarBear @ Aug 7 2022, 05:47 PM) QUOTE(Olympic 914 @ Aug 7 2022, 05:36 PM) I have used a product called Shoe Goo. On things other than shoes. I comes in black or clear. I think it would work in this application, maybe better than silicone. Interesting. Used clear but never seen black before. I looked at the Shoe Goo in my adhesives draw when I was deciding what to try, but I only have clear. My recollection is that Shoe Goo sets up more rigid than silicone but can't remember for sure. I knew silicone would stay soft and flexible which I figure would be good, but I think Shoe Goo might be less likely to peel off the main seal over time. Will be interesting to see how long term this work around is, but it looks to be adhered tightly at this point. |
|
|
|
| friethmiller |
Aug 8 2022, 07:33 AM
Post
#15
|
|
Senior Member Group: Members Posts: 1,592 Joined: 10-February 19 From: Austin, TX Member No.: 22,863 Region Association: Southwest Region
|
Man! This is one issue I have on both doors. I spent countless hours trying to get the top of the triangle glass to set properly in the Targa seal. I thought this was on me. I felt like I had screwed it up somehow. I personally think the bottom part of the triangle window seal is too thick and prevents the full adjustment but I'm not sure.
|
|
|
|
| Superhawk996 |
Aug 8 2022, 08:02 AM
Post
#16
|
|
914 Guru Group: Members Posts: 8,149 Joined: 25-August 18 From: Woods of N. Idaho Member No.: 22,428 Region Association: Galt's Gulch
|
QUOTE(friethmiller @ Aug 8 2022, 09:33 AM) I personally think the bottom part of the triangle window seal is too thick and prevents the full adjustment but I'm not sure. QUOTE(bbrock @ Aug 7 2022, 08:06 PM) I've wondered if a little deeper channel in the bottom of the triangle seal would allow the whole triangle window assembly to sit low enough for the corner to nestle tightly into the targa seal and still have everything else line up. I wasn't about to start carving on the seal to find out though. If you bought the 914Rubber window triangle seals, they are indeed too thick in several places. Again, I'm not trying to beat down 914Rubber -- I'm happy to have access to the triangle seals that would otherwise be NLA. I was able to rework the part which is better than having no part at all. But like the targa seal, would pay more for a part that simply fit exactly like OEM and didn't need rework. I ended up only using the driver side. The passenger side OEM part was still in decent shape. After the amount of rework I had to do with the driver side triangle seal, I decided to pass on doing the passenger side for now. I ended up having to carve down the bottom V-ribs on the bottom to allow the seal to sit deep enough in the door sheet metal pocket. 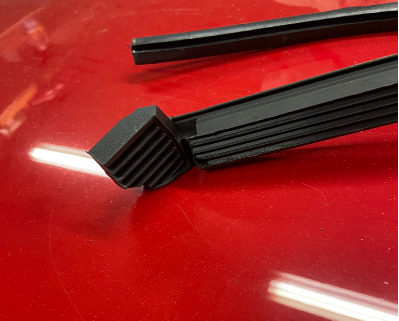 OEM (top) vs. 914Rubber (bottom) - picture doesn't quite do it justice. V ribs were a little taller, and seemed to be less compressible. Some of that could simply be that OEM seal was installed for so long that it had taken a set. However, that "set" is where the triangle needed to be to have a chance of mating with the targa seal. 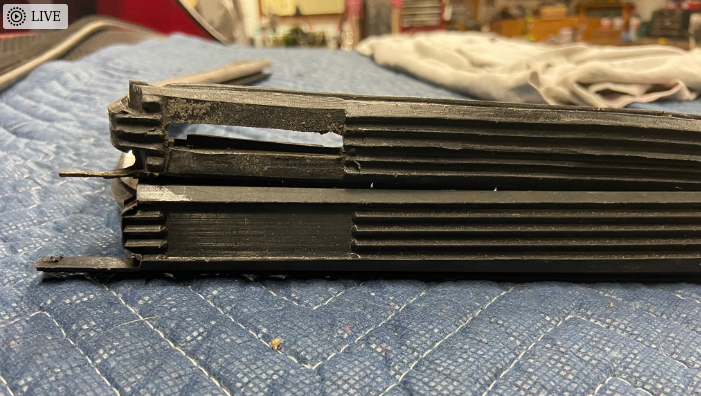 I used carbide in a Dremmel to deepen the pocket that the triangle glass sits in to get the triangle back down to the same position as the OEM seal allowed. My part is off a 73' and has a pocket to fit the metal blade that bolts to the window channel that helps hold the window triangle glass. In PM's with 914Rubber, it sounds like that pocket was eliminated in later 75' & 76'. So to use with 73' window channel, I also had to carve out the square pocket. I think the alternative was to remove the metal blade from my window channel. I opted not to do that since I think that blades helps stabilize and retain the triangle glass. Personally, I've only owned 73's so I don't know how well later cars fit without the pocket and/or the channel bracket my car has. |
|
|
|
| SirAndy |
Aug 8 2022, 09:08 AM
Post
#17
|
|
Resident German Group: Admin Posts: 42,550 Joined: 21-January 03 From: Oakland, Kalifornia Member No.: 179 Region Association: Northern California |
QUOTE(Superhawk996 @ Aug 8 2022, 07:02 AM) My part is off a 73' and has a pocket to fit the metal blade that bolts to the window channel that helps hold the window triangle glass. In PM's with 914Rubber, it sounds like that pocket was eliminated in later 75' & 76'. So to use with 73' window channel, I also had to carve out the square pocket. I think the alternative was to remove the metal blade from my window channel. I opted not to do that since I think that blades helps stabilize and retain the triangle glass. Personally, I've only owned 73's so I don't know how well later cars fit without the pocket and/or the channel bracket my car has. I didn't know later cars omitted that metal tab. (IMG:style_emoticons/default/idea.gif) |
|
|
|
| bbrock |
Aug 8 2022, 10:42 AM
Post
#18
|
|
914 Guru Group: Members Posts: 5,269 Joined: 17-February 17 From: Montana Member No.: 20,845 Region Association: Rocky Mountains
|
QUOTE(Superhawk996 @ Aug 8 2022, 08:02 AM) I used carbide in a Dremmel to deepen the pocket that the triangle glass sits in to get the triangle back down to the same position as the OEM seal allowed. My part is off a 73' and has a pocket to fit the metal blade that bolts to the window channel that helps hold the window triangle glass. In PM's with 914Rubber, it sounds like that pocket was eliminated in later 75' & 76'. So to use with 73' window channel, I also had to carve out the square pocket. I think the alternative was to remove the metal blade from my window channel. I opted not to do that since I think that blades helps stabilize and retain the triangle glass. Personally, I've only owned 73's so I don't know how well later cars fit without the pocket and/or the channel bracket my car has. I forgot about having to carve out for the blades, but I did the same. I'm not a fan of trying to outsmart the engineers by cutting off parts that clearly had a purpose. Same goes for the tabs in the aluminum channels at the top of the windshield frames. I believe 914R wants us to lop those off to install their seals. I refused as they look important for holding the seal in place and probably prevent creep from the umpteen heat cycles the seal will experience over its life. I did (reluctantly) trim mine a bit shorter to make the job of slotting out the new seal a bit easier, but those tabs are now in my seals doing their job. |
|
|
|
| Mikey914 |
Aug 8 2022, 11:03 AM
Post
#19
|
|
The rubber man Group: Members Posts: 12,785 Joined: 27-December 04 From: Hillsboro, OR Member No.: 3,348 Region Association: None
|
SO, to comment on the production of these seals. 1st rubber will shrink over time and we are always playing guess the coefficient. It just so happens that this particular part didn't shrink as much as others did. We replicated the sample that I was able to obtain off my 75, unaware there were variations.
As to the pocket in the bottom of the channel we did mold it most of the way and it can be cut open, but we made it this way for 2 reasons. 1- the limitation of the tool we made. 2- no part fits into the "drain" created. It would allow any water to drain into the door. Giver #1 we saw no reason to replicate that feature exactly when the end user can choose this option. These are a difficult piece to install to begin with, this makes them a little more so. The net result was yes they can be fitted to work properly, but will require additional pressure to do so. It makes the job easier if they are trimmed slightly. These are the 2nd generation of these parts we have made. We will be retooling on these to make them easier to install. We must complete our interior series 1st. In order, the pillars, the new dash top, the lower dash. I will put these next on the list. As you know we typically don't raise prices on the parts as we gain efficiencies, maybe a bad business decision, but I think we owe it to our customers so pay back their support to allow us to make the things we do. |
|
|
|
| bbrock |
Aug 8 2022, 11:11 AM
Post
#20
|
|
914 Guru Group: Members Posts: 5,269 Joined: 17-February 17 From: Montana Member No.: 20,845 Region Association: Rocky Mountains
|
@Mikey914
Thanks for this Mark. As others have said, we couldn't restore these cars to the level we do without you. None of this is intended as a dig, just being honest about the realities of installing these aftermarket parts. It is understood that there is a lot to juggle to hit the sweet spot with these. I'm good on seals. Next on your list I'd like to see that subwoofer box. (IMG:style_emoticons/default/poke.gif) (IMG:style_emoticons/default/biggrin.gif) I need that fat bottom. (IMG:style_emoticons/default/av-943.gif) |
|
|
|
|
5 User(s) are reading this topic (3 Guests and 0 Anonymous Users)
2 Members: Nana's_914, NARP74

|
Lo-Fi Version | Time is now: 24th October 2026 - 05:20 PM |
Invision Power Board
v9.1.4 © 2026 IPS, Inc.